Chapter 7. Developing Service Client Libraries
Client libraries represent the usable interface of services for developers in the rest of an application. That is, services are called through their client-side libraries instead of directly through HTTP. Client libraries provide an additional layer of abstraction that makes working with services easier for front-end application developers. Thus, developing, organizing, and deploying client libraries are key parts of service-oriented design. Good libraries include client-side validation, clear and well-documented APIs, connection and request abstraction, and simple methods for mocking. This chapter covers how to tackle each of these issues and looks at writing client libraries that conform to Rails 3.0’s ActiveModel.
Packaging
The first step when designing a new library is to organize the structure of the files and directories. This includes how to package the library for deployment and installation on other computers. RubyGems is the obvious choice for creating and sharing libraries. This is true even for service client libraries that are private and will be shared only by internal services and developers. Gems can be deployed via a private file server, a local gem server, or inside the Bundler cache of an application.
To create a gem, all that is required is a gemspec. It’s possible to create this file manually by using the syntax on the Gem::Specification documentation page (http://rubygems.rubyforge.org/rubygems-update/Gem/Specification.html). However, it can get a bit time-consuming and can cause problems if you forget to update the gemspec with new files. An easier way to get started creating a RubyGems gem is to use a generator such as Jeweler.
Jeweler
Jeweler (http://github.com/technicalpickles/jeweler), created by Josh Nichols, is a generator for starting new gems. It has a convenient command-line interface for starting new gems and comes with built-in rake tasks to handle things like generating the gemspec, building the gem, and pushing to RubyGems (http://rubygems.org). For internal libraries, you’ll probably want to skip the last part, but the other conveniences of the library make it worth using even for private gems.
This chapter focuses on building out an example from the social feed reader application. First, you create a library for the entry service. Remember that this service has methods for getting the information on feed entries, given a list of IDs. A larger example might have the service also return entries given a source (such as a feed URL or an ID), but the single list of IDs is enough to highlight the important parts. The second library is for accessing the vote service created in Chapter 5, “Implementing Services.” The third library is for accessing the reading list for a user. The simple example in this chapter only returns a list of entry IDs, given the user email. A more complete example would include getting a list of subscriptions and adding and removing feeds from the subscriptions. It is important to make these three separate libraries, one for each service, to ensure that when the service is updated, only its gem has to be updated.
First, you install Jeweler and its dependencies. This requires that you have the git and gemcutter gems installed in addition to any testing library that you’ll use. You also need git installed. The Jeweler installation is simple:
gem install jeweler
Now it’s time to create the gems. For organizational purposes, it’s easiest to create a single repository that all the gems can be put in. However, in a production environment, it’s a good idea to keep each client gem as a directory in the larger structure of the service code. That way, the client can be iterated and improved with the service code.
In the overall gem directory, it’s simple to create the skeleton structure of the gems with the following commands:
![]()
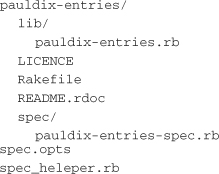
These examples use RSpec, but Jeweler includes helpers to generate files for many other testing frameworks. You can use the command jeweler-help to see the available options. The gems have my name, pauldix, as a prefix to ensure that they won’t collide with any public gems. For your gems, you should use the organization name or an abbreviation as a prefix to the gem name. The generator creates a basic directory structure for you, as well as some starting files. Here is the initial list for the pauldix-entries gem:
There are only a couple more things to set up to get an initial version of the gem built. First, you go into Rakefile and make the following changes:
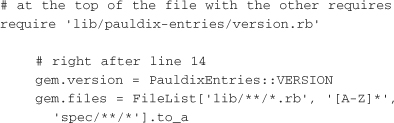
The require is a file that sets a version constant that will be shown next. This is useful for other libraries that want to ensure the version of the gem at runtime. The other lines are modifications to the gem specification. The first line sets the gem version from a constant in a module that will be set up next. The second line sets the generator to create a gemspec that includes all .rb files from the lib directory and all its subdirectories, pulls in the README and LICENCE files from the root directory, and pulls in all the files from the spec directory and its subdirectories.
Now it’s time to create the lib/pauldix-entries/version.rb file. You create the directory and make the version.rb file look like this:
![]()
Next, you load the version file in lib/pauldix-entries.rb. This file is responsible for loading all the other files and required gems used in the library. To begin, it’s only the following single line:
require 'pauldix-entries/version.rb'
With all this setup out of the way, it’s time to generate a gemspec and build the gem. Jeweler includes a few rake tasks for getting this done. From the root of the gem directory, you issue the following commands:
rake gemspec
rake build
The first command generates the gemspec. It’s worth taking a quick look at the generated file just to see what the rake task has built. The second command generates the gemspec and creates the gem file pkg/pauldix-entries-0.0.0.gem. This file can be used to install the gem. You need to take the same steps to get the vote service gem ready to go. Later sections fill out the files in these gems and make them functionally complete.
Building and Deploying a Library
Part of packaging a library is building and deploying it. With RubyGems, this is simple. Once the gemspec is written or generated, you can build the gem file with a single command. Deployment then consists of getting this single gem file to the target servers and getting it installed. It’s possible to run your own gem server so that you can issue the gem install command with the –source flag, but that’s more than is necessary.
With RubyGems, it’s possible to install using only the gem file. You simply issue the following command:
gem install pauldix-entries-0.0.0.gem
Because the gem installation is completely contained in the single gem file, deployment to a server is as simple as copying the file to the server. If you’re using Capistrano for deployment, it is a good idea to include a task that builds the gem and copies it up to the target servers. It’s also possible to use a shared file service such as S3 as the source. Or you may just want to check the gem files into the repository and install from there. Whatever your choice, it should come down to running a single command to get the new client library gem deployed to your servers.
Parsing Logic
The first chapter of this book briefly introduces JSON in an example that creates a user service. In that example, the user objects are serialized as JSON and parsed in the client. Because of JSON’s simple format, the example presents much of what you need to know.
The form that JSON takes can be summarized in a few sentences. First, you start with an array or an object. An array consists of ordered values, while an object is an unordered set of name/value pairs (like a Ruby hash). The mapping of JSON’s object to Ruby hashes is part of what makes JSON so easy to work with. The names in an object are strings, while the values in an array or an object can be either a number, a string, an array, or an object. So arrays and objects can contain more arrays and objects. This small and simple grammar makes it easy to write a JSON parser and even easier to use one.
There are more than a few options for parsing JSON in Ruby, but this section focuses on only two: the JSON gem and yajl-ruby. The following examples use this as input to the JSON parser:

This sample JSON is used in this chapter to show how to access objects, arrays, and the different kinds of values.
The JSON Gem
The JSON gem is the de facto standard for parsing JSON in Ruby. It has both a pure Ruby implementation and a native C implementation. The C implementation offers speed improvements, while the pure Ruby version may be easier to install. Installation on Ruby 1.8, or 1.9 can be done via the following command:
gem install json
Installation on JRuby must be done via the jgem command. The gem also has a different name on JRuby. It can be installed with the following command:
jgem install json-jruby
Now that the gem is installed, it’s ready for use:
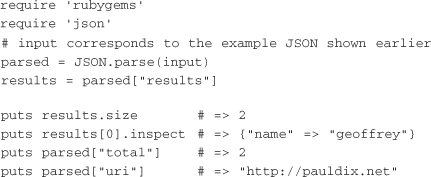
The parsing logic is contained in a single line: the call to JSON.parse. From there, the parsed input can be manipulated through standard Ruby objects. The object is parsed as a Hash, the array as an Array, the number as a Fixnum, and the string as a String. The hash keys are strings, as shown on the line that assigns the results value.
YAJL Ruby
YAJL (yet another JSON library) is a streaming JSON library written in C. “Streaming” refers to the library’s ability to parse JSON as the document comes in. This can be quite handy when you’re working with large files that may be difficult to keep in memory or when you’re parsing JSON as it comes in from an HTTP response. yajl-ruby is a Ruby library written by Brian Lopez that has bindings to YAJL.
The yajl-ruby project page (http://github.com/brianmario/yajl-ruby) boasts that it offers speed improvements over the standard JSON gem for both generating and parsing JSON. Due to its reliance on C libraries, it is available only in Ruby 1.8 and 1.9. The following command installs the gem:
gem install yajl-ruby
When the gem is installed, it’s ready for use:
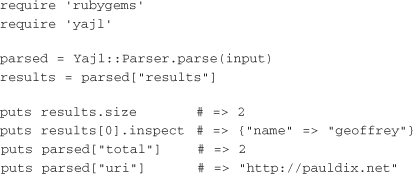
Nearly everything is the same in this example as in the previous one. The only difference is the require to yajl and the use of Yajl::Parser instead of JSON. However, this example could have kept the parsing line the same by using yajl-ruby’s built-in JSON compatibility API. You simply need to require that instead of yajl, like this:
require 'yajl/json_gem'
With the built-in compatibility, the yajl-ruby gem is the best option available for users of native libraries. It’s also worth noting that using this won’t automatically force use of YAJL in Rails 2.3 applications. For that, the yajl-ruby plugin written by Rick Olson should be used (http://github.com/technoweenie/yajl-rails). In Rails 3, YAJL is used by default if it is installed.
Wrapping Parsed Results
Wrapping parsed results is a good idea to keep code easier to read and maintain. While parsed JSON provides native Ruby data types, it’s still a good idea to wrap that data in a class. This provides more clarity about the data that the results could return. The wrapper classes for the input you worked with before and the JSON parsed results might look like this:
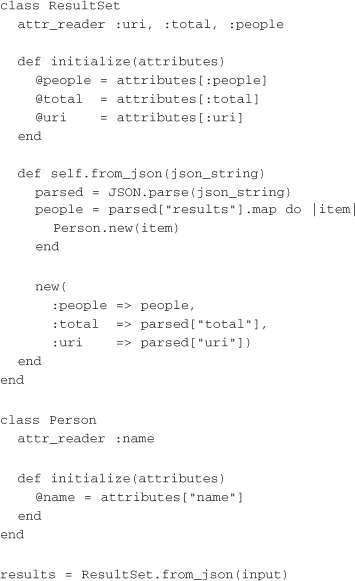
There is a clear separation between where the parsing happens and where the regular Ruby object code exists. This is a part of solid object-oriented design called encapsulation. Further, data elements of the object are clearly defined in the beginning of the class. This is very helpful for other developers who look at the code and need to know what data is available. As any developer who has put comments at the top of ActiveRecord models about what fields exist in the database can tell you, having that documentation helps with understandability later.
The class method ResultSet.parse contains the JSON parsing logic and the logic to set up each object. The results array in the parsed JSON is looped through to build Person objects. Finally, a new ResultSet object is returned.
Much of the code in the wrapper classes is boilerplate. While the classes give clarity about what data they store and how the parsing works, there is clearly room for simplification. Fortunately, there are already some tools built to simplify the creation of model classes, as discussed in the next section.
ActiveModel
ActiveModel is one of the building blocks of Rails 3.0. It is a library that makes the creation of classes that represent data models easier. It includes modules for validation, serialization, and other well-known features of ActiveRecord. These modules can be used to help write client libraries for services. The validations are particularly useful because they can be used to avoid unnecessary calls to a service to verify the validity of a new model.
Validations
A client library for the vote service from Chapter 5, “Implementing Services,” shows the use of some of ActiveModel’s features. That service has only one endpoint to post new data: the request to create a new rating or vote. Remember that a rating has an associated user ID and entry ID, as well as the type of vote it is (up or down).
In the pauldix-ratings gem that was generated earlier, a file can be added in lib/pauldix-ratings/rating.rb. The start of the ratings file that includes validations looks like this:
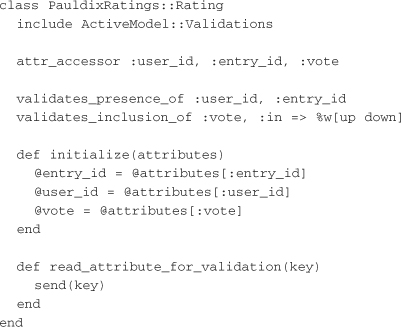
The Rating class is namespaced by the module PauldixRatings. The first line includes the Validations module in ActiveModel. A require should be added to the lib/pauldix-ratings.rb file for ActiveModel. The next line defines the attributes that a rating has: user_id, entry_id, and vote.
The validations look exactly like normal ActiveRecord validations. They are verifying that user_id and entry_id are present and that the vote value is either up or down. The read_attribute_for_validation method is required for validations to work properly. It takes a key, which is an attribute name, and returns that attribute’s value.
The final part of code is the initialize method. It contains the assignments for the attributes. A common shortcut for this kind of variable assignment is to do something like this:
@attributes.each_pair {|k, v| send("#{k}=", v)}
This shortcut is definitely more succinct than explicitly assigning each attribute. However, it may not be understandable to other developers looking at this code. One of the first questions another developer is likely to ask when using this library is “What values can go in the attributes?” It’s trivial for a small file like this Rating class, but as the class gets larger, with more attr_accessors and method definitions, it becomes less simple to determine.
The validation code in the Rating class now enables calls like this:

Here, a new rating is created, and its validity is checked afterward. After valid? has been called, the errors object is populated with any of the associated errors. Validation in the client gem like this can save a round trip to the service to check whether a newly created model will be able to save. If the client library and server API versions are kept in sync, this validation should hold when posting to the server.
ActiveModel includes built-in validations for the following:
• validates_confirmation_of—Used for attributes such as the validation of a password or an email with confirmation.
• validates_acceptance_of—Used for attributes such as check boxes for accepting the terms of service.
• validates_exclusion_of—Ensures that an attribute is not an excluded value given in an enumerable.
• validates_format_of—Ensures that an attribute matches a given regular expression pattern.
• validates_inclusion_of—Ensures that an attribute has a value in a given enumerable.
• validates_length_of—Ensures that an attribute is within the bounds of length restrictions. Restrictions include minimum, maximum, is, and within.
• validates_numericality_of—Ensures that an attribute is a number that can be represented by a float. Additional checks include greater_than, greater_than_or_equal_to, less_than, less_than_or_equal_to, and equal_to.
• validates_presence_of—Ensures that an attribute is not blank or nil.
• validates_with—Ensures that an attribute passes a custom validation. with refers to the validator that is used.
One validation that is noticeably absent from this list is validates_uniqueness_of, which ensures that a value is unique in the table (for example, a user email address). That’s because it’s not built into ActiveModel. It makes sense when you think about what is required for this validation to work. It’s very implementation specific. For example, with MySQL, that validation would work if a request were made to the database to obtain a lock on that value and then write afterward. Uniqueness is a requirement that cannot be validated on the client side alone. It requires integration with a specific data store. With the other validations, the client has everything on hand it needs to validate the data.
The preceding list represents all the validators that are built into ActiveModel. For more detailed coverage about the use of each, the best place to refer to is the API documentation (http://api.rubyonrails.org).
Serialization
ActiveModel includes a module to help with serialization for both XML and JSON. This section covers only JSON. The JSON serialization module in ActiveModel calls out to the serialization library that is set in ActiveSupport. At the time of this writing, the ActiveSupport library includes built-in support (in order of preference) for YAJL, JSONGem, and Yaml. The serialization module requires that the two methods attributes= and attributes be defined on the model. Further, the attributes method should return all of the model’s attribute names as string keys in the hash (even if they are not set).
Modifying the Rating class to use the serialization module is a little tricky. The following code is the new Rating class with support for validations and serialization:
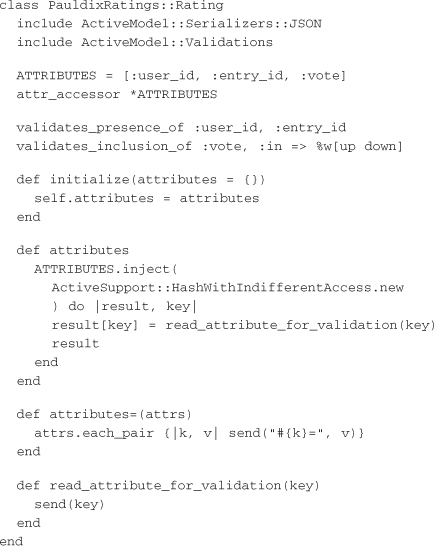
The requirement to have an attributes setter and getter motivate the changes in the Rating class. The initialize method has been simplified with a simple call to the attributes= method. Readability in the class is maintained by specifying at the top in the ATTRIBUTES constant what attributes the model has. The attributes= method loops through the key/value pairs and assigns each value to the key’s attribute. This is identical to the shortcut mentioned earlier.
The validation logic remains exactly as it was before. The serialization module has now given the Rating class the ability to marshal from JSON or to convert a rating object to JSON:

The first example shows how to convert a rating to JSON. The JSON is simply the attributes hash converted to a JSON object. The next example shows how to marshal a rating from JSON. You simply create a new rating object and call from_json and pass in the string. The from_json call actually modifies the rating it is called on. Finally, it returns a reference to that same rating.
Connection and Request Logic
Now that the parsing and validation of the models has been handled, logic for connecting to services can be pulled into the library. The key to managing request logic is to ensure proper handling of errors and to make sure that joins are done in a performant manner. The examples for these libraries omit much of the error handling for brevity. However, any possible return code should be accounted for in a production library.
Data Reads
Logic for reading data is handled a little differently than the logic for writing data. Remember that when reading data, the ideal is to run requests in parallel. This ensures that calls can be made to multiple services in the minimum amount of time. Enabling this kind of behavior requires that the objects that hold data (in a way similar to ActiveRecord models) should never actually make requests themselves. They can build request objects, but it is the responsibility of a controller outside the data object to manage those requests. This is very different from ActiveRecord, which makes connections within the data object.
A detailed example shows the issues you need to consider when performing data reads. This example considers a user’s reading list from the social feed reader application. The example assumes that there is a service that stores specific blog entries, another service that stores ratings data for each entry, and another service that returns a reading list for a specific user.
In the beginning of this chapter, you set up a gem for each of these services. The full code for these libraries is available at http://github.com/pauldix/service-oriented-design-with-ruby/tree/master/chapter_08/. The following sections show only the most important parts of it.
First, it’s worth talking about how to handle joins. In this example, there are three separate gems (PauldixEntries, PauldixRatings, and PauldixReadingList). An entry can have many ratings and a ratings total (aggregate statistics). A rating and a ratings total belong to an entry. A reading list has many entries. These joins represent a fairly complex relationship to model across gem boundaries. If each one referenced the other, it would lead to circular gem dependencies, where the entries gem requires the ratings gem and vice versa.
To avoid circular dependencies, it’s a good idea to have at most one library that joins the gems together. This could happen in the Rails or Ruby application that references these gems, or it could occur in one gem that ties them all together. For this example, the PauldixReadingList gem performs the joins. Thus, it includes the requires for the PauldixEntries and PauldixRatings gems.
The reading list gem should have an object that stores configuration. This is necessary for setting up development, testing, and production environments:
![]()
The config object has class accessors to store a host object and a hydra object. Remember from the previous chapter that a hydra object is the connection manager object that Typhoeus uses to queue and run HTTP requests. This will be used later to queue up requests while in the ReadingList class. The host object is simply the host for the HTTP service of the reading list.
Before looking at ReadingList, it’s worth taking a look at how it is used. The following example contains three sections, each of which would be placed in different parts of a Rails application:
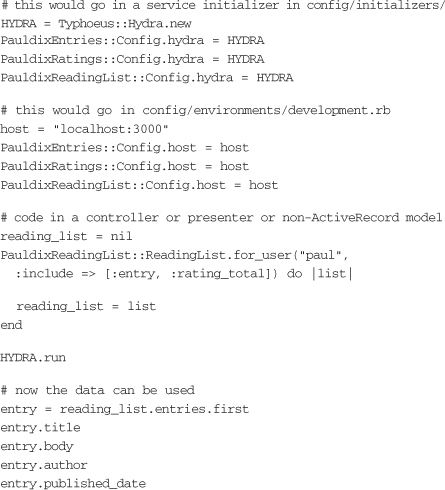
The first section of this example initializes the configuration objects for the three gems with the same hydra object. This means that any requests that the three libraries queue up will be run by the same connection manager. The second section sets the host that each service can be found on. This is usually an environment-specific setting that depends on whether it is being run in development, testing, staging, or production.
The final section shows how the reading list can be used to get a list of entries for a specific user. The call to get the list for a user takes two arguments: the user name and the include options. This specific call tells the reading list to include the entries and the rating totals for those entries. Finally, the call to get a list for a user requires a block to be passed in. This is because of the evented programming style of Typhoeus. The block is called when the request has completed.
Finally, a call is made to hydra to run all queued requests. The important thing to note about the example so far is that the request is not run by the reading list gem. The request is queued up by the reading list gem, but it is run outside this gem. This ensures that the hydra manager is able to run requests in parallel. A close look at the ReadingList class shows how this works:
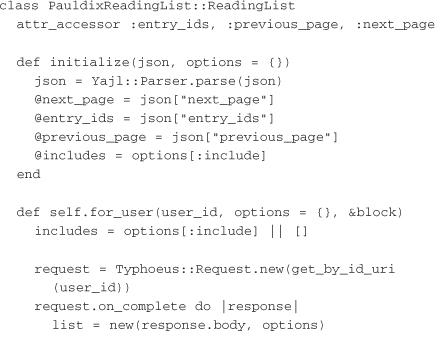

The reading list contains three pieces of data: a URI for the previous page in the list, the next page, and an array of the entry IDs of the current page. This previous and next-page functionality is exactly like the design of the vote service in Chapter 5, “Implementing Services.” The initializer contains logic to parse a JSON string and assign the values.
The for_user method contains the first interesting bit of code. First, a Typhoeus Request object is created. It is a simple GET request. Another small method call is made to construct the URI for the email. This will call to the config object for the host name. The request object’s on_complete handler is then set. This isn’t called right away. It will be called when the request has completed.
Inside the on_complete handler is where the reading list is instantiated and the joins for entries and ratings occur. The instantiation parses the JSON response from the ReadingList service. The joins are made only if the includes have been specified on the call to for_user. The joins will be addressed in a moment. For now, look at the remainder of the for_user method. The last line in the on_complete block calls the block that was passed in and gives it the newly created list, so these block calls occur only after the requests have completed.
Now it’s time to look at the joins. Both are identical, so we’ll look only at the join to the entry service. The method shown earlier in the reading list contains a single call to a method on Entry called get_ids. It takes an array of entry IDs and a block. Just like the reading list request for_user, the block is run only after the request has been completed. In the completion, the entries instance variable is assigned the variable that was yielded to the block.
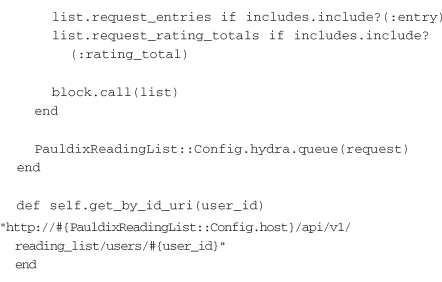
Finally, here is the associated code in the Entry class in PauldixEntries that shows the logic for getting and parsing entries:
The get_ids method takes an array of entry IDs and a block. It creates a request object. Just like the ReadingList class, it has a method for generating the URI for those IDs. The URI that is generated points to the entry service with a comma-separated list of IDs as a query parameter. The on_complete block is then assigned to the request. It parses the response body and creates ID objects. This multi-get call works as the multi-get for ratings works on the vote service created in Chapter 5, “Implementing Services.” It is a hash with the entry ID as a key, and the value is the entry JSON. The last line in the on_complete block calls the passed-in block with the newly created entry objects. Finally, the request object is queued in hydra.
The reading list has now set up all the request objects for getting the reading list and running the requests for the specific ratings totals and entries in parallel. A single call to hydra.run runs all the requests. The final bit of logic is to combine the results into a single collection of entry objects. The following code is in the ReadingList class:
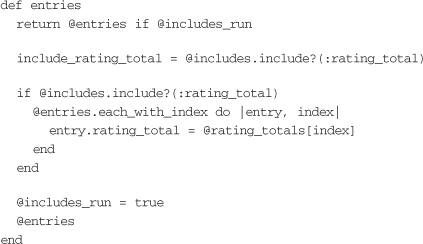
The entries method assumes that all the requests have already been run. It loops through the entries and assigns them their associated ratings totals. The important thing to take away from this rather long example is that these classes (ReadingList, Entry, and Rating) never make requests. They only create the request objects and queue them up. The responsibility for running the requests lies outside these classes. That way, if other requests need to be made for other services, they can be queued up as well.
Data Writes
Data writes can be handled a little differently than data reads. This is because normally data writes do not need to occur in parallel. Usually, a single write is performed, and errors or success status is immediately handed back to the caller. This means that a blocking model where the data object performs the request to update makes more sense. An example with the Rating class highlights how this is done. Remember that a rating has an entry ID, a user ID, and a vote (up or down):
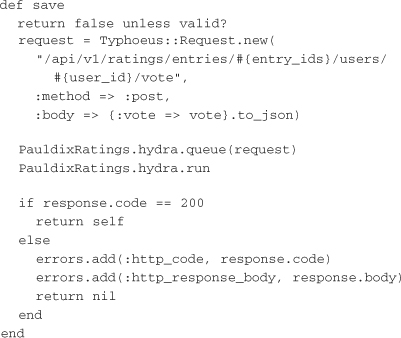
The save method makes the request to save a rating. First, it checks that the rating passes all validations. If so, it creates a request object and runs the request. If the response is a 200 code, it returns success. Otherwise, it sets errors on the rating object so that they can be handled by the caller.
Another option for saving ratings is to simply write them to a messaging system to be saved asynchronously. The only validations that must be performed are that an entry ID and a user ID are present. The other validations—that a user only gets one vote on an entry and that the user and actual entry exist—can be validated later. Having the votes go directly into a message queue makes the system very scalable and tolerant of high spikes in vote traffic. Chapter 11, “Messaging,” goes into greater detail on how to use messaging systems to create scalable systems that are tolerant of usage spikes.
Mocks, Stubs, and Tests
One of the great things about the Rails and ActiveRecord style of development is that developers can have the database and the models in their development environment. This means that the controllers, the views, and their associated tests can be created and run against only resources on the developer’s computer. When working with services, it is much more difficult to have a full environment on every developer’s machine. In fact, this works against the service-oriented design goal of isolation.
The best way to design around this is to provide stubs, or mocks, for client libraries that have to call out to services. You can provide a single method that can be called to stub out a client library. That way, it can be set up in the development or test initializer in an application. The following examples show how to stub out service calls for the reading list and entry service libraries.
From the reading list, there is a stub for user IDs and the associated entry IDs they should return:
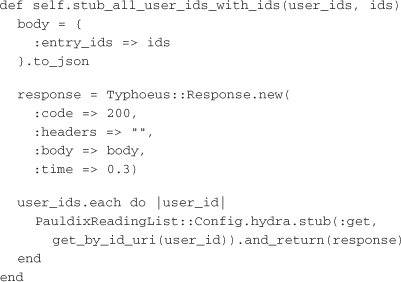
The stub method takes an array of user IDs and entry IDs. First, it creates the body of the response that is being stubbed. Then a response object is created that contains that body. Finally, the user IDs are iterated through, with a call to hydra.stub for each. This means that any call to hydra with a request for one of the associated user reading list URIs returns this response object.
Now a stub for the entry class needs to be created:
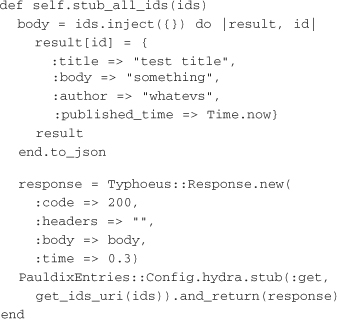
The Entry class stub works in very much the same way as the ReadinList stub. It takes a list of IDs that are to be stubbed out. It creates a body that looks exactly like what a real service call would return. Then a response object is created and a call is made to hydra to stub out each of the entry ID URIs with the prebuilt response.
Finally, these stubs can be used so that service calls can be avoided but data will be available:
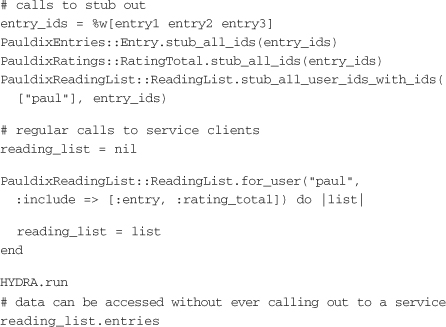
The first lines of the example call the stub methods. The entry IDs that are being stubbed out are entry1, entry2, and entry3. The user ID that is being stubbed out is paul. The call to configure the clients would still have to have occurred before the calls to stub.
After the stubs have been set, the clients can be called. The call to HYDRA.run returns the stubs and executes all the client code in the on_complete blocks, without ever hitting the network. This example shows very specific stubs, but it’s a good idea to have single calls to the clients that will stub out any requests made. That way, the testing and development using these libraries can be done without the actual services running.
The one gotcha with stubbing out service request calls is that the stubs must accurately reflect what the services will return. For this reason, it is a good idea to keep the client libraries with the service code. That way, the client can be fully integration tested against a service when it is updated. A developer updating a service will already have to be able to run it locally. Thus, the developer should also run the client against the service.
Conclusion
Writing client libraries for services is a vital component of creating a successful service-based design. Good client libraries abstract away the complexity of business logic and scaling effort hidden behind a service wall. The key goals with client libraries are readability and ease of use of the API. Further, client libraries should not be responsible for making actual service calls. The best method is to give each client library the logic to form a request and send it off to a connection manager such as hydra. That way, other libraries can queue requests at the same time.
Client libraries should be developed in tandem with the services they connect to. Services should be able to run multiple versions in parallel so that other applications that use the clients will not need to be upgraded in lock step. Then the new client libraries can be packaged up and deployed to applications after the services they connect to have been upgraded.
One final point about the client library examples in this chapter is that they have very similar code in their request logic. If services are standardized with conventions for how multi-gets, single requests, and data writes are made, much of this logic can be abstracted into a module that all the client libraries can use. This will cut down on code duplication and make the creation of more services easier.