
16
Building and Using Workflow in SharePoint 2010
WHAT’S IN THIS CHAPTER?
- What you get with out-of-the-box workflows
- How to associate workflows with a list or library
- Taking out-of-the-box workflows and modifying them with SharePoint Designer
- How you can build SharePoint Designer workflows from scratch
- Making Microsoft Visio a part of your workflow process and strategy
At this point in your workflow adventure you understand the underlying basics of what makes SharePoint workflow tick. You also have an understanding of what to expect from a planning perspective. In this chapter you are ready to take the next step and start digging in and using workflows.
LEVERAGING OUT-OF-THE-BOX WORKFLOWS IN SHAREPOINT
As you begin your journey into SharePoint workflow, the logical step is to start with those workflows you get right out of the box — those that can be used simply by enabling them and running through an association process that ties them to a list or library for use. The different types or methodologies of SharePoint workflow are a ladder of functionality and support for complexity. At the lowest levels of functionality and support for complex workflows are out-of-the-box workflows. At the other end of the spectrum lie those workflows that can be created in Visual Studio. Depending on your workflow needs, you may need to start with the basics and grow into the more complex, or you may need to bypass lower levels and jump right into creating workflows in Visual Studio. For now you should start learning about out-of-the-box workflows and how to start using those.
Three types of workflows exist: out of the box, SharePoint Designer, and Visual Studio 2010.
Workflow Enablement
As you learned in Chapter 15, you can enable and disable different features in creating and deploying SharePoint workflow. So before you get started with your first out-of-the-box workflows you must check whether they are enabled in your site collection. You can check on this in Site Settings ⇒ Site Collection Administration ⇒ Site Collection Features.
Here you’ll see all the features that are enabled in your site collection. Workflows are one of those features. Within this list are several applicable workflow features to look for, starting with the Workflows feature (see Figure 16-1), the generic feature that enables all-purpose out-of-the-box workflows. This feature includes the following workflows:
- Approval
- Collect Feedback
- Collect Signatures
- Issue Tracking
From here you can also enable the following additional workflows:
- Disposition Approval
- Publishing Approval
- Three-State Workflow
- SharePoint 2007 Workflows
Within this site collection feature screen you can activate the workflows you plan to use, or you can activate additional workflows later.
Introduction to Out-of-the-Box Workflows
Before you get started using and associating the out-of-the-box workflows with a list or library, you should know a little bit about each workflow.
- Approval: This will route a document or list item to a person or group for approval or rejection. This workflow can contain a staged model to add different distinct stages to your workflow. Each stage can have different sets of behavior such as serial or parallel processing. A similar workflow is also used by default in the Pages library on all publishing sites. This Approval workflow can be used to manage the page approval process before publishing.
- Collect Feedback: This workflow will route a document or list item to a person or group to ask for feedback. These reviewers can provide their feedback, which is then put together and sent to the person who started the workflow.
- Collect Signatures: This routes a document that has been created in either Office 2007 or 2010 applications to a person or group in order to collect their digital signatures on the documents. In order to complete the required steps all participants must add their personal digital signatures to the document where specified. This workflow, although automatically associated with the Document Content type, will appear for a document only if that document contains Microsoft Office signature lines.
- Issue Tracking: This will route an issue to a person or group to take action and resolve the issue in question. This workflow also can have different states, such as issue opened, issue in review, or issue closed.
- Disposition Approval: This workflow operates in support of the SharePoint records management process. The process is started on potential records and allows those who participate to either keep or delete the item in question.
- Publishing Approval: This workflow will route content for approval the same way the Approval workflow does. However, the Publishing Approval workflow is designed for sites with the Publishing feature enabled and is available only on those sites. One important difference you will see from the Approval workflow is that this form hides the options to add approvers, end the workflow on first rejection, end if the document changes, and enable content approval.
- Three-State: This is designed to track the status of a document or list item through distinct states. Each state is definable based on data from columns in that list or library. A state can be things such as submitted, in review, or completed. A task or set of tasks being completed is often the trigger to move on to the next state.
- SharePoint 2007 Workflows: These are legacy, and little time will be spent on them.
Each of these workflows can be used many times with unique names in the same library. You will most likely find that the most commonly used will be the Approval and Collect Feedback workflows. Each out-of-the-box workflow can fit basic needs, but you can’t go much beyond that.
The Association Process
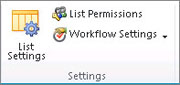
By now you have enabled the core out-of-the-box workflows and you can begin the process of associating each workflow with a list or library as necessary. As you learned in the previous chapter, you need to take certain steps to make a workflow available for use in each list or library. This association process is virtually identical for all SharePoint declarative workflows. The first step is associating that workflow with your list or library. You can do this through the library settings and subsequently through the association form. You can access the workflow settings for a given list or library through the Ribbon as shown in Figure 16-2 or through the main Library Settings page by clicking Workflow Settings as shown in Figure 16-3.

A user with appropriate permissions will go through the association process and assign a unique name for use only on that list or library by the workflow the user is currently associating. Doing this allows better reference for the user. For example, there may be many times when the out-of-the-box Approval workflow gets associated with a document library. Users would have difficulty in determining which workflow was which if they were all named Approval workflow. In addition to this workflow name, the workflow association can set various options such as start behavior, a default list of those participating, and the expected duration of the workflow. See Figure 16-4 for an example of how the first page of the association process appears.

The set of options you specify while performing an association is unique to that association. Each time a workflow is associated you can select different options, including a unique name. This allows you to associate each workflow multiple times with different configurations based on need. Once a workflow is enabled on your site collection it is available on each list or library to be associated as long as you have permission. You may notice that some workflows are not listed on some objects. For example, you won’t see the Publishing Approval workflow listed when you are working with lists or libraries. This is because the list is trimmed for applicability of the workflow. At this point you have a basic understanding of what an association is and what you have to do when you have a list or library that you want to tie some process to. To understand these actions even better you should walk through a basic example. You can replace names of sites and lists with more appropriate names for your environment. If you need to create a new site or list, you can do this from the Site Actions menu that is available in the top left-hand corner of the page.
For this example take the owner of the listContracts. You want to add an Approval workflow to assist in the approval of different contracts that will be sent out to vendors. You know that these contracts must go through a review cycle, then be approved by Legal. You know that this can be done in stages using the Approval workflow, and that they can be done in serial or parallel, so you want to take advantage of both of these options. In your association step you’ll go through and add the Approval workflow to your library and provide a basic amount of information on page one, basically just giving it a unique name for use and specifying what task and history lists to use.
The next page of the workflow association form is shown in Figure 16-5. The information you provide in this step is only there to assist the person kicking off the workflow when the workflow is set to start manually. That person can change the information you are putting in at this step.
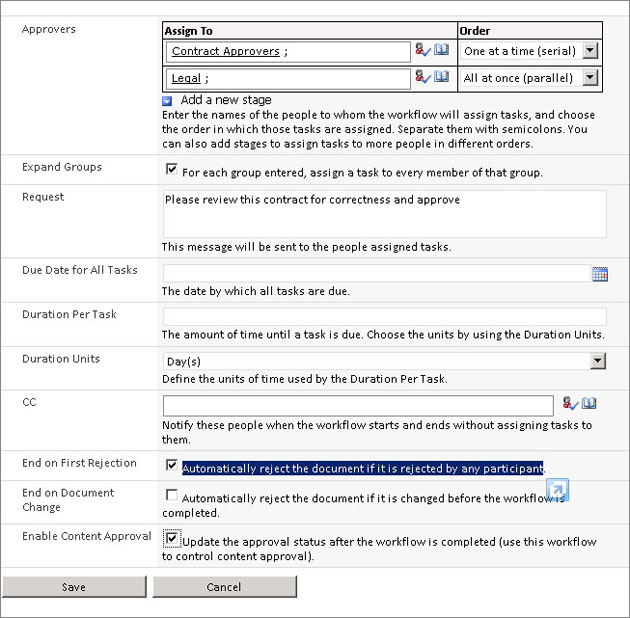
You want to make sure that you have two stages in this workflow. In Stage 1 you want the approval to go to the contract approvers group in serial. “Serial” means that if this group has three members, Sara, Carter, and Nolan, it will go to Sara first, then Carter, and finally Nolan. One very important item to note is that if any of these three rejects the contract, the workflow will stop. This is because the option is checked telling the system to “Automatically reject the document if it is rejected by any participant” (Figure 16-5). Be careful with this option; if selected, it can cause problems if someone accidentally rejects or does not understand the consequences of the reject action. This can cause the workflow to terminate. If this happens you cannot recover and simply start where you left off; you must start the workflow over. Once the contract approvers group finishes, the workflow moves on to the legal group. However, in this stage all members of the legal group get the workflow task at the same time, in parallel. At the end of the workflow the approval status of the contract item in question is set to approved or rejected depending on the result, thus ending the workflow. Once you click Save you will have created/associated your first workflow in SharePoint. When looking at the workflow you just created, you should be aware of some key points:
- Groups were used. These were SharePoint-specific groups, but these can be Active Directory users or Active Directory groups as well.
- More stages can be added or removed later; this is one of the options that can be easily configured.
- No other options were filled in, such as duration and CC fields. These can be filled in by a user who is starting the workflow at run time.
- For those situations where this workflow may be automatically started by the insertion of a document to the library, the workflow initiator will not be given the opportunity to modify the default values you specified. This means that if you were expecting to be provided the due date or CC values you must have each user start the workflow manually and not automatically.
Making Changes
Workflows in many organizations are rarely static, so you should be aware of how to make some common changes to these workflows once they are associated and even after they are in use. Many changes are simple and are really just changing values you set on the initial association pages during the association process. To make a change you need to go to the Workflow Settings page in the list or library with which the workflow is associated. At that point you just click the name of the workflow, which will bring up the change-workflow screen. This screen is the same as page one of the association screens that were originally filled out. Making changes here only affects workflows that have not started yet. The changes don’t affect running instances.
Changing Task- or History-List Settings
As you read in Chapter 15, there may be cases where creating special task and/or history lists becomes necessary. Creating special task and history lists for the workflow you are associating or editing takes place as part of the regular association process or through the change-workflow screen if done after association. On this first page you will see drop-downs for task and history lists. Simply use the drop-down list and select a task list that you have previously created (your best option), or you can select a new task or history list. If you choose the latter option SharePoint creates this new list for you and the list will be named the same as the workflow name. This is shown in Figures 16-6 and 16-7.


Setting Up Advanced Permissions on Your Workflow
One of the advanced-permissions items you can specify is setting the requirement to have “manage lists” permissions to start a new workflow. This can be a useful tool in reducing the number of those who can initiate your workflow. Specifying this is a simple matter of checking the box. However, the consequences can mean workflows that were supposed to be automatically started are not happening for those who are not meeting these permission requirements. Additional SharePoint permissions as they relate to your workflows will be a matter of restricting who has appropriate permissions on the lists or libraries that are involved with your workflow. Setting up these permissions properly is a core step in administering a SharePoint environment. These effects were covered in more detail in Chapter 15.
Removing Workflows
Removing workflows is an easy process that is also accessed from the Workflow Settings page, as shown in Figure 16-8.

Make sure you understand the ramifications of workflow removal. Removing a workflow association cancels all running instances of the workflow. To allow current instances of a workflow to complete before removing the association, select No New Instances and allow the current instances to complete. Then return to this page and select Remove to remove the workflow association.
TAKING THE NEXT STEP AND MODIFYING OUT-OF-THE-BOX WORKFLOWS
You have started learning the out-of-the-box workflows. The next step in your workflow journey is to take the workflows you were just exposed to and extend them to better suit your needs.
Extending workflows is a new ability in SharePoint 2010. SharePoint 2007 did not allow this.
One important note to keep in mind is that not all out-of-the-box workflows are available for you to modify with SharePoint Designer. The workflows you can modify when enabled are:
- Approval
- Collect Feedback
- Collect Signatures
- Publishing Approval
Before taking the next steps and modifying any of the available workflows, ensure that you are doing so with an account that has all the appropriate permissions. You can find these permissions in Chapter 15. Now that you’re ready to take the next step and start using SharePoint Designer, you need to understand the tool you’ll be using.
Introduction to SharePoint Designer
Opening your SharePoint site in SharePoint Designer gives you a starting dashboard that allows you to interact with different SharePoint artifacts. This is shown in Figure 16-9.
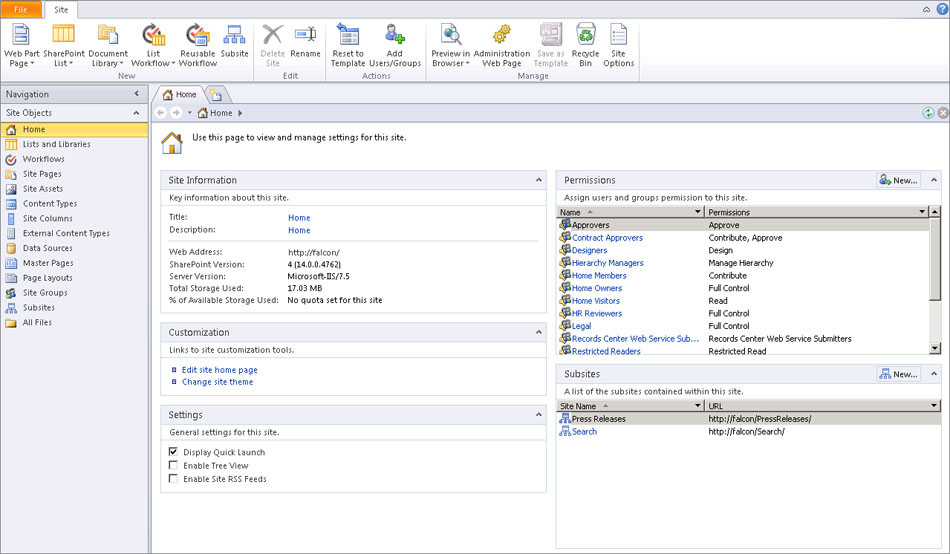
You can see from the top Ribbon that right from the starting page you can begin creating workflows. But for now you want to just modify an existing one, so you need to select the Workflows option from the Navigation pane on the left. From the workflow landing page/dashboard you can see the Ribbon change as shown in Figure 16-10.

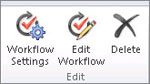
As with the other Office and SharePoint products, the Ribbon plays a significant role in the user experience. The Ribbon is context-sensitive, and you will see different options appear or become unavailable based on your current context. When editing a workflow you may see a Ribbon that looks as it does in Figure 16-11.

When not in editing mode the Ribbon look as it does in Figure 16-12.

The Ribbon is important for you as a workflow creator; many of the functions you need to perform are there. The Ribbon is broken into sections to increase usability. You can see them as follows:
- New: Use this section of the Ribbon, shown in the first panel of Figure 16-12, to create a new workflow.
- List Workflow: Use this button to create a new workflow that is tied to a specific list at design time. This will automatically associate the workflow for you. This button expands to display all the lists available on that site.
- Reusable Workflow: Use this to create a new reusable workflow that you can then deploy to the site for use by others.
- Site Workflow: Use this to create a new site-based workflow.
- Edit: Use this section of the Ribbon for editing workflows. When a workflow is selected you will have the Edit part of the Ribbon.
- Workflow Settings: From here you can change workflow settings.
- Edit Workflow: This brings up the selected workflow in edit mode.
- Delete: This deletes the selected workflow (Figure 16-13).
- Manage: This section allows you to perform various utility type functions with a selected workflow.
- Copy & Modify: This allows you to take the selected workflow and create a new workflow based on it. You will be doing this soon.
- Import from Visio: This takes a Visio file that has been exported into a Visio Workflow Interchange format (VWI) and imports that workflow into SharePoint Designer to continue the building process. More on that later.
- Export to Visio: This exports a workflow to a Visio format to allow for collaboration with a Visio workflow author.
- Associate to List: This goes through the association process for the selected workflow.
- Associate to Content Type: This goes through the association process for the selected workflow to a SharePoint content type (Figure 16-14).

You learn more about each of these tasks throughout this chapter.
Modification in Action
It’s time for you to modify an out-of-the-box workflow. To facilitate this modification of an existing workflow, Microsoft has given you the ability to copy and modify as described earlier. Follow these steps:
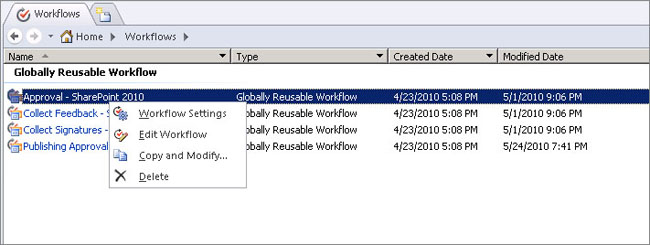
1. Create a new workflow from an existing one by right-clicking the workflow you want to use and selecting Copy and Modify as shown in Figure 16-15, or by using the Copy & Modify button from the Manage section of the Ribbon.
Selecting the Copy and Modify option creates a new workflow dialog box as shown in Figure 16-16.
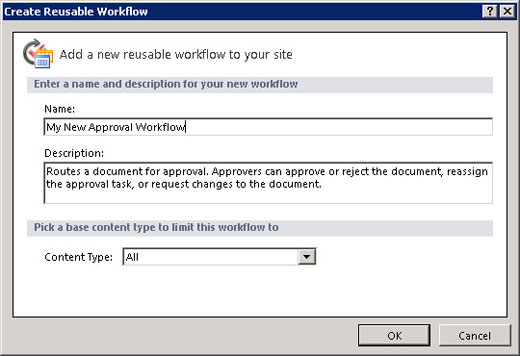
2. You must provide a name and description as well if you want to associate this workflow with a content type; then click OK.
3. You are now presented with the new copy of the worklow that you are free to edit by adding new conditions and actions. For now, click on the name of the workflow located in the area above the workflow canvas.
4. You will see the workflow dashboard here and will see that you have different settings or other options you can further customize. This dashboard is shown in Figure 16-17.
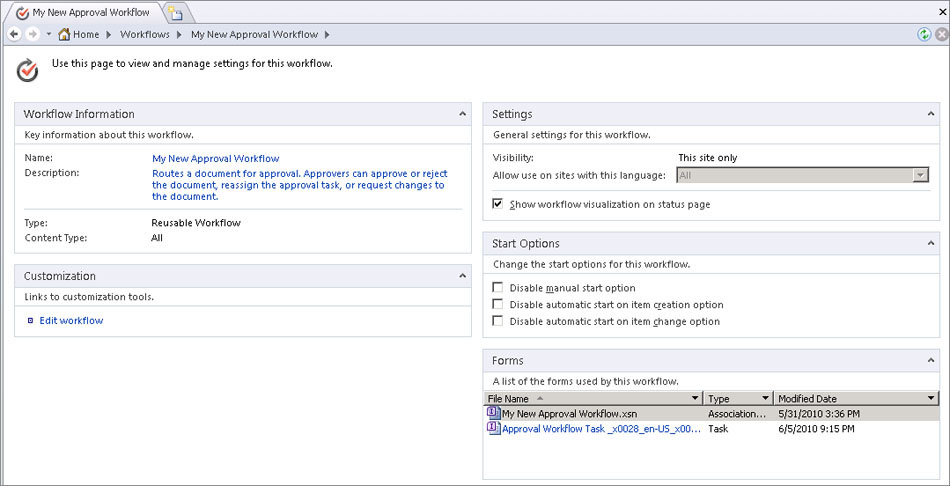
You can edit the basic information about the workflow, such as name and description, in the Workflow Information panel. An important option in the Settings panel is “Show workflow visualization on status page.” When you select this option, SharePoint will use Visio services to visually display status. Once you are ready to modify the workflow, move on to Step 5.
5. Click the Edit Workflow link in the Customization section. This will take you to the main workflow canvas.
From here you can begin to modify your new workflow. In this example your users want to add a step to notify the site owners group after the workflow is complete.
6. Add a new step. Simply click the Step button in the Ribbon. Type in a name (in this case you can call this the Notifications step). With SharePoint Designer 2010 you have the new feature of IntelliSense. This allows you simply to start typing, with the program returning results of conditions or actions as you type.
7. Use this IntelliSense feature by starting to type “Email.” Type in the first three letters, EMA; then you will see the option to click Enter to complete and add the action of sending an e-mail. This type of IntelliSense is present throughout SharePoint Designer and aids in the workflow creation process.
Define the e-mail message through the Define E-Mail Message dialog box. In this dialog you can specify principal recipients and CC as well as subject font, and take advantage of lookup fields so you don’t have to know by heart all the specific values you need to insert. In this case you can add the “home owners” to specify who the e-mail is being sent to. “Home” is the name of the site you’re working on; this will be different for different sites.
Then use Add Lookup at the bottom to add context from the workflow itself. In this example add the current item title along with some static content: “This is to notify you that the approval process on [Current Title] is complete.”
This will grab the title of the document that went through the approval process and e-mail the document to the group specified.
8. In the next modification you need to remove the ability of workflow initiators to change who can be approvers or to change who can be CC’d in an e-mail. You can do this by modifying the Association and Initiation Form parameters. Click the Initiation Form Parameters button from the workflow Ribbon. This brings up the Association and Initiation Form Parameters dialog shown in Figure 16-18.
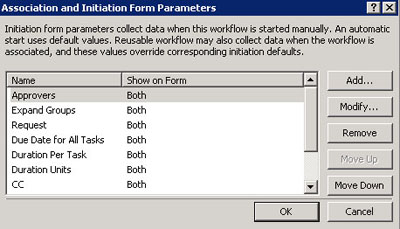
Highlight the Approvers item, click Modify, and select Association from the drop-down box. Do the same for the CC field. You can do this modification for all forms as well as add custom fields to either form.
9. Once you are done modifying this workflow you can publish the workflow to SharePoint as a reusable workflow or associate it directly to a list or library.
You have now taken an out-of-the-box workflow and made simple modifications. However, using SharePoint Designer to edit existing or out-of-the-box workflows is just one part of what you can do. You can also create your own workflows from scratch.
Before you start building your workflows from scratch you should understand some benefits of starting with the out-of-the-box workflows and doing a Copy & Modify. With these workflows a few key pieces are provided to get you started.
- Automatically generated forms
- Initiation
- Association
- Task
- Automatically generated Association and Initiation Form parameters
- Automatically generated workflow variables
Performing these steps shouldn’t take a significant amount of time; they allow you to create workflows faster because some of the beginning leg work is already done for you.
The first step in creating a workflow from scratch is to properly define your process, either on a whiteboard, on paper, or in Visio (more on that later). Going through this process first will pay dividends during all future steps. Some key items to note when mapping out your process include:
- Who will need to take actions in the workflow?
- Who will need to be notified at different steps in the workflow?
- Are you going to need Association forms?
- Are you going to need Initiation forms?
- Are you going to need Task forms?
- What forms technology should these be in? Can you use InfoPath?
- What data should be displayed on each of these forms?
These form decisions carry with them some other important decisions such as:
- What information do you want hard-coded and what should those associating this new workflow be able to configure?
- What should be hidden from those who are just initiating?
- Do these forms need custom branding or a particular look and feel?
As you saw when you were modifying the out-of-the-box sample, you can remove the ability to specify approvers as well as remove the ability to notify others on the CC line. Another important consideration here is what information needs to be displayed on the Task form in order for others to make informed decisions and take action as requested. By using SharePoint Designer and InfoPath you can place many different kinds of data within these forms that enable better decision-making by the workflow participants.
Once you have these data points you have the basics and are ready to start. In addition you know some of the data needed for your process. This is important to know for the creation of form parameters as well as variables. For medium to large workflows you should create each of these as a first step. This makes the creation of later steps easier, because you’ll be using these fields to check values for decisions about the path taken in a workflow as well as to send out task assignments.
Building a Sample
In a business scenario, your human resources (HR) organization needs a better way to author, review, and publish corporate policies. It needs to ensure that any review and publishing process will also provide proper security. Such security is needed so that no unauthorized person can modify the policy documents during the review. Additionally, HR needs to ensure that no policy document can be written to the official published library unless placed there by an administrator after going through the process.
The solution: To address all these needs you create a process tied to a draft document library, where the HR team will store all documents while they are being authored. This draft document library will have basic permissions that give read/write access to all members of the HR team. Once authors are ready to submit the documents for official approval they will manually kick off the HR policy review workflow. Once initiated, this workflow will move the policy document to a document library reserved for all policy documents in review. In this review library, permissions will be limited to those in the HR management group.
If the new policy is approved the document will be moved to the published-policy library on the official HR SharePoint site. This HR policy document library will have broad read permissions to allow all employees to read applicable policies. Write permissions will be limited to the administrator and site owner under whom the final workflow publishing action is taken.
Although on the surface this workflow seems basic, you need to overcome some limitations when building it. With SharePoint workflows, once an item is moved the workflow loses context. You can still do such basic functions as e-mail, pause, and request information, but all functions that use the current item functionality will no longer be available. To achieve the desired solution you need to break this up into two workflows. The first workflow will be associated with the draft documents library and will serve to notify participants and move the document to the in-process library.
There is no Move item or document command in a SharePoint workflow. Thus any move operation will involve copy and delete.
The second workflow will start automatically when the first workflow inserts the document into the in-review library. This second workflow will handle the approval steps and, if the policy document is approved, will move it to the published library while taking advantage of the impersonation step, which is explained later in this chapter.
You now know the business’s need and have figured out how to address that need; now you need to make this workflow happen by following these steps:
1. Start off by creating a new list workflow and select your draft document library as the library to associate this with.
2. Give the first step a name by clicking the default first step, and typing a name for this step. For this example, you can call it Notify because this is the step where you will be sending out notifications to the team that this workflow has initiated.
3. Add an impersonation step to this workflow so that the moving of this document will take place with the elevated security permissions that were discussed previously. Simply place your cursor below the Notify step and select the impersonation step from the Ribbon. This will insert a new step to your canvas called Impersonation Step. Insert the Copy List Item action within this step. Once this step is inserted, click this list’s hot key and select Current Item. You now need to specify where this document should be copied to. For this, select List Hot Key and from the drop-down select the document library you are using for reviews. For this example you can use Policies in Review.
4. You don’t want that old draft sitting there while the document being reviewed has been placed in another library, so you need to add another action to this process to delete the document. Place your cursor underneath the copy item within the impersonation step and add a new action to this step called Delete Item. Once this is inserted select the This List hot key and select Current Item from the drop-down.
You should now have a workflow that looks like that in Figure 16-19.

5. Save and optionally publish this workflow if you are ready. You now have the first part of the solution, but you still need to create the workflow that will handle the review process. This workflow will be initiated by the insertion of the copied document into the in-review library.
6. For this you need to select the List Workflow action from the SharePoint Designer Ribbon and select Policies in Review from the drop-down list. Start by renaming Step 1 under Policies in Review to Submit for Approval.
7. Within this first step add the Start Approval Process action from the list of actions. Remember that you can always just start typing and have SharePoint Designer do the work for you. Now you need to specify what users to assign this task to by selecting the Users hot key. This will bring up a standard dialog box called Select Task Process Participants. You can use the address book to find the users or just type them into the field. In this example you already have a group called HR Reviewers that you can use in this workflow. Add them in the dialog and insert any special instructions in the instructions box that you want them to see. Optionally, add parameters such as Duration per Task and/or Duration for Task Process. All these fields can use variables and different pieces of metadata. Using these can be very helpful in providing extra information to participants.
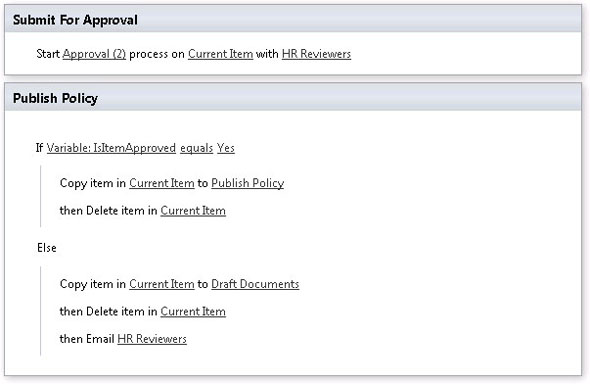
8. Now add the second step for what happens after the approval task is completed. Call this step Publish Policy. Insert a new condition of “if any value equals value.” You can use this to see if the outcome of the approval process is approved or declined. In the If value you need to define a workflow lookup by selecting the hot key, then the function key (fx). For data source use “workflow variables and parameters.” In Field from Source, select Variable: Is ItemApproved, and click OK. You can now select the second value hot key, which should automatically give you a drop-down of Yes and No. Select Yes.
This gives you an approval branch for what you want to happen if the new policy document meets with approval. You now want to copy this document to the published-policy library by once again using the Copy List Item action you used in the first workflow. Only now you want the destination to be the published-policy library. You also want to ensure that this document is not lying around in multiple libraries, so add the Delete item to this branch as well.
9. Next, you need to define what happens in this workflow if the document is not approved. In this case you want to copy the item back to the draft document library so that the author can modify and resubmit, then e-mail and notify the team. Once you have completed this you should see a workflow screen like that in Figure 16-20.
Now that you’ve seen what you can do with a workflow made from scratch, you should also learn a few situational-use cases for SharePoint workflow that may come in handy as you build other workflows.
Taking Advantage of Workflow Processes and Content Types
The more you learn about SharePoint the more you’ll find that one of its best features is content types. Unfortunately this wonderful concept/feature goes largely underutilized. Covering content types in any detail is beyond the scope of this chapter. However, once you have started to take advantage of content types you should be able to see ways in which these also can help you take advantage of workflow processes. In SharePoint 2007 this was a more difficult task, because associating workflow with content types was only possible by leveraging those workflows created in Visual Studio. In SharePoint 2010 this becomes quite simple and can be a very powerful tool for you. Here’s an example.
Take a simple need to have a set process for approving all contracts in your organization. Naturally, you have created a base-level content type for contracts. This content type has a series of properties associated with it that will be carried to any library in the site collection you associate it with. You also want to make sure that all contracts go through a legal review regardless of what site or library they get stored in. One way to accomplish this is to associate an Approval workflow with the Contracts content type.
Assume that you have built a custom approval process for contracts in SharePoint Designer, and that you already have created a Contracts content type. Rather than going through the typical step of associating with a list or library, you can now associate this workflow with the Contracts content type you have already created. You do this through the SharePoint Designer Ribbon by selecting the button for Associate to Content Type. This displays a drop-down menu (Figure 16-21) where you can select the content type with which you want to associate the workflow.
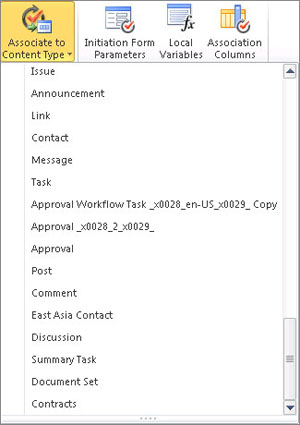
Once you select the content type, you are redirected to the Site Content Type settings in the SharePoint site where you fill out the typical association form — with one big difference. Pay special attention to the last option, which is “Add this workflow to all content types that inherit from this content type.”
If you are familiar with content types and how they can take advantage of inheritance, this should make perfect sense. Make sure you understand this before you choose Yes or No, because this will have further consequences. If you are going to have additional content types that build off this Contract Content type (such as vendor, employee, or service contracts) and you want all contract types to use this same workflow, you should choose Yes. If you want to begin to modify this workflow for each different sub-content type, choose No.
Modifying Workflow Outcomes
Workflow outcomes can be a powerful tool as you get deeper into customizing your workflows. Essentially these outcomes are the result of a task process. By adding a new outcome, SharePoint will place a new task action button on your forms. This will give the recipient of these tasks an additional action to take. You can then use this as an input into the workflow itself. You can see more of this in just a bit. You will probably create many workflows that go beyond the typical approve/reject outcomes. Adding an additional outcome to a workflow is fairly easy. You simply click the Approval Workflow Task, and click New in the Task Outcomes box as shown in Figure 16-22.
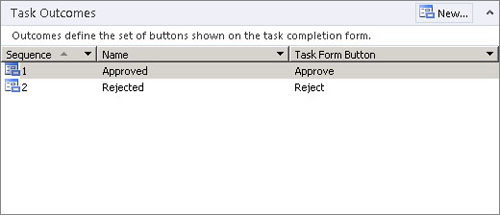
In this case you add an additional option to the typical approve/reject choice to allow participants to abstain from choosing. Click on the New button and add a new outcome called Abstain. Adding this new outcome automatically places the option on the Task form, but until you do a little more work on the workflow your process won’t be able to take advantage of this.
To go further you need to select the Approval Workflow Task which will take you to the Approval Task dashboard. From this you need to select Change the Behavior of the Overall Task Process. This will give you a fairly lengthy set of options, which actually is one big workflow. In this example you want to scroll to the section labeled When the Task Process Completes. This set of actions will run after each task is completed. Here you can set up actions to take place when a participant selects the new option you created called Abstain. In this example you can place a new Else-If branch in the approval process and select a condition for Task Process Results, as shown in Figure 16-23.

In this process you are setting up the workflow, so that if too many people abstain, the “vote” will be invalid and the workflow will simply cancel. Specify that if the percentage of Abstain is equal to or greater than 10, the workflow status will be set to “canceled.” Your ability to modify these task processes further can be a big part of your standard workflow definitions. With this you can specify situations that allow you to complete the task after more than 50 percent of the respondents approve, or you can set up additional rules that meet your business needs.
Modifying a Form
This is a good spot to illustrate how you can modify a form associated with a workflow to provide more information or simply to “pretty up” the basics. In this example you want to make sure people understand that if they click Abstain and 10 percent or more of the respondents do so, the workflow will be canceled.
Return to the dashboard of your workflow and click the Approval Workflow Task form.
This launches the InfoPath Editor in which you can edit the form for tasks with this workflow. Be sure that you have InfoPath Designer installed so that you can edit the form. First, insert a new row below the task action buttons. Then simply type in the text you want. For this example you can use, “This workflow limits the percentage of those abstaining to 10%.” Just to be sure people see and read this, you can boldface and underline the text. Now you need to save this modified form, but first you are required to save it locally. Save the modified form somewhere safe, and the form will then get published. You will also need to re-publish the workflow to have all changes take effect.
Parallel Workflow
The “parallel workflow” option on the SharePoint Designer menu may not be commonly used in your workflows, but you should understand that you have this ability and know how to use it. Simply using a parallel block is very easy. Take the previous workflow you built to support the HR policy publishing process. Go into the edit mode for that workflow after clicking Edit Workflow, place the curser just below the action that copies the policy to the published-policy library, and select the Parallel Block button in the Ribbon.
As you can see, it’s easy to do, but why would you want to, and how can you take advantage of this ability? Parallel blocks are advantageous when you need certain actions not to be dependent on previous actions completing. In other cases, waiting on actions to complete would be absolutely necessary. One example is creating a new list item for e-mailing a group of people to notify them of something and including a URL. For this you would have to wait for the list item to be completed before e-mailing the group a link to it.
Now back to the workflow. Let’s say the HR group wants to send out several different e-mails, with customized messages, notifying different groups simultaneously to ensure timely notification. For this you can simply place your cursor inside this block and add the “and Email” action shown in Figure 16-24. You can do this as many times as needed to send the custom e-mails to different groups. Figure 16-24 shows the completed workflow.

Association Columns
In SharePoint 2010, workflows have a completely new added layer of reusability. To take advantage of this new ability, Microsoft has created association columns. Association columns are created in a list or library during the association process. This can be a significant help in making the sharing of workflows easier. Think of a situation in which you may want to create a special Approval workflow. Within this Approval workflow you make use of special columns in the list or library to check status, values, and so on. If you shared this workflow and it was used by others in lists or libraries that did not contain these special columns, the workflow would not function. Here’s where the association column comes in. When used properly, any special columns that are necessary for the workflow to function can be added at association time as part of the workflow.
Visio has long played a role for organizations in mapping the flow of a business process. Thousands of businesses have used it as a process modeling tool. Additionally, many Business Process Management and workflow vendors today leverage the power of Visio and capitalize on the level of adoption it enjoys. Going deeply into this is beyond the scope of this chapter, but for a good example take a look at Global 360 and its Analyst View product. Additionally, you can take a look at the Visio Partner Toolbox page to see a broad range of companies building on the power of Visio. The URL is http://visiotoolbox.com/2010/partner-product-trials.aspx.
In Visio and SharePoint 2010, Microsoft has taken the next step in empowering the Visio user with tools to create workflow. With these new additions, Visio can now be used at a low level to model SharePoint workflows. Notice that in this statement you did not read “to create workflows” but rather to “model” them. This is because with Visio and SharePoint you don’t actually create the workflow functionality; you merely model it by using new SharePoint workflow stencils provided by Microsoft.
Why Visio?
Users today want to be more involved in workflow definition. IT organizations are looking for ways to better involve businesses in the process of building workflows. Putting a tool like Visio in the hands of your business users, a tool many of them are familiar with, enables them to participate more. Visio is a tool they’re comfortable with, or if they’re not, one on which they can be easily trained. For this reason, Visio is likely to gain more adoptions and have a greater level of success in organizations. This increased adoption and success helps achieve a greater return on investment. Combine this with the availability of many different Visio partners who add additional functionality, and you have a fantastic situation for adding value for your organization.
The Basics of Use
This section assumes a rudimentary understanding of Visio, so you won’t find an introduction to the core use of the tool. Visio 2010 provides a new template called Microsoft SharePoint Workflow. Within this new template are new stencils that map to the new SharePoint workflow functionality you’re now familiar with. Using these Visio stencils you simply lay each object onto the Visio canvas in a linear fashion. You will have a start, an end, and different steps in between. Every workflow must have a start and ensure that all paths of the workflow are terminated. Having a workflow path without a termination point will result in an error when you try to export it.
Just as with SharePoint Designer, you must lay out your different conditions and actions. These are the same as they are in SharePoint Designer. Your users will model the basic workflow steps in Visio and then will make sure that each step or action they need the workflow to take is represented in the Visio model. Once they feel the workflow is complete, they are then ready to export and share it. In this process they save a VWI file (Visio Workflow Interchange), which can then be saved in SharePoint or sent via other means to the next step. The business analysts can then do an import from the Visio operation inside SharePoint Designer. These analysts can finish up the workflow and send the file back for approval or simply publish the workflow to SharePoint.
Planning for Use
You’re now familiar with the different actions and outcomes that are core to creating workflows in SharePoint Designer. These will continue to be important when you make the move to Visio. You can see that these conditions and actions now take the form of stencils in Visio. These stencils are in Chapter 15, in Figures 15-6 and 15-7. As with just about any new technology or process, before you implement you must adequately plan for how the technology will be used. If you don’t do this, you can’t be as effective and will experience many more problems down the road. Workflow and Visio are no exception to this; in fact, the problems can be even more acute.
The Processes
The first things you need to plan for are what role Visio will play in your workflow strategy and who will be involved in using the tool. Keep in mind that with Visio you are only performing a structure of a workflow and are adding no details to the workflow within the Visio tool. For example, when you place an action stencil of Send Email onto the Visio design canvas, you provide no data as to whom that e-mail will be sent, or what data it will contain. The business analyst must perform these functions after the workflow is imported into SharePoint Designer. Once the workflow is in SharePoint Designer the analyst will have visible placeholders that can be filled in. Each of these placeholders must be completed and the workflow published before the workflow can be available for use.
What does this mean for you as you implement SharePoint and take advantage of workflow? The question speaks to the need for effective communication between business members and IT. Visio process modeling is an important step in empowering business users to participate in creating better workflows that match their business requirements. You need to plan accordingly and remember that as business users model their workflows they need to communicate the details of each step separately from the model itself. They will also need a sharing and collaboration method in order to be most effective. One option for achieving this is the new Visio Process Repository site template that comes with SharePoint 2010. This SharePoint site will help with saving drafts of processes as well as storing basic information about each process stored. Leveraging SharePoint for this effort will help ensure that those who are looking at these Visio diagrams are looking at the most recent versions as well as having a central repository for all those diagrams in process. You’ll find many other benefits for using a site like this for collaboration — which is probably why you are looking at SharePoint in the first place.
Considerations and Limitations
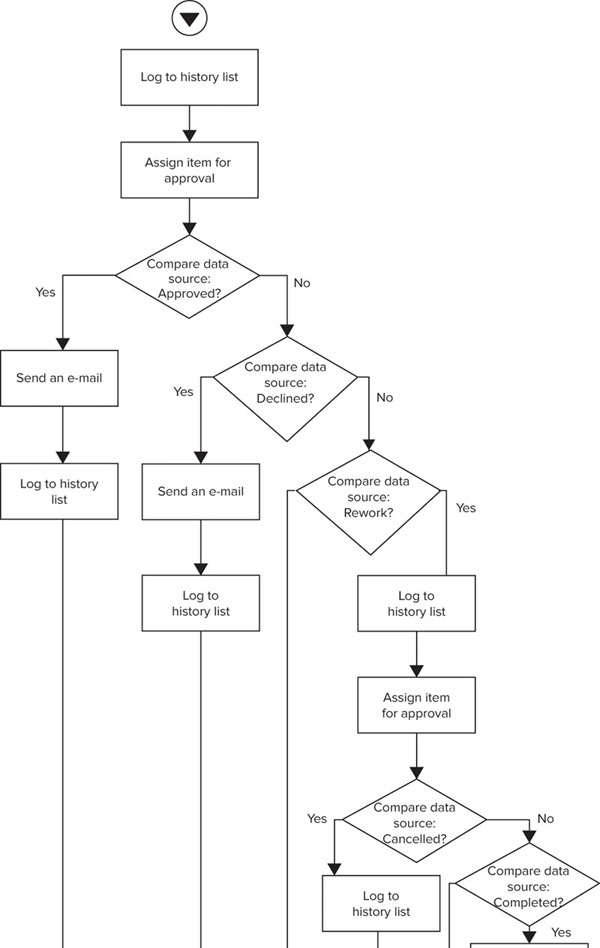
Before your users can be effective in leveraging Visio to model workflow, you must ensure they have all the information they need to be effective. They need to understand different modeling techniques and methods to get the results they need. Most of modeling workflow with Visio is straightforward, especially if you have used Visio in any manner before. However, you need to keep in mind several limitations when modeling SharePoint workflows. The first of these involves a common loop-back task. Within Visio and SharePoint there is no ability to loop back to previous activity. Typical business users see their workflow in very generic terms, as shown in Figure 16-25. Within this workflow a user submits a document or list item. This is then routed to a manager for approval. The manager has the options to approve, reject, or ask the submitter to perform some reworking.
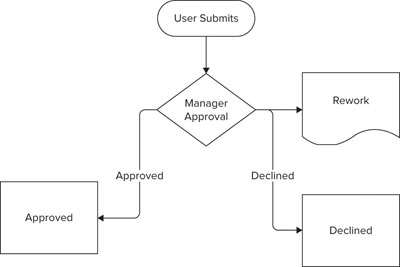
However, a direct loop back or “return to parent” is not possible. So you need to lay this out linearly. This means that you need to have a complete path for each outcome, and each path must root from one of two outcomes, Yes or No. This requires your building a nesting of conditions that can result in the outcome you’re looking for. Each evaluation of comparable data sources for conditional evaluations is limited to two outcomes, Yes or No. Because of this limitation your users are required to put more thought and planning into each workflow modeled in Visio. The typical thought pattern that you saw in Figure 16-25 will not work in Visio. Users must be trained to think more linearly and work more closely with business analysts who will be taking these models and turning them into a usable workflow.
Another potential pitfall your users may run into is the limitation of nested conditional evaluations to 10. This means that in any one path of your workflow model you are limited to 10 conditional evaluations. For example, if I lay out my workflow model with a series of evaluation conditions, checking for Yes or No, I have to remember that no single path can have more than 10 of these evaluation conditions. This limitation won’t come into play in the vast majority of your workflows, but you need to take it into account when you train your users. To help visualize the linear nature of Visio required, look at Figure 16-26. In this figure the workflow depicted in Figure 16-25 is represented as it would appear if built with Visio.
Next Steps
Carefully plan out your workflow strategy and map the levels of functionality required for each workflow from a longer-term perspective. The leap from SharePoint Designer to Visual Studio is a big one and many times you may be better off taking a Visio map of a workflow and building this from scratch, using native Visual Studio artifacts and procedures, without going through the import process (you see more on this process in Chapter 17). Once you have imported a workflow into Visual Studio, there is no exporting again. The back and forth you enjoyed between Visio and SharePoint Designer will not be possible at this level. The real power of workflow and Visio is at the first two layers. Having a user quickly model a workflow, then having someone from IT be able to see this visually as well as import into SharePoint Designer and create a functioning workflow, is indeed a significant step in the right direction.
Now you need to know the basics of how to get a workflow diagram from Visio to SharePoint Designer and then into SharePoint. Here are the steps:
1. Model your process by dragging different shapes onto the Visio design canvas. Make sure you have a start and an end activity.
2. Once you have finished modeling the workflow and you are satisfied it’s complete, you need to save and export the workflow. You can manually check for errors; however, the export process will automatically do this for you.
3. Once the workflow model is exported, you can then import the workflow into SharePoint Designer by selecting the Import from Visio button as shown earlier in Figure 16-14.
4. Provide the workflow with all the details and information on various steps that will be necessary for this workflow to function, just as you did in the sections of this chapter on modifying an existing workflow and starting from scratch. Once done with this you can optionally export the result back to Visio to allow the user to visualize any changes you’ve made. Keep in mind that the Visio user will not be able to see any data that was added, such as e-mail content or addresses.
5. You are now ready to publish this workflow to SharePoint. This publication will be the same as publishing those workflows that were not initially created in Visio.
Your workflow now has gone from Visio, has been imported into SharePoint Designer, and has been configured and published. You should perform several different runs of this process, each time configuring slightly different workflows and experimenting with different types of functionality.
This trip from Visio to SharePoint Designer and then perhaps to Visual Studio can be considered a ladder of functionality. With each progressive step the amounts of functionality and complexity can increase; however, taking a workflow to Visual Studio after Visio or SharePoint Designer involves some additional considerations, as you’ll see in the next chapter.
In this chapter you were introduced to both out-of-the-box workflows and SharePoint Designer. You also learned the basics of modifying those out-of-the-box workflows and creating new workflows from scratch. You can now take advantage of more advanced workflow features in SharePoint Designer such as parallel paths and custom workflow outcomes. You should be able to use and understand where Visio may fit into your workflow architecture. Additionally, you now have an understanding of what limitations Visio as a workflow tool introduces into your workflow design and collaboration process. Some of this will become clear in Chapter 17 as you explore workflows inside Visual Studio.