9
Publishing in SharePoint Server 2010
WHAT’S IN THIS CHAPTER?
- What is a publishing site?
- How to create and edit publishing pages
- Understanding page versioning and approval
- How to configure publishing sites
- Understanding anonymous access, content deployment, and variations
- How to create a page layout using SharePoint Designer
- How to create a page layout using Visual Studio 2010
Some websites you visit regularly because they allow you to perform a task, whether this is checking your e-mail, connecting with a friend on a social media site, checking in for a flight, or checking the balance of your bank account. However, you might visit other websites because they provide information you’re seeking, such as the latest bestseller paperback books or the available shades of paint at your local hardware store.
Web Content Management (WCM) refers to the process of storing and managing web content that is primarily textual and graphical in nature. (This is in contrast to sites that are collaborative or transactional in nature.) Web Content Management software products have several common characteristics:
- Non-technical users have the ability to publish content (text, images, and documents) to a website without the need for intervention from any IT staff.
- Content is standardized across a website through the use of page templates.
- Content can go through an approval process before it appears “live” on a website.
- Content can be scheduled to appear or disappear from a website at a given point in time.
- Content is often stored in a database rather than in files on a filesystem.
Many WCM solutions are available for free on the Web. Many of the free blogging sites available online provide a WCM solution for their users. Blogger.com, for instance, allows non-technical users to post content, including text and graphics, to their own websites. Blogger.com users can decide how they want their sites to look by choosing from available templates. Blog authors can choose to save draft versions of their postings, preventing that content from appearing on the site until they choose to explicitly “publish” the content. Additionally, many of the social media sites (like MySpace and Facebook), though not traditional WCM solutions, do allow non-technical users to upload their own content, content that is stored in a back-end database rather than on files on a filesystem. The wide adoption of WCM solutions on the Internet in recent years is an indication of its usefulness in both private and public spheres.
SharePoint Server 2010 provides WCM capabilities that can help small, medium, and large businesses and organizations publish content on their own websites. This chapter reviews the basic functionality provided in SharePoint Server 2010, and reviews how you can create your own page templates using Visual Studio 2010 and SharePoint Designer 2010.
UNDERSTANDING THE PUBLISHING PROCESS
This section helps you understand the process of getting content into SharePoint and making that content available on a website for other users to view.
Planning
Before you start the process of creating and managing your content, it’s important to do a little leg work. This section walks you through some basics of SharePoint WCM sites, answering some of your questions such as, “What is a publishing site?” and explaining which lists and libraries are included in a publishing site.
What Is a Publishing Site?
Sites that use SharePoint’s WCM features utilize a publishing process, so they are frequently referred to as publishing sites (a term that is used for the remainder of the chapter).
As you have probably discovered by now, SharePoint has a broad range of capabilities, such as allowing users to collaborate with each other, network with one another, or interact with external data. As was mentioned at the beginning of this chapter, the WCM features of SharePoint focus primarily on the ability to create attractive web pages, filled with textual content and images, which can be maintained easily by a non-technical staff of content authors.
SharePoint is a web-based application, so end users interact with SharePoint almost exclusively by using their web browsers. That being the case, every page in SharePoint that a user interacts with via the browser is a web page, whether the user is using a publishing site or not. So what differentiates a publishing site from any other SharePoint site, and what makes a publishing page different from any other page?
In a collaborative site, users frequently make use of lists and libraries to store and retrieve content such as documents and other data. Users might click a link that takes them to the View All Site Content page, where they can view all the lists and libraries that are a part of the given site. If they want to add an item to a list, they might navigate to a view of that list and enter data into that list using an input form. In a publishing site, it’s not intended that users interact in any way with underlying list data in the site’s list format. In fact, users should not even be aware they are browsing a SharePoint site. Every page they encounter should have a unique look and feel that does not reflect the “out-of-the-box” SharePoint look and feel.
Publishing sites provide the ability to create and use page templates, called page layouts, which are in turn used to create new web pages on the site that will be used to communicate textual and graphical content to end users. These pages stand in contrast to administrative pages (such as the Site Settings page, or any page whose URL includes “_layouts”) or pages used in collaborative sites such as Web Part pages or wiki pages. We call these pages — which are created using page layouts — publishing pages.
SHAREPOINT PUBLISHING INTRANET SITES
The WCM features of SharePoint are meant primarily for public-facing Internet sites. This means that the publishing features of SharePoint are meant to hide the underlying list and library data from end users, so they are aware only that they are browsing a uniquely branded website, and not that they are browsing a SharePoint-powered site in particular.
However, it’s not uncommon for companies to implement the publishing features of SharePoint on their corporate intranet site(s). Doing so provides the ability to deliver relevant content to users, such as the latest news stories or announcements, yet in a uniquely branded way that avoids the typical SharePoint look and feel.
Please keep in mind that choosing to implement SharePoint’s WCM features in a site collection that will also be used for collaboration requires additional design effort. The reason for this is that a publishing site is geared toward sites that are based on a site hierarchy and publishing pages, where end users don’t see or even know about the existence of lists and libraries. Collaboration sites, however, require users to interact with lists and libraries on a regular basis. It’s possible for users to do so in a publishing-enabled intranet site; it just means extra time must be put into designing a user interface that explicitly enables users to interact with a site’s underlying lists and libraries in a user-friendly way.
Publishing Lists and Libraries
Several libraries are included in every publishing site collection and every publishing site. Because you might have multiple people authoring content on your site, it’s important that you have an organizational plan for where you will store particular assets such as images and documents. This will prevent people from uploading the same document or image multiple times in different locations throughout your site collections.
Site Collection Lists and Libraries
There is only one instance of each of the following libraries or lists in a given site collection, and that instance is located in the top-level site of the site collection:
- Site Collection Images: The Site Collection Images library is used for storing images that could be used across the site collection, such as logos.
- Site Collection Documents: The Site Collection Documents library is used for storing documents that might be referenced across the site collection. For example, if you include a link to your site’s privacy policy in the footer of every page in your site collection, you could place a downloadable copy of the privacy policy in the Site Collection Documents library.
- Reusable Content: The Reusable Content list is used for storing text or HTML content that can be used on multiple pages in the site collection. The power of reusable content is that it can be updated once in a central location, and all the pages that reference that item will also be updated. For example, you could place a banner ad on each page of your site that references an ad you have stored in your Reusable Content list. If you then update the ad in the Reusable Content list, every page that references that item will now display the new ad. You can read more about the Reusable Content list later in this chapter, in the section titled “Making Use of Reusable Content.”
- Style library: This library is used for storing cascading style sheets (CSS) and XSL style sheets that can be referenced from anywhere in the site collection.
Site Lists and Libraries
An instance of each of the following libraries exists once per publishing site:
- Pages: Every publishing site has a Pages library. Each new publishing page you create in a particular site will be stored in that single library. A site cannot have more than one Pages library.
- Images: This library is like the Site Collection Images library, except each publishing site has its own Images library. The Images library is used to store images that are local to the particular site the library is a part of. For instance, if you were building a public-facing Internet site for a company that sells products, you might have a different subsite for each product group. If you had one subsite for carpeting products and another subsite for tiling products, you would put the carpeting images in the Images library in the carpeting subsite and the tiling images in the Images library in the tiling subsite.
- Documents: Each publishing site has its own library called Documents. This library is for storing documents that are local to the particular site to which the library belongs.
Things to Consider when Planning Content
Before you start creating a web page in SharePoint, it’s important to think about the content that’s going to be on the page. You need to ask yourself such questions as:
- Which page template am I going to be using? What pieces of content need to be added to the kind of page layout I’ve chosen?
- Are there images on this page? If so, are the images I need already stored in SharePoint? If not, where should I add my new image(s) in SharePoint; should my image be uploaded to the local Images library or to the Site Collection Images library?
- Does this page link to documents, such as PDF files, which the user can download? If so, do these documents already exist in SharePoint? If not, where should I add my referenced document(s) in SharePoint; should I upload them to the local Documents library, or should I upload them to the Site Collection Documents library?
- Is there content on this page that’s being used on other pages and that could be a candidate for content stored in the Reusable Content list?
Creating and Editing
This section walks you through the process of creating a publishing page and editing the content of that page.
Creating Your Page and Choosing a Page Layout
A publishing site collection is made up of a hierarchy of sites, and each site can contain publishing pages. The URL associated with each site is based on the site’s location in the hierarchy. For instance, if you had a top-level site located at http://www.wrox.com/, you could create a site inside that top-level site called “Books,” and give that subsite a URL of “Books.” In that case, the URL of your Books subsite would be http://www.wrox.com/Books. If you wanted to create a new publishing page for a new book, you would have to first navigate to the Books subsite. If you created a new page with a URL of Six-in-One.aspx, the new page would be placed in the Pages library of the Books subsite, and would have a URL of http://www.wrox.com/Books/Pages/Six-in-One.aspx. If you were to navigate to the Authors subsite instead of the Books subsite, and you created your new publishing page there, your new page would end up with a URL of http://www.wrox.com/Authors/Pages/Six-in-One.aspx. As you can see, choosing the location in which you create your new page will affect the URL, and thus the logical organization of the content on your site.
With that said, if you have navigated to any page within a site and choose to create a new page, it will be added to the given site’s Pages library. You can do so by clicking the Site Actions menu and selecting New Page, as illustrated in Figure 9-1.

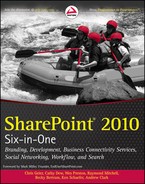
Doing so brings up the New Page dialog, as shown in Figure 9-2.
When you give your new page a name, keep in mind that this name will be used for the URL of your new page. URLs have “reserved” characters, such as ampersands, parentheses, percentage signs, and so on, which have special meanings in a URL. In light of this, it’s not possible to use these kinds of characters in your page name because they would interfere with the URL of the page. Additionally, if you provide a name that includes spaces, these spaces will be converted to dashes (–) in your URL.
Although it’s common practice to remove spaces from words to generate a URL, (such as giving a page called “Bolts and Nuts” a URL of BoltsAndNuts.aspx), most external search engines don’t have the ability to parse page URLs without spaces. What this means is that if you did a search for the word “Bolts” using an external search engine, the search engine wouldn’t know that the page BoltsAndNuts.aspx had anything to do with bolts. However, many external search engines do understand that a dash represents a non-breaking space in a URL. If your page has a URL of Bolts-and-Nuts.aspx, an external search is more likely to return that web page when a user does a search for the term “bolts,” because it recognizes the word “bolts” in the URL.
When you are satisfied with the name of your new page, click the Create button.
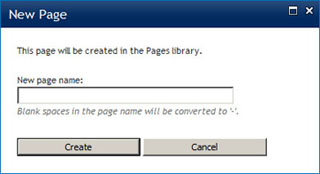
Each site has a default page layout that has been assigned with it. Each new page that gets created will use that page layout by default. However, you can change which page layout your new page uses by clicking the Page tab in the Ribbon and then selecting the Page Layout button in the Page Actions section of the tab. This will present you with a number of page layouts that you can use, as shown in Figure 9-3.
Each heading in the Page Layout selector reflects the kind of page (that is, content type) you want to use, and each kind of page can have multiple visual representations. For instance, an article page is a page used for communicating news article information. A news article has an article title, an article date, and a byline. However, it’s possible to have more than one visual representation of an article. Your article could have an image floating to the right or the left of the page, or it could have no image at all. You can select a new page layout for your page by clicking a page layout from the list of available layouts in the fly-out menu. (As you can see in Figure 9-3, the currently selected page layout, “Body only,” is outlined.)
Using the Publishing Placeholder Controls
A placeholder control is a region on a publishing page where you as an author can place content while editing the page. Three kinds of placeholder controls are unique to publishing sites: the image placeholder control, the rich link placeholder control, and the rich text placeholder control. This section walks you through each of these controls.
Image Placeholder Control
The image placeholder control allows you to place an image on the page. The image must already be stored somewhere within the site collection. When you click an empty image placeholder control, a window pops up that allows you to apply the properties of the image, such as the URL of the image, how the image is aligned, the size of the image, and so on. Figure 9-4 shows this window.

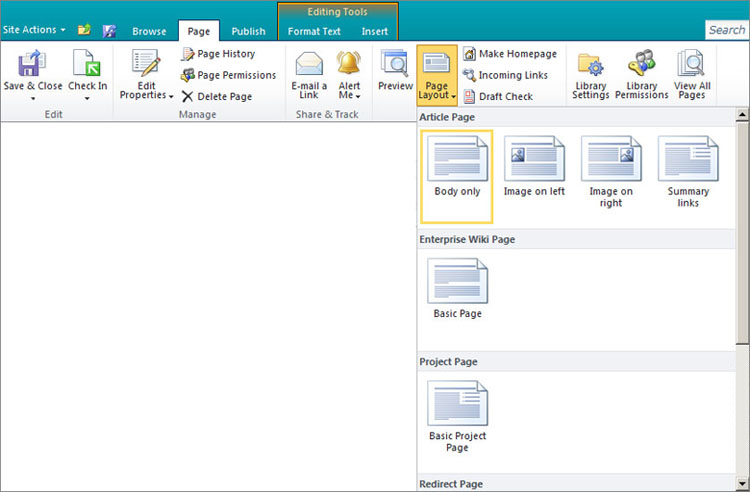
To choose an image from SharePoint, you can click the Browse button next to the Selected Image textbox. This will open another window that displays the tree structure of the site collection hierarchy. This will allow you to browse the site for an image to insert into the page. Typically, that image is stored in the Images library of the current site, or in the Site Collection Images in the top-level site. Figure 9-5 shows this window.
When you have selected an image, click OK to close this window, then click OK to close the first window. This will place the image in the image placeholder control.
Rich Link Placeholder Control
The rich link placeholder control allows you to add a hyperlink to your page. When you want to add a new hyperlink to the control, you can click the text in the control that says Click to Add a New Hyperlink. Doing so opens up a new window (as shown in Figure 9-6) that allows the user to specify the link’s URL and the text of the hyperlink. In addition, the user can also specify whether the link should open in a new window, whether the link should have a tooltip, and whether an icon should appear next to the link if the item being linked to is a Microsoft Office document. (For instance, if the link were to a Microsoft Word 2010 document, the user would see a Word 2010 icon next to the hyperlink.)
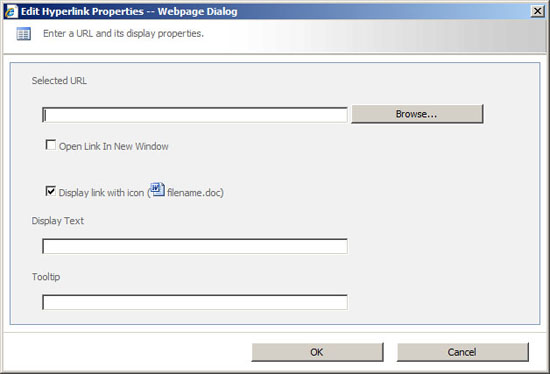
Clicking the OK button adds the link to the rich link placeholder control on the page.
Rich Text Placeholder Control
The rich text placeholder control provides maximum flexibility for authors. This placeholder allows them to insert text, images, links, videos, tables, or Web Parts into their pages. You can add text to the page with the benefit of a Ribbon similar to that seen in Word 2007 or Word 2010. An Editing Tools tab becomes available when you click inside the rich text placeholder control. This Ribbon enables you to select fonts, colors, and sizes, as well as to add bullets to the text, or format the text by making it bold, italic, or underlined. You can also apply unique styles (such as highlighting text) or adding markup styles to the page (such as adding a header using the Heading 1 style.) The Format Tools ribbon used for editing the textual content of the page is shown in Figure 9-7. (Please note that page layout designers can disable various editing features of the rich text placeholder as necessary.)

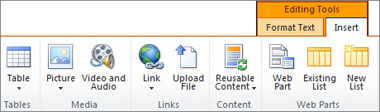
As mentioned, you can add a number of non-textual items to the rich text placeholder control. Images and hyperlinks are added to the rich text placeholder control in the same way they are added to the image placeholder control or the rich link placeholder control. Items can be added to the page using the Insert tab on the Ribbon, which becomes available when a user clicks inside a rich text placeholder control on a page. Users can also add tables, videos, reusable content, and even Web Parts to their rich text placeholder control by using the Insert Ribbon (as shown in Figure 9-8.)
Making Use of Reusable Content
Sometimes you have content that you want to appear on multiple pages in your site. However, you don’t want to have to re-create the same item multiple times on multiple pages. In addition, at times you want to be able to update content easily, from a central location, without having to manually edit, update, and save multiple publishing pages in your site. Luckily, the Reusable Content list helps you do just that. This kind of functionality is perfect for content such as banner ads that you want to place on multiple pages in your site. First, just add a reference to a banner that’s stored in your Reusable Content list to each publishing page on your site where you want the banner to appear. When it’s time to begin a new ad campaign, simply swap out the old image in your Reusable Content list with a new image, and the publishing pages that are referencing the banner in the Reusable Content list will now automatically display the new image instead.
The Reusable Content list lives in the top-level site of your publishing site collection. Because the Reusable Content list is just like any other list in SharePoint, you can add a new item to the list the way you would normally add an item to a list; you navigate to the list, and click the New Item button on the Items tab in the Ribbon. You can choose to add either a string of text or full-blown HTML to your Reusable Content list. (Text would be appropriate for content such as a disclaimer that you might want to appear in the body of multiple pages. HTML allows you to use images, hyperlinks, and so on). If you choose to add reusable HTML, you will see a dialog like that in Figure 9-9.
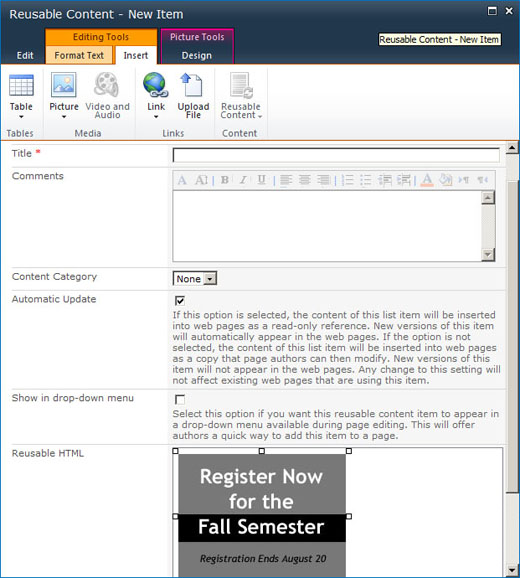
You will notice a checkbox in this dialog called Automatic Update. A thorough explanation of the option appears below the checkbox, which reads as follows:
If this option is selected, the content of this list item will be inserted into web pages as a read-only reference. New versions of this item will automatically appear in the web pages. If the option is not selected, the content of this list item will be inserted into web pages as a copy that page authors can then modify. New versions of this item will not appear in the web pages. Any change to this setting will not affect existing web pages that are using this item.
Another option available for this Reusable Content list item is for this item to be available for easy access when editing a page. You can do this by checking Show in the drop-down menu. Doing so adds your item to a drop-down menu in the editing Ribbon when a user is editing rich content on a publishing page.
You might also notice that the Reusable HTML field functions much like the rich text placeholder field used in publishing pages. You have the ability to add formatted text, images, hyperlinks, tables, or video. If you are carrying out an ad campaign, you might even want to link your image to a page in your site. For instance, the banner ad displayed in Figure 9-9 advertises registration for the fall semester. If users click the banner, you might want them to be taken to a registration page. You can add clickable images to the Reusable Content list.
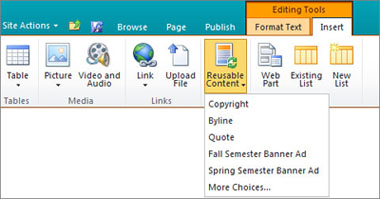
Now that you’ve added an item to your Reusable Content list, it’s time to use it in a publishing page. To do so, edit your page, place your cursor inside the rich text placeholder control, and click the Insert tab in the Ribbon. You will notice a button called Reusable Content. Clicking this button displays a list of available items in the Reusable Content list, as shown in Figure 9-10.
When you add a reusable content item to a rich text placeholder control, you will notice that the item appears slightly grayed out, and has a border surrounding it. This is to notify you, when you are editing the page, that the item is reusable content and needs to be edited centrally from the Reusable Content list, and not from the current placeholder on the page.
Once an item has been added to the Reusable Content list (with the Automatic Update checkbox selected), you can add it to your page and continue editing. If you update the item in the Reusable Content library, that change will be reflected in the Reusable Content list.
Saving Your Changes: Understanding Check-In/Check-Out, Versioning, and Approval
If the Pages library you are working with has check-in/check-out enabled, it means that when you check out a page no one else can work on that page at the same time as you. (If check-in/check-out is not enabled on the library, it’s possible that users could edit the page at the same time and inadvertently overwrite each other’s changes. This scenario is not likely, however, if there is only one content author responsible for the content in a particular site.) Depending on how the Page library is configured, editing a page can automatically check the page out for you.
If check-in/check-out has been enabled, it’s possible to simply save your changes while leaving the page checked out. You can do this by clicking the Save and Close button on the Page tab of the Ribbon. When you do this, you can safely close your browser and return to the page at a later time. However, remember that if you do so, other users will not be able to work on the page until it is checked in.
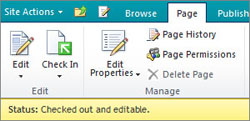
Luckily, you never need to wonder about the status of your page. A notification bar appears below the Ribbon, indicating the status of the page, as shown in Figure 9-11.
In some cases, SharePoint can have two versions of a page available at once. A draft version is available only to content owners, whereas published versions are available to anyone with Read permission. It’s important that you understand how versioning and the approval process have been configured in your Pages library, so you will know when and how your page will be versioned and published. The following list reviews the various scenarios you might encounter and how a publishing page behaves in each scenario.
- Versioning and approval disabled: If versioning and approval are not enabled on a Pages library, every page that gets edited and saved becomes immediately live on the website and available for visitors to view.
- Versioning disabled and approval enabled: If versioning has been disabled, it’s possible for a content author to save the page. The page will not have a version number, but it will not be live on the site until it has gone through an approval process.
- Major versioning enabled and approval disabled: Each time a content author makes changes to the page and saves it, a new whole number (1.0, 2.0, and so on) version of the page gets generated, and the page is immediately live on the site.
- Major versioning enabled and approval enabled: Each time a page gets saved, a whole number version of the page gets saved, but the page is still not live on the site until it has gone through the approval process.
- Major and minor versioning enabled and approval disabled: Each time a page is saved, a draft version of the page is saved. This draft version has an incremental number (such as 1.1 or 1.2). The draft version of the page will be visible to content owners, but will not be visible to general users of the site. However, if a previous version of the page has been published, the published version will still be available on the site for visitors (while the draft version is visible to content owners). For the draft version of the page to be visible on the site, a content author must explicitly click the Publish button on the Publish tab. Once that happens, the incremental version of the page gets converted to a whole number (that is, 1.2 becomes version 2.0) and the new version of the page becomes live.
- Major and minor versioning enabled and approval enabled: Each time a page is saved, a draft version of the page is saved. This draft version has an incremental number (such as 1.1 or 1.2). The page will be visible to content owners, but will not be visible to general users of the site. However, if a previous version of the page has been published, it will still be available on the site for general users. A content owner will submit the draft version of page for approval. Once the page goes through the approval process, the draft number is converted to a whole number, and the new version of the page becomes live.
Scheduling Your Page
Sometimes you want to create a new page, but you don’t necessarily want to publish the page right away. For example, you might have a new promotion on your site and want the promotional page available on Jan. 1, but you want it already built and ready to go ahead of time. SharePoint allows you to do this. It also allows you to specify if the page should be taken down from the site at a particular time. (By default, pages are published immediately and will stay up on the site indefinitely, unless otherwise specified.)
To set the scheduling for a page, navigate to the Publishing tab and click the Schedule button. This will bring up the Schedule Page dialog, as shown in Figure 9-12.

You can see that, by default, the page is set to be published immediately. However, you can specify a date and time when you want the page to go live.
Oftentimes you want to ensure that content does not become stale. Each publishing page has the possibility of having a user assigned to the Page Contact field. If a user has been assigned to this field, the Schedule Page dialog gives you the option of notifying that person on a regular basis, via e-mail, that the page needs to be reviewed. You can specify whether this user should be notified at a specific interval of days, months, or years. By doing this, the user is reminded of the page and can choose to update the content, leave the content alone, or delete the page.
You might also want to specify that a page should expire on a specific date. If you do so, you have the option of notifying the Page Contact user a specified length of time in advance. At that point, the user has the option of deferring the expiration date of the page or removing the expiration date of the page altogether.
If a user without contributor permissions tries to navigate to a page that has been scheduled but is not yet live, or to a page that has already expired, this user will get a 404 error, also known as a “Page not found” error, in his or her browser. To unauthorized users, the page does not exist. If authorized users were to view the Pages library, they would be able to view that publishing page. The Page list item still exists in the Pages library.
If a page has gone through the approval process, but the publication date has not arrived yet, authorized viewers looking at the page will see a message in the status bar saying something like “Status: Approved and scheduled for publication on 3/18/2011 12:00 AM. Publication Start Date: 3/18/2011 12:00 AM.” This clearly indicates that the page has gone through the approval process but is not yet live on the site. In the same way, if a page has expired, a user will see a similar message indicating that to be the case.
You should note several things about page scheduling:
- Both major and minor versioning, as well as content approval, must be enabled on a Pages library in order for publishing pages within that library to have the option to be scheduled.
- You cannot schedule an edit of a page to go live at a particular time. Doing so will take the currently published version of the page off the site until the specified date has arrived. If you want to edit the contents of the page, the changes must be published or approved at the time when you want the updated content to go live.
Approving Your Page
If a Pages library has been configured to require content approval, it’s necessary to initiate the approval process on a publishing page when you are ready for the page to go live. You can do this by clicking the Publish tab of the Ribbon. If the page is not already in an approved state, you have the option of initiating the approval workflow by clicking the Submit button on the Publish tab.
This will bring up a form that you will need to fill out. If the approval process or approval form has not been modified, you will have the following fields to fill out:
- Request: This is where you can add a personalized note to the person or people approving your page. This message will appear in the e-mail notification each approver receives.
- Due Date for All Tasks: This indicates the date by which the entire approval process should be completed. This is especially important if multiple people are involved in the approval process. This notifies approvers that even if one or more of them takes more than the allocated time to approve the page, the entire process should be completed by the date you specify here.
- Duration per Task: This is a number indicating the amount of time each approver has to complete his or her particular approval task.
- Duration Units: This indicates what unit of time you used in your Duration per Task field, whether that’s days, weeks, or months.
- CC: Each approver will receive an e-mail when assigned a new task. This field allows you to send a carbon copy of that e-mail to a particular user.
Once the approval process has been kicked off, a task will be added to the Workflow Tasks list that belongs to the same site to which the publishing page belongs. Additionally, approver(s) will receive e-mail notifications that a new page is awaiting approval.
How do approvers know that pages are waiting for approval? There are several ways:
- They will receive an e-mail notifying them that a page is awaiting approval. The e-mail will contain a link to the page.
- They can navigate directly to the Workflow Tasks library for that site. If users have been specifically assigned tasks, they can navigate to the My Tasks view of the task list and see all the tasks assigned to them. If a user is a member of a group that has been assigned the tasks (such as the Approvers group), this user can navigate to the By My Groups view to see all the tasks that have been assigned to any groups of which the user is a member.
- Approvers can click the Site Actions menu and click the Manage Content and Structure link. This will show them a tree view of the site collection. To the right, they will see a toolbar with a button that says View. When users click that button, they can select the My Tasks view from the drop-down menu. This view will not only show the users any tasks assigned to them in the current site, but it will also show them any tasks assigned to them in any subsite of the currently selected site.
If approvers want to approve or reject the publishing page, they must do so by modifying the tasks list item stored in the Workflow Tasks list. They can do this in two ways:
- They can navigate to the publishing page itself and click the Approve or Reject buttons on the Publishing tab of the Ribbon. This will take them to the task form.
- They can navigate directly to the Workflow Tasks list and view the task form.
If approvers want to leave comments regarding why they took the action they took, they have that option in the workflow task form. They also, by default, have several other options available to them:
- Approve: This approves the item. If the approval process is tied to the publishing process, this will make the page live on the site.
- Reject: This does not allow the page to advance through the approval process.
- Cancel: This allows the user to close the task form.
- Request Change: This keeps the workflow going, but notifies the author that a change is required before the page can be approved.
- Reassign Tasks: This allows the approver to assign this task to some other user.
Once the approval process has been completed, a message will be placed in the Workflow History list saying that the workflow completed properly. You can view the workflow history for a given page by clicking the Status button of the Workflows section on the Publish tab.
Now that you have walked through the basic process of creating, editing, scheduling, and approving a publishing page, it’s time to talk about how you can configure a publishing site collection, a publishing site, and a Pages library.
Creating a Publishing Site
Before any SharePoint site can be created, a site collection must be in place. The easiest way to get a publishing-enabled site is to create a new site collection using the Publishing Portal template, as shown in Figure 9-13. A farm administrator can do this from Central Administration.

This site collection template will automatically create a top-level publishing site, activate the proper features, and create a sample subsite called Press Releases, as well as a Search Center site for searching.
Each publishing site collection must have, at a minimum, the SharePoint Publishing Infrastructure Site Collection feature enabled. This feature, among other things, ensures that the site collection lists and libraries (mentioned previously in the “Publishing Lists and Libraries” section of this chapter) are created.
Once you have your top-level site, you can start creating child sites. You have two choices when creating a publishing site (as shown in Figure 9-14): you can create a site using the Publishing with Workflow site template or you can create a site using the Publishing Site site template.
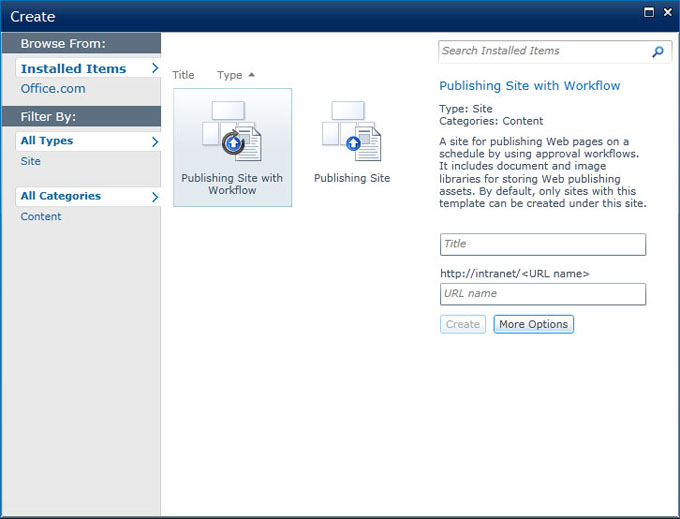
The Publishing Site with Workflow template will create a new publishing site. In that site, any publishing page that gets created in the Pages library will automatically be routed through an approval workflow. It’s possible to modify that workflow, as discussed later in this chapter, as well as to disable or remove it.
The Publishing Site template creates a publishing site without any sort of approval workflow attached to the Pages library. It’s possible to create an approval workflow and attach it to the Pages library after the fact, if this template is chosen; this simply means that the process of attaching the workflow is manual, instead of the workflow’s being automatically wired up, as it is in the site created with the Publishing Site with Workflow site template.
For a site to have publishing enabled, it must have a site-scoped feature, SharePoint Server Publishing feature, enabled. As mentioned previously, each publishing site (as opposed to site collection) has the following three libraries automatically added: Pages, Documents, and Images. The SharePoint Server Publishing feature ensures that these libraries are available in the site.
Setting the Site Homepage
Because a SharePoint site’s URL is tied to its site structure, it’s possible that a user might try to browse to a site by typing in a URL that ends with a slash (“/”), such as http://www.wrox.com/Books/. However, it’s not possible to browse a site; users can only browse pages. Because that’s the case, every site needs to have its own homepage, also known as a welcome page. The purpose of the welcome page is to give users a page that they can be redirected to when they navigate to a subsite. Imagine that a page called Homepage.aspx has been set up as the welcome page for the Books subsite. Anyone browsing to http://www.wrox.com/Books will be automatically redirected to the publishing page with a URL of http://www.wrox.com/Books/Pages/Homepage.aspx.
You can set the welcome page for a site in two ways using the browser. The first is to navigate to the page that you want to serve as the site’s homepage and display the Ribbon on the page. You can click the Make Homepage button on the Page tab of the Ribbon to make that page the site homepage. (Remember, this is the homepage for the particular subsite you are browsing, not for the entire site collection.)
Another way to modify the welcome page for a site is to navigate to the Site Settings page, then click the Welcome Page link under the Look and Feel heading. This will take you to a page that lets you browse to the page that you want to serve as your welcome page.
Modifying the Site Master Page and Style Sheet
Because publishing sites are often used for public-facing websites, site owners frequently want their sites to have a custom look and feel that doesn’t make users feel as if they’re navigating a typical SharePoint site. The easiest way to customize the look and feel of a site is to create a custom master page and custom style sheet for your site. Once you have done so, a site administrator has the option to easily select and apply a master page and/or a style sheet to a particular site or site hierarchy.
As with many other properties of a SharePoint site, the master page or style sheet selection can inherit its setting from its parent site. Additionally, a user has the option to reset the settings of all subsites below the current site to use the same settings as the current site.
To change the master page and style sheet that a site uses, navigate to the Site Settings page for your site and click the Master Page link under the Look and Feel section. This will take you to the Site Master Page Settings page, as shown in Figure 9-15.

In the first section, called Site Master Page, you can choose for this site to use the same master page as its parent site by selecting the radio button titled Inherit Site Master Page from Parent of This Site, or you can specify your own master page by selecting the radio button titled Specify a Master Page to be Used by This Site and All Sites that Inherit from It. A drop-down menu will allow you to select a master page from any of the approved master pages in the site collection’s Master Page gallery. Regardless of which radio button you choose, you can check the checkbox labeled Reset All Subsites to Inherit This Site Master Page Setting. This will propagate your setting to all child sites.
In SharePoint, the master page used for administrative pages, such as the Site Settings page or the View All Site Content page, is different than the master page used for publishing pages. In the System Master Page section, you have the ability to specify which master page your system pages will use. The settings for this section are identical to the settings for the previous section.
At the bottom of the page, in a section titled Alternate CSS URL, you have the option to specify a style sheet that will be used with your site. You have three options:
- Inherit Alternate CSS URL from parent of this site.
- Use Microsoft SharePoint Foundation default styles.
- Specify a CSS file to be used by this publishing site and all sites that inherit from it. After this third option, you can browse the site to find the CSS file you would like to choose. Typically, CSS files are stored in the Style library in the root of your site collection.
As with the master pages, you can choose to select a checkbox to indicate that you want to reset the CSS settings for all this site’s subsites.
WHEN WOULD YOU USE SEPARATE MASTER PAGES OR CSS FILES WITHIN A SITE COLLECTION?
In many publishing sites, the entire site collection will use a single master page and style sheet, so as to implement a unified look and feel across the site. However, it can be advantageous at times to use separate ones. This can be the case if you have multiple subsites that should intentionally have a different look and feel. For instance, a corporation might have a single site collection, and each product line might have its subsite and child sites. Each product line might need its own custom look and feel for its site hierarchy.
When it comes to style sheets, the style sheet used by a particular master page is often referenced directly in the master page itself, so it’s not necessary to explicitly set the style sheet using the Site Master Page Settings page. However, at times you can leverage the “cascading” functionality of cascading style sheets.
For instance, you might have a “base” style sheet, referenced inside your master page, which helps position elements on the page and set default font colors and sizes. However, for each subsite you might want to specify a separate font header style, so each subsite’s page titles appear in a different color from the others. You could easily create a small style sheet for each subsite, adding a class that overrides the header style. Then you could tell each subsite to use its own custom style sheet, using the Site Master Page Settings page. When SharePoint outputs the styles to the browser, the base style sheet’s reference will be added to the page, and the custom style sheet reference will be added afterward, ensuring that the secondary styles override the primary ones for that particular subsite.
Modifying Available Page Layouts and Site Templates
Sometimes you, as a site administrator, will want to limit the kinds of pages or sites available to users when they want to create something new. For instance, if you have a subsite called Press Releases, you might want to ensure that users can only create pages with a page layout of Article with Image on Left, so that users won’t be tempted to create a page using a page layout that wouldn’t be appropriate in that location, such as an About Us page layout. In the same way, you might create a subsite where people are allowed to create new blogs. However, as in the previous example, you might want to prevent users from creating a blog subsite inside the Press Releases subsite.
To specify which page layouts and site templates people can use when creating new pages or sites, browse to the Site Settings page for your publishing site, and click the Page Layouts and Site Templates link under Look and Feel. This will take you to the Page Layout and Site Template Settings page.
When setting which site templates users can use, you have three options:
- Inherit settings from the parent site.
- Allow users to use any site template which is installed in the site collection.
- Manually specify which particular site templates users can use. If this option is chosen, you can add or remove site templates from the list of available site templates.
You have the option of checking a checkbox to indicate that you want your choice propagated to all sites below the current one.
The same three options are available for page layouts. In the same way, you can manually specify which page layouts people can use, and reset all the current site’s subsites to use the current setting.
When a user creates a new page in a site, the user doesn’t have the ability to choose a page layout right away; a page is created using a predetermined page layout, and the user has the option of changing it. The last setting on this management page allows you to specify which page layout will be used by default when a user first creates a page in this subsite.
Modifying Site Navigation
Navigation in publishing sites is slightly different than navigation in other kinds of SharePoint sites. The navigation is not driven by a Quick Links list. Rather, the navigation is driven by the site hierarchy of your site collection, and the publishing pages that are a part of each site within that hierarchy.
Each subsite can have its own navigation settings. As with many other settings in SharePoint, child sites can inherit the properties of their parent sites, or they can have their own settings.
To modify the navigation of a particular site in your site collection, navigate to the Site Settings page for that site, and click the Navigation link under the Look and Feel heading. This will bring up the Navigation Settings page, shown in Figure 9-16.

Global navigation is the term given to the navigation that usually sits at the top of a page. Current navigation is the term given to the navigation that usually sits on the side of the page. In many sites, the top navigational elements remain static throughout the site collection, no matter where a user is within the site hierarchy. In the same way, the current navigation is often contextual, meaning the navigation will change based on where the user is within the site collection.
When you are modifying a site’s global navigation, you have one major decision: do you want to inherit the same navigation settings from the parent site or do you want to configure the settings especially for this site (and for any sites below this site that inherit this site’s settings)? To inherit the global navigation settings from the site’s parent site, you can simply select the radio button that says Display the Same Navigation Items as the Parent Site. Once you have done that, all your other options are grayed out or disappear.
If you are modifying the top-level site of your site collection (and have no other site to inherit settings from), or if you want unique global navigation settings for your site, you can choose the second radio button in the Global Navigation section, which reads Display the Navigation Items below the Current Site. At this point, you can choose for SharePoint to automatically display either sites, pages, or both, within the global navigation. If you choose for SharePoint to automatically show subsites or pages, you can also set a threshold value as to the maximum number of dynamic items for SharePoint to show.
Because items (either sites or pages) might be added automatically by SharePoint to the navigation without being explicitly added by you, it’s important to specify how those items are to be sorted. You have several sorting options, which can be set in the Sorting section of the page. If you choose for SharePoint to sort the items automatically, you can specify that the items be sorted by their titles, the date they were created, or their last modified date. Furthermore, each of those values can be sorted in either ascending or descending order.
SharePoint also provides a helpful hybrid approach; you can choose to manually sort the subsites within your navigation, but still have SharePoint automatically sort any new pages that get added to your site. In many publishing site collections, subsites are set up when the website is first created, and it’s important to the site owner that the subsites are listed in a particular order. However, as the site grows and content authors create new pages, those new pages can be automatically added to the navigation in a sorted order when this option is selected.
Choices made about sorting will also apply to the current navigation, whose settings can be modified in the Current Navigation section of the page. When configuring the site’s current navigation, you have the same options as with the global navigation, in terms of choosing to automatically display any subsites or pages automatically. You have three fundamental options to choose from when setting up your current navigation:
- Display the same navigation as the parent site.
- Display the current site, the navigation items below the current site, and the current site’s siblings.
- Display only the navigation items below the current site.
Learning how this works is best understood with examples.
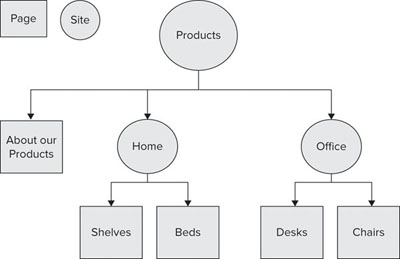
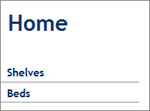
Figure 9-17 shows a sample site hierarchy that includes both sites and pages.
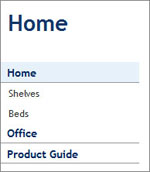
If you are browsing in the Home subsite, and you select Display the Same Navigation Items as the Parent Site, you might see current navigation that looks like Figure 9-18.

If you are browsing the Home subsite, and you select Display the Current Site, the Navigation Items below the Current Site, and Current Site’s Siblings, you might see something like Figure 9-19.
Notice that in Figure 9-19, you don’t see the pages inside the Office subsite. That’s because this navigation option shows only the sibling sites to the Home subsite, but doesn’t display everything inside those sites.
Finally, if you select Display Only the Navigation Items below the Current Site, you would see something like Figure 9-20.
Once you have set up the automatic configuration of your global and current navigational elements, you have the option to manipulate the settings further. Using the Navigation Editing and Sorting section of the Navigation Settings page, you can do the following:
- Hide an item so it doesn’t show up in the navigation. This is helpful for subsites such as Search. If your search box appears on the master page of your site, it’s therefore on most of your site pages, so you might not want it to appear in the global navigation, even if you told SharePoint to automatically display subsites.
- Move an item up or down. This option is available only if you chose Sort Manually in the Sorting section.
- Manually add a link. This is helpful if you want to include a link to a page located within a different subsite in SharePoint, or if you want to link to an external web page.
- Manually add a heading. If you want to add links manually, you can also manually add a heading. When this is done, a heading with links looks to the end user just like a subsite with pages.
The last navigation setting on this page allows you to specify whether the Show Ribbon and Hide Ribbon commands should be available from the Site Actions menu for that site.
Modifying Pages Library Settings
This section reviews some of the Pages library settings that are relevant to a publishing site. All these settings are accessible from the Document Library Settings page for each Pages library.
Several administrative pages are quite straightforward. If you click the Audience Targeting Settings link, you are taken to a page where you have a checkbox indicating whether the Pages library should utilize audience targeting. All Pages libraries utilize audience targeting, so it’s not necessary to modify this value. If you click the Manage Item Scheduling link, you are taken to a page with a checkbox that indicates whether or not you want page authors to utilize page scheduling.
Versioning and Approval
The importance of versioning and approval in the publishing process has already been described previously in this chapter. To configure the versioning and approval settings, click the Versioning Settings link under the General Settings section on the Document Library Settings page. (You can get to the Document Library Settings page of the Pages library by navigating to the Pages library, then selecting the Library tab and clicking the Library Settings button in the Settings section of the tab.)
It is here that you can specify whether or not publishing pages require content approval, by selecting a radio button response of Yes or No to the question, Require Content Approval for Submitted Items? Configuring the actual approval workflow can be done from a different configuration page, as described in the section in this chapter titled “Modifying the Approval Workflow,” which you can find later in this chapter.
The next part of the page allows you to specify whether you want versioning enabled at all in the library, and if you do want it enabled, whether you want major and minor versions of pages to be created or just major versions.
Because additional versions of pages can take up database space, as well as make for a “cluttered” user experience when viewing past versions of a page, it’s possible to limit the number of major and minor versions of a page that SharePoint will retain.
The next section on the Versioning Settings page, Draft Item Security, allows you to configure security for those items that have been saved but have not gone through any approval or publishing process; they are still considered in a draft state. You have three options:
- Allow anyone who has read access to the site to see a draft version of the page.
- Allow any user who has permission to edit the page to see a draft version of the page.
- Allow only the author of a page and whoever is supposed to approve the page to be able to see the draft version of the page.
Typically, in a publishing site, you don’t want end users to be able to see draft versions of content, so the first option would not be optimal. By default, the second option is selected.
Understanding Content Types and Columns in the Pages Library
Each publishing page in SharePoint is associated with a particular content type. If a page is added to your Pages library, and its particular content type has not yet been used in the site, that content type will be added automatically to the list of available content types in the library the first time that page is created. Each time a new content type is added to the Pages library, any columns belonging to that content type, and which have not yet been added to the Pages library’s list of available columns, will be added.
This is important for several reasons. First, remember that only certain users have permission to modify library settings. Often, users with contributor rights do not have permission to add content types or columns to any list, including the Pages library. What this means is that if a user with only contributor rights tries to add a page with a new content type to a Pages library, this user might encounter an error, or SharePoint might prevent the user from saving the page using the content type desired.
It’s also important to understand about content types and site columns in a publishing site because future updates to content types and site columns are affected by it. When a new content type is added to the Pages library, in actuality a copy of that content type is being added to the library. In the same way, a copy of any site column is being added to that library. Why is this important? If you update the parent content type or site column, from which the Pages library content type or site column has been copied, the change will not automatically be updated in every Pages library. You must ensure that changes made at the site collection or site level are pushed down to all libraries (including Pages libraries) that use them. This is especially important if you add a new site column to a content type. Because a content type’s columns were added to the Pages library when that content type was first used, SharePoint might not know that it needs to update the Pages library with a new site column when you add a new site column to a content type at the site collection level.
Modifying the Approval Workflow
By default, when a site is created using the Publishing with Workflow site template, the Pages library is automatically associated with a default Approval workflow. This workflow assumes that pages must be approved by any user who has been assigned to the SharePoint group for Approvers. Luckily, it’s possible to modify the approval workflow settings for each individual Pages library.
To do so, click the Workflow Settings link under the Permissions and Management section on the Document Library Settings page of your Pages library. You should see a workflow entitled Page Approval. Click that workflow name to modify it.
The first settings on this page are quite similar to the workflow settings you would see for nearly any out-of-the-box workflow for SharePoint. The key thing you want to note on this first page is the checkbox that says Start this Workflow to Approve Publishing a Major Version of an Item. If you want your workflow to be tied to the publishing process of a page, it’s important that you leave this checkbox checked.
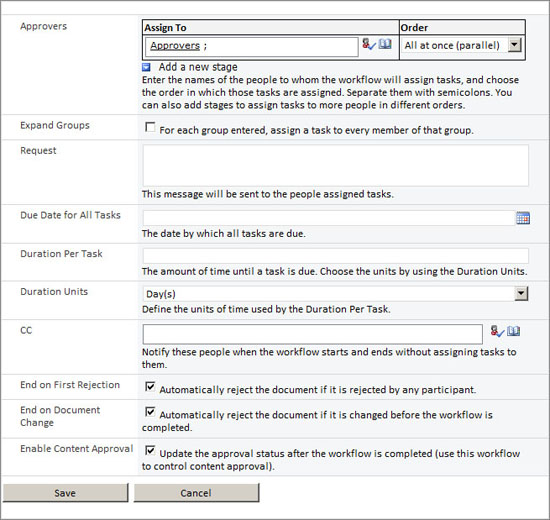
If you click the Next button at the bottom of the first administration page, you will be taken to another page, which looks like the page shown in Figure 9-21.
One of the first things you must decide is how many stages you want in your approval process: that is, how many times does the item need to pass approval?
The next thing you need to understand is the difference between serial and parallel approval. Serial approval means that first Person A approves the item, and then Person B approves the item. If Person A rejects the item, Person B will never even know the item was waiting for approval. Parallel approval means both Person A and Person B must approve the item, but the order in which they approve it doesn’t matter. If they both approve the item, it advances to the next stage. (You can read examples of serial and parallel approval in “The Association Process” section of Chapter 16.)
The first section of the workflow configuration form allows you to create different stages in the approval process. For each stage, you can specify who is a part of that process, and whether the people or groups listed must approve their tasks in serial or parallel order.
The next checkbox on the page allows you to tell SharePoint whether it should assign a separate task for everyone who is a member of a group that has been added to one of the stages specified in the previous section. Say you have a group called Approvers, and Approvers contains two users: User Y and User Z. If the Approvers group has been assigned to a stage in the workflow and the Expand Groups checkbox is unchecked, it doesn’t matter whether User Y or User Z approves the page; as long as one person in that group approves the page, that stage has passed approval. However, if the Expand Groups checkbox is checked, both Users Y and Z would receive a task, and they both would need to approve the item before it could pass that stage of approval.
It’s generally best practice to assign a group, rather than individual users, to an approval process. This ensures that if a person becomes unavailable for a time, some other user can be added to the group and carry out the approval workflow in the first person’s absence.
If no users have been added to a specific group that was assigned to the workflow, it will automatically progress to the next stage of approval.
The next section allows you to set a due date for all tasks. Because you’re not actually configuring a particular workflow instance right now, but you’re modifying the workflow template for all the publishing approval workflow instances that take place in this library, it usually doesn’t make sense to populate this field with a date.
If you wanted to set a default duration for each individual task, you could do it here, by modifying the Duration per Task and Duration Unit fields.
As with the Due Date for All Tasks, it doesn’t usually make sense to specify a user to copy an e-mail to, unless you want that person to be notified about every single approval workflow that gets executed for every page in the site.
At the end of the workflow configuration page, you have three checkboxes available:
- Automatically reject the document if it is rejected by any participant.
- Automatically reject the document if it is changed before the workflow is completed.
- Update the approval status after the workflow is completed (use this workflow to control content approval).
It’s advisable that the last checkbox always remain checked for publishing sites if you want this approval process to tag into the publishing process.
SITE ORGANIZATION, HIDDEN FIELDS, AND THE CONTENT QUERY WEB PART
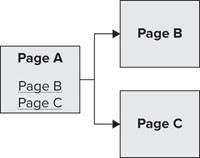
When the World Wide Web was new, every web page was static, and the power of the Web lay in the ability to hyperlink to different pages. What this meant was that if you created a new page called Page A, and you wanted to create a link to Page B, you had to edit Page A and hard code a link to Page B on that page. Figure 9-22 gives you an idea of what this looks like.
In contrast, think about object-oriented programming. You might have an object whose type is “Car.” That Car type has properties for Number of Doors, Paint Color, and Miles per Gallon. You could create an instance of that car object and assign each of those properties a value: 4 doors, red paint, 28 MPG. You could actually create 20 different instances of your Car object. What if you needed to find out what’s in your fleet of cars? You would loop through each of your objects and retrieve each object’s property values. This looks more like what’s shown in Figure 9-23.
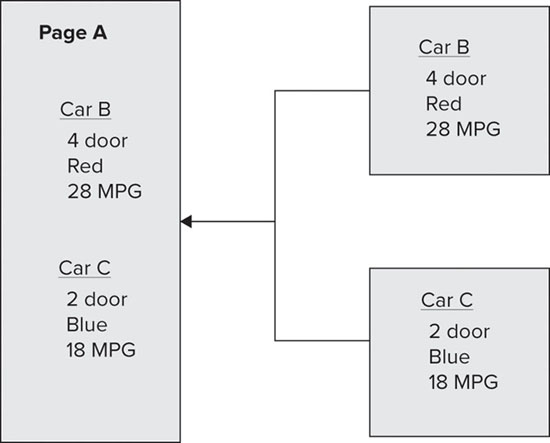
Publishing sites are meant to work much the same way. Each publishing page is an item in a list, and works like an object, and each field that you fill in on a page is like setting a property for that page. Each time you add content to a content placeholder on your page, you’re actually adding content to a column in the page’s underlying list item. In fact, you can easily find out what column values have been populated for your page by clicking the View Properties button of the Ribbon when looking at a publishing page. Figure 9-23 showed you an example of what the properties of a publishing page might look like.
In Figure 9-24, the Page Image field contains an image that was added to the page using a rich image placeholder control. On the Properties page, it’s easy to see that the image is simply a value assigned to the Page Image column.

In the same way that you looped through your Car objects to retrieve their property values so you could display those values on Page A, you could loop through publishing pages to retrieve their column values in order to display those column values from other pages on Page A, as represented in Figure 9-25.

This is important to know because a key feature of SharePoint is the ability to categorize and display information in a variety of ways. More importantly, once this categorization has been implemented, SharePoint can automatically handle the display of new or updated content. You no longer have to “hard code” links to other pages; SharePoint will do the linking for you.
This can work its way out in a variety of scenarios. Imagine that you have a SharePoint site for a company that has multiple subsidiaries. Each subsidiary has its own press releases that it displays on the site. Each time a new press release is written, it gets added as a publishing page in the subsidiary’s Pages library. In this scenario, you might want to have a “rollup” page that displays a list of all the press releases that have been released for a given subsidiary in the last year. At the corporate level, however, you might also want to display a list of all the press releases that have been released in the last year across all subsidiaries. Imagine how much work it would be to have to update multiple pages each time a new press release got added to a subsidiary’s site. Instead, SharePoint allows you to give it instructions telling it which content to retrieve and display. When a user clicks a link to a publishing page, that link goes to a specific destination in a specific subsite; however, links to that page can show up throughout the site collection, providing multiple avenues to get to that same information.
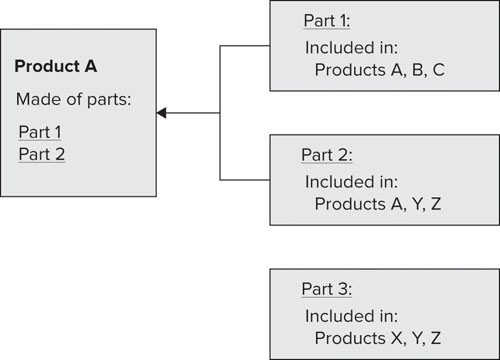
Here’s another scenario in which this functionality could be helpful. Say you had a site that displays product information. Each product is made up of several parts. When users view a product, they should be able to click a link for each constituent part, with that link taking them to detailed information about that part.
How could this second scenario happen? Imagine that each time users created a new page using the Parts page layout, they had the option to select one or more products in which the part is included, from a checkbox list. (This checkbox list is actually a site column of the multi-choice type, and all the available products have been preconfigured as choices in this column.) When someone visits a product page, SharePoint simply retrieves all the Parts pages in the site, then looks to see which products have been selected in the Products column of each Parts page. If the current product has been checked in the Parts page, SharePoint displays a link to that Parts page on the product page, as shown in Figure 9-26.
Using Hidden Fields
Although it would be possible to have users edit column values for a publishing page using the Edit Properties dialog, that’s not the most user-friendly experience. One of the key benefits of using page layouts is that authors get to edit the contents of a page within a page that looks very similar to what the page will look like when it’s published. Because each field that a user edits is also visible to end users, how can you assign these “behind the scenes” column values?
SharePoint provides a special control that a page layout designer can put on the page. This control shows up only when an author is editing the page. In this way, authors can enter content into the page that will not be displayed on the page itself when the page is in display mode, but that can be used when that page is retrieved from another place in the site to display its data. To view this in action, try editing a page layout that uses the out-of-the-box Article content type. At the bottom of the page you’ll see a special area (as shown in Figure 9-27) where a user can add a thumbnail image to the page. The thumbnail image will be added to the Rollup Image column for this particular page.

Although the rollup image that has been added to the page in Figure 9-27 will not be visible to end users who visit the page itself, that thumbnail image can still be used elsewhere in the site. Figure 9-28 shows a Content Query Web Part that has been added to the site’s News homepage and has retrieved several news articles from the current News subsite. You can see that it has retrieved and displayed this thumbnail picture from the news article it retrieved. (If users click the name of the article “New Product Released!” they will be taken to the page itself, but they won’t see the thumbnail picture on that page.)

Configuring the Content Query Web Part
Now that you have entered content into your page — content that you can retrieve from other locations within your site collection — you have the opportunity to leverage the Content Query Web Part (CQWP) to do the heavy lifting.
The CQWP is a powerful tool for publishing sites. Its power lies in its flexibility. The CQWP allows you to configure a query that can be executed directly against the content database with which you’re working. The results are returned as a string of XML, which can be styled using an XSL style sheet. To sum up, the CQWP can return almost any list item in the site collection and give you the flexibility to render that list item’s properties in the browser just about however you’d like.
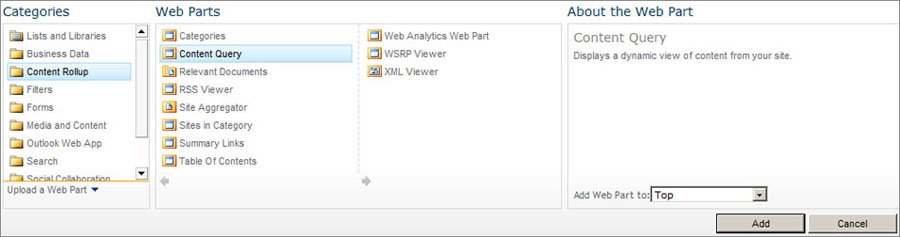
When adding a new Web Part to your page, and to select the CQWP in particular, click the Content Rollup category, then select Content Query from the list of available Web Parts, as shown in Figure 9-29.
Once you have added the Web Part to your page, you can modify its properties.
The first section you’ll come across in the CQWP tool pane is titled Query, as shown in Figure 9-30.
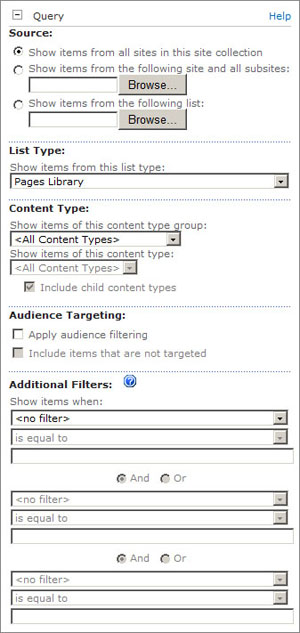
The first choice you’ll have to make is where your list items will come from. You have three choices:
- Show items from all sites in this site collection: Items can come from anywhere in the site collection, regardless of which site or subsite they might be in.
- Show items from the following site and all subsites: Items must come from a particular site within the site collection. Additionally, items will be returned from any subsite that is in the hierarchy of the chosen site. This option allows you to browse the site collection to find the site you would like to select.
- Show items from the following list: Items will be retrieved only from a particular list. Just as with the previous choice, this choice allows you to browse the site collection to find the list you want to query.
The next choice you’ll need to make is the type of list from which you want to pull your items. If you chose to retrieve items from a particular list while setting the Source property, this drop-down menu will be grayed out, because it’s clear which kind of library you’re querying. Otherwise, you will see different kinds of lists or libraries, such as Pages library, Document library, and so forth.
The section in Figure 9-30 below List Type, called Content Type, allows you to specify if you only want items returned when they have a particular content type. The kind of library you choose in the List Type section is important because your choice of list will dictate the kind of content types you have available to choose from. For instance, if you want to retrieve items from any list that was generated from the Custom List definition, those lists won’t contain documents. As a result, you won’t have the choice of retrieving items that have a content type of Document. If you say you want to retrieve items from a Pages library, then most likely you are trying to retrieve publishing pages. If that’s the case, you can specify that you only want to retrieve publishing pages that have a particular content type, such as Article Page. You also have the option of telling SharePoint that you want to retrieve any list item that’s returned from the kind of list you chose, regardless of its content type.
If you have chosen a particular content type, you also have the option of telling SharePoint to retrieve any items whose content type inherits from the kind of content type you chose. For instance, if you chose the Page content type, and then checked the checkbox that says Include Child Content Types, your query will return any publishing page, whether the content type was Article Page or Welcome Page, because both those content types inherit from the Page content type.
The nearby section called Audience Targeting tells you about enabling audience targeting on the Web Part. Audience targeting works differently for the CQWP than it sometimes works for other types of Web Parts. Typically, if a Web Part has had audience targeting enabled, it means that the entire Web Part will appear on the page only if a user belongs to an audience to which the Web Part has been assigned. In the CQWP’s case, the Web Part will show up for everyone, regardless of their audience membership. However, the results will be trimmed according to the user’s audience. It’s possible that some pages won’t have any audience assigned to them. If that’s the case, you have the choice of determining whether those kinds of pages should be displayed or not displayed, by default.
AUDIENCE TARGETING
Just as with other values that have been assigned to a page, leveraging audience targeting in your publishing site depends on authors assigning the appropriate audience or audiences to each publishing page they author. For example, an author could create a page and assign it to an audience called Vendors.
If audience targeting has been enabled on the CQWP, the Web Part will find out who is currently logged in to the site and looking at the Web Part. It will then determine which audiences the current user is a member of. If the current user (John Doe) is a member of the Vendors audience, he will see the page that was authored and assigned to the Vendors audience. If the page has been targeted to an audience of which John is not a member, he won’t see the page in the list of pages displayed in the CQWP. Keep in mind that other pages may or may not show up in the CQWP. Each page that’s pulled into the Web Part is being evaluated in the same manner.
Audience targeting is not the same as security. If John were to navigate to the page itself, he would have permission to view it, even if he wasn’t in the page’s target audience. The target audience setting simply tells Web Parts such as the CQWP whether the content is relevant for the current user.
One more thing to note: a user can only be a member of an audience if the user has logged in. You cannot effectively use audience targeting in a site where users are “anonymous,” or not logged in.
The final choice you have in the Query section of the CQWP tool pane is how you want to filter your results, if indeed you want to filter them. For each filter, you can specify a field to filter by (such as Article Date), an operator (such as “greater than or equal to”), and a value (such as “1/1/2011” or “[Today]”). If you have told SharePoint that you want to query items from a particular list or a particular content type, the list of available fields to filter by will be determined by your choice.
The next major section of the CQWP tool pane is called Presentation. This section allows you to group and sort items, as well as determine other aspects of the pages’ presentation in the Web Part. You can see this section of the tool pane in Figure 9-31.

Under the Grouping and Sorting heading, you have the choice of grouping items by a particular column, in either ascending or descending order. You can also specify the number of columns that you want your results to be displayed within. In addition, you can specify if you want your items sorted, in either ascending or descending order, by a particular column. You can also decide whether there is a limit to the number of items to be returned. (This is often critical when retrieving items. If you don’t limit the number of items returned, your Web Part could show increasingly more items, because the CQWP does not implement any paging mechanism.)
The next section of the Web Part allows you to choose from various predetermined styles. If your items are appearing in groups, you can choose how your group will look (by selecting an item from the Group Style drop-down menu). Each item will be rendered according to the choice you select from the Item Style drop-down menu. (For instance, Figure 9-28 is using the item style titled Image on Left.)
Each of these styles is chosen from several XSL style sheets stored in the Style library in the root of your site. It’s possible to modify your available styling options by modifying these style sheets, or by modifying the CQWP properties to point to a new style sheet of your choosing. (You can learn more about how to customize the CQWP by reading the online documentation at http://msdn.microsoft.com/en-us/library/ee558385.aspx.)
Each XSL style sheet that renders the list items provides tokens that essentially tell SharePoint something along the lines of “the title of the page goes here” and “the image of the page goes here.” The CQWP will look at the item style that you chose, and find out which pieces of information the style sheet needs for that item style. You can then map each of these “placeholders” to a column. For instance, if you look again at Figure 9-31, you can see that the XSL style sheet needs a description. In this case, the contents of each page’s Comments column will be displayed when the XSL style sheet is looking for a description. Looking back at Figure 9-28, the Comments column of the first page read, “Please welcome Jim Wesson, our new Customer Service department manager, to our team.” The second page’s Comments column read, “Our latest product was released this week. Read all about it!”
The last section of the Presentation section of the CQWP tool pane concerns Really Simply Syndication (RSS). It’s possible to turn on an RSS feed for your particular CQWP. One reason people like RSS is that it allows them to read new information when it’s published. Because your CQWP will dynamically display new publishing pages when they become available, this can be a simple way for users to be notified of new content on your site. By checking the Enable Feed for This Web Part checkbox, you are turning on an RSS feed for this CQWP. You can specify a title and description for this feed.
CONTENT TYPE AND COLUMN PLANNING
As you can see, the CQWP enables you to retrieve list items, including publishing pages, from all over your site collection. However, much of this functionality is dependent on filtering your result sets by content type or site column. Because of this, it’s critical that you plan your content types and site columns ahead of time to accommodate list items being retrieved by the CQWP.
For instance, if you have two different kinds of pages and want both to show up in the same CQWP, maybe you need to create a parent content type with two child content types that inherit from that parent content. In that case, you could set your CQWP to retrieve any pages that use that parent content and any inherited contents. For example, if you wanted to display both appetizer and dessert food items in a CQWP, you could create a Food content type, and then create Appetizer and Dessert content types that each inherit from the Food content type. You could then set up your CQWP to display any pages that use the Food content type, or any content types that inherit from the Food content type.
In the same way, if you want to display only pages that describe classes available this semester, you need to ensure that your Class Publishing Page content type has a column called Semester, where a content author can specify which semester the class is for.
Careful planning is key, because it’s much more difficult to edit existing content with new values after the content has been created. It’s much better to plan your content types and columns ahead of time.
This section briefly mentions some of the more advanced topics regarding Web Content Management in SharePoint 2010. If you want to learn more about each of these topics, please read Andrew Connell’s book, Professional SharePoint 2007 Web Content Management Development published by Wrox. Although the book was written for SharePoint 2007 and not SharePoint 2010, many of the core concepts have not changed between versions of SharePoint.
Anonymous Access
Many publishing sites are used for public-facing websites. Often these websites should be available for general users to access information. This means that users should not have to log in to the site to access the publishing pages on the site, and these users are therefore considered anonymous.
Anonymous access must be granted in two places in order for anonymous users to have access to your site: at the web application level (that is, in IIS) and in any site collection within the web application that anonymous users will be accessing.
To modify a web application’s settings, log in to Central Administration and click the Application Management link, then click the Manage Web Applications link. Select the particular web application whose settings you want to modify from the list of web applications. Each web application can have multiple zones. (Zones allow users to access the same site content using different authentication mechanisms.) The first thing you need to do is to tell SharePoint which zone you want to set up for anonymous access. To do so, click the Authentication Providers button on the Web Applications tab. This will bring up a dialog that displays which zones have been configured for the web application. Choose a zone to modify by clicking its name. This will bring up the Edit Authentication dialog, as shown in Figure 9-32.

Check the checkbox that says Enable Anonymous Access and save your changes.
Now that you have granted anonymous access to your web application, you can give your site collection anonymous access as well. You can do this by navigating to your site collection’s Site Permissions page. You will see a button in the Ribbon called Anonymous Access. This will pop open a dialog that allows you to grant three types of access for anonymous users:
- Access to the entire website.
- Access just to lists and libraries.
- Access to nothing.
Typically, in a public-facing website, you want anonymous users to have access to the first setting, the entire website. However, you don’t want users to be able to navigate to administrative pages, such as the Pages library list view. You can lock down your site collection so that anonymous users have permission to view only publishing pages on your site, and that’s it. You can do this by activating the ViewFormPagesLockDown feature on your site collection.
Content Deployment
In the majority of SharePoint environments, it’s permissible to allow anonymous users to access a public-facing website using a particular URL, and then allow content authors to access the same site collection content using a different URL. Content authors can be authenticated and begin the publishing process. There’s no need to move content from one server to another, because SharePoint handles things like versioning and approval (as discussed earlier in the chapter) so end users don’t see unpublished content.
However, some sites require tighter security. In some cases, there needs to be no way for content authors to edit content outside their corporate firewall. If this is the case, it’s possible to actually ship approved content from one SharePoint server farm to another. When this happens, the external farm can have no form of authentication enabled, so external users can have no way of editing content on the public site. Instead, content is authored within the firewall, and once published, a timer job moves content to the external content database.
Content deployment is advisable in scenarios only where extremely tight security is required. It can be a complex process to correctly configure and execute content deployment between servers and should only be done when necessary.
To configure content deployment, log in to Central Administration and click the General Application Settings link. At the bottom of the page, you will see a section titled Content Deployment.
The first thing you’re going to do is to tell SharePoint whether the server farm you’re working with is set up to ship or receive content or both. Additionally, content that gets moved between servers needs to be placed in an intermediate location that’s accessible to both the source and destination servers. You need to tell SharePoint where the intermediate location is. You can configure these settings by clicking the Configure Content Deployment link on the General Application Settings page.
The next thing you need to do is to set up a path, which is a mapping between servers and site collections. You have to have both a source and a destination site collection. The next thing you need to do is set up a job, which dictates how often content is moved along its path. You can set up both paths and jobs by clicking the Configure Content Deployment Paths and Jobs link in the Content Deployment section of the General Application Settings page. Once a job has been scheduled, it’s possible to check the status of that particular job.
Finally, if you want to check whether a particular piece of content was shipped between servers, you can click the Check Deployment of Specific Content link on the General Application Settings page. This page allows you to type in the URL of the page whose status you want to check. SharePoint will provide you with details about both the source and destination list item, so you can compare them to see if they’re the same.
For more information about content deployment, read the online documentation at http://technet.microsoft.com/en-us/library/ee721058.aspx.
Site Variations
SharePoint Server provides a mechanism for handling multiple publishing sites with similar content in multiple languages, and this mechanism is called site variations. The idea behind site variations is that you have a publishing site where the site content is written in the original language, then multiple other “variation” sites for other languages. After content has been authored in the original language, content owners can execute a workflow that copies that page and that page’s content into the variation sites. At that point, content owners for those other languages are made aware that a new page has been added to their sites and needs to be translated.
Variation sites try to balance the need for each language’s site to have a certain degree of autonomy as well as the need to have similar content appearing in multiple languages. Because each variation site is an independent site, content owners for that variation have the ability to create their own content at the variation level. However, the workflow process provides a means for content to be pushed out across languages.
Constructing a multi-lingual site is a complex process and cannot be explained in totality in this chapter. However, you can read about constructing multi-lingual sites using site variations in the online documentation at: http://msdn.microsoft.com/en-us/library/ms493894.aspx.
DEVELOPING PUBLISHING SOLUTIONS
This section gives you an overview of how page layouts are constructed, and how you can build your own page layouts using SharePoint Designer or Visual Studio.
Understanding the Publishing Site Columns and Content Types
A content type, at its simplest, is a container for a collection of columns. Every single list or library in SharePoint ultimately inherits from the Item content type, which has just one column: Title. When you add a content type to a list, you can edit the columns that make up that content type by viewing the edit form for that list item.
Say you create a new content type called Biography, and you give it two columns: Biography Image (of type Publishing Image) and Biographical Data (of type Publishing HTML). You could assign this content type to any list and edit the list data in an edit form, such as the one shown in Figure 9-33.

A content type assigned to a Pages library is really no different than a content type assigned to any other kind of library. The problem is that the visual representation of the data is not nearly as attractive for a publishing site when it’s in list format as when it’s displayed using a page layout.
As you’ve already learned in this chapter, page layouts provide a way of displaying and editing content from a particular content type. Just as a page is really a document in a document library with an assigned content type, so a page layout is simply a document that has been added to a document library (called the Master Page gallery) with an assigned content type.
Publishing pages must inherit from the Page content type, and page layout documents must inherit from the Page Layout content type. One of the columns associated with the Page Layout content type is called Associated Content type. This means that each time you create a new page layout, you must associate that page layout with a content type.
This association means that it’s possible to have multiple renderings of the same underlying content. If you create an item in a Pages library called John-Doe.aspx and assign it a content type of Biography, you can assign the Biographical Data column a value of “John Doe was born in 1976” and add a picture of him to the Biography Image column. You could create one page layout that has the person’s picture on the left side of the page, another page layout with the picture on the right side of the page, and another page layout that doesn’t show any picture at all. Regardless of which page layout is used to display the information from the list item, the underlying data in the list item remains the same and will still be associated with the Biography content type.
Figure 9-34 illustrates the Page content type and the Page Layout content type.

Figure 9-35 shows each of the content types that have been added to a Pages library. Each of the content types listed inherits from the Page content type.
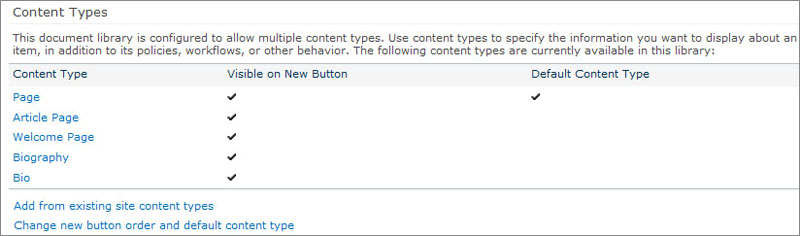
Figure 9-36 shows you the contents of a typical Master Page gallery. Notice that multiple page layouts display content for the Article content type.

Each page layout corresponds to an item in the Page Layouts fly-out menu that you can see in Figure 9-3, back near the beginning of this chapter. As you can see in Figure 9-3, each page layout is listed below its associated content type.
The next two sections of this chapter walk you through the process of creating your own site columns, content types, and page layout. The first example demonstrates the process of creating a page layout using SharePoint Designer, and the second example demonstrates the process of creating a page layout that can be deployed using a solution package and added to your site collection by activating a feature.
Example: Creating a Page Layout in SharePoint Designer
This example walks you through the process of creating a page layout using SharePoint Designer 2010.
1. Open up your browser and browse to the top-level site of the publishing site collection to which you would like to add a page layout.
2. Click the Site Actions menu and navigate to the Site Settings page. Click the Site Columns link under the Galleries heading on the Site Settings page.
3. Click the Create button at the top of the page to create a new site column.
4. Give your new column the name Biography Picture. Give it a type of Image with Formatting and Constraints for Publishing. Put the site column into a new group called Wrox Columns. Click OK.
5. Create a new column again, this time naming it Biographical Data and giving it a type of Full HTML Content with Formatting and Constraints for Publishing. Add the column to the Wrox Columns group you created in the preceding step. Click OK.
6. Navigate back to the Site Settings page. Click the link that says Site Content Types under the Galleries heading.
7. Create a new content type by clicking the Create button at the top of the page.
8. Give your new content type the name Biography. In the first drop-down menu, titled Select Parent Content Type From, select Publishing Content Types. Make sure that the second drop-down menu, titled Parent Content Type, is set to Page. Create a new content type group called Wrox Content Types. Click OK.
9. On the content type management page, under the Columns section, click the link that says Add from Existing Site Columns.
10. Select Wrox Columns from the drop-down menu. Add both the Biographical Data and the Biography Image columns to the Columns to Add group. When you see a warning prompt, click the OK button to close it. Click OK to save your changes.
11. Start SharePoint Designer. Open up the top-level site of the publishing site collection to which you would like to add a page layout.
12. Click the Page Layouts icon under the Site Objects heading on the left side.
13. In the Ribbon, you should see a tab called Page Layouts. Click the button that says New Page Layout in the Ribbon. This will pop open a window titled New.
14. Select Wrox Content Types from the first drop-down menu, titled Content Type Group. The second drop-down menu should have Biography selected. Give your new page layout a URL Name of Biography.aspx, and a title of Biography.
15. You should now see the HTML markup for your new Biography page layout in the SharePoint Designer main window.
16. Put your cursor inside the content placeholder called PlaceHolderMain, which you will find in the middle of your page layout. Click the Insert tab in your Ribbon, and click the Table button. Add a one-row, two-column table to your page.
17. If you do not see your Toolbox on the right side of your screen, click the View tab in your Ribbon, then click the Task Panes button and select Toolbox from the menu.
18. Expand your Toolbox (which should be on the right side of SharePoint Designer) and select the SharePoint Controls node. Inside this node, you will see another node titled Page Fields. This displays all the fields that are a part of the Biography content type’s parent content type, which is the Page content type.
19. Select the field called Title, under the Page Fields heading inside the SharePoint Controls section of your Toolbox, and drag and drop it into the right column of the table, which you added to your page layout.
20. Expand the HTML node of the Toolbox and select the Break item you find inside the Tags section. Drag and drop that Break item under the Title field you just added to the page layout.
21. Return to the SharePoint Controls node in the Toolbox, but this time, expand the Content Fields section. Drag and drop the Biographical Data field below the line break you just added to the page layout in the preceding step.
22. Drag and drop the Biography Image field into the first column in your table.
23. Save your changes to the page layout by clicking the disk icon at the top of SharePoint Designer, or press Ctrl+S.
24. In the breadcrumb that appears above the page layout, you should see the name of your site followed by Master Pages, followed by Biography.aspx, followed by the words Advanced Editor. Click Biography.aspx in the breadcrumb.
25. Your page layout is currently checked out and cannot be used until it is checked back in. Click the Check In button on the Page tab of the Ribbon. Select the Publish a Major Version radio button under the question “What type of version do you want to check in?” Add any comments you might have and click OK. Although your page layout is checked in, by default, items in the Master Page gallery require content approval. You will now approve your new page layout.
26. Return to your browser and navigate to the Site Settings page in the top-level site of your site collection. Click the Master Pages and Page Layouts link under the Galleries heading.
27. Ensure that the account that you are currently using has been granted approval rights in the site. (You can easily do this by adding that user to the SharePoint Approvers group.)
28. Find Biography.aspx. Hover over the item and select Approve/Reject from its context menu. This will bring up a dialog called Approve/Reject.
29. Select the Approved radio button and click OK.
30. Now it’s time to try out your new page layout. Click the Site Actions menu and select New Page. Give your new page the name John Doe.
31. Click the Page tab in the Ribbon. Click the Page Layout button in the Page Actions section of the Ribbon. You should now see a section called Biography with a page layout called Biography. Select the Biography page layout. You should now see a publishing page that uses your new Biography page layout.
Example: Creating a Page Layout in Visual Studio 2010
This section builds on the work you did in the preceding example. It will help you re-create the Biography page layout, but this time you will use Visual Studio 2010 to create a page layout that will be deployed with a solution package and become available once a feature has been activated. You can download the final Visual Studio project from the Wrox site; it’s called Wrox.SixInOne.PageLayouts.

1. Open Visual Studio 2010 and create a new project.
2. Select the Visual C# ⇒ SharePoint ⇒ 2010 ⇒ Module project template. Give your project a name of Wrox.SixInOne.PageLayouts. Click OK.
3. On the SharePoint Customization Wizard’s first screen, type in the name of your SharePoint development website that you’ll be using to test your solution. Select the Deploy as a Farm Solution radio button. Click the Finish button.
4. Right-click the project in your Solution Explorer and select Add ⇒ New Item. Select Empty Element from the list and call it Fields. Click the Add button.
5. If the Elements.xml file is not already open, double-click the Elements.xml file inside the newly created Fields element. Add the following XML inside the <Elements></Elements> nodes:
<Field ID="{CC20765D-FA68-42a8-8E10-FEB763207AA2}"
Name="BioImage"
DisplayName="Bio Image"
Group="Wrox Columns"
Type="Image"
RichText="TRUE"
RichTextMode="FullHtml"/>
<Field ID="{BA4F50F9-0046-449f-BA81-B70903C8EEAD}"
Name="BioData"
DisplayName="Bio Data"
Group="Wrox Columns"
Type="HTML"
RichText="TRUE"
RichTextMode="FullHtml"/>
6. Right-click the project in your Solution Explorer and select Add ⇒ New Item. Select Content Type from the list and call it Biography. Click the Add button.
7. Select Page from the drop-down list of available content types. (If you don’t see Page listed, ensure that the site you’re connecting to is a publishing site.) Click Finish.
8. If the Elements.xml file is not already open, double-click the Elements.xml file inside the newly created Biography element. Change the ContentType element’s Name attribute’s property value from Wrox.SixInOne.PageLayouts - Biography to Bio. Find the <FieldRefs></FieldRefs> nodes inside the file, and add references to the fields you created in your Fields element, by adding the following child elements to the FieldRefs element:
<FieldRef Name="BioImage" ID="{CC20765D-FA68-42a8-8E10-FEB763207AA2}"/>
<FieldRef Name="BioData" ID="{BA4F50F9-0046-449f-BA81-B70903C8EEAD}"/>
9. Select the module called Module1 in your Solution Explorer, and rename in Page Layouts. Delete the file inside the module called Sample.txt.
10. Open up the Elements.xml inside the module. You should see a module element that says <Module Name="Page Layouts">. Add the following attribute to the module, telling SharePoint that the files in this module are to be deployed to the Master Page gallery (which has a URL of /_catalogs/masterpage): Url="_catalogs/masterpage". Your new module element should now look like this: <Module Name="Page Layouts" Url="_catalogs/masterpage">.
11. Right-click the project in your Solution Explorer and select Add ⇒ New Item. Add a new Text File, (under the C# ⇒ General section), but give it a name of Bio.aspx. (If you tried to add an ASPX page using the default project item template, Visual Studio would also add a code-behind file, which in this case you do not need.)
12. Open up SharePoint Designer. Open up the Biography.aspx page layout you created in the previous example, and edit it in Advanced Mode. Copy the entire page markup, and paste it into the Bio.aspx page you just created in Visual Studio.
13. Look at the Page directive of your Bio.aspx page in Visual Studio. (This is the first line of code, that starts with <%@ Page.) Scroll toward the end of the line. If you find the following text, delete it: meta:progid="SharePoint.WebPartPage.Document" meta:webpartpageexpansion="full". (If you don’t remove these tags, SharePoint will think that your page has been customized from its original version, even though it has not.)
14. Now look at the markup in your new page. Find the control that starts with <PublishingWebControls:RichImageField. Notice that the FieldName property of the control is actually a GUID. To make the field more readable, it’s possible to replace this value with the field’s internal name. In our Visual Studio solution, our field has an internal name of BioImage. Replace the GUID you find in the FieldName attribute with the word BioImage, so your control now looks like this: <PublishingWebControls:RichImageField FieldName="BioImage" runat="server" id="RichImageField1"></PublishingWebControls:RichImageField>.
15. Repeat the same process with the <SharePointWebControls:TextField /> control, replacing the FieldName property value with the word Title.
16. Repeat the same process, this time replacing the <PublishingWebControls:RichHtmlField /> control’s FieldName property value with the Bio Data field’s internal name, BioData.
17. Next, open with the Elements.xml file inside your Page Layouts module. Notice that your new Bio.aspx file has been added to the parent Module element that you edited in a previous step.
18. The File element has a Url property value of Page Layouts/Bio.aspx by default. Remove Page Layouts/ from the URL, so the new property looks like this: Url="Bio.aspx". (If you don’t make this change, SharePoint will try to deploy your page layout to a folder called Page Layouts inside the Master Page gallery.)
19. Add the following property to the File element: Type="GhostableInLibrary". (Without this, the page layout will not be visible to you when choosing a layout.) Your new File element should now look like this: <File Path="Page LayoutsBio.aspx" Url="Bio.aspx" Type="GhostableInLibrary" />.
20. All this will do so far is provision a list item in the Master Page gallery. The next thing you need to do is assign properties to the page layout file. These properties will tell SharePoint things such as the name of the page layout, the page layout’s preview image, and the page layout’s associated content type. Add the following elements inside the File element:
<Property Name="Title" Value="Biography Page Layout" />
<Property Name="ContentType" Value="$Resources:cmscore,contenttype_pagelayout_name;" />
<Property Name="PublishingPreviewImage"
Value="~SiteCollection/_catalogs/masterpage/Preview Images/Bio.jpg,
~SiteCollection/_catalogs/masterpage/Preview Images/Bio.jpg" />
<Property Name="PublishingAssociatedContentType" Value=";#Bio;#;#"/>
21. Open up the Elements.xml file inside your Biography content type. Copy the ContentType element’s ID property.
22. Return to the Elements.xml file you were just modifying inside the Page Layouts module. Find the property with a name of PublishingAssociatedContentType. Insert the content type ID you copied in the previous step into the PublishingAssociatedContentType property value string, between ";#Bio;#" and the final ";#" of the string. Your new property value might look like this: <Property Name="PublishingAssociatedContentType" Value=";#Bio;#0x010100C568DB52D9D0A14D9B2FDCC96666E9F2007948130EC3DB064584E219954237AF39003263756b51a44d9098ce3c00bf1186e3;#"/>.
23. Notice that one of the properties you added to the File element was called PublishingPreviewImage. The property specified that the page layout had a preview image called Bio.png stored inside a folder called Preview Images, inside the Master Page gallery. You need to create this new folder and add your preview image to your solution package. To do so, right-click the Page Layouts module in your Solution Explorer and select Add ⇒ New Folder. Give your folder the name Preview Images.
24. Create a thumbnail picture of your new page and call it Bio.jpg. Add your new image to the Preview Images folder.
25. Open up the Elements.xml inside your Page Layouts module. Notice that Visual Studio added a reference to this new image for you. However, you need to make some modifications. First, modify the Url property value of the new File element, deleting Page Layouts/ from the property value, so the new property looks like this: Url="Preview Images/Bio.jpg". Also, add the Type="GhostableInLibrary" attribute to the File element.
26. Now that you’ve created your site columns, content type, and page layout, you can modify your feature that you’ll be using. Rename your feature folder from Feature1 to Wrox.SixInOne.PageLayouts.
27. Open up the Feature designer and remove the word Feature1 from the title. Give the feature a description of “Deploys the Biography site columns, content type, and page layout to the site collection.” Set the Scope to Site. Ensure that the items in the feature are listed in the following order: Fields, Biography, Page Layouts. (If they’re not listed in the correct order, SharePoint will throw an error when the feature is activated, if it tries to provision the page layout before the content type and site column are in place.) Save your changes to the feature.
28. Build your project and deploy it to your server. You should now be able to create a new page using the Bio content type and the page layout called Bio Page Layout. You should see your preview image when you try to select your new layout from the available page layouts. Notice that, unlike creating a page layout in SharePoint Designer, your page layout is already checked in and approved and ready for use.
This chapter walked you through the process of creating, editing, approving, and publishing new pages in a SharePoint publishing site. It also walked you through some of the configuration settings of a publishing site, such as configuring versioning and approval on a Pages library. You learned how to retrieve content from other locations in your site collection by using the Content Query Web Part. You learned about some of the advanced features in SharePoint such as anonymous access configuration, content deployment, and variation sites. Finally, you learned about how you can create your page layouts using SharePoint Designer or Visual Studio 2010.