
15
Workflow Introduction and Background
WHAT’S IN THIS CHAPTER?
- Introduction to workflow
- Understanding why workflow matters to you
- How does workflow relate to SharePoint?
- Understanding the architecture of workflow in SharePoint
- Planning workflow in SharePoint 2010
The goal of this chapter is to provide you with an overview of workflow concepts and why you should care about workflow. You read about the benefits of using workflow in your organization as well as about how workflow functions in SharePoint 2010. In subsequent chapters you learn more specifics about each type of workflow and how you can leverage each piece of workflow functionality. You learn about out-of-the-box workflows, modifying these workflows with SharePoint Designer, and starting workflows with Visio as an end user. The workflow section wraps up with an introduction to the workflow developer experience.
OVERVIEW OF WORKFLOW AND JUST A TOUCH OF BPM
Ask 10 people to define workflow you will probably get at least seven different answers and explanations. Although workflow isn’t new, confusion persists about just what it is. So to play it safe, take the word of the workflow people themselves, the Workflow Management Coalition (WFMC).
The WFMC defines workflow as:
The automation of a business process, in whole or part, during which documents, information or tasks are passed from one participant to another for action, according to a set of procedural rules.
Keep this in mind as you read more about workflow, in this and subsequent chapters, and start to think about where workflow fits into your organization. You will find that you can’t talk about workflow without at least mentioning Business Process Management (BPM). So in that respect you are going to need to know how BPM relates to workflow. Back to what our consortium says, this time about BPM:
Business Process Management: The practice of developing, running, performance measuring, and simulating Business Processes to effect the continued improvement of those processes. Business Process Management is concerned with the lifecycle of the Process Definition.
You could say that BPM is an evolution of workflow. For example, you may have a generic process that you perform in your business every day, such as ordering office supplies, requesting time off, or submitting expense reports. If you automate one of these processes using some technology, such as forms, e-mail, or database entries, that could be considered a workflow. This new workflow may be of benefit and produce tangible results for you and your company. However, to truly take advantage of that automation you have to report continually on it and investigate each aspect, step, and participant to find where improvements and changes are needed. You may feel the terms workflow and BPM are overused and sometimes overlap. There may be some truth in this, but if you think of the two terms as they’ve been defined here you should be able to keep things clear.
With “workflow” becoming something of a buzz term, many business software products are advertising various features offering it. Workflow can be a good feature because it allows for process automation; however, keep in mind that many of these vendors are adding workflow to their product only to increase your interest. Also, if you add several such products to your environment you are likely to create confusion and interoperability issues. These other applications typically won’t perform well in situations where the process needs to cross systems or manage data from multiple sources. This presents a problem because rarely is any good business process occurring in isolation.
As an example, your organization may have a finance system that is responsible for accounts payable, accounts receivable, and payroll. This system may have processes that support billing and consolidation; however, the way in which your business operates may additionally involve such items as information from Active Directory forms, and files for contracts. Each of these pieces of data is pulled from or stored in other systems. Surfacing each piece in a standard SharePoint site or page is a great use of SharePoint’s portal functionality. SharePoint can provide that high-level reporting surface or the consolidation composite view (that is, a view showing data from multiple sources consolidated in one screen). What ties these pieces together nicely is workflow. Keep in mind that workflow or process automation in any form, whether in SharePoint or not, can be of great benefit to those who take advantage of it. With SharePoint, workflow, and electronic forms you can now digitize entire business processes. So now you know what workflow is. You may be asking yourself, Why should I care?
Why Is Workflow and BPM of Benefit to You?
Organizations that implement workflow do so for a variety of reasons:
- Better work tracking
- Improved work on compliance
- Work reduction
- Improved efficiency
- Better customer service
- The familiar desire to do more with less
Take a look at a very generic example of a Return on Investment (ROI) calculation for workflow.
Let’s assume that an organization has calculated that the average total cost of an employee, factoring in benefits and taxes, is $50,000. The employee works 46 weeks a year after figuring in vacation, holidays, and sick days, which amounts to 230 work days per year. From there you can figure out the cost of an employee’s time by week, day, hour, or even minute:
| Cost Per Week | $1,086 |
| Cost Per Day | $217 |
| Cost Per Hour | $27.12 |
| Cost Per Minute | $0.45 |
Now you can calculate the savings if you automate some processes and thus make the employee more efficient. If you make one process one minute more efficient you save $0.45 per employee participating in that process. Calculate that savings over the course of a year and you save $103.50 per employee.
This ROI assumes that you can save one minute per employee per process. You could argue that it’s possible even to save one minute per step; however, for now let’s start with an easy calculation and assume a saving of one minute per process. Now it’s your turn to participate in this fun. Think of a process you have in your organization today. Then take your process and figure out how many employees participate in that process.
Next, multiply the number of employees by your average cost per minute. You now have, as shown in the following table, the ROI of a process that can be automated through SharePoint workflow. This ROI is only one small instance. Empowering more people to build workflows through tools such as SharePoint Designer can keep the ROI ball rolling.
| Employee cost per minute | $0.45 |
| Number of employees involved | 100 |
| Number of instances per month | 45 |
| Total savings per month | $2,025 |
Improving ROI is one example of how workflow can benefit your organization. This is something tangible that you can calculate. To further see the benefits of workflow, make a list of the processes you might automate and calculate the ROI for each process. SharePoint can play a huge role in workflow and not just because SharePoint offers workflow out of the box.
SharePoint: How Did We Get Here?
Microsoft realized just how powerful a tool workflow could be and integrated it into SharePoint for the 2007 release. Some of the features provided, such as the ability to customize out-of-the-box workflow and the ability to reuse workflows, left something to be desired. However, users still found that adding basic workflow to lists and libraries added value in significant ways. To this end, think of a true portal concept, which is what SharePoint is now. A portal can be thought of as a gateway to information. Portals gather information, be it files, text, or HTML, in one place. In an organization, I may use a portal to allow team sites to collaborate. The portal may include access to official corporate news, links with a stock ticker, corporate profiles, and policy updates. As a user I may have a page on my SharePoint site that pulls in a list with information on it that connects to a document library containing related files. That same site may also pull information from external sources using BCS. All these pieces of related data from different places are now presented in a unified view. Using a portal allows your users to have a one-stop shop to perform many different tasks.
You can make a logical transition to adding processes to a portal. If your users are familiar with using the SharePoint interface for collaboration, document management, announcements, and calendars, you can now logically extend their use of SharePoint by adding process automation (workflow). Incorporating workflow into SharePoint sites or pages tremendously increases the workflow adoption rate and ROI.
A well-built and integrated workflow can in a sense be considered an application. It’s sometimes hard to get people to use a new application as process automation. Adoption can be slow because the new application is different and people are used to doing things the way they’ve always done them. You can help overcome this resistance by encouraging participation in the process. Make sure people can participate through tools they already use, like e-mail, Word, and SharePoint. Once you get your SharePoint environment set, adding processes simply adds more value, not more red tape. Keep that in mind as you plan your SharePoint processes.
THE BASIC ARCHITECTURE OF SHAREPOINT WORKFLOW
The core of workflow in SharePoint is Workflow Foundation (WF). Workflow Foundation is part of .NET Framework 3.5; it’s a development framework that allows you to create workflows in your applications. At its core it is not SharePoint-specific. The SharePoint team took this framework and built in specific functionality that it could then host and offer as SharePoint-based workflow.
Workflow Foundation is actually a programming model, engine, and toolset designed for building workflow-enabled software for Windows. As a programming model, Workflow Foundation provides developers with a model-driven toolset that can take their development to a higher level and it also adds a certain graphical angle to it (see Figure 15-1).
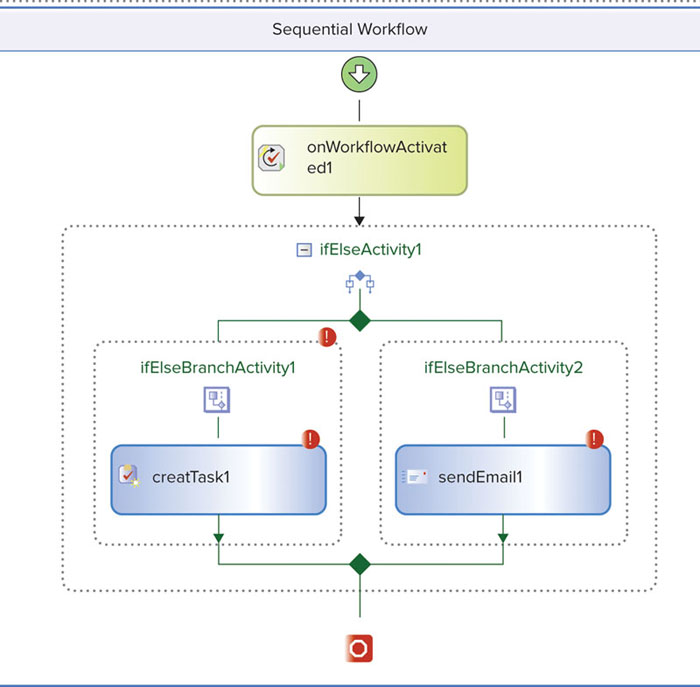
This graphical angle is one of the keys to success with Workflow Foundation. It allows you to be able to see the logic, or flow if you will, then be able to drill into each step and add the function (business logic) behind it. After you build a Workflow Foundation process, you are essentially left with an assembly that will need a host in order to be fully functional. This is where SharePoint comes in. Workflow Foundation does not provide management tools, executables, an installer, or the typical items that you would need to have a stand-alone application. You need a place to host this functionality — a host that is responsible for managing the functions and hydrating and dehydrating — loading from disc to memory or from memory to disc, respectively. You will also need basic task management and reporting. Thus you really need products like SharePoint to provide the plumbing. SharePoint can act as an appropriate host for workflows you build to run in or against SharePoint 2010.
Understanding WF and SharePoint as a Host
Now that you understand the relationship of Workflow Foundation to SharePoint, you should also understand the host that will execute and manage the processes you build. Within SharePoint, Microsoft provides a Workflow Foundation runtime engine that is responsible for the execution of all workflows. This runtime engine allows workflows to remain active for long periods of time, which will be required for many human-based (as opposed to system-based) workflows.
The SharePoint host enables all processes to survive resets and reboots. The runtime engine also handles the plumbing of a normal workflow service so you do not have to code it yourself. These runtime services can be such things as state management, process tracking and loading, and unloading workflows to and from memory. Loading and unloading to and from memory is especially necessary in long running workflows because you do not want every instance of every process staying resident in memory. When a process is waiting for user input, the runtime services will unload that workflow from memory and persist the data to the SharePoint database. When the workflow needs to be acted upon, the engine will load the instance into memory so that the instance can handle the event as needed. So even though your use of workflow in SharePoint may be significant, the number of actual workflows in memory at any given time will be smaller and thus actually use fewer system resources.
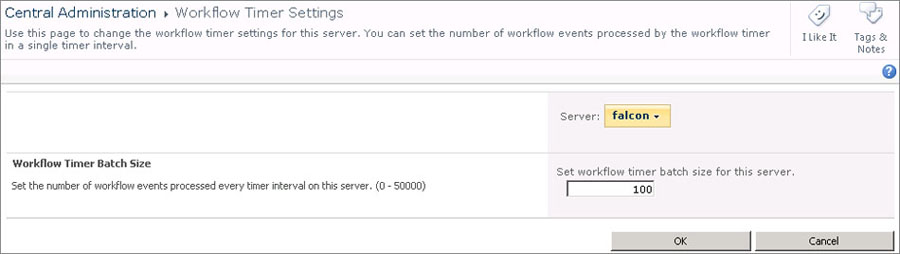
The SharePoint workflow host executes its workflows in one of two places. Where the execution takes place depends on what activity is being processed. If a workflow is awaiting some form of user input, the workflow will be executing on the web front end where that user input is taking place. If the workflow is in a delay state from a pause for duration or other similar context, the workflow will be executed by the SPTimer Service. With SharePoint 2010 you can specify a server where the SPTimer service will run. The flexibility in the timer service allows for more granularities in your SharePoint workflow architecture, including the dedication of a specific server to be your workflow server. In high-use environments dedicating a workflow server may be a wise use of resources. Figure 15-2 shows the settings for the workflow timer service. To get to this screen navigate to Central Administration ⇒ System Settings ⇒ Services on this server ⇒ Microsoft SharePoint Foundation Workflow Timer Service.
Understanding Workflow Types: Declarative and Compiled
Now you understand how SharePoint uses Workflow Foundation and acts as a host to workflows. Next, you need to understand the basic workflow types that SharePoint will have. SharePoint has two basic categories of workflow:
- Compiled
- Declarative
A compiled workflow is one that is typically built with Visual Studio, and is end to end a precompiled DLL that SharePoint hosts. Compiled workflows may still contain conditions and actions much as a declarative workflow does; however, compiled workflow authors can also insert custom code and calls to other systems that may be necessary to ensure proper function of their workflows. This compiled nature is an important distinction from the declarative workflow, which is deployed as an Extensible Object Markup Language (XOML) file and compiled each time an instance of the workflow is started. Similarities exist between the two types of workflows and you may not be able to tell one from the other as a regular participant in the workflow itself. Each will consist of forms, inputs, and outputs, just like other workflows.
With SharePoint 2010, the workflows are those of a new generation called declarative. Most of this chapter discusses this declarative side of SharePoint workflows. Declarative workflows may sound complicated but don’t be confused. Declarative programming can be thought of as specifying the “what” without the “how.” Declarative programming is about statements of the work involved to go get some document or a list item value. You don’t specify which document or list item. Those values are specified at a later time. Declarative programming shows up all over the place and not just in SharePoint.
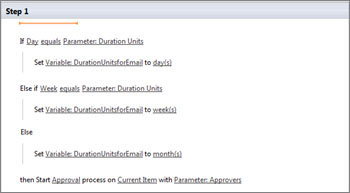
Take a basic SharePoint out-of-the-box Approval workflow (Figure 15-3). You can see that no specific details are called out; rather, parameters like Parameter: Duration Units are used. The details are specified at association or run time.
This declarative nature of workflow is one of the big benefits of SharePoint workflow. Declarative workflow makes everything reusable and significantly more configurable.
UNDERSTANDING CONDITIONS AND ACTIONS: THE CORE OF SHAREPOINT WORKFLOW
A typical workflow has these components:
- Association form
- Initiation form
- Task form
- Variables
- Conditions
- Actions
Not all of this will make sense right away, but by the end of this chapter you should understand. Each component is explained at some level in the next sections.
At this point you should understand the basics of the SharePoint workflow plumbing and you should understand what different components make up a workflow in SharePoint. To take the next steps you’ll need to be familiar with a new set of terms and understand how they affect your workflow. In this section, you learn all about these new terms. First you need to know that workflows have many pieces but the keys that make them functional in SharePoint 2010 are conditions and actions.
You can think of SharePoint conditions and actions as “if-then statements.” A conditions is your “if statement” and an action is your “then statement.” Take a look at how conditions and actions are exposed to you in various workflow design surfaces (Figures 15-4 through 15-7).

Figure 15-5

When you think of building these series of statements, perhaps you can liken them to another familiar surface you probably have used at one time or another, the Microsoft Outlook rules interface shown in Figure 15-8.
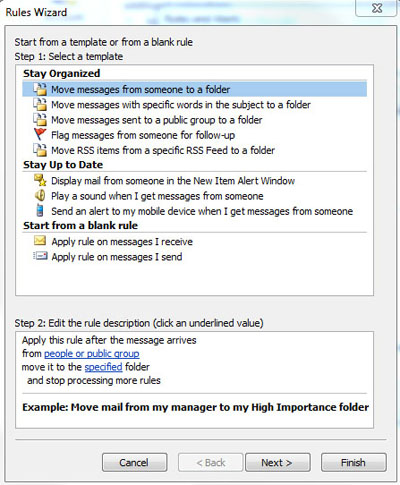
In Microsoft Outlook, you can set up rules for your inbox that say, in effect, “if an e-mail is received and the e-mail has me on the CC line, then move that e-mail into the CC folder.”
Compare this to a condition action in SharePoint workflow in Figure 15-9.
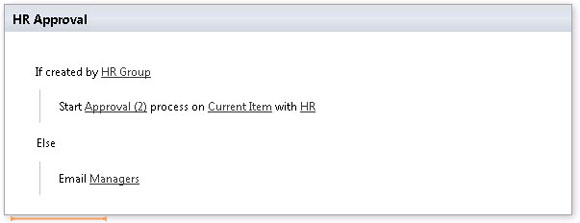
This basic step says when the workflow is initiated, the workflow engine checks to see if the document or list item was created by a member of the HR group. If it was, it starts the approval process. If it was not (“Else”), an e-mail is sent to the managers group.
You can see the idea here of setting up an if (condition) and next setting up a then (action). But obviously there is more to workflows than just a bunch of if/then statements. You will need to define specific details, such as variables, form parameters, and association columns; those are discussed more in a little while.
Understanding Workflow Components and Terminology
For now, let’s dive into all the terms and concepts you will need to know to create a workflow. You should begin by understanding some of the universal terms. These terms are not affected by workflow type or SharePoint version in any way. Table 15-1 goes over the basic SharePoint workflow terms.
Table 15-1: SharePoint Workflow Terms
| TERM | DEFINITION | EXAMPLE |
| Condition | A condition is an expression that indicates something that the workflow needs to test for a true or false result. | If this book is “AWESOME.” |
| Action | An action is the step that needs to be taken if the “condition” is found to be true. | E-mail friends to recommend this book. |
| Local variables | A variable is a data storage location for use inside or in the process of a workflow. This data or variable is only viable for the use in that workflow. | Book Rating could be a variable, where you give people a drop-down list of rating options such as “Awesome,” “Great,” “Good.” |
| Initiation form parameters | Initiation form parameters can be considered a second type of variable in the workflow; they are collected at the start of a workflow. | Fields on the Initiation form that are used to collect data and store them as variables. |
| Workflow step | A workflow step is a way of grouping items together (conditions AND actions). The items within a step will be processed together and in order as they appear. | A workflow step can be: check variable value, then e-mail users, then assign task item to group. This can be done all in one step. |
| Serial actions | Serial actions are the default and are set up to run one after the other. | This might be sending an approval task to the HR team, and then, when that task is completed, sending the task to the legal team. |
| Parallel actions | Parallel actions are actions set up to run at the same time rather than in order. | An example would be sending an approval task to both the HR team and the legal team at the same time, rather than the HR team, then the legal team. |
Now that you have a foundation of universal terms, Table 15-2 digs into more specifics.
Table 15-2: Workflow Process Terms
| TERM | DEFINITION |
| Workflow association | Workflow association involves the process that takes place when you link a workflow with a SharePoint entity. The association process includes the use of or specification of an “association form.” |
| Workflow instantiation | The instantiation of a workflow is the process of starting up a workflow and is accompanied by an instantiation form. |
| Task | The term “task” can be used in many contexts. The two important definitions for workflow are: 1. The assignment of a work item; 2. A reference to a task form, being a form that allows a user to interact with a workflow process. |
Table 15-3 lists the different workflow types you need to be familiar with and will be building in your SharePoint environment.
Table 15-3: Workflow Types
| TERM | DEFINITION | EXAMPLE |
| List-based workflow | A list-based workflow is a workflow type that is tied to a specific list. | The Vacation workflow is tied to (associated with) the Vacation Request list. |
| Site-based workflow | The site-based workflow is not tied to, or associated with, any library or list. Rather, it is associated with a site. Keep in mind that these workflows do not have an automatic trigger and must be started manually. | An example of a site-based workflow may be one that is for assigning tasks to review publishing content and ensuring that different pages are ready for archiving, updating, or deletion. |
| Re-usable workflow | Re-usable workflows are not tied to a specific list or library at development time; rather, they are generic and can be associated with a specific list or library at a later time. | If you create a great Approval workflow that you want to save as a template for all those within your site, you can create a re-usable workflow and make it available for others to use as is, or to modify and use. |
| Globally re-usable | These workflows are just like the regular re-usable workflows, but by being global they are available to all sites in the site collection. | The same great Approval workflow is made available to the entire site collection and not just your immediate site. |
When building a process, you will need to be familiar with the miscellaneous terms in Table 15-4.
Table 15-4: Miscellaneous Workflow Terms
| TERM | DEFINITION | EXAMPLE |
| Association columns | Association columns are columns that are specified at workflow design time and will be created at workflow association time in the list or library with which the new workflow is associated. | If this same Approval workflow has conditions to check for a value in a specific column, you could make those specific columns into association columns. The association columns would then be created in the list you associate with this workflow each time the workflow is associated with a list or library. |
| Impersonation step | An impersonation step is a step in a workflow that you can specify to be run as the workflow author and not the user of the workflow. | If in a step you need to modify permissions on a list, but a typical workflow initiator would not have access to make this change, you can make this part of an impersonation step. |
| Workflow visualization | Workflow visualization is the creation of a visual representation of a workflow through the use of Visio services. |
You learn more about how to use and implement specific actions and conditions in the next chapter as you dig into building your first workflows. Keep in mind that conditions and actions are context-sensitive, and not all conditions and or actions will be available for use in all workflows. Some actions, for example, can be used only in an impersonation step. The availability of actions is a very important aspect to keep in mind and underscores the importance of proper planning of all processes. Now that you have an understanding of the actions, take a look at the conditions in Table 15-5.
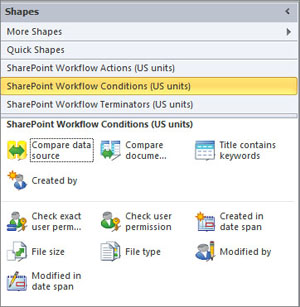
Table 15-5: SharePoint Workflow Conditions
| CONDITION | DEFINITION | EXAMPLE |
| If current item field equals value | This condition compares some field in the workflow item to a value. | If File name = Test.txt |
| Created by a specific person | This condition checks whether the item was created by a specific person or group. | If current item was created by HR Group |
| Created in a specific date span | This condition checks the “item create” date and compares it to a specific date range. | If current item was created between 1/1/2007 and 1/1/2011 |
| Modified by a specific person | This condition checks to see if the item was last modified by a specific person or group. | If current item was modified by HR Group |
| Modified in a specific date span | This condition checks the date the item was last modified and compares it to a specific date range. | If current item was modified between 1/1/2007 and 1/1/2011 |
| Person a valid SharePoint user | This condition checks to see if a user is a valid SharePoint user as determined by your authentication provider. | Use this to validate an external user |
| Title field contains keywords | This condition checks the item’s title against a keyword or list of keywords. | If title contains HR |
| File size a specific range | This condition checks the file size of an item. This condition is available only if your workflow is associated with a document content type of document library. | If file size is between 1,000 and 2,000 Kilobytes |
| File type a specific type | This condition checks whether the file type of the current item is of a specific type. | If file type is PPT |
Now that you know your “if’s” let’s talk about “then’s.” As with conditions, some of the actions are context-sensitive. For example, in Figure 15-10 take a look at the List category actions that are available to you in a normal step.

Now take a look at the same category when you are accessing that set of List actions from within an impersonation step in Figure 15-11.

As you can see, there is a difference in the two lists. SharePoint will not list a condition or action if it is not valid at that place in the workflow.
Table 15-6 lists the actions available in a workflow.
Table 15-6: SharePoint Workflow Actions
| ACTION | DEFINITION | EXAMPLE |
| Add time to date | Adding time to date allows you to add a specified amount of time to a specified date. The result is stored in a workflow variable. | You have a workflow that has a specific service-level agreement that dictates a due date. When the workflow starts you want to calculate this to log it, and use that date in future communication as well as in the workflow history list. |
| Log to history list | This logs a message to the history list configured for the workflow. | Use this to log information about the progress of the workflow such as status, assignee at that step, or remaining time it’s expected to run. |
| Send an e-mail | This sends an e-mail to specified recipients. The e-mail message can take advantage of workflow context and variables, allowing you to include extra information about the process itself. | Send an e-mail to a person or group that contains data from the workflow to give updates. This is a great action to include in all workflows. |
| Set workflow status | This sets the status of a workflow process to a more user-friendly status. | Set the workflow status to Awaiting Management Approval when a task item is assigned to a manager to show those interested that it is at that step. |
| Set workflow variable | This sets a variable in a workflow to a specific value. | Set workflow status of the running workflow to Awaiting Management Approval instead of the default “In progress.” |
| Stop workflow | This action stops the current instance of the workflow and additionally logs a message to the workflow history list to show status. | Stop workflow and log a message, such as the fact that originator cancelled the workflow. |
| Copy list item | Copies one specified list item to another. Lists must contain at least one column in both the source and destination lists. | This action could be used when you have a workflow running on a larger list with lots of information and you want to copy some of the list items but leave off more sensitive columns. |
| Create list item | Creates a new list item in the specified list and sets specified values. | Create a new entry in the calendar list. |
| Update list item | Updates a value in a list item to the new specified values. | Update an entry in the calendar list if details of the event change. |
| Set content approval status | Used if content approval is enabled and can set the status field to a value. | Set content approval status to Approved. |
| Set field in current item | Sets a specified field in the current item to a value that is also specified. | Set Due Date field to Date. |
| Lookup | Looks up information about a user’s manager, such as an e-mail address, and outputs that value to a workflow variable. | Look up the manager of the workflow initiator to send an e-mail. |
| Add list item perms | Grants specified permissions to specified users. | Grant edit permissions to the approvers group. |
| Inherit list item perms | This a list item that had separate permissions to inherit the parent permissions. | Make the list inherit site permissions. |
| Remove list item perms | Removes permissions to a list item for specified users. | Remove edit permissions from the approvers group. |
| Replace list item perms | Replaces current permissions on an item with new permissions that are specified. | Overwrite all permissions with approvers group set to Full Control. All others set to None. |
Absent from the previous tables are the task actions such as Start Approval Process or Start Custom Task Process. This is because they are important enough to spend some additional time on. The entire methodology for tasks in SharePoint 2010 has been re-engineered. Each task piece is itself similar to a “mini-workflow.” This task process is invoked like a regular action and allows for much more customization. Understanding customization options will be important for you as you begin to plan what your processes will look like. In the next chapter you get some examples of task processes in action, but for now you should understand task basics and customization options.
Task Form Fields
Task form fields are fields that will appear on different forms in the task process. You can add task form fields depending on your needs. These fields can also be set to be required or optional. These form fields play an important role because they can be used simply to display information that helps the workflow participant make decisions, or they can be used to collect data from the participant that can be used in your conditions further down the workflow. An important step in planning your workflows is to make a good list of all the pieces of data that will be involved.
Task Outcomes
Task outcomes are more or less the options task participants have on a specific activity such as:
- Approve
- Reject
- Abstain
You will get into task outcomes more as you begin to build custom workflows in the next chapter. The most important concept to understand at this point is that you have options for:
- How a task starts
- How it is processed
- How it is completed
Task outcomes are particularly important if you need to “expire” or “escalate” tasks, or have several task outcomes such as approve, decline, re-direct, and escalate. You also have custom approval options that may fit your business (for example, when the fourth manager approves, that task process is completed, or as soon as any manager rejects, the process moves on to a “decline” step that is specified in the workflow or stops altogether. The options you have are significant.
Completion Conditions
Completion conditions are the conditions necessary for the task process to be complete. These conditions can vary based on your needs. For example, a completion condition can be as simple as “when a manager approves or rejects.” A conditions can also be complex (for example, when at least 50 percent of the listed approvers approve or as soon as any approver rejects).
Additionally, some actions can be taken during the task process. The workflow can take specific actions in response to events such as:
- Before a task is assigned
- When a task is pending
- When a task expiries
- When a task is deleted
- When a task completes
PLANNING FOR WORKFLOW IN SHAREPOINT 2010
Now that you have learned some of the basics of SharePoint workflow, you need to begin the planning process for using SharePoint workflow in your own environment. The first step in your planning process is a big one — you need to determine whether you even want to enable workflow in your environment. Yes, enabling workflow is an option. If it is an option you choose to disable, you probably won’t have much interest in reading the rest of this section on workflow. So for now, assume that you have determined you will enable this feature, at least at some level.
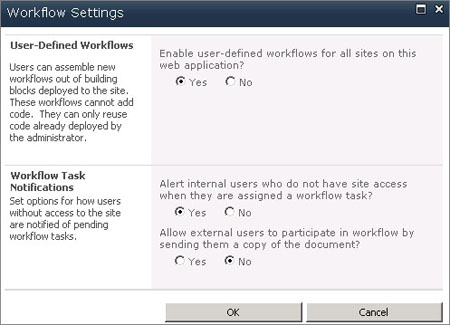
When you install SharePoint, user-defined workflow is enabled by default. However, you should probably know where the Off button is in case you ever want to disable workflow. The option to enable or disable user-defined workflows is in the setup for the web application scope in SharePoint Central Administration (see Figure 15-12). Enabling or disabling user-defined workflow through Central Administration affects all sites within a web application.
If you do not want to disable all user-defined workflows, you can restrict user creation of workflow in other ways. You also have the option to turn off the ability to use SharePoint Designer; this setting is configurable on a site-collection basis as shown in Figure 15-13, as well as on a web application as shown in Figure 15-14.
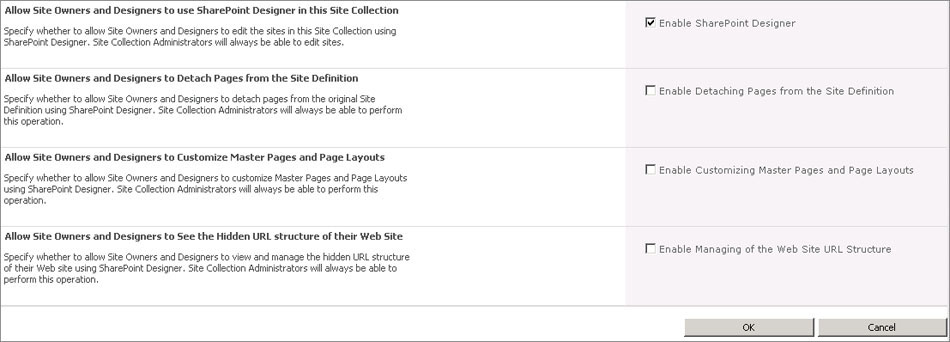

Disabling the use of SharePoint Designer prevents the use of SharePoint Designer to create and publish workflows, as you can see in Figure 15-15.

However, turning off SharePoint Designer will not disable out-of-the-box workflows. You can disable out these workflows on a site-collection basis through the deactivation of that feature as shown in Figure 15-16.
Additionally, a few special workflows aren’t activated by default but can be activated when needed. These workflows, described in more detail in Chapter 16, are:
- Three-state
- Disposition
- Publishing
Consider each of the options for enabling workflow carefully as you design your overall site structure. Though you cannot simply deactivate workflow at the site level, you can reduce permissions in some ways that help curb its use. But more on that aspect in a little bit.
Now the question is where do you enable workflows and for whom? Once you determine that workflow is good and you want your users to take advantage of this feature, you need to determine the answers to a few basic questions. These questions will dramatically help in your implementation of workflow and what tasks may need to take place before you roll it out to your organization. The questions to consider are:
- Who will be creating workflows?
- Who will be associating workflows?
- Who will be participating in workflows?
Do the research and planning for each of these questions and make a list to ensure you can adequately set up permissions. Table 15-7 gets you started.
Table 15-7: Example Planning Worksheet

Planning for Workflow Permissions
Now that you have defined who will be doing what with regards to workflow in your SharePoint environment, you need to know what permissions they are going to need to perform those actions. Table 15-8 lays out the permissions required for each part of workflow deployment and participation.
Table 15-8: SharePoint Workflow Permissions
| ACTIVITY | PERMISSION REQUIRED | NOTES |
| Deploy workflow | Manage list on the site | |
| Associate workflow with list | Full control of the list or library | During the association process, the owner can require additional permissions to start a workflow |
| Associate workflow with site | Must be a member of the site owner’s group | |
| Associate workflow with content type | Must be a member of the site owner’s group | |
| Initiate workflow | Edit items | |
| Participate in workflow | Edit items | |
| Terminate workflow | Full control over list or library the workflow is running on | |
| Remove workflow (remove association) | Full control |
Using this approach gives you a basic idea of how to establish permissions for your site structure based on the people who will be involved in workflow. You should create a chart that identifies the person and permissions, and that maps sites, lists, libraries, and content types to those who are going to be involved. You may also want to set up a special permission group to which workflow authors can be assigned. This planning helps you give just the right number of permissions to each site. However, planning is not just about rights to create or rights to participate in a workflow. Other special considerations must be made, such as the use of Task and History lists.
Planning for Custom Task and History Lists
SharePoint workflows make heavy use of both the Task and History lists in SharePoint. Each of these lists can contain a significant amount of information about the workflows running on that site. By default all users of that site have read permissions for each of these lists. You should take special care in planning the workflows that will run on each site, to ensure that any workflows containing confidential and or personal information are treated as such. An example of this may be a workflow that is responsible for maintaining an annual review for all employees. These review workflows may contain performance as well as salary information. Allowing these workflows to write information to the Task and History lists where any site member can read them may be unacceptable.
But don’t fret — you still have options in regard to these special-case workflows.
The first and most obvious way of solving this problem is to restrict permissions to the Task and History lists on a site that contains one of these workflows. However, limiting permissions creates another set of problems for the users of other non-confidential workflows on that site.
You next option is to create new and more restricted Task and History lists for the confidential workflows that may run on the site. This specification can be done at workflow association time in SharePoint as shown in Figures 15-17 and 15-18.


For cases where you are building a new list or library-based workflow in SharePoint Designer, you can also create new Task and History lists or specify existing Task or History lists when creating the workflow, as shown in Figure 15-19.

Let’s take this concept one step further with regard to Task and History lists. Because by default all contributors can see and edit items in either of these lists, they can maliciously edit these items, which can alter a workflow’s path, data, or outcome. For SharePoint-based workflows, altering the path, data, or outcome will be problematic. You should take special care to plan permissions appropriately for the Task and History lists on your sites. Additional steps to secure these lists and/or validate information may be necessary.
Another important aspect of workflow planning involves those users who will be responsible for workflow development and association. Special attention should be given to these two groups, specifically in the area of training. Not only will they need to know the steps for developing and associating workflow, but they also will need to know the ramifications. As stated before, many aspects of security, such as visibility of information, need to be understood.
An aspect of security that still needs to be discussed is security for those workflows that have impersonation steps, as shown in Figure 15-20.

In SharePoint 2010, workflows that are declarative (those that are out of the box or authored in SharePoint Designer) run in the security context of the workflow initiator (the one who started the workflow). A new feature in SharePoint 2010 allows the use of an impersonation step. The impersonation step switches the context in which that workflow is running for that step only. During the impersonation step, the workflow will run as the person who performed the workflow association.
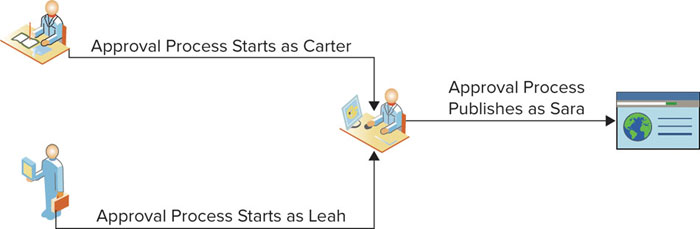
As an example of using an impersonation step, imagine a publishing site where Sara is the owner of all the publishing pages. She is responsible for approving all content that gets published, but she has several content writers and contributors. Her contributors Carter or Leah may create new pages and submit them for approval, but they don’t have permissions to actually publish them. Sara can create a publishing approval workflow in which Carter and Leah can submit content that goes to Sara for approval. If Sara approves, the content is automatically published to the site as Sara, even though the workflow was initiated by and thus is running in the context of either Carter or Leah as represented in Figure 15-21.
Some tasks that can be performed only in an impersonation step include:
- Set content approval status
- Create list item
- Update list item
- Delete list item
- Manage list item permissions
Because any workflow that has an impersonation step will run as the person who associated that workflow, those individuals who participate in that activity will need to fully understand what they’re doing. They need to trust that tasks running as them are acceptable and are doing actions they approve of.
Keep in mind that most of the preceding information applies specifically to those processes that are considered out of the box or that are created in SharePoint Designer. Workflows that are created in Visual Studio can be dramatically different because they are not constrained to what is exposed by SharePoint. In addition, the most important aspect to consider is that workflows created inside Visual Studio and deployed to SharePoint will run as the system account and work through the identity set up as the application pool account. Running as this identity allows the process to perform actions that other users do not have the ability to perform. You must fully understand what security impact this has on your SharePoint environment.
One last consideration to take into account about your use of workflow in SharePoint 2010 is what edition of SharePoint you are actually using. The ideas behind this are simple in terms of functionality. If you are using SharePoint Foundation server you will not get:
- Out-of-the-box workflows: With SharePoint Foundation, the only standard out-of-the-box workflow is the Three State workflow.
- Forms Services: This restricts the use of InfoPath forms in your workflow. Depending on your desire to customize the look and feel of your forms, this many not be a big deal. However, the additional option of having these forms can add tremendous value.
- Visio Services: The modeling of workflow processes in Visio, as well as the visualization of workflows in progress, can be a significant feature. Not having this feature will affect the involvement of your non-technical users in workflow design. Beyond that, as you will see in the next chapter on building workflow, you will not have the ability to visualize workflows in flight, as shown in Figure 15-22.

In this chapter you learned that surfacing (that is, displaying) processes in SharePoint can be a good way of allowing users to interact with them. This process surfacing can help you achieve greater adoption rates and in turn greater ROI. You also should now have a better understanding of the host architecture in place to support workflow in SharePoint 2010 and of the relationship with Workflow Foundation. At this point you also should understand core terminology of SharePoint workflow and know that the building blocks of SharePoint workflow are based on conditions and actions.