6
Cascading Style Sheets and SharePoint
WHAT’S IN THIS CHAPTER?
- What are cascading style sheets?
- Where SharePoint CSS lives
- How are cascading style sheets applied?
- Tools for editing SharePoint CSS
In previous chapters you learned about ways of branding SharePoint. This chapter discusses using cascading style sheets to change the way SharePoint looks. With the changes discussed in the section on master pages and with the material on themes for SharePoint Server 2010, it is now more important than ever that you understand exactly how CSS works.
CASCADING STYLE SHEETS: USING THEM FOR BRANDING SHAREPOINT
Cascading style sheets, or CSS, are used by web designers to add style to SharePoint. This standard of styling is translated into reality by a list of browser guidelines for HTML. There is a specific language for creating CSS syntax.
A style sheet is a set of one of more rules that should be applied to a website. A rule is a statement about how to apply a style to an element. The basic components of a rule come down to two parts. The first is a selector, which is the link between the element and the style. After the selector in the rule comes the declaration. The declaration is the part that determines exactly what will be changed and what it will be changed to. The selector and the declaration should be separated by a colon. In Figure 6-1 you can see the breakdown for the selector and declaration.

Once you understand the basic makeup of a CSS rule, you need to understand exactly how you can work with CSS to form more complicated rules. You can group selectors together if they all will have the same declaration. This would appear as follows: H1, H2, H3 {color: red}.
You can also assign more than one declaration to a selector. Grouping multiple declarations together will help to reduce the size of your style sheets. An example of grouping multiple declarations together with one selector follows: CustomTopNav {background-color: red; height: 25px; color: #ffffff;}.
This would set the element associated with the CustomTopNav style to have a background color of red, be 25 pixels high and the text in this area is white. The key to grouping declarations is that declarations must be separated by semicolons for them to be recognized.
The next component in understanding CSS is how you tie your styles into the site. The most common method used by SharePoint 2010 is to associate a single rule with an element. You would perform this action by adding in a style attribute to an individual element. This would appear like the Top Header style in Figure 6-2.

CSS is a standard method for creating style changes and can be combined with elements to create either complex or simple design changes to items in a browser. This allows you to further separate your information from how these items should appear on the page. The use of these style sheets enables you to manage only a single or a few files to control the appearance of your site instead of each page. This cuts down on the amount of overhead in both time and resources needed to maintain and change sites.
How Does CSS Drive the Branding of SharePoint?
In SharePoint Server 2010, CSS plays a major role in determining not only how each element is styled, but now also how it is placed on the page. With the change in SharePoint Server 2010 master pages to be <div>-based instead of HTML table-based, you now have greater ability to use CSS to control the placement of elements on the page in the browser.
SharePoint sites are run by CSS. Almost every element on the pages as displayed in the browser can be customized through an application of custom CSS. This makes CSS a very powerful tool when creating custom branding solutions for SharePoint 2010 sites.
Locations of CSS Files
You need to know where SharePoint Server 2010 stores its CSS files and where you should store them in order to create customized branding solutions. Advantages to learning where SharePoint stores its files include speeding up how long it will take you to make your own customizations and where you should store your own files when applying SharePoint custom branding.
In SharePoint Server 2010 the out-of-the-box CSS files are stored in several different locations throughout the SharePoint root folders. You can see one of the folders housing SharePoint CSS styles in Figure 6-3.

These files are stored in the file server, which gives you a good indication of where SharePoint starts to look for CSS files. However, you can also store your custom CSS files in the content database as exposed through the SharePoint Designer 2010 interface. You also need to plan out exactly what you’re going to customize and how you’re going to customize the files.
The best practices method for storing your custom SharePoint Server 2010 CSS files is still to deploy these as part of a solution package to the file server in the SharePoint root. This gives you the most flexibility on how to access and manage your customized files in a traditional managed code methodology.
What’s New in SharePoint 2010 CSS?
Some changes have been made to SharePoint 2010 CSS and to what exactly is being utilized and displayed via CSS. The biggest of these changes is the ability to position items using CSS. The advantages of using CSS to position items in a website are many, but the most advantages for SharePoint Server 2010 sites will come in increasing the accessibility of sites. By separating the visual layer from the content of your sites to a greater degree, you’re removing the inline styles from the page that would be viewable by page readers. You also have the added feature of more universal cross-browser style declarations that pertain to site accessibility. These declarations allow you to do things like resizing the text on the page from a selection. You also have the ability to use multiple style sheets for different types of browsers and screen readers. Making sites accessible is a huge advantage and something that was problematic and time-consuming in SharePoint Server 2007 and earlier.
Another advantage and feature new to SharePoint Server 2010 CSS is that you now have the ability to use CSS Sprites. This concept allows you to create one image to which you can add multiple items and then use CSS to position and display only the portion of the image that you would like to show. This allows you to avoid the performance hit of needing to load multiple images for a page or site. The thing to keep in mind when working with CSS Sprites is that these will work only for non-repeating images. So if you are looking to create a background gradient graphic that will repeat across an area like the top navigation, this must continue to be treated like a traditional image in your file structure and CSS.
But how exactly do CSS Sprites work? They’re a relatively simple concept to understand but a little more difficult to actually put into place. The best method for creating these is to create an image that is as wide as the largest image you would like to display, and then simply stack all your images into this one image file down the left side separated by a predetermined pixel height. Most people use one pixel as their separator. You will need to remember this height because it will affect your positioning of items in CSS. As you then create your CSS for your items, you will begin by setting the background image to be your entire image file. Then you will select and style the background for the individual items and include positioning on these items.
Modifying CSS Files
As you plan your SharePoint Server 2010 branding customizations, you will inevitably be planning for some customized CSS to change the appearance of your site. You should keep a few things in mind as you begin to make your own custom CSS files.
The biggest thing to remember is that you should never edit the out-of-the-box CSS files directly, for many reasons. The main one is that editing the out-of-the-box files will render any support contract with Microsoft null and void and you will no longer be able to use this support as a method of help. The supporting reason for this logic is also that some service packs and cumulative updates may contain changes to the out-of-the-box files and will overwrite your customizations.
The method that you should undertake when creating customized CSS files for your SharePoint Server 2010 sites is to create your own new CSS file. Once you have created this file you will then put all your customizations to the out-of-the-box classes as well as any completely customized classes in this sheet. You are not restricted to one CSS sheet in working with SharePoint Server 2010. You can create separate style sheets as you see fit. These can include specialized print CSS files or even cross-browser substitution CSS files.
Applying Custom CSS
When you have created your own style sheets for use with your SharePoint Server 2010 sites, you also need to be aware of how you can actually apply these sheets to your sites to customize the look and feel. Two methods exist for adding these sheets to your sites and having them called for display.
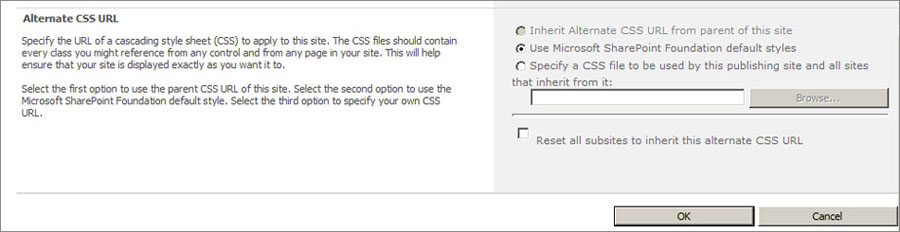
The first of these is to use the publishing site features to apply your custom CSS through the user interface of SharePoint. You can do this by navigating to Site Actions ⇒ Site Settings ⇒ Modify All ⇒ Look and Feel ⇒ Master Pages. Once in this menu you can scroll to the bottom and apply a custom style sheet that has been added to a document library through the alternate CSS link method as shown in Figure 6-4.
It’s important to keep in mind that in using this method of application you must have Publishing features for your site. Also, you can apply only one style sheet at a time.
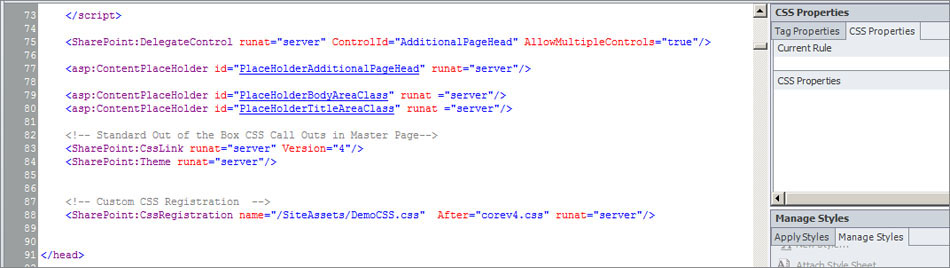
The other option for applying your custom CSS to your SharePoint Server 2010 sites is to do so through the use of a custom master page. To do this you will need to add a CSS registration link in the head tag of your custom master page. In Figure 6-5 you see a sample custom CSS sheet applied to a master page and you will notice the after call is for after the corev4.css file.
The added advantage of using this method is that it allows you more control over the inheritance of your CSS which determines when it is called at run time. It also gives you the flexibility to add multiple style sheets to your site whereas the in-browser option allows you to select and apply only one custom CSS sheet to your site. By applying your style sheets in this manner as well, you can also include them as part of you solution package.
Inheritance of Styles
How does SharePoint Server 2010 apply the CSS classes and style sheets at run time to make the sites display properly? This has always been a bit of a mystery in the logic of the product. In previous versions of SharePoint Server, the only method for trying to control the call of CSS files was to place those in the <head> tag of a custom master page at the very bottom.
In SharePoint Server 2010 sites you now have the ability to instruct SharePoint on when to apply the style sheets at server run time. You can do this in your custom master page files by using the after call in your CSS reference in the <head> tag.
Creating Themable CSS
With the changes to the Theme engine in SharePoint Server 2010 you now have the ability to create custom CSS files and styles that can take advantage of the Theme engine. This means you can create custom controls and items as well as customize the existing items with the Theme engine simply by working with the CSS.
In the CSS elements you can now specify that you would like a particular class to be themed by the new engine. To do this you simply add the correctly commented CSS declaration to the area where the rules are listed. Then you tell this rule how to choose a color and what shade of that color to apply. You can see an example in the following code:
.CustomCSSStyle {
/* [ReplaceColor(themeColor:"Light5-Lightest")] */ border:solid 1px #333333;
/* [ReplaceColor(themeColor:"Light2")] */ background-color:#f5f6f7;
}
In the corev4.css file you will notice that there are themable declarations in many of the out-of-the-box classes and elements. You can also remove the ability for an item to be re-colored by the Theme engine by simply removing this rule from the class.
You can also do this for custom items that you develop like a Web Part. You have a few extra considerations for working with items like the Visual Web Part in Visual Studio 2010. The most important thing in adding your custom CSS that is themable to any custom item is knowing where you need to place your CSS styles. In the SharePoint root you will notice that there is a normal Styles folder and then within that folder there is a Themable folder. You will need to place your custom style sheet into both of these locations. This will allow the part to display appropriately without a custom theme applied and also to perform appropriately when a theme is applied to the site.
The last thing that you will need to do when developing custom items is apply the EnableCSSThemeing attribute. You will want to set this attribute to True if you would like it to be themed or False if you would like to exclude this item from being themed. This attribute is added into the <SharePoint:CssRegistration> tag.
CSS and Page Layouts
Page layouts are the method used to control how the content is placed on the page and displayed to the end user. The master page in SharePoint Server 2010 sites controls the common elements on a site, and the page layouts control the other elements. Page layouts can contain Web Parts, Web Part zones, custom controls, and even content that is applied and saved directly to the layout file.
The creation of custom page layouts is another great method for customizing your SharePoint sites into the branded masterpieces that you desired and designed. When creating custom page layout files, which are simply .aspx pages, you can add your own customized CSS classes to the elements and then style and control the elements using that class.
When working to modify the out-of-the-box page layout files, you will want to examine which core out-of-the-box styles have been applied to the elements and then make your own versions of those styles in your custom CSS style sheet.
Just like the rest of the elements of SharePoint Server 2010, the Web Parts are also branded and controlled by CSS styles. You will need to make modifications to the styles that control these elements if you want to change the way these items appear in the browser.
Customizing Out-of-the-Box Web Part Design Using CSS
To customize the out-of-the-box Web Parts, you will first have to determine which styles are being applied to a Web Part and what exactly you can change. You can use tools like the Internet Explorer Developer tools to find the classes that are applied to a site in the browser.
The CSS that is working to style many of the out-of-the-box Web Parts is the same for each Web Part. This has not changed since the 2007 version of SharePoint. You will need to consider this as you create your branding design. Though most components of a Web Part can be changed to suit your needs or desires, it will often affect each Web Part unless you are working with custom parts.
Using CSS to Style Custom-Developed Web Parts and Controls
When you are working with either third-party or custom-developed Web Parts, you will want to change the way that these items appear in your branding schema. In working with these items you will need to determine first if they can be styled by CSS and then what classes are applied to the elements of the Web Part so that you can add them to your custom CSS sheets.
As developers are creating custom Web Parts, you will need to get the proper class names from them for each component so that you can create a custom style list for these parts in your style sheet. If you are working with a third-party Web Part, most of these will have the ability to either be styled or skinned to match your needs.
In understanding that you will need to customize CSS to make SharePoint Server 2010 branding customizations, you know you’ll also need to pick a tool for making these customizations. So what should you be looking for in the tool for working with CSS and SharePoint?
The biggest consideration is to pick a tool that you are comfortable with. This will make working with all the CSS easier. Various factors need to be considered for each of the Microsoft-recommended tools to change CSS for SharePoint Server 2010.
SharePoint Designer
The first tool to examine is SharePoint Designer 2010. This tool, much as we determined with SharePoint master pages in Chapter 4, has some additional built-in functionality for working with SharePoint sites.
SharePoint Designer 2010 has a new built-in Site Assets library in the file structure of site objects where you can store your custom CSS files as you are developing and testing them in your development environment. The asset library is a new function in SharePoint Server 2010 that is associated with the digital asset management process.
You can add a custom asset library to any site collection or site and use this library to manage media and graphics files for your sites. Within a graphics asset library you can give some more management responsibilities for the files and also provide some files for use by end users on their sites.
In Figure 6-6 you can see the Site Assets library opened to display the customized files for working with this site in its beginning stages, including a custom DemoCSS.css file.

Because CSS files are code files, you may not feel comfortable in working with them in their native format. SharePoint Designer 2010 also has several customizable toolbars and task panes that can provide visual guidance and help as you are working with CSS files. This allows you to choose exactly how much help or how little help you need when working with CSS. These additional toolbars and task panes will provide you the extra support in a visual or text format to help you make modifications or customizations as needed to CSS styles.
The first out-of-the-box SharePoint Designer 2010 feature for working with CSS files is the Style tab in the Ribbon menu of the program itself. When you open a CSS file in SharePoint Designer you will be given the option of using the Style tab in the Ribbon. This tab has many built-in options that can guide you in working with CSS and SharePoint Server 2010. In Figure 6-7 you can see the expanded Style tab in the Ribbon and some of the tools it provides.

The Style tab in the SharePoint Designer 2010 Ribbon is not the only built-in functionality for working with CSS files. There is also a CSS Properties Task Pane that you can use to understand and create styles. In Figure 6-8 you see an expanded CSS Properties Task Pane on the right side. In this task pane you can see the options for declarations that you can add to selectors.

The CSS Properties Task Pane can be used to have a much more visual method of creating CSS. The only catch to this task pane is that you must create the selector name in the file as code before you can use the more visual method to create styles.
The Manage Styles Task Pane is a quick and easy way to see all the styles currently being used in a page. It also provides a preview of the style with all the declarations applied to some sample text. You can see this task pane in Figure 6-9.

Another option in the Manage Styles Task Pane is the Apply Styles tab. This tab allows you to select and apply styles to elements through a visual list of the styles available.
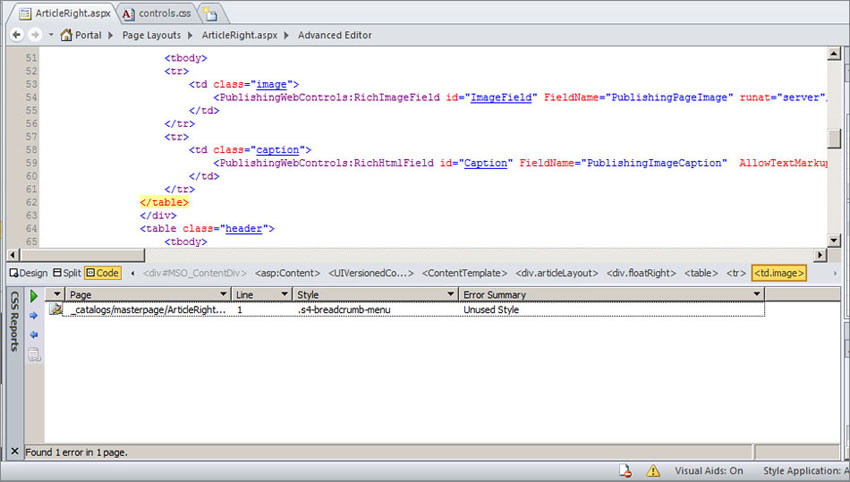
SharePoint Designer 2010 also enables you to run a CSS report. This report will examine the CSS being used on an open site in SharePoint Designer. In Figure 6-10 you can see the options for running a report on CSS errors in the site.

Once the report has run, you will get a report window at the bottom of the SharePoint Designer 2010 interface. You can see this report in Figure 6-11.
The second type of CSS report that you can run in SharePoint Designer 2010 is a CSS usage report. With this report you can find out what styles are being applied to your selections. You can see the options for the usage reports in Figure 6-12.

SharePoint Designer 2010 has many options for working with cascading style sheets that make it most people’s preferred tool. Other options are available for working with CSS in your SharePoint sites.
Visual Studio
Another tool for working with cascading style sheets for your SharePoint Server 2010 sites is Visual Studio 2010. The tools provided out of the box for working with CSS in Visual Studio are not quite as advanced as many graphics programs or web programs like SharePoint Designer. This is a tool you might use if you are more accustomed to working with code.
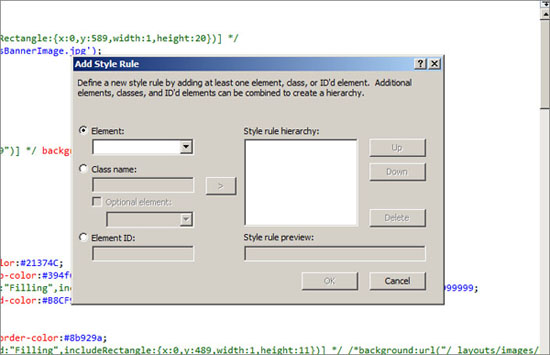
If you are not comfortable creating new styles in the code view of Visual Studio, you can make use of some of the more visual menus for working with CSS in this software. In Figure 6-13 you can see the menu for creating a new style rule.
There is a menu structure for creating or modifying styles in Visual Studio 2010. You can use the Modify or Build Style menu to get a more visual method of creation. This menu is displayed in Figure 6-14.

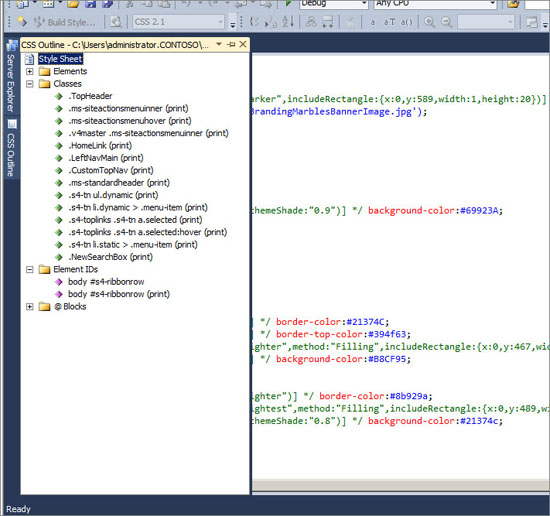
Visual Studio displays CSS in a code-view format. One item that can be helpful when working with larger CSS files, like the one you may run across in creating custom CSS for SharePoint Server 2010 sites, is the CSS Outline view. This task pane allows you to view all the items involved in your CSS file from either an element or a class perspective. By using this menu to drill down into the CSS, you are able to quickly get to the item you need without knowing code line numbers. You can see this menu structure in Figure 6-15.
Visual Studio 2010 is a tool most often used by developers and then by designers after moving their files from another program.
Other Tools
You can use many other tools to work with your CSS files. The tool you choose should be one that you are comfortable working with. This could be anything from Dreamweaver to Notepad.
A few browser-specific tools can be used to identify the CSS being used in your sites at run time. Among these are the developer tools built into Internet Explorer 8 and later. With these tools, you can use the cursor to select an item and then explore the CSS and HTML of that item in the Tools window. You can make modifications to the CSS in this window and see them applied to your site. You can see this in action in Figure 6-16.

Internet Explorer is not the only browser with a helpful tool that you can use to examine the CSS applied to a site. FireFox also has a tool that you can use in a similar way. The FireFox FireBug tool functions similarly.
If cross-browser compatibility is a concern, a number of tools are available that you can use online or purchase to view your site in multiple screen resolutions or multiple browsers without the hassle of creating multiple virtual machines.
Working with cascading style sheets in SharePoint Server 2010 is now more important than ever. With the sheer number of lines of CSS that are now employed by the product to control how the sites appear, you need to be comfortable with the concepts. Once you understand the concepts of basic CSS you can apply them to a custom style sheet to expand your site to fit your branding needs. Branding for SharePoint Server 2010 may be a confusing process, but if you continue to break apart the items you’re trying to change, you can find the common elements for them. Once you have started to find the common elements you can take the sites as far as you like.
A couple of final things to remember when working with your custom CSS will make your life easier as you continue down the branding path. You should try to put all your styles into one style sheet or at most a couple. Also make sure that you comment out your CSS in a manner that describes the items in a way that makes sense to you. This could be in the form of color descriptions or item descriptions.