
One of the surprising techniques available to SharePoint developers is the use of JavaScript to perform postprocessing on pages rendered by SharePoint. This gives you a great deal of flexibility, because you can make any modifications that can be programmed by using JavaScript and the browser's Document Object Model (DOM). This approach has several advantages, including the fact that it doesn't require any .NET programming or modification to underlying site-definition templates, does not require the individual making the modifications to be familiar with .NET programming—only JavaScript, and allows for rapid prototyping.
In this chapter, you'll explore two recipes that provide a good example of what's possible: hiding the QuickLaunch menu on a page, and opening links in a new browser window. Both of these are common requests that end users have, and would require modifying site-definition templates or out-of-the-box libraries to accomplish when using traditional SharePoint customization techniques. However, through the use of JavaScript entered into Content Editor web parts, you can quickly make these changes on a page-by-page basis.
Of course, these two recipes barely scratch the surface of what's possible. I've used similar techniques to associate bar graphs to list items based on the value of a field in the item, to cause links to redirect to a page that records link clicks in a SQL database, and many more variations. What you can do with JavaScript in Content Editor web parts is essentially limited only by your knowledge of how SharePoint renders the page in the first place, and of JavaScript in general.
Let's see how this works in practice.
The QuickLaunch menu is handy most of the time, but it also takes up a great deal of screen real-estate, particularly for users who prefer to set their monitors to a low resolution. Wouldn't it be great if you could give your end users the best of both worlds: having the convenience of being able to access the links on the QuickLaunch menu when needed, but being able to hide it when not in use?
In this recipe, you'll see how a little bit of JavaScript can accomplish this, without the need to alter any of the out-of-the-box SharePoint site definitions or applications.
All that you need to cook up this application is a little bit of JavaScript and some understanding of how Cascading Style Sheets (CSS) works. You'll also need a Content Editor web part to contain your JavaScript.
This recipe relies on the browser's implementation of JavaScript. It has been tested with Internet Explorer (IE) 6.0 and above, and Firefox. If you need to support other browsers, be sure to test it thoroughly.
Even if the browser used is capable of supporting JavaScript, the individual user (or firm policy) may have disabled that feature, in which case the following recipe may not work as expected. On the other hand, so much of SharePoint 2007 relies on JavaScript that it would in any case be almost unusable without JavaScript enabled.
JavaScript recipes apply only to the page on which they're placed, not throughout a web site, site collection, or farm, as is the case with many of the other recipes described in this book.
Note
Although it was common practice several years ago to disable JavaScript support in browsers for security reasons, this practice is much less common today because of the cost in terms of reduced functionality and because of the availability of less-intrusive ways to ensure security and prevent malicious browser-based viruses.
In a browser, open a SharePoint web site on which you have at least Design permissions.
Add a Content Editor web part to the page.
From the Content Editor web part's menu, choose the Modify option.
Click the Source Editor button.
Enter the JavaScript shown in the following recipe section.

Write two
<A>elements to the page; one to display the Show link, the other to display the Hide link—only one of the two links will be visible on the page at any one time.Call the
getElementsByClass()helper function to fill an array with references to all page elements that are assigned to thems-navclass.Read the
isQuickLaunchHiddenbrowser cookie from the user's local cookie cache to determine the start state for the QuickLaunch.If the user's preference is Show, loop through all elements in the array returned by the
getElementsByClass("ms-nav")function call, setting each element'sstyle.displayproperty to an empty string—thus showing that page element. If the preference is Hide, set each element'sstyle.displayproperty tonone.
<script>
// Step 1: Add <a> tags to page to hold Hide/Show options
document.write ('
     <a id="HideOption" href="javascript:Hide()" style="display:none">
          Hide Quicklaunch menu
     </a>'),
document.write ('
     <a id="ShowOption" href="javascript:Show()">
          Show Quicklaunch menu
     </a>'),
// Step 2: Declare an array containing a list
// of all page elements assigned the "ms-nav"
// class
var _NavElements = getElementsByClass("ms-nav");
// Step 3: Read user's current Show/Hide preference
// from local cookie
var isQuickLaunchHidden = readCookie('isQuickLaunchHidden'),
// Step 4: Show or hide the QuickLaunch
// depending on user preference
if (isQuickLaunchHidden == 'true')
{
  Hide();
} else {
  Show();
}
// Helper function to save a cookie representing user-specific
// choice to show or hide the QuickLaunch menu
function createCookie(name,value,days) {
     if (days) {
          var date = new Date();
          date.setTime(date.getTime()+(days*24*60*60*1000));
          var expires = "; expires="+date.toGMTString();
     }
<a id="HideOption" href="javascript:Hide()" style="display:none">
Hide Quicklaunch menu
</a>'),
document.write ('
<a id="ShowOption" href="javascript:Show()">
Show Quicklaunch menu
</a>'),
// Step 2: Declare an array containing a list
// of all page elements assigned the "ms-nav"
// class
var _NavElements = getElementsByClass("ms-nav");
// Step 3: Read user's current Show/Hide preference
// from local cookie
var isQuickLaunchHidden = readCookie('isQuickLaunchHidden'),
// Step 4: Show or hide the QuickLaunch
// depending on user preference
if (isQuickLaunchHidden == 'true')
{
Hide();
} else {
Show();
}
// Helper function to save a cookie representing user-specific
// choice to show or hide the QuickLaunch menu
function createCookie(name,value,days) {
if (days) {
var date = new Date();
date.setTime(date.getTime()+(days*24*60*60*1000));
var expires = "; expires="+date.toGMTString();
}else var expires = "";
document.cookie = name+"="+value+expires+"; path=/";
}
// Helper function to read the cookie to determine whether
// the QuickLaunch menu should be displayed
function readCookie(name) {
var nameEQ = name + "=";
var ca = document.cookie.split(';'),
for(var i=0;i < ca.length;i++) {
var c = ca[i];
while (c.charAt(0)==' ') c = c.substring(1,c.length);
if (c.indexOf(nameEQ) == 0) return c.substring(nameEQ.length,c.length);
}
return null;
}
// Helper function to delete a specified cookie
function eraseCookie(name) {
createCookie(name,"",-1);
}
// Helper function to return an array of web-
// page elements of the specified class. This
// function is needed because SharePoint assigns
// the QuickLaunch a class, but not an ID.
// Otherwise, we could use the native
// GetElementById() JavaScript function.
function getElementsByClass(searchClass,node,tag) {
var classElements = new Array();
if ( node == null )
node = document;
if ( tag == null )
tag = '*';
var els = node.getElementsByTagName(tag);
var elsLen = els.length;
var pattern = new RegExp('(^|\s)'+searchClass+'(\s|$)'),
for (var i = 0, j = 0; i < elsLen; i++) {
if ( pattern.test(els[i].className) ) {
classElements[j] = els[i];
j++;
}
}
return classElements;
}// Helper function to hide the QuickLaunch
function Hide()
{
for (var i=0; i<_NavElements.length; i++)
{
_NavElements[i].style.display = "none";
}
document.getElementById("HideOption").style.display = "none";
document.getElementById("ShowOption").style.display = "";
createCookie ('isQuickLaunchHidden','true',365);
}
// Helper function to display the QuickLaunch
function Show()
{
for (var i = 0; i<_NavElements.length; i++)
{
_NavElements[i].style.display = "";
}
document.getElementById("HideOption").style.display = "";
document.getElementById("ShowOption").style.display = "none";
createCookie ('isQuickLaunchHidden','false',365);
}
</script>Deploying the Show/Hide recipe is simply a matter of entering the JavaScript into a Content Editor web part on a web-part page. Figure 7-1 shows the Text Entry dialog box of a Content Editor web part after the JavaScript has been entered. After you click the Save button, the Hide QuickLaunch Menu option will be displayed on the page.
Figure 7-2 shows the content editor containing the Show/Hide JavaScript on the page.
Note
You will typically want to set the Chrome Type property of the Content Editor web part containing the Show/Hide JavaScript to none so that only the <A> elements are displayed.
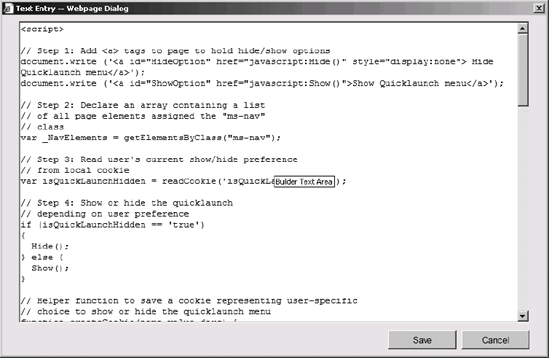
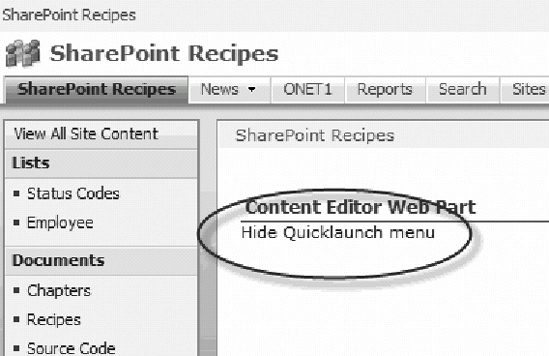
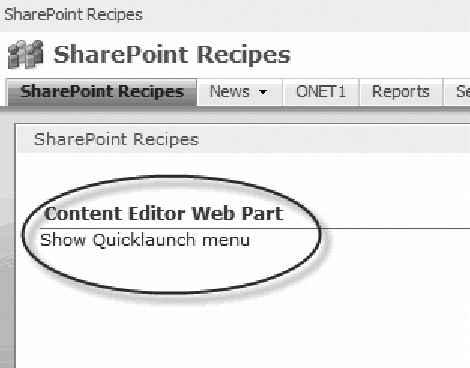
Figure 7-3 shows the page after the Hide option has been clicked.
Because the user's preference is stored in a local cookie, that preference is "remembered" from session to session, and from page to page. Because of this, if the Show/Hide web part is placed on multiple web-part pages, the user's preference will be used for all instances.
In this example, we hid the QuickLaunch menu, but this method can be used to hide any element or elements on a page that can be identified. Because Microsoft's standard templates do not assign an element ID to the QuickLaunch, we needed to use the
getElementsByClass()function. If the element(s) you want to show or hide do have an assigned ID, you can use the standardgetElementById()JavaScript function.
SharePoint opens list items, except for document library items that have an associated application, in the same browser window. There are times when you, or your end users, would prefer these items to be opened in a new window so that that original list display is not lost. This recipe shows you how, with just a bit of JavaScript, to add that feature to any page that displays list items.
To accomplish this bit of magic, we'll use JavaScript to find all the links (that is, <A> elements) on the web page, inspecting the links' href property to decide whether it's associated with a list item, and if so modify the target property to force the target link to open in a new browser window.
One other change we'll need to make to the link is to disable any onclick event handler that may be associated with it, because that handler will fire before the href + target combination, and thus will prevent the target page from opening in a new window despite our changes.
As with the previous JavaScript recipe, all you really need is a Content Editor web part in which to place the JavaScript. In this recipe, we'll take a slightly different approach, in that the bulk of the JavaScript will be stored outside the web part, and will be included by using a <SCRIPT SRC =...> HTML element. The advantage of this approach is that you don't need to copy the code to each page into which you want to insert it. This makes your code much more maintainable and enables you to scale its use to a large number of pages.
This recipe relies on the browser's implementation of JavaScript. It has been tested with IE 6.0 and above, and Firefox. If you need to support other browsers, be sure to test it thoroughly.
Even if the browser used is capable of supporting JavaScript, the individual user (or firm policy) may have disabled that feature, in which case the following recipe may not work as expected. As noted previously, however, without JavaScript support, SharePoint 2007 becomes unusable.
JavaScript recipes apply only to the page on which they're placed, not throughout a web site, site collection, or farm, as is the case with many of the other recipes described in this book.
Note
Although it was common practice several years ago to disable JavaScript support in browsers for security reasons, this practice is much less common today because of the cost in terms of reduced functionality and because of the availability of less-intrusive ways to ensure security and prevent malicious browser-based viruses.
In a browser, open a SharePoint web site on which you have at least Design permissions.
Add a Content Editor web part to the page.
From the Content Editor web part's menu, choose the Modify option.
Click the Source Editor button.
Enter the JavaScript shown in the following "Recipe—Content Editor" section.
Enter the JavaScript shown in the following "Recipe—Library" section and save to a file named something like
OpenInNewWindow.jsto a web-accessible location (for example, a document library).
Note
The following recipe source code assumes a specific location for the OpenInNewWindow.js file. Please be sure that the URL you specify in your code matches the location you choose for the .js file.
Loop through the collection of all
<A>elements on the current page.Assign a pointer to the current
<A>element in the collection to a variable for easier reference.Determine whether the
hrefproperty of the current<A>element includes a reference to one of the target pages we're interested in.If so ...
Set the
targetproperty to_blankto force the page to open in a new browser window.If the calling JavaScript has passed in a value of
truefor the debug flag, write the debug info to the page.Clear out the
onclickevent handler reference, because any existing SharePoint list item JavaScriptonclickhandler will supersede our addedhref/targetcombination, and prevent our change from having any effect.
Note
Clearing out the default JavaScript onclick event handler for the page will disable some of the client application integration features that would otherwise be available in document libraries, especially with Office 2007 documents.
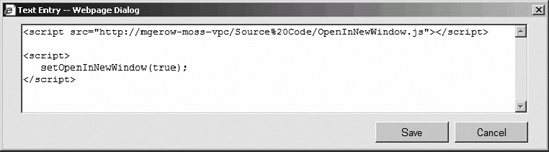
<!-- Include JavaScript source library -->
<script src="http://mgerow-moss-vpc/Source%20Code/OpenInNewWindow.js"></script>
<!-- Call the function to modify <A> page elements -->
<script>
   setOpenInNewWindow(true);
</script>
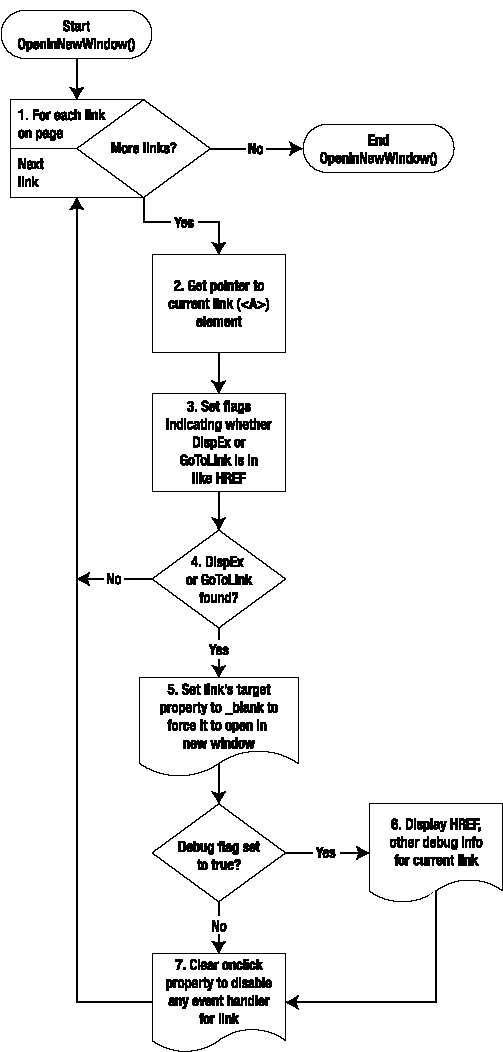
function setOpenInNewWindow(boolDebug) {
     // handle to current <A> element being processed
     var linkElement;
     // flag, test var for "GoToLink" call
     // used on simple links
     var boolTrapGoToLink = true;
     var boolIsGoToLink = false;
     // flag, test var for "DispEx" call
     // used on links that have associated
     // context menus
     var boolTrapDispEx = true;
     var boolIsDispEx = false;
// Step 1: Loop through all links on page
for (var i=0; i<document.links.length; i++)
{
// Step 2: Get handle to current link
linkElement = document.links[i];
try {
// Step 3: Determine whether link has either of the
// href values sought
boolIsGoToLink =
(linkElement.onclick.toString().indexOf("GoToLink") != −1) &&
boolTrapGoToLink;
boolIsDispEx =
(linkElement.onclick.toString().indexOf("DispEx") != −1) &&
boolTrapDispEx;
// Step 4: If link requires fix-up
if ( boolIsGoToLink || boolIsDispEx ) {
// Step 5: Assign link's target to new window
linkElement.target = "_blank";
// Step 6: If debug flag on, print out key information
// for affected links
if (boolDebug) {
document.write("<br/>" +
linkElement.Id + ": " +
linkElement.innerText + ": " +
linkElement.href + ": " +
linkElement.target);
document.write("<br/> " +
linkElement.onclick);
document.write("<br/> GoToLink at: " +
linkElement.onclick.toString().indexOf("GoToLink"));
document.write("<br/> DispEx at: " +
linkElement.onclick.toString().indexOf("DispEx"));
}
// Step 7: Clear onclick handler so .target
// parameter will be used to open
// link
linkElement.onclick = "";
}
} catch (e) {
//document.write(e);
}
}
}After you've uploaded the JavaScript listed in the preceding "Recipe—Library" section, add a new content editor to the bottom of a list page, as shown in Figure 7-4.
Note that setOpenInNewWindow() is called with a debug flag of true. In general use, you would pass a value of false to avoid displaying the debug information to the page. Save the content and exit page edit mode. Your page should look similar to that shown in Figure 7-5.

Note the debug information shown at the bottom of the page. Finally, you can test your web part by clicking the Name link of a document that would usually open in the same browser window. In my example, I clicked the Ch 7-1 image file. The result is shown in Figure 7-6.

This recipe is specifically designed to look for
hrefvalues containingDispExcalls used for document context menus, orGoToLinkcalls used for nondocument list items. These two calls are not exhaustive of all the targets SharePoint uses for links, so you will want to experiment to find the right set for your purposes. Of course, you may have your own specific links you'd like to fix by using this technique.Use JavaScript in a Content Editor web part placed on a web-part page (such as the home page of a site) to open Links list items in a new window.
Related to the previous variation, you could modify the
setOpenInNewWindow()method to take an additional string parameter containing the string sequence to search for. That way, you don't need to hard-code thehrefvalues within the function itself.