
The recipes in this chapter focus on automating tasks related to managing site collections and sites. You might be thinking that SharePoint 2007 (either Microsoft Office SharePoint Server or Windows SharePoint Services 3.0) already provides some pretty nifty ways to manage sites through the user interface (UI). For example, it's easy to add a web part and configure it on a web-part page. And backing up a site collection by using STSADM is pretty straightforward.
But what if, instead of a single site, we're talking about 1,000 sites that all need the same web part added? You could, of course, create a Feature and deploy it to your web application, but that doesn't put the web part on the page. And what if you want to make the same change to one or more property settings on a web part for all those 1,000 sites? And what if that change differs based on some other information on the site? You get the picture.
So the first set of recipes in this chapter shows you how to create site collections and sites, as well as enables you to manage web parts programmatically, making it feasible to customize large numbers of sites. There are also recipes to help you calculate storage for a given list or for a site (you can already get the storage for an entire site collection).
Finally, this chapter provides a recipe to enable you to take control of the backup process, making it easier to backup and recover individual site collections when needed.
Let's dig in...
Programmatically generating site collections has many advantages in terms of promoting consistency of organization. For example, you may want to make sure that the naming of new site collections follows a corporate standard and that these collections are created by using a particular path. You may also want to ensure that a specific account is assigned to the site collection administrators group. The following recipe shows you how to accomplish these programming goals by using the object model and a .NET console application. The functionality is similar to that found in the STSADM –O CREATESITE command, with one twist—this recipe will prompt the user for missing parameters. However, you can build on this recipe to expand its functionality as needed.
Note
Assembly references are made by right-clicking the project name in the Solution Explorer and then choosing the Add Reference option. Class Library references are added by placing C# using or Visual Basic (VB) Imports statements for the specified library at the top of a module, class, or code-behind file.
SharePoint requires that site collections be created by accounts that have sufficient privileges. The following recipe is designed to be used in a .NET console application, and can be run either manually or via the Windows Task Scheduler. Console applications are particularly useful in combination with the Windows Task Scheduler application, enabling you to create processes that run against SharePoint at predefined intervals.
Although this recipe essentially duplicates what is available through the
STSADM –O CREATESITEcommand, it opens up many possibilities for customizations (such as prompting the user for missing parameters).Because of security restrictions that SharePoint imposes on ASP.NET web applications and services, members of the
Microsoft.SharePoint.Administrationlibrary are best used through console or Windows applications, where the security context is directly inherited from the user. The limitation is that these applications must be run from a front-end web server that is part of the SharePoint farm. This is appropriate for administrative tools, but not convenient if you want to make this functionality available to end users. In a related recipe using the SharePoint web service, you'll see how to build an ASP.NET web application to add new site collections.

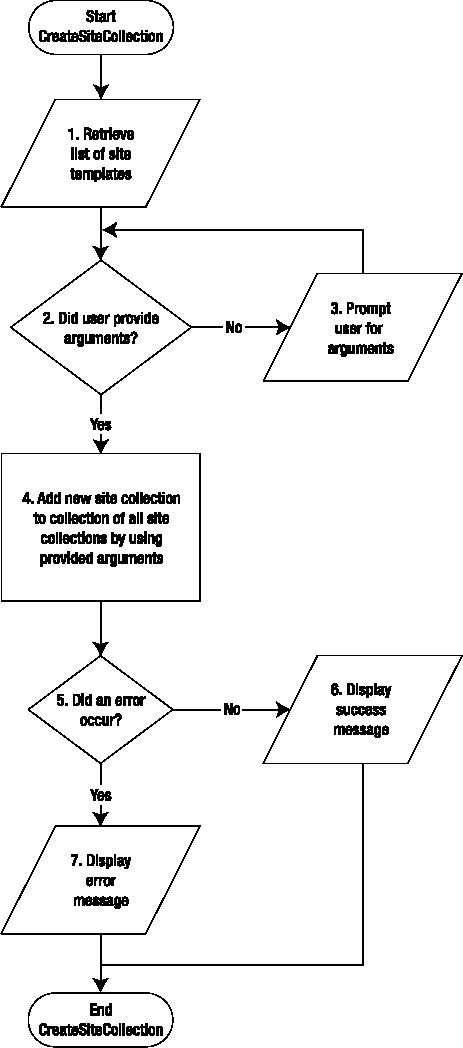
The first step is to determine whether the user passed in the necessary arguments to this process. If so, they will be used when calling the
SPSiteCollection.Add()method. If not, you need to get that information from the user now.Prompt the user for the necessary data by using the
WriteLine()andRead()methods.Using the supplied inputs, call the
SPSiteCollection.Add()method to add the new site collection.If the
SPSiteCollection.Add()method throws an exception, go to step 6; otherwise go to step 5.Display a success message to the console. Go to step 7.
Display an error message, including a description of the exception thrown, to the console.
Write all parameters back to the console so the user can see exactly what was received and acted on by the application.
Note
The SPSiteCollection object is poorly named, in that it really refers to a collection of site collections. This naming is a continuation of the semantic confusion of earlier versions of SharePoint, where the terms site and site collection were (and still are) used interchangeably in some contexts, while the terms site and web are used to mean the same thing in others.
Imports Microsoft.SharePoint
Imports Microsoft.SharePoint.Administration
Module Module1
    Sub Main (ByVal args() As String)
        'Steps 1-2: If no arguments have been passed,
        'prompt user to enter them now
        If args.Length = 0 Then
            ReDim args(7)
            args = GetParams(args)
        End If
        'Add the new site collection using the provided arguments
        AddSiteCollection(args)
    End Function
    Private Function AddSiteCollection(ByVal args() As String) As Integer
        Try
            'Get a handle to the root site on server
            Dim arrSitePath As String() = args(0).Split("/")
            Dim strServerPath As String = arrSitePath(0) & "//" & _
            arrSitePath(2)
            Dim site As New SPSite(strServerPath)
            'Get the list of site collections for the web application
Dim siteCollection As SPSiteCollection = _
site.WebApplication.Sites
'Step 3: Add the site collection
'args(0) = Site url
'args(1) = Title
'args(2) = Description
'args(3) = Web template
'args(4) = Owner login
'args(5) = Owner name
'args(6) = Owner email
siteCollection.Add( _
args(0), _
args(1), _
args(2), _
1033, _
args(3), _
args(4), _
args(5), _
args(6))
'Step 5: Confirm site collection information
Console.WriteLine()
Console.WriteLine("Site collection '" & args(0) & _
"' successfully created.")
Console.WriteLine()
DisplayParams(args)
'Release memory used by SPSite object
site.Dispose()
Return 0
Catch ex As Exception
'Step 6: If error occurs, display parameters and error message
Console.WriteLine()
Console.WriteLine("** ERROR OCCURRED **")
Console.WriteLine()
Console.WriteLine(ex.Message)
Console.WriteLine()
DisplayParams(args)
Console.WriteLine()
End Try
End Sub
Private Sub DisplayParams(ByVal args)
Try
'Step 7: Display parameters to console
Console.WriteLine("Site url: " & args(0))
Console.WriteLine("Title: " & args(1))
Console.WriteLine("Description: " & args(2))
Console.WriteLine("Template name: " & args(3))
Console.WriteLine("Owner login: " & args(4))Console.WriteLine("Owner name: " & args(5))
Console.WriteLine("Owner email: " & args(6))
Catch ex As Exception
'If error occurred, display the error message
Console.WriteLine()
Console.WriteLine(ex.Message)
Console.WriteLine()
End Try
End Sub
Private Function GetParams(ByRef args() As String) As String()
Try
'Step 2: Get parameters from user
Console.WriteLine()
Console.Write("Site url: ")
args(0) = Console.ReadLine()
Console.Write("Title: ")
args(1) = Console.ReadLine()
Console.Write("Description: ")
args(2) = Console.ReadLine()
Console.Write("Template name: ")
args(3) = Console.ReadLine()
Console.Write("Owner login: ")
args(4) = Console.ReadLine()
Console.Write("Owner name: ")
args(5) = Console.ReadLine()
Console.Write("Owner email: ")
args(6) = Console.ReadLine()
Catch ex As Exception
'If an error occurred, display the error message
Console.WriteLine()
Console.WriteLine(ex.Message)
Console.WriteLine()
End Try
Return args
End Function
End ModuleTip
Whenever you create a new SPSite object or reference an SPWeb object, you should call their Dispose() methods when done, to avoid leaving discarded copies in memory and the associated "memory leak." The reason that you need to explicitly Dispose() of these objects is that SPSite and SPWeb are thin wrappers around unmanaged code, and thus are not automatically handled by the .NET garbage-collection routines. See the Microsoft article at http://msdn2.microsoft.com/en-us/library/aa973248.aspx for more information.
using Microsoft.SharePoint;
using Microsoft.SharePoint.Administration;
using System;
class Module1 {
    static void Main(string[] args) {
        // Steps 1-2: If no arguments have been passed,
        // prompt user to enter them now
        if ((args.Length == 0)) {
            args = new string[7];
            args = GetParams(ref args);
        }
        // Add the new site collection using the provided arguments
        AddSiteCollection(args);
    }
    private static int AddSiteCollection(string[] args) {
        try {
            // Get a handle to the root site on server
            string[] arrSitePath = args[0].Split('/'),
            string strServerPath = (arrSitePath[0]
               + ("//" + arrSitePath[2]));
            SPSite site = new SPSite(strServerPath);
            // Get the list of site collections for the web
            // application
            SPSiteCollection siteCollection =
               site.WebApplication.Sites;
            // Step 3: Add the site collection
            // args(0) = Site url
            // args(1) = Title
            // args(2) = Description
            // args(3) = Web template
            // args(4) = Owner login
            // args(5) = Owner name
            // args(6) = Owner email
            siteCollection.Add(args[0], args[1], args[2], 1033,
               args[3], args[4], args[5], args[6]);
            // Step 5: Confirm site collection information
            Console.WriteLine();
            Console.WriteLine(("Site collection '"
                  + (args[0] + "' successfully created.")));
            Console.WriteLine();
            DisplayParams(args);
            // Release memory used by SPSite object
            site.Dispose();
            return 0;
        }
catch (Exception ex) {
// Step 6: If error occurs, display parameters and error message
Console.WriteLine();
Console.WriteLine("** ERROR OCCURRED **");
Console.WriteLine();
Console.WriteLine(ex.Message);
Console.WriteLine();
DisplayParams(args);
Console.WriteLine();
return −1;
}
}
private static void DisplayParams(string[] args) {
try {
// Step 7: Display parameters to console
Console.WriteLine(("Site url: " + args[0]));
Console.WriteLine(("Title: " + args[1]));
Console.WriteLine(("Description: " + args[2]));
Console.WriteLine(("Template name: " + args[3]));
Console.WriteLine(("Owner login: " + args[4]));
Console.WriteLine(("Owner name: " + args[5]));
Console.WriteLine(("Owner email: " + args[6]));
}
catch (Exception ex) {
// If error occurred, display the error message
Console.WriteLine();
Console.WriteLine(ex.Message);
Console.WriteLine();
}
}
private static string[] GetParams(ref string[] args) {
try {
// Step 2: Get parameters from user
Console.WriteLine();
Console.Write("Site url: ");
args[0] = Console.ReadLine();
Console.Write("Title: ");
args[1] = Console.ReadLine();
Console.Write("Description: ");
args[2] = Console.ReadLine();Console.Write("Template name: ");
args[3] = Console.ReadLine();
Console.Write("Owner login: ");
args[4] = Console.ReadLine();
Console.Write("Owner name: ");
args[5] = Console.ReadLine();
Console.Write("Owner email: ");
args[6] = Console.ReadLine();
}
catch (Exception ex) {
// If an error occurred, display the error message
Console.WriteLine();
Console.WriteLine(ex.Message);
Console.WriteLine();
}
return args;
}
}This console application would typically be either run interactively from a command window or called from a command script. Figure 1-1 shows it being run interactively.

In the preceding example, I passed all the needed parameters on the command line and so was not prompted to enter them. If I'd entered only the command CreateSiteCollectionConsole-CS.exe, the program would have prompted me to enter the missing data.
Use a console app as in the preceding example, but instead of using the SharePoint object model classes, shell out (that is, run a separate command file) to the
STSADM –O CREATESITEcommand. Although this may be less work initially, it makes input validation and error trapping more difficult.Use a web application that shells out to the preceding application. This sidesteps SharePoint's security restriction on ASP.NET applications, but again makes error trapping next to impossible. You'll see in a related recipe how to use the SharePoint web services in combination with an ASP.NET application as a better alternative to this variation.
Use a .NET Windows application instead of a console application. This enables you to create a more elegant UI, but remember that the application can run only on a front-end web server in your SharePoint farm.
As you saw in the previous recipe, it's a straightforward matter to create a new site collection by using the object model. Why then would you ever need to use the SharePoint web service alternative? The answer to this highlights one of the key benefits of using the SharePoint web services, namely, portability.
Although the object model exposes virtually all the features and functions of SharePoint, it must be used by .NET programs that execute on a SharePoint front-end web server. This is not true of the web services, which may be called from any computer that has sufficient privileges to connect to the SharePoint web site. This means that by using SharePoint web services (or custom web services you create based on the object model), you can build distributed SharePoint solutions in which some of the components may reside anywhere in the world that an Internet connection is available.
We also saw that SharePoint's security restrictions on ASP.NET applications made calling the SPSiteCollection.Add() method from an ASP.NET application impractical. The web service equivalent does not have that limitation.
The following recipe provides similar functionality to that available in the object model version, but uses the SharePoint web service instead.
Note
The account you use to access the Admin web service must be a member of the Farm Administrators group in the Central Administration site.
http://Virtual_Server_Name:[central admin port]/_vti_adm/Admin.asmxhttp://Virtual Server Name:[web app port]/_vti_bin/Sites.asmx
Note
Web services references are added by right-clicking on the project name in the Solution Explorer window and choosing the Add Web Reference option.
The preceding two URLs represent the logical locations for SharePoint web services. To make these web services available, use the Visual Studio Add Web Reference option. In the following code, I've named the references AdminService and SitesService, respectively.
The most important thing to keep in mind with SharePoint web services (as with any web service) is that they are web pages that you call programmatically. And, like many web pages, they require the calling process to authenticate before responding. With a web service, this authentication must be explicit, so it's important to always set the
Credentialproperty of the object instance of the service before calling any method that will return data. Not doing so, in my experience, is the number one cause of errors when using SharePoint web services.In the following code, I'm using the
System.Net.CredentialCache.DefaultCredentialsproperty to assign the credentials of the current user (assuming the ASP.NET application is impersonating the logged-in user). This means that if the current user doesn't have Farm Administrator permissions, that user won't be able to add a site collection and the add operation will fail. If you want to force all requests to run under a specific account, you can use theSystem.Net.NetworkCredential()method instead to create a credential for a specific user login (for example, a service account) that you know will have sufficient permissions.
Note
This is an ASP.NET recipe, but SharePoint web services may be called from any .NET application, including Console, WinForm, Windows Service, Web Application, or Web Service.
Retrieve the list of available site templates.
Verify that the user filled in all fields on the web page.
If one or more required fields are missing, prompt the user to provide missing data before proceeding.
Call the SharePoint web service to add the new site collection.
Trap any errors.
If no errors occurred while adding the new site collection, display a success message.
If an error did occur, display an error message.
Note
The following is the ASPX code for the VB version of this recipe. Other than minor changes to the %@Page language and code file attributes, this code is identical to the C# version.
<%@ Page Language="VB" AutoEventWireup="false" CodeFile="Default.aspx.vb"
         Inherits="_Default" %>
<!DOCTYPE html PUBLIC "-//W3C//DTD XHTML 1.0 Transitional//EN"
        "http://www.w3.org/TR/xhtml1/DTD/xhtml1-transitional.dtd">
<html xmlns="http://www.w3.org/1999/xhtml" >
<head runat="server">
    <title>Untitled Page</title>
</head>
<body>
    <form method="post" id="form1" runat="server">
    <div>
        <table>
            <tr>
                <td style="width: 163px">
                    Site collection path:</td>
                <td style="width: 100px">
                    <asp:TextBox ID="txtSiteCollPath" runat="server">
                       http://localhost/sites</asp:TextBox></td>
                <td style="width: 169px">
                    </td>
            </tr>
            <tr>
                <td style="width: 163px">
                    Template:</td>
<td style="width: 100px">
<asp:DropDownList ID="ddlTemplate" runat="server">
</asp:DropDownList></td>
<td style="width: 169px">
</td>
</tr>
<tr>
<td style="width: 163px">
Site name:</td>
<td style="width: 100px">
<asp:TextBox ID="txtSiteName" runat="server"></asp:TextBox></td>
<td style="width: 169px">
</td>
</tr>
<tr>
<td style="width: 163px">
Site owner login:</td>
<td style="width: 100px">
<asp:TextBox ID="txtOwnerLogin" runat="server"></asp:TextBox>
</td>
<td style="width: 169px">
</td>
</tr>
<tr>
<td style="width: 163px">
Owner name:</td>
<td style="width: 100px">
<asp:TextBox ID="txtOwnerName" runat="server"></asp:TextBox>
</td>
<td style="width: 169px">
</td>
</tr>
<tr>
<td style="width: 163px">
Site owner email:</td>
<td style="width: 100px">
<asp:TextBox ID="txtOwnerEmail" runat="server"></asp:TextBox>
</td>
<td style="width: 169px">
</td>
</tr>
<tr>
<td style="width: 163px">
Title:</td>
<td style="width: 100px">
<asp:TextBox ID="txtTitle" runat="server"></asp:TextBox></td>
<td style="width: 169px">
</td></tr>
<tr>
<td style="width: 163px">
Description:</td>
<td style="width: 100px">
<asp:TextBox ID="txtDescription" runat="server" Rows="5"
TextMode="MultiLine" Width="350px"></asp:TextBox></td>
<td style="width: 169px">
</td>
</tr>
<tr>
<td style="width: 163px">
</td>
<td style="width: 100px">
</td>
<td style="width: 169px">
</td>
</tr>
<tr>
<td style="width: 163px">
</td>
<td style="width: 100px">
<asp:Button ID="cmdCreateNewSiteCollection" runat="server"
Text="Create New Site Collection" /></td>
<td style="width: 169px">
</td>
</tr>
<tr>
<td style="width: 163px">
</td>
<td style="width: 100px">
</td>
<td style="width: 169px">
</td>
</tr>
<tr>
<td align="center" colspan="3">
<asp:Label ID="lblMessage" runat="server" ForeColor="Red">
</asp:Label>
</td>
</tr>
</table>
</div>
</form>
</body>
</html>Partial Class _Default
Inherits System.Web.UI.Page
Protected Sub Page_Load(ByVal sender As Object, _
ByVal e As System.EventArgs) Handles Me.Load
Try
'Step 1: Get list of templates for the selected web application
Dim objSites As New SitesService.Sites
objSites.Credentials = _
System.Net.CredentialCache.DefaultCredentials
Dim arrTemplates() As SitesService.Template
Dim templateCount As Integer = __
objSites.GetSiteTemplates(1033, arrTemplates)
Dim i As Integer
Dim listItem As ListItem
ddlTemplate.Items.Clear()
For i = 0 To arrTemplates.Length - 1
'Don't include hidden templates,
'which are not intended for interactive use
If Not arrTemplates(i).IsHidden Then
listItem = New ListItem(arrTemplates(i).Title, __
arrTemplates(i).Name)
ddlTemplate.Items.Add(listItem)
End If
Next
ddlTemplate.Enabled = True
lblMessage.Text = ""
Catch ex As Exception
lblMessage.Text = ex.Message
End Try
End Sub
Protected Sub cmdCreateNewSiteCollection_Click(ByVal sender As Object, _
ByVal e As System.EventArgs) Handles cmdCreateNewSiteCollection.Click
Try
'Step 2: Make sure all necessary data is provided
If txtSiteCollPath.Text > "" _
And txtSiteName.Text > "" _
And txtTitle.Text > "" _
And txtDescription.Text > "" _
And ddlTemplate.SelectedValue > "" _
And txtOwnerLogin.Text > "" _
And txtOwnerName.Text > "" _
And txtOwnerEmail.Text > "" Then
'Step 4: Add new site collection
Dim objAdmin As New AdminService.Admin
objAdmin.Credentials = _
System.Net.CredentialCache.DefaultCredentialsobjAdmin.CreateSite( _
txtSiteCollPath.Text & "/" & txtSiteName.Text, _
txtTitle.Text, _
txtDescription.Text, _
1033, _
ddlTemplate.SelectedValue, _
txtOwnerLogin.Text, _
txtOwnerName.Text, _
txtOwnerEmail.Text, _
"", "")
'Step 6: Display success message
lblMessage.Text = "Successfully added new site"
lblMessage.Visible = True
Else
'Step 3: Prompt user to enter all data
lblMessage.Text = "Please fill in all fields"
lblMessage.Visible = True
End If
Catch ex As Exception
'Step 7: Display error message
lblMessage.Text = ex.Message
lblMessage.Visible = True
End Try
End Sub
End Classusing System;
using System.Data;
using System.Configuration;
using System.Web;
using System.Web.Security;
using System.Web.UI;
using System.Web.UI.WebControls;
using System.Web.UI.WebControls.WebParts;
using System.Web.UI.HtmlControls;
public partial class _Default : System.Web.UI.Page {
protected void Page_Load(object sender, System.EventArgs e) {
try {
if (!IsPostBack)
{
// Step 1: Get list of templates for the selected
// web application
SitesService.Sites objSites =
new SitesService.Sites();
objSites.Credentials =
System.Net.CredentialCache.DefaultCredentials;SitesService.Template[] arrTemplates;
uint langId = (uint)1033;
uint templateCount =
objSites.GetSiteTemplates(langId, out arrTemplates);
int i;
ListItem listItem;
ddlTemplate.Items.Clear();
for (i = 0; (i <= (arrTemplates.Length - 1)); i++)
{
// Don't include hidden templates, which are
// not intended for interactive use
if (!arrTemplates[i].IsHidden)
{
listItem = new ListItem(arrTemplates[i].Title,
arrTemplates[i].Name);
ddlTemplate.Items.Add(listItem);
}
}
ddlTemplate.Enabled = true;
lblMessage.Text = "";
}
}
catch (Exception ex) {
lblMessage.Text = ex.Message;
}
}
protected void cmdCreateNewSiteCollection_Click1(object sender,
EventArgs e)
{
try
{
// Step 2: Make sure all necessary data is provided
if (txtSiteCollPath.Text != ""
&& txtSiteName.Text != ""
&& txtTitle.Text != ""
&& txtDescription.Text != ""
&& ddlTemplate.SelectedValue != ""
&& txtOwnerLogin.Text != ""
&& txtOwnerName.Text != ""
&& txtOwnerEmail.Text != ""){
// Step 4: Add new site collection
AdminService.Admin objAdmin = new AdminService.Admin();
objAdmin.Credentials =
System.Net.CredentialCache.DefaultCredentials;
objAdmin.CreateSite((txtSiteCollPath.Text + ("/" +
txtSiteName.Text)),
txtTitle.Text,
txtDescription.Text,
1033,
ddlTemplate.SelectedValue,
txtOwnerLogin.Text,
txtOwnerName.Text,
txtOwnerEmail.Text,
"", "");
// Step 6: Display success message
lblMessage.Text = "Successfully added new site";
lblMessage.Visible = true;
}
else
{
// Step 3: Prompt user to enter all data
lblMessage.Text = "Please fill in all fields";
lblMessage.Visible = true;
}
}
catch (Exception ex)
{
// Step 7: Display error message
lblMessage.Text = ex.Message;
lblMessage.Visible = true;
}
}
}The application is run from a web browser. When the ASP.NET web form first loads, the drop-down list of templates is populated. After all fields have been filled in, you click the Create New Site Collection button. A simple validation check ensures that data has been entered for all fields. Figure 1-2 shows the recipe in action.
After processing is complete (or has thrown an exception), the message label at the bottom of the page is set and the page is refreshed.
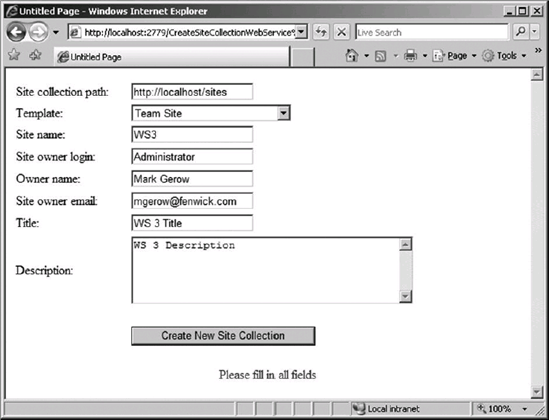
In this simple example, all fields were required, with validation running in the event handler for the Create New Site Collection button. An alternative is to add client-side validation by using validator controls.
Provide the option of opening up the new site in the same or a new browser window.
Allow the user to create a range of site collections (for example, WS1–WS99) through a single page.
Provide a series of checkboxes to enable the user to indicate which web parts to place on the home page of the root web site.
Having the ability to create sites programmatically is a great time-saver that opens the door to creating automated workflows around site provisioning. Although Microsoft provided lots of options in terms of tailoring site definitions through Features, and provides the <ExecuteUrl> directive in Onet.xml that enables you to automatically run an ASP.NET page immediately after a site is created, nothing beats having direct, complete control when it comes to provisioning new sites.
This recipe shows you how to provision a new site by using the SharePoint object model. As you've already learned, applications that use the object model must execute on a front-end web server in the SharePoint farm, and must execute under the credentials of an account with sufficient permissions. For that reason, provisioning sites by using the object model works best when using a .NET console or Windows Forms application. The following recipe demonstrates how to create a .NET console application that provisions a site.
Although this recipe essentially duplicates what is available through the
STSADM –O CREATEWEBcommand, it opens up many possibilities for customizations (such as prompting the user for missing parameters).If you're somewhat new to SharePoint, it's easy to get confused about the distinction between a site collection, site, and web, especially because Microsoft doesn't use the latter two terms consistently in its object model or documentation. Sometimes site collection and site are used to mean the same thing, and other times site and web are used synonymously. The
SPSiteclass represents a collection ofSPWebobjects. When you provision a new site collection (as in the two earlier recipes), it automatically includes one web that is designated as the root web and is accessed via theSPSite.RootWebproperty. Thus site collections always have at least one child web. The choice of terminology is unfortunate, but it seems like we're stuck with it!

Make sure that all necessary information is provided by the user. This information may be provided on the command line that calls the program, or may be entered in response to prompts that the program displays.
If arguments weren't provided from the command line, prompt the user to enter necessary data at the console.
Call the
SPSite.AllWebs.Add()method to add the new site (web).Determine whether an error occurs.
If no error occurs, display the success message.
Otherwise, if an error occurs, display the error message to the console.
Write out all the arguments that were used to provision the new site (web) to the console window.
Imports Microsoft.SharePointImports System Module Module1 SubMain(ByValargs()As String)' Steps 1-2: If no arguments have been passed, prompt user to ' enter them now If (args.Length = 0) Then args = New String((7) - 1) {} args = GetParams(args) End If ' Add the new site (web) using the provided arguments AddSite(args) End Sub Private Function AddSite(ByVal args() As String) As Integer Try ' Get a handle to the site collection to which the ' new site will be added. Dim strSitePath As String = args(0) Dim site As SPSite = New SPSite(strSitePath) ' Add the new site (web) ' ---------------------- ' Step 3: Add the site collection ' args(0) = Site collection url ' args(1) = Site (web) url ' args(2) = Title ' args(3) = Description ' args(4) = Template
Dim web as SPweb = site.AllWebs.Add(args(1), _
                args(2), _
                args(3), _
                CType(1033, UInteger), _
                args(4), _
                False, _
                False)
            ' Step 5: Confirm site (web) information
            Console.WriteLine()
            Console.WriteLine(("Site '" __
                  + (args(0) & args(1) + "' successfully created.")))
            Console.WriteLine()
            DisplayParams(args)
            ' Release memory used by SPSite and SPWeb objects
            web.Dispose()
            site.Dispose()
            Return 0
        Catch ex As Exception
            ' Step 6: If error occurs, display parameters and
            ' Error message
            Console.WriteLine()
            Console.WriteLine("** ERROR OCCURRED **")
            Console.WriteLine()
            Console.WriteLine(ex.Message)
            Console.WriteLine()
            DisplayParams(args)
            Console.WriteLine()
            Return −1
        End Try
    End Function
    Private Shared Sub DisplayParams(ByVal args() As String)
        Try
            ' Step 7: Display parameters to console
            Console.WriteLine("Site collection url: " + args(0))
            Console.WriteLine("Site (web): " + args(1))
            Console.WriteLine("Title: " + args(2))
            Console.WriteLine("Description: " + args(3))
            Console.WriteLine("Template: " + args(4))
        Catch ex As Exception
            ' If error occurred, display the error message
            Console.WriteLine()
            Console.WriteLine(ex.Message)
            Console.WriteLine()
        End Try
    End Sub
Private Shared Function GetParams(ByRef args() As String) As String()
Try
' Step 2: Get parameters from user
Console.WriteLine()
Console.Write("Site collection url: ")
args(0) = Console.ReadLine
Console.Write("Site (web): ")
args(1) = Console.ReadLine
Console.Write("Title: ")
args(2) = Console.ReadLine
Console.Write("Description: ")
args(3) = Console.ReadLine
Console.Write("Template: ")
args(4) = Console.ReadLine
Catch ex As Exception
' If an error occurred, display the error message
Console.WriteLine()
Console.WriteLine(ex.Message)
Console.WriteLine()
End Try
Return args
End Function
End Classusing Microsoft.SharePoint;
using System;
using System.Collections.Generic;
using System.Text;
class Module1
{
static void Main(string[] args)
{
// Steps 1-2: If no arguments have been passed,
// prompt user to enter them now
if ((args.Length == 0))
{
args = new string[7];
args = GetParams(ref args);
}
// Add the new site (web) using the provided arguments
AddSite(args);
}private static int AddSite(string[] args)
{
try
{
// Get a handle to the site collection to which the
// new site will be added.
string strSitePath = args[0];
SPSite site = new SPSite(strSitePath);
// Add the new site (web)
// ----------------------
// Step 3: Add the site collection
// args(0) = Site collection url
// args(1) = Site (web) url
// args(2) = Title
// args(3) = Description
// args(4) = Template
SPWeb web = site.AllWebs.Add(
args[1],
args[2],
args[3],
(uint)1033,
args[4],
false,
false);
// Step 5: Confirm site (web) information
Console.WriteLine();
Console.WriteLine("Site '" + args[0]+args[1]
+ "' successfully created.");
Console.WriteLine();
DisplayParams(args);
// Release memory used by SPSite, SPWeb objects
web.Dispose();
site.Dispose();
return 0;
}
catch (Exception ex)
{
// Step 6: If error occurs, display parameters and error message
Console.WriteLine();
Console.WriteLine("** ERROR OCCURRED **");
Console.WriteLine();
Console.WriteLine(ex.Message);
Console.WriteLine();
DisplayParams(args);
Console.WriteLine();
return −1;
}}
private static void DisplayParams(string[] args)
{
try
{
// Step 7: Display parameters to console
Console.WriteLine(("Site collection url: " + args[0]));
Console.WriteLine(("Site (web): " + args[1]));
Console.WriteLine(("Title: " + args[2]));
Console.WriteLine(("Description: " + args[3]));
Console.WriteLine(("Template: " + args[4]));
}
catch (Exception ex)
{
// If error occurred, display the error message
Console.WriteLine();
Console.WriteLine(ex.Message);
Console.WriteLine();
}
}
private static string[] GetParams(ref string[] args)
{
try
{
// Step 2: Get parameters from user
Console.WriteLine();
Console.Write("Site collection url: ");
args[0] = Console.ReadLine();
Console.Write("Site (web): ");
args[1] = Console.ReadLine();
Console.Write("Title: ");
args[2] = Console.ReadLine();
Console.Write("Description: ");
args[3] = Console.ReadLine();
Console.Write("Template: ");
args[4] = Console.ReadLine();
}
catch (Exception ex)
{
// If an error occurred, display the error message
Console.WriteLine();
Console.WriteLine(ex.Message);
Console.WriteLine();
}
return args;
}
}This console application is typically either run interactively from a command window or called from a command script. Figure 1-3 shows it being run interactively.
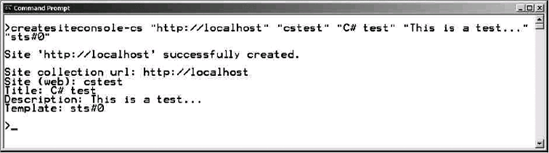
In the preceding example, I passed all the needed parameters on the command line, and so was not prompted to enter them. If I'd entered only the command CreateSiteConsole-CS.exe, the program would have prompted me to enter the missing data.
Use a console app as in the preceding example, but instead of using the SharePoint object model classes, shell out (that is, run a separate command file) to the
STSADM –O CREATEWEBcommand. Although this may be less work initially, it makes input validation and error trapping more difficult.Use a web application that shells out to the preceding application. This sidesteps SharePoint's security restriction on ASP.NET applications, but again makes error trapping next to impossible. You'll see in a related recipe how to use SharePoint web services in combination with an ASP.NET application as a better alternative to this variation.
Use a .NET Windows application instead of a console application. This enables you to create a more elegant UI, but remember that the application can run on only a front-end web server in your SharePoint farm.
As you saw in the previous recipe, having the ability to create sites programmatically is very useful. Although Microsoft provided lots of options in terms of tailoring site definitions through Features, and provides the <ExecuteUrl> directive in Onet.xml that enables you to automatically run an ASP.NET page immediately after a site is created, nothing beats having direct, complete control when it comes to provisioning new sites.
The previous recipe demonstrated how to create a site by using the object model; this one shows you how to accomplish the same thing by using a custom ASP.NET web service. Substituting a web service for an object model call enables this variant to run on any Internet Information Services (IIS) web server anywhere in the world that has the ability to connect to our SharePoint server farm.
Unfortunately, Microsoft left out a CreateWeb web service, so we'll need to build our own ASP.NET web service here. We'll then install our web service in the same location that Microsoft places the standard SharePoint web services, and call it from an ASP.NET web form.
For consistency with Microsoft's convention of calling web services at
http://<server name>/<path>/_vti_bin/<web service>, we'll create a virtual directory in IIS under that path and point to our custom web service.Note
For an explanation of how to set up a virtual directory in IIS, see Recipe 6-2 in Chapter 6.
To avoid any problems with user security, we'll use the
SPSecurity.RunWithElevatedPrivileges()method to ensure that the web service can add the requested web site. If you want to restrict who can call the web service, you can either add declarative security to theWeb.configfile of the service, or set Windows permissions on the folder containing the web service application.The front-end ASP.NET application is very similar to that contained in Recipe 1-2, so I won't discuss it in detail here.

Make sure that all necessary information is provided by the user. This information may be provided on the command line that calls the program, or may be entered in response to prompts that the program displays.
If necessary arguments weren't provided, return an error.
Call the
SPSite.AllWebs.Add()method to add the new site (web).Determine whether an error occurs.
If no error occurs, return a success message.
Otherwise, if an error occurs, return the error message to the calling program.
Imports System.Web Imports System.Web.Services Imports System.Web.Services.Protocols Imports Microsoft.SharePoint Imports Microsoft.SharePoint.WebControls <WebService(Namespace:="http://tempuri.org/")> _ <WebServiceBinding(ConformsTo:=WsiProfiles.BasicProfile1_1)> _ <Global.Microsoft.VisualBasic.CompilerServices.DesignerGenerated()> _Public Class Service Inherits System.Web.Services.WebService Private_retValAs String = "" Private _siteUrl As String = "" Private _webName As String = "" Private _title As String = "" Private _description As String = "" Private _webTemplate As String = "" <WebMethod()> _ Public Function CreateWeb( _ ByVal strSiteUrl As String, _ ByVal strWebName As String, _ ByVal strTitle As String, _ ByVal strDescription As String, _ ByVal strWebTemplate As String _ ) As String _siteUrl = strSiteUrl _webName = strWebName _title = strTitle _description = strDescription _webTemplate = strWebTemplate 'Step 1: Verify that all arguments have been passed If _siteUrl > "" _ And _webName > "" _ And _title > "" _ And _description > "" _ And_webTemplate >"" Then 'Run with permissions of collection administrator SPSecurity.RunWithElevatedPrivileges(AddressOf myCreateWeb) Return _retVal
Else
            '2. If some arguments are missing, return error message
            Return "Missing arguments"
        End If
    End Function
    Public Sub myCreateWeb()
        'Step 4: Trap error, if any
        Try
            Dim site As New SPSite(_siteUrl)
            'Step 3: Add the new site to collection
            Dim web As SPWeb = _
            site.AllWebs.Add(_webName, _title, _description, _
              CType(1033, UInteger), _webTemplate, False, False)
            'Step 5: Return success message
            retVal = "Successfully added new site"

            'Release memory used by SPSite, SPWeb objects
            web.Dispose()
            site.Dispose()
        Catch ex As Exception
            'Step 6: Return error message
            _retVal = ex.Message
        End Try
    End Sub
End ClassPartial Class _Default
Inherits System.Web.UI.Page
Protected Sub Page_Load(ByVal sender As Object, _
ByVal e As System.EventArgs) Handles Me.Load
Try
If Not IsPostBack Then
'Step 1: Get list of templates for the selected
'web application
Dim objSites As New SitesService.Sites
objSites.Credentials = __
System.Net.CredentialCache.DefaultCredentials
Dim arrTemplates() As SitesService.Template
Dim templateCount As Integer = __
objSites.GetSiteTemplates(1033, arrTemplates)
Dim i As Integer
Dim listItem As ListItem
ddlTemplate.Items.Clear()For i = 0 To arrTemplates.Length - 1
'Don't include hidden templates,
'which are not intended for interactive use
If Not arrTemplates(i).IsHidden Then
listItem = New ListItem(arrTemplates(i).Title, _
arrTemplates(i).Name)
ddlTemplate.Items.Add(listItem)
End If
Next
ddlTemplate.Enabled = True
lblMessage.Text = ""
End If
Catch ex As Exception
lblMessage.Text = ex.Message
End Try
End Sub
Protected Sub cmdCreateWeb_Click(ByVal sender As Object, _
ByVal e As System.EventArgs) Handles cmdCreateWeb.Click
Try
'Step 2: Make sure all necessary data is provided
If txtSiteCollPath.Text > "" _
And txtWebName.Text > "" _
And txtTitle.Text > "" _
And txtDescription.Text > "" _
And ddlTemplate.SelectedValue > "" Then
'Step 4: Add new site collection
Dim objCreateWebService As New CreateWebService_VB.Service
objCreateWebService.Credentials = __
System.Net.CredentialCache.DefaultCredentials
objCreateWebService.CreateWeb( _
txtSiteCollPath.Text, _
txtWebName.Text, _
txtTitle.Text, _
txtDescription.Text, _
ddlTemplate.SelectedValue)
'Step 6: Display success message
lblMessage.Text = "Successfully added new site '" & _
txtWebName.Text & "'"
lblMessage.Visible = True
Else
'Step 3: Prompt user to enter all data
lblMessage.Text = "Please fill in all fields"
lblMessage.Visible = True
End IfCatch ex As Exception
'Step 7: Display error message
lblMessage.Text = ex.Message
lblMessage.Visible = True
End Try
End Sub
End Classusing System.Web; using System.Web.Services; using System.Web.Services.Protocols; using Microsoft.SharePoint; using Microsoft.SharePoint.WebControls; [WebService(Namespace = "http://tempuri.org/")] [WebServiceBinding(ConformsTo =WsiProfiles.BasicProfile1_1)]public class Service : System.Web.Services.WebService { private string _retVal = ""; private string _siteUrl = ""; private string _webName = ""; private string _title = ""; private string _description = ""; private string _webTemplate; [WebMethod] public stringCreateWeb(stringstrSiteUrl,stringstrWebName,string strTitle, string strDescription, string strWebTemplate) { _siteUrl = strSiteUrl; _webName = strWebName; _title = strTitle; _description = strDescription; _webTemplate = strWebTemplate; // Step 1: Verify that all arguments have been passed if (_siteUrl != "" && _webName != "" && _title != "" && _description != "" && _webTemplate != "") { // Run with permissions of collection administrator SPSecurity.RunWithElevatedPrivileges(myCreateWeb); return _retVal; }
else
        {
            // 2. If some arguments are missing, return error message
            return "Missing arguments";
        }
    }
    private void myCreateWeb()
    {
        // Step 4: Trap error, if any
        try
        {
            SPSite site = new SPSite(_siteUrl);

            // Step 3: Add the new site to collection
            SPWeb web =
               site.AllWebs.Add(_webName, _title, _description,
               ((System.UInt32)(1033)), _webTemplate, false, false);
            // Step 5: Return success message
            _retVal = "Successfully added new site";
            // Release memory used by SPSite, SPWeb objects
            web.Dispose();
            site.Dispose();
        }
        catch (System.Exception ex)
        {
            // Step 6: Return error message
            _retVal = ex.Message;
        }
    }
}using System;
using System.Data;
using System.Configuration;
using System.Web;
using System.Web.Security;
using System.Web.UI;
using System.Web.UI.WebControls;
using System.Web.UI.WebControls.WebParts;
using System.Web.UI.HtmlControls;
public partial class _Default : System.Web.UI.Page {
protected void Page_Load(object sender, System.EventArgs e) {try {
if (!IsPostBack) {
// Step 1: Get list of templates for the
// selected web application
SitesService.Sites objSites = new SitesService.Sites();
objSites.Credentials =
System.Net.CredentialCache.DefaultCredentials;
SitesService.Template[] arrTemplates;
uint templateCount = objSites.GetSiteTemplates(1033,
out arrTemplates);
int i;
ListItem listItem;
ddlTemplate.Items.Clear();
for (i = 0; (i <= (arrTemplates.Length - 1)); i++)
{
// Don't include hidden templates, which are not
// intended for interactive use
if (!arrTemplates[i].IsHidden) {
listItem = new ListItem(arrTemplates[i].Title,
arrTemplates[i].Name);
ddlTemplate.Items.Add(listItem);
}
}
ddlTemplate.Enabled = true;
lblMessage.Text = "";
}
}
catch (Exception ex) {
lblMessage.Text = ex.Message;
}
}
protected void cmdCreateWeb_Click1(object sender, EventArgs e)
{
try
{
// Step 2: Make sure all necessary data is provided
if (txtSiteCollPath.Text != ""
&& txtWebName.Text != ""
&& txtTitle.Text != ""
&& txtDescription.Text != ""
&& ddlTemplate.SelectedValue != ""){
// Step 4: Add new site collection
CreateWebService_CS.Service objCreateWebService
= new CreateWebService_CS.Service();
objCreateWebService.Credentials
= System.Net.CredentialCache.DefaultCredentials;
objCreateWebService.CreateWeb(
txtSiteCollPath.Text,
txtWebName.Text,
txtTitle.Text,
txtDescription.Text,
ddlTemplate.SelectedValue);
// Step 6: Display success message
lblMessage.Text =
("Successfully added new site '" + txtWebName.Text + "'");
lblMessage.Visible = true;
}
else
{
// Step 3: Prompt user to enter all data
lblMessage.Text = "Please fill in all fields";
lblMessage.Visible = true;
}
}
catch (Exception ex)
{
// Step 7: Display error message
lblMessage.Text = ex.Message;
lblMessage.Visible = true;
}
}
}On the form load event, a call is made to the http://localhost/_vti_bin/sites.asmx web service to obtain a list of templates available on this web application. As with the web application that creates a new site collection, we prompt the user for the necessary parameters, verify that all data has been provided, and then call our web service. Figure 1-4 shows the CreateWeb application in a browser.

I could have combined the logic in the ASP.NET web form and web service so that only one application is required. The value of creating a web service is that it can be called from any number of applications, including ASP.NET, .NET console, and .NET Windows Forms applications. You'll definitely find it comes in handy!
Did you know that you can assign custom properties to sites? Each site has a property bag that holds key/value pairs (like the .NET config AppSettings collection). This collection of properties was undoubtedly designed for use by Microsoft's programmers, but it is exposed for general use.
You can use this to store any string data that you need to assign to a given site. For example, you might want to associate a customer ID with an extranet, so that you can look up the customer information to present on the site when viewed by users. Or you may want to set a flag that determines whether a particular extranet site should be billed to the customer.
In this recipe, you'll create a simple ASP.NET application that you can use to create, edit, and save values to a site's property collection.
Because SharePoint uses the
SPWeb.Propertiescollection to store internal data, you need to be careful to avoid naming conflicts with the properties that SharePoint creates. One simple technique is to use a unique prefix for each variable you create. For example, in this recipe I prefixed my variables withmg_.As noted in the code, you must set the
SPWeb.AllowUnsafeUpdatesproperty totrueto enable the program to save the updates to the property collection. Otherwise, an error will be thrown.And speaking of updates, be sure to call the
SPWeb.Properties.Update()method after you've modified the properties, or your changes won't be saved.
Create a new VB or C# ASP.NET web application.
Add a reference to the Windows SharePoint Services .NET assembly.
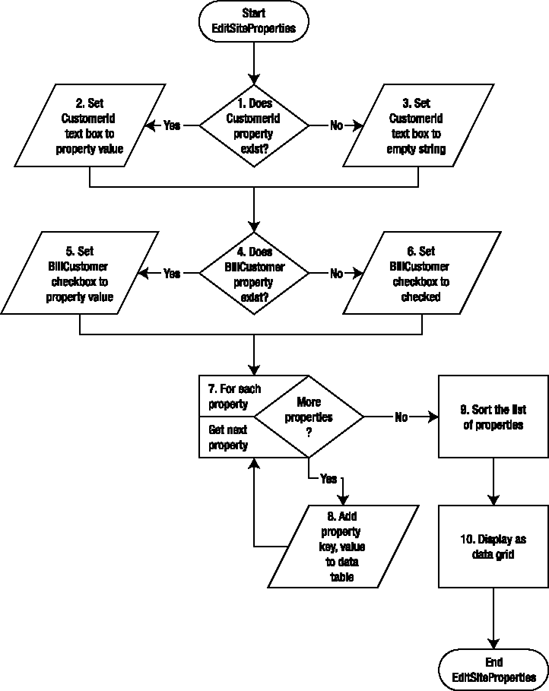
Check to see whether a property named
CustomerIdalready exists for this site.If it does, read its value and assign it to the
txtCustomerId.Textproperty.If not, set the value of
txtCustomerId.Textto an empty string.Check whether a property named
BillCustomeralready exists for this site.If yes, assign its value to the
cbBillCustomercheckbox.If not, set the value of
cbBillCustomer.Checkedtotrue.Loop through the list of properties in the current site.
Add a property key name and value to the data table.
Assign the data table to a data view and sort by key.
Refresh the grid view on the page to display the most current values.
Imports System
Imports System.Data
Imports System.Configuration
Imports System.Web
Imports System.Web.Security
Imports System.Web.UI
Imports System.Web.UI.WebControls
Imports System.Web.UI.WebControls.WebParts
Imports System.Web.UI.HtmlControls
Imports Microsoft.SharePoint
Imports System.Collections
Public Class _Default
    Inherits System.Web.UI.Page
    ' Hard-coded to save/retrieve properties of root site collection
    Private site As New SPSite("http://localhost")
    Protected Sub Page_Load(ByVal sender As Object, _
         ByVal e As EventArgs) Handles Me.Load
        If Not IsPostBack Then
            Dim web As SPWeb = site.RootWeb
            ' Step 1: Determine whether a value exists for customer id key
            If web.Properties.ContainsKey("mg_CustomerId") Then
                ' Step 2: Initialize to stored value
                txtCustomerId.Text = web.Properties("mg_CustomerId").ToString
            Else
                ' Step 3: Otherwise set to empty string
                txtCustomerId.Text = ""
            End If
            ' Step 4: Determine whether a value exists for bill flag
            If web.Properties.ContainsKey("mg_BillCustomer") Then
                ' Step 5: Initialize to stored value
                cbBillCustomer.Checked = _
                     (web.Properties("mg_BillCustomer").ToString.ToLower = _
                     "true")
Else
' Step 6: Otherwise set default value
cbBillCustomer.Checked = True
End If
' Display list of key/value pairs
refreshPropertyList()
' Release memory used by SPSite, SPWeb objects
web.Dispose()
site.Dispose()
End If
End Sub
Protected Sub refreshPropertyList()
Dim web As SPWeb = site.RootWeb
Dim dtProperties As DataTable = New DataTable("PropertyList")
Dim dvProperties As DataView = New DataView
Dim drProperty As DataRow
dtProperties.Columns.Add("Key")
dtProperties.Columns.Add("Value")
' Step through list of properties, adding
' key/value pairs to data table.
For Each key As Object In web.Properties.Keys
drProperty = dtProperties.NewRow
drProperty("Key") = key.ToString
drProperty("Value") = web.Properties(key.ToString)
dtProperties.Rows.Add(drProperty)
dtProperties.AcceptChanges()
Next
' Sort the list and display
dvProperties.Table = dtProperties
dvProperties.Sort = "Key"
gvPropertyList.DataSource = dvProperties
gvPropertyList.DataBind()
End Sub
Protected Sub cmdSave_Click(ByVal sender As Object, _
ByVal e As EventArgs) Handles cmdSave.Click
Dim web As SPWeb = site.RootWeb
' Error will occur if AllowUnsafeUpdates property
' not set prior to update
web.AllowUnsafeUpdates = True
web.Properties("mg_CustomerId") = txtCustomerId.Text
web.Properties("mg_BillCustomer") = cbBillCustomer.Checked.ToString
web.Properties.Update()
' Redisplay list to reflect changes
refreshPropertyList()
End Sub
End Classusing System;
using System.Data;
using System.Configuration;
using System.Web;
using System.Web.Security;
using System.Web.UI;
using System.Web.UI.WebControls;
using System.Web.UI.WebControls.WebParts;
using System.Web.UI.HtmlControls;
using Microsoft.SharePoint;
using Microsoft.SharePoint.WebControls;
using System.Collections;
public partial class _Default : System.Web.UI.Page
{
// Hard-coded to save/retrieve properties of root site collection
SPSite site = new SPSite("http://localhost");
protected void Page_Load(object sender, EventArgs e)
{
if (!IsPostBack)
{
SPWeb web = site.RootWeb;
// Step 1: Determine whether a value exists for customer id key
if (web.Properties.ContainsKey("mg_CustomerId"))
{
// Step 2: Initialize to stored value
txtCustomerId.Text =
web.Properties["mg_CustomerId"].ToString();
}
else
{
// Step 3: Otherwise set to empty string
txtCustomerId.Text = "";
}
// Step 4: Determine whether a value exists for bill flag
if (web.Properties.ContainsKey("mg_BillCustomer"))
{
// Step 5: Initialize to stored value
cbBillCustomer.Checked =
(web.Properties["mg_BillCustomer"].ToString().ToLower()
== "true");
}
else
{
// Step 6: Otherwise set default value
cbBillCustomer.Checked = true;
}// Display list of key/value pairs
refreshPropertyList();
// Release memory used by SPSite, SPWeb objects
web.Dispose();
site.Dispose();
}
}
protected void refreshPropertyList()
{
SPWeb web = site.RootWeb;
DataTable dtProperties = new DataTable("PropertyList");
DataView dvProperties = new DataView();
DataRow drProperty;
dtProperties.Columns.Add("Key");
dtProperties.Columns.Add("Value");
// Step through list of properties, adding
// key/value pairs to data table.
foreach (object key in web.Properties.Keys)
{
drProperty = dtProperties.NewRow();
drProperty["Key"] = key.ToString();
drProperty["Value"] = web.Properties[key.ToString()];
dtProperties.Rows.Add(drProperty);
dtProperties.AcceptChanges();
}
// Sort the list and display
dvProperties.Table = dtProperties;
dvProperties.Sort = "Key";
gvPropertyList.DataSource = dvProperties;
gvPropertyList.DataBind();
}
protected void cmdSave_Click(object sender, EventArgs e)
{
SPWeb web = site.RootWeb;
// Error will occur if AllowUnsafeUpdates property
// not set prior to update
web.AllowUnsafeUpdates = true;
web.Properties["mg_CustomerId"] = txtCustomerId.Text;
web.Properties["mg_BillCustomer"] =
cbBillCustomer.Checked.ToString();
web.Properties.Update();
// Redisplay list to reflect changes
refreshPropertyList();
}
}Press F5 to start the project if you're in Visual Studio, or simply enter the URL of the page in the browser location field. When you first run the application, the Customer Id field will be empty and the Bill Customer checkbox will be selected. Try changing values in either of those fields and click the Save Changes button. You will note that the two additional properties, mg_billcustomer and mg_customerid (substitute your own prefix if desired), will be added to the list of site properties displayed in the table. Figure 1-5 shows EditSiteProperties running in a browser.

Instead of creating an ASP.NET web application, use an ASP.NET 2.0 web part to edit and display the properties for a site. In this case, rather than explicitly referencing the site and web, use the
SPControl.GetContextWeb(context)method to return the site of the page containing the current instance of the web part.
It's not uncommon for a SharePoint installation to have hundreds or thousands of sites and subsites. Let's say you are responsible for one of these installations. You have just created the coolest web part, one that needs to be added to each and every site on your server! One approach would be to open each web site, switch to edit-page mode, add the web part, set any properties required, save your changes, and move on to the second of 2,000 sites. Not a very appealing prospect!
An alternative is to write a bit of ASP 2.0 code to programmatically iterate through all the sites on your server, open the Default.aspx web-part page, add the new web part, set its properties, and move on. Now that's what I call smart SharePoint administration!
In this recipe, you'll create a program to do two things: 1) add a new content editor web part and 2) add a web part of any type. The reason for going through each of these is to see both scenarios; at times you'll know the class you want to inherit from (for example, the ContentEditorWebPart class), which gives you access to the web-part-specific properties, and at other times you'll just know it's some type of web part, in which case all you can assume are the properties and methods inherited from the parent WebPart class.
Create a new .NET console project.
Add a reference to the Windows SharePoint Services .NET assembly.
Add a reference to the
System.Web.NET assembly.

Create an
SPSiteobject that points to the web site containing the web-part page.Set
AllowUnsafeUpdatestotrueto enable programmatic updates to the site.Check to see whether the page belongs to a document library that might require the page to be checked out before editing.
If the page is stored in a document library, temporarily disable the requirement that documents be checked out to avoid an error during processing.
Add the new web part.
Save changes back to the web site.
Determine whether the web-part page is stored in a document library.
If the page is stored in a document library, reset the required checkout flag to its original value.
Imports Microsoft.SharePoint
Imports Microsoft.SharePoint.WebControls
Imports Microsoft.SharePoint.WebPartPages
Imports System.Web
Imports System.Web.UI.WebControls
Imports System.Xml
Module Module1
    Sub Main()
        'Example 1:
        'Add an instance of a SharePoint "ContentEditorWebPart", which
        'is a descendent of the generic .NET 2.0 WebPart class
        Dim oCEwp As New _
             Microsoft.SharePoint.WebPartPages.ContentEditorWebPart
        oCEwp = AddContentEditorWebPart( _
            "Hello World!", _
            "Hello World web part", _
            "http://localhost", _
            "", _
            "Pages", _
            "Default.aspx", _
            "Right", _
            0, _
            WebParts.PersonalizationScope.Shared _
            )
        'Example 2:
        'Add a PageViewer web part
        Dim oPVwp As New Microsoft.SharePoint.WebPartPages.PageViewerWebPart
        oPVwp.SourceType = PathPattern.URL
        oPVwp.ContentLink = "http://www.fenwick.com"
oPVwp = AddWebPart( _
oPVwp, _
"Hello World web part", _
"http://localhost", _
"", _
"Pages", _
"Default.aspx", _
"Top", _
0, _
WebParts.PersonalizationScope.Shared _
)
End Sub
Private Function AddContentEditorWebPart( _
ByVal strContent As String, _
ByVal strTitle As String, _
ByVal strSiteUrl As String, _
ByVal strWebName As String, _
ByVal strDocLibName As String, _
ByVal strPage As String, _
ByVal strZone As String, _
ByVal numOrder As Integer, _
ByVal pScope As
System.Web.UI.WebControls.WebParts.PersonalizationScope _
) As Microsoft.SharePoint.WebPartPages.ContentEditorWebPart
Try
'Create an empty content editor web part.
Dim cewp As New _
Microsoft.SharePoint.WebPartPages.ContentEditorWebPart
'Create an xml element object and transfer the content
'into the web part.
Dim xmlDoc As New XmlDocument
Dim xmlElem As System.Xml.XmlElement = _
xmlDoc.CreateElement("xmlElem")
xmlElem.InnerText = strContent
cewp.Content = xmlElem
'Call generic method to add the web part
cewp = AddWebPart( _
cewp, _
strTitle, _
strSiteUrl, _
strWebName, _
strDocLibName, _
strPage, _
strZone, _
numOrder, _
UI.WebControls.WebParts.PersonalizationScope.Shared _
)
Return cewpCatch ex As Exception
Throw New Exception("AddContentEditorWebPart() error: " & _
ex.Message)
End Try
End Function
Private Function AddWebPart( _
ByVal oWebPart As Web.UI.WebControls.WebParts.WebPart, _
ByVal strTitle As String, _
ByVal strSiteUrl As String, _
ByVal strWebName As String, _
ByVal strDocLibName As String, _
ByVal strPage As String, _
ByVal strZone As String, _
ByVal numOrder As Integer, _
ByVal pScope As _
System.Web.UI.WebControls.WebParts.PersonalizationScope _
) As Web.UI.WebControls.WebParts.WebPart
Try
'Get handles to site, web, and page to which
'web part will be added.
Dim site As New SPSite(strSiteUrl)
Dim web As SPWeb = site.OpenWeb(strWebName)
'Enable update of page
web.AllowUnsafeUpdates = True
Dim webParts As SPLimitedWebPartManager
If strDocLibName > "" Then
webParts = web.GetLimitedWebPartManager( _
strDocLibName & "/" & strPage, pScope)
Else
webParts = web.GetLimitedWebPartManager(strPage, pScope)
End If
'If web part page is in a document library,
'disable checkout requirement
'for duration of update
Dim list As SPList
Dim origForceCheckoutValue As Boolean
If strDocLibName > "" Then
list = web.Lists(strDocLibName)
origForceCheckoutValue = list.ForceCheckout
list.ForceCheckout = False
list.Update()
End If
'Add the web part
oWebPart.Title = strTitle
webParts.AddWebPart(oWebPart, strZone, numOrder)'Save changes back to the SharePoint database
webParts.SaveChanges(oWebPart)
web.Update()
'If necessary, restore ForceCheckout setting
If strDocLibName > "" Then
list.ForceCheckout = origForceCheckoutValue
list.Update()
End If
' Release memory used by SPSite, SPWeb objects
web.Dispose()
site.Dispose()
Return oWebPart
Catch ex As Exception
Throw New Exception("AddWebPart() error: " & ex.Message)
End Try
End Function
End Moduleusing Microsoft.SharePoint;
using Microsoft.SharePoint.WebControls;
using Microsoft.SharePoint.WebPartPages;
using System;
using System.Web;
using System.Web.UI.WebControls.WebParts;
using System.Web.UI.WebControls;
using System.Xml;
class Module1
{
static void Main()
{
// Example 1:
// Add an instance of a SharePoint "ContentEditorWebPart", which
// is a descendent of the generic .NET 2.0 WebPart class
Microsoft.SharePoint.WebPartPages.ContentEditorWebPart oCEwp
= new Microsoft.SharePoint.WebPartPages.ContentEditorWebPart();
oCEwp = AddContentEditorWebPart(
"Hello World!",
"Hello World web part",
"http://localhost",
"BBB",
"",
"Default.aspx",
"Right",
0,
System.Web.UI.WebControls.WebParts.PersonalizationScope.Shared);// Example 2:
// Add a PageViewer web part
Microsoft.SharePoint.WebPartPages.PageViewerWebPart oPVwp
= new Microsoft.SharePoint.WebPartPages.PageViewerWebPart();
oPVwp.SourceType = PathPattern.URL;
oPVwp.ContentLink = "http://www.yahoo.com";
oPVwp = (Microsoft.SharePoint.WebPartPages.PageViewerWebPart)
AddWebPart(
oPVwp,
"Hello World web part",
"http://localhost",
"BBB",
"",
"Default.aspx",
"Left",
0,
System.Web.UI.WebControls.WebParts.PersonalizationScope.Shared);
}
private static Microsoft.SharePoint.WebPartPages.ContentEditorWebPart
AddContentEditorWebPart(
string strContent,
string strTitle,
string strSiteUrl,
string strWebName,
string strDocLibName,
string strPage,
string strZone,
int numOrder,
System.Web.UI.WebControls.WebParts.PersonalizationScope pScope)
{
try
{
// Create an empty content editor web part.
Microsoft.SharePoint.WebPartPages.ContentEditorWebPart cewp
= new Microsoft.SharePoint.WebPartPages.ContentEditorWebPart();
// Create an xml element object and transfer the content
//into the web part.
XmlDocument xmlDoc = new XmlDocument();
System.Xml.XmlElement xmlElem = xmlDoc.CreateElement("xmlElem");
xmlElem.InnerText = strContent;
cewp.Content = xmlElem;
// Call generic method to add the web part
cewp = (Microsoft.SharePoint.WebPartPages.ContentEditorWebPart)AddWebPart (
cewp,
strTitle,
strSiteUrl,
strWebName,
strDocLibName,
strPage,
strZone,
numOrder,
System.Web.UI.WebControls.WebParts.PersonalizationScope.Shared);
return cewp;
}
catch (Exception ex)
{
throw new Exception(
"AddContentEditorWebPart() error: " + ex.Message);
}
}
private static System.Web.UI.WebControls.WebParts.WebPart
AddWebPart(
System.Web.UI.WebControls.WebParts.WebPart oWebPart,
string strTitle,
string strSiteUrl,
string strWebName,
string strDocLibName,
string strPage,
string strZone,
int numOrder,
System.Web.UI.WebControls.WebParts.PersonalizationScope pScope)
{
try
{
// Get handles to site, web, and page to which
// web part will be added.
SPSite site = new SPSite(strSiteUrl);
SPWeb web = site.OpenWeb(strWebName);
// Enable update of page
web.AllowUnsafeUpdates = true;
SPLimitedWebPartManager webParts;
if ((strDocLibName != ""))
{
webParts =
web.GetLimitedWebPartManager(
strDocLibName + "/" + strPage, pScope);
}else
{
webParts =
web.GetLimitedWebPartManager(strPage, pScope);
}
// If web part page is in a document library,
// disable checkout requirement
// for duration of update
SPList list = null;
bool origForceCheckoutValue = false;
if ((strDocLibName != ""))
{
list = web.Lists[strDocLibName];
origForceCheckoutValue = list.ForceCheckout;
list.ForceCheckout = false;
list.Update();
}
// Add the web part
oWebPart.Title = strTitle;
webParts.AddWebPart(oWebPart, strZone, numOrder);
// Save changes back to the SharePoint database
webParts.SaveChanges(oWebPart);
web.Update();
// If necessary, restore ForceCheckout setting
if ((strDocLibName != ""))
{
list.ForceCheckout = origForceCheckoutValue;
list.Update();
}
// Release memory used by SPSite, SPWeb objects
web.Dispose();
site.Dispose();
return oWebPart;
}
catch (Exception ex)
{
throw new Exception(
"AddWebPart() error: " + ex.Message);
}
}
}This recipe has no UI. Simply run the program within Visual Studio or at the command prompt. When the program has successfully completed running, you can verify results by opening the target web-part page in a browser to see two web parts added.
In this example, we added a simple Content Editor web part. However, you can add any standard SharePoint or custom web part by using this technique. If you are adding a custom web part, be sure to include a reference to the custom web-part assembly (
.dll) in the project.Also note that in this example we used a console application, which presents fewer security complications than an ASP.NET application. However, you can use an ASP.NET application to add web parts as well, but you may need to impersonate the system account to perform certain operations, because of SharePoint's security policies that determine the permissions provided to a standard ASP.NET application.
The preceding recipe showed you how to add a web part to a page programmatically. That's particularly helpful if you need to customize a web part based on some metadata on a large number of pages. By adding the web part programmatically, you can examine characteristics of the web site or page and adjust the properties of the web part accordingly.
On the other hand, you might have a web part to add to multiple sites that doesn't need any customization; it just needs to be added as is. In that case, the easiest approach is to add the web part to a single page, configure its properties as desired, and then export the web part to a .dwp (2003 format) or .webpart (2007 format) web-part definition file. You can then create a program to read in the definition file and add the web part by using that definition programmatically.
Another advantage of this approach is that you don't need to include a reference to custom web-part assemblies as you did with the object model approach. Not having to include a reference could be helpful if you don't have easy access to the assembly .dll.
Remember that the
XmlReaderwill be looking for the.dwpfile in the same directory as the.exeunless you provide a fully qualified path.As with Recipe 1-6, the recipe to add a web part by using the object model, we need to check to see whether the web-part page is stored in a document library, and to turn off the checkout requirement if so. In such a case, we'll reinstate the checkout requirement after the web part has been added.
Create a new .NET console application.
Add references to the following:
Windows SharePoint Services
System.WebSystem.Xml

Open the web-part page for editing.
Read in the definition of the web part from the
.dwpfile created during export.Set the web site to allow programmatic changes.
Check to see whether the web-part page is stored in a document library.
If so, temporarily disable the requirement that documents be checked out to edit in that library.
Add the web part created in step 2 to the page.
Save updates to the SharePoint database.
Determine whether the web-part page is stored in a document library.
If the page is stored in a document library, restore the document library settings determining whether checkout is required.
Imports System.XmlImports System.Web Imports System.Web.UI.WebControls Imports Microsoft.SharePoint Imports Microsoft.SharePoint.WebControls Imports Microsoft.SharePoint.WebPartPages Module Module1 Sub Main(ByVal args() As String) Ifargs.Length < 6Then GetArgs(args) End If Console.WriteLine( _ AddWebPartDWP( _ args(0), _ args(1), _ args(2), _ args(3), _ WebParts.PersonalizationScope.Shared, _ args(4), _ args(5))) Console.WriteLine() Console.WriteLine("Press any key to continue...") Console.Read() End Sub Private Sub GetArgs(ByRef args() As String) ReDim args(5) Console.WriteLine() Console.Write("Site Url: ")
args(0) = Console.ReadLine()
        Console.Write("Web Name: ")
        args(1) = Console.ReadLine
        Console.Write("Doclib containing page (leave blank for none): ")
        args(2) = Console.ReadLine
        Console.Write("Page Name: ")
        args(3) = Console.ReadLine
        Console.Write("Path to DWP: ")
        args(4) = Console.ReadLine
        Console.Write("Zone: ")
        args(5) = Console.ReadLine
        Console.WriteLine()
    End Sub
    Public Function AddWebPartDWP( _
        ByVal strSiteUrl As String, _
        ByVal strWebName As String, _
        ByVal strDocLibName As String, _
        ByVal strPage As String, _
        ByVal pScope As _
             System.Web.UI.WebControls.WebParts.PersonalizationScope, _
        ByVal strDWPPath As String, _
        ByVal strZone As String _
        ) As String
        Try
            'Get handle to site and web to be edited
            Dim site As New SPSite(strSiteUrl)
            Dim web As SPWeb = site.OpenWeb(strWebName)
            Dim wp As WebPart
            'Step 1: Get handle to web part page to
            ' contain new web part
            Dim webParts As SPLimitedWebPartManager
            If strDocLibName > "" Then
                webParts = _
                   web.GetLimitedWebPartManager( __
                      strDocLibName & "/" & strPage, pScope)
            Else
                webParts = _
                   web.GetLimitedWebPartManager(strPage, pScope)
            End If
            'Step 2: get handle to .DWP file and import definition
            Dim reader As XmlReader = XmlReader.Create(strDWPPath)
            wp = webParts.ImportWebPart(reader, "")
            'Step 3: allow website to be edited
            web.AllowUnsafeUpdates = True
            'Steps 4-5: If web-part page is in a document library,
            'disable checkout requirement for duration of update
Dim list As SPListDimorigForceCheckoutValueAs Boolean If strDocLibName > "" Then list = web.Lists(strDocLibName) origForceCheckoutValue = list.ForceCheckout list.ForceCheckout = False list.Update() End If 'Step 6: Add the web part webParts.AddWebPart(wp, strZone, 0) 'Step 7: Save changes back to SharePoint database webParts.SaveChanges(wp) web.Update() 'Steps 8-9: If necessary, restore ForceCheckout setting If strDocLibName > "" Then list.ForceCheckout = origForceCheckoutValue list.Update() End If ' Release memory used by SPSite, SPWeb objects web.Dispose() site.Dispose() Return "Successfully added '" & strDWPPath & "'" Catch ex As Exception Return ex.Message End Try End Function EndModule
using System.Xml;
using System.Web;
using System.Web.UI.WebControls;
using System.Web.UI.WebControls.WebParts;
using Microsoft.SharePoint;
using Microsoft.SharePoint.WebControls;
using Microsoft.SharePoint.WebPartPages;
using System.IO;
using System;
class Module1
{
    static void Main(string[] args)
    {
        if ((args.Length < 6))
        {
            GetArgs(ref args);
        }
        Console.WriteLine(
AddWebPartDWP(
args[0],
args[1],
args[2],
args[3],
PersonalizationScope.Shared,
args[4],
args[5]));
Console.WriteLine();
Console.WriteLine("Press any key to continue...");
Console.Read();
}
private static void GetArgs(ref string[] args)
{
args = new string[6];
Console.WriteLine();
Console.Write("Site Url: ");
args[0] = Console.ReadLine();
Console.Write("Web Name: ");
args[1] = Console.ReadLine();
Console.Write("Doclib containing page (leave blank for none): ");
args[2] = Console.ReadLine();
Console.Write("Page Name: ");
args[3] = Console.ReadLine();
Console.Write("Path to DWP: ");
args[4] = Console.ReadLine();
Console.Write("Zone: ");
args[5] = Console.ReadLine();
Console.WriteLine();
}
public static string AddWebPartDWP(
string strSiteUrl,
string strWebName,
string strDocLibName,
string strPage,
System.Web.UI.WebControls.WebParts.PersonalizationScope pScope,
string strDWPPath,
string strZone)
{
try
{
// Get handle to site and web to be edited
SPSite site = new SPSite(strSiteUrl);
SPWeb web = site.OpenWeb(strWebName);
System.Web.UI.WebControls.WebParts.WebPart wp;
// Step 1: Get handle to web part page to contain new web part
SPLimitedWebPartManager webParts;if ((strDocLibName != ""))
{
webParts
= web.GetLimitedWebPartManager(strDocLibName +
"/" +strPage, pScope);
}
else
{
webParts =
web.GetLimitedWebPartManager(strPage, pScope);
}
// Step 2: get handle to .DWP file and import definition
XmlReader reader = XmlReader.Create(strDWPPath);
string strErrMsg;
wp = webParts.ImportWebPart(reader, out strErrMsg);
// Step 3: allow web site to be edited
web.AllowUnsafeUpdates = true;
SPList list = null;
bool origForceCheckoutValue = false;
if (strDocLibName != "")
{
list = web.Lists[strDocLibName];
origForceCheckoutValue = list.ForceCheckout;
list.ForceCheckout = false;
list.Update();
}
// Step 6: Add the web part
webParts.AddWebPart(wp, strZone, 0);
// Step 7: Save changes back to SharePoint database
webParts.SaveChanges(wp);
web.Update();
// Steps 8-9: If necessary, restore ForceCheckout setting
if (strDocLibName != "")
{
list.ForceCheckout = origForceCheckoutValue;
list.Update();
}
// Release memory used by SPSite, SPWeb objects
web.Dispose();
site.Dispose();
return ("Successfully added '" + strDWPPath + "'");
}
catch (Exception ex)
{
return ex.Message;
}
}
}First, add a web part to a SharePoint page and customize the web part as desired. Then export the web part to a .dwp file. The following listing shows part of the .dwp for the ContentEditor web part I used in my example:
<?xml version="1.0" encoding="utf-8"?> <WebPart xmlns:xsi="http://www.w3.org/2001/XMLSchema-instance"xmlns:xsd="http://www.w3.org/2001/XMLSchema"xmlns="http://schemas.microsoft.com/WebPart/v2"> <Title>This web part was added using it's .WEBPART file</Title> ... ... <TypeName>Microsoft.SharePoint.WebPartPages.ContentEditorWebPart</TypeName> <ContentLink xmlns="http://schemas.microsoft.com/WebPart/v2/ContentEditor" /> <Content xmlns="http://schemas.microsoft.com/WebPart/v2/ContentEditor"> <![CDATA[<FONT size=4>Now is the time for all <STRONG> <FONT size=5>good </FONT></STRONG> SharePoint developers to learn new ways to programmatically add web parts to a page....</FONT>]]> </Content> <PartStorage xmlns="http://schemas.microsoft.com/WebPart/v2/ContentEditor" /> </WebPart>
Next, run the application in Visual Studio or at the command prompt. Unless you enter all parameters, you'll be prompted to enter the parameters at the console. Enter parameters as appropriate for your environment, keeping in mind that the location of the .dwp file will be relative to the location of the executable. Figure 1-6 shows the AddWebPartDWP application after it has been run successfully.

After the program has run successfully, you can navigate to (or refresh) the target page to see the web part that has been added. Figure 1-7 shows the resulting web-part page with the added web part.

Surprisingly, there's no convenient way to determine the storage required by a document library without a bit of programming. This recipe displays a list of all document libraries in a given web site, providing the total storage required.
This recipe does not take into account versioning. The recipe will need to be modified to include document versions if that's a requirement.
Create a new ASP.NET web application project in Visual Studio.
Add a reference to the Windows SharePoint Services assembly.
At the top of the code-behind for
Default.aspx(assuming you use that for your web page), addusing(C#) orImports(VB.NET) statements forSystem.Text,Microsoft.SharePoint, andMicrosoft.SharePoint.WebControls.Add a new Extensible Stylesheet Language Transformations (XSLT) file to your project. In the following example, I called it
Recipes.xsl. The file should contain the following XSLT code:
<?xml version="1.0"encoding="utf-8"?> <xsl:stylesheet version="1.0"xmlns:xsl="http://www.w3.org/1999/XSL/Transform"> <xsl:output method="html"/> <xsl:template match="/"> <table> <tr> <td width="5%"> <strong> <u>ID</u> </strong> </td> <td width="45%"> <strong> <u>File Name</u> </strong> </td> <td align="right"width="10%"> <strong> <u>Size</u> </strong> </td>
<td/>
         </tr>
         <xsl:for-each select="DocumentElement/ListItems">
            <tr>
               <td>
                  <xsl:value-of select="ID"/>
               </td>
               <td>
                  <xsl:value-of select="FileName"/>
               </td>
               <td align="right">
                  <xsl:value-of select="format-number(FileSize,' #,###')"/>
               </td>
               <td/>
            </tr>
         </xsl:for-each>
         <tr>
            <td/>
            <td/>
            <td align="right">---------------</td>
            <td/>
         </tr>
         <tr>
            <td/>
            <td align="center">Total Bytes:</td>
            <td align="right">
               <xsl:value-of select=
                    "format-number(sum(
                         DocumentElement/ListItems/FileSize),'#,###')"/>
            </td>
            <td/>
         </tr>
      </table>
   </xsl:template>
</xsl:stylesheet>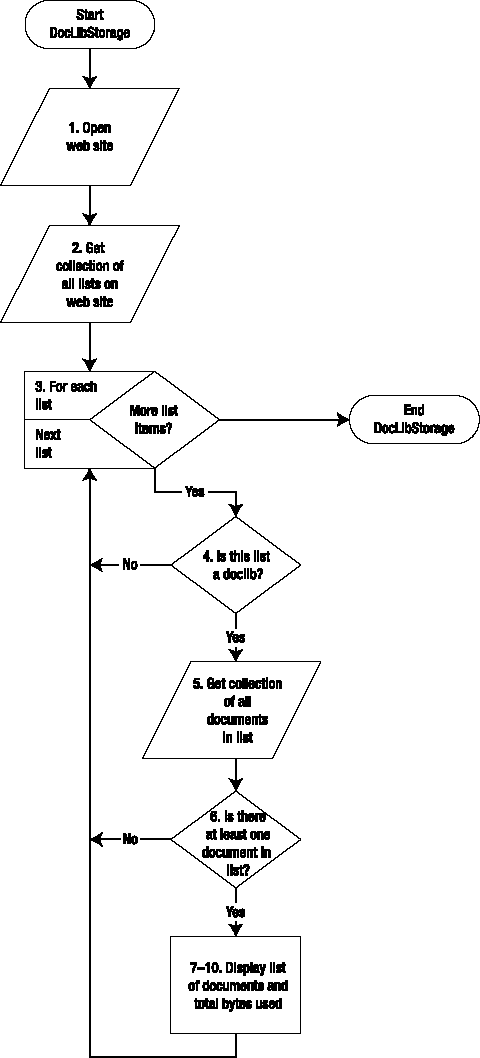
Create an
SPWebobject representing the web site containing the lists for which you want to calculate storage.Return a list of all lists in the web site.
Iterate through the list of lists.
Only process lists of type
DocumentLibrary.Obtain a list of all documents in the list as a data table.
Verify that there's at least one document in the list; otherwise, move on to the next list.
Format the list of documents to include only the ID, filename, and number of bytes used. Then write out the list by obtaining an XML representation of the data and formatting it by using an XSLT.
Imports System
Imports System.Data
Imports System.Configuration
Imports System.Web
Imports System.Web.Security
Imports System.Web.UI
Imports System.Web.UI.WebControls
Imports System.Web.UI.WebControls.WebParts
Imports System.Web.UI.HtmlControls
Imports Microsoft.SharePoint
Imports Microsoft.SharePoint.WebControls
Imports System.Text
Partial Public Class _Default
    Inherits System.Web.UI.Page
    Protected Sub Page_Load(ByVal sender As Object, ByVal e As EventArgs) _
 Handles Me.Load
        'Step 1: Open site collection and web site
        ' for which we want to report on list storage
        Dim site As New SPSite("http://localhost")
        Dim web As SPWeb = site.RootWeb
        'Step 2: Get collection of all lists
        Dim lists As SPListCollection = web.Lists
        'Step 3: Iterate through all lists, finding
        ' those which are document libraries
        Dim dtListItems As DataTable
        For Each list As SPList In lists
'Step 4: Is this a document library?Iflist.BaseTemplate = SPListTemplateType.DocumentLibraryThen 'Step 5: Get list of all documents in library dtListItems = list.Items.GetDataTable() 'Step 6: Is there at least one document in ' the library? IfdtListItemsIsNot Nothing Then 'Step 7: Add heading Dim lbl As New Label() lbl.Text = "<h1>"+ list.Title +"</h1>" Me.Controls.Add(lbl) 'Step 8: Select just the desired columns dtListItems = FormatTable(dtListItems) 'Step 9: Create XML representation of document list Dim sb As New StringBuilder() Dim sw As New System.IO.StringWriter(sb) dtListItems.WriteXml(sw) 'Step 10: Format XML using XSLT Dim xmlListItems As New Xml() xmlListItems.DocumentContent = sb.ToString() xmlListItems.TransformSource = "Recipes.xsl" Me.Controls.Add(xmlListItems) End If End If Next web.Dispose() site.Dispose() End Sub Private Function FormatTable(ByVal dtListItems As DataTable) As DataTable Dim dtMyList As New DataTable("ListItems") dtMyList.Columns.Add("ID") dtMyList.Columns.Add("FileName") dtMyList.Columns.Add("FileSize") For Each drListItem As DataRow In dtListItems.Rows Dim drMyListItem As DataRow = dtMyList.NewRow() drMyListItem("ID") = drListItem("ID") drMyListItem("FileName") = drListItem("LinkFileName") drMyListItem("FileSize") = drListItem("FileSizeDisplay") dtMyList.Rows.Add(drMyListItem) dtMyList.AcceptChanges() Next Return dtMyList End Function End Class
using System;
using System.Data;
using System.Configuration;
using System.Web;
using System.Web.Security;
using System.Web.UI;
using System.Web.UI.WebControls;
using System.Web.UI.WebControls.WebParts;
using System.Web.UI.HtmlControls;
using Microsoft.SharePoint;
using Microsoft.SharePoint.WebControls;
using System.Text;
public partial class _Default : System.Web.UI.Page
{
    protected void Page_Load(object sender, EventArgs e)
    {
        //Step 1: Open site collection and web site
        // for which we want to report on list storage
        SPSite site = new SPSite("http://localhost");
        SPWeb web = site.RootWeb;
        //Step 2: Get collection of all lists
        SPListCollection lists = web.Lists;
        //Step 3: Iterate through all lists, finding
        // those which are document libraries
        DataTable dtListItems;
        foreach (SPList list in lists)
        {
            //Step 4: Is this a document library?
            if (list.BaseTemplate == SPListTemplateType.DocumentLibrary)
            {
                //Step 5: Get list of all documents in library
                dtListItems = list.Items.GetDataTable();
                //Step 6: Is there at least one document in
                //  the library?
                if (dtListItems != null)
                {
                    //Step 7: Add heading
                    Label lbl = new Label();
                    lbl.Text = "<h1>" + list.Title + "</h1>";
                    this.Controls.Add(lbl);
//Step 8: Select just the desired columns
dtListItems = FormatTable(dtListItems);
//Step 9: Create XML representation of document list
StringBuilder sb = new StringBuilder();
System.IO.StringWriter sw
= new System.IO.StringWriter(sb);
dtListItems.WriteXml(sw);
//Step 10: Format XML using XSLT
Xml xmlListItems = new Xml();
xmlListItems.DocumentContent = sb.ToString();
xmlListItems.TransformSource = "Recipes.xsl";
this.Controls.Add(xmlListItems);
}
}
}
web.Dispose();
site.Dispose();
}
private DataTable FormatTable(DataTable dtListItems)
{
DataTable dtMyList = new DataTable("ListItems");
dtMyList.Columns.Add("ID");
dtMyList.Columns.Add("FileName");
dtMyList.Columns.Add("FileSize");
foreach (DataRow drListItem in dtListItems.Rows)
{
DataRow drMyListItem = dtMyList.NewRow();
drMyListItem["ID"] = drListItem["ID"];
drMyListItem["FileName"] = drListItem["LinkFileName"];
drMyListItem["FileSize"] = drListItem["FileSizeDisplay"];
dtMyList.Rows.Add(drMyListItem);
dtMyList.AcceptChanges();
}
return dtMyList;
}
}Either run the application from within Visual Studio, or open a browser and navigate to the application page. You should see output similar to the following, including sections for each document library in the target website. Figure 1-8 shows the resulting storage report in a browser.

In our version, we did not take into account the possibility of multiple document versions. You may want to add this.
Because the output is formatted by using an XSLT, you can easily modify that output by making changes to the XSLT. Note that if you decide to include more or different columns from the document list data table, you will need to modify the XSLT to reference those nodes in the resulting XML.
SharePoint backup and disaster recovery should be a multilayered affair, ranging from full Structured Query Language (SQL) database and file system backups to recover from catastrophic server failure, all the way to the humble yet important Recycle Bin. Along this continuum is the ability to recover a single site collection to its original or a new server. This can be accomplished by using the STSADM BACKUP and RESTORE commands.
This recipe shows you how to automate the process of backing up all site collections on a given SharePoint farm automatically by using a command script, which can be run from the Windows Task Scheduler or manually as needed.
The
STSADM BACKUPcommand can consume a large amount of server resources, so it should generally be run off-peak. In addition, the following script can open a large number of scripting sessions, one for each site collection. For that reason, the script includes the ability to insert a delay between each call to theSTSADM BACKUPcommand to throttle back the number of concurrent sessions. The actual number of seconds' delay needed will depend on many factors, including the speed of your server, average size of site collections, and amount of server memory.
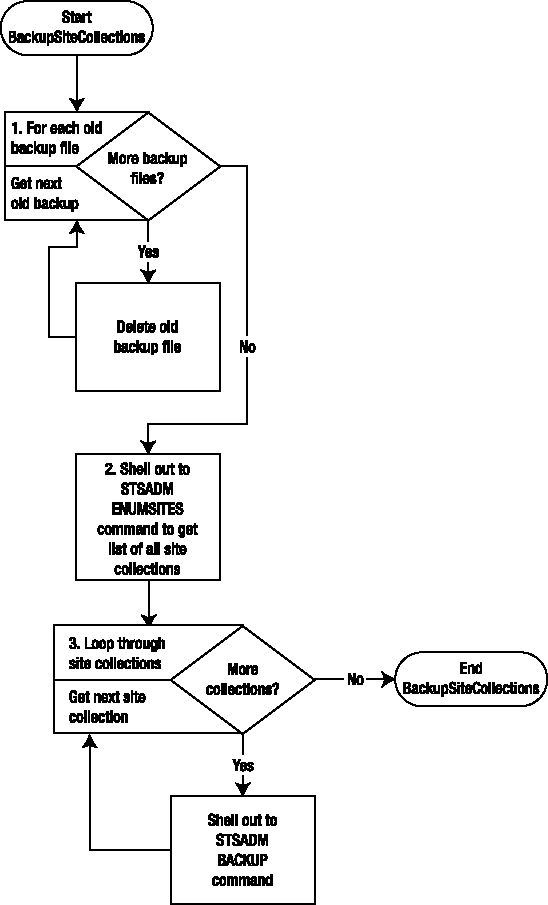
Get a list of all preexisting files in the backup folder and loop through the list to delete each file.
Call the
STSADM ENUMSITEScommand to return an XML document containing a list of all site collections on the local server.Loop through each node (that is, site collection) in the returned XML document, and again shell out, this time to the
STSADM BACKUPcommand, to write a site collection backup to the target backup folder.
' -------------------------------------------------------------- ' Purpose: Back up all SharePoint site collections on server ' By: Mark Gerow ' Date: 1/3/08 ' -------------------------------------------------------------- Option Explicit ' Set the path to the STSADM utility Const STSADM_PATH = _ "C:Program FilesCommon FilesMicrosoft Sharedweb server extensions12BINstsadm" ' Set the path to where you want the backups made Const BACKUP_PATH = "C:SharePoint_Backups" ' Define needed variables Dim objFso, objFolder, objFiles, objFile, objShell Dim objExec, strResult, objXml, objSc, objUrl Dim strUrl, strFileName, strCmd ' Step 1: OPTIONAL: Delete any preexisting backups Set objFso = CreateObject("Scripting.FileSystemObject") Set objFolder = objFso.GetFolder(BACKUP_PATH) Set objFiles = objFolder.Files For Each objFile in objFiles objFile.Delete(True) Next ' Step 2: Retrieve all site collections in XML format. Set objShell = CreateObject("WScript.Shell") Set objExec = objShell.Exec(STSADM_PATH & " -O ENUMSITES -URL http://localhost/") strResult = objExec.StdOut.ReadAll ' Load XML in DOM document so it can be processed.
Set objXml = CreateObject("MSXML2.DOMDocument")
objXml.LoadXML(strResult)
' Step 3: Loop through each site collection and call
' stsadm.exe to make a backup.
For Each objSc in objXml.DocumentElement.ChildNodes
    strUrl = objSc.Attributes.GetNamedItem("Url").Text
    strFileName = BACKUP_PATH & _
        Replace(Replace(strUrl,"/","_"),":","") & ".bak"
    strCmd = STSADM_PATH & " -O BACKUP -URL """ & _
        strUrl + """ -FILENAME """ + strFileName + """"
     ' For testing, display pop-up for each collection backed up
     WScript.Echo "Backing up site collection " & _
          strUrl & " to file " & _
          strFileName & " using the following command " & _
          strCmd
     WScript.Echo

    objShell.Exec(strCmd)

     ' Optional, if there will be many site collections, may want
     ' to insert a delay to avoid overloading server memory
     GoSleep(3)
Next
' This function can be used to insert a delay in the processing
' to avoid overloading server memory if there are many
' site collections to be backed up.
Function GoSleep(seconds)
    Dim startTime, endTime, nowTime, dummy
     startTime = DateAdd("s",0,Now)
     endTime = DateAdd("s",seconds,Now)
     nowTime = DateAdd("s",0,Now)
     While endTime > nowTime
         ' Need some commands in while loop to
         ' ensure it actually executes
         nowTime = DateAdd("s",0,Now)
         dummy = Time
     Wend
End FunctionOpen a command window, navigate to the folder containing the Backup.vbs file, and type the following command:
CSCRIPT Backup.vbs
Figure 1-9 shows a command window after the preceding command has been entered.

Assuming the script is set to write backup files to C:SharePoint_Backups, you should find one or more .bak files in that folder after the script runs. Figure 1-10 shows a directory listing of backup files.

This recipe could alternatively be written as a .NET console application, but given that it will still shell out to the
STSADMcommand, there's little value in the additional overhead of the managed code.As an alternative, you could use the
Microsoft.SharePoint.Administration SPSiteCollection.Backup()method to perform the same operation in a .NET application. This may be preferable if you want to provide the end user a user interface from which to select the site collection or collections to back up.