
One of the compelling reasons for using the SharePoint platform as a basis for your intranet and extranet web applications is its built-in security model. This model provides a rich set of tools for securing objects (web applications, site collections, sites, lists, folders, and items) and assigning permissions on those objects to users.
This group of recipes focuses on automating tasks around users and user permissions. You'll find recipes to add users, groups, and roles by using both the object model and web services, because there are advantages to both.
Finally, you'll see recipes for working with Active Directory (AD). The reason for including AD is that there will be times when you need to add, edit, or delete the underlying user accounts, rather than just their assigned permissions in SharePoint. In that case, assuming you're using Windows authentication, you'll need recipes for accessing AD directly.
It's often useful to know who has access to a site. You might need to produce a report showing who has access across multiple sites, or might want a count of users in each site group on a site—and the ability to obtain this information is a huge benefit in any company subject to legal or industrial compliance requirements. Of course the built-in SharePoint UI can help with this, but if you're managing a large number of sites, going to each site's user administration page to tally or list users can be tedious to say the least.
In this recipe, you'll see how to enumerate the users who are members of site groups as well as those who are given explicit permissions on a site. You'll also see how to identify Active Directory groups that are given permissions to a site.
The Microsoft Windows SharePoint Services (WSS) SDK, as well as IntelliSense in Visual Studio, will inform you that the
SPUser.Rolescollection is obsolete. However, theRolescollection is still the simplest way to obtain user role information, requiring less code, so I generally use it instead.
Create a new ASP.NET web application.
Add a reference to the Windows SharePoint Services library.
Add
Importsorusingdirectives to the top of the code-behind file forDefault.aspx(assuming you're using this as your application web page) to the following:Microsoft.SharePointSystem.Collections

Open the web site to process.
Create a temporary data table to hold results.
Iterate through site groups in the target web site.
Iterate through the list of users in each site group, adding group users to the data table.
After obtaining all users who are members of one or more groups, add users who don't belong to any site groups but have been given site permissions directly.
Imports System
Imports System.Data
Imports System.Configuration
Imports System.Web
Imports System.Web.Security
Imports System.Web.UI
Imports System.Web.UI.WebControls
Imports System.Web.UI.WebControls.WebParts
Imports System.Web.UI.HtmlControls
Imports Microsoft.SharePoint
Imports System.Collections
Partial Public Class _Default
    Inherits System.Web.UI.Page
    Protected Sub Page_Load(ByVal sender As Object, _
            ByVal e As EventArgs) Handles Me.Load
        Dim siteUrl As String
        Dim webName As String = ""
        Dim fontSize As Integer = 14
        ' Validate site url
        Try
            siteUrl = Request.QueryString("siteUrl").ToString()
        Catch
            Response.Write("<div style='font-size: " & fontSize & _
               "pt; font-weight: bold; font-color: red'>")
            Response.Write("Please provide a value for 'siteUrl' " & _
               "in the querystring")
            Response.Write("</div>")
            Return
        End Try
        ' Validate web name
        Try
            webName = Request.QueryString("webName").ToString()
Catch
Response.Write("<div style='font-size: " & fontSize & _
"pt; font-weight: bold; font-color: red'>")
Response.Write("Please provide a value for 'webName' " & _
"in the querystring")
Response.Write("</div>")
Return
End Try
' Display banner and return link
Response.Write("<H1>List of users for web site '" & siteUrl & _
"/" + webName + "</H1>")
Dim site As New SPSite(siteUrl)
Dim ADGroups As New ArrayList()
Dim userList As New DataTable()
userList = GetAllSiteUsers(siteUrl, webName)
Dim heading As String = "The following report displays all " & _
"members of the '" & site.AllWebs(webName).Title & _
"' as of " & DateTime.Now.ToLocalTime() & _
"<br/><br/>"
Response.Write("<div style='font-size: " & fontSize & _
"; font-weight: bold'>")
Response.Write(heading)
Response.Write("<hr/>")
Response.Write("</div>")
' Display users in all groups, and who are not members of any group.
Dim prevGroup As String = "..."
Dim table As New Table()
For Each userRow As DataRow In userList.Rows
' If a new GROUP, display heading info
If prevGroup <> DirectCast(userRow("GroupName"), String) Then
Response.Write("<br/>")
If DirectCast(userRow("GroupName").ToString(), String) _
<> "" Then
Response.Write("<strong>Group: " & userRow("GroupName")& _
" [" + userRow("GroupRoles") & _
"]</strong><br/><br/>")
Else
Response.Write("<strong>The following users have " & _
"been given explicit permissions" & _
" </strong><br/><br/>")
End If
prevGroup = DirectCast(userRow("GroupName"), String)
End If
If userRow("UserName").ToString() <> "" Then
Response.Write(userRow("UserName"))Else
Response.Write(" (" + userRow("UserAlias") + ") ")
End If
If DirectCast(userRow("UserRoles"), String) <> "" Then
Response.Write(" [" + userRow("UserRoles") + "] ")
End If
If DirectCast(userRow("IsADGroup"), String) <> "False" Then
Response.Write("<font color='red'> " & _
"** Active Directory Security Group</font>")
End If
Response.Write("<br/>")
Next
Response.Write("</div>")
site.Dispose()
End Sub
Private Function GetAllSiteUsers(ByVal siteUrl As String, _
ByVal webName As String) As DataTable
' Step1: Open the web site to process
Dim site As New SPSite(siteUrl)
Dim web As SPWeb = site.AllWebs(webName)
' Step 2: Create a data table to hold list
' of site users
Dim userList As New DataTable("UserList")
Dim userRow As DataRow
userList.Columns.Add("GroupName")
userList.Columns.Add("GroupRoles")
userList.Columns.Add("UserAlias")
userList.Columns.Add("UserName")
userList.Columns.Add("UserRoles")
userList.Columns.Add("UserCompany")
userList.Columns.Add("IsADGroup")
' Step 3: Iterate through site groups
For Each group As SPGroup In web.SiteGroups
' Step 4: Get list of all users in this group
' and add to data table
For Each user As SPUser In group.Users
userRow = userList.NewRow()
userRow("GroupName") = group.Name
userRow("GroupRoles") = GetRoles(group)
userRow("UserName") = user.Name
userRow("UserAlias") = user.LoginName.ToString()
userRow("UserRoles") = GetRoles(user)
userRow("IsADGroup") = user.IsDomainGroup.ToString()
userList.Rows.Add(userRow)
Next
Next' Step 5: Get users who have been assigned
' explicit permissions
For Each user As SPUser In web.Users
If user.Groups.Count = 0 OrElse GetRoles(user) <> "" Then
userRow = userList.NewRow()
userRow("GroupName") = ""
userRow("GroupRoles") = ""
userRow("UserName") = user.Name
userRow("UserAlias") = user.LoginName
userRow("UserRoles") = GetRoles(user)
userRow("IsADGroup") = user.IsDomainGroup.ToString()
userList.Rows.Add(userRow)
End If
Next
web.Dispose()
site.Dispose()
Return userList
End Function
' Note: the SPUser.Roles collection has been
' deprecated in WSS 3.0, but it's still the
' simplest way to access roles assigned to a
' user.
Private Function GetRoles(ByVal gu As SPPrincipal) As String
Dim roleInfo As String = ""
For Each role As SPRole In gu.Roles
If roleInfo <> "" Then
roleInfo = roleInfo + ","
End If
roleInfo = roleInfo + role.Name.ToString()
Next
Return roleInfo
End Function
End Classusing System; using System.Data; using System.Configuration; using System.Web; using System.Web.Security; using System.Web.UI; using System.Web.UI.WebControls; using System.Web.UI.WebControls.WebParts; using System.Web.UI.HtmlControls; using Microsoft.SharePoint; using System.Collections;
public partial class _Default : System.Web.UI.Page
{
    protected void Page_Load(object sender, EventArgs e)
    {
        string siteUrl;
        string webName = "";
        int fontSize = 14;
        // Validate site url
        try
        {
            siteUrl = Request.QueryString["siteUrl"].ToString();
        }
        catch
        {
            Response.Write("<div style='font-size: " + fontSize
               + "pt; font-weight: bold; font-color: red'>");
            Response.Write("Please provide a value for 'siteUrl' "
               + "in the querystring");
            Response.Write("</div>");
            return;
        }
        // Validate web name
        try
        {
            webName = Request.QueryString["webName"].ToString();
        }
        catch
        {
            Response.Write("<div style='font-size: " + fontSize
               + "pt; font-weight: bold; font-color: red'>");
            Response.Write("Please provide a value for 'webName' in "
               + "the querystring");
            Response.Write("</div>");
            return;
        }
        //}
        // Display banner and return link
        Response.Write("<H1>List of users for web site '"
           + siteUrl + "/" + webName + "</H1>");
        SPSite site = new SPSite(siteUrl);
        ArrayList ADGroups = new ArrayList();
        DataTable userList = new DataTable();
        userList = GetAllSiteUsers(siteUrl, webName);
        string heading = "The following report displays all members of the '"
            + site.AllWebs[webName].Title + "' as of "
            + DateTime.Now.ToLocalTime()
            + "<br/><br/>";
Response.Write("<div style='font-size: " + fontSize
+ "; font-weight: bold'>");
Response.Write(heading);
Response.Write("<hr/>");
Response.Write("</div>");
// Display users in all groups, and who are not members of
// any group.
string prevGroup = "...";
Table table = new Table();
foreach (DataRow userRow in userList.Rows)
{
// If a new GROUP, display heading info
if (prevGroup != (string)userRow["GroupName"])
{
Response.Write("<br/>");
if ((string)userRow["GroupName"].ToString() != "")
{
Response.Write("<strong>Group: "
+ userRow["GroupName"] + " ["
+ userRow["GroupRoles"] + "]</strong><br/><br/>");
}
else
{
Response.Write("<strong>The following users " +
"have been given explicit permissions " +
" </strong><br/><br/>");
}
prevGroup = (string)userRow["GroupName"];
}
if (userRow["UserName"].ToString() != "")
{
Response.Write(userRow["UserName"]);
}
else
{
Response.Write(" (" + userRow["UserAlias"] + ") ");
}
if ((string)userRow["UserRoles"] != "")
{
Response.Write(" [" + userRow["UserRoles"] + "] ");
}
if ((string)userRow["IsADGroup"] != "False")
{
Response.Write("<font color='red'> " +
"** Active Directory Security Group</font>");
}
Response.Write("<br/>");}
Response.Write("</div>");
site.Dispose();
}
private DataTable GetAllSiteUsers(string siteUrl, string webName)
{
// Step1: Open the web site to process
SPSite site = new SPSite(siteUrl);
SPWeb web = site.AllWebs[webName];
// Step 2: Create a data table to hold list
// of site users
DataTable userList = new DataTable("UserList");
DataRow userRow;
userList.Columns.Add("GroupName");
userList.Columns.Add("GroupRoles");
userList.Columns.Add("UserAlias");
userList.Columns.Add("UserName");
userList.Columns.Add("UserRoles");
userList.Columns.Add("UserCompany");
userList.Columns.Add("IsADGroup");
// Step 3: Iterate through site groups
foreach (SPGroup group in web.SiteGroups)
{
// Step 4: Get list of all users in this group
// and add to data table
foreach (SPUser user in group.Users)
{
userRow = userList.NewRow();
userRow["GroupName"] = group.Name;
userRow["GroupRoles"] = GetRoles(group);
userRow["UserName"] = user.Name;
userRow["UserAlias"] = user.LoginName.ToString();
userRow["UserRoles"] = GetRoles(user);
userRow["IsADGroup"] = user.IsDomainGroup.ToString();
userList.Rows.Add(userRow);
}
}
// Step 5: Get users who have been assigned
// explicit permissions
foreach (SPUser user in web.Users)
{if (user.Groups.Count == 0 || GetRoles(user) != "")
{
userRow = userList.NewRow();
userRow["GroupName"] = "";
userRow["GroupRoles"] = "";
userRow["UserName"] = user.Name;
userRow["UserAlias"] = user.LoginName;
userRow["UserRoles"] = GetRoles(user);
userRow["IsADGroup"] = user.IsDomainGroup.ToString();
userList.Rows.Add(userRow);
}
}
web.Dispose();
site.Dispose();
return userList;
}
// Note: the SPUser.Roles collection has been
// deprecated in WSS 3.0, but it's still the
// simplest way to access roles assigned to a
// user.
string GetRoles(SPPrincipal gu)
{
string roleInfo = "";
foreach (SPRole role in gu.Roles)
{
if (roleInfo != "")
{
roleInfo = roleInfo + ",";
}
roleInfo = roleInfo + role.Name.ToString();
}
return roleInfo;
}
}Start the application from within Visual Studio, or open a browser window and navigate to the application URL. Be sure to provide the siteUrl and webName query string parameters as part of the URL. You should see a page similar to Figure 2-1.

Modify the application to allow the user to input the site URL and web name via a web form, and then to either navigate to the report page or display the results below the input fields.
If you deploy the recipe to the
12/Template/Layoutsdirectory, the recipe will be accessible from any site viahttp://server/site/_layouts/mypage.aspx, and you can use the context within SharePoint via theSPControlobject (GetContextWeb()method) so that the page can determine which site you called it from.
There are many times when manually adding users to a site is impractical. For example, if you are automating the provisioning of multiple sites, or you want to add a standard set of users to one or more sites quickly, you will want a way to programmatically add those users.
This recipe shows you how to add one or more users to an existing site group of a web site. Other recipes in this chapter will show you how to create new site groups and roles, and assign users to those programmatically as well.
Note
Keep in mind that in 2007, groups are defined, and their users managed, at the site collection level, not on individual web sites.
The user login should be provided in the form of
[domain][login].This recipe provides essentially the same functionality as the
STSADM ADDUSERcommand, with the addition that this application will prompt for parameters if they are not provided.
Create a new .NET console application.
Add a reference to the Windows SharePoint Services .NET assembly.
Add an
Importsorusingstatement at the top of the main program file referencing theMicrosoft.SharePointlibrary.
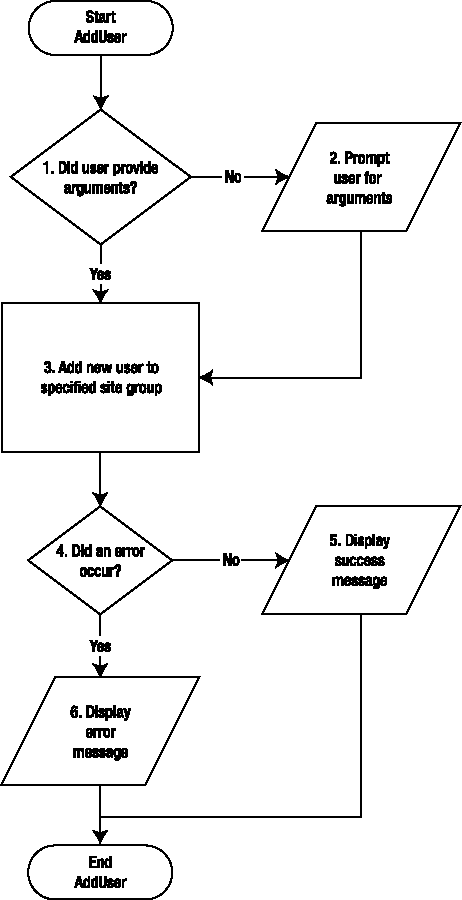
Determine whether the user included parameters on the command line.
If parameters were not included, prompt the user for them at the console.
Create
SPSiteandSPWebobjects representing the target site collection and web site and add the user.Determine whether an error occurred while adding the new user.
If no error occurred, display a success message.
Otherwise, if an error did occur, return the error message to the console.
Imports Microsoft.SharePoint
Module Module1
    Sub Main(ByVal args() As String)
        'Step 1: If no arguments passed in, prompt for them now
        If (args.Length = 0) Then
            args = New String(7) {}
            args = GetParams(args)
        End If
        Try
            'Step 3a: Get handle to specified site collection and web site
            Dim site As New SPSite(args(0))
            Dim web As SPWeb = site.AllWebs(args(1))
            'Step 3b: Add the user to the specified site group
            web.SiteGroups(args(6)).AddUser(args(2),args(3),args(4),args(5))
            'Steps 4-5: Display success message
            Console.WriteLine("User '" & args(2) & _
               "' has been successfuly added to site group '" & _
              args(6) & "'")
            web.Dispose()
            site.Dispose()
        Catch ex As Exception
            'Step 6: If error occurred, display error message
            Console.WriteLine(ex.Message)
        End Try
        Console.WriteLine()
        Console.WriteLine("Press any key to continue...")
        Console.Read()
    End Sub
    Private Function GetParams(ByRef args() As String) As String()
        Try
            ' Step 2: Get parameters from user
            Console.WriteLine()
            Console.Write("Site collection url: ")
            args(0) = Console.ReadLine
            Console.Write("Site (web): ")
            args(1) = Console.ReadLine
            Console.Write("User login: ")
            args(2) = Console.ReadLine
            Console.Write("Email address: ")
            args(3) = Console.ReadLine
Console.Write("User name: ")
args(4) = Console.ReadLine
Console.Write("Notes: ")
args(5) = Console.ReadLine
Console.Write("Site Group to add user to: ")
args(6) = Console.ReadLine
Console.WriteLine()
Console.WriteLine()
Catch ex As Exception
' If an error occurred, display the error message
Console.WriteLine()
Console.WriteLine(ex.Message)
Console.WriteLine()
End Try
Return args
End Function
End Moduleusing System;
using System.Collections.Generic;
using System.Text;
using Microsoft.SharePoint;
class Module1
{
static public void Main(string[] args)
{
//Step 1: If no arguments passed in, prompt for them now
if ((args.Length == 0))
{
args = new string[8];
args = GetParams(args);
}
try
{
//Step 3a: Get handle to specified site collection and web site
SPSite site = new SPSite(args[0]);
SPWeb web = site.AllWebs[args[1]];
//Step 3b: Add the user to the specified site group
web.SiteGroups[args[6]].AddUser(args[2], args[3],
args[4], args[5]);
//Steps 4-5: Display success message
Console.WriteLine("User '" + args[2] +
"' has been successfuly added to site group '" +
args[6] + "'");web.Dispose();
siite.Dispose();
}
catch (Exception ex)
{
//Step 6: If error occurred, display error message
Console.WriteLine(ex.Message);
}
Console.WriteLine();
Console.WriteLine("Press any key to continue...");
Console.Read();
}
static private string[] GetParams(string[] args)
{
try
{
// Step 2: Get parameters from user
Console.WriteLine();
Console.Write("Site collection url: ");
args[0] = Console.ReadLine();
Console.Write("Site (web): ");
args[1] = Console.ReadLine();
Console.Write("User login: ");
args[2] = Console.ReadLine();
Console.Write("Email address: ");
args[3] = Console.ReadLine();
Console.Write("User name: ");
args[4] = Console.ReadLine();
Console.Write("Notes: ");
args[5] = Console.ReadLine();
Console.Write("Site Group to add user to: ");
args[6] = Console.ReadLine();
Console.WriteLine();
Console.WriteLine();
}
catch (Exception ex)
{
// If an error occurred, display the error message
Console.WriteLine();
Console.WriteLine(ex.Message);
Console.WriteLine();
}
return args;
}
}Run the console application from a command window or from within Visual Studio. Unless you provide all data as command-line parameters, you will be prompted to provide them at runtime. Figure 2-2 shows this recipe running in a command window.

Assuming no errors occur, the user will be added to the specified site group.
Managing groups and users is one of several instances where the SharePoint web services are simpler to use than the object model. The signatures of the methods for managing users and groups are generally cleaner than their object model counterparts. And, of course, you have the advantage of being able to use them in programs running on any server that can make an HTTP call to one of the front-end servers in the SharePoint farm.
As with any web service call, be sure to set the instance object's credentials property to a network credential with permissions to access the SharePoint web server hosting the target site collection and web site.
Create a .NET console application.
Add a web reference named
UserGroupService, tohttp://[SharePoint server]/_vti_bin/UserGroup.asmx.
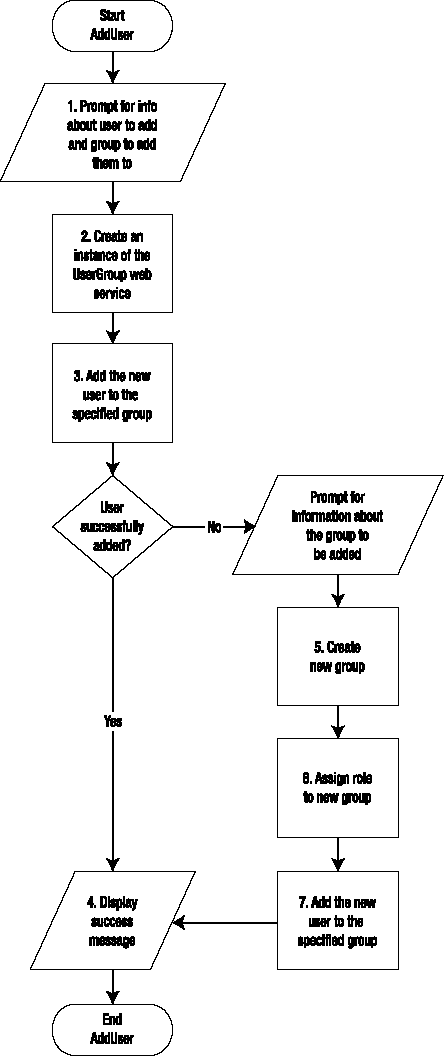
Get information about site collection, the web site, the user, and the target group.
Point the
UserGroupweb service to the target site collection and web site.Try to add the new user to the specified group.
If an error occurs, assume it's because the target group doesn't exist, so get more information needed to create the group, including the group owner and role.
Create the new group.
Assign the specified role to the new group.
Add the new user. This time it should work!
Module Module1
    'Define structure to hold user info
    Private Structure UserArgs
        Dim UserLogin As String
        Dim UserName As String
        Dim Email As String
        Dim UserDescription As String
        Dim GroupName As String
        Dim SiteUrl As String
        Dim WebName As String
    End Structure
    'Define structure to hold group info
    Private Structure GroupArgs
        Dim OwnerLogin As String
        Dim OwnerType As String
        Dim DefaultUserLogin As String
        Dim RoleName As String
        Dim Description As String
    End Structure
    Sub Main()
        'Step 1: Prompt for user info
        Dim userArgs As UserArgs = GetUserArgs()
        'Step 2: Create an instance of the UserGroup web service class
        '   and set its URL to the target site/web
        Dim objUserGroup As New UserGroupService.UserGroup
        objUserGroup.Url = userArgs.SiteUrl & "/" & _
           userArgs.WebName & "/_vti_bin/UserGroup.asmx"
        objUserGroup.Credentials = _
           System.Net.CredentialCache.DefaultCredentials
        'Attempt to add user to group; if error occurs, will need to get
        'some additional info about the group too
Try
'Step 3: Try adding user to the target group
objUserGroup.AddUserToGroup( _
userArgs.GroupName, _
userArgs.UserName, _
userArgs.UserLogin, _
userArgs.Email, _
userArgs.UserDescription)
Catch exAddUser As Exception
Try
'Step 5: Initial user add attempt failed,
' so try to create the group
Dim groupArgs As GroupArgs = GetGroupArgs()
objUserGroup.AddGroup( _
userArgs.GroupName, _
groupArgs.OwnerLogin, _
groupArgs.OwnerType, _
groupArgs.DefaultUserLogin, _
groupArgs.Description)
'Step 6: Assign the new group to desired role
objUserGroup.AddGroupToRole( _
groupArgs.RoleName, _
userArgs.GroupName)
'Step 7: Try adding user again now that group exists
objUserGroup.AddUserToGroup( _
userArgs.GroupName, _
userArgs.UserName, _
userArgs.UserLogin, _
userArgs.Email, _
userArgs.UserDescription)
Catch exAddGroup As Exception
Console.WriteLine(exAddGroup.Message)
End Try
End Try
'Step 4: Display success message
Console.WriteLine("Successfully added user '" & _
userArgs.UserLogin & _
"' to group '" & _
userArgs.GroupName & "'")
Console.WriteLine()
Console.WriteLine("Press any key to continue...")
Console.Read()
End Sub
Private Function GetGroupArgs() As GroupArgs
Dim groupArgs As New GroupArgsTry
Console.WriteLine()
Console.Write("Group owner login: ")
groupArgs.OwnerLogin = Console.ReadLine()
Console.Write("Group default user login: ")
groupArgs.DefaultUserLogin = Console.ReadLine()
Console.Write("Owner login type (User/Group): ")
groupArgs.OwnerType = Console.ReadLine()
Console.Write("Group role (Full Control/Contribute/Read): ")
groupArgs.RoleName = Console.ReadLine()
Console.Write("Group description: ")
groupArgs.Description = Console.ReadLine()
Console.WriteLine()
Catch ex As Exception
' If an error occurred, display the error message
Console.WriteLine()
Console.WriteLine(ex.Message)
Console.WriteLine()
End Try
Return groupArgs
End Function
Private Function GetUserArgs() As UserArgs
Dim userArgs As New UserArgs
Try
Console.WriteLine()
Console.Write("Site collection url: ")
userArgs.SiteUrl = Console.ReadLine()
Console.Write("Site (web): ")
userArgs.WebName = Console.ReadLine()
Console.Write("Site group to add user to: ")
userArgs.GroupName = Console.ReadLine()
Console.Write("User login: ")
userArgs.UserLogin = Console.ReadLine()
Console.Write("User name: ")
userArgs.UserName = Console.ReadLine()
Console.Write("User email: ")
userArgs.Email = Console.ReadLine()
Console.Write("Description: ")
userArgs.UserDescription = Console.ReadLine()
Console.WriteLine()
Catch ex As Exception
' If an error occurred, display the error message
Console.WriteLine()
Console.WriteLine(ex.Message)
Console.WriteLine()
End TryReturn userArgs
End Function
End Moduleusing System;
using System.Collections.Generic;
using System.Text;
namespace AddUserWS_CS
{
class program1
{
//Define structure to hold user info
private struct UserArgs
{
public string UserLogin;
public string UserName;
public string Email;
public string UserDescription;
public string GroupName;
public string SiteUrl;
public string WebName;
}
//Define structure to hold group info
private struct GroupArgs
{
public string OwnerLogin;
public string OwnerType;
public string DefaultUserLogin;
public string RoleName;
public string Description;
}
public static void Main()
{
//Step 1: Prompt for user info
UserArgs userArgs = GetUserArgs();
//Step 2: Create an instance of the UserGroup web service class
// and set its URL to the target site/web
UserGroupService.UserGroup objUserGroup =
new UserGroupService.UserGroup();
objUserGroup.Url = userArgs.SiteUrl + "/" +
userArgs.WebName + "/_vti_bin/UserGroup.asmx";
objUserGroup.Credentials =
System.Net.CredentialCache.DefaultCredentials;
//Attempt to add user to group; if error occurs, will need to get
//some additional info about the group tootry
{
//Step 3: Try adding user to the target group
objUserGroup.AddUserToGroup(userArgs.GroupName,
userArgs.UserName, userArgs.UserLogin, userArgs.Email,
userArgs.UserDescription);
}
catch (Exception exAddUser)
{
try
{
//Step 5: Initial user add attempt failed,
// so try to create the group
GroupArgs groupArgs = GetGroupArgs();
objUserGroup.AddGroup(userArgs.GroupName,
groupArgs.OwnerLogin, groupArgs.OwnerType,
groupArgs.DefaultUserLogin, groupArgs.Description);
//Step 6: Assign the new group to desired role
objUserGroup.AddGroupToRole(groupArgs.RoleName,
userArgs.GroupName);
//Step 7: Try adding user again now that group exists
objUserGroup.AddUserToGroup(userArgs.GroupName,
userArgs.UserName, userArgs.UserLogin,
userArgs.Email, userArgs.UserDescription);
}
catch (Exception exAddGroup)
{
Console.WriteLine(exAddGroup.Message);
}
}
//Step 4: Display success message
Console.WriteLine("Successfully added user '" +
userArgs.UserLogin + "' to group '" +
userArgs.GroupName + "'");
Console.WriteLine();
Console.WriteLine("Press any key to continue...");
Console.Read();
}
private static GroupArgs GetGroupArgs()
{
GroupArgs groupArgs = new GroupArgs();
try
{
Console.WriteLine();
Console.Write("Group owner login: ");
groupArgs.OwnerLogin = Console.ReadLine();
Console.Write("Group default user login: ");groupArgs.DefaultUserLogin = Console.ReadLine();
Console.Write("Owner login type (User/Group): ");
groupArgs.OwnerType = Console.ReadLine();
Console.Write("Group role (Full Control/Contribute/Read): ");
groupArgs.RoleName = Console.ReadLine();
Console.Write("Group description: ");
groupArgs.Description = Console.ReadLine();
Console.WriteLine();
}
catch (Exception ex)
{
// If an error occurred, display the error message
Console.WriteLine();
Console.WriteLine(ex.Message);
Console.WriteLine();
}
return groupArgs;
}
private static UserArgs GetUserArgs()
{
UserArgs userArgs = new UserArgs();
try
{
// Step 2: Get parameters from user
Console.WriteLine();
Console.Write("Site collection url: ");
userArgs.SiteUrl = Console.ReadLine();
Console.Write("Site (web): ");
userArgs.WebName = Console.ReadLine();
Console.Write("Site group to add user to: ");
userArgs.GroupName = Console.ReadLine();
Console.Write("User login: ");
userArgs.UserLogin = Console.ReadLine();
Console.Write("User name: ");
userArgs.UserName = Console.ReadLine();
Console.Write("User email: ");
userArgs.Email = Console.ReadLine();
Console.Write("Description: ");
userArgs.UserDescription = Console.ReadLine();
Console.WriteLine();
}
catch (Exception ex)
{
// If an error occurred, display the error message
Console.WriteLine();
Console.WriteLine(ex.Message);
Console.WriteLine();
}return userArgs;
}
}
}Run the application from a command window or from within Visual Studio. You will be prompted for the target site collection and web site, the user login and name, and the group to add the user to. If the group doesn't already exist, you will be prompted for group information as well. Figure 2-3 shows the AddUserWS recipe in action.

You can verify that the program ran correctly by opening a browser and navigating to the /_layouts/groups.aspx page of the target site collection and web site.
As with users, groups can be added programmatically to a site. This recipe shows you how to add groups and assign them to a role (for example, Contribute or Full Control).
SPWeb.SiteGroupcollectionSPWeb.Rolescollection (See the following "Special Considerations" section for more on this collection.)
The
SPWeb.Rolescollection has been flagged as obsolete in SharePoint 2007. However, it is still functional and is the easiest way to manipulate roll assignments through the object model. Because simplicity is always my goal, I will continue to use it until Microsoft removes it from the object model. In the meantime, other than Visual Studio displaying warnings about it being obsolete, there is no negative impact from using this collection.The following example uses the
SPWeb.SiteGroupsandSPWeb.SiteUserscollections. These collections refer to the collection of cross-site groups and site users, respectively. To limit the scope to just site-specific groups and users, substitute theSPWeb.GroupsandSPWeb.Userscollections.
Create a new .NET console application.
Add a reference to the Windows SharePoint Services .NET assembly.
Add an
Importsorusingstatement at the top of the main program file referencing theMicrosoft.SharePointlibrary.

Determine whether the user provided necessary parameters on the command line.
If the user did not provide the parameters, prompt for them now.
Get a handle to the site collection and web site and add a new site group to the web site.
Assign an existing role to the new site group.
If no errors occurred, display a success message to the console.
Otherwise, display the error message to the console.
Imports System
Imports System.Collections.Generic
Imports System.Text
Imports Microsoft.SharePoint
Module Module1
    Public Shared Sub Main(ByVal args As String())
        'Steps 1-2: If no arguments passed in, prompt for them now
        If (args.Length = 0) Then
            args = New String(6) {}
            args = GetParams(args)
        End If
        Try
            'Step 3a: Get handle to specific site collection and web site
            Dim site As New SPSite(args(0))
            Dim web As SPWeb = site.AllWebs(args(1))
            'Step 3b: Add the specified site group
            web.SiteGroups.Add(args(2), web.SiteUsers(args(3)), _
                 web.SiteUsers(args(4)), args(5))
            'Step 4: Assign specified role to the new group
            'Note: even though the SPWeb.Roles collection has been flagged as
            ' "obsolete" by Microsoft, it is still the easiest way to
            ' add roles to site groups in WSS/MOSS 2007
            web.Roles(args(6)).AddGroup(web.SiteGroups(args(2)))
            'Step 5: Display success message
            Console.WriteLine("Site group '" + args(2) + _
                 "' has been successfully added")
            web.Dispose()
            site.Dispose()
        Catch ex As Exception
            'Step 6: If error occurred, display error message
            Console.WriteLine(ex.Message)
        End Try
        Console.WriteLine()
        Console.WriteLine("Press any key to continue...")
        Console.Read()
    End Sub
Private Shared Function GetParams(ByVal args As String()) As String()
Try
' Step 2: Get parameters from user
Console.WriteLine()
Console.Write("Site collection url: ")
args(0) = Console.ReadLine()
Console.Write("Site (web): ")
args(1) = Console.ReadLine()
Console.Write("Site group to add: ")
args(2) = Console.ReadLine()
Console.Write("Owner login: ")
args(3) = Console.ReadLine()
Console.Write("Default user: ")
args(4) = Console.ReadLine()
Console.Write("Site group description: ")
args(5) = Console.ReadLine()
Console.Write("Role (Full Control/Contribute/Read): ")
args(6) = Console.ReadLine()
Console.WriteLine()
Console.WriteLine()
Catch ex As Exception
' If an error occurred, display the error message
Console.WriteLine()
Console.WriteLine(ex.Message)
Console.WriteLine()
End Try
Return args
End Function
End Moduleusing System;
using System.Collections.Generic;
using System.Text;
using Microsoft.SharePoint;
class Program1
{
static public void Main(string[] args)
{
//Steps 1-2: If no arguments passed in, prompt for them now
if ((args.Length == 0))
{
args = new string[7];
args = GetParams(args);
}try
{
//Step 3a: Get handle to specific site collection and web site
SPSite site = new SPSite(args[0]);
SPWeb web = site.AllWebs[args[1]];
//Step 3b: Add the specified site group
web.SiteGroups.Add(args[2], web.SiteUsers[args[3]],
web.SiteUsers[args[4]], args[5]);
//Step 4: Assign specified role to the new group
//Note: even though the SPWeb.Roles collection has
// been flagged as "obsolete" by Microsoft, it is
// still the easiest way to add roles to site
// groups in WSS/MOSS 2007
web.Roles[args[6]].AddGroup(web.SiteGroups[args[2]]);
//Step 5: Display success message
Console.WriteLine("Site group '" + args[2] +
"' has been successfully added");
web.Dispose();
site.Dispose();
}
catch (Exception ex)
{
//Step 6: If error occurred, display error message
Console.WriteLine(ex.Message);
}
Console.WriteLine();
Console.WriteLine("Press any key to continue...");
Console.Read();
}
static private string[] GetParams(string[] args)
{
try
{
// Step 2: Get parameters from user
Console.WriteLine();
Console.Write("Site collection url: ");
args[0] = Console.ReadLine();
Console.Write("Site (web): ");
args[1] = Console.ReadLine();
Console.Write("Site group to add: ");
args[2] = Console.ReadLine();
Console.Write("Owner login: ");
args[3] = Console.ReadLine();
Console.Write("Default user: ");
args[4] = Console.ReadLine();Console.Write("Site group description: ");
args[5] = Console.ReadLine();
Console.Write("Role (Full Control/Contribute/Read): ");
args[6] = Console.ReadLine();
Console.WriteLine();
Console.WriteLine();
}
catch (Exception ex)
{
// If an error occurred, display the error message
Console.WriteLine();
Console.WriteLine(ex.Message);
Console.WriteLine();
}
return args;
}
}Run the application from a command window or directly from Visual Studio. Unless you have provided the necessary parameters on the command line, the program will prompt you to enter them from the console. See Figure 2-4 for an example of this recipe executing in a command window.

Roles (or role definitions) in SharePoint are essentially named permission sets. You're probably already familiar with the standard ones: Full Control, Contribute, and Read. But you can create custom role definitions to suit your particular needs.
In principle, you can assign one or more roles to an individual user, site group, or AD group to meet your security requirements. In practice, your best approach is to avoid assigning roles to individual users. Instead, you should assign roles to site groups, and add individual users or AD groups to those site groups.
You can create new role definitions only in web sites that do not inherit permissions from their parent. Because the root site in a site collection by definition has no parent, you can always create new roles in the root. By default, however, child sites will inherit from the root, so you will need to break that inheritance either through the web UI or programmatically before you can use this method to add new roles to those web sites.
SharePoint has 32 distinct base permissions, such as Manage Personal Views or Approve Items. The base permission sets, such as Full Control or Read are composed of different combinations of these 32 base permissions. Because of the large number of possible combinations, for the purposes of this recipe I have chosen to "clone" one of the standard permission sets rather than ask the user to choose from all or some of the base permissions. However, you shouldn't assume that you're restricted to any out-of-the-box set of permissions; you can mix and match from the 32 base permissions as needed.
Create a new .NET console application.
Add a reference to the Windows SharePoint Services .NET assembly.
Add a
usingorImportsstatement for theMicrosoft.SharePointlibrary.

The user must provide the target site collection URL, web site name (blank for root), new role name, and base permission set to inherit from.
Create instances of the
SPSiteandSPWebclasses pointing to the target site collection and web site.Create an instance of the
SPRoleDefinitionCollectionclass pointing to the collection of existing roles in the target web site.Create a new instance of the
SPRoleDefinitionclass to represent the role to be added, assign all required properties, and add the target web site's role definition collection.If no exceptions occurred along the way, let the user know it worked. Otherwise, display an error message.
Imports System
Imports System.Collections.Generic
Imports System.Text
Imports Microsoft.SharePoint
Namespace AddRoleOM_VB
    Module Module1
        Private Structure roleData
            Public SiteUr As String
            Public WebName As String
            Public RoleName As String
            Public RoleDescription As String
            Public PermissionMask As SPBasePermissions
        End Structure
        Public Shared Sub Main()
            'Step 1: Prompt data needed to define
            ' the new role
            Dim r As roleData = GetParams()
            Try
                'Step 2: Get handle to specific site collection and web site
                Dim site As New SPSite(r.SiteUr)
                Dim web As SPWeb = site.AllWebs(r.WebName)
                web.AllowUnsafeUpdates = True
                'Step 3: Get collection of current role definitions for site
                Dim roles As SPRoleDefinitionCollection = web.RoleDefinitions
                'Step 4: Create a new role using information passed in
                Dim role As New SPRoleDefinition()
                role.Name = r.RoleName
                role.Description = r.RoleDescription
                role.BasePermissions = r.PermissionMask
                roles.Add(role)
'Step 5: Display success message
Console.WriteLine("Role '" + r.RoleName + _
"' has been successfully added")
web.Dispose()
site.Dispose()
Catch ex As Exception
'Step 6: If error occurred, display error message
Console.WriteLine(ex.Message)
End Try
Console.WriteLine()
Console.WriteLine("Press any key to continue...")
Console.Read()
End Sub
Private Shared Function GetParams() As roleData
Dim r As New roleData()
Try
' Get the basic data
Console.WriteLine()
Console.Write("Site collection url: ")
r.SiteUr = Console.ReadLine()
Console.Write("Site (web): ")
r.WebName = Console.ReadLine()
Console.Write("Role to add: ")
r.RoleName = Console.ReadLine()
Console.Write("Description of role: ")
r.RoleDescription = Console.ReadLine()
' Now get a character that represents the
' set of permissions the new role should
' inherit
Console.Write("Role (F=Full Control, C=Contribute, R=Read): ")
Dim strBasePermission As String = Console.ReadLine()
'Only allow user to enter valid permission character,
'keep looping until valid response provided
Dim site As New SPSite(r.SiteUr)
Dim web As SPWeb = site.AllWebs(r.WebName)
r.PermissionMask = SPBasePermissions.EmptyMask
While True
Select Case strBasePermission.ToUpper()
Case "F"
r.PermissionMask = _
web.RoleDefinitions("Full Control").BasePermissions
Exit Select
Case "C"
r.PermissionMask = _
web.RoleDefinitions("Contribute").BasePermissions
Exit SelectCase "R"
r.PermissionMask = _
web.RoleDefinitions("Read").BasePermissions
Exit Select
End Select
If r.PermissionMask <> SPBasePermissions.EmptyMask Then
Exit While
Else
Console.Write("Your selection was not valid" & _
" (F=Full Control, C=Contribute, R=Read): ")
strBasePermission = Console.ReadLine()
End If
End While
Console.WriteLine()
Console.WriteLine()
web.Dispose()
site.Dispose()
Catch ex As Exception
' If an error occurred, display the error message
Console.WriteLine()
Console.WriteLine(ex.Message)
Console.WriteLine()
End Try
Return r
End Function
End Module
End Namespaceusing System;
using System.Collections.Generic;
using System.Text;
using Microsoft.SharePoint;
namespace AddRoleOM_CS
{
class Program
{
private struct roleData
{
public string SiteUr;
public string WebName;
public string RoleName;
public string RoleDescription;
public SPBasePermissions PermissionMask;
}static public void Main()
{
//Step 1: Prompt data needed to define
// the new role
roleData r = GetParams();
try
{
//Step 2: Get handle to specific site collection and web site
SPSite site = new SPSite(r.SiteUr);
SPWeb web = site.AllWebs[r.WebName];
web.AllowUnsafeUpdates = true;
//Step 3: Get collection of current role definitions for site
SPRoleDefinitionCollection roles = web.RoleDefinitions;
//Step 4: Create a new role using information passed in
SPRoleDefinition role = new SPRoleDefinition();
role.Name = r.RoleName;
role.Description = r.RoleDescription;
role.BasePermissions = r.PermissionMask;
roles.Add(role);
//Step 5: Display success message
Console.WriteLine(
"Role '" + r.RoleName + "' has been successfully added");
web.Dispose();
site.Dispose();
}
catch (Exception ex)
{
//Step 6: If error occurred, display error message
Console.WriteLine(ex.Message);
}
Console.WriteLine();
Console.WriteLine("Press any key to continue...");
Console.Read();
}
static private roleData GetParams()
{
roleData r = new roleData();
try
{
// Get the basic data
Console.WriteLine();
Console.Write("Site collection url: ");
r.SiteUr = Console.ReadLine();
Console.Write("Site (web): ");
r.WebName = Console.ReadLine();Console.Write("Role to add: ");
r.RoleName = Console.ReadLine();
Console.Write("Description of role: ");
r.RoleDescription = Console.ReadLine();
// Now get a character that represents the
// set of permissions the new role should
// inherit
Console.Write(
"Role (F=Full Control, C=Contribute, R=Read): ");
string strBasePermission = Console.ReadLine();
//Only allow user to enter valid permission character,
//keep looping until valid response provided
SPSite site = new SPSite(r.SiteUr);
SPWeb web = site.AllWebs[r.WebName];
r.PermissionMask = SPBasePermissions.EmptyMask;
while (true)
{
switch (strBasePermission.ToUpper())
{
case "F":
r.PermissionMask =
web.RoleDefinitions["Full Control"].BasePermissions;
break;
case "C":
r.PermissionMask =
web.RoleDefinitions["Contribute"].BasePermissions;
break;
case "R":
r.PermissionMask =
web.RoleDefinitions["Read"].BasePermissions;
break;
}
if (r.PermissionMask != SPBasePermissions.EmptyMask)
break;
else
{
Console.Write("Your selection was not valid" +
" (F=Full Control, C=Contribute, R=Read): ");
strBasePermission = Console.ReadLine();
}
}
Console.WriteLine();
Console.WriteLine();
web.Dispose();
site.Dispose();
}catch (Exception ex)
{
// If an error occurred, display the error message
Console.WriteLine();
Console.WriteLine(ex.Message);
Console.WriteLine();
}
return r;
}
}
}Run the application from within Visual Studio or at the command prompt. The application will prompt you for the target site collection and web site, a name and description, and a choice of one of three base permission sets to model the new role after.
In the example shown in Figure 2-5, I purposely entered the invalid entry bad entry at the role prompt to demonstrate the simple validation employed to ensure that the value is one of F, C, or R.

You can verify that the new role has been added by opening up the Site Settings/Permissions page of the target web site, as shown in Figure 2-6.
Clicking on the role name (titled Permission Level in the Role.aspx page shown) will display the detail page for that role, as shown in Figure 2-7.
In my example, I modeled the new role after the base Contribute role, and thus it inherited all the base permissions associated with that base role.


In this recipe, I've used a .NET console application because it removes much of the complexity (and richness) of a web UI. However, you may want to create an ASP.NET web form that allows the user more flexibility in selecting the base permissions wanted in the new role, or to add the same new role to all site collections for a given web application.
Perhaps the most likely scenario in which you'd want to programmatically provision roles for a web site might be when you are programmatically provisioning sites, and want to set up the security based on more- or less-complex business rules determined by data from another system (such as a customer relationship management database).
This recipe is similar to the previous one in that it shows you how to add a role to a web site. But in this case, we'll use a web service instead of the object model. As noted numerous times throughout this book, the web services have the advantage of allowing you to create distributed applications, rather than running your code on a SharePoint web server.
Adding a role by using the built-in UserGroup.asmx web service is actually very easy, with one exception—getting the permission flags necessary to assign a complex set of permissions to the new role. With that in mind, I will emphasize the GetPermissionFlags() method that is part of the recipe, showing how a combination of web service and OM calls can be used to clone permissions of an already existing role definition.
In many instances, you would not expect to find a reference to the Windows SharePoint Services assembly in an application that uses SharePoint web services. This is because the web services are generally used when you want to build an application that doesn't need to run on a SharePoint web server, but the classes contained in the Windows SharePoint Services assembly assume that they are executed on a SharePoint server. The reason for including that assembly here is so we can get access to the
SPBasePermissionsenum type—and not to call any of the methods—so there is no conflict. We'll use theSPBasePermissionsenum to help us construct the flags necessary to set permissions for the new role definition.As always with web services that require authentication (as all SharePoint web services do), you will want to attach a set of credentials that have authority to create new roles for the target web site.
New roles may be added only to web sites that do not inherit their permissions from a parent site.
Create a new ASP.NET web application.
Add a reference to the Windows SharePoint Services .NET assembly.
Add a web reference to the
_vti_bin/UserGroup.asmxSharePoint web service.Add a
usingorImportsstatement forMicrosoft.SharePoint.Add a
usingorImportsstatement forSystem.Xml, which will enable us to create theXmlNodeobject to hold the returned list of role definitions.

In case there is no existing role definition that matches the template name, default the permission flags to none.
Call the web service to get a list of existing roles in XML form. Associated with each entry will be a comma-delimited list of the base permissions associated with a given role definition.
Parse the
SPBasePermissionsenum to create arrays holding the list of all 32 base permissions and their associated flag values.Loop through each role definition returned in step 2 to find the one whose name matches the desired template role. After you've found it, get the list of base permission names associated with that role, convert the list into an array, and then find the corresponding base permission value by using the arrays created in step 3. All the base permission values will be ORed together to create the value that will be used to set the complete collection of base permissions associated with the new role.
<%@ Page Language="C#" AutoEventWireup="true" Gerew_09614
          CodeFile="Default.aspx.cs" Inherits="_Default" %>
<!DOCTYPE html PUBLIC "-//W3C//DTD XHTML 1.0 Transitional//EN"
          "http://www.w3.org/TR/xhtml1/DTD/xhtml1-transitional.dtd">
<html xmlns="http://www.w3.org/1999/xhtml" >
<head runat="server">
    <title>Untitled Page</title>
</head>
<body>
    <form id="form1" runat="server">
    <div>
        <table width="100%">
            <tr>
                <td>
                    Site collection Url:</td>
                <td style="width: 100px">
                    <asp:TextBox ID="txtSiteUrl" runat="server"></asp:TextBox></td>
                <td style="width: 100px">
                </td>
            </tr>
            <tr>
                <td>
                    Web site name:</td>
                <td style="width: 100px">
                    <asp:TextBox ID="txtWebName" runat="server"></asp:TextBox></td>
                <td style="width: 100px">
                </td>
            </tr>
"http://www.w3.org/TR/xhtml1/DTD/xhtml1-transitional.dtd">
<html xmlns="http://www.w3.org/1999/xhtml" >
<head runat="server">
<title>Untitled Page</title>
</head>
<body>
<form id="form1" runat="server">
<div>
<table width="100%">
<tr>
<td>
Site collection Url:</td>
<td style="width: 100px">
<asp:TextBox ID="txtSiteUrl" runat="server"></asp:TextBox></td>
<td style="width: 100px">
</td>
</tr>
<tr>
<td>
Web site name:</td>
<td style="width: 100px">
<asp:TextBox ID="txtWebName" runat="server"></asp:TextBox></td>
<td style="width: 100px">
</td>
</tr><tr>
<td>
New role definition name:</td>
<td style="width: 100px">
<asp:TextBox ID="txtRoleName" runat="server"></asp:TextBox></td>
<td style="width: 100px">
</td>
</tr>
<tr>
<td>
New role definition</td>
<td style="width: 100px">
<asp:TextBox ID="txtRoleDefinition" runat="server" Rows="5"
TextMode="MultiLine" Width="300px"></asp:TextBox></td>
<td style="width: 100px">
</td>
</tr>
<tr>
<td>
Copy permissions from which role:</td>
<td style="width: 100px">
<asp:RadioButtonList ID="rblTemplateRole" runat="server">
<asp:ListItem>Full Control</asp:ListItem>
<asp:ListItem>Contribute</asp:ListItem>
<asp:ListItem Selected="True">Read</asp:ListItem>
</asp:RadioButtonList></td>
<td style="width: 100px">
</td>
</tr>
<tr>
<td style="width: 100px">
</td>
<td style="width: 100px">
<asp:Button ID="cmdAddRole" runat="server"
OnClick="cmdAddRole_Click" Text="Add Role" /></td>
<td style="width: 100px">
</td>
</tr>
<tr>
<td style="width: 100px">
</td>
<td style="width: 100px">
</td>
<td style="width: 100px">
</td>
</tr><tr>
<td style="width: 100px">
</td>
<td style="width: 100px">
<asp:Label ID="lblReturnMsg" runat="server"
ForeColor="Red"></asp:Label></td>
<td style="width: 100px">
</td>
</tr>
</table>
</div>
</form>
</body>
</html>Imports System
Imports System.Data
Imports System.Configuration
Imports System.Web
Imports System.Web.Security
Imports System.Web.UI
Imports System.Web.UI.WebControls
Imports System.Web.UI.WebControls.WebParts
Imports System.Web.UI.HtmlControls
Imports Microsoft.SharePoint
Imports System.Xml
Partial Public Class _Default
Inherits System.Web.UI.Page
Private objUserGroup As New UserGroupService.UserGroup()
Private Function GetPermissionFlags(ByVal strRoleName As String) As ULong
' Step 1: Default to NO permissions
Dim permissionFlags As ULong = CLng(SPBasePermissions.EmptyMask)
' Step 2: Get list of all current roles for this web site
Dim xnRoles As XmlNode = objUserGroup.GetRoleCollectionFromWeb()
' Step 3: Even though we're using the web service to update
' the roles collection, we can use the built-in enum
' type to get the numeric values of the various base
' permissions.
Dim enumBasePermissions As New SPBasePermissions()
Dim arrBasePermissionNames As String() = _
System.Enum.GetNames(enumBasePermissions.GetType())
Dim arrBasePermissionValues As ULong() = _
System.Enum.GetValues(enumBasePermissions.GetType())' Step 4: Loop through all current roles in target site
' finding the role for which we want to duplicate permission
' flags.
For Each xnRole As XmlNode In xnRoles.FirstChild.ChildNodes
If xnRole.Attributes("Name").Value.ToString().ToLower() = _
strRoleName.ToLower() Then
' Turn the comma-delimited list of base permissing names into
' an array so we can iterate through them
Dim arrPermission As String() = _
xnRole.Attributes("BasePermissions").Value.ToString().Split(","c)
' Iterate through the complete list of base permissions to
' find the entry that matches the base permission from our
' template role
For i As Integer = 0 To arrPermission.Length - 1
For j As Integer = 0 To arrBasePermissionNames.Length - 1
' When we've found our base permission, "OR" its
' numeric value with that of any other base
' permissionsto create the complete set of values
If arrPermission(i).Trim() = _
arrBasePermissionNames(j) Then
permissionFlags = _
permissionFlags Or arrBasePermissionValues(j)
End If
Next
Next
End If
Next
Return permissionFlags
End Function
Protected Sub cmdAddRole_Click(ByVal sender As Object, _
ByVal e As EventArgs) Handles cmdAddRole.Click
Try
' Point the UserGroup web service to our target site collection
' and web site
objUserGroup.Url = txtSiteUrl.Text + "/" + _
txtWebName.Text + "/_vti_bin/usergroup.asmx"
objUserGroup.Credentials = _
System.Net.CredentialCache.DefaultCredentials
' Get the permission flags of the role to be cloned
Dim permissionFlags As ULong = _
GetPermissionFlags(rblTemplateRole.SelectedValue)
' Create the new role
objUserGroup.AddRoleDef(txtRoleName.Text, _
txtRoleDefinition.Text, permissionFlags)
' Display success message
lblReturnMsg.Text = "Successfully added '" + _
txtRoleName.Text + "' role."Catch ex As Exception
lblReturnMsg.Text = "Error: " + ex.Message
End Try
End Sub
End Classusing System;
using System.Data;
using System.Configuration;
using System.Web;
using System.Web.Security;
using System.Web.UI;
using System.Web.UI.WebControls;
using System.Web.UI.WebControls.WebParts;
using System.Web.UI.HtmlControls;
using Microsoft.SharePoint;
using System.Xml;
public partial class _Default : System.Web.UI.Page
{
private UserGroupService.UserGroup objUserGroup =
new UserGroupService.UserGroup();
protected void Page_Load(object sender, EventArgs e)
{
}
private ulong GetPermissionFlags(string strRoleName)
{
// Step 1: Default to NO permissions
ulong permissionFlags = (ulong)SPBasePermissions.EmptyMask;
// Step 2: Get list of all current roles for this web site
XmlNode xnRoles = objUserGroup.GetRoleCollectionFromWeb();
// Step 3: Even though we're using the web service to update
// the roles collection, we can use the built-in enum
// type to get the numeric values of the various base
// permissions.
SPBasePermissions enumBasePermissions =
new SPBasePermissions();
string[] arrBasePermissionNames =
System.Enum.GetNames(enumBasePermissions.GetType());
ulong[] arrBasePermissionValues =
(ulong[])System.Enum.GetValues(enumBasePermissions.GetType());
// Step 4: Loop through all current roles in target site
// finding the role for which we want to duplicate permission
// flags.foreach (XmlNode xnRole in xnRoles.FirstChild.ChildNodes)
{
if (xnRole.Attributes["Name"].Value.ToString().ToLower()
== strRoleName.ToLower())
{
// Turn the comma-delimited list of base permission
// names into an array so we can iterate through them
string[] arrPermission =
xnRole.Attributes["BasePermissions"].Value.ToString().Split(','),
// Iterate through the complete list of base permissions to
// find the entry that matches the base permission
// from our template role
for (int i = 0; i < arrPermission.Length; i++)
for (int j = 0; j < arrBasePermissionNames.Length; j++)
// When we've found our base permission, "OR" its
// numeric value with that of any other base
// permissionsto create the complete set of values
if (arrPermission[i].Trim() ==
arrBasePermissionNames[j])
permissionFlags = permissionFlags |
arrBasePermissionValues[j];
}
}
return permissionFlags;
}
protected void cmdAddRole_Click(object sender, EventArgs e)
{
try
{
// Point the UserGroup web service to our target site collection
// and web site
objUserGroup.Url = txtSiteUrl.Text + "/" +
txtWebName.Text + "/_vti_bin/usergroup.asmx";
objUserGroup.Credentials =
System.Net.CredentialCache.DefaultCredentials;
// Get the permission flags of the role to be cloned
ulong permissionFlags =
GetPermissionFlags(rblTemplateRole.SelectedValue);
// Create the new role
objUserGroup.AddRoleDef(txtRoleName.Text,
txtRoleDefinition.Text, permissionFlags);
// Display success message
lblReturnMsg.Text = "Successfully added '" +
txtRoleName.Text + "' role.";
}catch (Exception ex)
{
lblReturnMsg.Text = "Error: " + ex.Message;
}
}
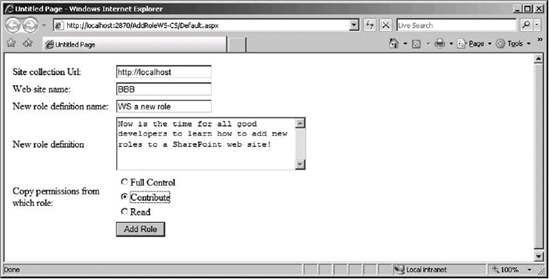
}Run the application from within Visual Studio, or by opening a web browser and navigating to the application page. Provide the target site collection URL, web name (if not creating the new role in the site collection's root web), role name, and optional definition. Select the template role you want to copy permissions from and click the Add Role button. See Figure 2-8 for an example of the page running in a browser.
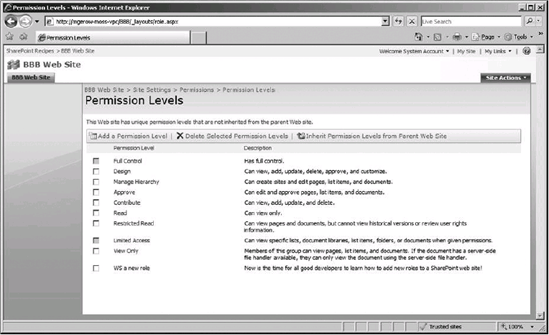
You can verify that the new role was created by opening the target web site's Site Settings/Permissions page as shown in Figure 2-9. You should see the new role at the bottom of the list, along with any description you provided.
Clicking on the role name in the list (WS a New Role in this example) will display the detail page of the new role (shown in Figure 2-10). You can see the various base permissions that were copied from the selected template role definition.

Rather than hard-code the list of template sites (that is, Full Control, Contribute, Read), you can use the
UserGroup.GetRoleCollectionFromWeb()method to populate a drop-down list of all existing roles for the user to select from.Add a test to make sure that the target web site is not set to inherit from a parent site, and allow the user to break inheritance if needed to add the new role.
This recipe doesn't apply only to SharePoint, but is very handy in a SharePoint installation that uses Windows (rather than Forms-based) authentication. The reason is that SharePoint does not provide any means of creating new Windows user accounts, only for using accounts that already exist. There are times when you want to be able to programmatically create new accounts, and you may prefer not to require SharePoint administrators to use the standard Active Directory user utility.
The following application is built as a web service so that it can be used by a wide variety of calling programs, including ASP.NET, .NET console, and .NET Windows applications.
Although .NET provides the
DirectoryServiceslibrary and associated classes, working with Active Directory has a very different feel to working with native .NET classes. This recipe shows you some of the basics, but if you plan on doing a lot of work with AD, you will want to consult a general-purpose reference.One arcane aspect of Active Directory is the way connection strings are written. For example, if you are trying to connect to the Windows domain named
test.domain, and open the folderNewUsers, you would create a connection string that looks likeLDAP://CN=NewUsers,DC=test,DC=domain—not very intuitive!Note
The account that the web service's application pool is running under will need permissions to connect to and manage AD, for the web services to run. An alternative is to connect to AD with specific credentials.
As you'll notice in the following recipe, we set the password to never expire. This is because, unlike Windows, browsers provide no easy way to allow a user to change their password. If you were to require users to change their password at first login (the AD standard), you would therefore effectively lock the user out of SharePoint.
Add a reference to the
System.DirectoryServiceslibrary.Add a
usingorImportsstatement forSystem.DirectoryServices.Add a
usingorImportsstatement forSystem.Data.Ideally, make sure you can connect remotely or directly to a server that is acting as a domain controller for the Windows domain that you will be adding new users to. If not, you can still install the Active Directory Computers and Users utility on your development machine from
www.microsoft.com/downloads/details.aspx?familyid=E487F885-F0C7-436A-A392-25793A25BAD7&displaylang=en. Running this setup will install various utilities under your Control Panel/Administrative Tools.

Because no processing is possible without a user alias, check that parameter first to make sure it's not empty. If it is empty, set an error message and return to the calling program.
Create a directory object pointing to the new user to be added, as well as the target AD directory.
If the specified target folder is not an AD organizational unit, return to the calling program with an error message.
Use the properties collection of the AD user object created in step 2 to write the values passed to this method to AD.
The password cannot be set by using the properties collection, so use the
invoke()method to set that.Note
The call to the
invoke()method must be made before the password and account flags can be set.Finally, set the password to Never Expire and enable the new account. Note that this must be done after the password has been set.
If an error occurs, return an error message to the calling program.
Otherwise, return all data from new user object, plus a success message to the calling program.
Imports System.Web
Imports System.Web.Services
Imports System.Web.Services.Protocols
Imports System.DirectoryServices
Imports System.Data
<WebService(Namespace:="http://tempuri.org/")> _
<WebServiceBinding(ConformsTo:=WsiProfiles.BasicProfile1_1)> _
<Global.Microsoft.VisualBasic.CompilerServices.DesignerGenerated()> _
Public Class AddUserToADService
    Inherits System.Web.Services.WebService
    'The LDAP connection string needs to match the domain you'll
    'be adding users to.  For example, the connection string below
    'applies to a domain called 'test.domain', and will save new
    'user accounts in the 'NewUsers' organizational unit folder.
    Const LDAP_CONNECTION_STRING = "LDAP://OU=NewUsers,DC=test,DC=domain"
    'AD sets account flags by "AND'ing" together various numeric
    'values stored in HEX.  The following are the base-10
    'integer representations of the HEX values for the flags we
    'want to set.
Const AD_ENABLED = 512
Const AD_DISABLED = 514
Const AD_NEVER_EXPIRE = 65536
<WebMethod()> _
Public Function AddUserToAD(ByVal strAlias As String, _
ByVal strName As String, _
ByVal strCompany As String, _
ByVal strEmail As String, _
ByVal strPhone As String, _
ByVal strNotes As String) As DataTable
Dim strMsg As String = ""
'Step 1: Verify that alias was provided
If strAlias = "" Then
strMsg = strMsg & "Valid user alias required"
Else
'Step 2: Instantiate a Directory Entry Object
'to represent the "Extranet" folder
Dim adUserFolder As New DirectoryEntry(LDAP_CONNECTION_STRING)
Dim newADUser As New DirectoryEntry
Dim existingADUser As New DirectoryEntry
'Step 3: Check to make sure the folder is an
'"organizational unit" object
Try
If adUserFolder.SchemaEntry.Name = "organizationalUnit" Then
'Create a directory entry to represent the new user
newADUser = adUserFolder.Children.Add( _
"CN=" & strAlias, "User")
'If already a user with this alias,
'set the fields to data for
'this user and return message
If DirectoryEntry.Exists(newADUser.Path) Then
existingADUser = adUserFolder.Children.Find( _
"CN=" & strAlias, "User")
strName = existingADUser.Properties( _
"displayName").Value
strCompany = existingADUser.Properties( _
"company").Value
strNotes = existingADUser.Properties("mail").Value
strPhone = existingADUser.Properties( _
"telephoneNumber").Value
strNotes = existingADUser.Properties("comment").Value
strMsg = "User '" & strAlias & _
"' already exists in Active Directory"Else
'Step 4: Save caller-supplied properties
newADUser.Properties("sAMAccountName").Add( _
strAlias & "")
newADUser.Properties("displayName").Add(strName & "")
newADUser.Properties("company").Add(strCompany & "")
newADUser.Properties("mail").Add(strEmail & "")
newADUser.Properties("telephoneNumber").Add( _
strPhone & "")
newADUser.Properties("comment").Add(strNotes & "")
newADUser.Properties("info").Value = _
"New SharePoint User"
newADUser.CommitChanges()
'Step 5: Set the password using the "Invoke" method.
newADUser.Invoke("setPassword", "P@ssW0rd")
'Step 6: Enable the user, set account to never expire
newADUser.Properties("userAccountControl").Value = _
AD_NEVER_EXPIRE + AD_ENABLED
newADUser.CommitChanges()
strMsg = "User '" & strAlias & _
"' successfully added to Active Directory"
End If
End If
Catch ex As Exception
'Step 7: Return error message
strMsg = "User '" & strName & _
"' could not be added to Active Directory " & _
"due to the following error: " & ex.Message
End Try
End If
'Step 8: Construct a dataset to return values
Dim dtReturn As New Data.DataTable("result")
dtReturn.Columns.Add("Alias")
dtReturn.Columns.Add("Name")
dtReturn.Columns.Add("Company")
dtReturn.Columns.Add("Phone")
dtReturn.Columns.Add("Email")
dtReturn.Columns.Add("Notes")
dtReturn.Columns.Add("Message")
'Add a single row to the data table to contain
'information describing the results of the method call
Dim drReturn As Data.DataRow = dtReturn.NewRow
drReturn("Alias") = strAlias
drReturn("Name") = strNamedrReturn("Company") = strCompany
drReturn("Phone") = strPhone
drReturn("Email") = strEmail
drReturn("Notes") = strNotes
drReturn("Message") = strMsg
dtReturn.Rows.Add(drReturn)
dtReturn.AcceptChanges()
Return dtReturn.Copy
End Function
End Classusing System;
using System.Web;
using System.Web.Services;
using System.Web.Services.Protocols;
using System.DirectoryServices;
using System.Data;
[WebService(Namespace = "http://tempuri.org/")]
[WebServiceBinding(ConformsTo = WsiProfiles.BasicProfile1_1)]
public class AddUserToADService : System.Web.Services.WebService
{
//The LDAP connection string needs to match the domain you'll
//be adding users to. For example, the connection string below
//applies to a domain called 'test.domain', and will save new
//user accounts in the 'NewUsers' organizational unit folder.
const string LDAP_CONNECTION_STRING =
"LDAP://OU=NewUsers,DC=test,DC=domain";
//AD sets account flags by "AND'ing" together various numeric
//values stored in HEX. The following are the base-10
//integer representations of the HEX values for the flags we
//want to set.
const int AD_ENABLED = 512;
const int AD_DISABLED = 514;
const int AD_NEVER_EXPIRE = 65536;
[WebMethod()]
public DataTable AddUserToAD(string strAlias,
string strName, string strCompany,
string strEmail, string strPhone, string strNotes)
{
string strMsg = "";//Step 1: Verify that alias was provided
if (strAlias == "") {
strMsg = strMsg + "Valid user alias required";
}
else {
//Step 2: Instantiate a Directory Entry Object to
//represent the "Extranet" folder
DirectoryEntry adUserFolder =
new DirectoryEntry(LDAP_CONNECTION_STRING);
DirectoryEntry newADUser = new DirectoryEntry();
DirectoryEntry existingADUser = new DirectoryEntry();
//Step 3: Check to make sure the folder is an
//"organizational unit" object
try {
if (adUserFolder.SchemaEntry.Name == "organizationalUnit") {
//Create a directory entry to represent the new user
newADUser = adUserFolder.Children.Add("CN=" +
strAlias, "User");
//If already a user with this alias, set the
//fields to data for
//this user and return message
if (DirectoryEntry.Exists(newADUser.Path)) {
existingADUser = adUserFolder.Children.Find("CN=" +
strAlias, "User");
strName =
(string)existingADUser.Properties["displayName"].Value;
strCompany =
(string)existingADUser.Properties["company"].Value;
strNotes =
(string)existingADUser.Properties["mail"].Value;
strPhone =
(string)existingADUser.Properties["telephoneNumber"].Value;
strNotes =
(string)existingADUser.Properties["comment"].Value;
strMsg = "User '" + strAlias +
"' already exists in Active Directory";
}else {
//Step 4: Save caller-supplied properties
newADUser.Properties["sAMAccountName"].Add(
strAlias + "");
newADUser.Properties["displayName"].Add(
strName + "");
newADUser.Properties["company"].Add(strCompany + "");
newADUser.Properties["mail"].Add(strEmail + "");
newADUser.Properties["telephoneNumber"].Add(
strPhone + "");
newADUser.Properties["comment"].Add(strNotes + "");
newADUser.Properties["info"].Value =
"New SharePoint User";
newADUser.CommitChanges();
//Step 5: Set the password using the "Invoke" method.
newADUser.Invoke("setPassword", "P@ssW0rd");
//Step 6: Enable the user, set account to
//never expire
newADUser.Properties["userAccountControl"].Value =
AD_NEVER_EXPIRE + AD_ENABLED;
newADUser.CommitChanges();
strMsg = "User '" + strAlias +
"' successfully added to Active Directory";
}
}
}
catch (Exception ex) {
//Step 7: Return error message
strMsg = "User '" + strName +
"' could not be added to Active Directory " +
"due to the following error: " + ex.Message;
}
}//Step 8: Construct a dataset to return values
DataTable dtReturn = new DataTable("result");
dtReturn.Columns.Add("Alias");
dtReturn.Columns.Add("Name");
dtReturn.Columns.Add("Company");
dtReturn.Columns.Add("Phone");
dtReturn.Columns.Add("Email");
dtReturn.Columns.Add("Notes");
dtReturn.Columns.Add("Message");
//Add a single row to the data table to contain
//information describing the results of the method call
DataRow drReturn = dtReturn.NewRow();
drReturn["Alias"] = strAlias;
drReturn["Name"] = strName;
drReturn["Company"] = strCompany;
drReturn["Phone"] = strPhone;
drReturn["Email"] = strEmail;
drReturn["Notes"] = strNotes;
drReturn["Message"] = strMsg;
dtReturn.Rows.Add(drReturn);
dtReturn.AcceptChanges();
return dtReturn.Copy();
}
}You can test the web service from within Visual Studio or by creating a test harness application that includes a reference to the web service. Because testing from within Visual Studio is the easiest, I'll show that process here.
When the web service project has been created, and the source code added as shown in the previous sections, press F5 to run the web service. Visual Studio automatically creates the necessary plumbing to enable you to execute the methods exposed by the service, in this case the AddUserToAD() method. Figure 2-11 shows the Visual Studio–generated web page for that method.
Fill in the strAlias field and any other fields desired, and then click the Invoke button, which will call the web service, passing the provided data as parameters.
Assuming no errors occurred, the web service method will return a .NET data table in XML form, similar to that in Figure 2-12, showing all data used in the creation of the new account, along with a message indicating success.


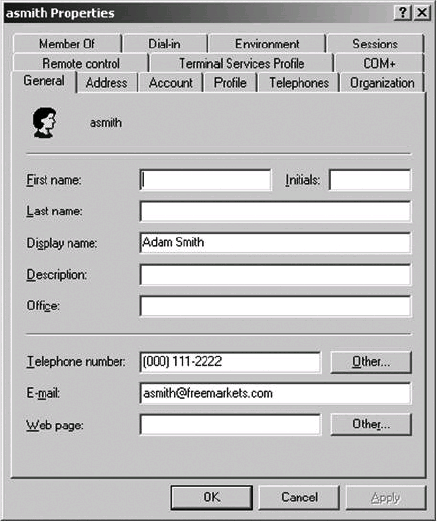
You can verify that the new user was successfully added to Active Directory by opening the Active Directory Users and Computers utility (Dsa.msc). Open the NewUsers folder, and double-click on the account name just added. Figure 2-13 shows the General tab of the Active Directory properties dialog box for the user added in my example.
The preceding recipe provides the basics required to add a new user account to Active Directory. However, you will probably want to add a routine to generate a random password for new users.
Another useful method would allow users or administrators to change or reset passwords. This can be built around the
Invoke("SetPassword")method used here to create the initial password.You could also provide the ability to disable an account by using the
UserAccountControlproperty used here to set the password to never expire.