
Ultimately, most content that your users will be interested in will be stored in lists—whether documents, events, tasks, contacts, or custom content you create.
The recipes in this chapter all relate to lists. I have selected recipes that operate on document libraries because they are the most commonly used list type, and with the exception of document-related programming, anything you can do with a document library, you can do with the other list types.
Recipes include those for creating a new list programmatically, both with the object model and web services. You'll also find recipes for uploading and removing documents from a document library—which of course apply to only that type of list. Finally, there's a recipe for modifying properties of a document library.
Note
One of the really exciting enhancements relating to lists in SharePoint 2007 centers around event handlers. You'll find recipes for those in Chapter 5.
Lists are at the heart of what SharePoint is all about. List types include document libraries, task lists, event lists, custom lists, and many more. The ability to create lists programmatically gives you great flexibility in how you can provision and extend web sites. For example, you might want to provide your end users with a custom page that enables them to build lists based on complex business rules that would be difficult to encapsulate in a list template. Or you might decide that the built-in list definition pages provide too much information and would confuse some of your users.
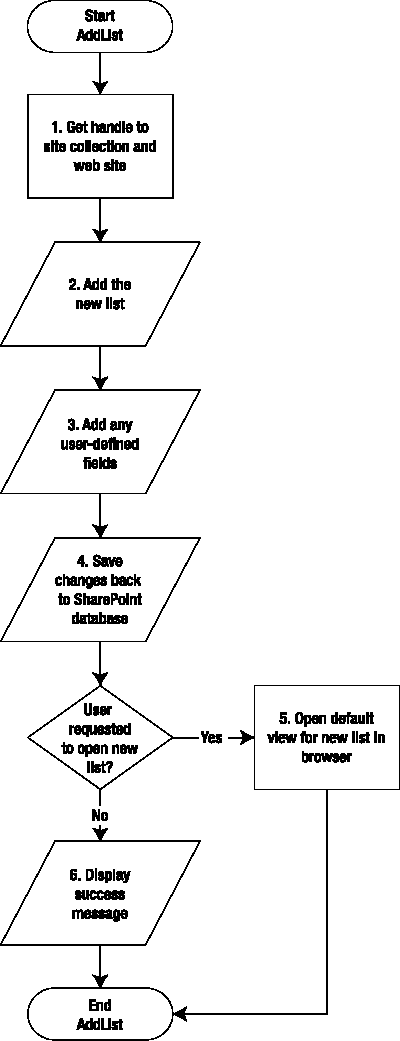
In this recipe, you'll create a simple web page that enables the user to create a new list for a given web site, add a few custom fields if desired, and make sure any new fields appear on the default view.
The network security credentials under which this web page runs will determine the permissions that the application has. You should therefore make sure that whatever security context it runs under has permissions to create new lists on the target web site, or that if a security violation does occur, you handle it appropriately.
Create a new ASP.NET web application project.
Add a reference to the Windows SharePoint Services .NET assembly.
In the code-behind for the default web page (or whatever web page you decide to use for this application), add
usingorImportsstatements for theMicrosoft.SharePointandSystem.Collectionsclass libraries (the latter is to makeArrayListsavailable).Add controls as shown in the following "To Run" section. The control names are as follows:
txtSiteUrl      txtUDFName1    ddlUDFType1
txtWebName      txtUDFName2    ddlUDFType2
txtListName     txtUDFName3    ddlUDFType3
ddlListType
Create instances of the
SPSiteandSPWebclasses pointing at the site collection and web site that will contain the new list.Add the new list. If an error occurs, display an error message and return to the web page.
If any custom column fields are not blank, add those fields to the list and to the list's default view. If an error occurs, display an error message and return to the web page.
Call the
Update()methods on the list and web objects to update the SharePoint database.If the user selected the checkbox to automatically open the new list, redirect the user to the default view page for that new list.
Otherwise, display an alert indicating success and return to the web page.
Imports System
Imports System.Data
Imports System.Configuration
Imports System.Web
Imports System.Web.Security
Imports System.Web.UI
Imports System.Web.UI.WebControls
Imports System.Web.UI.WebControls.WebParts
Imports System.Web.UI.HtmlControls
Imports Microsoft.SharePoint
Imports System.Collections
Partial Public Class _Default
    Inherits System.Web.UI.Page
    Protected Sub Page_Load(ByVal sender As Object, _
       ByVal e As EventArgs) Handles Me.Load
        If Not IsPostBack Then
            ' Get column types
            InitializeTypeDDL(ddlUDFType1)
            InitializeTypeDDL(ddlUDFType2)
            InitializeTypeDDL(ddlUDFType3)
        End If
    End Sub
    Protected Sub cmdCreateList_Click(ByVal sender As Object, _
       ByVal e As EventArgs) Handles cmdCreateList.Click
        Try
            lblErrorMsg.Visible = False
            ' Step 1: Get a handle to the site collection and web site
            Dim site As New SPSite(txtSiteUrl.Text)
            Dim web As SPWeb = site.AllWebs(txtWebName.Text)
            Dim listCollection As SPListCollection = web.Lists
            web.AllowUnsafeUpdates = True
' Step 2: Create the new list
listCollection.Add(txtListName.Text, "", _
web.ListTemplates(ddlListType.SelectedItem.Text))
Dim newList As SPList = listCollection(txtListName.Text)
' Step 3: Add any user-defined fields
If txtUDFName1.Text <> "" Then
AddField(newList, txtUDFName1, ddlUDFType1)
End If
If txtUDFName2.Text <> "" Then
AddField(newList, txtUDFName2, ddlUDFType2)
End If
If txtUDFName3.Text <> "" Then
AddField(newList, txtUDFName3, ddlUDFType3)
End If
' Step 4: Save the changes
newList.Update()
web.Update()
' Step 5: If requested, open new list
If cbOpenList.Checked Then
' The following assumes the list title matches the
' list name; if this is not the case, use
' web.Url + newList.DefaultViewUrl() to
' obtain a path to the list's default view
Response.Redirect(web.Url.ToString() + _
"/lists/" + newList.Title.ToString())
Else
' Step 6: Display success message
Me.RegisterClientScriptBlock("Success", _
"<script>alert ('List successfully added'),</script>")
End If
web.Dispose()
site.Dispose()
Catch ex As Exception
lblErrorMsg.Text = ex.Message
lblErrorMsg.Visible = True
End Try
End Sub
' Add the UDF to list and default view
Private Sub AddField(ByVal newList As SPList, ByVal tb As TextBox, _
ByVal ddl As DropDownList)
Dim defaultView As SPView = newList.DefaultView
newList.Fields.Add(tb.Text, GetFieldType(ddl), False)
Dim newField As SPField = newList.Fields(tb.Text)
defaultView.ViewFields.Add(newField)
defaultView.Update()
End Sub' Return SP field type from ddl value for UDF type
Private Function GetFieldType(ByVal ddlUDFType As DropDownList) _
As SPFieldType
Select Case ddlUDFType.SelectedItem.Value
Case ("Number")
Return SPFieldType.Number
Case ("Text")
Return SPFieldType.Text
Case ("Date")
Return SPFieldType.DateTime
Case Else
Return SPFieldType.Text
End Select
End Function
' Get a sorted list of all templates available
Protected Sub cmdLookupListTemplates_Click(ByVal sender As Object, _
ByVal e As EventArgs) Handles cmdLookupListTemplates.Click
Try
lblErrorMsg.Visible = False
Dim site As New SPSite(txtSiteUrl.Text)
Dim web As SPWeb = site.AllWebs(txtWebName.Text)
' Get sorted list of available list templates
Dim arrListItems As New ArrayList()
For Each listTemplate As SPListTemplate In web.ListTemplates
If Not listTemplate.Hidden Then
arrListItems.Add(listTemplate.Name)
End If
Next
arrListItems.Sort()
' Add them to the drop-down list
ddlListType.Items.Clear()
For Each templateName As String In arrListItems
ddlListType.Items.Add(templateName)
Next
ddlListType.SelectedIndex = 0
' Show the rest of the form Panel1.Visible = True
web.Dispose()
site.Dispose()
Catch ex As Exception
lblErrorMsg.Text = ex.Message
lblErrorMsg.Visible = True
End Try
End Sub
' Set standard type values for UDF type ddl'sPrivate Sub InitializeTypeDDL(ByRef ddl As DropDownList)
ddl.Items.Clear()
ddl.Items.Add("Date")
ddl.Items.Add("Number")
ddl.Items.Add("Text")
ddl.SelectedIndex = 2
End Sub
End Classusing System;
using System.Data;
using System.Configuration;
using System.Web;
using System.Web.Security;
using System.Web.UI;
using System.Web.UI.WebControls;
using System.Web.UI.WebControls.WebParts;
using System.Web.UI.HtmlControls;
using Microsoft.SharePoint;
using System.Collections;
public partial class _Default : System.Web.UI.Page
{
protected void Page_Load(object sender, EventArgs e)
{
if (!IsPostBack)
{
// Get column types
InitializeTypeDDL(ref ddlUDFType1);
InitializeTypeDDL(ref ddlUDFType2);
InitializeTypeDDL(ref ddlUDFType3);
}
}
protected void cmdCreateList_Click(object sender, EventArgs e)
{
try
{
lblErrorMsg.Visible = false;
// Step 1: Get a handle to the site collection and web site
SPSite site = new SPSite(txtSiteUrl.Text);
SPWeb web = site.AllWebs[txtWebName.Text];
SPListCollection listCollection = web.Lists;
web.AllowUnsafeUpdates = true;// Step 2: Create the new list
listCollection.Add(txtListName.Text, "",
web.ListTemplates[ddlListType.SelectedItem.Text]);
SPList newList = listCollection[txtListName.Text];
// Step 3: Add any user-defined fields
if (txtUDFName1.Text != "")
AddField(newList, txtUDFName1, ddlUDFType1);
if (txtUDFName2.Text != "")
AddField(newList, txtUDFName2, ddlUDFType2);
if (txtUDFName3.Text != "")
AddField(newList, txtUDFName3, ddlUDFType3);
// Step 4: Save the changes
newList.Update();
web.Update();
// Step 5: If requested, open new list
if (cbOpenList.Checked)
{
// The following assumes the list title matches the
// list name; if this is not the case, use
// web.Url + newList.DefaultViewUrl() to
// obtain a path to the list's default view
Response.Redirect(web.Url.ToString() +
"/lists/" + newList.Title.ToString());
}
else
{
// Step 6: Display success message
this.RegisterClientScriptBlock("Success",
"<script>alert ('List successfully added'),</script>");
}
web.Dispose();
site.Dispose();
}
catch (Exception ex)
{
lblErrorMsg.Text = ex.Message;
lblErrorMsg.Visible = true;
}
}
// Add the UDF to list and default viewprivate void AddField(SPList newList, TextBox tb, DropDownList ddl)
{
SPView defaultView = newList.DefaultView;
newList.Fields.Add(tb.Text, GetFieldType(ddl), false);
SPField newField = newList.Fields[tb.Text];
defaultView.ViewFields.Add(newField);
defaultView.Update();
}
// Return SP field type from ddl value for UDF type
private SPFieldType GetFieldType(DropDownList ddlUDFType)
{
switch (ddlUDFType.SelectedItem.Value)
{
case ("Number"):
return SPFieldType.Number;
case ("Text"):
return SPFieldType.Text;
case ("Date"):
return SPFieldType.DateTime;
default:
return SPFieldType.Text;
}
}
// Get a sorted list of all templates available
protected void cmdLookupListTemplates_Click(object sender, EventArgs e)
{
try
{
lblErrorMsg.Visible = false;
SPSite site = new SPSite(txtSiteUrl.Text);
SPWeb web = site.AllWebs[txtWebName.Text];
// Get sorted list of available list templates
ArrayList arrListItems = new ArrayList();
foreach (SPListTemplate listTemplate in web.ListTemplates)
{
if (!listTemplate.Hidden)
{
arrListItems.Add(listTemplate.Name);
}
}arrListItems.Sort();
// Add them to the drop-down list
ddlListType.Items.Clear();
ListItem li;
foreach (string templateName in arrListItems)
{
ddlListType.Items.Add(templateName);
}
ddlListType.SelectedIndex = 0;
// Show the rest of the form
Panel1.Visible = true;
web.Dispose();
site.Dispose();
}
catch (Exception ex)
{
lblErrorMsg.Text = ex.Message;
lblErrorMsg.Visible = true;
}
}
// Set standard type values for UDF type ddl's
private void InitializeTypeDDL(ref DropDownList ddl)
{
ddl.Items.Clear();
ddl.Items.Add("Date");
ddl.Items.Add("Number");
ddl.Items.Add("Text");
ddl.SelectedIndex = 2;
}
}When the page is first displayed, only the first section (section I) will be displayed. This is because the list types must be read from the target web site before the list can be added. After you have filled in a site collection URL and web site name, click the Lookup List Templates button to populate the drop-down list of list templates and display the rest of the form, as shown in Figure 3-1.
Provide a new, unique list name, as well as up to three custom columns to add in addition to those that are part of the base list template when creating the new list.
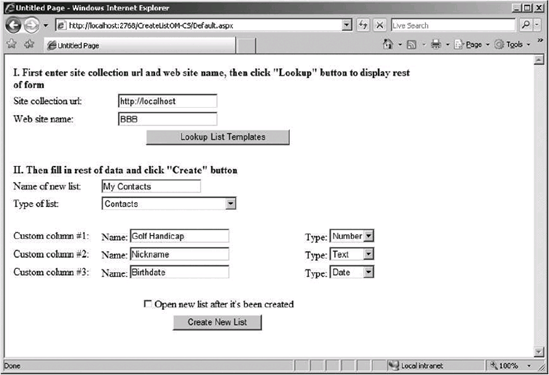
Clicking the Create New List button will use all the provided information to create the new list. If you selected the Open New List After It's Been Created checkbox, the browser will be redirected to the default view page of the new list. Otherwise, a success alert will be displayed and the page refreshed.
This recipe provides a simple example of a whole class of applications that could be used to address one of two requirements: either 1) you want to limit end users' options when creating new lists or 2) end users need guidance when creating new lists to ensure that those lists are appropriate to the specific business purpose.
This recipe shows how you can create a new list by using the built-in SharePoint web services. Using this approach, you can create a truly distributed application by placing the front-end web site, console, or Windows application anywhere in the world that can access one of the SharePoint front-end web servers.
Although many operations using the web services are as simple as or simpler than using the object model, this recipe shows one aspect of the web services that is more complex—namely the use of Collaborative Application Markup Language (CAML) to pass complex parameters to the web service methods. CAML has the advantage that complex information, such as a list of fields to add to a list, can be packaged as XML documents and sent to the service.
As you'll see next, to accomplish all we need to get done, we'll call on three separate web services: Lists, Views and Webs.
Each instance of the
Lists,Views, orWebsweb service must be assigned a network credential with permissions to access and update the target site collection and web site.
Create a new ASP.NET web application.
Add a reference to the
http://[server name]/_vti_bin/Lists.asmxweb service (you may uselocalhostinstead of[server name]if you wish).Add a reference to the
http://[server name]/_vti_bin/Views.asmxweb service (you may uselocalhostinstead of[server name]if you wish).Add a reference to the
http://[server name]/_vti_bin/Webs.asmxweb service (you may uselocalhostinstead of[server name]if you wish).Add a
usingorIncludesstatement at the top of theDefault.aspxcode-behind file to referenceSystem.CollectionsandSystem.Xml.

Create an instance of the
Lists.asmxweb service and assign its URL property to the target site collection and web site. Also set theCredentialsproperty to either the default credentials or another credential that has permissions to create a new list in the target site.Create the new list by using the selected template ID.
If the user has entered one or more custom columns, add those to the list by using the
UpdateList()method.Get the default view for the list by using the
Viewsweb service; add any new fields to theViewFieldsproperty of the default view.If the user selected the checkbox indicating that the new list should be displayed, redirect the user's browser to the default view page for the new list.
Otherwise, display a success message and refresh the page.
Imports System
Imports System.Data
Imports System.Configuration
Imports System.Web
Imports System.Web.Security
Imports System.Web.UI
Imports System.Web.UI.WebControls
Imports System.Web.UI.WebControls.WebParts
Imports System.Web.UI.HtmlControls
Imports System.Xml
Imports System.Collections
Partial Public Class _Default
    Inherits System.Web.UI.Page
    Protected Sub Page_Load(ByVal sender As Object, _
       ByVal e As EventArgs) Handles Me.Load
        If Not IsPostBack Then
            ' Get column types
            InitializeTypeDDL(ddlUDFType1)
            InitializeTypeDDL(ddlUDFType2)
            InitializeTypeDDL(ddlUDFType3)
        End If
    End Sub
    ' Get a sorted list of available list templates
    Protected Sub cmdLookupListTemplates_Click(ByVal sender As Object, _
ByVal e As EventArgs) Handles cmdLookupListTemplates.Click
        Dim objWebs As New WebsService.Webs()
        objWebs.Url = txtSiteUrl.Text + "/" + txtWebName.Text + _
            "/_vti_bin/Webs.asmx"
        objWebs.Credentials = System.Net.CredentialCache.DefaultCredentials
Dim xnListTemplates As XmlNode
xnListTemplates = objWebs.GetListTemplates()
' Get sorted list of available list templates
Dim arrListItems As New ArrayList()
For Each xnListTemplate As XmlNode In xnListTemplates.ChildNodes
Try
If xnListTemplate.Attributes("Hidden").Value.ToString() _
<> "TRUE" Then
arrListItems.Add(xnListTemplate.Attributes("DisplayName").Value
+ ":" + xnListTemplate.Attributes("Type").Value)
End If
Catch
arrListItems.Add(xnListTemplate.Attributes("DisplayName").Value + _
":" + xnListTemplate.Attributes("Type").Value)
End Try
Next
arrListItems.Sort()
' Add them to the drop-down list
ddlListType.Items.Clear()
Dim li As ListItem
For Each templateData As String In arrListItems
li = New ListItem(templateData.Split(":"c)(0), _
templateData.Split(":"c)(1))
ddlListType.Items.Add(li)
Next
ddlListType.SelectedIndex = 0
' Show the rest of the form
Panel1.Visible = True
End Sub
' Add the new list
Protected Sub cmdCreateList_Click(ByVal sender As Object, _
ByVal e As EventArgs) Handles cmdCreateList.Click
Try
lblErrorMsg.Visible = False
' Step 1: Create an instance of a list service
Dim objLists As New ListsService.Lists()
objLists.Url = txtSiteUrl.Text + "/" + txtWebName.Text + _
"/_vti_bin/Lists.asmx"
objLists.Credentials = _
System.Net.CredentialCache.DefaultCredentials
' Step 2: Create the new list
Dim listTemplateType As Integer = _
Integer.Parse(ddlListType.SelectedValue)
objLists.AddList(txtListName.Text, "", listTemplateType)
' Step 3: Add any user-defined fields - this requires
' a bit of CAML
Dim xmlDoc As New XmlDocument()Dim xnNewFields As XmlNode = _
xmlDoc.CreateNode(XmlNodeType.Element, "Fields", "")
If txtUDFName1.Text <> "" Then
xnNewFields.InnerXml += _
"<Method ID='1'>" + _
"<Field Type='" + ddlUDFType1.SelectedValue + _
"' DisplayName='" + txtUDFName1.Text + "'/>" + _
"</Method>"
End If
If txtUDFName2.Text <> "" Then
xnNewFields.InnerXml += _
"<Method ID='2'>" + _
"<Field Type='" + ddlUDFType2.SelectedValue + _
"' DisplayName='" + txtUDFName2.Text + "'/>" + _
"</Method>"
End If
If txtUDFName3.Text <> "" Then
xnNewFields.InnerXml += _
"<Method ID='3'>" + _
"<Field Type='" + ddlUDFType3.SelectedValue + _
"' DisplayName='" + txtUDFName3.Text + "'/>" + _
"</Method>"
End If
' We can pass "null" values for any parameters we don't
' need to change, so we're passing data for only the new fields
' we want to add
objLists.UpdateList(txtListName.Text, Nothing, xnNewFields, _
Nothing, Nothing, Nothing)
' Step 4: Add any new fields to the default view
Dim objViews As New ViewsService.Views()
objViews.Url = txtSiteUrl.Text + "/" + txtWebName.Text + _
"/_vti_bin/Views.asmx"
objViews.Credentials = _
System.Net.CredentialCache.DefaultCredentials
' Get a handle to the view
Dim xnDefaultView As XmlNode = _
objViews.GetView(txtListName.Text, "")
' Get the GUID of the view, which we'll need when we call the
' UpdateView() method below
Dim viewName As String = xnDefaultView.Attributes("Name").Value
' Get any existing fields in the view, so we can add the new
' fields to that list. To do this, we need to find the
' "ViewFields" node (if one exists), and grab its XML to use as
' a starting point.
Dim xnViewFields As XmlNode = _
xmlDoc.CreateNode(XmlNodeType.Element, "ViewFields", "")
For Each childNode As XmlNode In xnDefaultView.ChildNodesIf childNode.Name = "ViewFields" Then
xnViewFields.InnerXml += childNode.InnerXml
End If
Next
' Now add the new fields to end of the list of preexisting
' view fields.
If txtUDFName1.Text <> "" Then
xnViewFields.InnerXml += "<FieldRef Name='" + _
txtUDFName1.Text + "'/>"
End If
If txtUDFName2.Text <> "" Then
xnViewFields.InnerXml += "<FieldRef Name='" + _
txtUDFName2.Text + "'/>"
End If
If txtUDFName3.Text <> "" Then
xnViewFields.InnerXml += "<FieldRef Name='" + _
txtUDFName3.Text + "'/>"
End If
' Update the view. As with the ListUpdate() method, we need to
' pass parameters only for data we want to change. We can pass
' "null" values for all the rest.
objViews.UpdateView(txtListName.Text, viewName, Nothing, _
Nothing, xnViewFields, Nothing, _
Nothing, Nothing)
' Step 5: If requested, open new list
If cbOpenList.Checked Then
Response.Redirect(txtSiteUrl.Text.ToString() + "/" + _
txtWebName.Text.ToString() + "/lists/" + _
txtListName.Text.ToString())
Else
' Step 6: Display success message
Me.RegisterClientScriptBlock("Success", _
"<script>alert ('List successfully added'),</script>")
End If
Catch ex As Exception
lblErrorMsg.Text = ex.Message
lblErrorMsg.Visible = True
End Try
End Sub
' Set standard type values for UDF type ddl's
Private Sub InitializeTypeDDL(ByRef ddl As DropDownList)
ddl.Items.Clear()
ddl.Items.Add("DateTime")
ddl.Items.Add("Number")
ddl.Items.Add("Text")
ddl.SelectedIndex = 2
End Sub
End Classusing System;
using System.Data;
using System.Configuration;
using System.Web;
using System.Web.Security;
using System.Web.UI;
using System.Web.UI.WebControls;
using System.Web.UI.WebControls.WebParts;
using System.Web.UI.HtmlControls;
using System.Xml;
using System.Collections;
public partial class _Default : System.Web.UI.Page
{
protected void Page_Load(object sender, EventArgs e)
{
if (!IsPostBack)
{
// Get column types
InitializeTypeDDL(ref ddlUDFType1);
InitializeTypeDDL(ref ddlUDFType2);
InitializeTypeDDL(ref ddlUDFType3);
}
}
// Get a sorted list of available list templates
protected void cmdLookupListTemplates_Click(object sender, EventArgs e)
{
WebsService.Webs objWebs = new WebsService.Webs();
objWebs.Url = txtSiteUrl.Text + "/" + txtWebName.Text +
"/_vti_bin/Webs.asmx";
objWebs.Credentials = System.Net.CredentialCache.DefaultCredentials;
XmlNode xnListTemplates;
xnListTemplates = objWebs.GetListTemplates();
// Get sorted list of available list templates
ArrayList arrListItems = new ArrayList();
foreach (XmlNode xnListTemplate in xnListTemplates.ChildNodes)
{
try
{
if (xnListTemplate.Attributes["Hidden"].Value.ToString()
!= "TRUE")
{
arrListItems.Add(xnListTemplate.Attributes["DisplayName"].Value
+ ":" + xnListTemplate.Attributes["Type"].Value);
}
}catch
{
arrListItems.Add(xnListTemplate.Attributes["DisplayName"].Value +
":" + xnListTemplate.Attributes["Type"].Value);
}
}
arrListItems.Sort();
// Add them to the drop-down list
ddlListType.Items.Clear();
ListItem li;
foreach (string templateData in arrListItems)
{
li = new ListItem(templateData.Split(':')[0],
templateData.Split(':')[1]);
ddlListType.Items.Add(li);
}
ddlListType.SelectedIndex = 0;
// Show the rest of the form
Panel1.Visible = true;
}
// Add the new list
protected void cmdCreateList_Click(object sender, EventArgs e)
{
try
{
lblErrorMsg.Visible = false;
// Step 1: Create an instance of a list service
ListsService.Lists objLists = new ListsService.Lists();
objLists.Url = txtSiteUrl.Text + "/" +
txtWebName.Text + "/_vti_bin/Lists.asmx";
objLists.Credentials =
System.Net.CredentialCache.DefaultCredentials;
// Step 2: Create the new list
int listTemplateType = int.Parse(ddlListType.SelectedValue);
objLists.AddList(txtListName.Text, "", listTemplateType);
// Step 3: Add any user-defined fields - this requires
// a bit of CAML
XmlDocument xmlDoc = new XmlDocument();
XmlNode xnNewFields =
xmlDoc.CreateNode(XmlNodeType.Element,"Fields","");
if (txtUDFName1.Text != "")
{
xnNewFields.InnerXml +=
"<Method ID='1'>" +
"<Field Type='" + ddlUDFType1.SelectedValue +
"' DisplayName='" + txtUDFName1.Text + "'/>" +
"</Method>";
}if (txtUDFName2.Text != "")
{
xnNewFields.InnerXml +=
"<Method ID='2'>" +
"<Field Type='" + ddlUDFType2.SelectedValue +
"' DisplayName='" + txtUDFName2.Text + "'/>" +
"</Method>";
}
if (txtUDFName3.Text != "")
{
xnNewFields.InnerXml +=
"<Method ID='3'>" +
"<Field Type='" + ddlUDFType3.SelectedValue +
"' DisplayName='" + txtUDFName3.Text + "'/>" +
"</Method>";
}
// We can pass "null" values for any parameters we don't need to
// change,so we're passing data for only the new fields we want
// to add
objLists.UpdateList(txtListName.Text,null,xnNewFields,
null,null,null);
// Step 4: Add any new fields to the default view
ViewsService.Views objViews = new ViewsService.Views();
objViews.Url = txtSiteUrl.Text + "/" +
txtWebName.Text + "/_vti_bin/Views.asmx";
objViews.Credentials =
System.Net.CredentialCache.DefaultCredentials;
// Get a handle to the view
XmlNode xnDefaultView = objViews.GetView(txtListName.Text, "");
// Get the GUID of the view, which we'll need when we call the
// UpdateView() method below
string viewName = xnDefaultView.Attributes["Name"].Value;
// Get any existing fields in the view, so we can add the new
// fields to that list. To do this, we need to find the
// "ViewFields"node (if one exists), and grab its XML to use as
// a starting point.
XmlNode xnViewFields =
xmlDoc.CreateNode(XmlNodeType.Element, "ViewFields", "");
foreach (XmlNode childNode in xnDefaultView.ChildNodes)
{
if (childNode.Name == "ViewFields")
{
xnViewFields.InnerXml += childNode.InnerXml;
}
}// Now add the new fields to end of the list of preexisting
// view fields.
if (txtUDFName1.Text != "")
xnViewFields.InnerXml += "<FieldRef Name='" +
txtUDFName1.Text + "'/>";
if (txtUDFName2.Text != "")
xnViewFields.InnerXml += "<FieldRef Name='" +
txtUDFName2.Text + "'/>";
if (txtUDFName3.Text != "")
xnViewFields.InnerXml += "<FieldRef Name='" +
txtUDFName3.Text + "'/>";
// Update the view. As with the ListUpdate() method, we need
// to pass parameters only for data we want to change. We can
// pass "null" values for all the rest.
objViews.UpdateView(txtListName.Text, viewName,
null, null, xnViewFields, null, null, null);
// Step 5: If requested, open new list
if (cbOpenList.Checked)
{
Response.Redirect(txtSiteUrl.Text.ToString() + "/" +
txtWebName.Text.ToString() + "/lists/" +
txtListName.Text.ToString());
}
else
{
// Step 6: Display success message
this.RegisterClientScriptBlock(
"Success",
"<script>alert ('List successfully added'),</script>");
}
}
catch (Exception ex)
{
lblErrorMsg.Text = ex.Message;
lblErrorMsg.Visible = true;
}
}
// Set standard type values for UDF type ddl's
private void InitializeTypeDDL(ref DropDownList ddl)
{
ddl.Items.Clear();
ddl.Items.Add("DateTime");
ddl.Items.Add("Number");
ddl.Items.Add("Text");
ddl.SelectedIndex = 2;
}
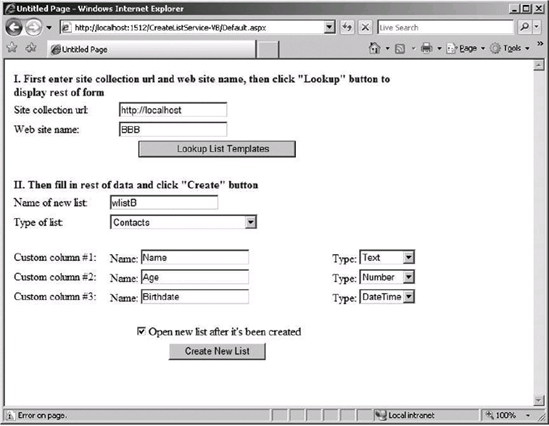
}Open a new web browser and navigate to the application page, or simply run the application from within Visual Studio. When the page is first displayed, only the Site Collection URL and Web Site Name fields will be displayed. Fill in at least the site collection URL (leaving the web name blank will indicate that you want the root web site of the site collection) and click the Lookup List Templates button. Clicking this button will cause the application to query SharePoint for a list of list templates available for the target web site, and will display the remainder of the web form.
Enter a new, unique list name and select the type of list you want to create. You may optionally add one to three custom columns. If you want the browser redirected to the new list after it's created, select the Open New List After It's Been Created checkbox. To create the list as specified, click the Create New List button (shown in Figure 3-2).
Assuming there were no errors, the list will be created. You can verify that the list was created correctly by navigating to the default view page of the new list.
One of the great advantages of using web services instead of the object model classes is that you can call them from any application that can communicate via HTTP with one of the front-end SharePoint farm servers. This means that, for instance, you could create a Windows Forms application that could reside on the end user's desktop and use these same web services to create a view. Or, you could create a .NET console application that is scheduled to run on an entirely different server, which reads a database to obtain the needed information to create a new list.
This recipe shows how you can add, edit, or delete SharePoint list items by using the object model (OM). In effect, you are using a SharePoint list as a table to hold data to be manipulated by a custom ASP.NET web application running on the SharePoint front-end server.
The code in this recipe is a bit more involved than that in most other recipes in this chapter. This is because I've included more of the form event-handling code than I typically do. However, this recipe provides a lot of useful techniques and essentially gives you a complete (although simplistic) model for handling additions, edits, and deletions to any SharePoint list.
As with any application that makes changes to a SharePoint web site by using OM calls, you will need to set the
SPWeb.AllowUnsafeUpdatesproperty totrueprior to attempting those changes. Failure to do so will result in a runtime error.
Add a reference to the Windows SharePoint Services .NET assembly.
Add a
usingorImportsstatement for theMicrosoft.SharePointlibrary at the top of the code-behind file for the default page.Add all form fields as shown in the following "To Run" section. Fields include the following:
txtEmpName    ddlCommand
txtJobTitle   ddlID
txtHireDate   lblReturnMsg
Button1

Several process flows are embodied in the program code because of the interactivity of the web form and the associated event handlers. I've therefore decided to focus on the process of updating the list when the command button is pressed.
If the user has selected New, use the
SPListItemCollection.Add()method to create a new list item.If the user has selected Update, use the
SPList.GetItemById()method to find that item and return anSPListItemobject pointing to it.If the user has selected Delete, first get the
EmpNameproperty value by using the same technique as in step 2.For New or Update, assign values from form fields to the associated
SPListItemproperties.For Delete, call the
SPList.DeleteItemById()method to remove the item from the list.If changes were made via adding or updating, call the
SPListItem.Update()method to save changes to item properties back to SharePoint.In any case, call the
SPList.Update()method to save all changes.
Imports System
Imports System.Data
Imports System.Configuration
Imports System.Web
Imports System.Web.Security
Imports System.Web.UI
Imports System.Web.UI.WebControls
Imports System.Web.UI.WebControls.WebParts
Imports System.Web.UI.HtmlControls
Imports Microsoft.SharePoint
Partial Public Class _Default
    Inherits System.Web.UI.Page
    Protected Sub Page_Load(ByVal sender As Object, ByVal e As EventArgs) _
       Handles Me.Load
        If Not IsPostBack Then
            ' Populate the "Command" drop-down list
            ddlCommand.Items.Add("Delete")
            ddlCommand.Items.Add("New")
            ddlCommand.Items.Add("Update")
            ddlCommand.SelectedIndex = 2
            ' Get list of current IDs
            GetIDs()
            ' Populate form fields
            setFields()
            ' Get Current entries in list
            RefreshEmployeeList()
        End If
End Sub
' Return list of employees currently in
' the SharePoint list
Private Function GetAllEmployees() As DataTable
Dim site As New SPSite("http://localhost")
Dim web As SPWeb = site.AllWebs("")
Dim employees As SPList = web.Lists("Employee")
Dim dtEmployees As DataTable = employees.Items.GetDataTable()
Dim dtEmployeesNew As New DataTable("Employees")
dtEmployeesNew.Columns.Add("ID")
dtEmployeesNew.Columns.Add("EmpName")
dtEmployeesNew.Columns.Add("JobTitle")
dtEmployeesNew.Columns.Add("HireDate")
For Each drEmployee As DataRow In dtEmployees.Rows
Try
Dim drEmployeeNew As DataRow = dtEmployeesNew.NewRow()
drEmployeeNew("ID") = drEmployee("ID").ToString()
drEmployeeNew("EmpName") = drEmployee("EmpName").ToString()
drEmployeeNew("JobTitle") = drEmployee("JobTitle").ToString()
drEmployeeNew("HireDate") = drEmployee("HireDate").ToString()
dtEmployeesNew.Rows.Add(drEmployeeNew)
dtEmployeesNew.AcceptChanges()
Catch
End Try
Next
web.Dispose()
site.Dispose()
Return dtEmployeesNew
End Function
' Return a drop-down list object containing
' all current IDs, unless the "New" command
' selected, in which case no ID is needed
Private Function GetIDs() As DropDownList
ddlID.Items.Clear()
If ddlCommand.SelectedValue = "New" Then
ddlID.Enabled = False
ddlID.Items.Add(New ListItem("N/A"))
Else
ddlID.Enabled = True
Dim dtEmployess As New DataTable()
dtEmployess = GetAllEmployees()
For Each drEmployee As DataRow In dtEmployess.Rows
Dim li As New ListItem(drEmployee("ID").ToString(), _
drEmployee("ID").ToString())
ddlID.Items.Add(li)
Next
End IfddlID.SelectedIndex = 0
Return ddlID
End Function
' Redraw grid-view listing all employees
Private Sub RefreshEmployeeList()
Dim dtEmployeeListData As New DataTable()
dtEmployeeListData = GetAllEmployees()
Me.GridView1.DataSource = dtEmployeeListData
Me.GridView1.DataBind()
End Sub
' Update form fields to reflect
' selected command and, if appropriate
' selected ID
Private Sub setFields()
' Clear out data entry fields
txtEmpName.Text = ""
txtHireDate.Text = ""
txtJobTitle.Text = ""
' By default, let user select an existing ID
ddlID.Enabled = True
' Enable or disable fields as appropriate
If ddlCommand.SelectedValue = "Delete" Then
txtEmpName.Enabled = False
txtHireDate.Enabled = False
txtJobTitle.Enabled = False
Else
' If "New", doesn't make sense for
' user to select an ID
If ddlCommand.SelectedValue = "New" Then
ddlID.Enabled = False
Else
ddlID.Enabled = True
' Retrieve existing data for selected employee
Dim site As New SPSite("http://localhost")
Dim web As SPWeb = site.AllWebs("")
Dim list As SPList = web.Lists("Employee")
Dim ID As Integer = Integer.Parse(ddlID.SelectedValue)
Dim item As SPListItem = list.GetItemById(ID)
' Assign form field values from SharePoint list
txtEmpName.Text = item("EmpName").ToString()
txtHireDate.Text = item("HireDate").ToString()
txtJobTitle.Text = item("JobTitle").ToString()
web.Dispose()
site.Dispose()
End IftxtEmpName.Enabled = True
txtHireDate.Enabled = True
txtJobTitle.Enabled = True
End If
End Sub
Protected Sub ddlCommand_SelectedIndexChanged(ByVal sender As Object, _
ByVal e As EventArgs) Handles ddlCommand.SelectedIndexChanged
GetIDs()
setFields()
End Sub
Protected Sub ddlID_SelectedIndexChanged(ByVal sender As Object, _
ByVal e As EventArgs) Handles ddlID.SelectedIndexChanged
setFields()
End Sub
Protected Sub Button1_Click(ByVal sender As Object, ByVal e As EventArgs) _
Handles Button1.Click
Try
Dim site As New SPSite("http://localhost")
Dim web As SPWeb = site.AllWebs("")
Dim list As SPList = web.Lists("Employee")
Dim item As SPListItem
Dim ID As Integer
lblReturnMsg.Text = ""
lblReturnMsg.Visible = True
web.AllowUnsafeUpdates = True
Select Case ddlCommand.SelectedValue
Case "New"
item = list.Items.Add()
item("EmpName") = txtEmpName.Text
item("JobTitle") = txtJobTitle.Text
item("HireDate") = txtHireDate.Text
item.Update()
lblReturnMsg.Text = "'" & txtEmpName.Text & _
"' has been successfully added"
Exit Select
Case "Update"
ID = Integer.Parse(ddlID.SelectedValue)
item = list.GetItemById(ID)
item("EmpName") = txtEmpName.Text
item("JobTitle") = txtJobTitle.Text
item("HireDate") = txtHireDate.Text
item.Update()
lblReturnMsg.Text = "'" & txtEmpName.Text & _
"' has been successfully updated"
Exit SelectCase "Delete"
ID = Integer.Parse(ddlID.SelectedValue)
item = list.GetItemById(ID)
Dim empName As String = item("EmpName").ToString()
list.Items.DeleteItemById(ID)
lblReturnMsg.Text = "'" & empName & _
"' has been successfully deleted"
Exit Select
End Select
list.Update()
GetIDs()
setFields()
RefreshEmployeeList()
web.Dispose()
site.Dispose()
Catch ex As Exception
lblReturnMsg.Text = ex.Message
End Try
End Sub
End Classusing System;
using System.Data;
using System.Configuration;
using System.Web;
using System.Web.Security;
using System.Web.UI;
using System.Web.UI.WebControls;
using System.Web.UI.WebControls.WebParts;
using System.Web.UI.HtmlControls;
using Microsoft.SharePoint;
public partial class _Default : System.Web.UI.Page
{
protected void Page_Load(object sender, EventArgs e)
{
if (!IsPostBack)
{
// Populate the "Command" drop-down list
ddlCommand.Items.Add("Delete");
ddlCommand.Items.Add("New");
ddlCommand.Items.Add("Update");
ddlCommand.SelectedIndex = 2;
// Get list of current IDsGetIDs();
// Populate form fields
setFields();
// Get Current entries in list
RefreshEmployeeList();
}
}
// Return list of employees currently in
// the SharePoint list
DataTable GetAllEmployees()
{
SPSite site = new SPSite("http://localhost");
SPWeb web = site.AllWebs[""];
SPList employees = web.Lists["Employee"];
DataTable dtEmployees = employees.Items.GetDataTable();
DataTable dtEmployeesNew = new DataTable("Employees");
dtEmployeesNew.Columns.Add("ID");
dtEmployeesNew.Columns.Add("EmpName");
dtEmployeesNew.Columns.Add("JobTitle");
dtEmployeesNew.Columns.Add("HireDate");
foreach (DataRow drEmployee in dtEmployees.Rows)
{
try
{
DataRow drEmployeeNew = dtEmployeesNew.NewRow();
drEmployeeNew["ID"] = drEmployee["ID"].ToString();
drEmployeeNew["EmpName"] = drEmployee["EmpName"].ToString();
drEmployeeNew["JobTitle"] =
drEmployee["JobTitle"].ToString();
drEmployeeNew["HireDate"] =
drEmployee["HireDate"].ToString();
dtEmployeesNew.Rows.Add(drEmployeeNew);
dtEmployeesNew.AcceptChanges();
}
catch { }
}
web.Dispose();
site.Dispose();
return dtEmployeesNew;
}
// Return a drop-down list object containing
// all current IDs, unless the "New" command
// selected, in which case no ID is neededDropDownList GetIDs()
{
ddlID.Items.Clear();
if (ddlCommand.SelectedValue == "New")
{
ddlID.Enabled = false;
ddlID.Items.Add(new ListItem("N/A"));
}
else
{
ddlID.Enabled = true;
DataTable dtEmployess = new DataTable();
dtEmployess = GetAllEmployees();
foreach (DataRow drEmployee in dtEmployess.Rows)
{
ListItem li = new ListItem(drEmployee["ID"].ToString(),
drEmployee["ID"].ToString());
ddlID.Items.Add(li);
}
}
ddlID.SelectedIndex = 0;
return ddlID;
}
// Redraw grid-view listing all employees
void RefreshEmployeeList()
{
DataTable dtEmployeeListData = new DataTable();
dtEmployeeListData = GetAllEmployees();
this.GridView1.DataSource = dtEmployeeListData;
this.GridView1.DataBind();
}
// Update form fields to reflect
// selected command and, if appropriate
// selected ID
private void setFields()
{
// Clear out data entry fields
txtEmpName.Text = "";
txtHireDate.Text = "";
txtJobTitle.Text = "";
lblReturnMsg.Text = "";
// By default, let user select an existing ID
ddlID.Enabled = true;
// Enable or disable fields as appropriateif (ddlCommand.SelectedValue == "Delete")
{
txtEmpName.Enabled = false;
txtHireDate.Enabled = false;
txtJobTitle.Enabled = false;
}
else
{
// If "New", doesn't make sense for
// user to select an ID
if (ddlCommand.SelectedValue == "New")
ddlID.Enabled = false;
else
{
ddlID.Enabled = true;
// Retrieve existing data for selected employee
SPSite site = new SPSite("http://localhost");
SPWeb web = site.AllWebs[""];
SPList list = web.Lists["Employee"];
int ID = int.Parse(ddlID.SelectedValue);
SPListItem item = list.GetItemById(ID);
// Assign form field values from SharePoint list
txtEmpName.Text = item["EmpName"].ToString();
txtHireDate.Text = item["HireDate"].ToString();
txtJobTitle.Text = item["JobTitle"].ToString();
}
txtEmpName.Enabled = true;
txtHireDate.Enabled = true;
txtJobTitle.Enabled = true;
web.Dispose();
site.Dispose();
}
}
protected void ddlCommand_SelectedIndexChanged(object sender, EventArgs e)
{
GetIDs();
setFields();
}
protected void ddlID_SelectedIndexChanged(object sender, EventArgs e)
{
setFields();
}
protected void Button1_Click(object sender, EventArgs e)
{try
{
SPSite site = new SPSite("http://localhost");
SPWeb web = site.AllWebs[""];
SPList list = web.Lists["Employee"];
SPListItem item;
int ID;
lblReturnMsg.Text = "";
web.AllowUnsafeUpdates = true;
switch (ddlCommand.SelectedValue)
{
case "New":
item = list.Items.Add();
item["EmpName"] = txtEmpName.Text;
item["JobTitle"] = txtJobTitle.Text;
item["HireDate"] = txtHireDate.Text;
item.Update();
lblReturnMsg.Text = "'" +
txtEmpName.Text + "' has been successfully added";
break;
case "Update":
ID = int.Parse(ddlID.SelectedValue);
item = list.GetItemById(ID);
item["EmpName"] = txtEmpName.Text;
item["JobTitle"] = txtJobTitle.Text;
item["HireDate"] = txtHireDate.Text;
item.Update();
lblReturnMsg.Text = "'" +
txtEmpName.Text + "' has been successfully updated";
break;
case "Delete":
ID = int.Parse(ddlID.SelectedValue);
item = list.GetItemById(ID);
string empName = item["EmpName"].ToString();
list.Items.DeleteItemById(ID);
lblReturnMsg.Text = "'" + empName +
"' has been successfully deleted";
break;
}
list.Update();
GetIDs();
setFields();
RefreshEmployeeList();
web.Dispose();
site.Dispose();
}catch (Exception ex)
{
lblReturnMsg.Text = ex.Message;
}
}
}Run the application from within Visual Studio, or open a web browser and navigate to the web page URL. When the page first loads, a list of existing items from the http://localhost/ root web Employee list is displayed. Select Update, New, or Delete from the Command drop-down list. If you select New, the ID drop-down will also be set to New; otherwise, you may select one of the existing ID values.
For a New or Update command, enter text into any or all of the Employee Name, Job Title, or Hire Date fields (remember format requirements for the Hire Date value).
Click the Go button to process the command as shown in Figure 3-3.

After the update has been processed, a confirmation message will be displayed and the list of employees will be updated to reflect any changes.
See Recipe 3-4.
Lists in SharePoint are roughly analogous to SQL tables, with the exception that SharePoint does not support relational operations such as joins and intersections on lists. One very common task you might want to perform programmatically is to add, edit, or delete entries in a SharePoint list.
This recipe shows you how to create a simple web page to do just that. The page will display a list of current entries in an Employee list, and enable you to delete or update existing rows, and add new rows. Through this recipe, you'll work with two important SharePoint web services methods: Lists.GetListItems() and Lists.UpdateListItems().
Recall that an important advantage of working with SharePoint through its web services is the ability to create applications (whether ASP.NET, .NET Windows, or .NET console applications) that can run on any computer that can connect to one of your SharePoint farm's front-end web servers. A particularly useful feature of the Lists.UpdateListItems() method is that you can pass a batch of commands to process in a single pass. For example, if you want to add 100 list items, you don't need to call the method 100 times. Rather, you create a chunk of XML describing all 100 rows to add, and UpdateListItems() does the rest.
And batches aren't limited to just one type of command. You can mix add, update, and delete operations in a single batch. This makes the UpdateListItems() method particularly useful for processing remote updates.
As with any SharePoint web service, authentication is required, so you'll need to pass a network credential to the
Lists.asmxservice before calling any of its methods. Failure to do so will result in an exception being thrown, indicating that the calling program is not authorizedOne of the fields updated in this recipe is of the date/time type. When passing data to SharePoint via the
<Batch><Method>XML, you need to use the YYYY-MM-DD format. For example, the date 10/1/2007 needs to be encoded as 2007-10-1.
Create a new ASP.NET web application.
Add a web reference to
http://localhost/_vti_bin/Lists.asmx.
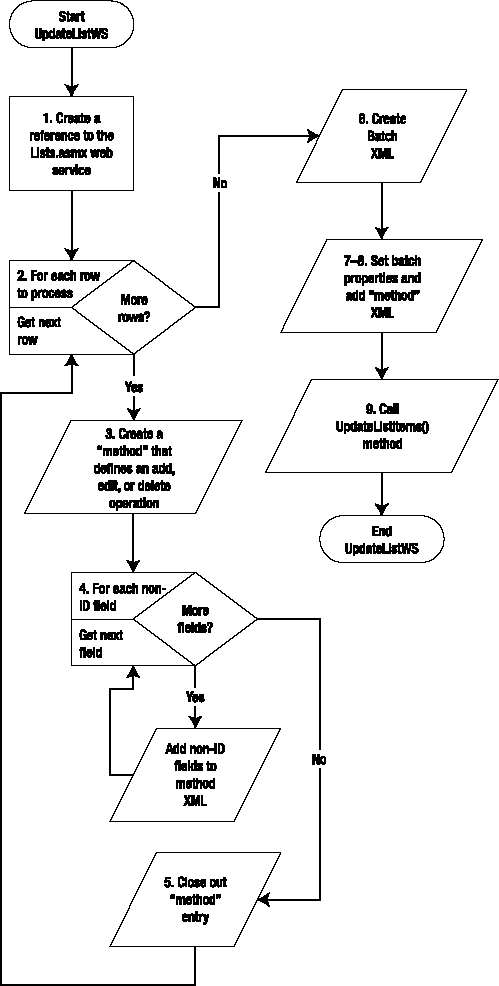
Create an instance of the
Lists.asmxweb service and assign valid credentials.Loop through rows in the table of commands (only one row is passed in this recipe).
Create an XML fragment to contain a
<Method>(for example, command) to add, edit, or delete a list item in the SharePoint list.Loop through row columns, skipping the first column, because it contains the command, adding
<Field>elements to the method.After all columns have been processed, close out the
</Method>.Create a new
<Batch>to contain the<Method>elements created in steps 3–5.Set the
<Batch>properties.Add the
<Method>elements.Call the
Lists.UpdateListItems()method, passing the<Batch>.
Imports System
Imports System.Data
Imports System.Configuration
Imports System.Web
Imports System.Web.Security
Imports System.Web.UI
Imports System.Web.UI.WebControls
Imports System.Web.UI.WebControls.WebParts
Imports System.Web.UI.HtmlControls
Imports System.Text
Imports System.Xml
Partial Public Class _Default
    Inherits System.Web.UI.Page
    Protected Sub Page_Load(ByVal sender As Object, ByVal e As EventArgs) _
        Handles Me.Load
        If Not IsPostBack Then
            ' Populate the "Command" drop-down list
            ddlCommand.Items.Add("Delete")
            ddlCommand.Items.Add("New")
            ddlCommand.Items.Add("Update")
            ddlCommand.SelectedIndex = 2
            ' Populate the "ID" drop-down list
            ddlID = GetIDs()
            ' Get Current entries in list
            RefreshEmployeeList()
        End If
    End Sub
Protected Sub ddlCommand_SelectedIndexChanged(ByVal sender As Object, _
ByVal e As EventArgs) Handles ddlCommand.SelectedIndexChanged
ddlID = GetIDs()
End Sub
Private Function GetAllEmployees() As DataTable
Dim objListService As New ListsService.Lists()
objListService.Url = "http://localhost/_vti_bin/lists.asmx"
objListService.Credentials = _
System.Net.CredentialCache.DefaultCredentials
Dim dtEmployees As New DataTable("Employees")
dtEmployees.Columns.Add("ID")
dtEmployees.Columns.Add("EmpName")
dtEmployees.Columns.Add("JobTitle")
dtEmployees.Columns.Add("HireDate")
Dim drEmployee As DataRow
Dim xnEmployees As XmlNode = objListService.GetListItems( _
"Employee", Nothing, Nothing, Nothing, Nothing, Nothing, _
Nothing)
For Each xnEmployee As XmlNode _
In xnEmployees.ChildNodes(1).ChildNodes
Try
drEmployee = dtEmployees.NewRow()
drEmployee("ID") = xnEmployee.Attributes("ows_ID").Value
drEmployee("EmpName") = _
xnEmployee.Attributes("ows_EmpName").Value
drEmployee("JobTitle") = _
xnEmployee.Attributes("ows_JobTitle").Value
drEmployee("HireDate") = _
xnEmployee.Attributes("ows_HireDate").Value
dtEmployees.Rows.Add(drEmployee)
Catch
End Try
Next
Return dtEmployees
End Function
' Return a drop-down list object containing
' all current IDs, unless the "New" command
' selected, in which case the only valid
' value for ID is also "New"
Private Function GetIDs() As DropDownList
ddlID.Items.Clear()
If ddlCommand.SelectedValue = "New" Then
Dim li As New ListItem("New", "New")
ddlID.Items.Add(li)Else
Dim dtEmployess As New DataTable()
dtEmployess = GetAllEmployees()
For Each drEmployee As DataRow In dtEmployess.Rows
Dim li As New ListItem(drEmployee("ID").ToString(), _
drEmployee("ID").ToString())
ddlID.Items.Add(li)
Next
End If
Return ddlID
End Function
' Redraw grid-view listing all employees
Private Sub RefreshEmployeeList()
Dim dtEmployeeListData As New DataTable()
dtEmployeeListData = GetAllEmployees()
Me.GridView1.DataSource = dtEmployeeListData
Me.GridView1.DataBind()
End Sub
' Build necessary batch XML and call the web service method
Private Sub UpdateListWS(ByVal listName As String, _
ByVal dtListData As DataTable)
' Step 1: Create a reference to the "Lists" web service
Dim objListService As New ListsService.Lists()
objListService.Url = "http://localhost/_vti_bin/lists.asmx"
objListService.Credentials = _
System.Net.CredentialCache.DefaultCredentials
' Step 2: Loop through rows in data table,
' adding one add, edit, or delete command for each row
Dim drListItem As DataRow
Dim strBatch As String = ""
For i As Integer = 0 To dtListData.Rows.Count - 1
drListItem = dtListData.Rows(i)
' Step 3: Create a "Method" element to add to batch
' Assume that first column of data table was the 'Cmd'
strBatch += "<Method ID='" + i.ToString() _
+ "' Cmd='" + drListItem("Cmd") + "'>"
For j As Integer = 1 To drListItem.Table.Columns.Count - 1
' Step 4: Loop through fields 2-n, building
' one "method" in batch
' Include only columns with data
If drListItem(j).ToString() <> "" Then
strBatch += "<Field Name='" _
+ drListItem.Table.Columns(j).ColumnName + "'>"
strBatch += Server.HtmlEncode(drListItem(j).ToString())
strBatch += "</Field>"
End If
Next' Step 5: Close out this method entry
strBatch += "</Method>"
Next
' Step 6: Create the parent "batch" element
Dim xmlDoc As XmlDocument = New System.Xml.XmlDocument()
Dim xmlBatch As System.Xml.XmlElement = xmlDoc.CreateElement("Batch")
' Step 7: Tell SharePoint to keep processing if a single
' "Method" causes an error.
xmlBatch.SetAttribute("OnError", "Continue")
xmlBatch.SetAttribute("ListVersion", "1")
xmlBatch.SetAttribute("ViewName", "")
' Step 8: Add method (i.e. add/update/delete command) to batch
xmlBatch.InnerXml = strBatch
' Step 9: Process the batch
Dim xmlReturn As XmlNode = objListService.UpdateListItems( _
listName, xmlBatch)
' Display batch that was just run on web page
lblBatchXML.Text = "<strong>Batch just processed</strong><br/><br/>" _
+ Server.HtmlEncode(xmlBatch.OuterXml)
'Display the returned results
lblReturnXML.Text = "<strong>Results</strong><br/><br/>" _
+ Server.HtmlEncode(xmlReturn.InnerXml)
End Sub
Protected Sub Button1_Click(ByVal sender As Object, ByVal e As EventArgs) _
Handles Button1.Click
' Define table to hold data to process
Dim dtEmployees As New DataTable("Employee")
' New, Update, or Delete
dtEmployees.Columns.Add("Cmd")
' New if adding, or ID of item
dtEmployees.Columns.Add("ID")
' Builtin Title column
dtEmployees.Columns.Add("Title")
' Employee name
dtEmployees.Columns.Add("EmpName")
' Employee hire date
dtEmployees.Columns.Add("HireDate")
' Employee title
dtEmployees.Columns.Add("JobTitle")
' Call routine to update list
Dim drEmployee As DataRow = dtEmployees.NewRow()
drEmployee("Cmd") = ddlCommand.SelectedValue
drEmployee("ID") = ddlID.SelectedValue
drEmployee("EmpName") = txtEmpName.Text
drEmployee("JobTitle") = txtJobTitle.Text
drEmployee("HireDate") = txtHireDate.Text
dtEmployees.Rows.Add(drEmployee)' Update SharePoint
UpdateListWS("Employee", dtEmployees)
RefreshEmployeeList()
End Sub
End Classusing System;
using System.Data;
using System.Configuration;
using System.Web;
using System.Web.Security;
using System.Web.UI;
using System.Web.UI.WebControls;
using System.Web.UI.WebControls.WebParts;
using System.Web.UI.HtmlControls;
using System.Text;
using System.Xml;
public partial class _Default : System.Web.UI.Page
{
protected void Page_Load(object sender, EventArgs e)
{
if (!IsPostBack)
{
// Populate the "Command" drop-down list
ddlCommand.Items.Add("Delete");
ddlCommand.Items.Add("New");
ddlCommand.Items.Add("Update");
ddlCommand.SelectedIndex = 2;
// Populate the "ID" drop-down list
ddlID = GetIDs();
// Get Current entries in list
RefreshEmployeeList();
}
}
protected void ddlCommand_SelectedIndexChanged(object sender,
EventArgs e)
{
ddlID = GetIDs();
}
DataTable GetAllEmployees()
{
ListsService.Lists objListService = new ListsService.Lists();
objListService.Url = "http://localhost/_vti_bin/lists.asmx";objListService.Credentials =
System.Net.CredentialCache.DefaultCredentials;
DataTable dtEmployees = new DataTable("Employees");
dtEmployees.Columns.Add("ID");
dtEmployees.Columns.Add("EmpName");
dtEmployees.Columns.Add("JobTitle");
dtEmployees.Columns.Add("HireDate");
DataRow drEmployee;
XmlNode xnEmployees = objListService.GetListItems(
"Employee", null, null, null, null, null, null);
foreach (XmlNode xnEmployee in xnEmployees.ChildNodes[1].ChildNodes)
{
try
{
drEmployee = dtEmployees.NewRow();
drEmployee["ID"] = xnEmployee.Attributes["ows_ID"].Value;
drEmployee["EmpName"] =
xnEmployee.Attributes["ows_EmpName"].Value;
drEmployee["JobTitle"] =
xnEmployee.Attributes["ows_JobTitle"].Value;
drEmployee["HireDate"] =
xnEmployee.Attributes["ows_HireDate"].Value;
dtEmployees.Rows.Add(drEmployee);
}
catch { }
}
return dtEmployees;
}
// Return a drop-down list object containing
// all current IDs, unless the "New" command
// selected, in which case the only valid
// value for ID is also "New"
DropDownList GetIDs()
{
ddlID.Items.Clear();
if (ddlCommand.SelectedValue == "New")
{
ListItem li = new ListItem("New", "New");
ddlID.Items.Add(li);
}
else
{
DataTable dtEmployess = new DataTable();
dtEmployess = GetAllEmployees();foreach (DataRow drEmployee in dtEmployess.Rows)
{
ListItem li =
new ListItem(drEmployee["ID"].ToString(),
drEmployee["ID"].ToString());
ddlID.Items.Add(li);
}
}
return ddlID;
}
// Redraw grid-view listing all employees
void RefreshEmployeeList()
{
DataTable dtEmployeeListData = new DataTable();
dtEmployeeListData = GetAllEmployees();
this.GridView1.DataSource = dtEmployeeListData;
this.GridView1.DataBind();
}
// Build necessary batch XML and call the web service method
void UpdateListWS(string listName, DataTable dtListData)
{
ListsService.Lists objListService = new ListsService.Lists();
objListService.Url = "http://localhost/_vti_bin/lists.asmx";
objListService.Credentials =
System.Net.CredentialCache.DefaultCredentials;
// Create XML containing "batch" of updates to process
DataRow drListItem;
string strBatch = "";
for (int i = 0; i < dtListData.Rows.Count; i++)
{
drListItem = dtListData.Rows[i];
// Create a "Method" element to add to batch
strBatch += "<Method ID='" + i.ToString() + "' Cmd='"
+ drListItem["Cmd"] + "'>";
// Asume that first column of data table was the 'Cmd'
for (int j = 1; j < drListItem.Table.Columns.Count; j++)
{
// Include only columns with data
if (drListItem[j].ToString() != "")
{
strBatch += "<Field Name='"
+ drListItem.Table.Columns[j].ColumnName + "'>";
strBatch += Server.HtmlEncode(drListItem[j].ToString());
strBatch += "</Field>";
}
}// Close out this entry
strBatch += "</Method>";
}
// Create the parent "batch" element
XmlDocument xmlDoc = new System.Xml.XmlDocument();
System.Xml.XmlElement xmlBatch = xmlDoc.CreateElement("Batch");
// Tell SharePoint to keep processing if a single
// "Method" causes an error.
xmlBatch.SetAttribute("OnError", "Continue");
xmlBatch.SetAttribute("ListVersion", "1");
xmlBatch.SetAttribute("ViewName", "");
xmlBatch.InnerXml = strBatch;
// Display batch that was just run on web page
lblBatchXML.Text = "<strong>Batch just processed</strong><br/><br/>"
+ Server.HtmlEncode(xmlBatch.OuterXml);
XmlNode xmlReturn = objListService.UpdateListItems(
listName, xmlBatch);
//Display the returned results
lblReturnXML.Text = "<strong>Results</strong><br/><br/>"
+ Server.HtmlEncode(xmlReturn.InnerXml);
}
protected void Button1_Click(object sender, EventArgs e)
{
// Define table to hold data to process
DataTable dtEmployees = new DataTable("Employee");
dtEmployees.Columns.Add("Cmd"); // New, Update, or Delete
dtEmployees.Columns.Add("ID"); // New if adding, or item ID
dtEmployees.Columns.Add("Title"); // Builtin Title column
dtEmployees.Columns.Add("EmpName"); // Employee name
dtEmployees.Columns.Add("HireDate"); // Employee hire date
dtEmployees.Columns.Add("JobTitle"); // Employee title
// Call routine to update list
DataRow drEmployee = dtEmployees.NewRow();
drEmployee["Cmd"] = ddlCommand.SelectedValue;
drEmployee["ID"] = ddlID.SelectedValue;
drEmployee["EmpName"] = txtEmpName.Text;
drEmployee["JobTitle"] = txtJobTitle.Text;
drEmployee["HireDate"] = txtHireDate.Text;
dtEmployees.Rows.Add(drEmployee);
// Update SharePoint
UpdateListWS("Employee", dtEmployees);
RefreshEmployeeList();
}
}Run the application from within Visual Studio, or open a web browser and navigate to the web page URL. When the page first loads, a list of existing items from the http://localhost/ root web Employee list is displayed. Select Update, New, or Delete from the Command drop-down list. If you select New, the ID drop-down will also be set to New; otherwise, you may select one of the existing ID values.
For a New or Update command, enter text into any or all of the Employee Name, Job Title, or Hire Date fields (remember format requirements for the Hire Date value). Click the Go (see Figure 3-4) button to process the command.
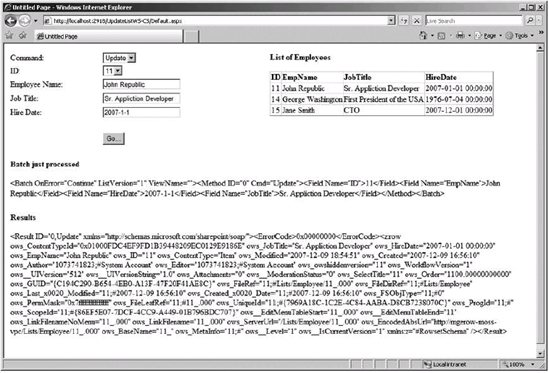
After the batch has been processed, the Batch Just Processed section will display the XML that was sent to the Lists.UpdateListItems() method, and the Results section will display the XML returned by the method, including a status code for each command in the batch, as well as full data for each item processed.
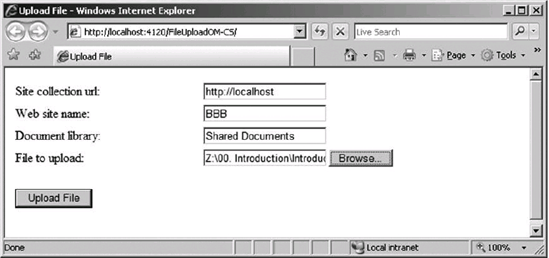
Here's a useful little recipe to upload a document via an ASP.NET page. The user is asked to provide the site collection URL, the web site, and the name of a document library on the site. The user must also select a file for upload.
As always, the network credential under which the page runs needs to have permission to access and upload a document to the target document library.
By default, ASP.NET web pages are limited to 4MB data transfers, which means that without making changes to the
Web.configfile, you will be able to upload only a 4MB file. Unless you expect all your files to be under 4MB, you will need to increase themaxRequestLengthvalue in the web application'sWeb.configfile. The element to add is<httpRuntime maxRequestLength="512000"/>(to increase the maximum upload size to 500MB) and should be added just after the<system.web>element. Failure to make this change will result in an error indicating that the file to be uploaded exceeds the maximum limit.
Create a new ASP.NET web application.
Add a reference to the Windows SharePoint Services .NET assembly.
Add
usingorImportsstatements for the following:Microsoft.SharePointSystem.IO
Add web controls for all specified form fields:
txtSiteUrl(text box)txtWebName(text box)txtDocLibName(text box)FileUpload1(file upload)cmdUploadFile(button)lblErrorMsg(label)

Prompt the user for the target site collection, web site, and document library name. The user also selects a file from disk to upload via the file upload control.
Verify that the name of the file to upload has been provided. If not, prompt the user to provide it now and return to the web form.
Assuming that the user has provided a valid file, read its contents into a byte array.
Upload the file to the target document library.
Imports System
Imports System.Data
Imports System.Configuration
Imports System.Web
Imports System.Web.Security
Imports System.Web.UI
Imports System.Web.UI.WebControls
Imports System.Web.UI.WebControls.WebParts
Imports System.Web.UI.HtmlControls
Imports Microsoft.SharePoint
Imports System.IO
Partial Public Class _Default
    Inherits System.Web.UI.Page
    Protected Sub cmdUploadFile_Click(ByVal sender As Object, _
       ByVal e As EventArgs) Handles cmdUploadFile.Click
        Try
            lblErrorMsg.Visible = False
            ' Step 1: Get handle to site collection, web site, list
            Dim site As New SPSite(txtSiteUrl.Text)
            Dim web As SPWeb = site.AllWebs(txtWebName.Text)
            Dim dl As SPList = web.Lists(txtDocLibName.Text)
            Dim file As SPFile
            web.AllowUnsafeUpdates = True
            web.Lists.IncludeRootFolder = True
            ' Step 2: Make sure user has selected a file
            If FileUpload1.PostedFile.FileName <> "" Then
                ' Step 3: Load the content of the file into a byte array
                Dim fStream As Stream
                Dim contents As Byte() = _
                   New Byte(FileUpload1.PostedFile.InputStream.Length - 1) {}
                fStream = FileUpload1.PostedFile.InputStream
                fStream.Read(contents, 0, CInt(fStream.Length))
fStream.Close()
' Step 4: Upload the file to SharePoint doclib
file = web.Files.Add(web.Url.ToString() + "/" + _
dl.Title.ToString() + "/" + _
FileUpload1.FileName, contents)
Else
lblErrorMsg.Text = "Please select a file to upload"
lblErrorMsg.Visible = True
End If
web.Dispose
site.Dispose()
Catch ex As Exception
lblErrorMsg.Text = ex.Message
lblErrorMsg.Visible = True
End Try
End Sub
End Classusing System;
using System.Data;
using System.Configuration;
using System.Web;
using System.Web.Security;
using System.Web.UI;
using System.Web.UI.WebControls;
using System.Web.UI.WebControls.WebParts;
using System.Web.UI.HtmlControls;
using Microsoft.SharePoint;
using System.IO;
public partial class _Default : System.Web.UI.Page
{
protected void cmdUploadFile_Click(object sender, EventArgs e)
{
try
{
lblErrorMsg.Visible = false;
// Step 1: Get handle to site collection, web site, list
SPSite site = new SPSite(txtSiteUrl.Text);
SPWeb web = site.AllWebs[txtWebName.Text];
SPList dl = web.Lists[txtDocLibName.Text];SPFile file;
web.AllowUnsafeUpdates = true;
web.Lists.IncludeRootFolder = true;
// Step 2: Make sure user has selected a file
if (FileUpload1.PostedFile.FileName != "")
{
// Step 3: Load the content of the file into a byte array
Stream fStream;
Byte[] contents =
new Byte[FileUpload1.PostedFile.InputStream.Length];
fStream = FileUpload1.PostedFile.InputStream;
fStream.Read(contents, 0, (int)fStream.Length);
fStream.Close();
// Step 4: Upload the file to SharePoint doclib
file = web.Files.Add(web.Url.ToString() + "/" +
dl.Title.ToString() + "/" +
FileUpload1.FileName, contents);
file.Update();
}
else
{
lblErrorMsg.Text = "Please select a file to upload";
lblErrorMsg.Visible = true;
}
web.Dispose();
site.Dispose();
}
catch (Exception ex)
{
lblErrorMsg.Text = ex.Message;
lblErrorMsg.Visible = true;
}
}
}Run the application from within Visual Studio, or open a browser and navigate to the application's web page. Fill in all required information and select a file to upload from your computer or a network share. Click the Upload File button as in Figure 3-5.
Assuming no errors occurred, the page will return without messages after the file has been uploaded to the target document library. You can verify this by navigating to the library.
One variation is to upload multiple files from a file share to a given destination. This can be done by reading the contents of a file system folder into an array and uploading each file in turn.
In addition to uploading the file, set various custom columns of the document library with metadata about the document provided by the end user.
One of the odd omissions in SharePoint is a built-in web service method to upload a document to a document library. In this recipe, you'll create such a web service, which you'll find will come in handy in many instances.
The FileUpload web service is quite simple, taking advantage of .NET web services' ability to transfer byte arrays—which we use to hold the bytes composing any document. One "gotcha" that we need to handle is the problem of uploading large files. To handle this, we'll need to address two potential pitfalls: 1) file size restrictions and 2) transfer time restrictions. These are covered in the "Special Considerations" section that follows.
As with any web service that requires authentication, you will need to attach network credentials with permissions to access both the service and SharePoint.
Unless you expect all your files to be quite under 4MB, you will need to increase the
maxRequestLengthvalue in the web service'sWeb.configfile. The element to add is<httpRuntime maxRequestLength="512000"/>and should be added just after the<system.web>element. Failure to make this change will result in an error indicating that the file to be uploaded exceeds the maximum limit. (In the preceding example, the maximum upload size has been increased to 500MB.)You may also want to increase the maximum file size that SharePoint allows. You can do this through the SharePoint Central Administration Website (SCAW) on the Web Application General Settings page. Change the value in the Maximum Upload Size field to reflect the setting made to the web service
Web.config(for example, change the value to 500 for the preceding example).Finally, depending on the typical connection speed, you may need to increase the connection time-out value in IIS to enable connections to remain open longer for slow connections or large file uploads. You can set the connection time-out value on the Web Site tab of the web site property sheet in IIS.
Create a new ASP.NET web service project in Visual Studio.
Add a reference to the Windows SharePoint Services assembly.
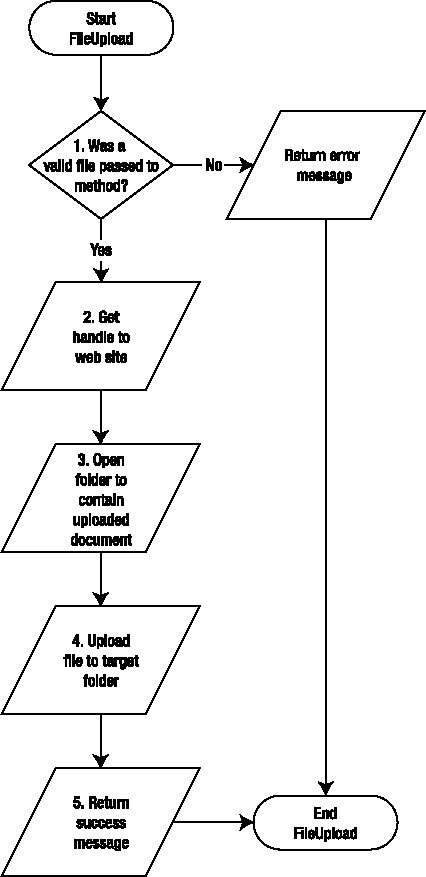
Verify that a non-null byte array was passed to the upload method. If the array is null, abort processing and return an error message.
If a valid byte array was passed, get a handle to the target web site.
Open the target folder. If the full target path doesn't exist, create any necessary folders or subfolders.
Upload the file.
Return a success message to the calling routine.
Imports System
Imports System.Web
Imports System.Web.Services
Imports System.Web.Services.Protocols
Imports Microsoft.SharePoint
Imports Microsoft.SharePoint.WebControls
<WebService([Namespace]:="http://tempuri.org/")> _
<WebServiceBinding(ConformsTo:=WsiProfiles.BasicProfile1_1)> _
Public Class Service
    Inherits System.Web.Services.WebService
    'Uncomment the following line if using designed components
    'InitializeComponent();
    Public Sub New()
    End Sub
    <WebMethod()> _
    Public Function UploadFile2SharePoint( _
       ByVal fileName As String, _
       ByVal fileContents As Byte(), _
       ByVal siteUrl As String, _
       ByVal webName As String, _
       ByVal pathFolder As String) _
       As String
        ' Step 1: Make sure a valid file has been
        ' passed to the service method
        If fileContents Is Nothing Then
            Return "Missing File"
        End If
        Try
            ' Step 2: Open the target site and web
            Dim site As New SPSite(siteUrl)
            Dim web As SPWeb = site.AllWebs(webName)
            ' Step 3: Open the folder to hold the document
            Dim folder As SPFolder = _
               web.GetFolder(EnsureParentFolder(web, _
               pathFolder + "/" + fileName))
            Dim boolOverwrite As Boolean = True
            ' Step 4: Add the file
            Dim file As SPFile = _
               folder.Files.Add(fileName, fileContents, boolOverwrite)
            web.Dispose()
            site.Dispose()
' Step 5: Declare victory!
Return "'" + file.Name + "' successfully written to '" + _
file.Item.Url + "'"
Catch ex As System.Exception
Return ex.Message
End Try
End Function
' This is a stock function from the WSS SDK to make
' sure that a folder path exists before we try to upload the
' file.
Public Function EnsureParentFolder( _
ByVal parentSite As SPWeb, ByVal destinUrl As String) As String
destinUrl = parentSite.GetFile(destinUrl).Url
Dim index As Integer = destinUrl.LastIndexOf("/")
Dim parentFolderUrl As String = String.Empty
If index > −1 Then
parentFolderUrl = destinUrl.Substring(0, index)
Dim parentFolder As SPFolder = parentSite.GetFolder(parentFolderUrl)
If Not parentFolder.Exists Then
Dim currentFolder As SPFolder = parentSite.RootFolder
For Each folder As String In parentFolderUrl.Split("/"c)
currentFolder = currentFolder.SubFolders.Add(folder)
Next
End If
End If
Return parentFolderUrl
End Function
End Classusing System;
using System.Web;
using System.Web.Services;
using System.Web.Services.Protocols;
using Microsoft.SharePoint;
using Microsoft.SharePoint.WebControls;
[WebService(Namespace = "http://tempuri.org/")]
[WebServiceBinding(ConformsTo = WsiProfiles.BasicProfile1_1)]
public class Service : System.Web.Services.WebService
{
public Service () {
//Uncomment the following line if using designed components
//InitializeComponent();
}
[WebMethod]public string UploadFile2SharePoint(
string fileName, byte[] fileContents, string siteUrl,
string webName, string pathFolder)
{
// Step 1: Make sure a valid file has been passed
// to the service method
if (fileContents == null)
{
return "Missing File";
}
try
{
// Step 2: Open the target site and web
SPSite site = new SPSite(siteUrl);
SPWeb web = site.AllWebs[webName];
// Step 3: Open the folder to hold the document
SPFolder folder =
web.GetFolder(
EnsureParentFolder(web,pathFolder+"/"+fileName));
bool boolOverwrite = true;
// Step 4: Add the file
SPFile file = folder.Files.Add(
fileName, fileContents, boolOverwrite);
web.Dispose();
site.Dispose();
// Step 5: Declare victory!
return "'" + file.Name + "' successfully written to '" +
file.Item.Url + "'";
}
catch (System.Exception ex)
{
return ex.Message;
}
}
// This is a stock function from the WSS SDK to make
// sure that a folder path exists before we try to upload the
// file.
public string EnsureParentFolder(SPWeb parentSite, string destinUrl)
{
destinUrl = parentSite.GetFile(destinUrl).Url;
int index = destinUrl.LastIndexOf("/");
string parentFolderUrl = string.Empty;
if (index > −1)
{
parentFolderUrl = destinUrl.Substring(0, index);
SPFolder parentFolder
= parentSite.GetFolder(parentFolderUrl);if (!parentFolder.Exists)
{
SPFolder currentFolder = parentSite.RootFolder;
foreach (string folder in parentFolderUrl.Split('/'))
{
currentFolder
= currentFolder.SubFolders.Add(folder);
}
}
}
return parentFolderUrl;
}
}Note
The following code assumes that a default namespace of TestFileUploadService has been specified in the project properties.
using System;
using System.Collections.Generic;
using System.Text;
namespace TestFileUploadService
{
    class Program
    {
        static void Main(string[] args)
        {
            // If 3 arguments have not been passed
            // on command line, prompt user for inputs
            // via console
            if (args.Length < 4)
            {
                args = new string[4];
                Console.Write("Full path of source file: ");
                args[0] = Console.ReadLine();
                Console.Write("Target site url: ");
                args[1] = Console.ReadLine();
                Console.Write("Target web name: ");
                args[2] = Console.ReadLine();
                Console.Write("Target folder path: ");
                args[3] = Console.ReadLine();
            }
// Create an instance of the file upload service
// and assign credentials of an authorized user
FileUploadService.Service objFileUploadService =
new FileUploadService.Service();
objFileUploadService.Credentials =
System.Net.CredentialCache.DefaultCredentials;
// Read in source file
System.IO.FileStream fs =
new System.IO.FileStream(args[0],System.IO.FileMode.Open);
byte[] fileContents = new byte[fs.Length];
fs.Read(fileContents,0,(int)fs.Length);
fs.Close();
// Get just the filename
string fileName =
args[0].Split('')[args[0].Split('').Length-1];
// Upload the specified file
Console.WriteLine();
Console.WriteLine(
objFileUploadService.UploadFile2SharePoint(
fileName,
fileContents,
args[1],
args[2],
args[3])
);
Console.WriteLine();
Console.WriteLine("Press any key to continue");
Console.Read();
}
}
}Run the TestFileUploadService.exe application from within Visual Studio or from the Windows console. Enter a valid filename, site, web, and path that you wish to upload the file to, as shown in Figure 3-6.
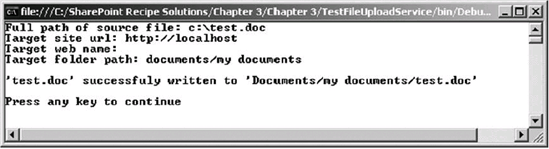
Assuming that no errors occur, you will see a confirmation message indicating that the file has been successfully uploaded. You can verify this by opening a browser and navigating to the target folder.
This example creates a SharePoint-specific file-upload routine. However, it's quite simple to create a variation that uploads the file to the file system instead of a SharePoint library by using a
System.IO.FileStreamobject.