The SharePoint platform can be used to locate information across SharePoint and the rest of your enterprise providing a complete and comprehensive enterprise search experience. This platform allows searching a variety of sources, including SharePoint, Exchange, file shares, web content, and database content, and provides intelligent query management and robust result views.
Using SharePoint Search
SharePoint search offers a rich interface that allows you to search for and locate information, based on its content and associated properties. Results can then be refined and reviewed to isolate the desired materials. SharePoint combines several features to create this robust search experience, including the following:
Content Crawling: Scans content to be included in a search. It identifies properties and security attributes used by query services to determine when to display crawled items to users as part of search results.
Query Services: Allows specification of information to be used by the SharePoint search to find content to display in search results.
Query Results: Organizes and displays results of executed queries.
Refiners: Lets you identify details to be used to further filter listed results based on defined properties related to the results.
All of these capabilities come together to provide the SharePoint 2016 search experience.
Performing a Search
SharePoint offers several interfaces to help you take full advantage of its search services to locate relevant information. These interfaces support searches in the overall environment or specific sites, lists, and libraries.
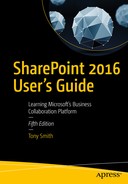
Searches can be initiated from any site page within SharePoint. Whether a page is a web part, a wiki, or a publishing page, the search box is at the top of the page to give you easy access to search services. The search interface either provides a standard search box, as shown in Figure 11-1, or a search box with integrated options, which allow selection of verticals to use in targeting the search (see Figure 11-2). When you execute a search from the site’s search box , the scope will initially default to the current site, but you can expand it to search across the entire environment instead.
Figure 11-1. Standard search box
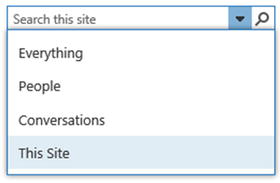
Figure 11-2. Search box with sources
You can also initiate a search in list and library views. A search box is part of list and library view headers (see Figure 11-3), next to the views list. Searches performed in a list or library view are scoped to return results just from the associated list or library.
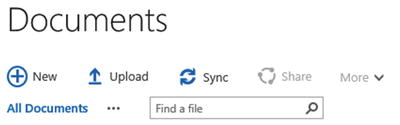
Figure 11-3. List or library view search
Finally, you can initiate a search in search pages. Whether your environment uses the standard search page or a search center, the search page includes a search box similar to the one found on a normal site page. A search page search is initially scoped to search all available crawled content.
To perform a search in SharePoint, navigate to any of the search boxes described and enter the search text you want to use. When the search box allows the selection of verticals, you can also identify the desired vertical to run the search against. The executed search will then scope to the appropriate content set and navigate you to the search results page.
Working with Search Results
Once a search is performed, search results are presented. The results returned for a search include items that meet the search criteria contained in the identified scope, that the user performing the search has rights to access. That is, search results will not include content that the searcher does not have at least read access to. The order of the results returned is determined by the items’ relevance, which is based on a variety of factors, including how closely the result meets the query, how active or current the item is, and how relevant the item is to the searcher. Presentation of results returned is further defined by additional factors, including whether result blocks are defined and the result type definitions in use.
Result Blocks
Query rules can be created within SharePoint search to define rules to extend search queries beyond standard search text queries. These rules are made up of a set of conditions and actions that are executed when search text meets identified conditions. Result blocks, defined as part of query rules, group sets of highly relevant content. For example, a search for “sales videos” would typically search crawled content for items containing those words or that phrase and return those items. However, when a search for “sales videos” is run, it is more likely the searcher is looking for video files related to sales than for content containing those two words. A default query rule in SharePoint specifies that when the word “video” is used in a search, the query should look for video files. The query can be extended so that when “sales videos” is the query text, the most relevant content would be video files in the Sales site. Such highly relevant content can be presented in a result block (see Figure 11-4), which groups these items and so elevates their importance above the other returned results.
Figure 11-4. Result block
Promoted Results
Much as query rule actions are used to create result blocks, query rule actions can be used to define promoted results, which are result items defined by a rule to always appear at the top of the search result set when searches meeting the query rule conditions are executed. For example, if you have a specific approved company logo file that should be used whenever the logo is needed, you may create a query rule that returns the logo file as the most relevant result when a search is performed for “company logo”.
Standard Search Results
Beyond specialized result blocks and promoted results, a search yields a set of standard search results that list materials matching the executed search. The layout of listed search results is based on the type of items listed, called result types. For example, documents and discussion items have different search result layouts. The layout of the items in the results is defined for each result type based on the display template associated with that result type. The display templates define the item details to list in the results and how these details are organized.
The standard search results view also includes a hover panel for each listed result. This panel lists additional details about the item in a format also determined by the display template for the associated result type. The hover panel, which appears when the mouse hovers over the item, can provide in-depth information about the item and organize actions available to be performed against it. To continue the example of the discussion item and the document, hovering over a discussion item shows a listing of the details for the item, including the discussion text and the original post the item is associated with (see Figure 11-5). The hover panel also includes options to navigate to the item and to the associated discussion.

Figure 11-5. Discussion item hover panel
A Word document’s hover panel (see Figure 11-6) incorporates a preview along with general details about the document. With this hover panel you can also open the document, follow it, send it, navigate to the associated library, and if you have the rights, edit it.
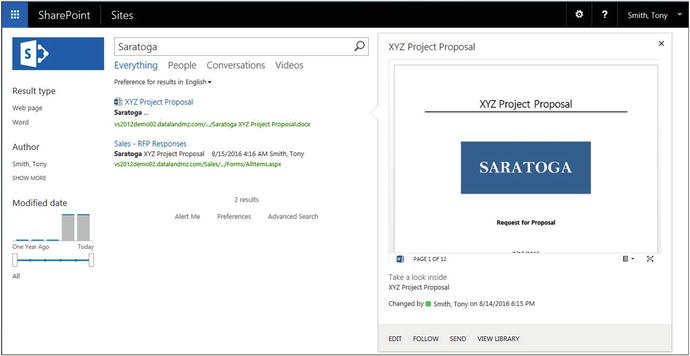
Figure 11-6. Word document hover panel
Note
Office Online Server must be installed and configured in your SharePoint environment for document previews to appear in the hover panel.
Items listed as search results are organized by relevance, which is a ranking given based on how well items seem to meet the query. Relevance rankings are based on a complex formula that includes factors such as property weighting, query authority, and freshness.
Refiners
Refiners are sets of filters found to the left of the search results. They can be used to further filter those results. Refiners are a set of defined attributes whose values are based on those found in the returned content. By default, the refinement panel allows filtering by result type, author, and date modified. This list, however, can be expanded or otherwise changed by having a SharePoint technical administrator configure additional refiners. Refiners can be text options that, when clicked, filter results, or they can be graphical tools that allow more advanced filtering. For example, the Modified Date refiner appears as a slider that lets you adjust the time frame by sliding a ruler within the graphic (see Figure 11-7).
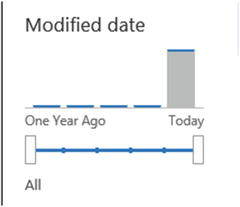
Figure 11-7. Modified Date refiner
Working with Search Centers
A standard search initiated in SharePoint from the standard search box (see Figure 11-1) is executed through the default search page, the OSSSearchResults.aspx page, or a search center. These search pages allow results to be displayed, refiners to be leveraged, and additional searches to be performed.
The standard SharePoint search results page provides a rich search query and results management interface incorporating the various search capabilities of SharePoint. However, should you want to extend these capabilities, you can access more advanced filtering or introduce a customizable search page to meet specific organizational needs. Search centers allow this sort of advanced search management. Two search center templates can be leveraged to create search center sites, which you can use as locations for routing and execution of searches.
Standard SharePoint Search Centers
By default, two search center templates are available: the basic search center and the enterprise search center. These templates are used to create search center sites configurable as primary search pages in a SharePoint environment.
Basic Search Centers
Basic search center sites provide an interface that lets standard searches be performed against the SharePoint search service, as shown in Figure 11-8.

Figure 11-8. Basic search center
A basic search center presents all of the search results and refiner details discussed earlier in this chapter and allows you to perform additional searches from the search center home page. Basic search center sites, however, do not include the ability to select different verticals over which to execute a search. They are designed to allow standard search execution and results management without advanced source filtering.
Enterprise Search Centers
Enterprise search center sites (see Figure 11-9) provide all of the capabilities of the basic search centers and also allow selection of available verticals that you can use for targeted searches.
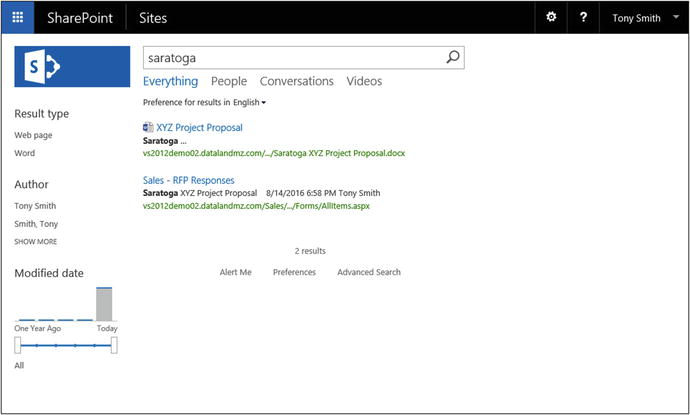
Figure 11-9. Enterprise search center
By default, the enterprise search center lets you perform searches over the following sources of content:
Everything: All content crawled by SharePoint
People: SharePoint users
Conversations: SharePoint social discussions
Videos: Video files
Reports: Report files; this option is not available by default but can be added by activating the necessary features
You can limit the executed query to the selected content, which brings you to a site’s search page used to perform queries and display results for the selected vertical.
Executing Advanced Searches
One benefit of using a search center instead of the default search page is that you can perform advanced searches. In a standard search in SharePoint, the text you enter is used to locate matching material based on the items’ content and associated properties. These searches look across all crawled elements to identify whether there is a match to the query details entered. Advanced searches allow you to more granularly specify search terms. You can locate entered text in specific columns, locate exact phrases, exclude items containing identified content, and limit results based on language.
To access the Advanced Search page in a search center site, select the Advanced link located at the bottom of the search center page. The Advanced Search page (see Figure 11-10) allows entry of specific search criteria to granularly target the search.
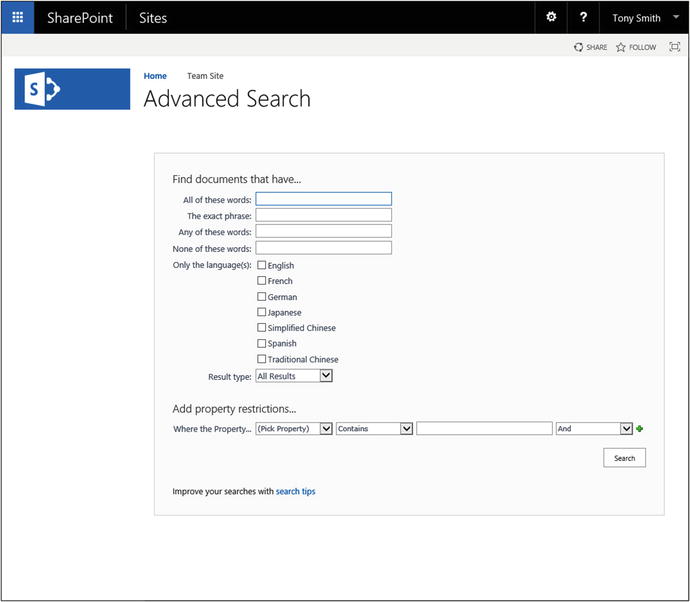
Figure 11-10. Advanced Search page
On the Advanced Search page, you can specify any combination of the following details to perform targeted searches against the content in your SharePoint environment:
All of these words: Specifies that items are returned only if they contain all words entered in the field.
The exact phrase: Specifies that items are returned only if they contain the exact phrase entered, not just the words included in the phrase.
Any of these words: Specifies that results are returned if they contain any items entered in this field.
None of these words: Specifies words that, when found, exclude an item from returned results.
Only the language(s): Limits returned items to those containing content only in the selected language or languages.
Result type: Limits returned items to a specifically selected type, such as a Word document or PowerPoint presentation.
Add property restrictions: Allows selection of specific item attributes on which to search for details. You can identify multiple properties and specify conditions for each property where results are to be returned. For example, select a Date field from the list of properties to specify that you want to locate items whose column value falls on or before an entered date .
Configuring the Site Collection to use a Search Center
When you configure a site collection to use a search center, you specify that searches performed in the site will be routed to the search center for execution instead of to the standard SharePoint search results page. To configure a site collection to use a search center, do the following:
Navigate to the root site in the site collection.
On the site’s home page, select the Site Settings option from the Settings menu.
On the Site Settings page, select the Search Settings option from the Site Collection Administration section.
On the Site Collection Administration Search Settings page (see Figure 11-11), do the following:

Figure 11-11. Site Collection Administration Search Settings page
In the Enter a Search Center URL section, enter the URL to the basic or enterprise search center to be used in performing searches in the site collection.
In the Which Search Results Page Should Queries Be Sent To section:
Specify whether the page is to use the same results page as the parent.
If you are not using the same results page, select whether to specify a results page. If you do, either select the page to use, or turn on the drop-down menu in the search box and use the first node as the results page.
Click the OK button.
The site collection is updated to use the search center specified, and you are returned to the Site Settings page.
Configuring a Site to use a Search Center
At times you might want to override the site collection search center settings for a specific site within the collection. This may happen if you are interested in leveraging a different view of the search page or a different search results layout when performing a search in a specific site. To update the search center settings for a specific site, do the following:
Navigate to the site where you want to configure the search center.
On the site’s home page, select the Site Settings option from the Settings menu.
On the Site Settings page, select the Search Settings option from the Search section.
On the Search Settings page, do the following:
In the Enter a Search Center URL section, enter the URL to the basic or enterprise search center to be used when searching in the site collection.
In the Which Search Results Page Should Queries Be Sent To section:
Specify whether the page is to use the same results page as the parent.
If you are not using the same results page, select whether to specify a results page. If you do, either select the page to use, or turn on the drop-down menu in the search box and use the first node as the results page.
In the Configure Search Navigation section, identify any links you want to list in the Quick Launch area of the search page. Do this by clicking the Add Link option and entering the following details:
Title for the link.
URL for the link. Specify whether to open it in a new window.
An optional description for the link.
Optional audience details. Specify target groups to make the link available to.
Click the OK button to save the link.
Click the OK button to save the search center settings details.
The site is updated to take advantage of the search center specified , and you are returned to the Site Settings page.
Crawling Capabilities
SharePoint crawling services can be configured to make content in SharePoint, Exchange, file shares, web sites, and databases available when searches are performed. The crawl capabilities of SharePoint differ depending on the version of SharePoint you have in your environment.
SharePoint Server Standard Search: SharePoint Server Standard provides enterprise content crawling capabilities that allow crawling of content in a variety of sources, including SharePoint, Exchange, file shares, and web sites. SharePoint Standard Search, however, cannot crawl database content.
SharePoint Server Enterprise Search: The search services of SharePoint Server Enterprise crawls the types of content SharePoint Server Standard search crawls as well as database content by means of Business Connectivity Services connections.
Defining content to be crawled and configuring the crawls’ properties, including their frequency, are managed by SharePoint technical administrators through the SharePoint Central Administration site. Some configurations however, can be made in site collections to identify elements to be included or excluded by the search services.
Managing Managed Properties
Crawled properties identify list and library properties to be crawled for inclusion in search. Executing a query searches for the query text across document content and all of the crawled properties. When columns are added to lists and libraries, they become, by default, crawled properties. Crawled properties can be extended by making them managed properties. Managed properties are list and library properties that can be specifically referenced by search queries when performing searches. This allows for searching only within a specific column.
For example, you would use managed properties if you manage documents related to a specific product. These documents may have a property, called Product, that identifies the product the document is associated with. Performing a general search across these product documents for those related to a specific product would return all documents that reference that product name in any way instead of limiting the search to only the items specifically identified as related to the product. For instance, several documents that contain footnotes may reference the product but in no other way relate to it. Since these footnote references exist, a search for the product name returns these items. If you specify that the Product property be configured as a managed property, the crawling service will know not only to index the fact that the product name was referenced as part of the document details but also to maintain the property and property value relationship. Specific searches can then be performed using the Product property and identifying the documents where the Product column contains the desired product name. The results you get are then limited to just those items specifically identified as related to the desired product.
Managed properties can be defined by IT technical administrators in the SharePoint Central Administration site to make them available in all site collections in a SharePoint environment. However, managed properties can also be created in a specific site collection for use only within that context.
Creating Site Collection Managed Properties
Creating site collection managed properties defines directly searchable properties in the site collection. Managed properties created at this level have some limitations compared to those created by SharePoint technical administrators in Central Administration. Limitations include the following:
Site collection level managed properties support only the creation of Text and Yes/No type properties. Other formats, including Integer, Decimal, Date and Time, Double Precision Float, and Binary, are not supported at this level.
Managed properties created at the site collection level cannot be made sortable or refinable.
Site collection level managed properties can be used only in the site collection they are created in.
To create a new site collection managed property , do the following:
Navigate to the root site in the site collection.
On the site’s home page, select the Site Settings option from the Settings menu.
On the Site Settings page, select the Search Schema option from the Site Collection Administration section.
On the Managed Properties page (see Figure 11-12), select the New Managed Property option.
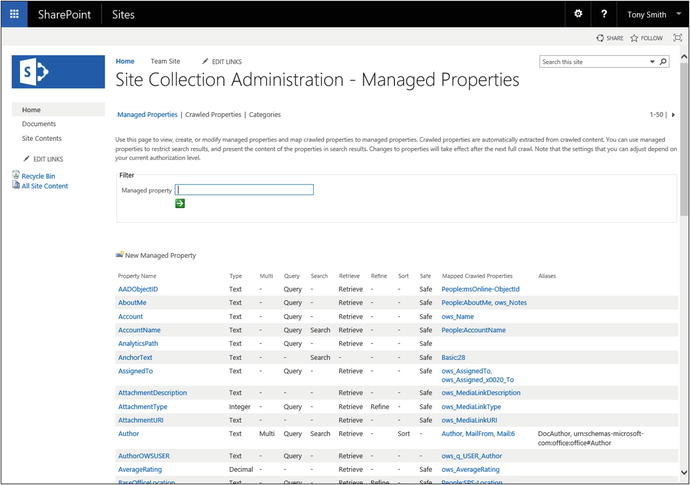
Figure 11-12. Managed Properties page
In the New Managed Property window , do the following:
In the Name and Description section, enter a name for the new managed property and an optional description.
In the Type section, select the type of information to be stored in this property, with options limited to Text and Yes/No.
In the Main Characteristics section, click the Searchable option to ensure the managed property can be used for searches.
In the Advanced Searchable Settings section, click the Advanced Searchable Settings button to open the Choose Advanced Searchable settings window.
In the Full-Text Index section, you can change the full-text index in which the column data are to be placed when crawled.
In the Weight Group section, you can identify the weight grouping in which the crawled details are to be placed.
Click the OK button to save the advanced searchable settings.
In the Queryable section, click the Queryable check box to allow search queries to run directly against this managed property.
In the Retrievable section, click the Retrievable check box to allow content return in search results.
In the Allow Multiple Values section, click the Allow Multiple Values check box to identify that the column can support multiple values.
In the Safe for Anonymous section, identify whether this managed property can be used when performing anonymous searches. This option is relevant only when anonymous access is configured in your site collection.
In the Alias section, enter an alias name to use when referencing the managed property if you want to manage the property by a name other than the defined managed property name itself.
In the Token Normalization section, leave the Token Normalization option checked.
In the Complete Matching section, check the Complete Matching option only if you want queries executed against the property to find the value if only the full value of the field is used. For example, if the property value is “butterfly” and the search is for “butter”, when the Complete Matching option is checked, the item is not returned.
In the Mappings to Crawled Properties section, click the Add a Mapping option. Then in the Crawled Property Selection window, search for and select the crawled property to connect to the managed property. Then click OK to save the association.
In the Company Name Extraction section, check the Company Extraction option if you want to scan the managed property for company names when it is crawled. If a company name is part of the value, search results can be filtered through refiners by this value.
In the Custom Entity Extraction section, specify whether to scan the managed property for any custom word or word part extractions to allow filtering through refiners by a custom refiner set. Select these options only if the custom extraction dictionaries are in use. Custom extraction dictionaries must be configured by a SharePoint technical administrator.
Click the OK button.
The new managed property is added. It becomes available upon completion of a full crawl of the content that uses the managed property.
Editing the Details of an Existing Managed Property
You can update the properties of an existing managed property in order to change the configuration of the item to meet the search needs of information contained within the corresponding crawled properties. To edit the details of an existing managed property, do the following:
Navigate to the root site in the site collection.
On the site’s home page, select the Site Settings option from the Settings menu.
On the Site Settings page, select the Search Schema option from the Site Collection Administration section.
On the Managed Properties page (see Figure 11-12), do the following:
Enter the name of the managed property to be edited and select the search icon.
In the Properties list, select the managed property to be edited.
On the Edit Managed Property page, do any of the following as necessary:
In the Alias section, edit or add an alias for the managed property.
In the Mappings to Crawled Properties section, add or remove associations with crawled properties.
In the Company Name Extraction section, update the company extraction option.
In the Custom Entity Extraction section, update the custom extraction option.
Click the OK button.
Changes made to the managed property are saved. The updates appear after the next full crawl of the lists and libraries using columns associated with this managed property.
Deleting Managed Properties
To remove managed properties from SharePoint, do the following:
Navigate to the root site in the site collection.
On the site’s home page, select the Site Settings option from the Settings menu.
On the Site Settings page, select the Search Schema option from the Site Collection Administration section.
On the Managed Properties page, do the following:
Enter the name of the managed property to be deleted, and select the search icon.
In the Properties list select the Delete option from the item’s context menu.
In the deletion confirmation window, click the OK button.
The managed property is removed from the site collection.
Reindexing a List or Library
At times you might want to have the SharePoint crawling services recrawl the content throughout the environment or in a specific list or library—for example, when you remove a large number of documents from a library or move a large number of documents to a new location. You need to reindex the content for such changes to be reflected.
Reindexing of your entire environment must be done by a SharePoint technical administrator. However, a specific list or library can be flagged for reindexing when the next scheduled crawl is run in the list or library itself. To flag a list or library for reindexing during the next scheduled crawl, do the following:
Navigate to the list or library you want reindexed.
On the list or library view page, select the List or Library Settings option from the List or Library ribbon tab.
On the Settings page, select the Advanced Settings option from the General Settings section.
On the Advanced Settings page in the Reindex List or Reindex Document Library section, click the Reindex List or Document Library button.
In the Reindex List or Reindex Document Library window, click the Reindex List or Reindex Document Library button.
The list or library is flagged to be reindexed, and you are returned to the Advanced Settings page.
Excluding Sites from Search
If you specify that a site is not included in search results, content in the identified site will be excluded from the content crawl, and this content will not appear in search results. This is done as follows:
Navigate to the site you want to exclude from the search.
On the site’s home page, select the Site Settings option from the Settings menu.
On the Site Settings menu, select the Search and Offline Availability option from the Search section.
On the Search and Offline Availability page, select No for the Allow This Site to Appear in Search Results? option and click the OK button.
The site is excluded from search, and its contained content is not listed in search results.
Excluding a List or Library from Search
You can configure a specific list or library to be excluded from search. You would do this to limit the exposure of the content in the list or library by making it available only to users browsing to it directly. When you exclude a list or library from search, the rest of the site’s content continues to participate in search results. Only the selected list or library is excluded. To exclude a list or library from search, do the following:
Navigate to the list or library that you want to exclude from search.
On the list or library view page, select the List or Library Settings option from the List or Library ribbon tab.
On the Settings page, select the Advanced Settings option from the General Settings section.
On the Advanced Settings page in the Search section, select No for the Allow Items from this List or Document Library to Appear in Search Results? option and click the OK button.
The list or library is excluded from search and you are returned to the Settings page.
Excluding List or Library Columns from Search
At times you will want to keep content of a list or library available through search but not want it to crawl all of the list or library columns. You might, for example, have a Notes column where general comments about an item are placed. If crawled, the column’s contents would dilute a search’s effectiveness. You want Notes left uncrawled so its content does not influence search results. To exclude a column from search, do the following:
Navigate to the site where the column is to be excluded from search.
On the site’s home page, select the Site Settings option from the Settings menu.
On the Site Settings page, click the Searchable Columns link in the Search section.
On the Searchable Columns page, check the check box for the column to be excluded from search and click the OK button.
The selected column is excluded from search, and you are returned to the Site Settings page.
SharePoint Query Capabilities
The query capabilities of SharePoint define services and features related to performing search requests. Search requests identify criteria used to locate content crawled by the SharePoint search services. SharePoint 2016 provides several configurable options that can be tailored to align the environment’s query capabilities with your information searching needs.
Managing Query Rules
One of the most powerful tools available for configuring search queries are query rules. Query rules allow you to define conditions that, when met as part of entered search criteria, make a corresponding action occur. These actions help improve search relevance by refining details returned in specific scenarios. For example, if you expect people in the organization to search for videos, and you want to ensure that a search performed with the word “video” returns video files, a query rule can be used to specify that the use of the word “video” indicates that specific types of files, such as .wmv or .mp4 files, are to be located instead of simply any items that contain the word “video”.
Adding Query Rules
When a SharePoint technical administrator creates query rules in SharePoint Central Administration, you can use them across your SharePoint environment. Creating a query rule in a site collection or site limits the rule’s impact to that specific site collection or site. To create a site collection query rule, do the following:
Navigate to the root site in the site collection where you want to create a new query rule.
On the site’s home page, select the Site Settings option from the Settings menu.
On the Site Settings page, select the Search Query Rules option from the Site Collection Administration section.
On the Manage Query Rules page. do the following:
In the For What Context Do You Want To Configure Rules? section, identify the context in which to apply the new query rule. The context information that can be selected includes the following:
Result Sources: Identifies the type of result the query rule is based on.
User Segment: Defaults to All User Segment. This option lets you limit the query rule’s application to a specific user segment.
Topic Categories: Defaults to All Topic Categories. Lets you select specific topic categories to limit the rule to.
In the New Query Rule section, click the New Query Rule link to open the Add Query Rule page.
On the Add Query Rule page, do the following:
In the General Information section, enter a name for the new query rule.
Optionally expand the Context section, and do the following:
For Sources, specify whether to expand the query rule to include all sources, or click the Add Sources link and pick an additional source for the rule to act upon. Save this source to add it to the sources list.
For Categories, choose whether to use the query rule on all categories or on select categories. If you click Add Categories to open the Categories Search, you can search for and select term store categories and save these to the list of categories that the query rule is to be associated with.
For User Segments, decide whether to use all user segments, or select the Add User Segment option to add user segments and user segment terms to be leveraged as part of the query rule.
In the Query Conditions section , identify the condition in which to invoke the query rule and the condition values. Add more conditions by selecting the Add Alternate Condition link, and then enter the additional conditions and condition values.
In the Actions section, do the following:
To add a Promoted Result, click the Add Promoted Result link. On the Add Promoted Result page, specify the title and URL for the promoted result and whether it is to appear as a banner or hyperlink. Optionally add a description for the items.
To add Result Blocks, click the Add Result Blocks link. In the Add Result Block window, do the following:
In the Block Title section, enter a value for the title of the result block.
In the Query section, identify the query and source details on which to base the result block.
Optionally expand the Settings section, and specify whether to list a More link and, if you do, what URL the link is to navigate to. Also in this section, you can update whether to show the result block above other core results or rank it within the results. Finally, you can identify templates for display of the group and items within the group.
Optionally expand the Routing section to specify a URL to use for routing to a Content Search web part.
Click the OK button.
Select the Change Ranked Results by Changing the Query option to build a query and specify a sort order to use to locate items for the result block.
Optionally expand the Publishing section to specify whether the rule is active and has a start and end date when it is active. Also, identify whether the rule needs to be reviewed and, if it does, by whom.
Click the Save button to save the new rule.
The query rule is saved, and you are returned to the Manage Query Rules page. This query rule will influence searches performed throughout your site collection.
As mentioned earlier, you can create query rules that impact only a specific site. Do this when you want to create a specialized rule, one relevant only within a specific location in your site collection. To create a query rule scoped to a specific site, do the following:
Navigate to the site in which the query rule is to be created.
On the site’s home page, select the Site Settings option from the Settings menu.
On the Site Settings page, select the Query Rules option from the Search section.
On the Manage Query Rules page, do the following:
Identify the context in which you want to configure rules by selecting a Result Source and, optionally, a specific user segment and topic category. Doing this will show a list of query rules filtered by the selected items.
Click the New Query Rule link to open the Add Query Rule page.
On the Add Query Rule page, do the following:
In the General Information section, enter a name for the new query rule.
Optionally expand the Context section, and do the following:
For Sources, identify whether to expand the query rule to include all sources, or click the Add Sources link and then pick an additional source for the rule to act upon. Save this source to add it to the sources list.
For Categories, decide whether to use the query rule on all categories or on select categories. If you click Add Categories to open the Categories Search, you can search for and select term store categories and save these to the list of categories that the query rule is to be associated with.
For User Segments, decide whether to use all user segments, or select the Add User Segment option to add user segments and user segment terms to be leveraged as part of the query rule.
In the Query Conditions section, identify the condition in which to invoke the query rule and the condition values. Add more conditions by selecting the Add Alternate Condition link, and then enter the additional conditions and condition values.
In the Actions section, do the following:
To add a Promoted Result, click the Add Promoted Result link. On the Add Promoted Result page, specify the title and URL for the promoted result and whether it is to appear as a banner or hyperlink. Optionally add a description for the items.
To add Result Blocks, click the Add Result Block link. In the Add Result Block window, do the following:
In the Block Title section, enter a value for the title of the result block.
In the Query section, identify the query and source details on which to base the result block.
Optionally expand the Settings section, and specify whether to list a More link and, if you do, what URL the link is to navigate to. Also in this section, you can update whether to show the result block above other core results or rank it within the results. Finally, you can identify templates for display of the group and items within the group.
Optionally expand the Routing section to identify a URL to use for routing to a Content Search web part.
Click the OK button.
Select the Change Ranked Results by Changing the Query option to build a query and specify a sort order to use to locate items for the result block.
Optionally expand the Publishing section to specify whether the rule is active and has a start and end date within which it will be active. Also, identify whether the rule needs to be reviewed and, if it does, by whom.
Click the Save button to save the new rule .
The rule is saved and is ready to be used in queries performed in the site.
Editing Query Rules
You can edit query rules created at the site collection and site levels to tailor their impact on searches. To edit an existing query rule, do the following:
Navigate to the site collection’s root site to edit a site collection query rule or to the associated site to edit a site query rule.
On the site’s home page, select the Site Settings option on the Settings menu.
On the Site Settings page, select the Search Query Rules option from the Site Collection Administration section to edit a site collection query rule, or select the Query Rules option from the Search section to edit a site-level query rule.
On the Manage Query Rules page, do the following:
Select the Result Source for which to show query rules, and optionally identify a User Segment and Type Category by which to filter the rule context to be displayed.
Select the Edit option from the query rule’s context menu.
On the Edit Query Rules page, update any of the listed query rule details. Once complete, click the Save Button.
The updates to the query rule are applied, and you are returned to the Manage Query Rules page.
Deleting Query Rules
To delete an existing query rule, do the following:
Navigate to the site collection’s root site to edit a site collection query rule or to the associated site to edit a site query rule.
On the site’s home page, select the Site Settings option on the Settings menu.
On the Site Settings page, select the Search Query Rules option from the Site Collection Administration section to edit a site collection query rule, or select the Query Rules option from the Search section to edit a site-level query rule.
On the Manage Query Rules page, do the following:
Select the Result Source for which to show query rules, and optionally identify a User Segment and Type Category by which to filter the rule context to be displayed.
Select the Delete option from the Query rules context menu.
In the deletion confirmation window, click the OK button.
The query rule is removed. It will no longer influence search queries.
Search Result Capabilities
Search results in SharePoint 2016 are designed to provide highly relevant details for search queries. Search results are configured to be easy to work with and to let you easily identify materials meeting your specific needs. SharePoint has several capabilities for organizing search results and presenting them to users. This section discusses those capabilities and how to manage them.
Managing Result Sources
Result sources identify the set of materials a search query will run through to locate content. Your SharePoint environment can include multiple result sources, some within SharePoint and others outside it. The following details are used to define query rules :
The source location for the materials to be searched.
The protocol, such as OpenSearch, to be used to retrieve results.
Any narrowing conditions, such as limiting items to a specific type of file or content type.
There are several default result sources available in SharePoint 2016, including the items listed in Table 11-1.
Table 11-1. Result Sources
Result Source | Description |
|---|---|
Conversations | Content in microblogs, newsfeeds, and community sites |
Documents | Microsoft Office and PDF documents |
Items Matching a Content Type | Items of the same content type as that specified in the performed query |
Items Matching a Tag | Items that match a term specified by the incoming query |
Items Related to Current User | Items related to the user performing the query |
Items with Same Keyword as this Item | Items having the same keyword details as those specified by the query |
Local People Results | People included in the profile database for the local profile service |
Local Reports and Data Results | Excel documents, Office Data Connections, Report Definition Language items, and items in report libraries |
Local SharePoint Results | All items in the local SharePoint search index with the exception of people |
Local Video Results | Video files, including .wmv, .avi, .mpg, .asf, .mp4, .ogg, .ogv, and .webm files |
Pages | SharePoint web pages |
Pictures | Image files |
Popular | Documents and list items sorted with the most viewed items at the top |
Recently Changed Items | Documents and list items sorted with the most current items at the top |
Recommended Items | Documents and list items that were recommended for the query performed |
Wiki | SharePoint wiki pages |
Result sources, like query rules , can be created at three levels in SharePoint:
Centrally, for use in the entire SharePoint environment by SharePoint technical administrators using the SharePoint Central Administration site.
Within a site collection, for use in an entire site collection.
Within a specific site, for use only in that site.
Creating a Site Collection Result Source
Site collection administrators can create result sources in their site collections. You might do this if you have searches you want to perform only for audio files or a specific type of Microsoft Office document. To create a result source for a site collection, do the following:
Navigate to the root site in the site collection.
On the site’s home page, select the Site Settings option from the Settings menu.
On the Site Settings Page, select the Search Result Sources option from the Site Collection Administration section.
On the Manage Result Sources page, select the New Result Source option.
On the Add Result Source page, do the following:
In the General Information section, enter a name for the new result source and an optional description.
In the Protocol section, identify the protocol to use to connect to the result source. There are several options.
Local SharePoint: Indexed items managed by the local SharePoint environment.
Remote SharePoint: Indexed items managed by a different SharePoint environment.
OpenSearch 1.0/1.1: Non-SharePoint items indexed by a system or service supporting the OpenSearch protocol.
Exchange: Exchange server-based content.
In the Type section, decide whether to run the search across the entire SharePoint index or only across people profiles.
In the Query Transform section, identify the search terms used to limit results for the result source.
In the Credentials Information section, specify whether the result source is to use default SharePoint authentication credentials or a specified username and password.
Click the Save button to save the new result source.
The result source is saved, and you are returned to the Manage Result Sources page. When creating result sources there are times when the new source you want to create is very similar to an existing result source. When this is the case, you can start creating a new result source by copying an existing one. This is done as follows:
Navigate to the root site in the site collection.
On the site’s home page, select the Site Settings option from the Settings menu.
On the Site Settings Page, select the Search Result Sources option from the Site Collection Administration section.
On the Manage Result Sources page, select the Copy option from the result source context menu (see Figure 11-13).
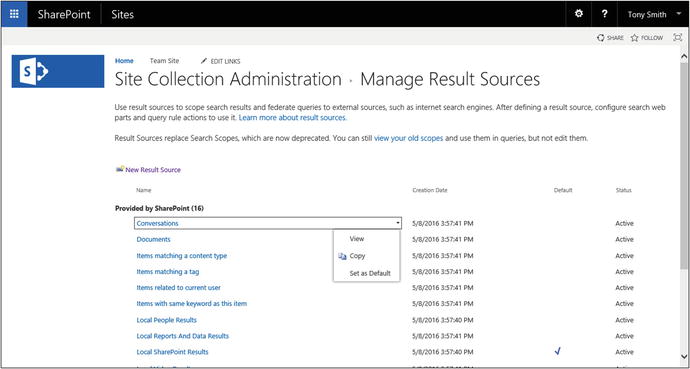
Figure 11-13. Result source context menu
On the Add Result Source page, do the following:
Change the name for the new result source, and add an optional description.
Update the details as appropriate in the Protocol, Type, Query Transform, and Credentials sections.
Click the Save button.
The new result source is created. You are returned to the Manage Result Sources pageCreating Site Result Sources
You can create result sources that are available only in a specific site in your site collection . You would create a site-level result source when you need a tailored source within a site, one that will not be used elsewhere. To create a new site-level result source, do the following:
Navigate to the site where you want to create the new result source.
On the site’s home page, select the Site Settings option from the Settings menu.
On the Site Settings page, select the Result Sources option from the Search section.
On the Manage Result Sources page, select the New Result Source option.
On the Add Result Source page, do the following:
In the General Information section, enter the name for the new result source and an optional description.
In the Protocol section, identify the protocol to use to connect to the result source. There are several options.
Local SharePoint: Indexed items managed by the local SharePoint environment.
Remote SharePoint: Indexed items managed by a different SharePoint environment.
OpenSearch 1.0/1.1: Non-SharePoint items indexed by a system or service supporting the OpenSearch protocol.
Exchange: Exchange server-based content.
In the Type section, decide whether to run the search across the entire SharePoint index or only across people profiles.
In the Query Transform section, identify the search terms used to limit results for the result source.
In the Credentials Information section, specify whether the result source is to use default SharePoint authentication credentials or a specified username and password.
Click the Save button to save the new result source.
The new result source is created within the site, and you are returned to the Manage Result Sources page.
As with site collection result sources , you can create site result sources as copies of existing result sources. This is done as follows:
Navigate to the site where you want to create the new result source.
On the site’s home page, select the Site Settings option from the Settings menu.
On the Site Settings Page, select the Result Sources option from the Search section.
On the Manage Result Sources page, select the Copy option from the result source context menu.
On the Add Result Source page, do the following:
Change the name for the new result source, and add an optional description.
Update the details as appropriate in the Protocol, Type, Query Transform, and Credentials sections.
Click the Save button.
The new result source is created in the site. You are returned to the Manage Result Sources page.
Editing Existing Result Sources
You can edit site collection and site-level result sources as needed to update their details. You can edit only the custom result sources that were created within your site collection or sites, not the default ones. To edit an existing site collection or site level result source, do the following:
Navigate to the site collection’s root site to edit a site collection result source or to the site containing the site-level result source you want to edit.
On the site’s home page, select the Site Settings option from the Settings menu.
On the Site Settings page, select the Search Result Sources option from the Site Collection Administration section to edit a site collection result source, or select the Result Sources link from the Search section to edit a site-level result source.
On the Manage Result Sources page, select the Edit option from the result source item’s context menu.
On the Edit Result Source page, update the details for the result source as necessary, and click the Save button.
Updates to the result source are saved, and you are returned to the Manage Result Sources page.
Deleting Result Sources
If necessary, you can delete a result source created in your site collection or in a site within your site collection. To delete a site collection or site-level result source, do the following:
Navigate to the site collection’s root site to edit a site collection result source or to the site containing the site-level result source you want to edit.
On the site’s home page, select the Site Settings option from the Settings menu.
On the Site Settings page, select the Search Result Sources option from the Site Collection Administration section to edit a site collection result source, or select the Result Sources link from the Search section to edit a site-level result source.
On the Manage Result Sources page, select the Delete option from the context menu of the result source.
In the deletion confirmation window, click the OK button.
The result source is deleted, and you are returned to the Manage Result Sources page.
Managing Result Types
Result types are rule sets that identify which display template to use when search results are presented. Each type of item returned in a search result (such as Word Documents, PDF files, videos, and so on) has its own display template, used to identify the layout of the item’s details when they appear in search results This includes the hover panel details displayed when a mouse hovers over an item in the search results page. As with result sources, result types can be created in any of the following levels in SharePoint:
Within the SharePoint Central Administration environment, by a SharePoint technical administrator for use across the entire SharePoint environment.
Within a site collection, making it available in searches performed across the site collection.
Within a site, making it available only in the specific site.
Creating Site Collection Result Types
To create a result type available in your entire site collection, do the following:
Navigate to the root site in your site collection.
On the site’s home page, select the Site Settings option from the Settings menu.
On the Site Settings page, select the Search Result Types option from the Site Collection Administration section.
On the Manage Result Types page, click the New Result Type option.
On the Add Result Type page, do the following:
In the General Information section, enter a name for the result type.
In the Conditions section, identify the result source to use as the base of the result type and the type of files to apply the result type to.
In the Actions section, select the display template to use for the presentation of the result type, and specify whether to optimize the template for frequent use.
Click the Save button.
The new result type is created and made available in the site collection. You are returned to the Manage Result Types page.
To create a new result type by copying an existing result type, do as follows:
Navigate to the root site in your site collection.
On the site’s home page, select the Site Settings option from the Settings menu.
On the Site Settings page, select the Search Result Types option from the Site Collection Administration section.
On the Manage Result Types page, select the Copy option from the context menu of the result type.
On the Add Result Type page, do the following:
In the General Information section, update the name for the result type.
In the Conditions and Actions sections, update details as necessary.
Click the Save button to save the new result type.
The result type Result Types is saved for use in the site collection, and you are returned to the Manage Result Types page.
Creating Site-Level Result Types
Creating result types at the site level confines their impact to the results display for the site where you create them. Doing this allows you to tailor result displays to specific site needs. To create a site-level result type, do as follows:
Navigate to the site where you want to create the result type.
On the site’s home page, select the Site Settings option from the Settings menu.
On the Site Settings page, select the Result Types option from the Search section.
On the Manage Result Types page, select the New Result Type option.
On the Add Result Type page, do the following:
In the General Information section, enter a name for the result type.
In the Conditions section, identify the result source to use as the base of the result type and the type of file to apply the result type to.
In the Actions section, select the display template to use or the presentation of the result type, and specify whether to optimize the template for frequent use.
Click the Save button to save the new result type.
The result type is created, and you are returned to the Manage Result Types page.
As with site collection result types, you can create a site-level result type as a copy of an existing result type. This is done as follows:
Navigate to the site where you want to create the result type.
On the site’s home page, select the Site Settings option from the Settings menu.
On the Site Settings page, select the Result Types option from the Search section.
On the Manage Result Types page, select the Copy option from the context menu of the result type.
On the Add Result Type , page do the following:
In the General Information section, update the name for the result type.
In the Conditions and Actions sections, update details as necessary.
Click the Save button to save the new result type.
The result type is created, and you are returned to the Manage Result Types page.
Editing Result Types
Result types created in a site collection or site can be edited as needed to adjust the result type. To edit an existing result type, do as follows:
Navigate to the site collection’s root site to edit a site collection result type or to the site containing the site-level result type you want to edit.
On the site’s home page, select the Site Settings option from the Settings menu.
On the Site Settings page, select the Search Result Types option from the Site Collection Administration section to edit a site collection result source, or select the Result Types link from the Search section to edit a site-level result source.
On the Manage Result Types page, select the Edit option from the context menu of the result type to be edited.
On the Edit Result Type page, update the details as needed and click the Save button to save the changes.
The changes to the result type are saved, and you are returned to the Manage Result Types page.
Deleting Result Types
If you need to, you can delete a result type created in a site collection or a specific site. To delete a result type from a site collection or site, do the following:
Navigate to the site collection’s root site to edit a site collection result type or to the site containing the site-level result type you want to edit.
On the site’s home page, select the Site Settings option from the Settings menu.
On the Site Settings page, select the Search Result Types option from the Site Collection Administration section to edit a site collection result source, or select the Result Types link from the Search section to edit a site-level result source.
On the Manage Result Types page, select the Delete option from the context menu of the result type to delete it.
In the delete confirmation window, click the OK button.
The result type is deleted , and you are returned to the Manage Result Types page .
Exporting and Importing Search Configurations
You have seen how to manage the various aspects of search at a site-collection level as well as at a site level. Once you have configured search the way that you want, you may decide that the configuration is appropriate for another site collection or site in your environment. In SharePoint 2016, you can export customized search configurations and then import them into other site collections and sites to replicate a search configuration you created. The export and import process includes all of the settings configured for query rules, result sources, result types, ranking models, and general site search settings.
Exporting and Importing Site Collection Search Configurations
To export the search configuration of a site collection, do the following:
Navigate to the root site of the site collection containing the configuration to be exported.
On the site’s home page, select the Site Settings option from the Settings menu.
On the Site Settings page, select the Search Configuration Export option from the Site Collection Administration section.
In the Do You Want to Save the SearchConfiguration.xml File message, select the Save option and identify the save location.
The site collection search configuration is saved to the SearchConfiguration.xml file, which can then be used to import the saved search configuration into another site collection. This is done as follows:
Navigate to the root site of the site collection containing the configuration to be imported.
On the site’s home page, select the Site Settings option from the Settings menu.
On the Site Settings page, select the Search Configuration Import option from the Site Collection Administration section.
On the Import Search Configuration page, select the SearchConfiguration.xml file to import and click the Import button.
The search configuration is imported into the site collection, and you are taken to the Search Config List page showing the status of the import .
Exporting and Importing Site Search Configurations
As with site collection search configurations, site-level search configurations can also be exported and then imported into another site to replicate a created search configuration elsewhere in the environment. To export a site-level search configuration, do the following:
Navigate to the site containing the search configuration to export.
On the site’s home page, select the Site Settings option from the Settings menu.
On the Site Settings page, select the Configuration Export option from the Search section.
In the Do You Want to Save the SearchConfiguration.xml File message, select the Save option and identify the save location.
The SearchConfiguration.xml export file is saved to the identified location. You can then use this file to import the search configuration into another site by doing the following:
Navigate to the site containing the search configuration to import.
On the site’s home page, select the Site Settings option from the Settings menu.
On the Site Settings page, select the Configuration Import option from the Search section.
On the Import Search Configuration page, select the SearchConfiguration.xml file to import and click the Import button.
The search configuration is imported into the site, and you are taken to the Search Config List page showing the status of the import.
Using Search with Web Parts
SharePoint has several web parts that leverage search services to present information in site pages. These web parts offer an alternative approach to use crawled content. They also provide ways to show content roll-ups collecting details throughout the environment, using a method that has no negative impact on the performance of the environment.
Content Search Web Part
The most versatile SharePoint search web part is the Content Search web part. It can be configured to present various types of content. This web part is only available in SharePoint Server Enterprise.
The content and layout of the information presented in the Content Search web part is dictated by the web part’s configuration, which is managed through its properties. To configure a Content Search web part, add it to the appropriate page using the Add Web Parts options (the web part is located in the Content Roll-Up category). Then edit the web part properties (adding web parts to pages and configuring them is discussed in Chapter 4). On the web part properties page, do the following:
In the Search Criteria Section:
Click the Change Query button to define the query on which the search results presented is to be based. Do so as follows:
On the Basics tab:
In the Select a Query section, identify the result source to use as the basis for the query.
In the Restrict by App section, specify whether to scope the search to include only items in a certain location.
In the Restrict by Tag section, specify whether to restrict results by tags associated with the content.
On the Refiners tab, select refiner values to further limit search results presented and click the Add button to add any refiners to the Selected Refiners list.
On the Settings tab:
In the Query Rules section, identify whether to make results listed in the search web part subject to any defined query rules.
In the URL Rewriting section, identify whether items returned from a catalog are to use the catalog’s URL settings.
In the Loading Behavior section, specify whether to execute the query synchronously, from the server, or asynchronously, from the client. Running the query synchronously prevents the page from loading until the query is executed and results can be listed in the page. Running the query asynchronously allows the page itself to load more quickly as it loads separately from the query being executed and the results presented in the web part.
In the Priority section, identify the priority level of the query’s execution within the search service. This establishes an order of execution in the event that the search service is overloaded and multiple queries are queued for execution.
In the Caching section, identify the caching model. You can choose to do no caching, cache for all users, or for a specific group.
On the Test tab, run the defined query to view the results that will be returned.
Click the OK button.
Identify the maximum number of results to show in the web part.
In the Display Templates section ,
Identify the layout for the web part. Choose whether to show items as a list, as a list that allows paging, or in a slideshow format.
Select the item display format identifying the layout of individual items in the web part. There are several display format options.
Diagnostics: Shows the link and managed property details for the listed items.
Large Picture: Represents each item using a single preview image associated with the item.
Picture on Left, 3 Lines on Right: Lists a preview image with the item’s details to the right of the image.
Picture on Top, 3 Lines on Bottom: Shows the preview image appears with the item’s details below the image.
Recommended Items: Picture on Left, 3 Lines on Right: Has the same layout as the Picture on Left, 3 Lines on Right format but shows the recommended items from the query.
Two Lines: Lists each item’s properties.
Video: Provides a video player thumbnail for each item. If it is a video, details are shown below the player.
Specify whether to display anything in the web part if no results are returned.
In the Property Mappings section, identify whether to map the properties used in the display template to the default item properties for those elements or to other item properties. You can remap the Picture URL, Link URL, Line 1, Line 2, and Line 3.
In the Settings section :
Identify whether displayed query results are to be provided by the web part itself or by some other web part on the page.
Identify the results table to be used when identifying results, with options including PersonalFavoriteResults, RefinementResults, RelevantResults, and SpecialTermResults.
Identify the first result to display from the results list.
Optionally identify an alternative error message to be displayed if the web part generates an error.
Click the OK button in the web part properties.
The web part properties are saved, and the web part is updated to reflect the new configuration.
Other Search Web Parts
Besides the Content Search web part, there are several other standard SharePoint web parts that take advantage of the search service to display content. Because the components that make up the standard search pages are web parts that are also available within the web part listing and that can be added to and configured in other pages, you can create your own specialized search pages. You can find these web parts in the Search category when you add web parts to a page (adding web parts to pages is discussed in detail in Chapter 4). These web parts include the following:
Search Box: Shows a standard SharePoint search box, such as may be seen in the standard SharePoint search page.
Search Results: Lists search results based on an executed search query.
Refinement: Lists the refinement panel, which allows filtering of listed search results.
Search Navigation: Lists search verticals, which can be used to scope the search query being performed.
Taxonomy RefinementPanel: Lists refiners based on term set data. Refiners can be used to filter listed search results.
Along with the standard search component web parts that you can use to construct your own search pages, there is a second set of web parts that take advantage of the search services to display specific content within SharePoint pages. These web parts, available in the Search-Driven Content category, include the following:
Catalog-Item Reuse: Displays items contained in a catalog.
Items Matching a Tag: Lists items tagged with a specific term.
Pages: Lists items based on the Pages content type.
Pictures: Lists items based on the Picture or Image content types
Popular Items: Displays items identified as most popular—that is, those defined as items viewed by the most people.
Recently Changed Items: Lists items most recently modified .
Recommended Items: Lists recommended content based on content recommendation rules.
Videos: Lists items based on the Video content type .
Web Pages: Displays items based on the Pages content type.
Wiki Pages: Lists items based on the Wiki Page content type.
Summary
In this chapter, we focused our discussion on the SharePoint Search capabilities. We demonstrated how to perform basic and advanced searches and reviewed the layout and capabilities available within the search results. We then discussed how to configure search capabilities such as managed properties, query rules, result blocks, and result sources. We also described how to exclude sites, lists, libraries, and columns from search. Finally, we looked at web parts that take advantage of search.
In the next chapter, we will discuss the personalization and social features available in SharePoint such as the SharePoint profile, alerting, newsfeeds, and following content.