
SharePoint has a set of services that expand the capabilities of Microsoft Office and extend these personal productivity tools to enhance team productivity. The following enterprise office services in SharePoint enhance Word, Excel, PowerPoint, OneNote, InfoPath, and Visio.
Office Online Server: Web-based version of Word, Excel, PowerPoint, and OneNote allowing for web-based management of Office files providing document view and edit capabilities without Office being locally installed.
Form Services: Publishes InfoPath forms rendering them as web forms that can be populated without r InfoPath being installed.
Visio Services: Allows Visio diagrams to be accessed via the browser for viewing and commenting without Visio being installed.
All of these enterprise office services are designed to expand the capabilities of Microsoft Office. Making Office resources available through the web browser extends their reach and availability without the need to manage the programs. In this chapter each of these services is discussed, and how they are configured and used is described.
Office Online Server
Office Online Server is the most recent release of the web-based versions of Microsoft Word, Excel, PowerPoint, and OneNote. The previous version of this product was called Office Web Apps. Office Online Server is installed separately from core SharePoint services but is then leveraged by SharePoint to allow web-based editing and viewing of Office files. There are three common scenarios in which Office Online Server provides significant value.
When you need to work with Microsoft Office documents on a device that does not have Microsoft Office installed. While this may be uncommon on standard workstations, it is often the case on alternative devices, such as tablets.
When you need to take advantage of simultaneous document editing.
When you want document previews available when searching for or browsing Microsoft Office documents.
Note
To take advantage of Office Online Server, the services must be deployed and configured by a SharePoint technical administrator.
While the Office Online Server version of Office applications allows editing of Office documents, its functionality has limitations, the most notable of which are the following:
Word
Encrypted documents cannot be opened.
No auto save feature.
Document styles cannot be modified.
No find and replace functionality.
No zoom in Edit view.
Page layout, margins, and orientation cannot be changed.
Themes and backgrounds cannot be edited.
Grammar check is not available.
Track changes cannot be turned on or off.
Table styling is not available.
Picture cropping is not available.
WordArt cannot be edited.
Excel
Workbooks that use data validation cannot be edited.
Protected workbooks cannot be opened.
Some functions work differently, including
Info: Returns an error.
Now: Returns date and time on the server.
Today: Returns date and time on the server.
Changes made to the file are saved automatically.
PowerPoint
Password protected files cannot be opened.
Changes are saved automatically.
No find and replace functionality.
Cannot change slide master or modify slide layouts.
Cannot edit tables.
Cannot insert charts, equations, WordArt, or symbols.
Cannot manage headers or footers.
OneNote
Command for creating empty space on a page is not available.
Rule lines are not displayed.
Cannot mark notes as read or unread.
No command to insert current date and time.
Cannot link notes.
Opening Files in Office Online Server
When Office Online Server is available in SharePoint you can choose whether to open a Word, Excel, PowerPoint, or OneNote file in the associated Microsoft Office program or in the browser. To open a document in Office Online server, do the following:
Navigate to the library containing the document to be opened.
Select the Open in Word Online, Excel Online, PowerPoint Online, or OneNote Online option from the hover panel menu (see Figure 14-1).
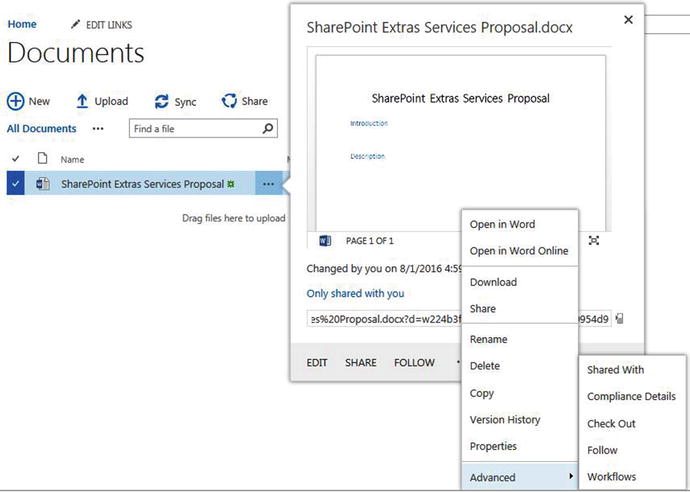
Figure 14-1. Document hover panel menu
The document opens in the web version of the Office program. Web-based versions of Word, Excel, PowerPoint, and OneNote look much like the full versions (see Figure 14-2).

Figure 14-2. Word online
While working with documents in the Online version of the Office program, you can work with and make changes to documents as needed. Select the Open In option on the ribbon tab row to open the file in the local version of the associated program when it is loaded on a local computer.
Managing Default Open Behavior
While site users can open a file in the online version of the Office program, a manager of a library can set the default behavior of a library when opening. You can choose to either open the file in the online or local versions of Office. To set the default document opening behavior for Office files, do the following:
Navigate to the library where you want to set the default opening behavior.
On the library view page, select the Library Settings option from the Library ribbon tab.
On the Settings page, select the Advanced Settings option from the General Settings section.
On the Advanced Settings page in the Opening Documents in the Browser section, set the Default Open Behavior for Browser-Enabled Documents as needed:
Select Open in Client Application to open the files in the local Office version.
Select Open in the Browser to open the file in the Online version of the program.
Select Use the Server Default option to inherit the open behavior from the site collection settings.
The document library will be configured so that when the Edit option is selected, the document will be opened using the selected approach.
Publishing Excel Elements
Previous versions of SharePoint included a service called Excel Services . Excel Services allowed for Excel components to be published for display within SharePoint using Excel Services web parts in SharePoint pages. In SharePoint 2016, Excel Services has been removed but the capabilities provided have been incorporated into Office Online Server. With Office Online Server in place, Excel documents can be published in whole or in part for sharing within SharePoint site pages. You can publish the following elements of an Excel document:
An entire Excel workbook
A sheet within an Excel workbook
A specific object within a sheet, such as a PivotTable or pie chart
A named range of cells in a sheet
While these capabilities do not allow editing of cells in published views, you can configure named cells to be updated through parameters added to the Excel Services view or passed into the Excel Services views.
Creating Named Cells for Parameters
When Excel elements are published, such as, charts or calculations that require input from the user viewing the item or input passed in via a filter or connected web part, the Excel document must be configured to allow parameter management. To add named cells to support parameters in either Excel 2013 or Excel 2016, do as follows:
Open the document in Microsoft Excel.
In Excel, highlight the cell to be updated by the parameter.
Type a name for the cell in the Name box to the left of the formula bar.
With the cell named, it can be configured to have values passed in via a parameter.
Creating a Named Range
As just mentioned, named ranges in Excel can be published. You can publish a select group of cells in a sheet without having to show the entire sheet or workbook. Create a named range by highlighting the cells to be included, and then type a name for the range in the Name box.
Publishing an Excel Sheet
Once the content to be published is configured and parameter names and named ranges are added, you can publish it to Excel Services. The approach for publishing content from Excel 2016 or 2013 is done as follows:
In Excel, select the File ribbon tab.
On the File menu, select the Save As option.
In the Save As section, select the save location.
In the Save As window, click the Browser View Options button (see Figure 14-3).

Figure 14-3. Excel Save As window
In the Browser View Options window, do the following:
On the Show tab, select the item to publish. Options include:
Entire workbook
Sheets (requires selecting the sheets to be published)
Items in the workbook (requires selecting the PivotTables, charts, and named ranges to be published)
On the Parameters tab, add any parameters identifying editable cells. This is done as follows:
Click the Add button.
In the Add Parameters window, click the box next to the parameter cells to be included and click the OK button.
Click the OK button.
Click the Save button in the Save As window to save the file to SharePoint.
The file is saved to SharePoint, and the identified resources are published.
Viewing Excel Published Content
Once items are published, they can be viewed in the library where the file is saved and through web parts added to SharePoint pages. To view Excel published content in the library containing the file, select the View in Browser option from the document’s hover panel menu. Selecting this option opens the published content and gives you access to all of the published views that were created, as Figure 14-4 shows.

Figure 14-4. Excel Services published content
The view of the Excel Services published file includes the following options:
Filters: Lists filters configured for the published content that can be used to filter the information presented.
Options: Provides management options available when viewing a file published with Excel Services. The options available, which depend on the rights of the individual viewing the information, include the following:
Save a Copy: Lets you save a copy of the workbook under a different name.
Download: Initiates a download of a copy of the file to be saved locally.
Print: Lets you print the full workbook or the item being viewed.
Share with People: Brings you to the Sharing window for the document in the library.
Find: Allows content searching in the current view.
Refresh All Data: Reloads the information in the sheet.
Calculate Workbook: Reruns the calculations used in the document.
Do More: Provides additional management options available to you in the workbook. Options provided in this section, which depend on the rights of the user viewing the item, may include:
Edit in Excel: Opens the item in the locally installed copy of Excel.
Edit in Excel Online: Opens the document in the Excel web application.
The view of the Excel published content also includes a listing of all of the published components in the file. This information is listed in the View section, and items can be selected to update the display that shows the selected published component.
Using the Excel Web Access Web Part
Excel published content can be displayed on SharePoint pages with the Excel Web Access web part , which can be configured to display a specific published item in an Excel document that has been published. To use the Excel Web Access web part, add it to a web part, wiki, or publishing page, and configure it to display the appropriate published item (working with pages and web parts is discussed in Chapter 4).
When configuring the Excel web access web part, the following options are available:
Workbook Display
Workbook: Identifies the Excel document that is the source for the content to be displayed in the web part. Browse to the item by clicking the ellipse button, or enter the path directly into the box.
Named Item: Identifies the element to be displayed. If this option is left blank, the web part shows the workbook. You can enter a sheet or object name that has been published.
Toolbar and Title Bar
Autogenerate Web Part Title: Identifies whether to automatically generate the web part title or manually type it in the Title field of the web part.
Autogenerate Web Part Title URL: Identifies whether to automatically configure the URL used when clicking on the title of the web part.
Type of Toolbar: Determines the configuration of the toolbar appearing at the top of the web part.
Toolbar Menu Commands: Allows identification of the commands to make available in the Toolbar menu of the web part.
Navigation and Interactivity
Navigation: Identifies whether to include hyperlinks for navigation.
Interactivity: Identifies the types of activities to allow with the published item being displayed.
Once the Excel Web Access web part is added to a page and configured, it shows the identified Excel Services published content, which can be combined with other Excel Web Access web parts, reporting web parts, images, and the like to create a dashboard or scorecard page used to relay important analytics.
Form Services
One of the programs previously available as part of Microsoft Office was InfoPath. InfoPath 2013 has since been made freely available for download and install. There is no 2016 version of this program. However, the 2013 version can be used in conjunction with SharePoint 2016. InfoPath is used to create forms to collect information. You can create InfoPath forms that contain information for managing such processes as employee time-off requests or sales staff expense management. The forms can contain logic needed to ensure that information collected is accurate and complete. When InfoPath forms are used independent of SharePoint, people that need to fill out the form must have InfoPath installed on a local computer and must also have the most current copy of the form template used when the instances of the form are created. These requirements add management overhead and can result in use of the wrong templates or can keep people from participating in the process if they do not have the appropriate version of InfoPath.
SharePoint’s Form Services, available in SharePoint Server Enterprise , is used in conjunction with Form libraries, which let you publish InfoPath form templates to SharePoint and render them as web forms. Since the form templates are managed in SharePoint, you can be certain that newly generated forms are based on the correct and most current template. Since the forms are rendered in the web browser, you ensure that all users who need access to the form get it, regardless of whether they have InfoPath on their local computer.
Creating Forms and Form Libraries
To create a new InfoPath form and publish it to a form library for use with Form Services, do the following:
Create a new SharePoint Form Library project and add needed fields, layouts, and business logic.
On the InfoPath File tab, select the Publish option.
On the Publish page click, the SharePoint Server option.
If the form is not yet saved locally, save it when prompted, and identify a save location. (Any accessible location will do. It has no direct relationship to the form library or template where the item is published.)
In the first Publishing Wizard window, enter the URL for the SharePoint site where the form is to be created and click the Next button.
In the second Publishing Wizard window, do the following:
Verify that the Enable This Form To Be Filled Out By Using a Browser option is clicked.
Select the Form Library option.
Click the Next button to continue the publishing process.
In the third Publishing Wizard window, either create a new form library in the specified site or select an existing form library to update the form template within. Then click the Next button.
If you chose to create a new form library, in the fourth Publishing Wizard window, enter a name for the new form library and an optional description. Then click the Next button.
On the fifth Publishing Wizard screen, identify fields from the form to include as columns in the library and to use as parameters for creating connections with other web parts for filtering purposes. Then click the Next button.
On the sixth Publishing Wizard page, click the Publish button. This will perform the publishing of the form.
In the Publish Confirmation window, click the Close button.
A new form library is created. It uses the created InfoPath form as the template when new items are created in the library. The form will be rendered through the web browser.
Populating Forms
Once a form is published as the template for a form library, site users can create new instances of the form, populate the details, and submit the completed form to the library. This completed form can be reviewed or can initiate a workflow process to further mature the collected information or pass it through an approval process. (Creating and managing workflows is discussed in Chapter 9.)
To create a new instance of a form managed through a form library, do the following:
Navigate to the form library.
In the library view, click the New option, or select the New Document option from the Files ribbon tab.
Fill out the presented form. Once you are done, click the Submit button, if it is available, or the Save option (see Figure 14-5).
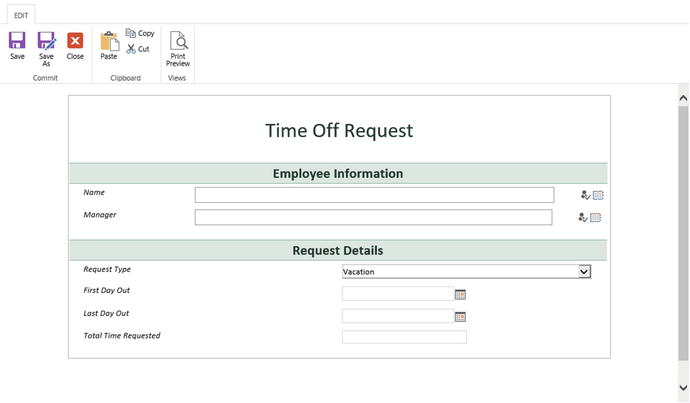
Figure 14-5. InfoPath form in Form Services
When populating a form through Form Services, the following form management options are available:
Submit: Available only if the form was configured with a Submit option. If available and selected, the Submit option saves the form in the library and runs any workflows associated with the form.
Save: Saves the form to the form library. This option differs from Submit in that here you can save a partly completed form and submit it when you have finished populating it.
Save As: Saves the opened form under a new name in the form library.
Close: Closes the form without saving any changes made.
Paste: Pastes the clipboard content into the currently selected field.
Copy: Copies highlighted content to the clipboard.
Cut: Copies highlighted content to the clipboard and removes it from the field.
Print Preview: Opens a printable view of the form.
Using the InfoPath Form Web Part
Published forms can be presented in a web part and added to pages in SharePoint. That is, you can place the entry form on the same page as other resources(for example, when using a form to collect survey-like information related to page content). To use the InfoPath Form web part, add it to the appropriate page and configure it to render the desired form in SharePoint. The configuration options in the InfoPath Form web part are as follows:
List or Library: Selects the form library with the form template to be used.
Content Type: Selects the content type used for display in the form library.
Show InfoPath Ribbon on Toolbar: Identifies whether to display the InfoPath ribbon option when the page is viewed.
Send Data to Connected Web Parts when Page Loads: Specifies whether to send form information to a connected web part when the SharePoint page loads.
Views: Selects the default form view to be displayed on the page.
Submit Behavior: Specifies form behavior when the Submit option is selected.
Visio Services
Visio Services renders Visio files stored in SharePoint Server Enterprise through the web browser. Thus, you can view those diagrams without having Visio on a local computer . This is useful when people without access to Visio need to view Visio diagrams or when the Visio diagram needs to be placed on a page with related components and information.
To publish a Visio diagram through Visio Services , save the file to a SharePoint document library as a Visio Web Drawing (.vdw) file, if you use Visio 2010, or as a Visio 2013 or Visio 2016 (.vsdx) file. Once saved to one of these formats in a document library, you can view the file in the web browser through Visio Services by selecting the View in Web Browser option from the document’s hover panel menu. This opens the document in the browser (see Figure 14-6).

Figure 14-6. Visio diagram in Form Services
When you view a Visio diagram through Visio Services, the following options are available to support users accessing the file:
Open in Visio: An option present when Visio is available to open the file. Selecting it opens the file in the locally installed Visio program.
Refresh: Reloads the diagram in the view.
Shape Info: Allows you to view the details of the listed shape.
Comments: Available only when viewing a VSDX file, this option lets you create and place comments on objects in the diagram. To create a comment, select the object. Then click the Comments option to enter the comment.
As discussed with Form Services, Visio Services also includes a web part that displays Visio Services published files in SharePoint pages. The Visio Web Access web part displays a selected Visio diagram on a page. This web part is configured through management of the following web part properties when it has been added to a page:
Web Drawing URL: Allows for selection of the Visio diagram file, either a .vdw or .vsdx file, to be displayed. Browse to a file by selecting the ellipse button and choosing the file from the Select an Asset window.
Force Raster Rendering: Applying only to .vdw files, identifies whether to use raster rendering with the file.
Automatic Refresh Interval: Defines the schedule in which to refresh the web part data.
Fit All Shapes in View: Identifies whether to size the diagram to fit into the view.
Index of the Initial Page to Show: Identifies the page in the diagram to be presented initially.
Expose the Following Shape Data Items to Web Part Connections: Specifies the shapes in the diagram whose data can be used in connections to other web parts.
Toolbar and User Interface: Identifies the toolbars to be included in the diagram view. The following options are available for selection:
Show Refresh: Reloads the diagram in the web part.
Show Open in Visio: When selected, opens the diagram in the locally installed Visio program.
Show Page Navigation: Lists selectable pages in the diagram.
Show Status Bar: Presents the diagram status bar.
Show Shape Information Pane: Allows viewing of selected shape details.
Show Default Background: Identifies whether to use the default background when presenting the diagram.
Web Drawing Interactivity: Lets you disable interactivity capabilities available to users viewing the diagram. The options include:
Disable Zoom: Allows zooming in and out of the diagram.
Disable Pan: Allows panning the diagram.
Disable Hyperlink: Identifies whether hyperlinks are to be available.
Disable Selection: Identifies whether objects can be selected.
Summary
In this chapter we reviewed the Enterprise Office Services available within SharePoint 2016. We discussed Office Online Server and how it integrates with SharePoint 2016 providing web-based versions of Word, Excel, PowerPoint and OneNote. We then reviewed Form Services discussing how InfoPath Server can be published as web forms within SharePoint. Lastly we discussed Visio Services and how Visio diagrams can be published to SharePoint for display within SharePoint pages.