7
Up with Hubs, Down with Subs – Planning Hub Sites
Families are important. Functional families are indispensable. This is not only true for you and me but for SharePoint sites as well. While it’s possible for all your organization’s pages and documents owned by all your users in each of their business units to live on a single site, it’s not recommendable. Too much family under one roof will end in trouble eventually. In SharePoint, each site can be a part of a greater whole but maintain its identity, permissions, and boundaries. How those sites work together has changed over time. We’re moving away from tall, formal hierarchies and moving toward voluntary associations that can change over time to fit changing organizational needs.
In this chapter, we’ll explore how to turn a site into a hub and how site families can work together to share information in consistent and compelling ways. We’ll cover the following topics together:
- Site templates and the role of hubs
- Subpar subsites – the benefits of a flattening architecture
- Hub site benefits – roll up and push down
- Hubs and global navigation
- Viva Connections – bringing the intranet to Teams
By the end of the chapter, we’ll see the value of organizing sites into hubs and embracing the flat architecture of SharePoint Online versus the subsite hierarchies we’ve relied on in the past. Let’s get started with defining what makes a hub unique, how to create one, and some rules on when hubs make sense and when they don’t.
Site templates and the role of hubs
We’ve looked at Team Sites and Communication Sites as modern templates for building new sites in SharePoint Online. Each site is something of an island unto itself. People create content for themselves and store it in places they have access to – let’s say one giant treasure chest. Sometimes, several groups of people work together in such a way that they need to start putting boxes, dividers, and containers within that chest and only hand out keys to the people who really need access to each part. We’re building what was traditionally referred to as a site collection.
This older title makes sense in a world where a site collection served as a boundary for gathering multiple subsites together into a single container. For example, a Human Resources (HR) site collection may have had a benefits subsite, a policies subsite, a subsite for managers to coordinate, and so forth. The subsites could either inherit the permissions from the parent HR site, or they could override it and choose to change who has access.
The site collection also defined a boundary for how to roll up information. Site collections were contained within their own database on-premises, so that makes sense from a data availability perspective. Web parts such as the Content Query Web Part (CQWP) provided a way to aggregate content from all sites within that hierarchy into a single result set.
The information architecture needs are the same now as they’ve always been in SharePoint. We need to define an outer boundary across multiple places where people are working on content and have those areas work together in a coherent way. Subsites were a good answer at a different time but a site collection was a silo with multiple subsite compartments inside. It was difficult to relocate subsites and have them easily connect to a new silo. Hub sites are a much more flexible modern option since spoke sites retain their individuality and can easily change association by leaving and joining another hub.
Defining hubs
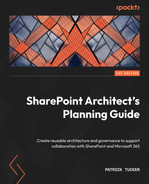
Let’s define what a hub site is. Usually, only modern sites are configured as hub sites, since that was the original implementation, but any site can become a hub by being configured in the SharePoint Online admin center (shown in Figure 7.1). A hub is a site family, and the hub site is the topmost parent in that family. The home page should always be a modern site page to see the benefits of the site becoming a hub.
By registering a hub, we are stating that a site serves as the origination point, home base, or parent to all other sites (once again created with any template) that may be associated with that hub. When a site joins a hub, there are some immediate benefits to joining that family:
- Shared global navigation – Everyone in the family can stay more easily connected to each other by sharing a common navigation at the top of each hub-connected site.
- Shared color theme – We all get matching T-shirts. The branding colors defined by the hub site are automatically pushed to any site that connects to the hub and can’t be changed. This allows us to create a singular look and feel within the site family.
- Shared search scope – When we search at the hub site level, all connected sites are included when we perform a new search. When we’re on one of the connected sites, a new layer in the breadcrumb is added to go back up to the hub before backing all the way up to the organization.
- Rollup of information – News and Events web parts included on hub site pages can automatically include every site in the hub. Content can be created in one spot and readily surfaced in another.
- Shared search across hubs – We can connect multiple hubs together to share searching even more broadly. One hub can be a parent of another hub. Searching could then be expanded to look at both families at the same time. This allows us to support complex, multi-level hubs that still need to work together.
Creating a hub is very straightforward. First, we need to create a site and identify that site as a hub in the admin center. We see that depicted in Figure 7.1. We need a name for the hub, which can be different from the site. That name is what will appear as the home link in the hub navigation. Parent hub association is set to None by default. We’ll discuss parent hubs more in this chapter.
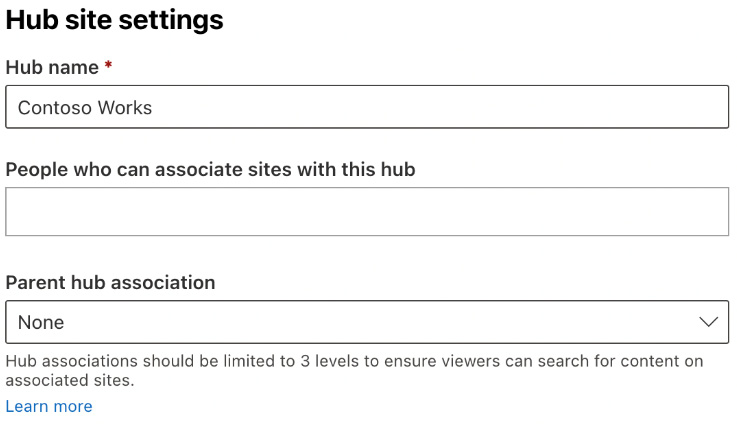
Figure 7.1 – Hub site settings for a site in the admin center
We can also decide which users who are site owners should have permission to join their sites to the hub. We can leave this open so that a hub can grow organically, or more tightly govern it by restricting who can do the work in their sites. Let’s take a look next at why hubs are a preferable architecture to the subsites that have so long existed in SharePoint.
Subpar subsites – the benefits of flat architecture
Site collections define many boundaries in SharePoint on-premises, not least of which was a place to build subsites. Subsites are still an available option in modern sites, but hubs provide a more flexible alternative. What made subsites such a popular option in classic SharePoint? I think more than anything, they were the only self-service option when site creation was otherwise disabled. Even if admins had disabled site creation, users could often still create a subsite within a site collection they were a member of.
In addition to that, it really was much more difficult in SharePoint on-premises to have two site collections share information with each other. Often, the answer was to create subsites in places where they could work with other sites, even if the hierarchy didn’t fully make sense. Once a subsite was in place, what if you needed to move it to another site collection?
Aside from a migration tool, the only real options are PnP PowerShell or Content and Structure under Site Administration if publishing features are turned on. Even then, we can move a subsite to a different spot in the hierarchy in the same site collection. Subsites are strict hierarchies. Once a subsite is in a site collection, it’s designed to stay there. That doesn’t always work for business needs, however.
As an example, if we have a site collection for IT, there may be subsites for development, networking, project management, budgeting, and perhaps a governance subsite that has its own policies and procedures subsite. It might look something like this:

Figure 7.2 – A potential site hierarchy
When the site was created, these connected sub-areas may have fit the organizational structure. But, over time, as the organization grows, we might find that a project management office has grown too and no longer is solely an IT function. Budgeting may become centralized under corporate accounting. Policies and procedures may become a function of knowledge management, and no longer be updated directly by IT. As the organization changes, so must our sites and data. Let’s now discuss how where the sites live impacts their flexibility.
Where should sites live?
I like to think of subsites in a site collection like units in an apartment building. The contents inside may come and go, but the unit is there to stay until the entire complex comes down. I may be able to move my stuff to a unit I prefer more, but I can’t relocate my unit to a completely different side of the building or a higher floor. The structure is set and is not designed to change.
Hub sites are more like mobile homes. Each one is independent but can be grouped together into a neighborhood to work closely together as a group. If the purpose or the desire of the group changes, the home can join a new community. The site can easily join a new hub. Our previous structured hierarchy now becomes depicted more as a set of relationships between sites, as follows:
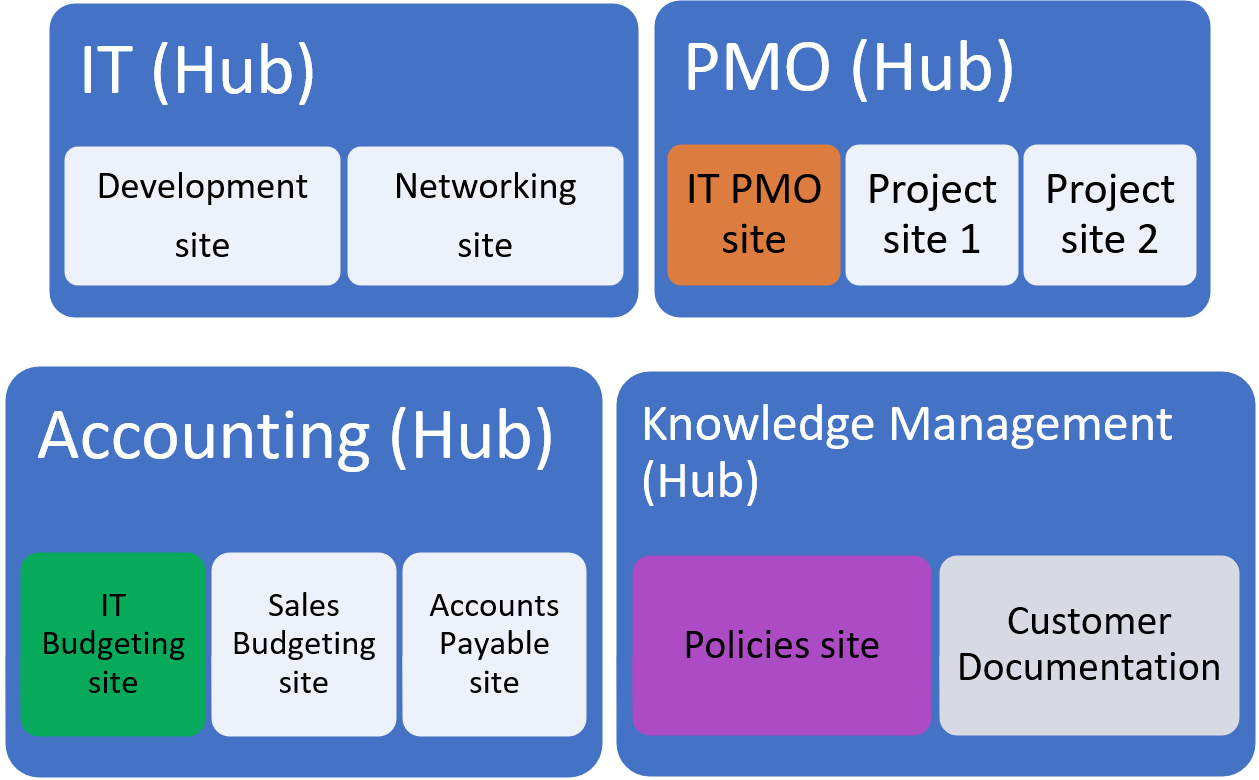
Figure 7.3 – A visual representation of sites existing within hubs
When the structure of the organization or the desired architecture of sites changes in the future, we can easily disconnect a site from one hub and then join it to another. When the hub site moves, its permissions are retained, making it so much more flexible than subsites that had permissions reset to align with its new site collection. We could even have one of our sites that is part of one family leave and form its own. Congratulations proud papa site! Next, let’s look closer at what happens when a site joins a new hub.
Hub site benefits – roll up and push down
In an earlier section, we discussed the implications of adding a site to a hub. While the ability to quickly associate, dissociate, and reassociate sites to hubs is compelling, there are other benefits for a site that joins a hub. If sites in SharePoint Online can be likened to homes, then the hub could be considered a Homeowners Association (HOA). Hubs are like a neighborhood.
When I decide to move into the neighborhood, there are certain rules I have to follow. I can’t paint my house hot pink. I can’t build a 20-foot-tall security fence in my backyard. I have to remain in line with the expectations about how things look and feel. When a site joins a hub, something similar happens. If a color theme is applied to the hub site, it will be automatically pushed down to the sites in that hub. There is no choice but to accept it or leave the neighborhood.
In exchange for following the rules of the neighborhood, I also get to enjoy the benefits of being a part of the neighborhood as well. The streets are cleaned and maintained. The common areas are mowed and cared for. We can visit the pool or the fitness center. Any site in a hub can take advantage of shared global navigation. This appears at the top of the site above the title and site image. We see that in the dark band in the following figure:
Figure 7.4 – An example of the hub navigation menu
We also get the advantage of sharing a common search vertical, to which we can navigate from the top of the hub or from any of the connected sites. The following screen capture shows a site called Benefits, which is part of a hub called Contoso Works. When we do a keyword search on the site, results are shown from that site, but we can easily navigate up to the hub or onto the organization level and search across all sites:
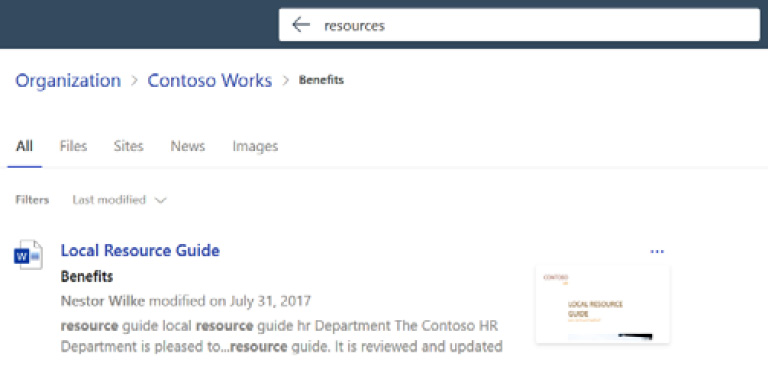
Figure 7.5 – Performing a keyword search on a site connected to a hub with a search nav breadcrumb
The theme, global navigation, and search scope get pushed down. We also have an easy and effective way to surface information that may be created on sites within the hub to the top-level site of the hub.
Rolling up – data floats to the top of the hub
Imagine that we have an organization that has grown over the years by acquiring other companies. While there is a broad, corporate identity, each of the acquired companies still keeps its branding, identities, and functions intact. We build a new site for HR at this company and realize that each of the dozen acquired brands also has its own HR functions, and thus its own HR sites. There are no plans to coalesce them into a single HR department, but we do need to have all HR data across the brands work together as a unit.
We could build an HR hub, which would be a site that sits at the top of the hierarchy of the various HR groups within the organization. Each brand’s HR site would be added to the hub. While the permissions may be different for each site, such as preventing one HR manager from seeing hiring or salary data for a brand that isn’t their own, we still need to be able to have important information from all the sites rolled up to a single spot. All HR sites are part of the same neighborhood.
News and Events web parts allow that rollup to work quickly and easily within a hub. We don’t have to give access to all HR managers to edit the main hub site directly. They can create content within their own areas, and the web parts on the hub site can gather them all into a single location. In the following screen capture, we have a News web part that will automatically show any published news posts in the web part on the hub site. These news items are automatically security trimmed but may also be audience targeted if we want only those within certain groups or roles to see them. We can also leverage the filter property to only show news items tagged with metadata indicating they should roll up to the top level:

Figure 7.6 – News web part configuration on a hub home page
Hubs are a great way to bring multiple sites together to share information up and down. It allows us to have sites that are not otherwise connected to form a virtual hierarchy. But what if I have two hubs that need to work together?
The extended site family – child hubs
We can’t fully have one hub include another hub, but we can connect them for specific purposes and benefits. In the SharePoint Online admin center, we can select a hub site and find Parent hub association in its settings. That sounds more like a group of concerned citizens with children coming together to protest, but it is the way we add a child hub. We can also see other hubs that are already associated so we know who else is in the family before we join. Here’s the UI for that from the admin center:
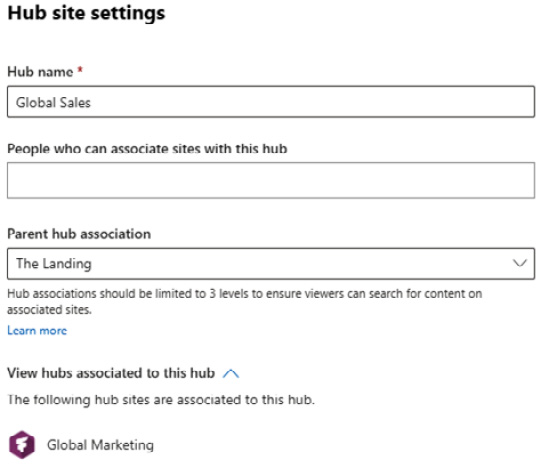
Figure 7.7 – Adding a child hub in the admin center
So, what actually happens when we associate hubs together? In the example shown in the preceding figure, we have an HR-focused hub that is being connected to the intranet home site. Taking a look at either site will not immediately reveal any differences. Nothing changes in the global navigation for either site. If I search for something on the intranet, I still see the same organization-wide search results because it is a home site. If, however, my parent hub is not the home site, then I see the purpose behind this concept. The child (or nested) hub becomes part of the parent hub’s search scope.
What if we also want to depict this hub hierarchy that we’re creating in the navigation? Let’s assume we have the following structure:
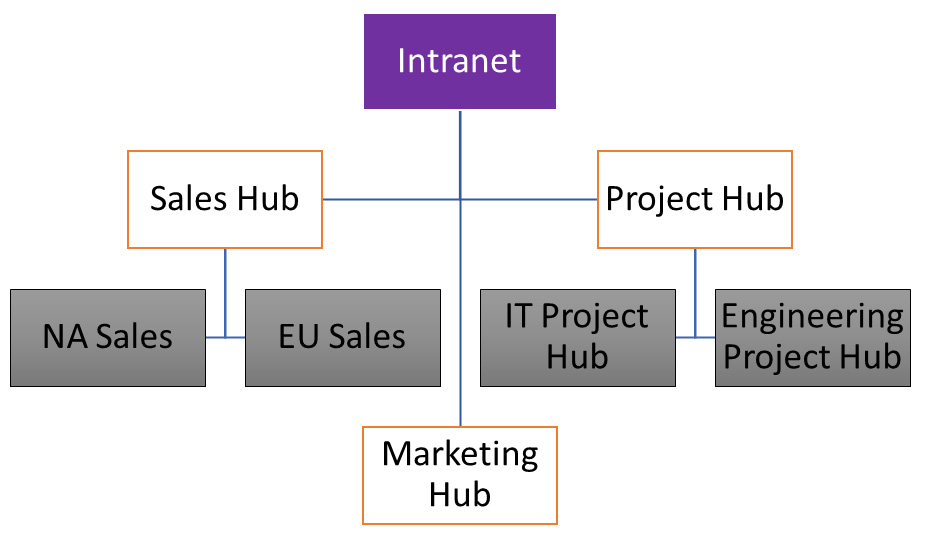
Figure 7.8 – An example site structure
In this example, the intranet is the parent hub. We can choose one of two options when adding a link to its hub navigation, depending on what we want to display, as seen in the following bulleted list. Keep in mind that choosing one of these links just gives you a snapshot in time and adds links that are editable as they would be if they were manually added. That also means that your navigation isn’t updated when new nested hubs or sites are added:
- Associated hubs – If we’re on level 2 or above (the orange boxes in Figure 7.8) on the Sales Hub and chose this option, links would be added to NA Sales and EU Sales, the hubs below it.
- Associated child hubs – On that same Sales Hub, if we chose this option, we would see links to the other child hubs that are connected to the parent hub. In our case, links would be added to the Project Hub and the Marketing Hub.
It’s no coincidence that we’re only depicting three levels here. I didn’t run out of ink. Nested hubs no longer work (to connect us to search results, which is their purpose) after the third level. There are some other limitations as well. The navigation from the parent hub doesn’t cascade down, so there won’t be an easy way to navigate back to the top. The color theme doesn’t apply between hubs either.
While child hubs may have a place in your tenant for extending search, they may not yet be fully baked enough to become part of your everyday information architecture. Building tall hierarchies between several sites that are complex and difficult to manage is why we left subsites for hub sites in the first place. We still get more flexibility with the option to remove sites from that hierarchy whenever we choose, but a simpler approach may be better.
In this section, we’ve seen how hubs can allow sites to work together as a voluntary association of sites that should work together. We’ve seen that the valuable real estate at the top of the site in the hub navigation is also an opportunity to guide our users anywhere, not just within the hub. Let’s look at taking that hub navigation to a truly global level.
Hubs and global navigation
One of the benefits that hubs provide is a consistent set of navigation links across the top of all sites associated with the hub. Those links that may be displayed are editable by the hub site owner and are automatically reflected across the entire hub. This may take a few minutes to apply. The only link that automatically gets added is to the hub site itself so that we always have a breadcrumb to get back to the parent home page. We can set an image and title for that link, or we can remove it altogether, as seen in the following screen capture:

Figure 7.9 – Hub site settings for the logo and title of the hub navigation link
We can have up to 2,000 hub sites in our organization’s tenant. We’ve seen that we can connect multiple hubs to share searching, but the navigation will be different for each hub and within each associated hub as well. While it makes sense to have this flexibility, there may be certain links to sites, systems, tools, departments, or functions that should be available to all users and stay persistent regardless of which site we’re on – enter the home site and the SharePoint app bar.
The home site
One lucky communication site in our tenant can be set as the SharePoint home site. Since it serves as the main landing zone of a company intranet, the home site should be the one at the root URL. If there is another site we’ve been working on and we desire it to be the root, we can perform a site swap. This can be done in the SharePoint admin center using the Replace site menu item. Just remember to unregister the site you want to replace as a hub and remove any existing home site assignment:

Figure 7.10 – Admin center screen capture of the Replace site menu
We can set the home site in the Settings area of the SharePoint admin center or by using this PowerShell cmdlet: Set-SPOHomeSite -HomeSiteUrl <siteUrl>, supplying the URL of the desired home site in your tenant. Once the home site has been set, we now have some new options in the Settings area of the site itself – global navigation.
Global navigation
Global means everywhere, right? If our tenant is the universe, hub navigation is a guide to the stars in our galaxy. Each hub has its own stars. For something universal, truly global, we need to turn our eyes toward home – the home icon, that is, on the SharePoint app bar. The app bar resides on the left side of all modern SharePoint sites. By default, the home icon takes us to the Microsoft-provided SharePoint home page. We can change that by configuring the global navigation settings shown here:
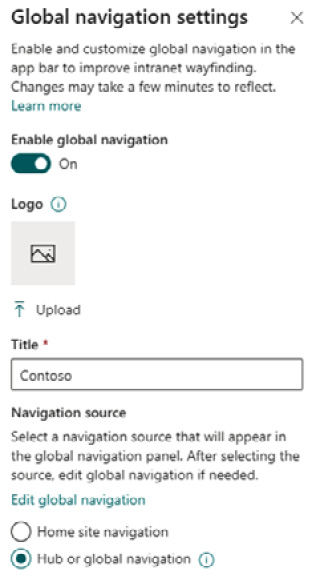
Figure 7.11 – Settings from the home site for global navigation
If we enable global navigation here, we can choose to have the menu that displays when clicking that home icon to be either the site navigation of the home site or the hub navigation if the home site is a hub site. The links will now always display when clicking the home icon, creating global navigation. If we choose the hub navigation to drive the global navigation, it will also display on the home site hub and all associated sites at the top (just like normal). We can also change the title that becomes a header on the global navigation panel and the icon to something more in line with our corporate branding.
Global navigation is an important aspect of the app bar, but there are additional components that may help our users quickly find content important to them. We can’t edit or control these links, though. They are curated by Microsoft AI for us. Here are the other sections of the app bar:
- My sites – Followed or frequently visited sites
- My news – News based on your activity and interests as determined by AI
- My files – Files in SharePoint and OneDrive you’ve recently worked on
- My lists – Recent or favorite lists driven by the Microsoft Lists service
- Create – A way to quickly create sites, documents, or lists
This section has shown us global navigation across all SharePoint sites using a home site, the app bar, and an optional hub. Can it truly be global though if it just exists in one product? It turns out we can expand the reach of our globe into Microsoft Teams as well using Viva Connections.
Viva Connections – bringing the intranet to Teams
The Microsoft Viva platform has been around now for just over a year. Some components have been around longer, living under other names. There are four modules. Products may be licensed separately, or there is a Viva Suite license that provides all of them in a single package. As a suite of tools, Viva is focused on employee experience and engagement, so each tool fulfills part of that promise. Let’s explore what the tools are designed to do for us in greater detail. The four components are noted here:
- Viva Insights – Personal and organizational insights driven by Microsoft AI to promote well-being and meaningful insights into both good and bad modern work habits. Insights is a Teams app and provides experiences in Outlook and Office.com, including a daily briefing email. Using pre-built queries as well as those provided by Workplace Analytics provides deep manager and leader insights. Personal insights are free but additional features will require an Insights or Viva Suite license.
- Viva Learning – A self-service learning option that connects to LinkedIn basic and Microsoft Learn site content for free. SharePoint learning sources may be connected for free as well, though direct support for Learning Pathways is not currently available. Learning is also a Teams app, but content may be surfaced in a Teams tab or private chat. Learning management systems (including Pluralsight, Udemy business, and Coursera) may be connected to Viva Learning with an individual or Viva Suite license. Each person can decide on the topics that interest them or have assignments made.
- Viva Topics – Metadata tagging driven by Microsoft AI can be applied to content in SharePoint sites automatically or curated by a knowledge manager. We’ll discuss this further in the next chapter. Topics is another paid module with either a license just for Topics or as part of the Viva Suite license.
- Viva Connections – A Microsoft Teams app that enables your intranet in Microsoft Teams. Portions of the SharePoint app bar are visible here, as is a Feed web part and an optional dashboard for displaying content with adaptive cards. Viva Connections is included with your Enterprise licensing but needs to be configured.
The last item is obviously the one of greatest concern for this chapter. Viva Connections relies on a communication site becoming a home site and global navigation being configured. From there, our intranet can become an app in Teams that can be deployed to our organization. It is an app that is added in the Teams admin center. When deploying, we can customize the name of the app and the icon that is displayed. The full-color icon must be a PNG file sized 192 x 192. The outline icon should be an inverted PNG file of 32 x 32 pixels. As seen in the following figure, we can also set the accent color of the app by clicking on one of the colors or by providing a hex code or RGB value:
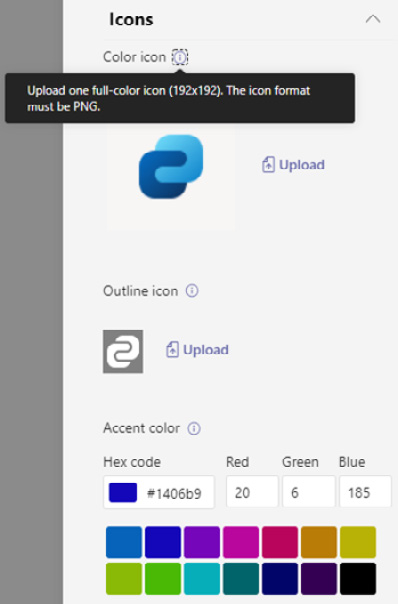
Figure 7.12 – Configuring the Viva Connections app in the Teams admin center
Once the app has been allowed in the Teams admin center, we need to make sure it is made available through an App permission policy. Most intranet home sites allow everyone in the organization read/visitor access so it only makes sense to enable the Viva Connections app for everyone in the Global (organization-wide default) policy.
Finally, a Setup policy can ensure that the app displays in a prominent way for all users, rather than just being made available in the apps list where someone might miss it. Pinning the Viva Connections app to the top will give the intranet a place of prominence and drive both usage and adoption. The following figure shows a sample intranet loaded in Teams using Viva Connections. Take special note of the Teams UI on the left-hand side:
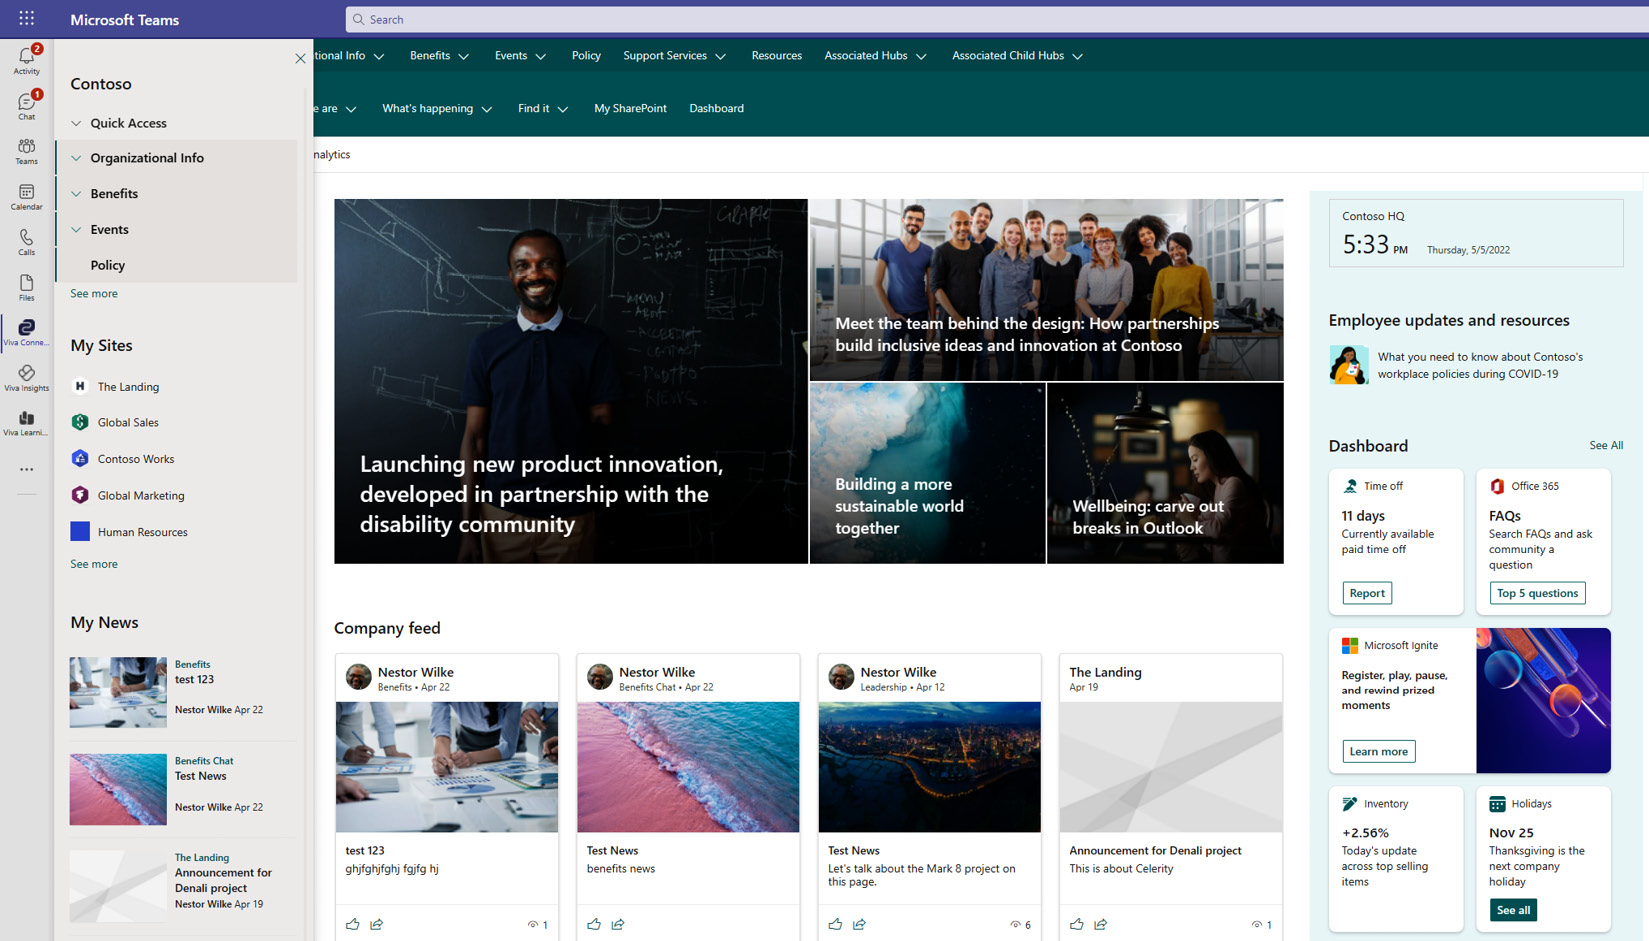
Figure 7.13 – Viewing Viva Connections in Microsoft Teams
Clicking once on Viva Connections opens the home site directly in Teams – one-stop shopping! Clicking the icon a second time opens the global navigation (the same one we configured in SharePoint). My Sites and My News are other components from the SharePoint app bar. On the far right of the page in the preceding screen capture, we also see the dashboard. Let’s talk about this and the feed web part in a bit more detail.
Dashboard and feed
The dashboard shows up in a couple of places. First, it is a web part that can be added to our home page. Second, it gets its own tab when viewing Teams on a phone (at the time of this writing, Viva Connections is not supported on tablets but is coming in the second half of 2022) to accompany the Feed tab and a Resources tab that displays the global navigation.
Wherever it is surfaced, the dashboard is actually created by clicking a Set up Viva Connections link on the home site settings. A page is created to hold the dashboard contents. A View Dashboard button becomes visible after initial creation. That page can only contain cards designed for the dashboard, not modern SharePoint web parts. Some of the cards are already aware of the data. Other custom cards can be built using the Adaptive Cards Framework but the code to populate them would need to be created as an Adaptive Card Extension (ACE) with the help of SPFx.
The following are the cards that are available at the time of this writing. Most cards can be audience targeted so the dashboard becomes focused on different sets of users:
- Approvals – Connects to Approvals in Microsoft Teams, which can be driven from chat, notifications, Power Automate workflows, or the Approvals hub.
- Assigned Tasks – Gets data from the Tasks app in Teams, which includes Assigned to me tasks from Planner.
- Card Designer – Creates custom cards, which can include text, up to two buttons, and a quick view built using JSON and Adaptive Cards Templating.
- Teams app – A card that links to and opens an available app in Teams.
- Top News – This displays news posts that have been boosted by clicking Boost on the command bar for a news post. Boosting news makes it more visible, including on this card, until a date that we specify. Up to 10 news posts can be boosted, and we can control their order.
- Shifts – Shows user-specific information from the Shifts Teams app, including the ability to clock in and out.
- Web link – This is essentially a quick links web part, with each card showing text and/or an image and navigating to a different site when clicked.
The dashboard provides an alternative approach to modern web parts in some ways and gives us new ways to connect to data from M365, third-party sources, and our own custom sources and code as well. Since there is overlap between what each delivers, which one do we choose? Obviously, if we haven’t implemented Viva Connections yet, the decision is a simple one. For those of us with modern intranets and Viva Connections, perhaps some guidelines we could follow are noted here:
- For links that need an intermediate step or some extra context, we can use the web link card in Viva Connections. The intermediate step is the quick view available to custom cards.
- If we want to format the view of a link, we have more UI options with Viva Connections than with the quick links web part.
- For connections to Teams apps, some M365 services such as Planner, or even apps from the SharePoint app store, the dashboard provides capabilities that are not found on modern web parts.
- To implement custom data following a standard JSON format, the custom card can model the data, present it on the card, and connect to it through the code we write.
There is no wrong answer to the question of what to use. Just remember that the dashboard gets a separate, dedicated space on the Teams mobile app and can exist as a separate page or a web part on our SharePoint home sites.
Viva Connections is a free tool that brings our investment into a home site in SharePoint Online into the world of Teams as an app. Teams continues to be a one-stop-shop, and adoption for both Teams and your intranet will benefit.
Summary and planning document
In this chapter, we’ve explored the concept and implementation details of hub sites in SharePoint Online. We compared their flexible association with the more structured approach of subsites. The shared navigation, search, color theme, and rollup of news and events provide the true benefits of this approach. It is more than just creating a site hierarchy. It’s a way of connecting sources of data that may exist in multiple locations, owned by multiple people, and presenting them as a unified site or product that can follow the expectations and user experience of the organization. We also explored how hubs can provide global navigation to a home site and the SharePoint app bar, which forms the foundation for connecting our intranet to Microsoft Teams as an app through Viva Connections.
Here are some items to consider when planning for hubs as part of your SharePoint Online architecture:
- How many subsites exist in your tenant today?
- Do they need to stay where they are? Does their current ownership and location make sense?
- Can any subsites be promoted to their own sites?
- Can any subsites coalesce together?
- How many hubs do I need?
- Do we just need one for the root of the intranet?
- Are any business units complex enough to justify having their own site family and thus the creation of a hub?
- Do any hubs logically roll up into other hubs? Are there parent/child relationships?
- When does a hub not make sense? Could we use something such as a custom search vertical to roll up information instead?
- What information should be owned by a group or department, but should also be surfaced on the home page through News, Highlighted Content, or Events web parts?
- What belongs in the global navigation?
- The app bar should contain the only true global nav? What is important enough to enough people in the organization to take up space there?
- How many categories or sections should be in the global navigation?
- Should sections be organized by organizational structure, functional groupings, or some other measure?
- What links should be global to the hub, even if they are not consistent across other hubs?
- Should site navigation still be used if there is a hub navigation menu, or will that be too confusing for users?
- Do I need Viva Connections?
- Is there strong Teams adoption in the organization that would make adoption of your intranet more natural with less context switching if Viva Connections were implemented?
- Do users interact with Teams on mobile devices? What about your intranet?
- Are you leveraging custom adaptive cards in Teams or other applications that could be leveraged in Viva Connections as well?
Hubs provide a very flexible way to create and arrange sites. Adding the home site capability allows us to use the global navigation we’ve defined in a hub for the SharePoint app bar and, ultimately, Viva Connections. The beauty of it is that if the organizational structure or desires change in the future, we can easily rearrange sites in the hub to become part of new site families altogether. While site structure is an important aspect of our information architecture planning, the proper use of metadata with the content in those sites may be even more so. That is where we pick up in our next chapter.