9
Keeping Things Secure – Permissions, Sharing, and DLP
Keeping your door locked can be important. I recall an incident once, having just moved into an apartment, where I forgot to do so, and my next-door neighbor absent-mindedly walked right into my entrance and had almost made his way into my living room before realizing where he was. I was so taken aback just watching him that I didn’t say a word, but it gave me and my family quite a fright. From that point on, I always had a conscious thought of locking the door whenever I came home.
With our sites, lists, and libraries, it can be more than just an awkward moment if the wrong people get access to the wrong data. Making sure that the right people have access to the right content is critical to keeping trust in the tools and in one another. When we do decide to let others past our front doors, we provide a set of keys that gives them access. Once they’re inside, though, they still may not have free access to everything. We may still lock our bedroom door or our medicine cabinet to make sure our most sensitive content stays safe and secure.
In this chapter, we’ll explore how SharePoint permissions can provide the proper access to the right set of individuals or groups. We’ll also explore best practices around sharing content internally and externally by digging into the following topics:
- Microsoft 365 (M365) groups, Azure Active Directory (Azure AD) groups, and SharePoint permissions
- How to control access to sites and content
- Best practices and concerns for sharing content
- Using data loss prevention (DLP) to manage external sharing
Let’s start by laying out our basic building blocks for permissions in SharePoint.
M365 groups, Azure AD groups, and SharePoint permissions
Before we talk about the implications of M365 groups on SharePoint permissions, let’s outline some definition around how permissions work in our sites. SharePoint manages access by groups defined within the service itself. These groups are mapped to a granular set of permissions that indicate what can or can’t be done by someone who is part of that group. While it is possible for a person to be granted direct permissions to a site, adding them to a group with defined access is preferred and best practice.
These groups are maintained at the site level. This means that when we used subsites, it was really the site collection where all our groups were actually kept, even if a group was only used on one subsite. With hub sites, each site maintains its own unique set of permissions so that there is no dependency on a site needing a hub to keep track of its access lists. The boundaries of permission groups are site-level, and those permissions cascade down to all nested objects such as libraries and their folders and files, or list items and their attachments. We can break that inheritance to introduce unique permissions at the object level.
Let’s continue our discussion with a look at how SharePoint handles security groups internally, how hubs add an opportunity to partially share permissions across sites, how M365 groups impact team sites, and how we can make our M365 groups and Azure AD security groups work together.
SharePoint groups
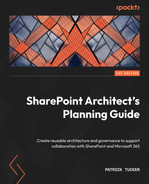
Modern SharePoint sites provide three groups as starting containers for people who are part of the site—owners, members, and visitors. When we click on the gear icon and go to Site permissions, we see these documented as full control, limited control, and no control, as in the following screenshot:
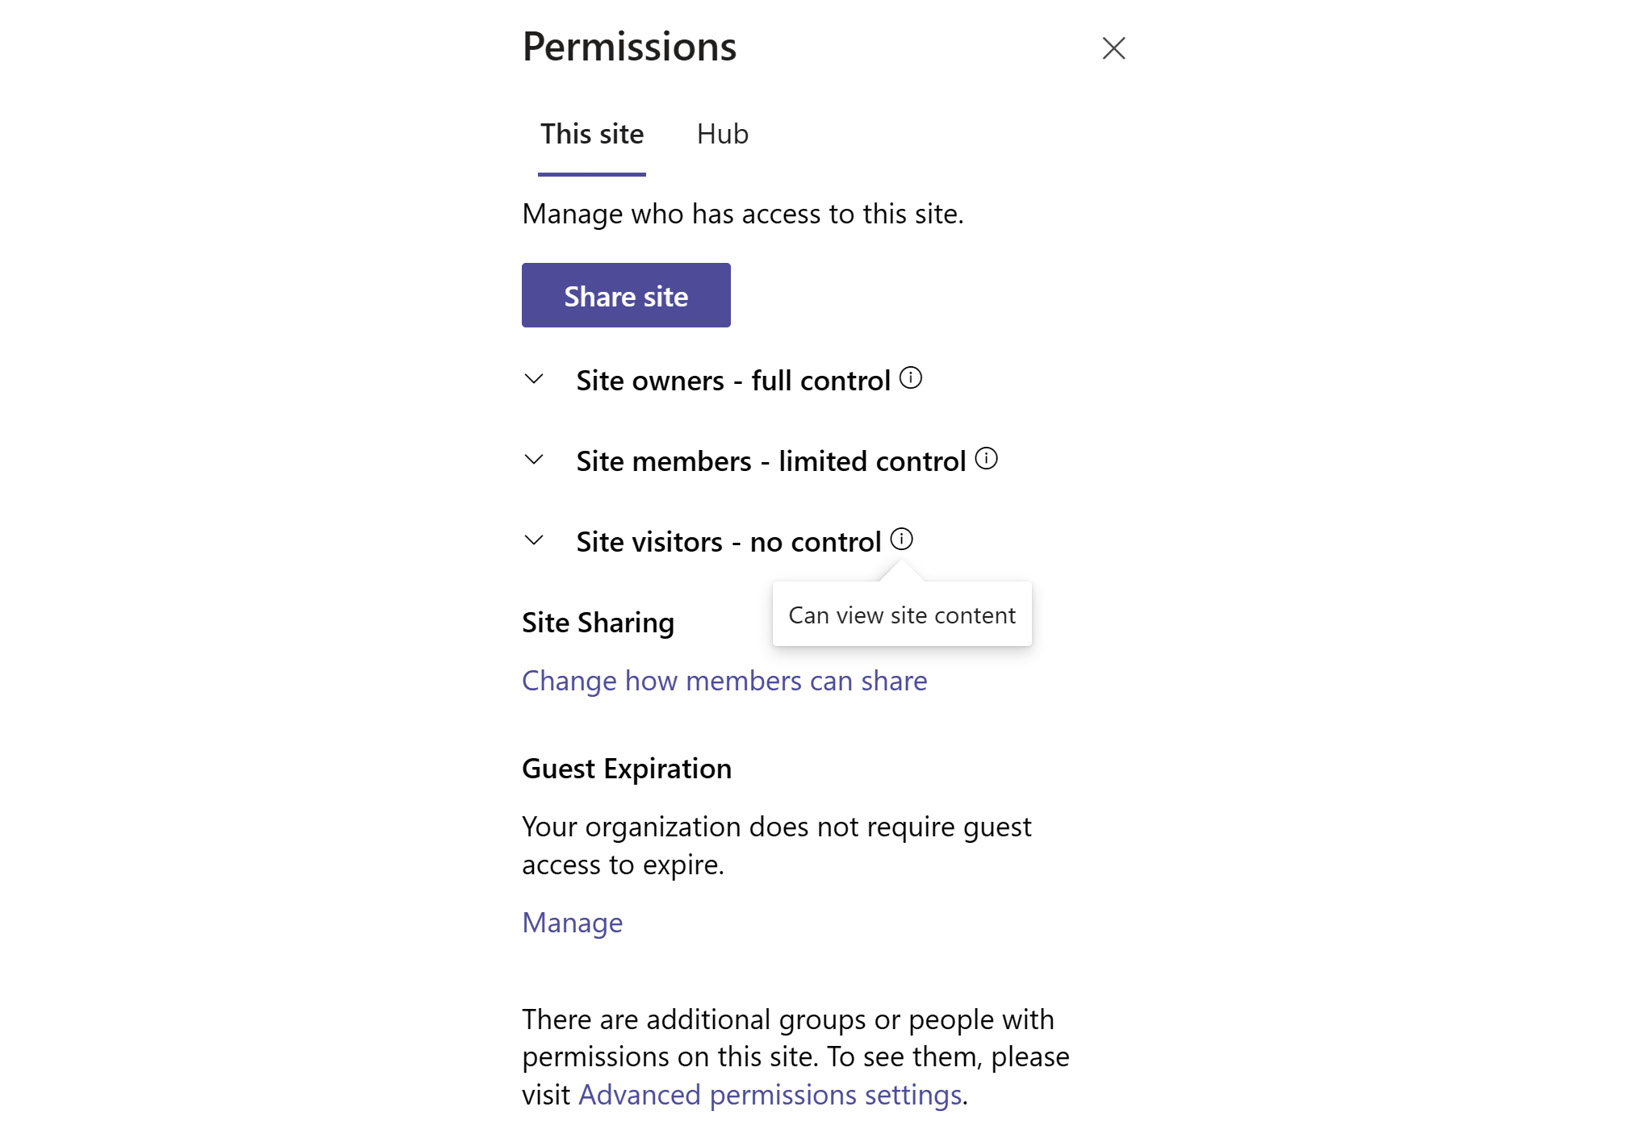
Figure 9.1 – Viewing the permissions of a site
Site admins may add people to these groups. Those in the Site owners group have full control over the site, which means they can manipulate these groups as well to add or remove people from the site. In general, we can consider Site members as a group of people who have read and write access to all content on the site by default. They can’t manage permissions, but they can do just about everything else. Those in the Site visitors group have no control, but they do have read access to all the content by default.
Hub site permissions
Visitor access is the one aspect of hub permissions that can propagate down to all sites connected to the hub. If we are on the hub site, there is an extra tab for the hub on the Permissions panel. If we enable the Sync hub permissions to associated sites toggle, we will be prompted to enter up to 10 individuals or groups who will have visitor access to the connected sites. One of the options here is to use the Everyone except external users token to allow all licensed users to have immediate access. This does not change the visitors group on the hub site, so we would need to repeat any permission assignments there.
Owners on the sites associated with the hub would need to accept this setting or choose to manage their own visitors group uniquely. When selecting a hub to associate with, the site owner must choose whether to sync hub permissions to their site, as shown in the following screenshot:
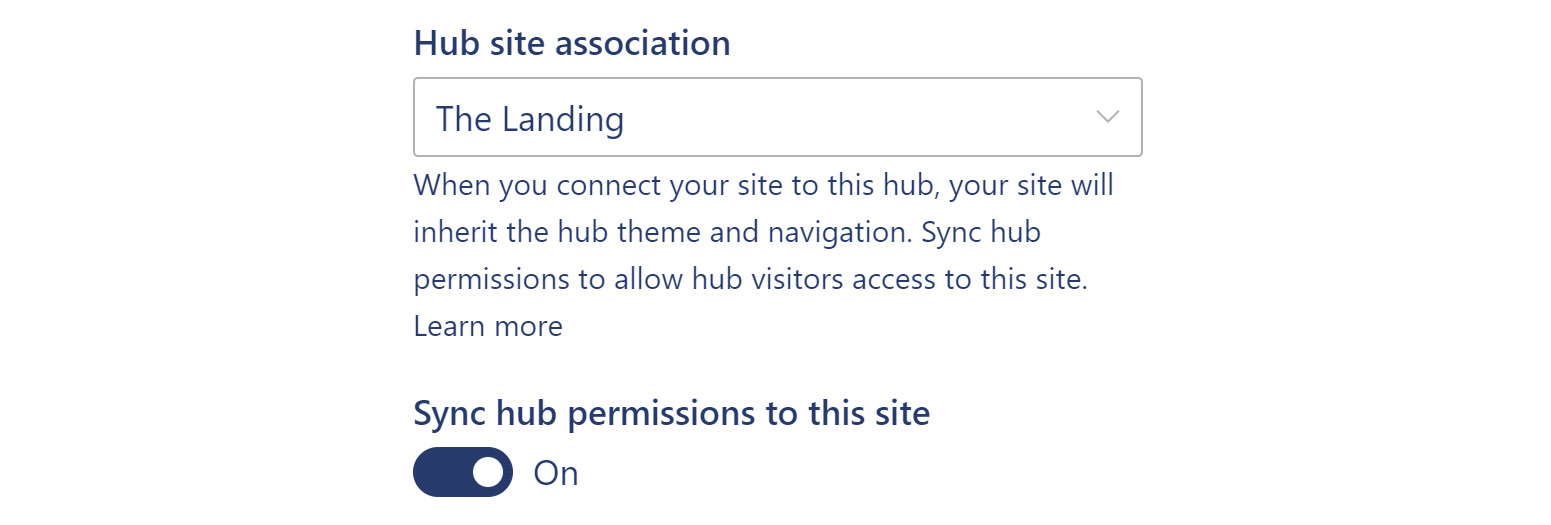
Figure 9.2 – Site information: hub site association for visitor access
The implication of taking this step is that a new group is created called Hub Visitors with read access. If we expand the group, we won’t see a list of users, but this is how access is granted from the hub. If we set the Sync hub permissions to this site toggle in Figure 9.2 to Off, that group will be removed. This allows the site to retain its own set of visitors if needed and to avoid any impact on the people we might assign there.
Team sites versus communication sites
A site owner can add people to the site by going to Site permissions from the settings gear. On communication sites, there is a button labeled Share site, while on team sites, there is a button labeled Add members. The difference in verbiage is significant. As we learned in Chapter 4, Understanding M365 Groups as the Foundation of Collaboration, one of the primary differences between the two modern site templates is that team sites are connected to M365 groups. This changes how permissions are mapped.
For communication sites, which do not have an associated M365 group, we can share the site directly. There aren’t any other connected resources to be shared as well. When an owner shares a site, they can add an individual account, an M365 group (thus adding all of its owners and members), or an Azure AD security group.
As they are added to one of the three SharePoint groups (owners, members, or visitors), they are effectively being assigned to a permission level, the naming scheme of which is different than the groups. We’ll explore permission levels more in a moment, but for now, the owner can add someone with full control, edit, or read permissions, which will add them to the corresponding group noted above.
For Teams sites, the options look a little different. We see two options when adding people to our sites, as seen in the following screenshot:

Figure 9.3 – Options for sharing a Teams site
And this is just people. We can’t add another M365 group or an Azure AD security group here (but we can bring their worlds together, which we’ll discuss in a bit). When we add members to the group, we will provide them with read and write permissions to files and pages in SharePoint, as well as other connected tools such as Teams channels. If someone is added to a group using the Microsoft Teams interface, they will also get access to the SharePoint site and all its contents as a member, with read and write privileges.
The read-only role does not exist in Microsoft Teams. It will never exist for team chats, but if we want to allow for read-only behavior with team files, we have the Share site only option. This option allows us to share the site in the same way we can with the communication site template. This is useful if we want to add visitors or add people as collaborators to files in SharePoint without giving them access to other resources such as Teams chat.
Combining types of groups
To bring the worlds together, as previously mentioned, we can rely on group membership to create dynamic Azure AD groups that populate by adding members of other groups using the memberOf attribute. This is available in the Azure portal, Microsoft Graph, and PowerShell. This requires a global, Intune, or user administrator and an Azure AD Premium license.
We can dynamically populate groups with user attributes such as location or job title. However, these user properties don’t always allow us to create the same set of people in an M365 group as we might have in an Azure AD group.
Now, when we set up the dynamic group, we can have its membership populated with users from other Azure AD or M365 groups. For quite a while, we had to potentially duplicate membership in an M365 group to add people to a team or team site, or at least set up some dynamic group filtering that could get us close to the same results. Now, we could simply have an M365 group be forever updated with changes to a security group as its membership changes.
Now that we’ve explored how to share our sites with individuals or collections of people, let’s take a look at how granular we can be with what they are able to do.
How to control access to sites and content
When we add someone to a group in SharePoint Online (SPO), that group has been configured to allow or block specific types of interactions. These granular permissions are set in named permission levels, and that is our next focus.
Permission levels
A person added to the members group can read and write data in lists and libraries. They can edit pages and create new lists, but they can’t add other people to the site. These permissions are set in the Edit permission level, which we see as owners when we add people to our sites. We can view the particulars of the Edit permission level— and others—if we visit the Advanced Permissions Settings page at https://<<tenant name>>.sharepoint.com/sites/<<siteName>>/_layouts/15/user.aspx. This page is still in classic mode but offers some deeper insights into SharePoint permissions.
If we click on the Permission Levels link in the ribbon, we see there are five of these, even though there are only three groups visible (seen in the following screenshot) in the modern user interface (UI) for adding users. If we use classic templates such as a Publishing Site template, we will see even more:
Figure 9.4 – Viewing permission levels for an SPO site
A permission level is comprised of three sections:
- List permissions: What a user can do with list objects and data
- Site permissions: What a user can do to manage the site
- Personal permissions: What a user can do to manage personalized views and web parts
A full list with explanations can be found here: https://docs.microsoft.com/en-us/sharepoint/sites/user-permissions-and-permission-levels. Out of the box, Full Control is mapped to the owners group, Edit is mapped to the members group, and Read is mapped to the visitors group. Design and Contribute permissions are available as well (remnants from classic solutions), but not mapped to a group. If we use a template other than the two modern templates, we may also see additional permission levels created.
While Contribute is not in use for members in modern sites, it’s worth calling out how it differs from the Edit permission level. The two are almost the same, with one key difference. In Edit, this box is checked: Manage Lists - Create and delete lists, add, or remove columns in a list, and add or remove public views of a list. So, that means that if someone is a contributor, they can only work in existing lists and libraries, not create their own. In an M365 Groups-backed site, we can’t change the assigned permission levels, but we can do so in other modern templates. That may be the better option for many members who are content creators, allowing owners to be the ones who manage the structural containers in a site.
As admins, if we do prefer to map the members group to the Contribute permission level, we can go to the Advanced permissions settings page and select a group. This should enable the ribbon item to edit user permissions. We see the following screen when we click there, which allows us to change the permission level to either an out-of-the-box selection or one of our custom creations:

Figure 9.5 – Changing the permission level for a SharePoint group
We can create custom permission levels as well. Our best practice is to create a new permission level and implement our changes there rather than modifying the ones from the system. We can do this easily by scrolling to the bottom of an existing one and clicking Copy permission level and saving our own. Some examples of when this may be preferred are if we want to allow people to create and edit documents, but not delete them, or perhaps we want to allow members the ability to approve documents as well as edit them. Custom permission levels allow us to accomplish this.
Requesting access
We may have specific permissions mapped to the SharePoint groups for our sites and people have been mapped to those groups, but those needs access may change over time. To help owners keep up with those user-mapping changes, we can enable access requests so that those without permissions can be prompted with a screen allowing them to ask for it, including an optional comment or justification. We see that setting depicted here:
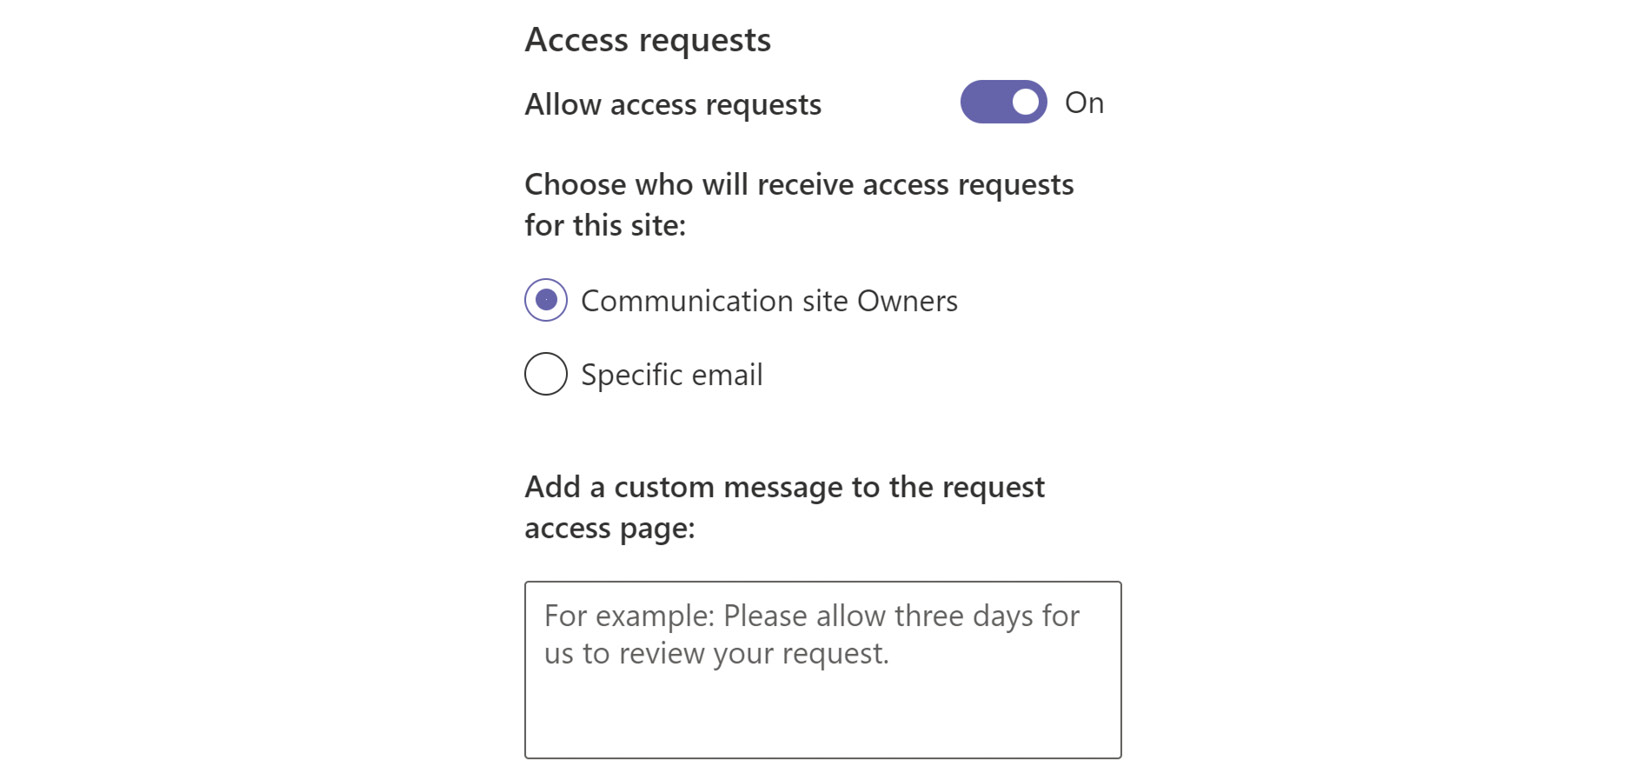
Figure 9.6 – Enabling access requests with notifications sent to all owners
This setting allows people to make requests to see content they don’t have permissions to view, including the site as a whole. Site owners can configure who gets notified of access requests and subsequently accept or deny those requests. These requests will include site-sharing attempts by anyone other than a full control user. These automatically go to the owner to process.
If the setting to allow access requests is off, someone trying to access the site will get a standard Access denied error page. If on, which is the default, we can specify an email address or have the request route dynamically to the right person(s). For classic sites, communication sites, and modern team sites without a group, that request goes to the users in the owners group. For group-connected sites, the group admins receive the request. If there are multiple owners or admins, the first one to reply has the final word.
Access to team or other M365 group resources is not automatically granted. However, if a member of a Microsoft team requests that someone be added to the team, they do get access to it and the SharePoint site by being added as a member of the group.
Breaking inheritance
An extremely rich but long-forgotten uncle recently passed away and left you his castle and millions of dollars. OK—wrong kind of inheritance! In SharePoint inheritance, files, folders, libraries, and sites all share permissions defined by adding people to groups. So, if someone gets added to the members group, by default they can view and edit data everywhere. There may be instances, however, where we want some content within our site to have a unique set of permissions. We may want to have a subset of people view more sensitive information in a library or only allow a couple of folks to edit and make everyone else read-only.
To break inheritance, we need to go to a list or library, click the gear, and find the permissions link for it. By default, the site permissions are applied to the list or library. When we click Stop inheriting permissions, our library now manages its own permissions, but what was there previously has been copied in. So, if we want people in the members group to only have read access, we would need to select that group and edit user permissions, which would only impact the group. We can also delete existing users or add anyone with a license to SPO. If we change our mind later, we can click Delete unique permissions and restore things to the default.
Be mindful that breaking inheritance introduces limited access permissions on your site. This happens when an item within a site is shared but not the site itself. This isn’t a permission we can add people to directly and it can’t be deleted. We can see this in a message in a yellow bar that states: There are limited access users on this site. Users may have limited access if an item or document under the site has been shared with them. We should also have the option to click Show users to see who is impacted.
In this section, we’ve seen ways for admins and owners to configure permissions and direct the sharing of access to the site. Breaking inheritance is a way to change the granular level of access on certain containers or pieces of content. Sharing those pieces of content with people who haven’t been granted access to the whole site or a library is also crucial for members and a core function of the platform. Let’s discuss some best practices for configuring and working with sharing.
Best practices and concerns for sharing content
To share is the point, one might say. People who have access to the site can already get to the content, so sharing is ultimately about letting others outside the site have access as well. From the gear icon, we can get to the Site Sharing settings, which allow us to choose from one of the following three options for how data can be shared on a site-by-site basis:
- Site owners and members can share files, folders, and the site
- Same as above except only owners can share the site
- Only site owners can share the site and the contents (this doesn’t hide the share menu; it just no longer works)
The latter option effectively turns sharing off on a site (except for owners, of course). If sharing is enabled, the sharing experience for files in SharePoint and OneDrive for Business are both determined by the settings we apply in the SharePoint admin center. We can apply a sharing configuration that impacts all sites at the organization level.
Controlling sharing
Sharing outside the organization is a strength of SharePoint in the cloud. Sending your sensitive information and intellectual property to an anonymous user who can share it with anyone else they want is . . . not a strength. In this section, we’ll explore how to control the sharing experience with those outside the organization.
Sharing links
There are two mechanisms for providing access. We’ve looked at adding people to groups, which is more of a direct access approach. Direct access to pieces of content assumes that a user already has access to the site, though they may not have access, or the right level of access, to that content. Sharing links is more designed for sharing individual pieces of content, which can be done with people who aren’t in the site or the connected group. There are multiple sharing links that can be configured as defaults for all sites or configured on a per-site basis.
Under the Policies section in the SharePoint admin center, we can define rules for external sharing and set the default behavior of sharing links. Let’s review each section and the implications of the settings we find there.
External sharing
In this section, we have two sliders that apply settings to SharePoint and OneDrive. The settings for OneDrive can’t be more open or permissive than those we set for SharePoint, as we see here:
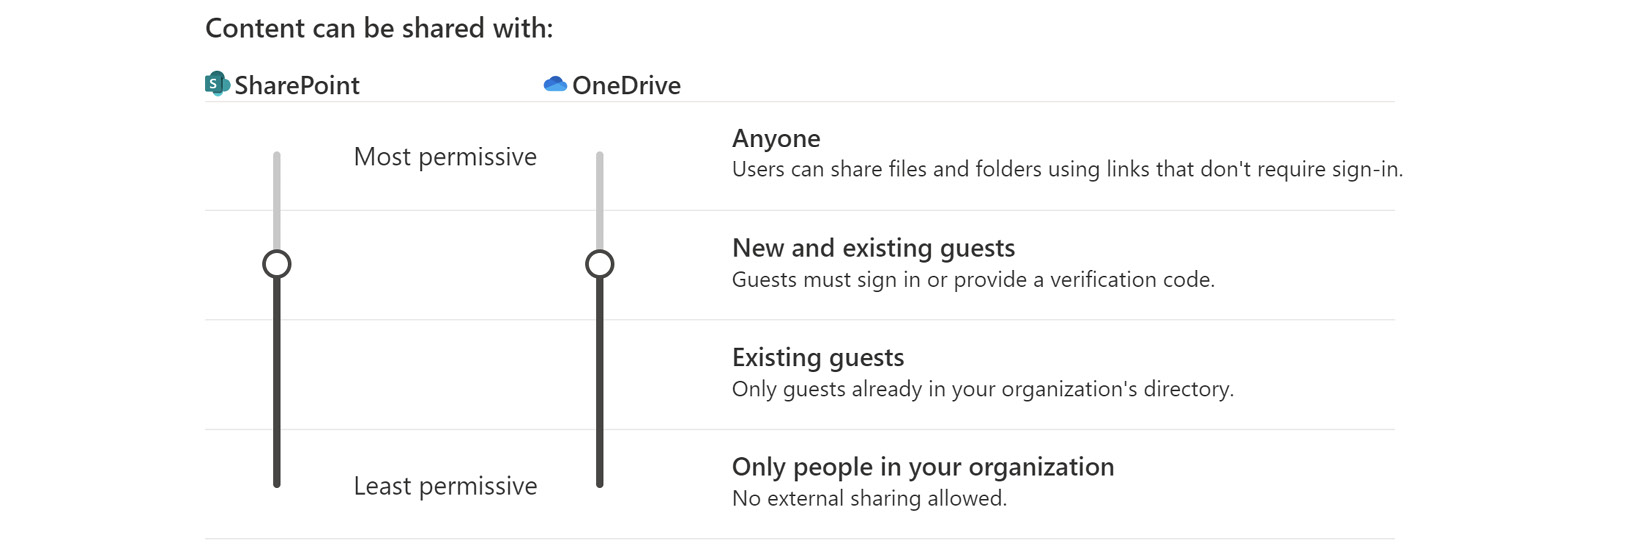
Figure 9.7 – Configuring sharing settings in the SharePoint admin center
The most permissive level is Anyone. I would heartily recommend this level not be used, as anyone with the shared link Uniform Resource Locator (URL) can open a document that’s been shared with them with no prior authentication or logging of who’s done what. Anyone links can be forwarded on to literally anyone else, so they are certainly not secure.
New and existing guests allows us to share content with guest accounts that have been added to the Azure AD by an administrator or by simply using an external email to name the recipient. This is safer than being anonymous because the person must sign in or use a verification code to get to the content.
If we use a verification code and Azure B2B is not enabled, the recipient will need to enter the code each time they need access to the content. This means that the user is never added to the Azure AD. If Azure B2B is enabled, we can configure whether to use one-time codes or have the user sign in.
Existing guests is even more secure still as the guest account must already exist before sharing can occur. To make sure that admins control who those external users are, we need to disable the Azure AD organizational relationships Members can invite and Guests can invite settings.
The least permissive option is Only people in your organization. This disables the ability to share externally across all sites. Chances are, in most cases, this is too restrictive. We may keep this setting as the default but allow broader sharing options for individual sites. For example, if our industry is health care or financie, where there’s a lot of private data, we may still need to share information with external vendors for specific reasons. We’ll look at making those exceptions in a moment.
External sharing may further be limited to a specific set of allowed domains (seen in the following screenshot). We can limit sharing to only be allowed by people in a specific security group. Perhaps we can even create a group dedicated to this purpose so that sales, marketing, operations, and other users who need to work with vendors or suppliers are allowed while others are blocked:
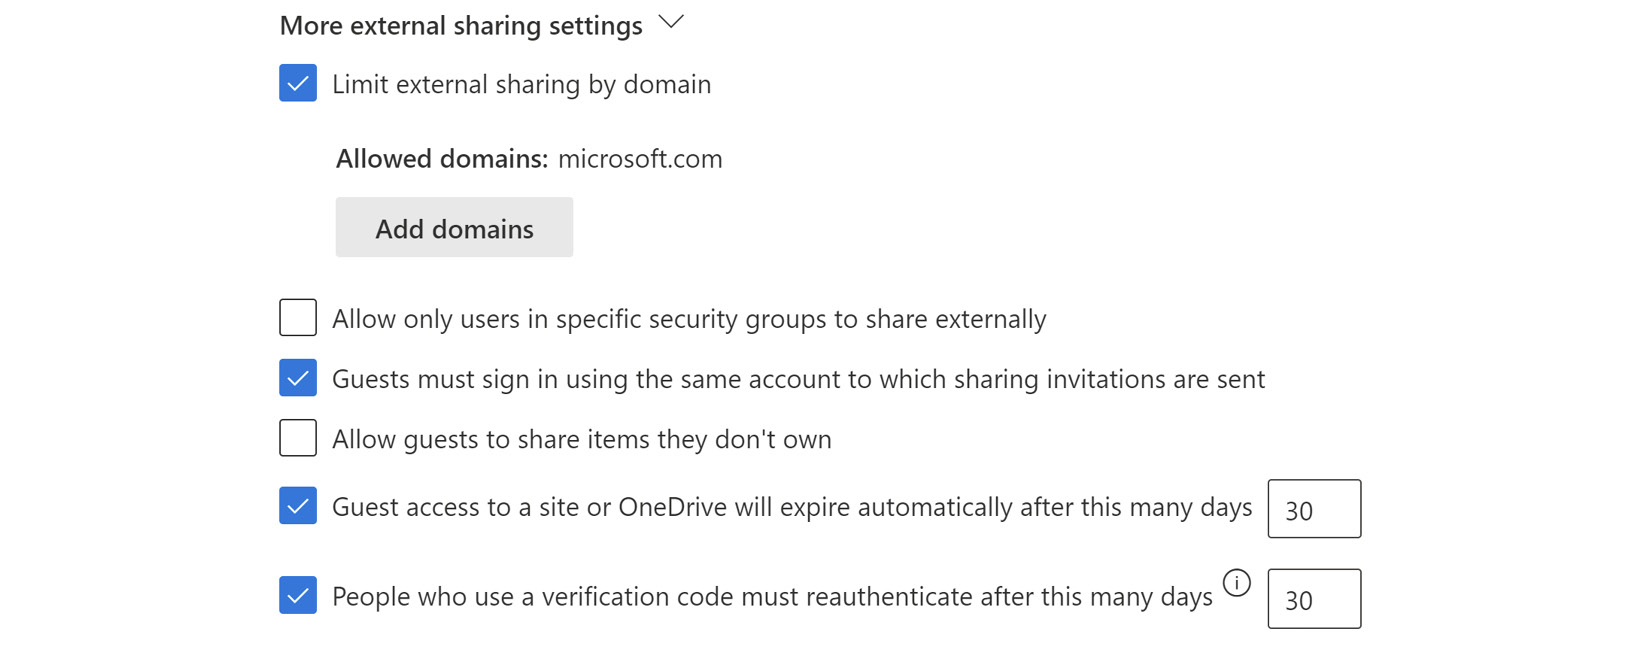
Figure 9.8 – More external sharing settings in the SharePoint admin center
Please note in the preceding screenshot, we have checked the box to have guests sign in with the same account in which they received the invitation and have unchecked the ability to allow guests to share items they didn’t create. This, along with the expirations, will help to keep our content more secure.
The other settings we find here allow us to choose the type of default link. With Anyone disabled, we can either start with sharing to only people in our organization or by naming specific people. Where sharing with guests is expected, the latter option may be a time saver, but the first is a bit more secure. I would recommend always having the default link permission to be View instead of Edit, though the latter is the default. Users can change this in either case when they share content.
Site by site
We can also change that configuration to make exceptions at the site level as well. For SharePoint, we can select a site from the Active Sites list in the admin center and choose the Sharing menu. From here, we can change the selection for external sharing, up or down. For example, we can select Anyone even if the default is Organization only. A list of domains can be set uniquely here as well. For the default sharing link type and permissions, we can either choose to keep the site settings the same as the organization-level default or change it.
For OneDrive for Business sites, we need to go to the global admin center at https://admin.microsoft.com and take these steps:
- Select an active user.
- On the OneDrive tab for that user, we can navigate to Sharing.
- Select Manage external sharing.
If we check the option to allow people outside the organization to have access, we have one of three options to choose, as seen in the following screenshot:
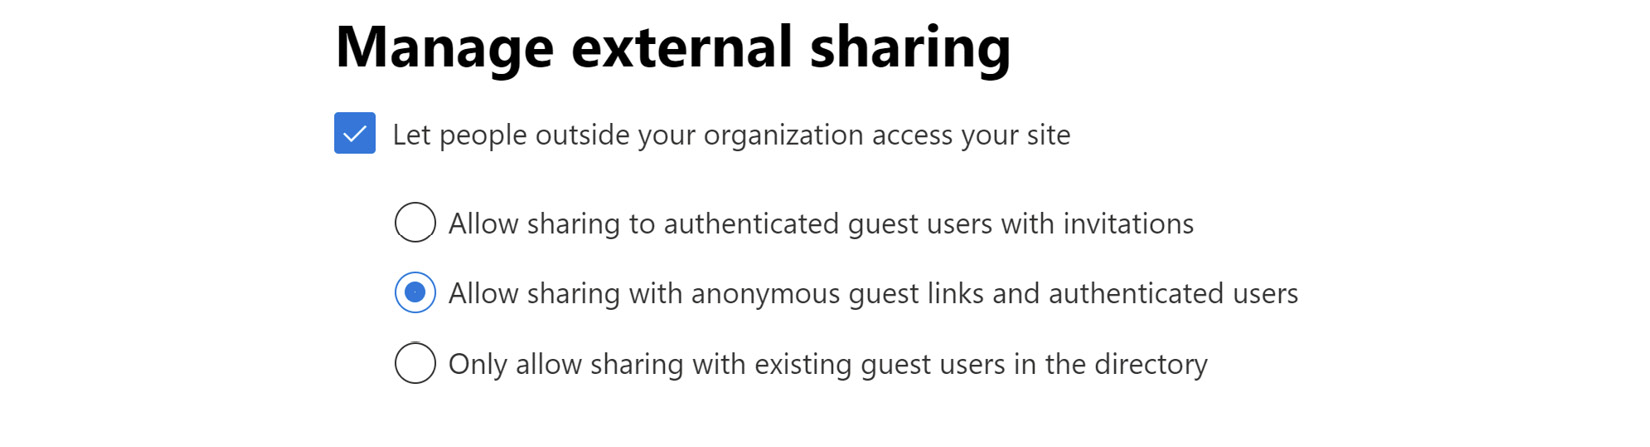
Figure 9.9 – Changing the external sharing options for a OneDrive site
We also have the choice to set these options via PowerShell using the Set-SPOSite cmdlet, as follows:
Set-SPOSite -Identity https://contoso.sharepoint.com/sites/siteTest -SharingDomainRestrictionMode AllowList -SharingAllowedDomainList “contoso.com” -SharingCapability ExternalUserSharingOnly.
Taking the time to configure sharing capabilities as early as possible will set us up for a more secure environment. What if we’re not opposed to sharing content unless that content has some sensitive data within? The settings we’ve reviewed so far are the same regardless of what documents contain. If we want to limit sharing based on the detection of sensitive information, we need to also implement DLP policies.
Using DLP to manage external sharing
In the Microsoft Purview admin center, a global or security admin can create and administer policies designed to detect and respond to sensitive information being shared externally. This section is not an exhaustive effort to cover DLP, but an opportunity for us to see how it can enhance and better secure the SPO sharing experience.
Perhaps we can think about DLP policies as performing very specific searches for us in the places we’ve specified that triggers when it finds something that looks like a match to one of our rules. We as admins and users can be notified and decide how to respond.
Let’s break down what DPL policies are and how they are created, and how admins can be alerted if an action triggers a policy.
DLP policies
DLP policies start from templates that fit into one of the following four categories:
- Financial
- Medical and health
- Privacy
- Custom
Each template includes awareness of sensitivity or retention labels, or one or more sensitive information types (SITs). In the first three templates, we have a pre-selected list of SITs. For example, the United States (US) Financial Data template includes credit card number, US bank account number, and American Bankers Association (ABA) routing number. These SITs are predefined in the admin center, but we can create our own if needed by using regular expressions (regexes). Each defined pattern is accompanied by a confidence level that determines the amount of supporting evidence that is needed per match.
A policy can find and protect data that lives in SharePoint sites or OneDrive for Business accounts, along with Exchange, Teams, devices, on-premises repositories, Microsoft Defender for Cloud Apps, and Power BI workspaces. We define a location when we create the policy. Multiple rules can be applied to a single piece of content, which are evaluated in priority order.
Creating a policy
To perform these steps, we either need to be a global or compliance admin. SharePoint admins can’t access the portal otherwise. In the Microsoft Purview compliance portal, we can navigate to the Solutions area, locate DLP policies, and create a new one. We can set the following details:
- Template: We can search the built-in templates or create one from scratch. The templates will automatically use the sensitive information types they’ve been configured with.
- Name: Replace the name borrowed from the template with a descriptive name for our policy, including trigger, condition, and location information.
- Locations to protect: Given our focus on SharePoint and OneDrive, we can either apply our policy to all sites and accounts or pick specific ones. You’ll need to enter full site URLs for SharePoint or select from a list of accounts. You can also choose a distribution group to grab everyone in that group. We also have the option to exclude sites or accounts as well.
- Policy settings: Choose whether to use the defaults or customize advanced DLP rules that can include conditions, exceptions, options for notifications and overrides, and incident reporting.
- Protection actions: We can show notifications and tips in the apps where users are working on content. We can define how many instances of the same sensitive information are needed in an item before the condition is met. We can choose whether admins get emails if a report is triggered or if a DLP rule is matched. The last checkbox enables us to restrict access or encrypt content in the source locations if the policy is triggered.
Here is a screenshot of the possible conditions we can apply if we choose advanced DLP rules:

Figure 9.10 – View of advanced rule conditions on a DLP policy
We can join multiple conditions together in the creation of our rule. Note that the Content is shared from Microsoft 365 condition would allow us to respond if someone tries to share a document from SharePoint or OneDrive for Business (along with email and Teams chat) and that document has already been identified as containing sensitive information.
Sharing alerts
While DLP can automatically prevent someone from sharing a file if it contains sensitive information, there may be times when we just want to receive an admin notification if sharing occurs, not necessarily prevent it. We can do this in the same Microsoft Purview compliance center by creating an alert policy, as seen in the following screenshot:
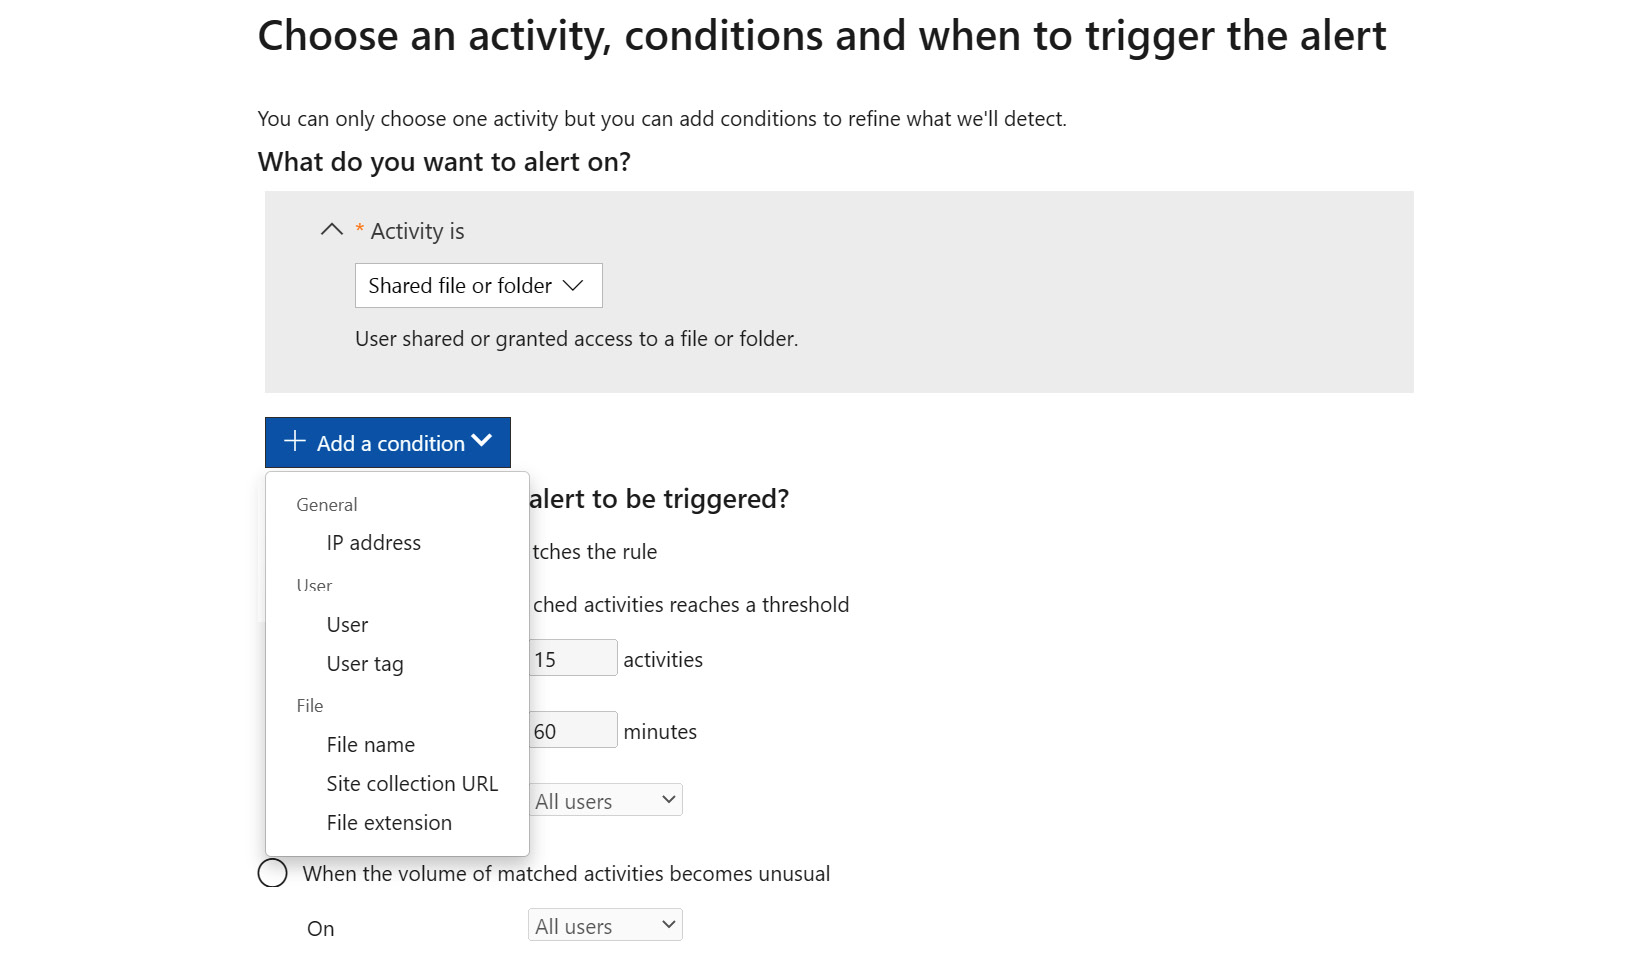
Figure 9.11 – Creating an alert policy for sharing
In the preceding screenshot, we’ve already chosen Shared file or folder as the activity. We could also choose the Shared file externally activity if we want to keep close tabs on sharing outside the organization. When the activity triggers, an alert email will be sent to whichever email recipients we’ve named. We can set a threshold for the number of times the activity occurs within a specified time frame, only get alerted if the volume of activities is unusual, or get an alert every time a file is shared (if we’re gluttons for punishment). The condition allows us to only get alerts when a certain Internet Protocol (IP) address, user, file, file type, or site is involved.
For end users, we can also leverage email notifications and policy tips to make them aware there is a compliance concern or violation, but still allow them to work. Policy tips can show in documents on SharePoint or OneDrive for Business at the top of the document in a yellow band or as a warning icon that can be expanded for more information.
So, in this section, we’ve seen that tools in the compliance center allow us to prevent sensitive information from leaving the company through sharing, or at a minimum to let admins, managers, compliance officers, or other concerned stakeholders know that it has occurred.
Summary and planning document
In this chapter, we’ve explored how to secure and share sites and content in SPO. Many of the concepts are familiar to admins of SharePoint on-premises, but we saw a few distinctions made necessary with the addition of M365 groups. Adding someone to a group automatically adds them to the associated SharePoint site. Sharing only the site with them doesn’t bring all the other M365 groups’ connected resources along. We also looked at best practices for external sharing and how to both limit it and be notified of it using tools in the Microsoft Purview compliance center.
This information will help us set up the permissions of sites in the most effective way, and to be aware of the implications of M365 groups that we didn’t have to worry about on-premises. Since sharing is an extension of the permissions of an item or document outside the organization, we should also have the context we need to configure it well and control/monitor sharing as it happens by using DLP.
Let’s define some questions to ask to create the security and permissions section of our planning document.
Permissions
Try to answer the following questions:
- Who should have access to a site? Are they already a part of an M365 group or an Azure AD security group? We should try to avoid adding users directly to a site.
- Should users have access to the SharePoint site only, or to other resources such as a chat in a Microsoft Team, if it’s available?
- Are there Azure AD security groups that you want to add to a team or team site that would allow the creation of a dynamic group?
- Should people without access to a site be able to request it, or should they get an error message when attempting to access site content?
- Who are the owners of each site? Should they have full control, or do they really just need to read and edit content?
- Do members need to create their own new lists or just interact with ones that exist?
Sharing
Have a go at answering the following questions:
- Do we want to allow or block external sharing at the tenant level?
- Do we want to enable anonymous sharing, which could introduce more security concerns?
- Which sites should allow a guest to access content, even if it is turned off globally?
- Are there certain users such as field sales reps, marketing, or executives who should be able to share externally from their OneDrive for Business account?
- Should certain people who handle highly sensitive data be blocked from sharing externally?
- Do admins or others need to be notified if documents are shared externally? If so, in all circumstances or just for sensitive content?
- If someone tries to share sensitive data internally or externally, should they be stopped from doing so by using a DLP policy?
Maintaining the security of our data is important and a never-ending process. Communicating the expectations, system settings, and rationale behind security decisions can be complicated if they are perceived to be onerous to the user. Providing awareness of the context and the business needs to keep data safe is critical to getting buy-in from everyone using M365. In the next chapter, we’ll explore those concepts and more around successful adoption and effective change management, in security…and beyond.