8
The Mega World of Metadata
We rely on the advantages of metadata regularly but may not even know it. For example, imagine you’re making winter travel plans to go skiing. You know your jacket has seen better days, so you decide to hop onto your computer, go to your favorite online retailer, and enter the word skiing in the search box. What results will you get back?
Having just entered that keyword, I see that over 10,000 results are waiting for me! To get ready for the trip, we may eventually need clothes, equipment, some lip balm, or even a movie about skiing to get us in the mood, but what we need right now is a jacket. Rather than page through 10,000 results 20 items at a time, we can use metadata to filter our search.
Maybe we choose a department to limit the results to clothing, a favorite brand, a price range, or a condition (new or used). Any time we use information that describes a thing but is not inherent in that thing, we are using metadata. Metadata is sometimes referred to as properties, tagging, attributes, or columns, but the goal is to make storing and finding data easier once the metadata is applied. Sorting, filtering, and grouping all rely on metadata in the world of online shopping or the world of SharePoint data.
In this chapter, we’ll explore why metadata is so important, how to implement it in the most beneficial and useful ways, where to create it, and which features and functions it drives in SharePoint Online (SPO). We will go through the following main topics:
- The crucial role of metadata in SPO
- Site columns, content types, and document templates
- Managed Metadata
- SharePoint Syntex and Viva Topics
- Metadata on a mission—retention and sensitivity labels
Let’s start by building our awareness and discussing why good metadata is so crucial to the success of our SPO environment.
The crucial role of metadata in SPO
Metadata is simply data about data or additional data that we can use to describe something in greater detail. In SharePoint, lists and libraries use metadata to describe content. For lists and libraries, the columns of data used to describe an item are metadata. Created, Created By, Modified, and Modified By are out-of-the-box metadata, but we can add any number of additional columns as well. Effective metadata enables better organization, searching, and classification.
While you can search for items and documents by keyword within the content, we are missing out if we don’t take the time to plan effective metadata, which can give you additional ways to organize data and aids in both viewing and searching. Additionally, we can attach extra functionality—such as retention, disposition, classification, and sensitivity—to metadata as well.
Here’s a simple example. Let’s assume your favorite book is stored as a document in SharePoint. The content on the pages themselves is the data. Other attributes that tell us more about the book are metadata. The title, the price, the International Standard Book Number (ISBN), and the author are all pieces of metadata. Suppose that we now need to find that book in a warehouse full of books—in other words, that document lives with thousands of other documents in our SharePoint library. What additional metadata could we use to find our book quickly, and maybe even others similar to it?
SharePoint libraries also support the use of folders for organizations. Views use metadata to provide multiple ways to organize. Folders provide a single method of organization. Imagine if the bookstore were actually a bunch of smaller bookstores inside. If our book was published in 1998 and the general subject is science fiction, do we put it in the store built for 90s books or do we put it in the store for science fiction books? Being able to search by metadata allows the book to live in one spot but gives us multiple ways to find it.
Understanding the options
To help us get started down the right path, here is a rundown of the tools and technical options available to us to make metadata shine. We’ll dig deeper into most of these areas as we proceed.
Where does metadata surface?
We will find metadata showing up and becoming practically useful in several locations, as noted here:
- Lists and libraries: Columns based on SharePoint-provided data types created for a specific list or library. A list or library can also provide default metadata columns and values.
- Views: Using the columns of metadata, we can create a dedicated page to show the data sorted, filtered, or grouped by that metadata. These pages can be saved or dynamically set each time we look for something.
- Document sets: Like folders, but with metadata that is shared with all documents inside. Can be changed at the top level to cascade down.
- Content types and site columns: Reusable site columns may be tied to an overall set of columns in a defined information type available across the site. This set may then be used in many lists and libraries.
- Inside Office documents: If a document has metadata, you can edit those properties inside of Word docs, Excel spreadsheets, and so on, or even embed them in the body of the document.
- Retention and sensitivity labels: Defined in the Microsoft Purview compliance portal. Applicable as metadata tags for documents. Can be used to enforce retention policies or tied to information sensitivity settings.
- Topic from Viva Topics: Viva Topics can use artificial intelligence (AI) as a guiding hand to apply a topic to people and content. This helps relieve the frustration of manual metadata tagging, but the topics can still be actively curated by a knowledge manager. Topics show up as embedded links inside content and provide a rollup of content into topic centers.
- Managed search properties: Helps both the Search and the Highlighted Content web part be more effective. Classic and PnP modern refinement panels can use these as well.
With this, we have a sense of where metadata is visible.
How do we add metadata?
Now, let’s see how we go about adding values that make it useful. We can do this in the following ways:
- Manually: Tag each document with the correct metadata as it’s added. SharePoint provides attention views to keep track of what is missed. This means we can go back and add metadata after content is added as well.
- Power Automate solution: Automatically apply metadata values based on custom conditions meaningful to the business
- Configure library/folder defaults: Set default values for each folder or library to automatically tag content with as many metadata values as you desire.
- Configure default labels: Set a default retention or classification label so that any file dropped into a library automatically inherits the proper characteristics.
- ShareGate spreadsheets: We reviewed ShareGate as a migration tool in Chapter 2, Making the Move – Migration Options and Considerations. We can use spreadsheets populated with document names and locations from a source and automatically apply metadata via a comma-separated values (CSV) file when documents are migrated.
- SharePoint Syntex: Use Microsoft AI to recognize content in documents, extract important information, and apply metadata tags.
- Viva Topics: Use AI and curated topic centers to add a topic to documents throughout your sites.
Metadata is useful but should also be consistent across lists and sites.
How do we reuse metadata across the enterprise?
Let’s look at options for reuse instead of reinvention. You can choose from the following:
- Site designs/PnP provisioning: An easy method to define a starting point for consistent metadata but hard to push incremental changes, as the templates apply at the time the site is built
- Content-type gallery: A content-type hub where you can create content types that get published or republished to multiple sites
- Using a hub to push content types: Create content types and columns on a hub site and automatically push to associated sites (requires a SharePoint Syntex license)
- Term store: A place for reusable values to attach to columns; any choice column that you use more than once or in more than one site could be added as a term set
- Search managed properties: Mapping crawled properties from content to managed properties allows us to use metadata to filter and refine search results through the Highlighted Content web part.
I think it’s clear to see that SharePoint is built on metadata. It’s going to be present whether we take full advantage of it or not. Unfortunately, most organizations never fully include metadata in their content management strategy or SPO implementation. From my experience, that is usually due to either not understanding the benefits fully or not being willing to take the time to add metadata from the beginning or train people in how to do so. It may also be due to the fact that metadata support has grown and changed multiple times over the years, so it can be confusing when trying to choose the best approach.
In the next session, let’s start looking at where and how to start applying valuable metadata to our content in lists and libraries.
Site columns, content types, and document templates
Lists and libraries in SPO are made for metadata. Columns that we create to build out the structure of a list and additional properties we can add to a library provide the focal point; it’s where our metadata resides. For the remainder of the chapter, let’s focus on metadata as it relates to libraries and documents.
Getting started
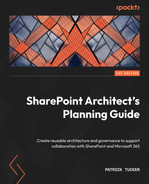
With any document library, we have a place to store files and folders. Our default metadata consists of Created, Created By, Modified, Modified By, and name along with additional metadata, such as file size, whether an item is a record, Like count, and others visible in the following screenshot:
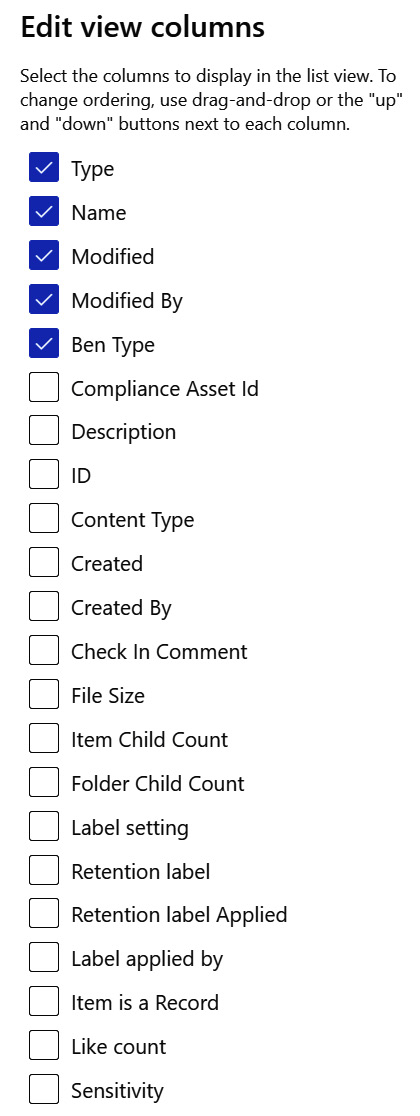
Figure 8.1 – Metadata columns as seen when editing a view on a library
While the built-in metadata is certainly valuable, it is through the addition of custom columns that we can leverage our business rules and requirements to provide even greater benefits. This starts with the addition of columns in a library. In a standard view, we can select Add Column to create a new column from a predefined list of data types (text, number, date and time, hyperlink, and so forth). We can also add columns by clicking on the gear icon while viewing a list or library and selecting the List settings or Library settings page. Here, we can see a listing of columns with links to create additional ones for our list or library:

Figure 8.2 – The Columns section of the Settings page for a document library
When a column is added in this manner, we are adding metadata to the single list or library we are currently on. In Figure 8.2, there is a custom column named Ben Type. This is a choice field created on a library within a human resources (HR) site and contains a list of available benefit types when adding documents to a library supporting multiple benefit documents for employees (such as life insurance, health insurance, and paid time off). Clicking on the name of the column allows us to edit it after it has been applied, so we could add more choices to the list if needed. We can also mark the column as Required so that files in the library will consistently apply that metadata.
Missing metadata
While SharePoint will allow us to fully upload and add new documents to the library without metadata marked as Required, we are still reminded that it is needed. If a column is marked as Required, we will be asked to supply a value in the details panel after the document is loaded. We will also see an icon to the right of the filename indicating that required metadata is missing and an indication in the view that required information should be supplied, which we see in the following screenshot:
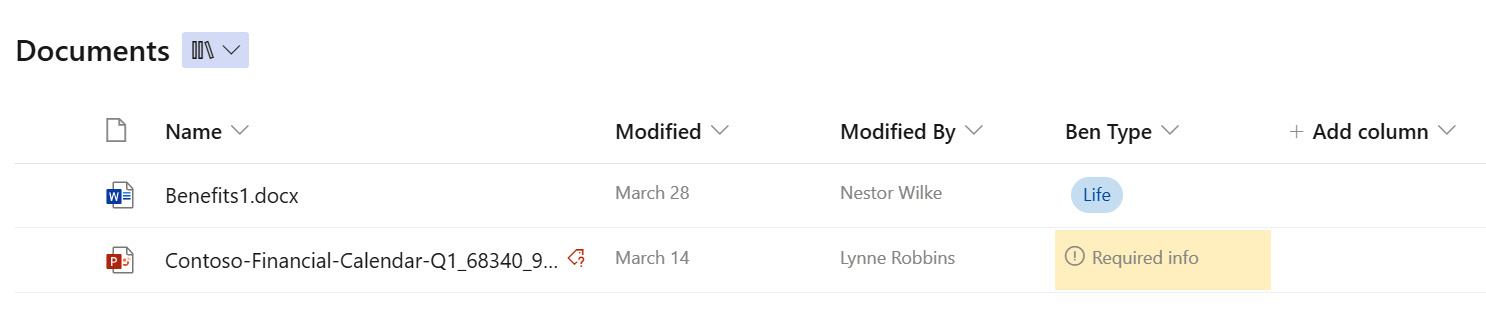
Figure 8.3 – Missing metadata indicators while looking at a library view
Once a document is added that lacks required metadata, a view is also dynamically created for our library, called the Files that need attention view. This shows only content that is missing metadata values. These features allow us to clearly see where metadata is missing in each library and hopefully provide an incentive to add it in after the fact. The value of metadata can only be realized when individual pieces of content are tagged with the right set of values to drive sorting, filtering, and searching.
Reusing metadata
Our custom column representing the type of benefit a document is related to may be useful across multiple libraries within the HR site. It could be that our organization comprises multiple sub-entities, each with its own HR sites. So, what if we wanted to use that same list of benefit types in multiple places? We could just keep creating the same column repeatedly, but if changes are necessary later, that’s a lot of work for us to update all those locations. Site columns can be grouped together into content types and made available to the search index to become available across sites. Document templates and managed metadata can help us to reuse a document layout or a set of values. The goal is to reuse as much as possible.
Site columns
To reuse the same column in multiple libraries, we need to use site columns. These are columns that are created at the site level and are available to use across any number of lists or libraries within a particular site. For example, if we were building an item inventory for a retailer, we may have a list for each product category—so… appliances, clothing, office supplies, food, and whatever else may be appropriate. While each set of items would have its own unique characteristics, there may be some repeatable and reusable metadata we could leverage. All items would have a purchase price, a sale price, and a supplier. For the supplier column, we may have a set list of supplier choices to choose from that are the same across categories and thus across lists. If we create a supplier site column, we can simply add it to each list rather than having multiple, discrete copies on each list.
Site columns must be created in advance by going to the Site Settings page. In the Web Designer Galleries section, we can click on Site columns to create what we need. Several will already be created for us, but we can create our own by defining a column name, data type, and group. I’ve found it a best practice to always create a custom group for site columns that are custom (rather than using the Custom Columns group). This allows us to use meaningful names such as the name of a company, project, or the like.
We may also use a specific prefix to help us identify custom columns when the context of the grouping isn’t clear. Where we want to use that column, we can now select it rather than recreate it. We need to do this step from the List settings or Library settings page by choosing Add from existing site columns. When we click that link, we can select our group to easily filter and view only the columns we’ve created. We can choose whether to add the new column to the default view, as seen in the following screenshot:
Figure 8.4 – Adding a site column to a library
Site columns are not only important for reusability, but also for making search work more effectively.
Crawled and managed properties
The search crawler in SPO is continually looking for newly added content to display in search results and search-driven components. When a new document is added to a library, the content of the file will be crawled and added to the search index. Our metadata can also be automatically added to the search index as crawled properties. Creating site columns can help automate this process.
If we have created a site column and content has been added for that property in a list or library, a crawled property may be added automatically. This will be true if the site column is created in a communication site, or if a Site Collection Administrator has added a site column in a modern team site. Search will then automatically add the crawled property as a managed property in the search index, which may be used to drive refiners and filters in components such as PnP Modern Search Web Parts or the Highlighted Content Web Part.
When a new column is added to the search index, it does not re-crawl existing content until the documents are edited and re-saved. This is one of the major limitations of the search crawl design. So, metadata planning really needs to take place before content is added to the system.
We can do this work manually by adding crawled properties and mapping them to managed properties in the SharePoint admin center by going to https://[TenantName]-admin.sharepoint.com/_layouts/15/searchadmin/TA_SearchAdministration.aspx and managing the search schema. This would require us to use one of the built-in managed properties consistent with the data type of a crawled property, such as RefinableString00 or RefinableDate01. There are a finite number of these managed properties within your search schema, so relying on site columns to automate this work will save time and potential aggravation.
Reusing one column across libraries is valuable, but what if there are several properties that work together and need to travel together as well? Let’s talk about grouping columns together with content types.
Content types – packages of metadata
A content type is a set of site columns that are defined together under a single label for reuse. Items for a list and documents for a library are built-in content types. We can create our own to encapsulate business data that describes an item or document consistently across lists and libraries.
In our earlier example of a library in an HR site, we had a column that indicated the type of applicable benefit. A content type for a benefits document would allow us to keep related information that describes a document together as a package that we might call Benefits Document. It might contain the type/category defined earlier, as well as the applicable year, area of the company where it applies, and perhaps a list of applicable departments.
We can build the content type in the same place we built our site column on the Site Settings page. This would make it available to all libraries in a site. If we want to make the content type available across multiple sites, we can build it in the Content type gallery found in the SharePoint admin center instead, at this Uniform Resource Locator (URL): https://[TenantName].sharepoint.com/sites/ContosoWorks/_layouts/15/SiteAdmin.aspx#/contentTypes. If we create it in the site, it’s immediately available. Content types from the gallery will need to be published for sites to use them. Once published, Microsoft has shifted from a push-everywhere model to a pull-as-needed model. Once a content type has been added to a list or library from the gallery, updates to the source in the Content type gallery will be propagated, but only to where the content types are used.
In either place, we build the content type by first creating all the columns (or adding them on the content-type definition page) and then just associate them under the content type we create. We will need to define a category, and we’ll need to select a parent content type to start from. This will allow us to define whether it will be available to lists, libraries, or folders within both. The result would look something like this:
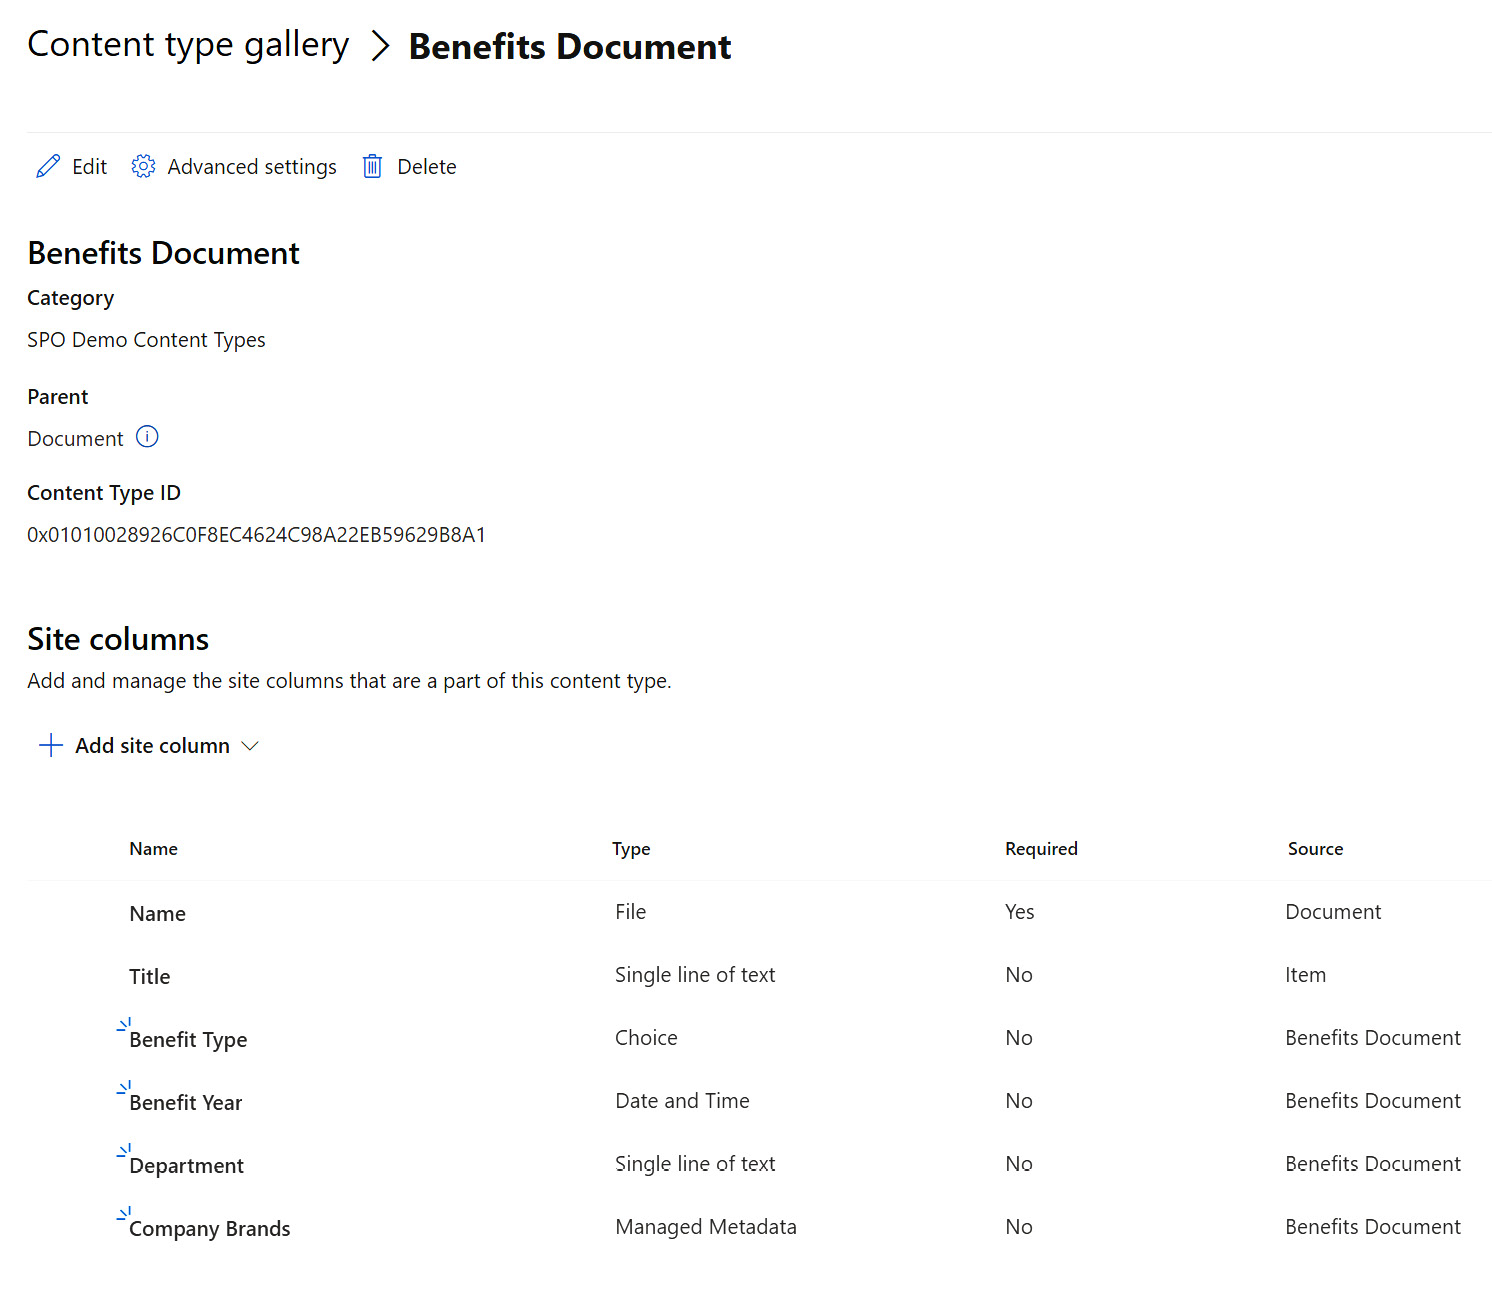
Figure 8.5 – An example of a content type created in the Content type gallery
By having a benefits content type, we can now have all the columns travel together and be applied to any number of libraries in our site, or across sites if we’ve used the gallery. We just need to make the library aware that the type exists. We can choose to use it alongside other content types we’ve defined or with built-in document types such as Word, Excel, or PowerPoint.
We must first enable content types for a list or library from its Settings page. We need to go to Library settings | Advanced Settings, then select Yes for Allow management of content types. We can continue to use the classic approach of adding our specific content type from that Settings page or use the new modern option by adding the Content Type column in the list or library view directly. By clicking Add column on the view and choosing Content Type, we are presented with a screen allowing us to select the published or site-level content types that are available. These are immediately added to the library. If we upload a file, we can change the content type of the document after it’s uploaded in the details panel. This has the effect of enabling the site columns on that document, which can then be supplied with the necessary values. We can then add the site columns to the library view as well. We see that in the detail panel shown in the following screenshot:
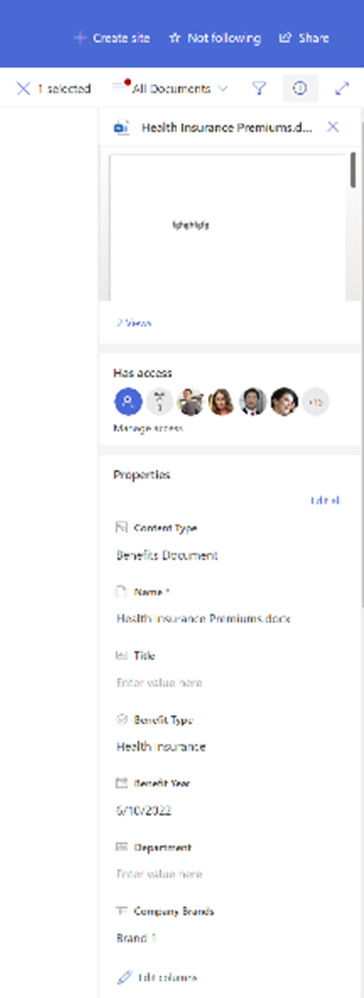
Figure 8.6 – Screen showing properties on the detail panel
Clicking the New button in the upper left of the screen, we see an option to create a new document using our Benefits Document content type. While the metadata columns will be applied, the document will still open with a default, blank page. What if we want to start with some boilerplate that should always be present within the benefits document itself?
Document templates
If a benefits document, in our example, should have some starter content or—optionally—a place to surface metadata properties within the content, we can use a template to help us out. This assumes that the document is an Office file (Word, Excel, PowerPoint, OneNote, or Visio drawing). There are a couple of different ways we can leverage templates.
Option 1 – From the New menu
Under the New button menu, there are two options we might see. One is Add template. Clicking this opens a Windows Explorer or Mac Finder window where we can select either a template file or an example Office file (so, either a .dotx or .docx file). That file is then uploaded and surfaced as a new library content type. The name of the file will determine the name of the template. If we don’t need to add content placeholders that map to metadata, this option works fine. For context, there are differences between how document templates work in SharePoint versus Office documents in general. In Office documents, the resulting .docx file retains a link to the .dotx file. In SharePoint, it makes a copy but doesn’t use the .dotx file as an Office template.
Option 2 – Creating a modern template menu item
Under the same New button, we have the option to create a template. While it starts the same way with an upload of a document serving as the template, we also get an online editor that can be used to insert placeholders inside the document, which acts as a place to surface whichever values are added through the metadata properties. The designer opens the file on the left (which cannot be edited here, so we need to make sure the template is complete before starting). We can highlight text and use the placeholder panel on the right to get things connected, as seen in the following screenshot:

Figure 8.7 – Adding placeholders to a modern template
When configuring each placeholder, we can enter text directly, select from column data in a list or library (selecting this will open a dialog to pick a library, then a column), or choose a managed metadata term, which we explore in greater depth shortly.
Option 3 – Adding a template in the Content type gallery
In the Content type gallery located in the SPO admin center, we can select a content type that is based on the Document parent type and go to Advanced settings. From there, we can either supply a URL to a template document already uploaded or we can upload a file to serve as the template from our computer. This does not currently give us the option to add placeholders. After saving changes, the content type will be updated wherever it is currently utilized.
Option 4 – The classic approach in Advanced settings
The modern approaches are preferable, but this is included for sake of completeness. If content types are disabled for a library and we are logged in as owners, we can go to the Advanced settings section on the Library settings page and either supply a relative path to a file to use as the template or click the Edit template link to open the template.dotx file for that library locally and make changes.
In this section, we’ve explored options for creating and reusing individual metadata columns or grouping them together to reuse as a package. We’ve also seen how content types can have an associated template file. In those content types, we included a Choice field. What if that list of choices needs to be included and consistent across multiple content types? That’s where Managed Metadata comes in.
Managed Metadata
The Managed Metadata service has been a mainstay of SharePoint for quite some time. At its core, Managed Metadata provides a way to centrally define and reuse sets of terms that can be applied to content as tags or property values. Since the repository of terms can be used consistently across multiple sites, it provides a great way to implement a standard organizational taxonomy.
While site columns create placeholders for values and content types group them together, Managed Metadata is where the reusable values themselves reside. Let’s review the components that come together to make managed metadata possible. The following diagram shows the objects in the term store and how they relate together:
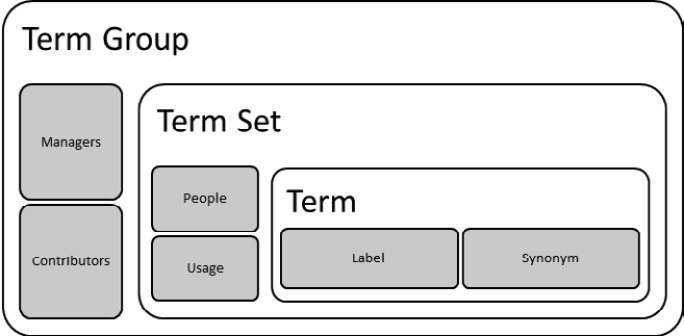
Figure 8.8 – A view of objects and their relationships inside the term store
Let’s expand these objects and explore a bit more detail about how they work. In SPO, the experience of managing and using terms has gone through a modernization, though a link to Return to classic can be found in the upper-right corner of the Term store page. The modern view is seen in the following screenshot:
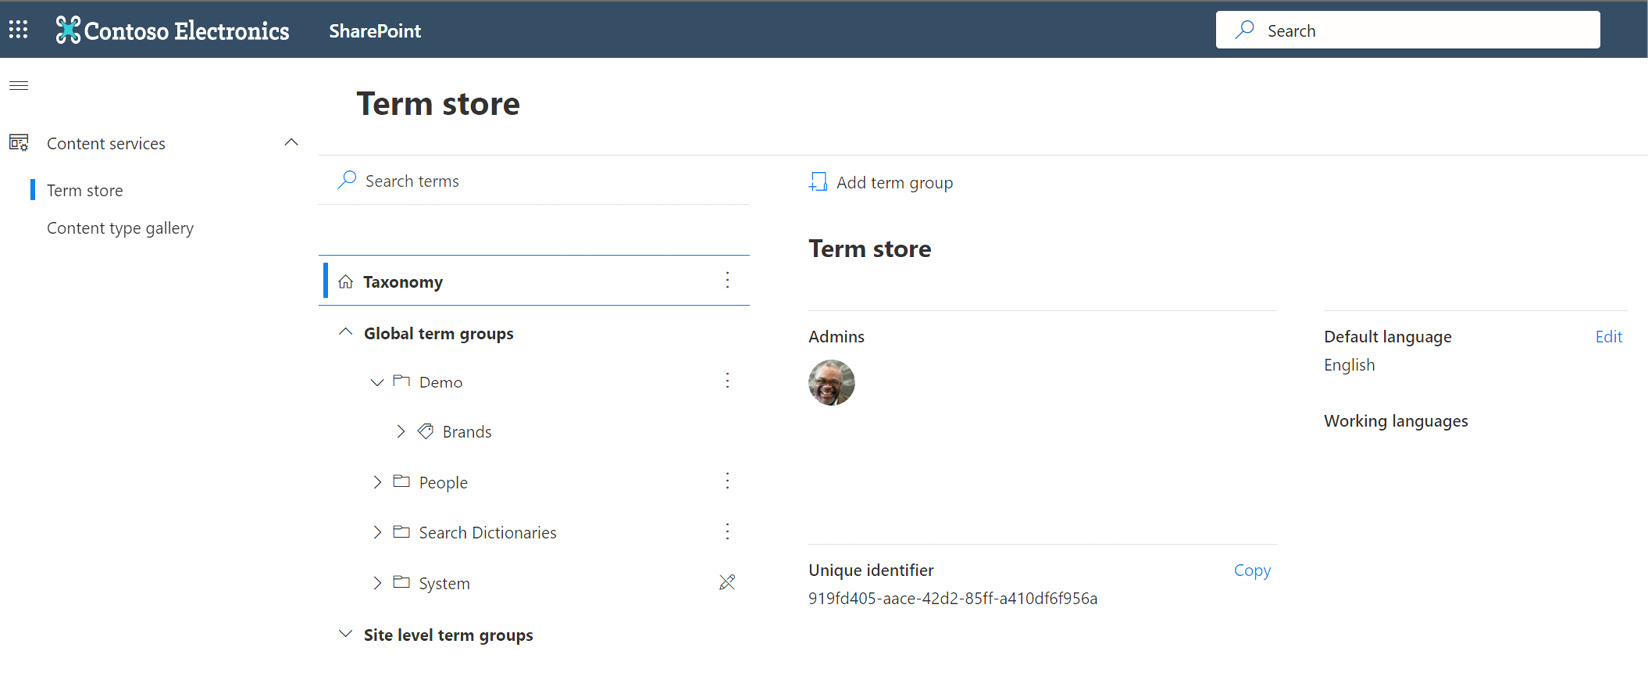
Figure 8.9 – Modern term store
Our starting point is the Content services section of the SPO admin center, which includes the following features:
- Term store—We get one per tenant. The Taxonomy node represents the term store, which gets its own set of admins. To fully utilize the features and functions, we need to be added as term store admins even if we are SharePoint admins. The first global admin is automatically added and is the only one who can add new Term store admins.
- Term groups—These provide structure for multiple term sets, acting almost like folders. Each group creates a security boundary where group managers and contributors may be added. Group managers can create new term sets and manage permissions for their group but do not have additional admin capabilities. There are two types of term groups, depending on who is responsible for maintaining them, as outlined here:
- Global term groups are defined in this global space, and managers or contributors would need to come to admin center pages to do their work.
- Site-level term groups are maintained here but are also accessible to site collection admins and site owners from the settings of their respective sites.
- Term sets—Each term set is a managed list of terms. Maybe we can think of a term set as a choice field on steroids and more global in scope. To create and manage terms, we must be admins, owners, contributors, or group managers. Terms may be added manually or imported in bulk from a CSV file. There can be a total of 1 million terms defined per tenant. A term set may be copied or moved to a different group. We can also use the following settings:
- Usage settings—We can decide whether a term set is open or closed. If open, end users of sites can add their own terms as they go. A term set can be sorted alphabetically or in a custom order.
- Navigation—Terms may be used for tagging but they can also be used for navigation. Since there is a hierarchy in a term set, that makes sense but only works at the site level, not for hub or global navigation.
- Terms and synonyms—Each term is a value in a listing of values. These values could be hierarchical as well, such as a cascading list of states and then cities. We may have a term set for things such as departments, corporate brands, project codes, or any other organizational collection of data that needs to be used globally and remain consistent. The primary term value is the label. We can also have synonyms. This is helpful when we have Human Resources, for example, but also want to call it HR. A term may be moved or copied to a different term set.
- Hashtags and keywords—We may as well consider this deprecated if we’re starting fresh with metadata. The system term set is available out of the box. It contains hashtags and keywords, which are remnants of classic SharePoint. Hashtags could be added to content to make it more searchable and more like social media. Keywords were more like a folksonomy—a perpetual, unstructured list where metadata could be added in a keyword column that surfaced on a per-list or per-library basis. The difference between taxonomy and folksonomy is that taxonomy is a top-down approach to classification and folksonomy is a bottom-up crowdsourced approach. Keywords are no longer added to a list or library by default, but list/library settings may be changed to do so. A system exists along with People and Search Dictionaries.
- Managed metadata columns—One of the data types we can choose when making a column for a list, library, or site column is Managed Metadata. This is really where our term sets have an impact as this is where values are applied, stored, and used for tagging and enhancing searchability. When we click to enter a value into a Managed Metadata column, we can click on the tag icon and be presented with a list of possible values. This stays consistent wherever that term set is used.
Managed Metadata provides a way to consistently tag and classify content. I like to think of the example of a grocery store. If I walk into a store I know, I can look at the headings at the top of each aisle and see a term defining what that aisle contains. When entering a new store for the first time, the aisles may be arranged differently, but the labels may still be consistent—produce, dairy, snacks, drinks, and so forth.
Even if the aisles in my store get rearranged, I rely on the consistency of the terms used to find my way, even when locations change. In data that our organization stores in SharePoint lists and libraries, we can use Managed Metadata to create a consistent set of values that allow us to find content quickly by searching, sorting, and filtering on the metadata tagging. This example is admittedly one-dimensional. Since terms may be nested, there may be hierarchies where picking one essentially filters the next level down.
One of the biggest challenges is taking the time and effort to build term sets, define content types, and apply metadata at the item or document level. In our next section, we’ll look at two metadata tools that may make that process easier with the help of AI.
SharePoint Syntex and Viva Topics
The single biggest blocker to the successful use of metadata has consistently been the amount of time it takes to tag content. This is true for new documents as they are added. That’s seen as a burden on busy content creators, and this burden is even greater for content that may have lived in SharePoint for some time. We move from a burden to a nearly insurmountable task.
One shortcut that has helped in the past is setting default metadata values based on a folder structure in a document library. Often, metadata is seen as a replacement for the use of folders since we can sort, filter, and group dynamically based on metadata values. In this case, the two can work together.
On the Library settings page, we can click on Column default value settings and then choose either the root of the library or any folders that we have created. In the example of a library on an HR site that can contain different types of benefits documents, we can add a folder for life insurance. For that folder, we can set a default choice field value with the right metadata. This is what we see in the following screenshot:
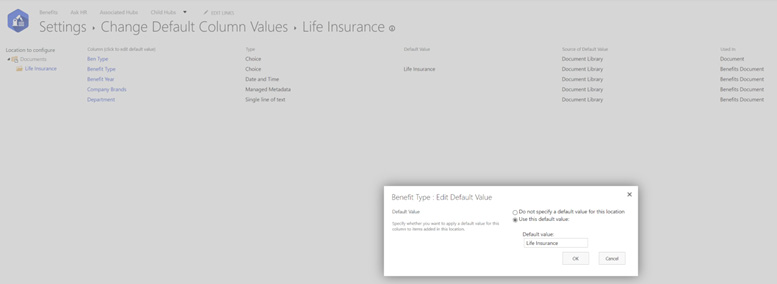
Figure 8.10 – Setting default column values for a column on a specific folder
Now, dropping a file aware of the column into the right folder automatically applies the right value. This can be a very useful option if the folders and metadata are both solidly defined in advance. This may mean more time to set up the architecture, but a more streamlined experience for content owners and creators. There’s less manual work for them to do.
SharePoint Syntex
This concept of making the application of metadata easier is where SharePoint Syntex comes into play. The goal of the product is to use AI and machine learning (ML) to automate the processing of content and application of metadata (both outside the document and inside the contents, such as with the modern template placeholders previously discussed). Syntex does require a separate license but provides two primary features all geared toward metadata extraction from forms, documents, and images to improve knowledge management and searchability.
- Document understanding—This allows us to use unstructured documents with common search phrases to automatically find placeholders in the file, extract them, and automatically populate metadata columns. A no-code model that we create and edit can automatically apply content types and extract metadata columns from Office documents we add to a library enabled with the feature. Training files can be used to mature the model by telling it where to find key information based on search patterns in the document and when it fails to do so. Models can be applied to any number of site libraries.
- Form processing—We can leverage the AI Builder tool that is part of Power Automate to create a form processing model. This also requires an additional license for both Power Automate and AI Builder. AI Builder credits are only included with Syntex if you have more than 300 seats. Otherwise, they need to be purchased separately. If form processing is enabled, we can go to Automate | AI Builder | Create a model to process a form menu in our document library. From the model, we can extract information from structured files. So, if a contract has the contract number in the upper right, we can use form processing to always locate it. The extracted information may be saved to a new or existing SharePoint list.
These features are configured in the M365 admin center under Settings > Org settings. A dedicated SharePoint site established as the content center also provides a place for admins to create models and training files (seen in the following screenshot):
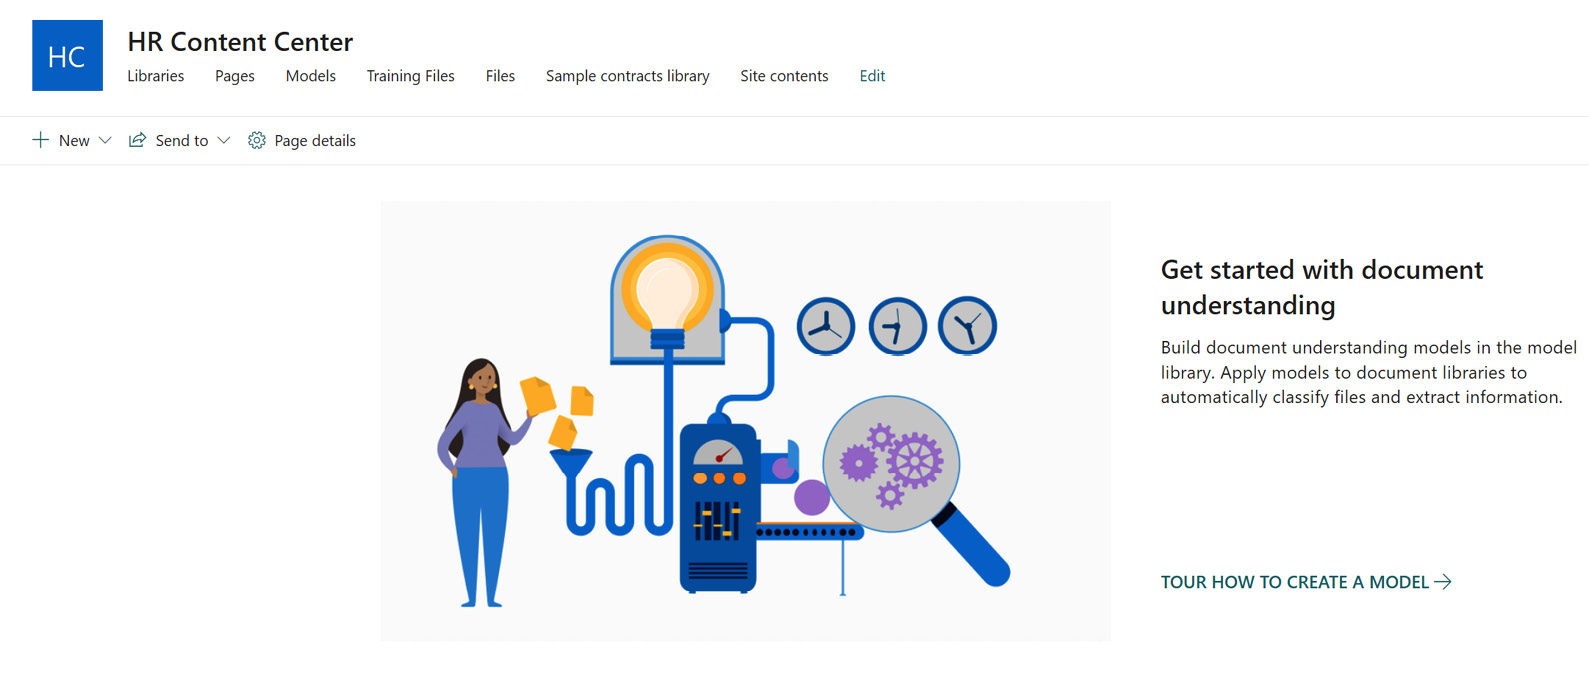
Figure 8.11 – The home page of a SharePoint Syntex content center
We can also create additional content centers if it makes sense to do so. In the preceding screenshot, this example is for content used by the HR department. Other business units (BUs) could have content centers of their own or use a single instance for all. The goal of SharePoint Syntex is to train a classifier to find metadata for us at the time content is loaded into the system and populate site columns we’ve created in advance to hold that data.
Viva Topics
This component of the Viva suite exists to bring metadata to content by using AI, ML, Microsoft Graph, search, and the human touch of curated topic pages. With Viva Topics installed, licensed, and running, the discovery process connects and surfaces commonly used terms within your content by associating them with a topic. It also connects people who seem to be commonly creating content or who are strongly associated with a topic.
The limiting factor of lacking time to effectively add metadata is partially addressed here by having Microsoft tag the content for us, but also gives us the ability to guide it and crowdsource the application of it. This use of metadata is in some ways more like enterprise keywords, in that a topic is a single tag or keyword. It can’t be joined with others in the same way that we can join site columns within a content type. However, one document could be connected to several topics if they are present within the content. Let’s take a look at how topics seem to magically show us the information we need at a glance, how we can configure that magic to our needs, and where to manage it.
Magic topics ride
The magic of Microsoft AI begins to find connections between content and people to create a suggested topic. Viva Topics looks to identify properties and information and displays them on a topic page that exists within the Viva Topics center. The page will include the following:
- Names, alternates, and/or acronyms
- A brief topic description
- People who might know about or be connected to the topic
- Documents, pages, and sites that may be related to the topic
In the following screenshot, we see an example of a suggested topic page for the Blackthorn keyword, which is the name of an executive project related to supply chain in the fictional Contoso topic center:
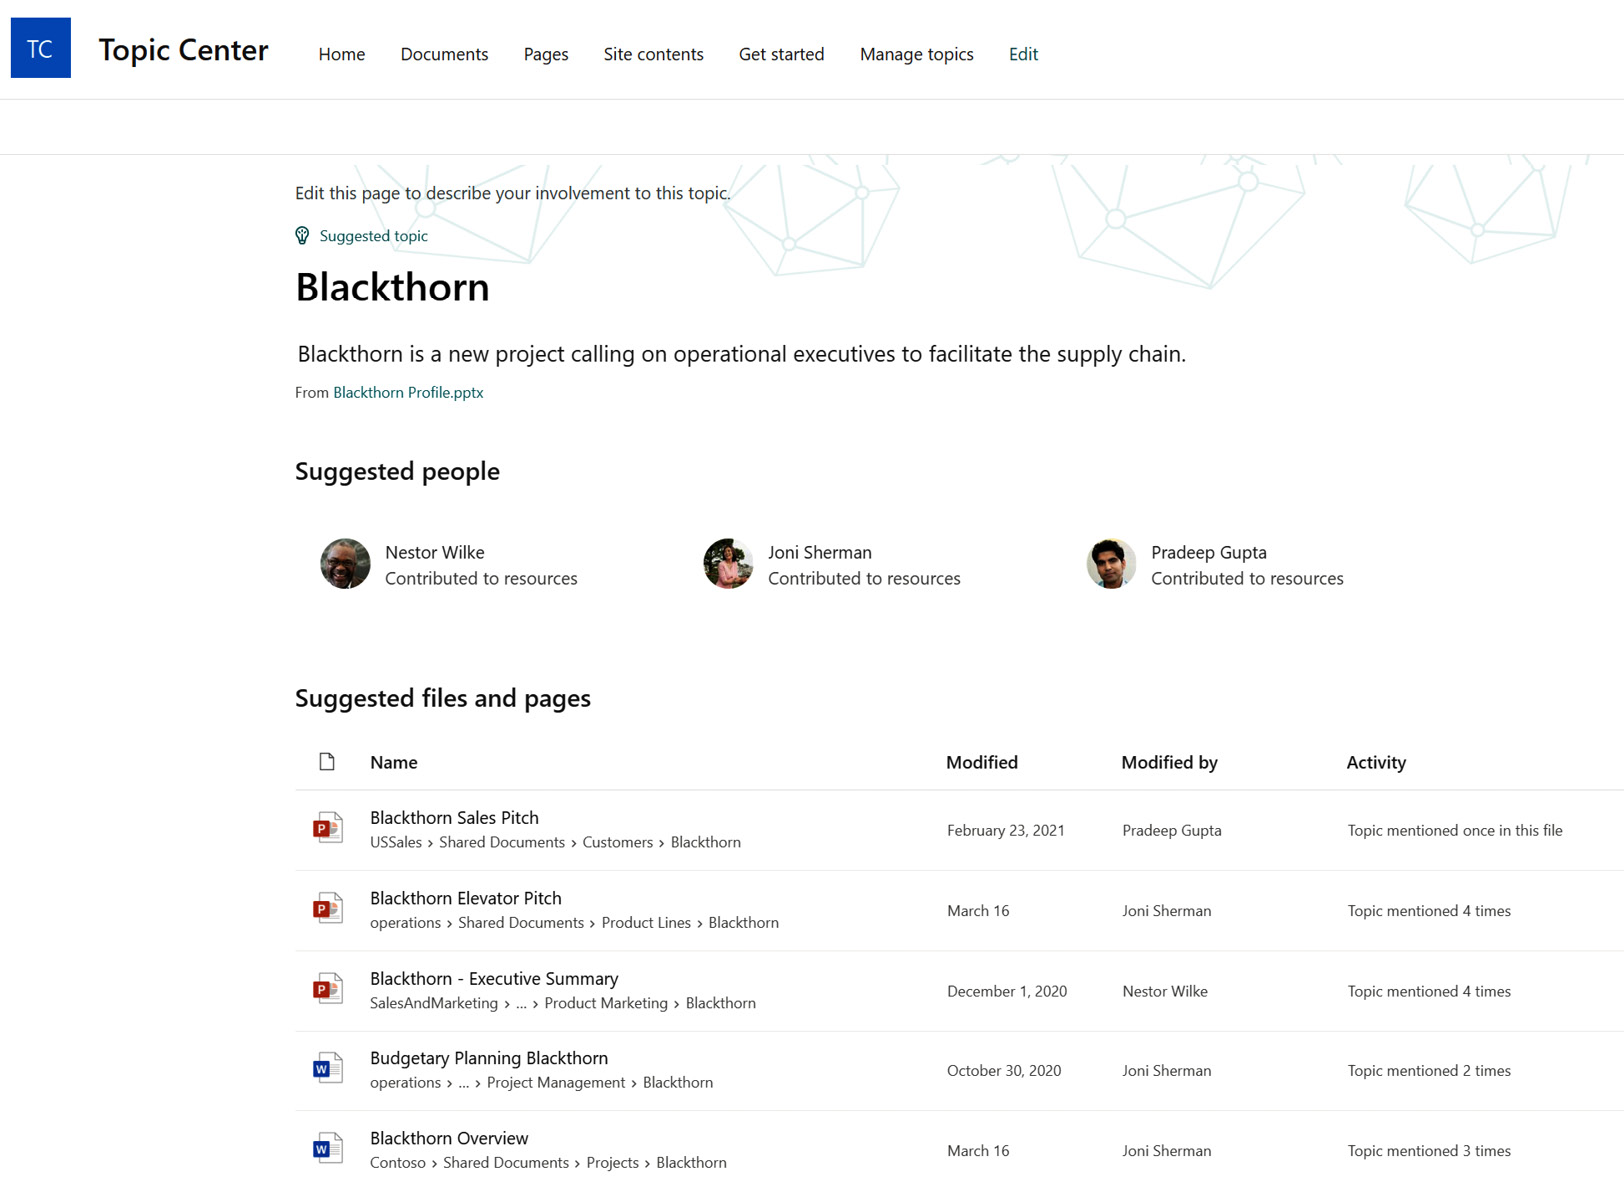
Figure 8.12 – An example of a suggested topic page
Because the Blackthorn keyword is mentioned numerous times, a topics page has been automatically generated.
Configuring the magic
We’ll look momentarily at how to make the topic page official, but first, we need to understand how we’ve gotten this far in the first place. In the M365 admin center | Settings | Org settings, we find a service link named Topic Experiences. It is here that we can configure some parameters around how the Topics service should work. These are the options we can configure there:
- Topic discovery—Here, we can choose which SharePoint sites should be used to discover topics. The default (and recommendation) is All sites, though we can specify a list to include, a list to exclude, none, or a set of selected sites that can be populated by uploading a CSV file. The process of initial discovery can take up to 2 weeks, so it is best to get things started and check back in on the progress. We can also exclude certain people here from being tagged by the AI on suggested topic pages.
- Topic visibility—Here, we can define who gets to see topics. We’ll discuss where they can be seen momentarily. The default is Everyone in the organization. We also have the option to decide if all suggested topics are visible or none. Since topics are designed to be curated by the crowd, All would be my choice.
- Topic permissions—Only open to those with group admin permissions, we can use this screen to decide who can create new topic pages or edit existing ones. We also have the option of setting who can manage topics in the topic center. This setting provides access to the Topic management dashboard. This list should be limited to admins and organizational knowledge managers, who will have the ability to confirm, reject, or view feedback on topics. The resulting role assignments are listed here:
- Topic viewer—Must have a Viva Topics license and visibility to topics but can’t make changes to topics.
- Topic contributor—Must have a Viva Topics license and can view and edit topics. These users can also create new topics in the Topic center.
- Knowledge manager—Must have a Viva Topics license and can manage topics for the organization on the Manage topics page of the Topic center. Upon viewing suggested topics, knowledge managers can accept or remove them.
- Knowledge admin—Admins who set up Viva Topics in Microsoft 365 (M365) and have access to manage the Topic center and Topic pages.
- Topic Center—A SharePoint site is created for the Topic center. This is defined at the beginning. Only the site title, or Topic center name, may be modified.
The Topic center
The Topic center is a SharePoint site like any other communication site but built with additional features and capabilities. The home page of the site will show suggested topics and confirmed connections for each logged-in user, as seen in the following screenshot:

Figure 8.13 – An example Topic center home page
The Get started page is one that can be used to plan the rollout and adoption of topics with links to Microsoft adoption and knowledge collateral. The Manage topics page is where knowledge managers may view suggested, confirmed, published, and removed topics with a graph to show adoption stats. Topics can be confirmed from the list on the suggested topics page by a knowledge manager.
So, what happens once a topic has been confirmed and published? It starts to show up in a few key locations on our sites.
Interacting with topics
In addition to a visit to the Topic center (which may not be the friendliest experience for standard users), topics themselves are surfaced in the following ways:
- A Topics web part—If we do want to retain the user interface (UI) of the Topic center but don’t want users to navigate to the center’s URL, we can include a Topics web part on any site. It will display the same information as the Topic center home page.
- Topics highlighted on SharePoint pages and news posts—If a topic is included on SharePoint pages, it will automatically become a clickable link with a card that pops up on hover. The card will include the title, details, people, documents, sites, and related topics. Clicking the link will take us to the specific topic page in the Topic center. The fact that this happens automatically, and no one needs to supply a hashtag or metadata value, is the real power behind Viva Topics. An example is shown here:

Figure 8.14 – A topic card visible on a SharePoint news page
- In Office applications—In the same way that topic cards are generated and can be clicked on pages, a topic card can be viewed as a result in the search panel on Office documents, opened on the web, or opened using desktop apps.
- Search results—If we were to search for the Blackthorn keyword, for which we have a published topic, a filter would be visible at the top of the search results page showing the title, description, and associated people, resources, and related topics within the search results page itself. After this, normal search results will display as well. So, a topic gives us a consolidated view across the topic material in one spot within the search, as shown in the following screenshot:
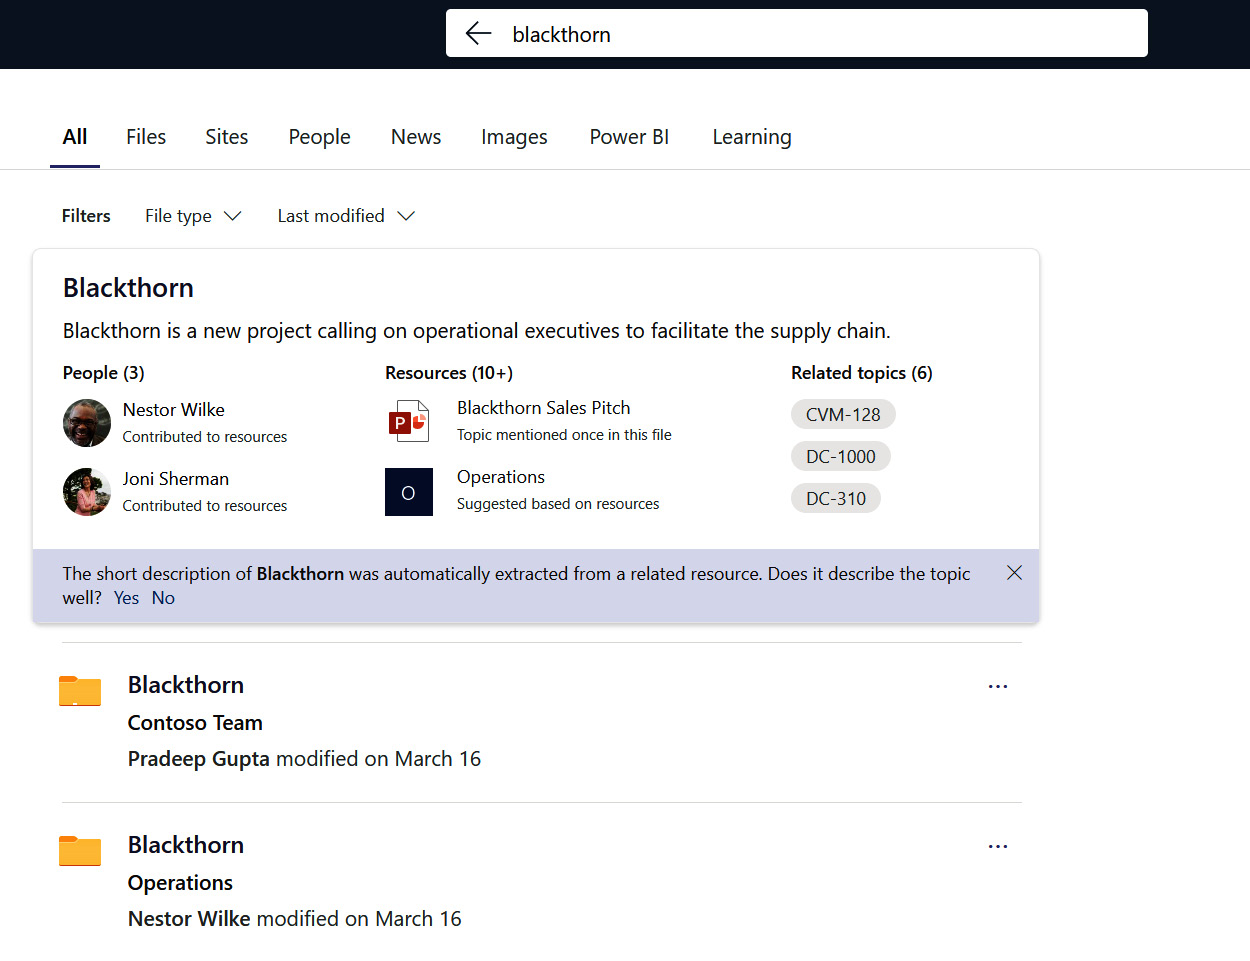
Figure 8.15 – Viewing the Topic filter on a search page in SPO
- In the Term store—On a given term set, under the usage settings, we find an option to create topics from terms. Clicking the Get Started button provides us with a checkbox list of terms within that term set. We can select each to then generate a new Viva topic for that term. This only works if the term has been applied to content. The term remains and is distinct from the topic if it is successfully created. Changes to the default label or the description of the term will update Viva Topics as well. This allows both metadata approaches to coexist. We can see the details here:

Figure 8.16 – Creating a topic from a term in the term store
So, SharePoint Syntex helps us to automate the processing of document information that can be supplied as metadata and surfaced within the content. Viva Topics helps us automate the application of tagging to content based on usage rather than manual effort. Both tools can be effective time savers for content creators and may supplement existing investments in traditional metadata as well.
In the next section, we have one more vantage point to take on metadata. What happens if the metadata value we supply is connected to other processes within M365 such as compliance and retention?
Metadata on a mission – retention and sensitivity labels
So far, we’ve discussed metadata as a way to drive content management toward consistency for the benefit of filtering, sorting, and searching. We can also use metadata to apply policies to documents that live in SharePoint. The policies can either be retention (how long a document is around and what its disposition rules are) or sensitivity (information protection rules for Office documents in SharePoint and OneDrive).
Retention labels
Retention labels can be defined in the Microsoft Purview (formerly the Compliance center as part of security and compliance) admin center and applied to an item or document in SharePoint or OneDrive, as well as the site itself if needed. Labels are in addition to policies that can be applied to larger sets of documents, such as all files in a particular site. The label is a metadata column that can be applied by an end user, automatically at the library level, or through a document understanding model from SharePoint Syntex.
The label is associated with rules related to how long the document should be kept in the system, actions that should occur when the time comes to delete it, and—optionally—whether content should be locked down as a record. A document may only have one retention label at a time, and the rules take effect when it is applied. The retention label will stay attached to the document even if it moves to a different location in SharePoint but is lost if the content is moved outside the system.
In the following example, we have a retention label configured to keep a document around 3 years from the time of creation and to auto-delete at the end of that time. The assumption is that documents may be uploaded as part of an employee’s onboarding that may contain sensitive financial information, and we need to keep the document around for legal compliance reasons:
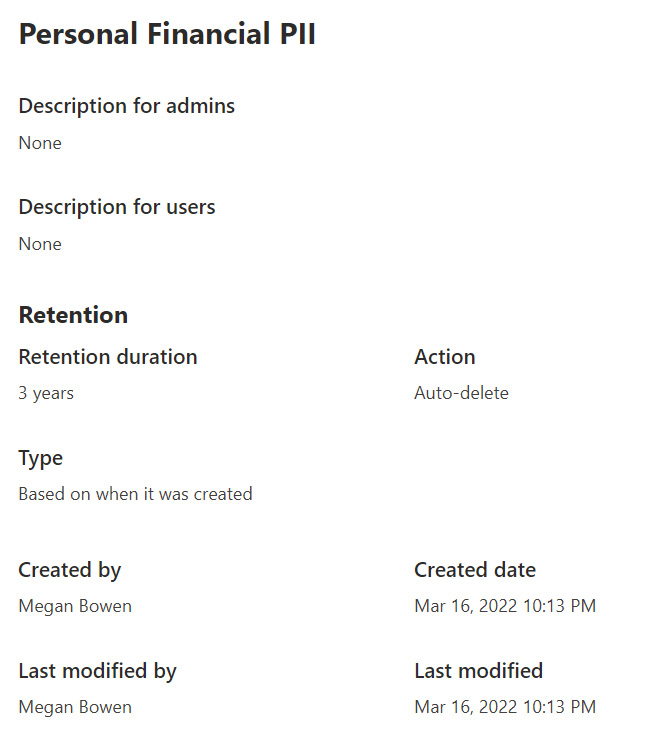
Figure 8.17 – Example of a retention label
Once this label is published to either all sites or to a specific site of our choosing (or M365 Groups, Exchange email, or OneDrive for Business), it will become available on the libraries within that site. We can then apply the label we want by name to the column called Retention Label (referred to in the details panel as Apply label). Even if there are several to choose from, we can only select one. Additional metadata columns automatically capture who applied the label and when it was applied.
If we want all documents in a library to have the same label applied, we can set the default label in the Permissions and management section of Library settings. This runs when we add a new document automatically, so users don’t have to remember to do this. We can also check the box to retroactively apply the label to all content that may already have been created, as shown in the following screenshot:

Figure 8.18 – Applying a retention label at the library level
Now, if we attempt to delete a file that is the target of retention, it will appear that we were successful. The document shows in the UI as being deleted. However, in a hidden list viewable and accessible only to site collection administrators and electronic discovery (eDiscovery) admins, called the Preservation Hold Library, our document is retained for the 3-year period with the label specified.
Retention labels are a way to apply different retention rules to varying documents all living in the same place. Retention is concerned only with how long content is kept. For additional access controls, we need to look at the other label option.
Sensitivity labels
These labels are around to help us as we share information inside and outside the organization. They can be applied to sites, groups, and teams or to individual documents, as we’ve seen with retention labels. Sensitivity labels may be set like a metadata column to a named label, or we may set the label within an Office document as well. These labels are supported on Windows, macOS, iOS, and Android and will remain with the content while inside SharePoint or if downloaded and stored externally.
Sensitivity labels can apply one or more of the following features:
- Encryption and content markings (watermarks, headers, footers)
- Create restrictions on which actions someone could take, such as not allowing offline access or expiring downloaded content after a period of time
- Restrict who can access the file over and above permissions on the library
- Set the default sharing link such as preventing external sharing for documents marked as internal
- Provide an alert when a document containing sensitive information is shared
These additional protections are enabled when the label is applied. We can also use the automatic application of a label so that a user doesn’t have to remember to do this.
Both types of labels are added as metadata to a file stored in SPO but have actions tied directly to them. The purpose of the label is not to classify or tag for searching, but to apply other rules and processes.
Summary and planning document
In this chapter, we’ve explored multiple ways to provide metadata values to documents that reside in SharePoint. List and libraries can have these columns defined just for themselves or we can leverage site columns and content types to work consistently across libraries and/or sites. Adding a document template and placeholders allows us to connect a starter document to a content type so that we can template both the contents and where the metadata connects within the file. The Managed Metadata service exists to provide those columns a list of consistent values to keep our metadata usable and up to date across sites in the tenant.
We explored SharePoint Syntex and Viva Topics as tools that allow us to remove the burden of manual application of metadata values and replace this with automatic extraction of that content within the document or generate tags from commonly used keywords. Finally, we found that metadata can also be used to apply retention and sensitivity rules to content that we define in the Microsoft Purview compliance area.
When planning for metadata, the more information we can determine in advance, the more successful our implementation will be. The tools reviewed in this chapter also help make refactoring content to add meaningful metadata for sorting, filtering, grouping, and searching easier and quicker. Next, we’ll look at some questions to consider when planning for metadata in SPO.
Sources of metadata
Try to answer the following questions:
- Do filenames currently contain metadata such as a date, project name, or department?
- Is anyone keeping spreadsheets of additional information about items or documents that could be leveraged as metadata?
- Do folder structures found on network file shares reveal a hierarchy of metadata values?
- Can we add metadata and keep folders or use metadata to replace source folders instead?
- What are the most searched keywords?
Applying metadata
Now, see if you can answer the following questions:
- Do we have any repetitive choice fields that could become a term set?
- Who are the knowledge managers in the organization? Are they the same as content creators?
- Do we have any enterprise keywords that are used across departments, locations, and sites?
- Do we have resources with time to create content types and apply metadata values?
- Which tools exist that automate the application of metadata?
- Do we need to apply metadata for new files as they are added or for legacy content as well?
- What are the most common use cases for searching content in our organization?
- What are the content sources that naturally span across multiple BUs?
Retention and sensitivity
Now, have a go at answering these questions:
- Do certain documents need to be retained for legal or compliance reasons?
- Does the organization have a comprehensive retention plan?
- Do content owners need to be notified when the retention period reaches an end?
- Do we need to restrict access to content when shared internally or externally?
- Should offline content be allowed? If so, how quickly should it expire?
- Do we apply labels for individual documents, or can they be grouped together?
In this chapter, we’ve looked at tagging content across sites. In the next chapter, we’ll turn our attention to securing those sites and their content, as well as controlling how and when information is shared outside the organization.