
Chapter 3 Getting Started Using Skype
Solutions in this chapter:
Signing Up As a User
We covered signing up as a new user during the installation process, but you might want or need to create multiple users or accounts at a later time. For example, you might want one account for you and another account for someone else in your household. Maybe you have a computer and a laptop, so you want to have a different account for each. Whatever your need, you can create and use multiple accounts in Skype.
After Skype has logged you in, you will be presented with the following screen:

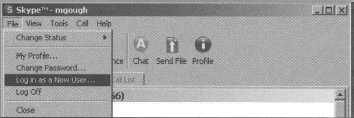
To create an additional account, select the File menu, and then select Log in as a New User …, as the following image indicates.

You will then be presented with the same screen you saw when you first signed up for your Skype account.

Select the New Users – Create a Skype Account tab. As we covered in Chapter 2 when you first signed up, create a new Skype name for yourself and follow the prompts. Once you are successful in creating a new account, Skype will log on the new user for you.
Switching between Users
If you have more than one user on your system, you will want to switch between these users from time to time. To switch between users you have created or allow any users who want to use their Skype accounts on your computer, select the File menu and then select Log in as a New User …, as the following image indicates.
You will then be presented with the following screen:

Select the Skype Name drop-down box, and you will see a list of all users who have logged in to the computer.

Select the user you want to log on, enter the correct password, and select Next.
Do not worry about the Set connection parameters and proxies link just yet. This is an advanced option that we’ll cover later.
You will then be presented with the main Skype screen showing the user you selected is logged in.

Adding or Searching for Contacts
Now that you are up and running, you will want to add Skype users or search for Skype users with whom you want to communicate. You can verbally ask people you know for their Skype names, send them an e-mail, or search in the Skype directory for them. You can add users two ways: via Add a Contact for a known Skype name or by searching the Skype directory for users.
There are two ways two add contacts. One is to click the ![]() icon or choose Add a Contact from the Tools menu.
icon or choose Add a Contact from the Tools menu.

Select one of the two options to add a user, and you will be presented the following screen.

Enter the Skype name that you want to add and press the ![]() button.
button.

You will then be presented with the results of your search to validate the user you want to add.

If more than one user is listed in the results, select one of them. At this point you may view the user’s profile or just add the selected contact. You may also double-click the user’s name and you will be presented with the following screen:

This screen will show you the contact’s short profile so that you can verify that he or she is the person you want to add. You can click either the Close or, if you want to add the contact, click the Add Contact button.
Once you add the contact, you will be presented with the following screen.
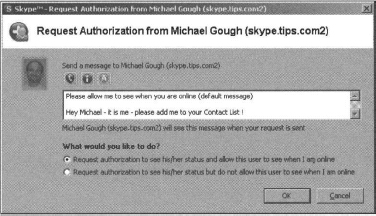
You can send the contact a message letting him or her know who you are. I left the default message on the screen, but you may type anything you like in the message window.
You are then presented two choices for requesting authorization. Every time you ask a Skype user to add you to their contact list requires the user’s authorization.

When the other user accepts the default authorization request, you will each be able to see the Online status of one another.
For more privacy, you can ask a contact to add you but not let them know when you are online. This is appropriate when you want to make calls to a person but not let them know every time you are online.
Understanding the Basics … Request Authorization
We recommend leaving the default selection when you request authorization and let your contact see when you are online, unless you desire more privacy and do not want to be disturbed.
After you send the request for authorization, you will be returned to the search result screen. Go ahead and close the window to return to the main Skype screen.
Your new Skype contact has been added and now will show up in your contact list as grayed out until the user approves your request for authorization. Your new contact will see the following screen to authorize you:

Once the contact approves you, the icon next to the user will turn green, showing you that you have been approved and added to the other user’s contact list.
Go ahead and repeat the steps we just described to add to your contact list all the people for whom you know their Skype contact names.
Understanding the Basics … Advertise Your Skype Name
You can add your Skype name to your e-mail signature so that anyone you normally communicate with will see you have a Skype name and can add you to their contact lists:
Skype = mgough
Searching for Contacts
If you do not know your contact’s Skype name, you can search the Skype directory for contacts using a simple search or and advanced search. Searches rely on the information a user adds to his or her profile. If your contact does not fill in all the profile entries, you will have difficulty locating that person.
Basic Search
There are two ways to start a basic search. One is by selecting the ![]() icon; the other is from the Tools menu.
icon; the other is from the Tools menu.

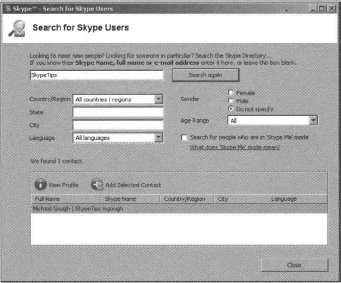
Select one of the two options to add a user, and you will be presented with the following screen:

Type the term you want to search for into the Search text box. You can search for three information items in the main Search box:
- User’s Skype name
- User’s full name
- User’s e-mail address
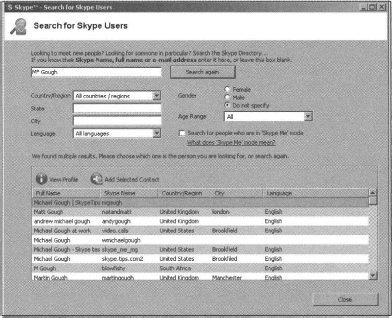
Fill in what you want to search for and select the ![]() button, and your results will be returned. In the following screen I searched for SkypeTips, to return my username.
button, and your results will be returned. In the following screen I searched for SkypeTips, to return my username.
Advanced Search
If the basic search does not locate the user you are looking for, you can use additional information items to search for a user:
- State
- City
- Language
- Gender
- Age range
Do not worry about SkypeMe mode at this time; we’ll cover that a little later.
You can now search for a contact by any of the criteria shown on this screen. Keep in mind that you can only search for information the user has entered into his or her profile. If the user did not input a city, for example, you will not be able to locate him or her based on city.
You may also use the wildcard ( * ) option to search for all items, but it is not completely effective. The wildcard option will return some interesting results. In the following screen, I typed in M* Gough. This returns the names of anyone whose first name starts with M and whose last name or Skype name is Gough.
Use the various search options to find the Skype users you are looking to add to your contact list.
Starting a Chat
One of Skype’s main features that you will use often is the Chat or IM feature. You will just say “Hi” or ask if someone is available for a voice call using the Chat option.
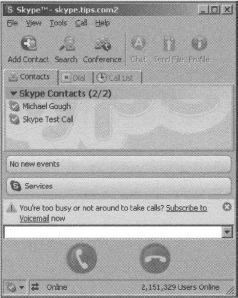
Before we start to explain how to start a Chat, we first need to discuss the selection of a contact in your list. Until now your contact list looked something like this.

When you select a contact in your list, the view will change to expand that user’s information.

The Contact name expands to include some basic profile information about the user. At this point, you can also right-click on the user name to get a menu of actions.
To start a chat, find the contact you want, select the name with a single mouse click, and initiate the chat using one of two methods: Select the ![]() icon at the top of the screen or right-click with your mouse on the contact name, and select
icon at the top of the screen or right-click with your mouse on the contact name, and select ![]() . We will discuss how to adjust the Skype Options settings later in this chapter, but if you make the default for double-click a contact to Start Chat, you will also be able to initiate a chat by double-clicking your contact’s name. Most IM tools such as MSN, Yahoo!, AIM, and others all use double-clicking to start a chat, so you will want to change this so that when you double-click a contact in your list it opens a Chat window and does not call your contact.
. We will discuss how to adjust the Skype Options settings later in this chapter, but if you make the default for double-click a contact to Start Chat, you will also be able to initiate a chat by double-clicking your contact’s name. Most IM tools such as MSN, Yahoo!, AIM, and others all use double-clicking to start a chat, so you will want to change this so that when you double-click a contact in your list it opens a Chat window and does not call your contact.
Once the Chat window is open, you can start typing your message, use emoticons, change the text, and invite other contacts to your chat.

Notice the ![]() icon in the bottom-right corner. This lock icon indicates that the chat session between contacts is encrypted with 256-bit AES encryption.
icon in the bottom-right corner. This lock icon indicates that the chat session between contacts is encrypted with 256-bit AES encryption.
From within the Chat window you can also initiate the following actions by clicking these icons:
 Add a contact to your chat (multiparty chat)
 Set the topic of your chat
 Quit the current chat
 Call your contact
 Send your contact a file
You can also view a contact’s profile by selecting the ![]() profile icon from the side of the Chat window.
profile icon from the side of the Chat window.

Making a Test Call
Now that Skype is installed and you have added one or more contacts, it is time to make your first test call. Skype provides a test user called Echo123 that is added when Skype is installed.
Select the Echo123 contact and you will see the following screen:

Click the ![]() icon to call Echo123, or right-click the contact name and select
icon to call Echo123, or right-click the contact name and select ![]() . To solicit an inbound test call from Echo123 right-click the contact name and select Start Chat … In the Chat window type ‘call me’ and click the Enter button. Once connected, Echo123 greets you with a message that explains how you may leave a short test voice message, just like an answering machine. Once you complete your 10-second message, it will be played back to you so that you’ll know whether Skype is working properly. If you hear your message played back, you are good to go and are ready to make your first Skype voice call to a real contact!
. To solicit an inbound test call from Echo123 right-click the contact name and select Start Chat … In the Chat window type ‘call me’ and click the Enter button. Once connected, Echo123 greets you with a message that explains how you may leave a short test voice message, just like an answering machine. Once you complete your 10-second message, it will be played back to you so that you’ll know whether Skype is working properly. If you hear your message played back, you are good to go and are ready to make your first Skype voice call to a real contact!
You are now ready to make your first Skype voice call to a real contact!
Making Your First Call
Now that you have completed the system test, you are ready to start talking with your family, friends, and colleagues.
Select a contact and either double-click the contact’s name or use the ![]() icon to initiate the call. When you call someone and that person does not answer, you will get a busy signal or voicemail. Once a contact answers, you can do the following within a call:
icon to initiate the call. When you call someone and that person does not answer, you will get a busy signal or voicemail. Once a contact answers, you can do the following within a call:
 Chat
Chat Call another contact or make a conference call
 Send your contact a file
 View their profile
 Put the call on hold
 Mute or unmute the microphone
When you initiate a call to one of your contacts and they answer, you will see a screen that resembles the following:

Expand the Skype window by selecting the right side of the window and dragging the window wider to the right to expose two additional icons. You should see the following screen.

Notice that you now have two more icons for putting the call on hold and muting the call.


In the bottom left corner of the screen, you should see the ![]() icon. This lock indicates that the voice call session between contacts is encrypted with 256bit AES encryption.
icon. This lock indicates that the voice call session between contacts is encrypted with 256bit AES encryption.
You can place the call on hold so that you can answer another call or attend to a task by selecting the ![]() icon. You might want to do this to answer another call or to initiate a conference call, or for any other reason. To take the call off hold, select the
icon. You might want to do this to answer another call or to initiate a conference call, or for any other reason. To take the call off hold, select the ![]() icon.
icon.
Muting and Unmuting the Microphone
You can mute and unmute the microphone by selecting the ![]() icon. You might want to do this to reduce feedback if you are using a microphone and external speakers, if you are just listening to a conference call, or if someone is talking to you in person and you do not want your call participants to hear what is going on. To unmute the microphone, select the
icon. You might want to do this to reduce feedback if you are using a microphone and external speakers, if you are just listening to a conference call, or if someone is talking to you in person and you do not want your call participants to hear what is going on. To unmute the microphone, select the ![]() icon again.
icon again.
Hanging Up the Call
Either party can end the call by selecting the ![]() hangup icon.
hangup icon.
Inviting Others to Join Skype
Since not everyone you know has or uses Skype, you might want to invite your family, friends, and colleagues to learn and use this great tool. Of course, you can ask them verbally or send them an e-mail, but Skype offers an automated way that will also provide the invitee a link via which he or she can download Skype. To do this, select Share Skype with a Friend from the Tools menu.

This choice launches your browser and takes you to the Skype Web site, where you can invite users to download and start using Skype via an e-mail Skype sends.

You can also send your family, friends, and colleagues an e-mail that contains a URL to the Skype download page, but the Skype invitation page makes it easy for you to invite users and get them familiar with the Skype Web site.
Setting Your Status
To let others online know your status (whether you’re online or off), use the Current Status setting. You set your status by selecting the drop-down box indicated by the ![]() icon in the bottom-left corner of the Skype screen.
icon in the bottom-left corner of the Skype screen.

You can also set your status from the Task Bar icon in the bottom-right corner of your screen.

You are presented with seven status options:
- Offline
- Online
- Skype Me
- Away
- Not Available
- Do Not Disturb
- Invisible
Offline
The Offline status setting will let your contacts know that you are no longer online. Because you are physically disconnected from the Skype network at this point, they cannot send you chat messages or call you.
- Indicates that you are offline
- Contacts see you as offline
- You cannot be contacted via chat or voice calls
The Online status setting changes your status back to normal online status and available for all features.
- Indicates that you are available and online
- Contacts can see that you are online
- You can be contacted via chat and calls
Skype Me
The Skype Me status setting makes you available for random chat, and anyone can call or chat with you without authorization. This setting overrides the authorization requests, so make sure that you really want this status setting because it means that anyone at any time can contact you from searches in the Skype directory. Privacy is basically disabled while this status setting is selected.
- Indicates that you are available and taking any calls from anyone, without authorization
- Contacts can see you are online and you can be “Skyped”
- You can be contacted via chat and calls
Understanding the Basics … Skype Me Status
Be careful using the Skype Me status option because it means that anyone can contact you any time, without authorization.
Away
The Away status setting tells your contacts that you are “away” and not at your computer to answer calls or chat. All features still work with this status setting enabled. This setting can be set manually and is automatically set to Away after you have not used your computer for a short period of time—five minutes by default. The status setting will return to Online once computer activity is sensed, only when it was automatically set by inactivity.
- Indicates that you are away from your computer for a short period of time
- Contacts can see you are online but away
- Automatically changes back to Online when computer activity is sensed
- You can be contacted via chat and calls
Not Available
The Not Available status setting tells your contacts you unavailable and not at your computer to answer calls or chat. All features still work with this status setting enabled. This setting can be set manually and is automatically set to Not Available after you have not used your computer for a long period of time—20 minutes by default. The status setting will return to Online once computer activity is sensed, only when it was automatically set by inactivity.
- Indicates that you have been away for a long period of time
- Contacts can see that you are online but are not available
- Automatically changes back to Online when computer activity is sensed
- You can be contacted via chat and calls
Do Not Disturb
The Do Not Disturb status setting tells your contacts that you should not be disturbed. However, your contacts can still contact you, and chats and calls will still come through. You will not hear ringing for incoming calls, and you must manually change this status setting when you want your contacts to know that you are available again.
- Contacts can see that you are online, but the status is Do Not Disturb
- You can make outbound contacts
- You can be contacted
Invisible
The Invisible status setting makes it look as though you are offline (even though you are not). You can still be contacted when your status is set to Invisible.
- Contacts see you as offline
- You can make outbound chats or calls
- You can be contacted
Basic Options
Now that you are up and running with Skype, we can explore the options available to better configure and customize Skype to your personal preferences. The following are the options that you can configure to meet your needs:
- General settings
- Privacy
- Notifications
- Sound alerts
- Sound devices (advanced)
- Hotkeys
- Connection (advanced)
- Advanced
- Voicemail (advanced)
We will not cover all these settings in this chapter, since we are only covering the basic settings at this point. The advanced settings are covered later in the book. To access the Skype Options settings, select the Tools menu, then select Options.

You will be presented with the list of options in the General Options tab.

Save and Cancel Buttons
If you change a setting, you must do one of two things: Click the ![]() button to save your changes, or click the
button to save your changes, or click the ![]() button to cancel your changes. You only have to click the Save button once after you have completed changes to any and all Option screens. If you click the Cancel button on any screen prior clicking the Save button, you will lose all changes since the last save. Some changes require you to restart Skype, so just follow the prompts.
button to cancel your changes. You only have to click the Save button once after you have completed changes to any and all Option screens. If you click the Cancel button on any screen prior clicking the Save button, you will lose all changes since the last save. Some changes require you to restart Skype, so just follow the prompts.
General Options
The General options tab allows you to set the following items:
- Double-click on a contact or use the address field
- Show emoticons
- Show me as away after X minutes
- Show me as not available after X minutes
Under Related Tasks, you will see:
- Edit your profile
- Adjust your sound devices
- Set connection parameters and proxy

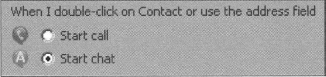
When I Double-Click a Contact Name, What Happens?
By default, when you double-click your mouse a contact name, Skype calls that contact. You might find that this is not the best option, because every time you double-click a user name accidentally, you will call that contact and then have to cancel the call. We recommend you change this setting to Start Chat. Then you can call your contact from within the Chat window by selecting the ![]() icon, as we discussed in Chapter 2.
icon, as we discussed in Chapter 2.
If you are an MSN, Yahoo!, AIM, or other IM user, you might find it convenient to set Start Chat as your default.
Understanding the Basics … General Options
We recommend that you set the Double-Click option to:
Emoticons are the cute little animated icons that appear in your Chat window when you select one of them from the menu. They help convey your feelings in an instant message. You will want to enable this setting unless you do not prefer to use emoticons.

Understanding the Basics … General Options
We recommend you set the Emoticons option to:

Show Me As …
There are two status settings that are automatic when you stop using your computer for a period of time. Skype will automatically set your status to one of the following:

We covered what these two settings mean in Chapter 2. If you want to adjust these settings so other users do not think you are away or not available after the default period of time, you may set these to your desired state. If you set the Away value to 0 it will disable both these features.
Understanding the Basics … General Options
We recommend you set the Show me as option to:

Related Tasks: Editing Your Skype Profile
Skype lists several items that are related in the Related Tasks area. For the General tab, the following are listed.

We cover only editing your profile here, since Adjust sound devices and Set connection parameters and proxies are advanced settings we cover in the “Advanced Settings” section of Chapter 6.
The one related task that appears in the General tab is the ![]() settings. This is where you add more information about yourself that you want published in the Skype directory. Most of the information you enter here is public information, so take care not to enter information you do not want others to know about you.
settings. This is where you add more information about yourself that you want published in the Skype directory. Most of the information you enter here is public information, so take care not to enter information you do not want others to know about you.
When you select the ![]() option, you will be presented with the following screen:
option, you will be presented with the following screen:

As you can see by my profile, I choose to share very little information with the public. I prefer that people contact me through my Web site or send me e-mail. This way I can limit the number of people looking for other Michael Goughs in the world or people who think they know me but whom I don’t remember.
What you put in here will be your personal preference. You can use the Full Name field to list something additional about you. Notice in the following screen that I have modified my Full Name to include my SkypeTips.com Web site. Changes to your profile are made available as soon as you click the Update button, but it will probably take a bit longer for this information to propagate throughout the network.

This is what your contacts will see when they select your name (Chapter 6 explains in detail how to use the fields in this dialog box):

This way you can customize what your contacts see next to your name on their contact list, or in my case my SkypeTips.com Web site.
Privacy Options
The Privacy Options tab allows you to set the following items:
- Allow calls from
- Allow chat from
- Allow SkypeIn calls from (advanced)
- Keep Chat History
Under Related Tasks, you will see:
- Manage blocked users
- Manage other programs’ access to Skype (advanced)

If people do a search and find you in the Skype directory, these settings will control what they can do upon selecting you as a new contact. The following is a list of possible settings:
- Anyone can call or chat
- Only people from my contacts list can call or chat
- Only people whom I have authorized can call or chat
It is important that you understand the differences among these three settings so that you make the best choice for your situation. The three settings have different meanings in terms of the way people can chat and call you. Do you want anyone to initiate a chat or call you before or after authorization, or do you want only people in your contacts list to be able to chat or call you?
Anyone Can …
If this option is selected, anyone can send a chat message or call you after they send you a request for Authorization. However, also be aware that they can chat and call you before you authorize them, as a part of asking you for authorization. Others can use this setting to explain to you who they are and why you should authorize them.
Only People from My Contacts Can …
If this option is selected, only people you have added to your contacts can send a chat message or call you. Users will be alerted that you are “not a contact” in their main Skype window if they attempt to chat or call you. If you are privacy conscious and do not want to be contacted by a user until you add that user to your contact list, this is the best setting to choose. Also, if you once authorized a contact and later removed the person from your contacts list, that user will be unable to chat to or call you. When a contact sends you a request for authorization, the chat and call features will be disabled.
Only People Whom I Have Authorized Can …
If this option is selected, potential contacts cannot chat or call you before you have authorized them and added them to your contacts. Users who have never been authorized will be alerted that they are “not authorized to call” you in their main Skype window if they attempt to chat to or call you. If you delete a previously-authorized user from your contact list with this option set, the user will still be able to contact you unless you block the user. If you delete a contact from your contact list with this option set, the user may still chat to or call you.
Understanding the Basics … Privacy Options
Here’s a brief summary of the privacy options:
- For the most privacy, enable Only people from my Contacts can …
- For good privacy, enable Only people whom I have authorized can …
- For the least privacy, enable Anyone can …
Allow Calls From
This setting is where you set who can call you.
Understanding the Basics … Privacy Options
We recommend you set the Allow Calls option to:

This is where you set who can chat with you.
Understanding the Basics … Privacy Options
We recommend you set the Allow Chats option to:

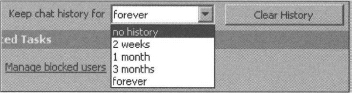
Keep Chat History
If you chat with your contacts, you might close the chat window and later want to remember what you chatted about. Skype gives you the option of saving your history for each chat for the following lengths of time:
- No history
- Two weeks
- One month
- Three months
- Forever
You may select whatever option you feel is best, but we would recommend changing this setting only after you understand Skype better and when you know that you do not want to save the chat history forever. Chat histories are stored unencrypted on users’ machines.
Understanding the Basics …Privacy Options
We recommend you set the Keep chat history for option to Forever.
In the Related Tasks area, Skype lists several items that are related. For the Privacy tab, the following items are listed.

We cover only Manage blocked users here. Manage other programs’ access to Skype is an advanced setting that we cover in the “Advanced Settings” section of Chapter 6.
Blocked Users
To access and manage your list of blocked users, use the Related Tasks area of the Privacy tab.

If there are Skype users that you no longer wish to contact you for any reason, you can block them by adding them to your Blocked Users list. They will not be able to see your online status, even if this had been previously authorized, and you will disappear from their contact list until you remove them from your Blocked User list. This tab is where you manage the list.

You may block a user when you right-click his or her name in your contacts list. You can also access this list from within a chat window by selecting the ![]() icon.
icon.

Notification Options
The Notification options tab allows you to display a notification if another Skype user does one of the following:
- Comes online
- Calls you
- Starts a chat with you
- Sends you a file
- Requests authorization
- Sends you contacts
- Leaves you a voicemail (advanced)
or to display messages for:
- Help/Tips

Only the Comes online setting is annoying when it’s set. As users come and go, the notification pops up in the bottom-right corner of your screen and can be very active, since it will also notify you regarding users’ status change from Away, Not Available, and others. We recommend leaving the other settings on by default so you know when an event happens.
Understanding the Basics … Privacy Options
We recommend you set the Comes online option to:

Related Tasks
In the Related Tasks area, Skype lists several items that are related. For the Notification tab, the following are listed:

Configure sound alerts is an advanced setting that we cover in the “Advanced Settings” section of Chapter 6.
When an event has happened that you missed, the ![]() icon in the Windows Task Bar will flash with a caution icon like this
icon in the Windows Task Bar will flash with a caution icon like this ![]() . This notifies you that you have a missed call.
. This notifies you that you have a missed call.

Events
Skype notifies you of any events in the main Skype window, such as missed calls or if someone has left you voicemail message.
Within your main Skype window, you will see a message in the Event window:

This message will tell you how many events you have. To check an event, simply select the yellow tab and it will expand to show you the specific events from each user.

You’ll see if you have a missed call or someone has left you voicemail (more on that in the “Voice Mail” section of Chapter 6). When you select the specific event, it will take you to all the events related to that contact.

Here you can listen to your voicemail or delete the event by selecting the trash ![]() icon. Here you can listen to your voicemail or delete the event by selecting the trash icon. Caution should be exercised when clicking on the trash icon, to avoid inadvertently deleting event items.
icon. Here you can listen to your voicemail or delete the event by selecting the trash icon. Caution should be exercised when clicking on the trash icon, to avoid inadvertently deleting event items.
Sound Alerts
The Sound Alerts option allows you to set the sounds that play for certain events. Next to each option are three icons:
 Play the sound
 Select a different sound file
 Reset the sound to Skype default

The default sounds are a good place to start, but if you tend to change sounds to your liking, feel free to customize Skype to play sounds the way you want.
Understanding the Basics … Privacy Options
We recommend you deselect the Play sound when contacts come online setting:
You may also choose Mute All Sounds and rely solely on the visual alerts to let you know what Skype is doing. We do not recommend this choice, however, as you could just as easily mute your sound card or turn off your speakers if you do not want Skype to make sounds as you use it.
Hotkeys Options
Many users still like to use the keyboard to control certain functions of their computer. Skype allows you to set several hotkeys for the following actions:
If you want to use hotkeys, you first have to enable them by selecting the Enable global hotkeys check box.

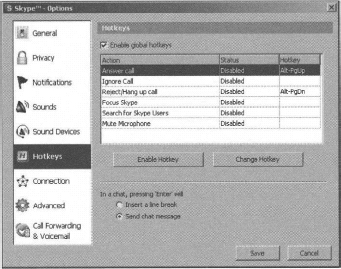
After you enable the hotkeys, you can set or change them to what you want. First, set the hotkey combination you want. Select the ![]() button and you will be prompted with the following screen:
button and you will be prompted with the following screen:

Fill in the hotkey combination you want to use. In the following example, we will set Focus Skype to Alt + S.

Now when you press the Alt + S key combination, the main Skype window will appear.

Now you must select the ![]() button to activate your setting.
button to activate your setting.
Understanding the Basics … Hotkeys
Be sure to test your hotkey combination to see whether any of the applications you normally use have the same combination you want to set for Skype.
While in Chat, Pressing Enter Will …
When you use chat, the default action when you press Enter is to send the chat message to your contact. If you like, you can change this action so that when you press Enter, you only create a new line in your message instead of sending the message. If you do this, you can send the message either by using your mouse to click the Enter icon in the chat window, or you can use the ALT+S keystroke combination.

Understanding the Basics …
While in Chat, Pressing Enter Will …
We recommend leaving the default to Enter sending the chat message:
