Chapter 6 Advanced Features of Skype
Solutions in this chapter:
Advanced Settings
As you have learned in the previous chapters of this book, Skype has a number of settings and configurations that affect its functionality and usefulness for your needs. In the sections that follow, we look at a number of advanced settings that you can adjust in Skype that affect the program’s startup, how calls are processed, and the way chats appear and function, as well as other settings that can impact the way you and your computer work with Skype. In addition, we discuss a number of command options that you can manually type and add to shortcuts, giving you more power in terms of the way you work with Skype. We cover the following topics in this section:
- Advanced profile settings
- Configuring sound alerts
- Sound devices
- Connection settings
- Advanced settings
- Command-line options
Advanced Profile Settings
Skype allows you to search for and talk with people you know or those you might like to meet. Skype also provides a way to share information about yourself online. People who use Skype can search for others who meet certain criteria, such as name, gender, age, language, and location that they provide in My Profile. My Profile is a dialog box that allows you to enter information about yourself. As we will see, some of this information is available to anyone who decides to search for and/or view your profile; other information is available to only Skype users that you have authorized to view your online status.
To view your Skype profile, click the File menu in Skype and then click the My Profile menu item, or click the Tools menu and then click Options, and then on the General settings under Related Tasks, choose Edit My Skype Profile. A dialog box similar to the following screen will appear. When opening this for the first time, you might be surprised to find that some of the information is already filled out. The details provided in these fields are obtained from information you provided when you set up your Skype account, but you can modify or delete any data appearing in these fields at any time.
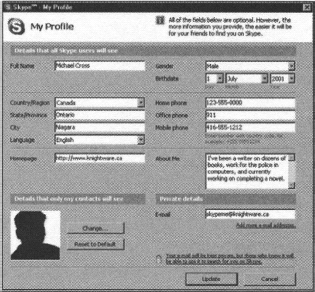
The My Profile dialog box provides different levels of access to information that others can view. As shown in the previous figure, there are three categories, which we discuss in the sections that follow:
- Details that all Skype users will see
- Details that only can be viewed by Skype users that you have authorized to see your online status
- Private details
Details That All Skype Users Will See
Details that all Skype users will see contains information that anyone using Skype can view. Anyone talking or chatting with you in Skype can view the information by right-clicking your avatar and choosing View Profile from the menu that appears. Also, anyone searching Skype for people to chat with or call can view this information, partially through their search results or by right-clicking your name in the search results and choosing View Profile from the menu that appears.
Personalizing Skype
As we discussed earlier in this chapter, Skype provides the ability to disclose information about yourself to others on the Internet, allowing others to discover who you are (or claim to be) as a person. This makes Skype a great method for meeting new people. You can view the interests, age, location, gender, and other facts of another person before starting a conversation. This allows you to find people who share common interests or hobbies that you share or want to discuss.
My Profile is separated into three categories to disclose different areas of information to everyone or only a select few on the Internet. These categories are:
- Details that all Skype users will see This option means that everyone on the Internet can view this section’s information using Skype.
- Details that will be seen only Skype users that I have authorized to view my online status. This option includes a picture you can set.
- Private details Email addresses are never viewable, but they can be used to find you if the user searching for you knows the complete email address. The e-mail addresses are kept private and unavailable for anyone to view using Skype.
Details that all Skype users will see contains information that is revealed to anyone searching for other Skype users. For example, while searching for user information, you could right-click a name in the search results, select View Profile from the menu that appears, and see profile information for that user.
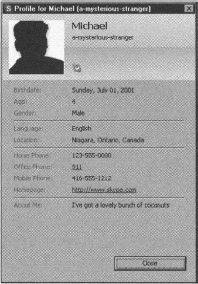
You can and will want to manipulate the information that you place inside your profile to share some additional information about yourself, more than the field name indicates. For example, Michael Gough has modified his Full Name field to Michael Gough | SkypeTips.com, and this is how all his contacts or anyone who searches for him will see him. In addition, he advertises that he has a webcam and uses Video4IM, by placing webcam & Video4IM in the City field so that users who select his name will see more information than the field’s name leads you to believe. Later we’ll discuss the reason that Michael does not provide the name of the city he lives in. The following screen is an example of Michael’s contact information.

All Michael wants anyone to know is that he is in Wisconsin, so the City field can be used for other practical information that other Skype contacts can see. Similarly, you will want to decide what normal information you want to include in your profile and what additional information you can manipulate into the available fields. For example, if you wanted everyone in your company using Skype to advertise your company name, you could add the company name to the Full Name field, such as Joe Skyper | My Company.
This would allow people to know that this is a work account and not a personal account. Feel free to use the fields, not just the way they are labeled, but also for what you want or need your profile to show.
Understanding the Basics …
Update Your Full Name in Your Profile to Show More about You
You can add more than your name to your Full Name profile entry. Add your company name, Web site URL, or any other unique piece of information for your contacts to see.
Providing Information Without Compromising Personal Privacy
Because Skype allows you to make personal information about yourself available to others on the Internet, you should be careful how much you reveal about yourself. Of the three sections in My Profile, the Details that all Skype users will see is the one you should be most concerned about because anyone can view this information. You should carefully consider the information you include in your profile.
Your profile includes fields that allow you to enter information that could be used for identity theft, for example. If you include your full name, birth date, gender, location, and other information of a personal nature, unscrupulous people viewing the information could utilize this data to gain further information about you and possibly use it for illegal activity. Even worse, a predator, stalker, or other dangerous persons could view the information and put you in physical or emotional jeopardy. For example, since areas to advertise your phone numbers are available to view in Skype, a person could begin harassing you by calling the work, home, or mobile phone number that you made available.
A Word about Privacy
Whenever you use the Internet, you should always be concerned what information you post or provide publicly, such as a profile for any IM client—and that includes Skype. Think of it this way: Share as little information as you need or want based on your desired privacy state. In the Skype profile example shown several pages ago, the last name is not specified. I prefer to show it in my profile because I want to be sought out for my efforts with Skype and video calls. I also do not list the city I live in—only the state and country. I would strongly recommend that you never list any personal information about your children, and if your children are using any IM clients, check their profiles to be sure that they do not share any personal information about themselves. This is your responsibility as a parent.
If you represent a company, you will also want to limit the information that is shared about your employees and your company. The simplest rule to follow when entering information in your profile is: Include only the absolute minimum information about yourself, and avoid any information that allows anyone to find exactly where you live.
For example, you know my Web site, you know my country, and you know I live in Wisconsin, but that is all I would ever share in my profile except my custom information, such as that I have a webcam and use Video4IM, which appears in my City field.
Avoid listing the following information in your profile as a general rule unless you are absolutely sure you want people to know and find this information:
- Your home address
- Any phone numbers
- City
- Birth date
- The address of where you work
- Private information such as driver’s license data, Social Security number, or identity card info
If you want to make a phone number available for others to call, you should consider getting a SkypeIn number. This allows people to call a phone number that will send calls to the Skype program on your computer. If you want to take the calls on your home, work, or mobile phone, the SkypeIn number is still an option. Since calls to a SkypeIn number can be forwarded to another phone number (such as your landline or mobile phone), people calling this number would be unaware of where the call is actually connecting.
In terms of other information, you can be nonspecific or alter the information slightly so it is not entirely correct. The Gender drop-down list, for example, allows you to enter your gender as male, female, or blank. By leaving it blank, you are not being specific about whether you are male or female, which can reduce the number of sex chat requests you receive or messages from people who are looking to talk to a specific gender. As we mentioned earlier, other fields can be modified, allowing you to enter information that is customized, incomplete, or nonspecific. For example, the Birthdate drop-down lists allow you to enter the day, month, and year of your birth, which advertises your birth date and age to others. If you do not want this information made available, simply do not fill out the date information, or enter an incorrect month or day so that people viewing the information would then see your correct age but still have inaccurate data on you.
You should also avoid giving directions to where your personal information is available. The profile allows you to enter a homepage, which people can then visit. In visiting your homepage, a person might be able to find your full name, work information, or other details that you specifically left out of your Skype profile for privacy reasons. If this is the case, you might want to enter the URL of a Web site that does not belong to you but that reflects your interests. For example, if you enjoy reading books, you might enter the Web site of your favorite author or publishing company. In doing so, you provide a possible topic for chat without providing details about you or your family. The other alternative, of course, is to simply leave the field blank if you do not have a Web site or do not want to provide that information to strangers.
Other Ways Your Profile Allows People to Know You
Since the fields in your profile can be modified to include whatever information you want, you can provide tidbits about yourself that can inspire conversation with others. The Full Name field does not necessarily need to contain your first and last name, so you can modify this field to include other data. You could enter such things as your first name and a brief message about your interests or some alias that is more revealing about your personality. For example, entering Michael—avid comic book collector says much more about a person than merely his name and allows people to find him if they search for a particular hobby or shared interest.
Another area of the profile that allows you to share information about yourself is the About Me field. Here you can provide a list of topics you would like people to know about and possibly chat about some of the things you are interested in—things you do not want to talk about online, a joke you find funny, or anything else you would like to say to others. You can enter whatever you like in this field, but you should avoid entering detailed personal information, as we have already mentioned.
My Profile Fields
- Full Name Enter your name as anyone will see it. This is the short line that shows up in Skype—for example, Michael Gough | www.SkypeTips.com.
- Gender You can enter your gender to indicate male or female, or leave it blank (recommended).
- Birthdate You can enter your birth date, but unless you are absolutely sure you want to give that information out, avoid filling in this field, or provide false data that still gives your age.
- Country/Region This is fairly harmless information that will help others generally locate you and understand what part of the world and time zone you are in.
- State/Province Fill in this field to let people know roughly where you live and what time zone you are in.
- City Recommend staying away from entering information in this field unless you are absolutely sure that you want or need to post this information. Use this field to enter something about yourself—for example, webcam & Video4IM, or a hobby or interest.
- Language This will help people understand what language they need to speak to be able to communicate with you.
- Home Phone Avoid entering this information unless you are absolutely sure that you want to share it with total strangers. Do you have a listed phone number? We highly recommend that you avoid this field if you have children and to check periodically that this field is left blank.
- Office Phone Avoid entering this information unless you are absolutely sure that you want to share it with total strangers.
- Mobile Phone Avoid entering this information unless you are absolutely sure you want to share it with total strangers.
- Homepage Enter a Web site URL that you want to share with others. Do not post Web sites that contain personal information about yourself or your family.
The About Me field is an area where you can type information about yourself that does not necessarily apply to any of the other fields. About Me can be used to offer other Skype users insight into your hobbies, interests, what you do for a living, a personal description, or other facts that can be used to inspire conversation. In the case of businesses that use Skype, this field can identify the account as being for a particular use, such as providing help desk or sales support. You can even use it to set limitations on conversation, such as indicating that sex chats are not welcome. The information you provide here is optional but useful in providing information to others who want to chat or call. Avoid placing any personal information in this field.
Private Details
The Private Details section provides an Email field where you can enter an e-mail address. This is not available to view by anyone who uses View Profile, but it allows people who know your e-mail address to search for you in Skype. When you open My Profile for the first time, the Email field will display the e-mail address you provided when you set up your account (assuming that you specified one). If you change Internet providers and get a new e-mail account or decide to set up a free e-mail account on Google, MSN, or Yahoo! for use with Skype, you can change the value of the Email field at any time or enter multiple e-mail addresses. You can even delete the e-mail address in this field if you do not want to provide any e-mail address that people can use to search for you. Skype does not advertise the e-mail addresses, so have little fear of these being misused or added to a spam list.
Details That Only Your Contacts Will See
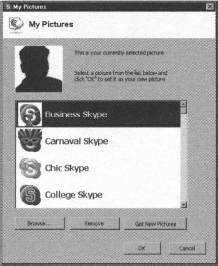
This section also provides a way to reveal more about yourself to others by including a picture of yourself or an avatar, as it is called, that you would like to represent you. Using this section, you can specify a picture that can only be viewed by users that you have authorized to see your online status. Clicking the Change… button will cause a dialog box to appear that allows you to modify the picture. Here you can select another picture from a list, and that picture is displayed when people view your profile information. If there is no picture in the list that you like, you can click the Get New Pictures button to open your Web browser and load the http://personal.skype.com Web site, where other pictures are available to download. If you already have a picture, such as a photo of yourself that is small and that you would like to use, click the Browse … button to open a dialog box use it to find the picture file. A copy will be placed in the Documents and Settingslocal computer usernameMy DocumentsMy Skype Pictures folder. You might have to resize a picture you select so that it appears correctly. Once you have selected the picture on your hard disk that you would like to use, click Open to load the picture into your profile. If you decide not to use the picture later, you can click the Reset to Default button to remove the picture from your profile and use the basic icon that was initially there.
Configuring Sound Alerts
Sound alerts are audible indicators of an event that has occurred. A sound can be played in Skype to indicate that you are calling someone, someone is calling you, or other events. As we will see in this section, these sounds can be turned off or changed at any time.
The various sound alerts in Skype are controlled using the Options dialog box. You can open Skype’s Options by clicking the Tools menu and then clicking the Options menu item. Once the menu is opened, clicking the Sounds icon in the left side of the dialog box will display a screen similar to that shown in the following picture.
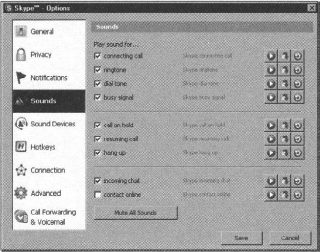
The Sounds screen in Skype’s Options contains a listing of all the events that you can associate with sounds. Beside each of the events are three controls that you can use to listen to and change the various sound files associated with those events.
As shown by the ![]() icon, this button is used to play the sound file associated with a particular event. When you click this control, the sound will play through whatever sound device you configured your computer to use for sound playback.
icon, this button is used to play the sound file associated with a particular event. When you click this control, the sound will play through whatever sound device you configured your computer to use for sound playback.
As shown by the ![]() icon, this button is used to select a new sound for an event. If you do not like the default sound associated with an event, you can click this button and load a new file.
icon, this button is used to select a new sound for an event. If you do not like the default sound associated with an event, you can click this button and load a new file.
When you click the ![]() button, Skype opens the My Sounds dialog box, which is shown in the following figure. The top part of the dialog box displays the event that the sound is associated with. Below this is a listing of various sounds that have previously been used or reviewed. When you click any of the entries in this list, the sound file will play. If you would like to use this new sound for the event, you can click OK to associate it with the event, or click Cancel to keep the current sound.
button, Skype opens the My Sounds dialog box, which is shown in the following figure. The top part of the dialog box displays the event that the sound is associated with. Below this is a listing of various sounds that have previously been used or reviewed. When you click any of the entries in this list, the sound file will play. If you would like to use this new sound for the event, you can click OK to associate it with the event, or click Cancel to keep the current sound.
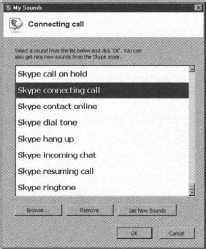
The Browse … button on the bottom of the dialog box is used to open another dialog box titled Choose Your Sound, which you can navigate your hard drive to select existing sound files on your computer. Once you select a file in the Choose Your Sound dialog box and click OK, the file is loaded into the My Sounds list of sounds. In Windows, this file is also copied to the Documents and Settingslocal computer usernameMy DocumentsMy Skype Content folder.
Because you may load a file into My Sounds and later decide you do not want to use it, you can use the Remove button to delete a file from your listing. The file is also deleted from the Documents and Settingslocal computer usernameMy DocumentsMy Skype Content folder on your hard drive. On the chance that you might want to use the file again in the future, you should copy the file from this folder to another location before clicking the Remove button and then clicking Yes on the confirmation message box that appears.
Get New Sounds is another button on the My Sounds dialog box; click Get New Sounds and it will open your Web browser and take you to the Skype store. On this Web site, you can acquire new sound files to use with your Skype program.
The ![]() button restores the default sound. If you change your mind about the sound file you associated with a particular event, you can click the
button restores the default sound. If you change your mind about the sound file you associated with a particular event, you can click the ![]() button and Skype will associate the event with the original sound file that was used when you first installed Skype.
button and Skype will associate the event with the original sound file that was used when you first installed Skype.
Play Sounds for …
There are nine different events that sounds can be associated with in Skype. Each of these events has a check box beside it, which can be unchecked to mute the sound. If you do not want any sounds associated with events, you can click the Mute All Sounds button to uncheck all the check boxes. To effectively decide which of these events should be muted, however, you need to know under what circumstances the sound will play.
Connecting Call
The connecting call check box is used to indicate whether a sound is played when you first begin a call and Skype is attempting to connect to the other party. To compare this to a conventional phone, this is the phase of the call when you are dialing the number. As Skype connects to the other party, additional sounds may be played.
Ringtone
When someone calls you, the ringtone sound is played as an audible alert that someone is trying to contact you.
Dial Tone
Once a connection is made in Skype, there is a period of time during which you will need to wait for the other party to answer the call. During this time, the dial tone sound is played.
If the person is unavailable, perhaps talking with someone else using Skype, the busy signal sound is played. This lets you know that the person is using Skype but unavailable at the moment.
Call on Hold
If you place a call on hold in Skype, the sound file associated with this event will play. When a call is placed on hold in Skype, the connection between you and the other person still exists so that you do not need to call the person, or vice versa. Skype simply pauses the call so that the other party cannot hear, just as with the Hold feature in a regular telephone call.
Resuming Call
The resuming call sound is played when you take a person off hold in Skype so that the call is resumed and you can now hear one another again.
Hang Up
The hang up sound is played when a call is terminated. When you click the red cancel call button during a call, the connection with the other person is ended, and this sound is played.
Incoming Chat
When someone requests a chat with you, the incoming chat sound is played to indicate the request. This allows you to know when someone wants to chat with you, without relying on the visual alerts or popup chat window that is also available in Skype.
Contact Online
When the contact online check box is checked, a sound is played when someone in your Contacts list starts Skype and goes online. By default this sound is turned off, but it can be turned on at any time. However, because you might have a number of contacts going on and offline while you are using Skype, this sound can become annoying if you have numerous contacts in your Contacts list.
Because Skype is used to transmit and receive voice over IP, it follows that configuring sound devices is an important part of using Skype. Without proper configuration, you might not be able to hear or talk with others. There are configuration options in the Sound Devices screen of the Options dialog box, but you can also make most of the changes for these devices through your operating system.
Skype Sound Device Options
You can set Skype’s sound devices through the Options dialog box, which is accessed by clicking the Tools menu and then clicking the Options menu item. As shown in the following figure, the left side of the dialog box is used to navigate between the various option areas. Clicking Sound Devices displays settings for configuring the devices to use with Skype or using the default ones configured for the operating system.
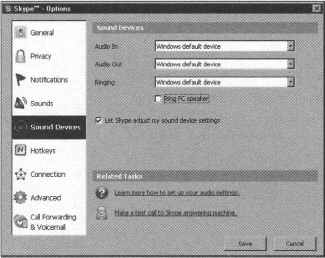
The Sound Devices section provides three drop-down lists that store the same values. Each list contains the names of sound devices installed on your computer and the option to use the default sound device that you set up previously on the operating system. To use the device that was configured earlier through the operating system, select the Windows default device option; otherwise, select the name of a specific device you want to use. The three drop-down lists control the following types of sound devices:
- Audio In controls the microphone or other device that you will use when speaking or recording sound in Skype.
- Audio Out controls the sound card or other device you will use for playing sound over speakers or a headset.
- Ringing controls the device that will be used to play a ring or other sound when a call comes in through Skype.
Below these drop-down lists is a check box to Ring PC speaker. When this check box is checked, it provides the alternative to have the ring sound of an incoming call played through the internal speaker of your computer. This could be handy to have selected if you have a headset connected to your audio card most of the time, if your speakers happen to be muted or if the volume is turned down.
The final option on this screen is to Let Skype adjust my sound device settings. If you want Skype to control the settings of sound devices, check this check box. If you experience problems afterward and/or would like to control your own sound device settings through the operating system, uncheck this box.
Understanding the Basics …
Let Skype Adjust My Sound Device Settings
Most users should be able to set this check box and let Skype adjust the sound device settings. If you experience low volume on either your speakers or microphone, try deselecting this option.
If You Have Two Sound Devices
As we discuss in Chapter 8, if you add a Skype telephone adapter, Skype telephone gateway, or USB phone, you will see these devices show up as additional sound devices. If you want to switch between the cordless phone attached to a Skype gateway and your sound card to do a video call, for example, you would switch between the two audio devices in the Skype’s Sound Devices tab. Some Skype gateways, such as the VoSky Internet Phone Wizard, automatically switch to the correct sound device when you pick up the telephone to make or answer a Skype call.
Understanding the Basics … Changing Sound Devices
If you have multiple sound devices, such as a sound card and a device like the VoSky IPW, you would switch between the two using the Sound Devices option boxes. If you want to make a video call at your computer and want to use your sound card, for example, you can switch it from the Actiontec Internet Phone Wizard to your sound card.
Making a Test Call to Ensure Your Settings Are Correct
After you have made any changes to the sound devices on your system, you should make a test call to ensure that everything is working correctly. Skype provides an automated user called Skype Test Call (or Echo123) that you can call any time. Refer to Chapter 3, “Making a Test Call,” for more information.
Connection Parameters
To chat and call other people using Skype, you need to have an Internet connection. Many people simply install Skype on a computer with an existing Internet connection and set up their account, but others find they get errors connecting to the Internet and need to perform additional steps. This is especially the case in businesses where a proxy or firewall is used. Home users will rarely if ever have to worry about these settings. For more on proxy servers and firewalls, please read Chapter 13.
Understanding the Basics …
Connection Parameters for Home Users
Home users should not have to worry about the Connection Parameters setting. If you have some type of custom configuration, you will know when to apply these advanced settings.
Skype Connection Settings
Internet Options allow you to configure proxy server settings for programs connecting to the Internet, but these options are available only on Windows machines. Because Skype can be run on other operating systems, Skype also has configuration settings that can be used to control connections that use proxy servers such as many large companies have. Skype’s Connection options can be set by using the Options dialog box, which is accessed by clicking the Tools menu and then clicking the Options menu item. As shown in the following picture, clicking Connections displays the proxy settings. Refer to Chapter 13 for more on this topic.
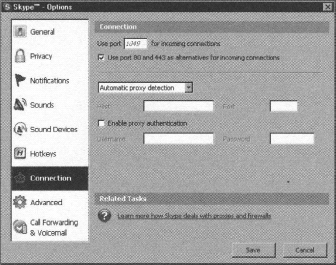
The top section on the Connection screen is for your local computer, on which Skype is being used. It allows you to control the ports that Skype uses for incoming connections from people who are calling or want to chat. The first field is Use port … for incoming connections. In this field, you can enter the port number that will be used to listen for incoming connections to your computer. Below this is a check box that provides additional ports that Skype can use to function if a local firewall is blocking the port you specified. When this check box is selected, ports 80 and 443 can also be used to listen for incoming connections, if the port you specified fails to work for some reason. Because port 80 is generally used for HTTP and 443 is commonly used for HTTPS, if you experience problems with software that relies on ports 80 and/or 443, make sure that this check box is unchecked. More on this option when using firewalls or complex networks is covered in Chapter 13.
Understanding the Basics …
Connection Settings for Home Users
Home users should not have to adjust this setting, but making it 443 and choosing to use both port 80 and 443 are recommended, as indicated below.
The second section on the Connection screen is where you enter information that Skype will use to connect to a proxy server. Home users will rarely if ever need to worry about this setting. The drop-down list provides three options:
- Automatic Proxy Detection
- HTTPS
- SOCKS5
As we discussed earlier in this chapter, Automatic Proxy Detection is used to automatically find and set the IP address and port of a proxy server that is located on your internal network. The configuration information that is provided by the proxy server is used to configure your machine, thereby eliminating the need for you to manually enter any settings. Because no additional input is needed once you select this option, the other fields in this section are disabled when Automatic Proxy Detection is selected.
The other two options in the drop-down list require manual configuration. When either HTTPS or SOCKS5 is selected, you must identify which server is the network’s proxy server and the port it uses. The Host field is used to enter the proxy server’s name or IP address; the Port field identifies the port that the proxy server listens to for making connections. For connections using HTTPS, the default port number is 443, whereas SOCKS5 usually uses 1080 as the default port.
The second option in the drop-down list is HTTPS, which is a secure version of the Hypertext Transfer Protocol. Proxy servers that use HTTPS provide additional security because authentication is required and data can be encrypted. When data is passed between your machine and the proxy server, HTTPS allows it to be encrypted using the Secure Sockets Layer (SSL) or Transport Layer Security (TLS), which prevents others from eavesdropping on any data sent between the two machines.
The third option in the drop-down list is SOCKS5, a version 5 of the SOCKS protocol, which is an abbreviation of the word sockets. Proxy servers use SOCKS to control access to servers beyond the barrier a firewall or proxy server provides. With SOCKS, an extra layer of security is added because the SOCKS proxy server requires authentication before serving clients and passing any requests on to servers on the Internet or outside the network.
When checked, the Enable proxy authentication check box, below the drop-down list and its corresponding fields, enables the Username and Password fields below it. Proxy authentication is used to determine who is using a particular program so that they can be authenticated and have the necessary credentials to use a program or access resources through the proxy server. If proxy authentication has to be set up on the server, the username and password that you provide identify you as the person using Skype so that you can be authenticated on the server. If additional privileges have been provided for your user account on the proxy server (such as the necessary access needed to use Skype through the proxy server), providing the username and password may be necessary to enable Skype to function properly.
Once you have made the changes you want to the Connections options, you can then save them by clicking the Save button. No changes are applied until you have saved them. If you are unsure about the changes you made and you want to disregard them, simply click the Cancel button. More on the use of firewalls and proxy servers are discussed in Chapter 13.
Skype’s Advanced Options Dialog Box
Advanced options in Skype are set using the Options dialog box. In Skype, click the Tools menu and then click the Options menu item to launch a dialog box. The left side of the dialog box has a number of option areas that can be selected, bringing up individual tabs or options in the dialog. Clicking the one labeled Advanced will show the advanced settings that are available to you.
We discussed some of the Advanced options in Chapter 3, and we review and expand on some of these features in this chapter. It is important that you note that any settings you change will not be set until you save them. The Save button on the bottom of the dialog box saves the settings and closes Options. The Cancel button simply closes the dialog box without saving any of your changes.
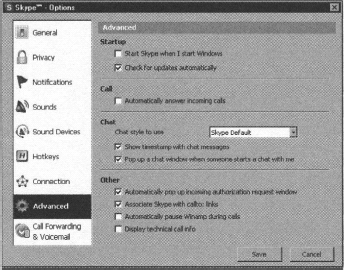
The Startup section of the Advanced options allows you to control how Skype starts and the actions it will take on startup. When the Start Skype when I start Windows check box is checked, Skype starts when Windows starts up. If this box is unchecked, you need to start Skype by either clicking the desktop icon created at installation or from the Windows Start menu. There is a lot more to this issue than can be covered in the available space, so it is better left out altogether.
If the Check for updates automatically check box is checked, Skype will also connect over the Internet and determine whether a newer version of the software is available, thereby saving you the need to periodically check Skype’s Web site to see if you are using an old version and whether a significant update has been released. You could also check for updates manually by clicking the Help menu in Skype and then choosing the Check for Update menu item. You are then taken to Skype’s website where you are informed of the latest version and given an opportunity to download it directly. Occasionally upgrades are forced upon the user at login time regardless of this setting, and there is no choice but to upgrade if you wish to continue using Skype.
Call Option
The Call section of the Advanced options has only a single feature that can be set. When the Automatically answer incoming calls check box is checked, the application will answer any incoming phone calls it receives, without intervention from you. If this option is unchecked, you will need to listen for the sound of a telephone ringing and visually monitor the icon in your computer’s system tray, which will flash and temporarily show a message saying that someone is attempting to call you. When a call comes in and automatic answering is not enabled, you will need to go the Call List tab in Skype and select whether to answer or reject the call. We do not recommend setting this to auto-answer unless you are absolutely certain this is the right setting for you, since you will not always be at your computer.
Chat Options
The Chat section of the Advanced options allows you to control the appearance and functionality of the interface used for chatting with others and determines what will happen when someone initiates a chat with you. The Chat style to use drop-down list configures Skype to use one of two designs for the way text messages are formatted in a chat session. We covered samples of each style in Chapter 3:
- Skype default
- IRC-like style
The Skype Default chat style displays the person’s name in a rounded box. The Show timestamp with chat messages check box configures whether Skype includes the time that a message was received with each message. When this option is checked, the time of a received message appears beside that message in the chat and is added to the chat history. This allows you to monitor when each message was received and maintain a record of how long you chatted with a particular person. We recommend that you leave this setting enabled.
Understanding the Basics … Chat History
A chat history documents all the messages that have been sent and received between you and a particular person. In short, it is a record of everything that was said during a Skype chat. Chat histories can be particularly useful if you want to review a previous chat you have had with someone or need the information for a complaint against someone who has been abusive.
In Skype, chat histories are not stored on a network server; if stored at all, they’re stored on your local computer. Whether they are stored on your computer depends on the Privacy settings you have set. You can configure these settings by clicking the Tools menu in Skype, clicking the Options menu item, and then clicking Privacy. Because the chat histories are converted as HTML files, they can be viewed with any Web browser. When chat histories are archived on a Windows computer, they are in the Documents and Settingslocal usernameApplication DataSkypeskype usernameIMHistory folder.
The Popup a chat window when someone starts a chat with me check box in the Chat section of the Advanced options is used to configure what happens when someone initiates a chat with you. It controls whether Skype automatically opens a chat window or whether you must manually open one when someone requests to chat. If this option is checked, the chat interface will open as soon as you receive a chat message from someone. If it is unchecked, you need to visually monitor the icon in the system tray for messages saying that someone wants to chat. We recommend leaving this setting enabled. When you minimize an open chat session, it will not pop up automatically when the other party sends a new chat message.
As discussed in Chapter 3, there are four additional advanced settings under the heading Other:
- Automatically pop up the incoming authorization request window
- Associate Skype with callto: links
- Auto-pause Winamp during calls
- Display technical call info
What follows is more in-depth discussion of two of these Other settings, namely:
- Associate Skype with callto: links
- Display technical call info.
Associate Skype with callto: Links
When the Associate Skype with callto: links check box is checked, other programs on your computer, such as Web browsers, will open Skype when a particular type of hyperlink on a Web page is clicked. When a user clicks a callto: hyperlink, Skype will automatically open and call the person or number associated with that link.
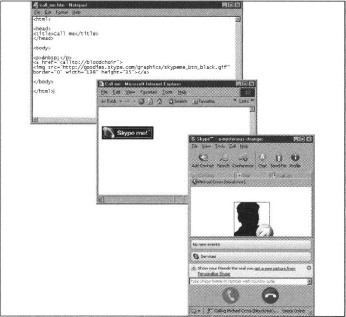
If you have used the Internet, you are probably familiar with clicking text or images to load another Web page into your browser or open your e-mail program to send e-mail to a specific person. These hyperlinks are created in Hypertext Markup Language (HTML) using a text editor or Web page-editing software. Without going too far into detail on HTML, if you have never seen the HTML code of a Web page, basic code could appear as follows:
<HTML>
<HEAD>
</HEAD>
<BODY>
Text in my Web page
</BODY>
</HTML>
Generally speaking, the information you write between the <body> and </body> tags is what is displayed in your Web page. If you wrote the code shown in the previous example into a text editor like Windows Notepad, saved the file with an .htm or .html extension, and then opened it in your Web browser, you would see a simple Web page with the words Text in my Web page appearing on it.
To create a textual callto: link, enter HTML code similar to the following into the body of a Web page:
<a href="callto://skypename-or-number/">text to display in link</a<
In this code, skypename-or-number is the name you created for yourself in Skype or an actual phone number; text to display in link is your name or other information you would like to appear to the user in the hyperlink. If you clicked this link and had the Associate Skype with callto: links check box option checked, Skype would open and automatically call the name or number specified in the link.
In addition to the textual links that allow people to call you in Skype, you can also use images in a hyperlink for Skype calls. By visiting the Skype Web site at http://share.skype.com/tools_for_sharing/tools_for_sharing/skype_me_buttons/, you can acquire images for use on your Web page that are specifically designed for this purpose and find additional information on creating callto: hyperlinks using images.
Whether you use a textual or graphical hyperlink, when Associate Skype with callto: links is checked, Skype automatically opens when someone clicks the callto: hyperlink. As shown in the following figure, when you create an HTML document with a callto: link, users accessing this Web page will see a graphic or text that they can click. Once the callto: link is clicked, Skype opens and begins to call the Skype name or number specified in the link. Using callto: links is one of the simplest ways of accommodating visitors to your Web site, enabling them to contact you quickly and easily.
Using the Display Technical Call Info Option
When the Display technical call info check box is selected, technical information about a Skype call is provided during an active call. When this check box is selected and you move your mouse pointer over the avatar or picture of the contact or contacts you are talking to, a small box appears with information about that call. This information provides data about not only your sound setup (input and output devices used for the call) but also packets sent and lost during transmission and whether the call is being relayed. Such information can be useful in determining whether a problem exists with your setup or equipment. This technical information is updated every few seconds during the call, so long as you hover your pointer over the contacts avatar. The Display technical call info feature for troubleshooting is also covered in Chapter 13.

Input/Output
The technical call information displays data on the sound device or devices Skype uses for calls:
- Input Displays the device that’s been set up for audio input, such as a sound card with a microphone jack or other equipment that accepts voice input when you’re speaking.
- Output Displays information on what device has been configured in Skype for audio output, such as a sound card with speakers or other equipment. This is the same information that you provided when you configured Skype’s Sound options, so if a device other than the one you wanted to use appears here, you should check your Sound options.
Understanding the Basics … Input/Output
The average user does not need to worry about this option, but for troubleshooting it can be used to show you what your input and output sound device is set to if you have multiple sound devices.
Call Status
Call Status identifies the current stage or progress of a call. A numerical value is provided in the technical call information, indicating whether Skype is in the process of connecting, receiving a busy signal, ringing, and so forth. Rather than simply providing a number to reflect the status of a call, words that describe the status are also displayed below the avatar of the person you’re calling. For example, when the call is connecting, the Call Status displays 1 and then changes to 3 when it is ringing. To see what the Call Status number translates to in user-friendly terminology, simply look at the text appearing below the avatar of the person you’re calling. The information provided in the Call Status entry allows you to view the progression of the call while viewing other technical call information.
Understanding the Basics … Call Status
The average user does not need to worry about this option, but for troubleshooting it can be used to show you the place you are in the call in case you experience problems.
Codec
Codec is short for encoder/decoder and is used for processing sound and/or video to data. When you speak into a headset using Skype, the signal of your voice is converted by the codec to a digital format so that packets of data can then be sent over the Internet. At the receiving end, these packets are reconstructed and the signal of your voice can then be played over the receiver’s speakers or headset.
Understanding the Basics … Codec
The average user does not need to worry about this option, since it does not change.
Packet Loss and Other Issues
Because Skype allows calls to be made using Voice over IP, calls are made by transferring chunks of data called packets over the Internet. These packets are transmitted from your computer over the Internet and reconstructed on the receiving computer. Because some packets may be lost or take more time than others to reach the receiving computer, Skype also provides a number of entries in the technical call information that deal with packet loss and other network issues that can cause disruptions in the sound quality of a call.
Jitter
The Jitter entry is used to display variations in the time it takes for packets to arrive. This can be the result of heavy network congestion, changes that occurred when the packets were routed, or other issues related to the transfer of packets between your machine and the computer receiving them. When the jitter is too great, sound quality can be adversely affected, which is the reason that data is buffered in a storage area called a jitter buffer. The jitter buffer stores the packets, creating a delay that allows them to be sent to the voice processor at even intervals.
Understanding the Basics … Jitter
The average user does not need to worry about this option, but for troubleshooting it can be used to show information about your network traffic. In general, the more jitter you have, the more the quality of your voice call can be reduced. This information is more for the network administrator to troubleshoot or improve network routing.
Packet Loss/Send Packet Loss/Recv Packet Loss
Several entries in the technical call information are used to display the monitoring of packets that were lost during transmission. Packet loss provides an overall display of lost packets, showing a percentage and an actual number of lost packets in brackets. The technical call information further breaks it down to show Send packet loss, which displays the number of packets that were lost after being sent from your machine, and Recv packet loss, which shows the number that were lost during transmission to your computer. Some packet loss is expected during transmission of data, and a low number of lost packets (such as 5 percent) shouldn’t greatly affect the sound quality of calls. However, a large number of lost packets indicates that either you or the person you’re talking to should check their network connection, network card, or other devices that are used to transmit data over the Internet.
Understanding the Basics … Packet Loss
The average user does not need to worry about this option, but for troubleshooting it can be used to show how much traffic is being dropped. In general, the larger the network, the larger the packet loss, which can reduce your voice call quality. This information is more for the network administrator to troubleshoot or improve network routing.
SessionIn and SessionOut
Similarly, the SessionIn and SessionOut entries provide information on packets that were sent using the User Datagram Protocol (UDP). UDP is a connectionless protocol and is part of the TCP/IP protocol suite. TCP/IP provides error correction and will attempt to resend a packet that is lost or corrupted; UDP provides very little in the way of error correction. This protocol is often used for sending messages or other information because it is quick and has little overhead. In the case of voice messages, so much data is being sent and processed at quick intervals, it makes little sense to have delays caused by waiting for packets of data to be resent. The SessionIn entry shows the number of UDP packets that were received by your computer, whereas SessionOut shows the number of UDP packets that were sent during a call (assuming a pure P2P UDP session in both directions).
Understanding the Basics … SessionIn and SessionOut
This is one of the two items that the average user will need to know about. If you see the words:
- Good remote: Bad
- Relayed ‘TCP’
your call and/or file transfers are being relayed, which will significantly reduce your call quality and file transfer times. Either you or your other contact do not have a P2P-friendly device or are behind a restrictive firewall.
The Relays entry is used to indicate the number of times data is relayed through supernodes or relay hosts, as in the case where one or both parties are behind a firewall. In such a case, a user might find another Skype user unreachable but might be able to relay data through another Skype node that is reachable. The data is sent to this relay host, which then passes it on to either another relay host or the party that is being called. Rather than connecting directly to one another, a connection is made through a third party or parties that pass packets of data between the two computers. Even though these packets of data are being passed through the third party, they remain encrypted and secure.
Understanding the Basics … Relays
The average user does not need to worry about this option.
UDP Status
The UDP status line indicates the status of the connection between you (the local machine) and the person you’re calling (the remote machine). The entries in the technical call data provide information on whether one or both people in the call have a good P2P connection and may indicate a problem with Skype’s setup or hardware used for making the Internet connection. There are two entries on the UDP status line:
- Local, which refers to your connection
- Remote, which refers to the connection of the person you’re calling.
Each of these entries can have a value of Good or Bad, making it very simple to analyze whether you, the other person, or both of you have a good or bad connection.
Understanding the Basics … UDP Status Local
This is one of the two items that the average user will need to know about. If you see the words:
- Local:Good Remote: Good Tells you that both users have a good P2P connection.
- Local:Bad Remote: Good Tells you that your connection is not P2P friendly.
- Local:Good Remote: Bad Tells you that you have a good P2P connection and your remote is not P2P friendly.
- LocahBad Remote: Bad Tells you that both sides are not P2P friendly.
If home users get Bad, their DSL/cable router is most likely not P2P friendly; run Nat Check.
If businesses behind a firewall get Bad, the network and/or firewall is not allowing P2P connections. Run Nat Check to verify and troubleshoot. See Chapter 13 for more information.
CPU Usage
The CPU Usage entry informs you of the amount of processing the CPU of your computer is doing to perform the call. This entry is in a percentage and will usually vary throughout the call as processing requirements change.
Understanding the Basics … CPU Usage
The average user does not need to worry about this option.
Call Forwarding and Voice Mail
Forwarding Calls
Skype allows you to forward incoming Skype calls to the following choices:
- One or more Skype contacts
- One or more landline telephone
- One or more cell phones
- Any combination of these options
To forward calls to a telephone number, you will need to subscribe to SkypeOut for this to work, but you can forward calls to other Skype contacts for free. Because SkypeOut enables you to dial anywhere, you could configure Skype to forward a call to either your landline or your mobile phone. This allows you to receive any important Skype calls even though you are not at your original computer. SkypeOut is discussed later in this chapter.
Configuring the settings for call forwarding is done by clicking the Tools menu in Skype and then clicking the Options menu item. A dialog box is displayed that provides various options that can be set for Skype. By clicking the Call Forwarding & Voice-mail icon in Skype options, you can access the Call Forwarding Settings section.
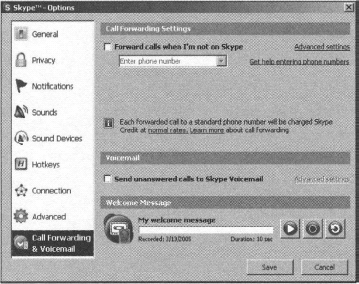
By clicking the Forward calls when I’m not on Skype check box, you can then enter a phone number or Skype contact in the drop-down list. Once numbers or contacts are entered here, you can use the drop-down list to select any previous phone numbers or contacts you entered. If you would like to forward a call to more than one number or contact, you can click the Advanced settings link to the right, which will produce two additional drop-down lists. In doing so, you will be able to enter phone numbers or contacts in each of these lists so that a call is forwarded to up to three different choices at the same time.
Leave Skype Open or Close Skype When Forwarding Calls
You have another option when using Call Forwarding: whether you will leave the Skype application open or closed when you forward calls. If you leave Skype open, when a Skype call is received it will ring at your computer first for four rings, stop ringing, and then forward the incoming call to your Call Forwarding list. If you close Skype, your status will be updated and your contacts will see the $$ icon in their contact lists, indicating that you are forwarding your Skype calls.
- If the Skype application is Open Call Forwarding will ring the computer four times before forwarding.
- If the user is logged out of the Skype Application. Call Forwarding changes your status to the $$ icon and calls are forwarded immediately.
Understanding the Basics … Forwarding Calls
For Call Forwarding to work, you need to decide whether you are forwarding calls to an ordinary phone number (landline or mobile phone) or to another Skype user. To forward calls to a conventional phone number, you must have a sufficient balance of SkypeOut credits. These credits are needed because the call is being sent from the Internet to the traditional phone network. Without SkypeOut credits, you will not be able to forward calls to a landline or mobile phone and will only be able to forward them to another Skype name.
Voice Mail
The voice-mail service in Skype is similar to what you might have on your regular phone line. When someone attempts to contact you when you are not online with Skype or otherwise are unavailable, you can set up an outgoing message that allows you to explain that you are not available. The caller then has the option of leaving up to a 10-minute message for you, which you can review the next time you log into Skype.
Although this is a nice feature in Skype, it is not free. It must be purchased on a subscription basis of three months or a year. However, voice mail is free when it is bundled with SkypeIn, if you purchase this option. SkypeIn is discussed later in this chapter.
When voice mail is set up, if a Skype user is unavailable, a voice-mail message can still be left for him or her. The voice mail remains on the user’s computer until he or she decides to review or delete it. If you already have an answering machine connected to or built into your home telephone, you might want to read Chapters 8 and 9, which discuss how to connect Skype to your existing telephone and use the same phone for both landline and Skype calls before you purchase or configure Skype voice mail.
Setting Up Voice Mail
Because voice mail is an additional feature, you need to subscribe to it before you will see it available in Skype. To purchase voice mail, click the Tools menu in Skype and then click Go to My Account Page, and your Internet browser will open and load a Web page on Skype’s site, where you will be required to enter your Skype username and password. Once you have done so, clicking the Sign Me In button will open another Web page containing your account information. On this page, click the Buy Skype Voicemail link to open a page where you can begin setting up voice mail.
The process begins by clicking a link to subscribe to voice mail for three months or 12 months. Once you click the link related to how many months you would like Skype, another Web page will open a message informing you that that e-mail has been sent to you with a confirmation number. This number must be entered on the Web page to confirm your purchase, and you need to click the Submit Confirmation Number link. As we saw when we set up SkypeIn and SkypeOut, after clicking this link another page will appear asking you to specify how you would like to pay for the service and whether you would like to use existing billing information or provide a new billing address. Once payment information has been entered, a new page with the details of your purchase will appear. At any time during this operation, you can cancel out of the purchase.
Using Voice Mail
When you receive a voice mail, the Windows Task Bar Skype icon will rotate through the three ![]() icons indicating an event exists. This sequence indicates an event and missed call and/or voice mail. Voice mails can be played on Skype’s Call List tab. By clicking the
icons indicating an event exists. This sequence indicates an event and missed call and/or voice mail. Voice mails can be played on Skype’s Call List tab. By clicking the ![]() icon resembling an audiocassette tape, you can view a list of any existing voice mails on your system. The drop-down list beside this icon allows you to view a list of voice mails for all the Skype usernames or select specific usernames to filter the listing to only one user.
icon resembling an audiocassette tape, you can view a list of any existing voice mails on your system. The drop-down list beside this icon allows you to view a list of voice mails for all the Skype usernames or select specific usernames to filter the listing to only one user.
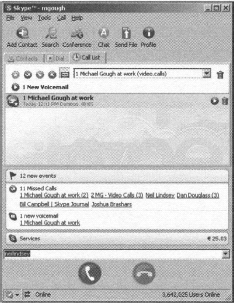
If there are no voice mails, no entries will be listed on the Call List tab. Any existing or new voice mails will remain in the list until you delete them by clicking the trash-can ![]() icon beside the entry you want to remove. Regardless of whether you have no messages or some that have been played, a message will appear at the top of the tab stating “No New Voicemails.” Any new voice mails will be indicated at the top of the tab, stating the number of new voice mails you have, with each new voice-mail entry appearing in a bold font. If you want to play a particular voice mail, you only need to click the Play
icon beside the entry you want to remove. Regardless of whether you have no messages or some that have been played, a message will appear at the top of the tab stating “No New Voicemails.” Any new voice mails will be indicated at the top of the tab, stating the number of new voice mails you have, with each new voice-mail entry appearing in a bold font. If you want to play a particular voice mail, you only need to click the Play ![]() icon to play that particular voice mail.
icon to play that particular voice mail.
Voices Carry … Saving Voice Mail
Once a voice mail is played, it remains on your computer, since you might want to play it again at a future time. If you are using Skype on a Windows machine, these messages are saved as .DAT files in the Documents and Settingslocal usernameApplication DataSkypeskype usernamevoicemail folder. If you are using Skype on a computer running Macintosh OS X, these messages are saved in the Library | Application Support | Skype | skype username | Voicemail folder.
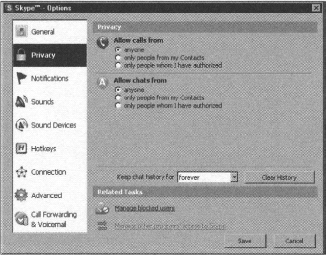
Once you have a subscription to voice mail, you can control who can leave voice mail via the Privacy settings in the Options dialog box. Click the Tools menu in Skype and then click the Options menu item, and the Options dialog box appears. Click the Privacy icon, and the settings appear that allow you to control who can contact you and adjust the settings to your needs.
Advanced Architecture
Skype’s architecture is made up of a variety of components that together provide the features that allow text, audio, and video conferencing between two or more people. Skype uses a peer-to-peer (P2P) architecture, whereby everyone using the Skype software acts as both a client who requests resources and a server that responds to those requests and provides resources. Because resources are not located on a single machine or a small group of machines acting as network servers, this type of network is also referred to as decentralized. It should be pointed out that, since Skype is a closed/proprietary application, portions of the following discussion are based on assumptions and conjecture.
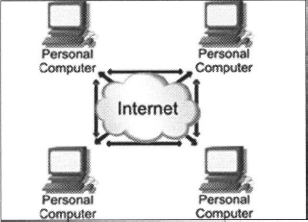
Decentralized Peer-to-Peer Networks
We discuss peer-to-peer networks in greater detail later in this chapter, but for now it is important to remember that in a P2P architecture, every member of the network is both a client and a server. In a traditional network, each computer on the network will log on and use resources from a single machine or group of machines that authenticate the users and provide specific resources. For example, if you were to send e-mail, you would need to log onto the network and then gain access to an e-mail server (which could require another username and password) so that your e-mail can be transferred to the appropriate person. If either of these servers failed, you would be unable to send or receive an e-mail message.

When you have a decentralized P2P network, it does not rely on costly servers to provide resources. Each computer in the network is used to provide resources, meaning that if one becomes unavailable, the ability to access files or send messages to others in the network is unaffected. If one computer goes down, there are always others that can be accessed, and the network remains stable.
An added benefit of this architecture is that it is highly scalable, with little or no cost. In a traditional network, increasing the size or resource capabilities requires adding new servers and possibly additional cabling and/or other components to the network infrastructure. In P2P networks, each new computer that joins the network lends its processing power, bandwidth, and storage space so that the resources of the network can grow proportionally to the network’s size.
Components of Skype’s Architecture
Using a distributed P2P architecture, Skype is made up of a variety of components. These interact to allow users to perform a variety of functions, inclusive to those that allow users to communicate with one another. After looking at the elements involved in this architecture, we will examine the way they work together in the P2P network.
Client Software or Nodes
We have spent considerable time discussing the interface we are using in this book, which is required if you want to communicate with others and send files in Skype. The software you use to connect to Skype allows your computer to function as a node, which is a machine that participates in the Skype network. Without this interface, you would be unable to log onto the Skype network or perform any of the functions associated with this communication system.
Login Server
Although the Skype architecture is that of a distributed P2P network, this does not mean that there are absolutely no centralized servers. The login server authenticates users which allows them to log into the network, and is one of the few centralized servers you will encounter when you use Skype. The server stores usernames and password information and provides authentication when people attempt to log into Skype. Because a login process is required before you can use Skype, the login server also provides the method of identifying the users who are online or offline.
The other primary role of the login server is ensuring that usernames created for accounts are unique within the Skype namespace. Skype usernames must be unique because they identify the account that belongs to a specific person and they are used when you decide to send a message or place a call to someone. Because the usernames are stored on centralized servers, the server can determine whether a particular username is available or not when you initially set up a Skype account.
Once users log into Skype using their usernames and passwords, they are also issued an electronic credential. This credential is digitally signed by Skype and used to prove that users are who they say they are. When a communication is sent between two computers in Skype, one computer will present the credential to the other as a form of identification, thereby validating the user as authentic. This method of authentication provides continued verification of a user’s legitimacy without needing to contact the login server after you log into Skype.
In addition to these services, centralized servers are also used to provide other communication services. Centralized servers store contact lists, which contain information that is used to connect to people in your Skype Contacts list. This information enables Skype to connect to other Skype users and to call people who are using landlines and mobile phones. As we will see later in this chapter, a SkypeOut server enables you to call phone numbers on conventional phone lines, whereas SkypeIn servers allow people using conventional phones to call you on Skype. SkypeIn and SkypeOut servers bridge the traditional phone system and the Internet, allowing Skype users to call people on either system. Using these centralized servers, Skype provides the necessary services for communicating with others on or beyond the Internet.
Global Index
The Global Index is a distributed directory that contains information about Skype users, allowing clients to find information about other people using Skype and communicate with them by sending messages and placing calls. When a call is made through Skype, the clients interact with one another to ensure that the Global Index is up to date.
When you set up an account with Skype, you provide information related to yourself that will be available to others, including a unique username that will identify you in Skype. This information is added to the Global Index, which propagates across the Skype network to keep track of users, regardless of whether they are online or offline.
Another piece of information that is added to the Global Index is your current IP address and port number when you log into the network. The IP address is a unique number that identifies your computer on the Internet and is associated with the unique username you use in Skype. When someone searches for a particular person or attempts to send a message to a user, the Global Index is used to resolve the user’s Skype name to the proper IP address he or she is using. This resolution ensures that a message is sent to the computer that the user is currently using.
Encryption
The electronic credential passed to a client at login is an important part of communication between two nodes in Skype and the way encrypted communication is set up. When two nodes attempt communication with one another, the digitally signed credentials are exchanged and they agree on a 256-bit encryption key to use during the session. This process occurs before any messages are exchanged between the two parties.
The communication between these users is then sent over Skype’s session layer, which is encrypted using the Advanced Encryption Standard (AES), also known as Rijndael. This 256-bit encryption, also used by the U.S. government to encrypt sensitive data, uses 1.1 × 1077 possible keys, making it almost impossible for outside parties who are not participating in the communication to decrypt it.
The encryption in Skype not only provides security for all forms of communication, it also allows for file transfers. This encryption can make transferring files between Skype users slower than other methods, but it ensures that other outside parties cannot view sensitive materials during the transfer. For more information and details on how Skype security and encryption works, read Skype’s security white paper by Tom Berson of Anagram Laboratories, a well-known cryptographer, that outlines how Skype uses encryption. You can find this paper at www.skype.com/security/.
Supernodes
The login server is used to ensure that usernames are unique, and it stores information on usernames and passwords, but much of the information about online and offline users is maintained by supernodes. Supernodes are clients that provide additional services to the network. They act as hubs for other clients, store Global Index information, and provide the means of connecting clients.
Skype clients make network connections to supernodes and update the Global Index with their information. These connections allow the Global Index to remain accurate and provide the basis for clients’ ability to have their communications routed to the proper person. When you search for a particular user, information stored and propagated by the supernodes is queried. Because of the supernode’s role in the network, this makes it one of the most important elements of Skype’s infrastructure and architecture.
Supernodes do not run any additional software, except of course the Skype software that is used by every node on the Skype network. Any Skype client can become a supernode as long as it has an Internet IP address; sufficient CPU, memory, and bandwidth; and is not behind a firewall or Network Address Translation (NAT) gateway that prevents unsolicited inbound network connections. Because any node meeting these criteria could become a supernode, it follows that Skype does not maintain supernodes (except in the ways Skype provides support to any other node).
Advanced Peer-to-Peer Technology
Skype is the result of development by Niklas Zennstrom and Janus Friis, who had earlier success with file-sharing software named Kazaa. Because the same people who developed Skype in 2003 also developed Kazaa, it should come as no surprise that they built on their success and utilized a peer-to-peer architecture. Rather than relying on central servers located on the Internet to provide a majority of services and resources, P2P technology allows the individual computers participating in the Skype network to act as both clients and servers. These individual nodes provide similar services to one another and therefore are peers to one another. Because there are so many peers making up the infrastructure of the network, if one peer fails, the total network of peers is unaffected and can continue to function normally.
File Sharing and P2P
P2P networks are relatively new to computer networks, but they did not develop overnight. P2P has evolved over the last few years, mostly due to the controversy of P2P file-sharing applications such as Kazaa and Napster, which allowed users to share files on their computers with other people, allowing them to search for music, video files, images, software, and documents and download them from other people’s computers. The sharing of these files raised an old argument that had been around since people began taping music from the radio and taping movies from TV—that of copyrighted material and the loss of royalties. Because copyrighted material was being shared without permission between people on these networks, those who produced the original work and owned the copyright could not make any money from the distribution of these materials. This not only forced an evolution in how P2P communication operated; it also lent notoriety to the technology itself.
The first generation of file-sharing software like Napster did not have a pure P2P architecture; it used a centralized file list on servers that could be searched to find files to download. This centralized list of files proved to be a lynchpin of Napster’s design. In legal battles between Napster and the music-recording industry, U.S. courts decided that whoever controlled such central file lists with copyright material on them was also responsible for copyright infringement. This forced Napster to shut down for a time and restructure; it also led to new P2P development that did not involve information being stored on a central server or group of servers.
When Friis and Zennstrom developed Kazaa, they avoided the issues related to Napster’s temporary demise and used a design of nodes and supernodes. Nodes are normal clients that have the software installed and participate in the functions of the P2P network. As we discussed earlier in this chapter, a client may also participate as a supernode and provide additional services to other clients. Because this architecture worked so well in previous P2P software, it became the foundation on which Skype was built to allow communication between clients.
Skype’s P2P Architecture
To understand how Skype’s architecture works, it is best to look at it in action. By reviewing the events that occur when you use Skype, you will better understand the structure of its P2P network and how all the various elements work together.
After Skype has been installed and configured, the first step in using the software is to log into Skype via a login server. No other central servers are used in this architecture. As we mentioned earlier in this chapter, the login server is the only component in Skype’s architecture that does not run on a participant’s machine, and it is used to store the usernames and passwords of all Skype accounts. When you use the client software to log in to Skype, your username and password are compared to information stored on this server, authenticating the information to ensure that you are the valid user for a particular account.
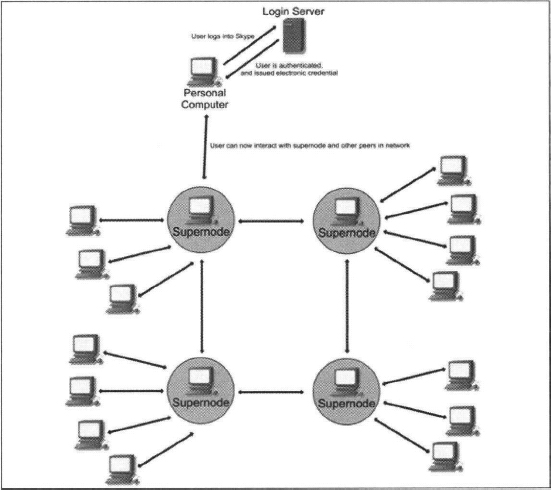
Once you are successfully logged into Skype, the login server performs a number of other functions. It advertises that you are now online and/or your status and identifies supernodes that your Skype client will use to maintain connections to the network. The login server also provides the user with an electronic credential that identifies the user on the network and authenticates him or her as being valid. This credential allows authentication between nodes of the network without needing to repeatedly contact the login server. It is also used during the process of setting up encrypted communication between clients that exchange communications with one another.
It is at this point that interaction with the login server ends and the role of the supernode takes over. As we discussed earlier in this chapter, supernodes act as hubs by handling contact lists containing information on users of the network and routing calls to their proper destination. This is done through the Global Index, which is a distributed directory that is spread across the clients acting as supernodes on the Internet and that have the ability to support tens of millions of users who are simultaneously using Skype. When a search for a user is performed, the Global Index is referenced, allowing any user who has logged in within the last 72 hours to always be found.
When you decide to chat with someone or set up an audio call, several steps occur between the two clients before the session is established. The electronic credentials that Skype received when you logged in are exchanged to authenticate each party. Once this is done, the two clients then agree on a 256-bit encryption key, which is used to encrypt any further communications between the two. After agreeing on the encryption key to use, the chat or call begins and communications are then transmitted in an encrypted format over Skype’s session layer.
Skype’s Premium Services
As we have discussed throughout this book, Skype-to-Skype calls are free, but Skype also has some premium services, namely SkypeOut, SkypeIn, and voice mail. This section covers these services to help you understand what they provide.
SkypeOut
After you use Skype for any length of time, it becomes clear rather quickly that you are limited to making Skype voice calls to others who are using Skype software on your computer only. With its basic services, Skype does not provide the functionality to make voice calls to regular phone numbers associated with landlines and mobile phones. That is where SkypeOut comes into play. SkypeOut is an additional feature that you must pay for that allows connectivity with any phone on the public switched telephone network (PSTN). It works just like a calling card by providing you credits that will be used up as you make SkypeOut calls.
You can sign up for this additional service through the Skype software by clicking the Tools menu, then clicking Go to My Account Page. Once you do so, your Internet browser will open and load a Web page on Skype’s Web site where you will be required to enter your Skype username and password. When you provide this information and click the Sign Me In button, another Web page will load, containing your account information. Because your account will already have been set up, no additional information is required, but a valid e-mail address is necessary to complete the subscription. All you have to do at this point is click the link to buy SkypeOut credits, select the amount of credit you want to purchase, and provide your payment information. Payment options are in Euros, US Dollars, the Japanese Yen, and the British Pound, and the credits you purchase are good until you use them up or 180 days after the last time you made a call using SkypeOut. Additional credits can be purchased using the same procedure.
One of the benefits of using SkypeOut over a regular phone line is when you call long distance. When calling from a normal phone, the distance between where you and the area you are calling determines the long distance rate. However, since you are calling from a computer over the Internet, such a rating scheme would not really apply. For this reason, SkypeOut does not consider where you are calling from, only where you are calling to. SkypeOut uses factors including the volume of calls to and from the country you are calling and access charges related to the call (such as when calling cell phones) and provides a global rate that allows you to call a wide variety of countries at the same rate per minute.
Using SkypeOut
Once you have purchased SkypeOut credits, you are then able to use Skype to call a telephone anywhere in the world. If you have already installed Skype on your computer, no additional installation is required. SkypeOut calls are made using the Dial tab of the Skype user interface.
The Dial tab provides a graphic interface of a telephone keypad, which you can click with your mouse to dial a specific number. As an alternative method, phone numbers can also be entered into the address field that is always in view in the main Skype window by typing the number using your keyboard. In dialing the number, however, you must begin with the + symbol and country code before entering the full phone number (which includes the area code or city code). For example, to call a number for information in the 905 area code in Canada, you would enter +19055551212. The country code is the international dialing number that precedes the actual phone number and is used to indicate the country in which the phone number is located. If you are unsure of the country code for the number you are calling, don’t worry. Skype provides an easy-to-use method of looking that up; further information is provided later in this chapter.
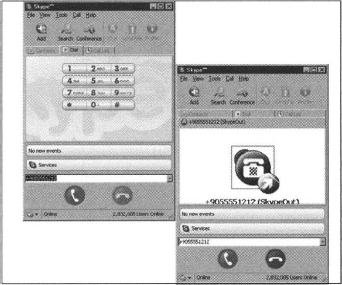
The + symbol must be used at the beginning of a phone number you want to call using Skype, which may lend some confusion as to how the keypad interface on the Dial tab is used to enter this symbol. If you click and hold down your left mouse button on the 0 (zero) button for a few seconds, the + symbol will be entered into the address field. You may also substitute 00 or 011 for the + symbol.
If you need to dial an extension after a phone number has been dialed, you can use the Dial tab during the call to enter extensions. Because the interface resembles the keypad of a conventional phone, you would click the numbers just as you would press the keys on your phone’s keypad to enter the extension.
Phone numbers can also be entered using your keyboard. Using the address field box below the Services button, you can type in the number you are calling and then press the Enter button on your keyboard to initiate the call. It is not possible to enter a pause into the dial string. If you prefer using your mouse, you could also begin your call using the red and green call buttons at the bottom of the screen. Once you are ready to make your call, click the large green phone ![]() button, which opens another tab for that call session. To cancel or hang up on the call, click the large red phone
button, which opens another tab for that call session. To cancel or hang up on the call, click the large red phone ![]() button at the bottom of the tab.
button at the bottom of the tab.
Understanding the Basics … Using Emergency Numbers
SkypeOut is a great tool for making long distance calls, but it is important to realize that it is not a full replacement for a normal phone line. SkypeOut does not have the ability to make calls to emergency numbers that allow you to make fast connections to police, fire departments, and ambulance. Emergency numbers that Skype is unable to call include:
- 911, used in such places as Anquilla, Aruba, Antigua and Barbuda, Bahamas, Barbados, Canada, Cayman Islands, the Dominican Republic, the United States, and the United Kingdom
- 919, used in Bahamas
- 511, used in Barbados
- 711, used in the Dominican Republic
- 112, the international emergency number used in Europe
- 999, used in such places as Antigua and Barbuda, Dominica, Hong Kong, Trinidad and Tobago, and the United Kingdom
What this means is that in life-threatening situations where you need police, fire department, or ambulance assistance, you still need to use a conventional phone or cell phone to call for help. Before deciding to replace your normal phone with Skype, you should carefully consider this issue.
SkypeOut Dialing Wizard
Because there are so many country codes used for international dialing, you can use the SkypeOut Dialing wizard that is available on Skype’s Web site at www.skype.com/products/skypeout/rates/dialing.html. This Web page begins with a drop-down list that asks which currency you would like to use for determining SkypeOut rates, offering two options:
- Euros
- U.S. dollars
After providing additional information, the Dialing Wizard uses your choice of currency to determine the rate per minute of your call. It is, however, not necessary to choose a currency for SkypeOut rates to determine the country code to use.
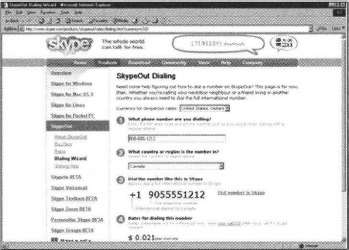
The first step in determining the country code begins by entering the phone number you want to dial in the What phone number are you dialing? field. When entering this number, you need to include the city code or area code, and optionally the number you are calling. The webpage updates dynamically with each keystroke and warns the user when the number is incorrect.
The second step in the wizard is specifying the country that you are calling in the What country or region is the number in? drop-down list. This list is broken into two sections, with the 10 most commonly called countries displayed first and then all countries displayed below that group. Also, by keying the appropriate first letter, the country you are after can be quickly located.
Once the phone number and country have been provided in this Web page, a number automatically appears in the section for Step 3. You can then manually enter this number into the Dial tab of Skype, or click the link called Dial number in Skype, which opens Skype and begins dialing the number indicated in Step 3.
International Dialing Codes
The following URLs provides information on country and area/city codes that can be used for making calls in Skype. In using these numbers, however, do not forget that the number you enter in Skype must begin with the + symbol. Also, it is important to remember that as new countries emerge, change, or cease to exist and area or city codes are added or changed, you might need to refer to the SkypeOut Dialing wizard from time to time.
SkypeIn
SkypeOut allows you to call conventional phone numbers associated with landlines and mobile phones; SkypeIn allows the people with these regular phones to call you on your computer. SkypeIn provides the means of obtaining a phone number in a particular area that people can use to call you on Skype. Although it appears to others that they are dialing a regular phone number, the call actually comes to you via Skype over the Internet.
One of the major benefits of SkypeIn is that you can get up to 10 different phone numbers in different areas of the world. When someone in a different country dials a number associated with his area, it is usually the same as if they are calling a local number. Even though they are calling you from a different country, they avoid paying any long distance fees to talk to you. This can be of great significance for businesses that have clients located throughout the world or for individuals who have friends and family that they often communicate with in other countries. You must have one of the following versions of Skype installed to use SkypeIn:
- Skype for Windows version 1.1.0.61 or later
- Skype for Linux version 0.94.0.1 or later
- Skype for Mac OS X version 0.15.0.4 or later
Setting Up SkypeIn
Signing up for the SkypeIn service and obtaining a phone number is a similar process to what we covered earlier with SkypeOut. When you click the Tools menu in Skype and then click Go to My Account Page, your Internet browser will open and load a Web page on Skype’s Web site where you will be required to enter your Skype username and password. After you provide this information and click the Sign Me In button, another Web page will load containing your account information. On this page, click the Buy SkypeIn number link to open a page that will begin the process of setting up your new phone number.
The first step is choosing the country you would like your phone number to be in. On the Web page, you will see links for the various countries available. At the time of this writing, there are nine options:
After clicking the name of the country you would like your phone number in, a new page will appear containing additional options. The first option to choose is the area code or city code you would like your phone number. As we mentioned earlier in this chapter, the area/city code identifies the location of where that phone number exists. The drop-down list provides a variety of area/city codes to choose from. To find a code in a city or area that suits your needs, you might want to refer to the Web sites cited earlier for more information on country codes and area codes.
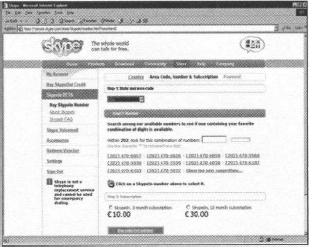
Once you select the area/city code you want to use, you will see a number of suggested phone numbers that are available in that area. If there is a particular series of numbers you want (such as those that spell a word), you can enter the series of numbers into the field in Step 2. This will initiate a search of all available phone numbers that use this series and display the results. When you find a number you would like to use, click that number to claim it for your own. Before doing so, however, it is important that you choose the number you really want, since a number cannot be exchanged for another one after it is purchased.
To complete the setup of your SkypeIn number, you must then select a subscription option of either three or 12 months and click the Buy selected number link. Clicking this link will take you to another Web page displaying a message that informs you that e-mail has been sent to you with a confirmation number. This number must be entered on the Web page to confirm your purchase, and you will need to click the Submit Confirmation Number link.
After you click this link, another page will appear asking you to specify how you would like to pay for the service and whether you would like to use existing billing information or provide a new billing address. Once payment information has been entered, a new page with the details of your purchase will appear. At any time during this operation, you can cancel out of the purchase.
Tweaking the Technology … Versions
Because new versions of software generally provide new features and settings, you should ensure that you are using the latest version of Skype. SkypeIn does not work with every version of Skype, so you could experience problems with its function if you have not upgraded to the latest version. To ensure that SkypeIn will work properly, you need to be using the latest versions, which at the time of this writing are Version 1.4.0.78 (for Windows), Version 1.3.0.14 (for Mac), Version 1.2.0.17 (for Linux), or Version 1.1.0.6 (for Pocket PC).
Using SkypeIn
Once you have a SkypeIn number, you are ready to begin using it. You can share it with your friends, colleagues, and customers. The Skype number is good for the length of your subscription, and the number will be reserved for you 90 days after your subscription runs out. This provides you with time to renew SkypeIn without having to change your number once the subscription expires.
As with calls from one Skype user to another, called Skype-to-Skype calls, you must be logged onto Skype to receive a call with SkypeIn, unless you have call-forwarded to a landline or cell phone number. When a SkypeIn call is received, you will hear the sound of a telephone ringing and see the Skype icon flashing in your system tray and you can answer or reject the call.
The information about a particular user calling you could consist of varying information on the Call List tab. When a call is received using SkypeIn, the name and/or phone number related to the incoming call may be displayed, and the word SkypeIn will appear in brackets beside it. However, if the person calling you is calling from a location that does not support Caller ID, his or her name might not appear. Aside from this, it will appear identical and use the same command structure as when a Skype call is received.
Forwarding to and from SkypeIn Numbers
Because your SkypeIn number has same the appearance and functionality to callers as a normal phone number, you might be able to forward calls from your landline or mobile phone to it. When a call is received by your normal phone number, it is forwarded to your Skype number, where you could answer the call and talk using Skype. Whether you can do this depends on whether you have that feature available on your landline or mobile phone. To find how to forward the calls, you need to consult your phone company or cell phone provider. The user should be aware of additional charges that may be applicable to calls that are call-forwarded to a SkypeIn number.
As we discussed earlier in this chapter in the section on SkypeOut, you can also forward calls from Skype to another phone number. If you have both SkypeOut and SkypeIn, a call to your SkypeIn number can be forwarded to your landline or mobile phone. Even if your computer is turned off, these calls can be sent to contacts or the phone number(s) you specify in Call Forwarding. Calls that are forwarded in this way are charged at the applicable SkypeOut rate.
Another option under Privacy will appear once you sign up for SkypeIn to control who may call you from SkypeIn. The following picture shows you the additional settings that appear:
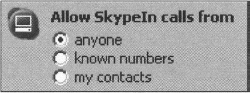
The settings in the Allow SkypeIn calls from section determine not only who can call you using SkypeIn but also who may leave voice mail. You have three options that you can choose from:
- Anyone Any person can call you using SkypeIn.
- Known numbers Only calls from people who transmit their Caller ID information can call you using SkypeIn.
- My Contacts People you have entered a SkypeOut number for in your Contacts list can call you using SkypeIn.
Other Advanced Topics
Here we look at a few more advanced features: editing the Skype language file, tips and tricks, and command-line options.
Editing the Skype Language File
Language files are used in Skype to manage the text that appears on screens throughout the program. With the exception of the About box (which contains legal information) that is displayed through the Help menu, all the menus, hints, captions, and other text in Skype can be modified through the use of Skype language files. Because the Skype program was written in English, language barriers can make it difficult for those who speak or read another language. To allow information to be displayed in other languages, Skype allows you to create and load language files into the program so that items appearing in Skype can appear in any other language.
Language files are simple text files that are saved with the .lang extension. Because they are text files, they can be edited using any text-editing program. As shown in the following figure, the left side of each line shows the item that can be edited, whereas an equals sign ( = ) links it to the actual text that is displayed. By modifying the text on the right side of the equals sign, you can change the text in Skype to anything you want.

An even easier way of editing the language file is to use the editing tool that is included in Skype. This tool can be opened by clicking the Tools menu and then clicking the Edit Skype Language File … menu item. Once this is done, the Skype UI Text Editor shown in the following figure appears. As shown in this figure, the Comment column shows the items available to be translated, and the Original column shows the text that was currently used when you opened the language file with this tool. The Current column, which appears to the right, is where you can translate the current text to another language. The text in this column displays what is currently used and can be edited to any words or phrases you choose.
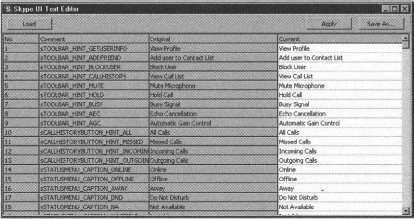
Tweaking the Technology … Editing Language Files
Although the original intended use of language files was so that English text could be translated to another language, it can also be used to personalize Skype. This way, the language in Skype becomes more akin to what you are used to. You can modify the menus, hints, and other text in Skype to use a regional dialect, slang terms, or humorous sayings to make your experience with Skype more enjoyable.
In using the language files, you might also think that they can be used to translate text in chats with people who speak languages other than your own. However, this is not the case. The language files only translate or modify text used in the Skype program, not text that appears in chats with other Skype users.
In modifying the various entries in a language file, you could be somewhat confused by the names of items in the Comment column. When you review them, however, you will see a common theme to their naming scheme. Items in this column include the names of various features or elements in Skype and have several words that help to define what the text relates to:
- Menu Items with this word in their names refer to text that appears in the menus and menu items in Skype.
- Caption The items with this word in their names refer to titles or captions of the dialog boxes in Skype.
- Hint Items with this word relate to tool tips or hints that appear when you hover your mouse pointer over a particular item.
To immediately see what a particular entry that you modify relates to or the effects of your modification, you can use the Apply button at the top of the editing tool. When Apply is clicked, changes made in the language file instantly appear in the Skype program. This allows you to make and review changes on the fly, without closing the editor.
In addition to this button, two other buttons appear on the Skype UI Text Editor: Save As … and Load. The Save As … button opens a dialog box that allows you to name your .lang file and save it to a location of your choosing. Once you have saved various language files, you can then load them by clicking the Load button. Once this button is clicked, an Open dialog box appears, allowing you to navigate your hard drive to select the language files you have saved or acquired from other Skype users.
Other Tips and Tricks
In addition to the settings we have covered so far, a number of tips and tricks can be used to enhance your experience with Skype. Some of these are areas where configuration can make Skype more suited to your tastes, improve personal privacy, or augment your use of its features. These tips and tricks include:
- Personalizing Skype
- Privacy issues with information displayed in Skype
- Dragging and dropping people (figuratively speaking) into chat rooms
- System commands used in chats
- Authorization of new contacts
In using Skype and talking with other users, you might find additional suggestions and techniques to improve your use of this software.
Chat Tips and Tricks
In addition to making calls, which we have covered for most of this chapter, a major component of Skype is its functionality for instant messaging or chats. In the sections that follow, we discuss some tips and tricks for chatting with one or more people in Skype and commands you can use to make chatting with others easier and more effective.
Drag and Drop in Chat
You can add other people to a chat by clicking the Add button in the Chat window, but people in your Contacts list can also be “dragged and dropped” into an existing chat. The Contacts tab of Skype provides a listing of people you have added to your list. If you have an existing chat with someone and would like to add others from your contact list to the chat, click the name of the person you want to add, hold down the left mouse button, and move your pointer over the chat window. When you release the left mouse button, the name of the person from your contact list will have been added to the chat window.
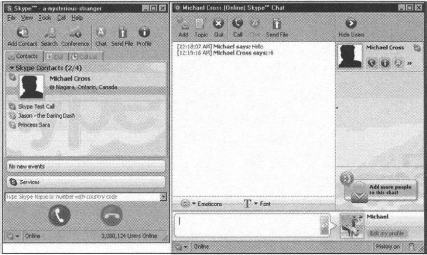
Using System Commands in a Chat
System commands allow you to perform functions without clicking buttons and menu items in the program. In some instances, these commands are the only method of performing a certain function. During a chat, enter these commands in the text field you use to type your message. Once you enter the command, information related to the command having been processed may appear somewhere in the program’s interface or chat area. The system commands available in a Skype chat are:
- /add skypename Adds the Skype user you specified by name to the chat—for example, /add jennifer would add the user named jennifer to the chat.
- /help Displays a listing of all system commands in the chat area, appearing as though you would type them as a message.
- /topic newtopic Sets or changes the topic of the chat. For example, /topic Skype Tips would change the topic to Skype Tips. A message will appear in the chat area that you have changed the topic to the new topic name, and the topic name will also appear at the top of the chat window.
- /me action Used to specify an action you are performing that others would not be able to see. This command adds a bubble (in Skype default) or writes an italic line (in IRC-like chat) containing the full name you provided in your profile, followed by the action you typed. For example, if a user named Michael entered /me jumps up and down, a bubble or italic line of text would appear with the words Michael jumps up and down.
- /history Displays the chat history, which you can review and search. Chat histories are stored in the Documents and Settingslocal usernameApplication DataSkypeskype usernameIMHistory folder on computers running Microsoft Windows.
- /find text Searches the text of the chat for a certain word or phrase. Once found, the word or phrase appears highlighted in the chat window.
- /fa Repeats the last search performed with the /find command and is used to find the next instance of the word or phrase you are searching for.
- /is the same as /fa.
- /alertsoff Turns off the alerts that indicate a new message is posted to the chat, so you know which chats you need to respond to when working in another window. Alerts cause the current chat window to pop up or the Windows taskbar entry for this chat to blink.
- /alertson Restores the default setting for new message alerts in Skype, allowing the current chat window to pop up or the Windows taskbar entry for this chat to blink.
- /alertson text Causes you to be alerted only when a new text message is posted to the chat. When this occurs, the current chat window pops up or the Windows taskbar entry for this chat blinks.
- /leave Exits you from the chat.
Command-Line Options
In addition to the Startup options we discussed earlier in this chapter, there are other methods of configuring what happens when Skype starts. When Skype is used on a machine using a Windows operating system, several command-line switches can be added to a shortcut or when starting Skype using the Run command. These switches can improve the speed at which Skype starts and what happens after Skype has loaded.
To illustrate the way a switch is used, let’s look at the properties of a Skype shortcut. By right-clicking the desktop icon for Skype and selecting Properties from the menu that appears, you will see a dialog box. The Target text box shows the path to Skype’s location on the hard drive. This path configures the shortcut as to which program is launched when the shortcut is double-clicked. Additional commands can be typed after this text, modifying how the program starts.
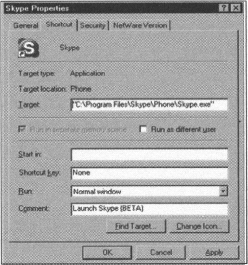
Four switches can be used with the command line to start Skype:
- /nosplash Instructs Skype not to display a splash screen when Skype starts.
- /minimized Starts Skype in a reduced state, so it is minimized to the system tray at startup.
- /callto:name-or-number Instructs Skype to call a name or number that you specify after the /callto: switch. This can be any Skype name or SkypeOut number that you specify. SkypeOut is discussed in detail earlier in this chapter.
- /shutdown Closes the Skype program.
Authorization
More of a feature than architecture is how Skype handles user authorization. We discussed in Chapter 3 how users will do a search for you or add you to their contacts from your invitation or your Skype names advertised in e-mail or on a Web site. We also discussed in Chapter 3 the Blocked User feature. When a person searches or adds you to their contact list, you are sent an authorization request. Once you accept this request and authorize a contact, it can never be revoked. The only option you have is to block the user if they begin harassing you. Authorization only allows the other contacts to see your online status. To control this further, you must use your Privacy settings to change who may chat or call you:
For people who do not want to be bothered by skam (Skype spam), you can set your Privacy option to Only people from my contacts. This will prevent anyone who is not in your contact list from contacting you directly through Skype without you adding them first. The user would first have to send you an IM from another client, send you e-mail or telephone you to give you their Skype username and add them to your contact list. For people who need the public to contact them, as I do with our www.SkypeTips.com site, this option is too restrictive. However, I could set my Privacy option to Only people whom I have authorized so that people must first ask for authorization before contacting me with questions.
I have adjusted these settings in an effort to find a happy balance, but find that if I simply remove contacts that are no longer active, and block those that require it, I am good to go, as I need to be able to accept unsolicited calls in support of my Web site. I now set my Privacy setting to Anyone so that I may respond to questions without having to authorize every caller. If you want more control over users that you authorized and now want to de-authorize, your only real option is to remove them from your Contacts list and add them to your Blocked Users list, and they will have to find another way to contact you to be removed from your Blocked Users list.