
Solutions in this chapter:
Requirements to Make Voice Calls (Basic and Advanced)
The first place to start in making voice calls is to make sure your system or systems are capable of performing good voice calls. A few minimum requirements should be met to guarantee that your experience will be a good one.
The following are Skype-recommended minimum requirements to perform voice calls, categorized by the type of equipment you’ll be using.
Personal Computer (PC)
To take advantage of all the advanced features of Skype and to experience the best sound quality possible, Skype recommends the following configuration:
- A personal computer (PC) running Windows 2000 or Windows XP
- 1GHz processor minimum
- 256MB RAM
- 30MB free space on your hard drive
- Full-duplex sound card
- Headset (defined as having both headphones and a microphone)
- A high-speed Internet connection (cable, DSL, wireless, or other)
If your PC is five years old or less, it will most likely perform just fine. Though Skype specifies you can use Windows 2000 or Windows XP, we recommend that you use the latest version of the operating system and stay current within five years for support and security reasons. So our recommendation is to use:
- Athlon, Celeron (>500MHz), Pentium III, or better
- Microsoft Windows XP
Understanding the Basics … What Version of Windows to Use
We recommend using Windows XP rather than Windows 2000 and keeping your operating system current within three to five years. We also recommend keeping your system current with Windows Updates.
We make these additional recommendations because of the additional features you can perform with Skype. We will expand on how you can talk and listen to Skype voice calls in Chapter 8, “Hardware Add-ons for Skype.” Skype recommends a headset (USB or one that connects to a full-duplex PC sound card), but there are other options you can consider in lieu of a headset:
- Headphones of any kind with a separate noise-canceling microphone
- Externally powered speakers (that plug into the wall) along with a noise-reduction microphone
Understanding the Basics … What to Use for a Microphone and Speakers?
A headset/microphone combination works the best for Skype calls. You may also use external speakers and a “noise-canceling microphone” combination for Skype calls; these will work just as well, though you will need to adjust the speakers’ volume to reduce feedback.
PC Laptops
If you have a laptop, it might have both speakers and a built-in microphone. This will work, but if you find the voice quality unsatisfactory, you can add a headset or headphone/noise-canceling microphone combination that you can throw into your laptop bag. Such a device will work much better for Skype calls with most laptops. Some laptops have speakers and no built-in microphone, so you can add a noise-canceling microphone, a headset, or a headphone/noise-canceling microphone combination. None of these devices will break the bank.
Apple Devices
If you are one of the nearly 10 percent of computer users who have Apple or Mac machines, you will also have minimum system requirements. We suggest the following for a good Skype voice call experience:
- Apple G3, G4, or G5 or better
- 600MHz or better
- 256MB of RAM
- A 30GB or larger hard drive
- Audio and video (included with Apple systems)
- Mac OS 10.3 (Panther) or later
If you have a PowerBook or iBook, it might have both speakers and a built-in microphone. This will work, but if you find the quality to be unsatisfactory, you can add a headset/noise-canceling microphone that you can throw in your laptop bag. Such a device will work much better for Skype calls. Some laptops have speakers and no built-in microphone, so you can add a noise-canceling microphone, a headset, or a headphone/noise-canceling microphone combination. None of these devices will break the bank.
Pocket PC
Many of us use a personal digital assistant (PDA), and these devices may be capable of using the Pocket PC (PPC) version of Skype. The following is the recommended configuration:
- Windows Mobile 2003 for Pocket PC
- 400MHz processor
- Wireless (WiFi) enabled
- Wired headset/microphone preferred
- Bluetooth headset profile (optional)
If you are in the market for a new Pocket PC device, some work better than others. The main thing to look for is that they work well without a headset. If Skype works well without a headset, Skype will work even better with a headset.
Headsets
Many Pocket PC devices work much better with a headset because the built-in microphone and speaker are too close together and work poorly in many cases or are located in the wrong positions on the device to act like a telephone. Adding a headset/microphone will significantly improve the quality of a Skype call on a Pocket PC device.
Understanding the Basics … Pocket PC Quality Tip
Setting the volume one setting down from maximum will reduce the echo in a Skype call.
Bluetooth Headsets
Many people like to use Bluetooth headsets with their cell phones. If your Pocket PC device is capable of using a Bluetooth headset, you might want or prefer a wireless Bluetooth headset over a wired headset. Be sure to check with the device manufacturer to ensure it supports a Bluetooth headset profile.
Linux
Linux has the same requirements as a personal computer, since it uses the same hardware, with the exception that you are using one of the many Linux distributions instead of Windows. For Skype, the same requirements apply as for the PC in that we recommend that you use the latest version of your Linux distribution.
Skype packages are available for the following distributions of Linux:
- SuSe version 9 and newer
- Fedora Core 3 or newer
- RPM for Mandrake 10.1 or newer
- Debian
- Dynamic binary tarball (requires Qt 3.2)
- Static binary tarball (compiled with Qt 3.2)
Connection Types
You may use many types of Internet connections with Skype. This section takes a look at the options to help you decide which ones to use. The following connection types are covered:
- Local area network (LAN) connection
- Wireless (WiFi) connection
- Dialup modem
LAN-Based Connections
The most popular way to connect using Skype is using a LAN-based connection. Here we cover two types of LAN-based connection:
- Home high-speed connection
- Work LAN connections
A Word about Upload and Download Speed
In dealing with high-speed Internet connections, it is important to understand that there are two speeds:
- Upload speed The speed at which you send data
- Download speed The speed at which you receive data
Generally speaking, the download speed will always be significantly faster than the upload speed with a cable modem or telephone company digital subscriber line (DSL) offering. Skype works pretty well with either a cable modem or DSL connection, but if the upload speed is low, you could run into voice call quality issues. You will find this issue when you’re staying in hotels, for example, or in WiFi hotspots, because many people are sharing the same broadband connection at one time.
The typical speeds for residential available high-speed Internet or broadband connections are:
- Cable modem 4Mbps download, 250Kbps upload
- Standard DSL 1.5Mbps download, 128Kbps upload
- Satellite 500Kbps download, 56Kbps upload
Home High-Speed Connections
To clarify terms, we use the term broadband to describe any high-speed Internet connection available for your home. You may already have or be planning to get a broadband Internet connection like those offered by your cable television provider or telephone company. These are the two primary connection types available to the residential home user and, in many cases, small business owners as well. In addition you may have the option of Satellite or the newer 3G Broadband offered by your Cell Phone carrier or Wi-Max (802.16) wireless broadband connection. In Europe and many other countries and just starting here in the United States your Cell Phone carrier offers a high-speed broadband option for laptops that uses a PC Card to connect to the Cell Phone companies high-speed data network. This option is mostly marketed to laptop users and not recommend for the home user. Contact your Cell phone company for more information on their high-speed broadband offerings for laptops.
We will not cover Wi-Max as it is still a few years away for most of us, just know it is coming for those people that cannot get DSL, Cable or 3G service. Wi-Max is not widely available and is a fairly new option in the Broadband space. Wi-Max is best described as a “Wireless Broadband” or a very fast and strong signal wireless that will go long distances for users that can not get DSL, Cable or other forms of broadband access. WiMax will be able to provide users with a fast Broadband connection when a Broadband connection from your Cable Television provider or Telephone company is not available, but it will take a few years to be readily available to home users.
We do not recommend satellite broadband connections, since the upload speed is not much faster than a dialup connection and they are more costly. To enjoy good-quality Skype calls, you need a good broadband connection, so check out your available options and select the fastest, most cost-effective solution you can find. The faster the connection, the better. In the United States, a cable modem provides the best download and upload speeds, but options for DSL from your telephone company could rival those of your cable provider. Whatever your decision, be sure to get faster than the following specs to take full advantage of Skype and the software add-ons available for it:
- Download speed greater than 1Mbps
- Upload speed greater than 128Kbps
Your provider may offer faster solutions, but in the United States these tend to be the basic offerings. Europe and other countries have many more options, and in Russia, 10Mbps download and upload fiber connections are available—very fast indeed. So be sure to check with your broadband provider to inquire about both minimum upload and download speeds. Again, the faster the connection, the better. You might want to add some options to Skype that will benefit greatly from the fastest connection you can get, such as adding video to your Skype call to have a fully functional video call between two users. (We cover video calls using Skype in the section titled “Making Video Calls with Skype” in Chapter 8.)
Testing Your Broadband Connection Speed
Many “speed-test” sites on the Internet will rate the speed of your Internet connection. The main thing to look for is that the speed test shows you both the upload and the download speeds. Many, if not most, of the speed-test sites will show you only throughput or the download speed. With Skype, your biggest concern will be the upload speed. You can find several speed-test locations at the following URL, which includes many locations worldwide: www.dslreports.com/stest.
Work LAN Connections
In the workplace, we commonly hear the term LAN, which stands for local area network. This network is much faster than what you can have at home because businesses or corporations purchase very fast Internet connections so that they can handle the traffic requirements to meet their business needs.
A LAN has many more complexities than a home connection, and these could affect your Skype voice calls. At this point all you need to know is that there is a difference between a LAN and your home connection; we cover this topic in more detail in Chapter 13.
Wireless-Based Connections
Wireless technology, often referred to as Wi-Fi, offers us the freedom to roam. We can use it in our home, workplace, or any public hotspot. A hotspot is a location that has wireless access for free or as a pay service. These locations include:
- Airports
- Hotels
- Coffee shops
- Public WiFi such as hotspots offered by towns and cities
- Internet cafés
- A person’s home
In our home, wireless technology becomes popular because we can sit anywhere in our home and have access to Internet for e-mail, IM, or Skype calls. Wireless technology also becomes useful for handheld devices such as a Pocket PC or a wireless Skype phone.
The one concern about wireless connections that you should be aware of is the speed and impact of wireless networks on the throughput of a Skype voice call. There are three basic types of wireless access:
- 802.11a
- 802.11b
- 802.11g
802.11a
The 802.11a standard is not so popular a solution as 802.11b or 802.11g, and it is not available for Pocket PC devices. The largest users of 802.11a are businesses. The speed is nice at 54Mbps, but it’s more costly than 802.11b and 802.11g.
802.11b
The 802.11b standard is the most popular version of Wi-Fi, but it’s not so fast as 802.11a or 802.11g. It is compatible with 802.11g devices; wireless routers you purchase that can handle 802.11g will also be downward compatible with 802.11b. The 802.11b speed is only 11Mbps—far slower than the other two options. 802.11b is also the least expensive and older of the wireless solutions.
802.11g
The 802.11g standard is fast becoming the most popular version of Wi-Fi because it is fast and compatible with 802.11b clients that may already have built-in Wi-Fi cards, such as laptops. This allows a user to implement a faster version of wireless technology, but not have to replace the older, widely available and widely used 802.11b devices. The 802.11g speed is 54Mbps, which as fast as 802.11a. These features make it the best option for a wireless connection.
Many vendor-specific features promote boosting performance in 802.11g wireless routers that further increase the throughput for your Skype calls and video, if you choose to use this option with Skype.
Understanding the Basics … Wireless Recommendation
If you are looking to use wireless technology in your home or small business, 802.11g is the best option. This cost-effective solution provides options for better security, faster and better throughput, and compatibility with older 802.11b clients. It will be perfect for Skype calls and video.
For more information on wireless, read The Wireless Internet Explained by John Rhoton.
Modem-Based Connections
According to Nielsen/NetRatings Inc.’s NetSpeed Report of September 2005 (www.nielsennetratings.com/pr/pr_050928.pdf), as of the first quarter of 2005 in the United States, broadband Internet surpassed dial-up modem Internet connections for the first time. Dial-up is a technology that is on its way out, being replaced with higher-speed connections such as broadband for home and business.
As far as whether Skype will work over a dial-up connection, it will, but it will be a poor-quality call. If both users are using a modem, the Skype call will be terrible at best. Also, if a modem is all you have, the closer you can get to the maximum dial-up speed, which is 56Kbps, the better. The slower the modem connection, the worse the Skype call quality will be.
Modems and dial-up connections are a dying technology. Consider upgrading to a broadband connection if you want good-quality Skype calls. We generally do not recommend dial-up connections when using Skype.
Understanding the Basics … Using a Modem
Modems do not perform well with Skype and its many add-ons.
Testing Your Existing Setup
If you have not already used a voice chat or voice call solution, the first order of business is to test your existing setup to make sure it will work as expected.
Windows
The first thing that needs to be checked is whether your system can record and play an audio file. If you know you have a sound card, you can move on to testing your record and playback ability. If you do not know whether you have a sound card, go to the “Check That You Have a Sound Card” section to see if you have a sound card installed.
The test in the next section will help you determine whether your sound card is functioning properly for a Skype call.
Windows comes with a utility called Sound Recorder that allows you to record and play short audio clips. This utility can also be used to make sure your microphone records and that your speaker plays an audio clip. To make sure your sound card and microphone/headset combination or sound-canceling microphone/external speakers work properly, record and play a sound clip.
Find Sound Recorder in the Programs menu under Accessories | Entertainment.

Open Sound Recorder, press the red record button, and speak into your microphone.

Once you record a clip, play it back. If you can hear your test clip, your system is working properly. If you did not hear your sound clip, check your settings and sound card connections. Also check to make sure your microphone is not muted.
- Microphone = pink connection
- Headphone/speaker = green connection
Mute is a tricky item. It is supposed to be muted in Sound Controls. It is a tricky setting so images would be confusing. This is why I used the Sound Recorder as the option to test recording.
Check That You Have a Sound Card
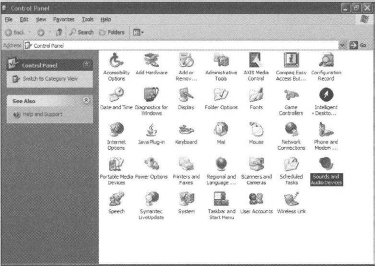
To check that you have a sound card, open Control Panel, select the appropriate Sound icon, and open the next window.
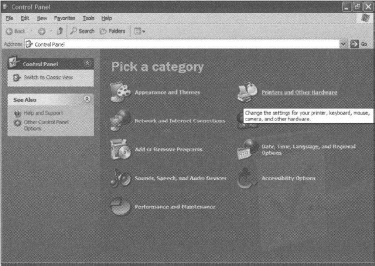
Select and open the Sounds and Audio Devices icon.
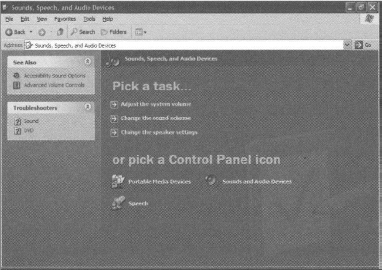
Select and open the Sounds, Speech and Audio Properties icon.
In the next screen, select the Sounds and Audio Device icon.
Now select the Audio tab to see the sound card settings.
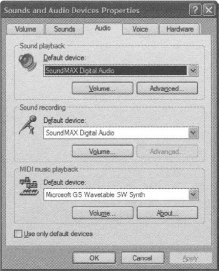
The listed device should be your sound card. If there is no device listed in the Sound playback or Sound recording boxes, you probably do not have a sound card installed, or the drivers for the sound card are not loaded. Check with your PC manufacturer and/or sound card company to fix this issue.
Apple PowerBooks and iBooks come with integrated microphones and speakers, so there’s not much to worry about in terms of testing. Apple G3, G4, and G5 computers come with sound cards, so all that you’ll need is the addition of a headset/microphone or microphone and speaker combination. Make sure the mic is not muted.
Linux
The application to test your sound card on Linux varies based on the flavor of Linux you’re using. Be sure to test the recording and playback capability with the appropriate recording application that comes with your flavor of Linux.
Pocket PC
The Pocket PC is designed to take memos, so many have built-in microphone and speakers. They might not work very well, but they are often included. Many Pocket PC devices use a special 4C connector that is not the same as the connections used for cell phones or your PC. These have four connectors, and only special headsets or adapters can be used in a headset/microphone combination. You can read an article about these special 4C connectors at www.skypetips.internetvisitation.org/articles/pocketPC.html.
Some Pocket PC devices also have Bluetooth, but for a device to use Bluetooth headsets, a headset profile must be included with the device.
Be sure to check the vendor’s specifications before purchasing a Pocket PC so that you understand what it can and cannot do. You might also want to test the device for two weeks before purchasing it to thoroughly test Skype with the device. Be sure that, if you are purchasing the device new, you ascertain the return policy for the model you are looking to purchase so you have ample time to test it with Skype.
Installing Skype for Windows
The first step in installing Skype is to download it. To download the latest version of Skype for Windows, go to the following URL: www.skype.com/download/.
Select the Windows icon. You will be taken to the main download page, which provides you with the latest requirements and other information.
If you want the latest step-by-step download and installation instructions, Skype provides a download guide at the following URL: www.skype.com/help/guides/.
Now let’s get started. Open the file you just downloaded and you will be presented with the following screen:
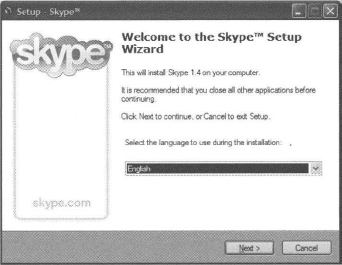
Select your language and click Next. You will then see the following screen:
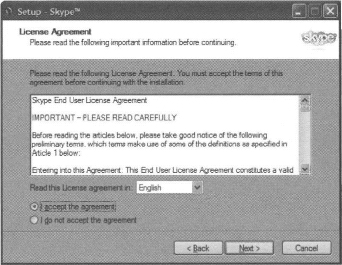
Read the End Users License Agreement (EULA). Be sure you understand it completely, and if you agree to its terms, select Next.
Tweaking the Technology … Corporations Beware
If you are installing Skype at or for your company, be sure to check with your management to be sure you are not in violation of company policy.
When you select Next, you will be presented with the following screen:

Select the directory you want to install Skype to and click Next. Unless you know that you want to install Skype to another directory or location, just accept the default, since this choice will work for most everyone.
After Skype installs, you will be presented with the following screen:
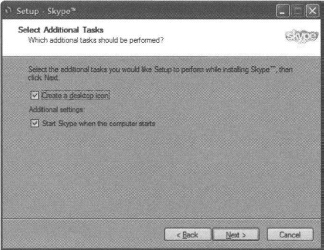
We suggest that you leave both these options selected, since you will most likely want a desktop icon for Skype and to launch Skype when you first start your computer. Select Next once you make your selection.
After Skype is installed, you will then be prompted as to whether you want to start Skype. Click Finish.

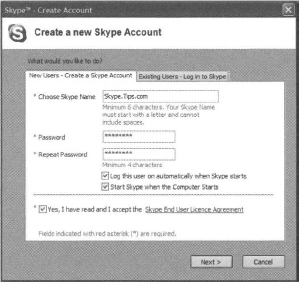
If you have never installed Skype before, you will be presented with the Create a new Skype Account screen.
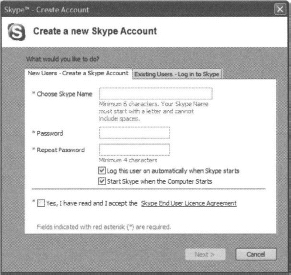
If you already have a Skype name, select the ![]() tab. If this is the first time you are using Skype or you want to create a new Skype user, fill out the screen and be sure to select this check box after you have read the EULA:
tab. If this is the first time you are using Skype or you want to create a new Skype user, fill out the screen and be sure to select this check box after you have read the EULA:
Skype usernames can include the underscore ( _ ) or period ( . ) characters to help you create a unique name. Here are some examples:
- michaelgough
- michael.gough
- michael_gough
Select Next to create the account. If the name is already taken, you will be prompted with some examples. Select your own option and continue with registration. You will then be prompted with the following screen to enter your personal information:

Fill out the screen with your personal information. You may leave this information blank if you do not want your profile to show this information about you.
You may optionally include an email address in your profile, but it will not be displayed to others. This is a privacy feature designed to prevent unscrupulous spammers from harvesting email addresses using Skype. But those who know your complete email address will be able to use it to search for you (no partial searches using an email address are possible). Most often this feature is used by friends who know your email address, but not your Skype name. You also have the opportunity to decide whether you want Skype to send you e-mail about new features and other Skype-related information. We will leave this decision up to you.
When you’re finished, select Next. If the name you chose is taken, you will see the following screen:
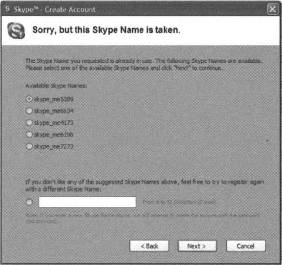
You can let Skype choose a similar name for you, but we suggest you try another name combination. Consider using the underscore and period to help make your username unique. Then click Next.
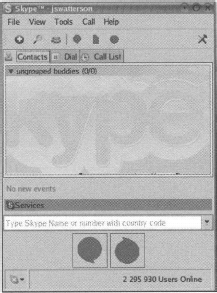
When the name is successfully registered, Skype will log the user in. Now Skype is ready to use, and you will see the following screen:

Now you are ready to add contacts and start using Skype. (You’ll learn more about this in the section of Chapter 3 titled “Adding or Searching for Contacts.”“ Skype adds the user Skype Test Call for you so you can make your first test call. We will discuss making a test call in Chapter 3.
Skype also now has a Getting Started Wizard that will appear once Skype successfully logs into your account. You can use this guide as additional assistance to get started using Skype.

If you do not want to see this wizard every time you start Skype, just select the ![]() check box, and the Getting Started Wizard will be disabled.
check box, and the Getting Started Wizard will be disabled.
Installing Skype for Pocket PC
The first step in installing Skype is to download it. To download the latest version of Skype for Pocket PC, go to the following URL: www.skype.com/download/.
Select the Pocket PC icon and it will take you to the main download page. The page provides you with the latest requirements and other information.
If you want the latest step-by-step download and installation instructions, Skype provides a download guide at the following URL: www.skype.com/help/guides/.
Downloading Skype for the Pocket PC
There are three ways to download and install Skype and prepare for installation to the Pocket PC. One is to download Skype directly to your Pocket PC that has a WiFi Internet connection. The second is to download the SkypeForPocketPC.exe file to your computer when you have docked and synchronized your Pocket PC and launch the installer from your computer. The third is to download the SkypeForPocketPC.cab file to your computer, copy it to your Pocket PC, and start the Skype installation from your Pocket PC.
Download Directly to the Pocket PC
If this option is available to you, doing a direct download is the best way to install Skype for the Pocket PC. Select the Cab installer for handheld device from the Skype Pocket PC download page. If you download Skype directly to your Pocket PC, the download utility will ask if you want to Open file after download. Make sure this choice is selected and start the download. Pocket PC .cab files will automatically install when launched, so all that will be left to do is open the Skype application, which will be found in the Programs folder of your Pocket PC.
Follow the instructions in Chapter 3 for signing up as a new user and adding users to Skype.
Download to Your Computer and Launch the Skype Installer
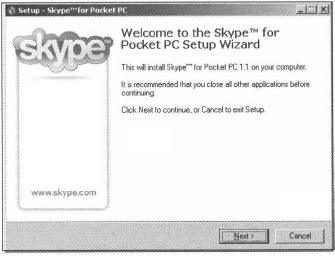
If you select the Download Skype for Pocket PC installer to your computer, you will first need to connect your Pocket PC to your docking cradle and establish a connection. Once you are connected to your Pocket PC with ActiveSync, you will see the following screen.
Select Next and you will be taken to the following End User License Agreement screen:
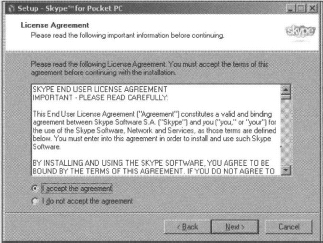
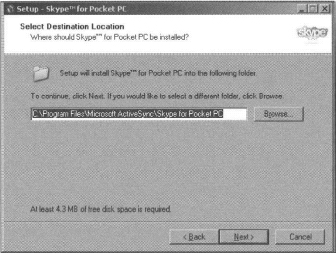
Make sure you read and understand the EULA, and then select I accept the agreement. Then click Next. You will see the following screen. Go ahead and accept the defaults to install the Pocket PC Skype installer.
You will then be taken to the next screen. Select Install to continue.
Once the Skype installer is completed, you be prompted to select Finish to launch the Pocket PC installer from your computer.

At this time the Skype installer will start the process of coping files and installing Skype onto your Pocket PC device.
If your Pocket PC device does not support Skype, the following screen will appear:

This means that your Pocket PC does not meet the minimum system requirements to run Skype.
Download to Your Computer and Copy the Installer to Your Pocket PC
If you download the Skype cab installer for Pocket PC device to your computer first, you will need to connect your Pocket PC to your docking cradle and establish a connection. Once you are connected to your Pocket PC with ActiveSync, you will see the following screen. We are connected as Guest in this example.
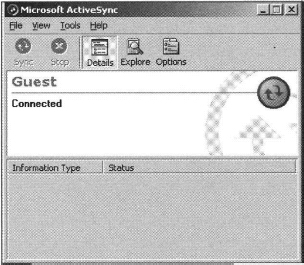
Select the ![]() icon to open a folder on your Pocket PC. Just drag the SkypeForPocketPC.cab file onto your Pocket PC device.
icon to open a folder on your Pocket PC. Just drag the SkypeForPocketPC.cab file onto your Pocket PC device.
Once the file is copied, go to your Pocket PC and double-click the file icon, and it will install Skype to your Pocket PC device.
All that will be left to do is open the Skype application, which you’ll find in the Programs folder of your Pocket PC.
Follow the instructions in Chapter 3 to sign up as a user and add users to Skype.
Understanding the Basics … Pocket PC and Skype Compatibility Tip
If you have a Pocket PC and are unsure whether it is capable of running Skype, simply run the SkypeForPocketPC.exe installer, and it will tell you during the installation whether your device is capable of running Skype.
Installing Skype for Mac OS X
The first step in installing Skype is to download it. To download the latest version of Skype for Mac OS X, go to the following URL: www.skype.com/download/.
Select the Mac OS X icon and it will take you to the main download page. The page provides you with the latest requirements and other information.
If you want the latest step-by-step download instructions, Skype provides a download guide at the following URL: www.skype.com/help/guides/.
When you download Skype you will see the Skype ![]() icon. The screen will prompt you to drag the icon into the Applications folder, and Skype will then be ready to use.
icon. The screen will prompt you to drag the icon into the Applications folder, and Skype will then be ready to use.

You will see the Skype ![]() icon on the Mac Dashboard at the bottom right of the screen
icon on the Mac Dashboard at the bottom right of the screen
Once Skype is installed, you are ready to log in or sign up as a new user. The main Skype screen looks like the following:

Refer to Chapter 3 for more on how to do this. The Windows version is used for the examples in this book because it is the most widely used version, so if you’re a Mac user, keep in mind that some screens and features available in Windows might not be available for the Mac OS X version.
Installing Skype for Linux
The first step in installing Skype is to download it. To download the latest version of Skype for Linux, go to the following URL: www.skype.com/download/.
Select the Linux icon and you will be taken to the main download page. The page provides you with the latest requirements and other information.
Linux Installation Options
There are several options for installing Skype onto Linux. Since there are several flavors of distributions of Linux, you will need to select the package that is right for your configuration. The following is a list of Skype packages available for various Linux flavors:
- SuSe version 9 and newer
- Fedora Core 3 or newer
- RPM for Mandrake 10.1 or newer
- Debian
- Dynamic binary tarball (requires Qt 3.2)
- Static binary tarball (compiled with Qt 3.2)
The easiest way to install the Linux version is to use one of the install packages that are already compiled and available for SuSe, Fedora, Mandrake, or Debian. If you are using RedHat Linux, you may use the Fedora RPM package for RedHat as well.
Installing a Precompiled Skype for Linux Package
Installing the precompiled Skype for Linux packages is straightforward. Like any package, once you download the package you simply double-click the package icon and it should launch the package installer.
RPM Version
Follow these steps to install the RPM version:
- Open a console.
- Log on as superuser or root.
- Find the location where you saved the RPM.
- Enter the following command:
rpm -U skype-version.rpm
where skype-version.rpm is the name of the file you downloaded, such as skype-1.2.0.11-fc3-i586.rpm.
Once the package is installed, open Skype from the appropriate menu location. For Fedora you will find it under Applications | Internet | Skype.

Once Skype is installed, you are ready to log in or sign up as a new user. Chapter 3 describes in more detail how to do this. The Windows version is used for the examples in this book because it is the most widely used version, so if you’re a Linux user, keep in mind that some screens and features available in Windows might not be available for Linux versions.
Here is a screenshot of the Fedora for Linux installation.
Generic Tarballs
If you cannot use one of the existing compiled installations, you can use the regular UX tarball option to install Skype. There are two versions of binary tarball:
- Dynamic binary tarball (requires Qt 3.2)
- Static binary tarball (compiled with Qt 3.2)
If you are already familiar with using tarballs, go ahead and install Skype onto your Linux distribution.
Here are the steps for installing the tar version of Skype:
- Open a console
- Find the location where you saved the tar.bz2 file
- Enter the following command:
tar xjvf skype-version.tar.bz2
where skype-version. tar. bz2 is the name of the file you downloaded, such as skype-1.2.0.11.tar.bz2 or Skype_staticQT-1.2.0.11.tar.bz2. Skype is then unpacked to the current directory. Note that this does not require root privileges. If you cannot log in as a superuser, use the Static binary tarball.