
6
White-Box Functional Testing
The last chapter described the key approaches to black-box testing. By looking at the external behavior of a feature, thoroughly defined by the feature specification, you can test its primary functionality and ensure it meets all the requirements.
Unlike black-box testing, where the implementation of a feature is unknown, white-box testing lets a tester understand the workings of the code and design test cases to exercise it all. You’ll now cast aside the naivety that was initially so useful to find surprises and unexpected behavior. Here, you need as much knowledge as possible to understand how and why the implementation works – the springs and joints of your particular application.
This will let you see dependencies that may not have been obvious: areas of code the developers had to rework, special cases they had to handle, or uncertainties and unknowns they had to deal with. Many important test cases won’t be obvious simply by looking at the feature’s behavior, and white-box testing is the best way to discover them.
White-box testing overlaps with unit testing, which tests functions in isolation rather than running as part of the whole system. This book concentrates on system tests since these offer the broadest test coverage, although this chapter also considers the implementation and measurement of unit tests. By focusing only on individual functions, unit tests are simpler and therefore easier to test, which is one of their main strengths.
In this chapter, you will learn about the following:
- The importance of code analysis to automatically find issues within a program
- Static testing to check and review code
- The different ways of measuring unit test coverage and their strengths and weaknesses
- How to test APIs, modules, and messages
- How to systematically test state machines
- How error guessing can be applied to white-box testing
- What to check during white-box testing
- Gray-box testing, which uses a combination of white- and black-box testing techniques
We begin by considering the advantages and disadvantages of white-box testing.
Advantages and disadvantages of white-box testing
White-box testing has its own set of advantages and disadvantages, as shown in the following table:
|
Advantages |
Disadvantages |
|
Can find issues without running the code |
Requires testers with coding skills |
|
Easy to automate |
Hard to catch unimplemented requirements |
|
Easy to measure coverage |
Fragile to code refactoring |
|
Can check all code paths | |
|
Easy to investigate failures |
Table 6.1 – Advantages and disadvantages of white-box testing
White-box testing provides a new set of tools that complement and enhance the testing provided by black-box testing. White-box testing begins with you familiarizing yourself with the code partly by inspection but ideally with at least one session with the developers. When talking through their code, the developers may notice issues they hadn’t thought of before or at least flag up limitations they were aware of and hadn’t had the time or resources to improve. That walk-through is valuable, so make sure you schedule time for it.
However, that also highlights the first weakness: you need to understand the code you’re being shown. If you are not a proficient coder in that language, your ability to perform code reviews will be limited. If no one on the test team has coding skills, then detailed white-box testing may not be possible, but even coding skills, you can still understand the modules and messages, internal states, and the transitions between them. That allows some white-box testing without the need to read individual lines of code.
Given that you have a handover and can understand the code, you can write unit- or higher-level tests to check the behavior of each function and their behavior together. You can measure your progress, and there is a clear place to stop when you have covered each new function. That’s unlike black-box system testing, where there is always another combination of variables or another test environment you could try.
The test coverage can also be comprehensive, checking each line of code and each decision outcome. You can check each boundary condition, and if there are any failures, it’s clear which line of code caused them. That differs from black-box testing, where it takes investigation to work out which line of code was running at the time.
On the downside, white-box testing may not find unimplemented requirements. If you only test the code that’s there, you won’t see code that is missing. Once unit tests are automated, they may fail if the code is refactored, even if the overall behavior is unchanged. Changing a function name might be enough to break white-box tests, whereas black-box tests only consider the overall behavior.
As with all types of testing, white-box testing is insufficient on its own but provides essential new ideas as part of a wider test plan.
Using code analysis
Most of this book is devoted to dynamic testing, in which you execute the code and check its functionality. However, testing can begin without running the application by looking at the code to see errors, inefficiencies, and unhandled cases.
The first stage of this testing is to scan the code automatically. Many applications are available to check for uninitialized or unused variables, possible divide-by-zero errors, and the like. These can be built into source code editors but you may need more advanced checks as code complexity increases. Ensure this analysis has run and passed before spending any time on manual testing.
This analysis can catch errors such as memory leaks and null pointers in lower-level languages without memory management. If your company uses languages like that, make sure those checks are part of your software development life cycle.
You can measure many metrics in the code, such as the number of comments, churn in each file, and the size of modules. While gathering the data is easy, that doesn’t indicate what you should do with it. Code comments, for instance, used to be highly recommended, but in modern languages, it’s possible to write far more readable statements. The best code doesn’t need comments, so their presence is a mixed blessing as they take work to write and keep up to date. A discussion of coding best practices is beyond the scope of this book, but be aware of the possibilities of metrics you can measure and the pitfalls of aiming for the wrong targets.
Code analysis will produce an output of warnings and errors for you to triage and work through. It’s important to introduce this early in product development because later on, the list of issues can become offputtingly long. If you are in that state, aim to work through a few each day to reduce the backlog. Once a build is clean, developers are far more motivated to keep it clean. Nobody will notice if a list of issues increases from 76 to 77, but no one wants to introduce the first error.
Other issues can only be found by running address-sanitized builds. These add tracking to each memory allocation and free commands to look for memory leaks or invalid access. These are massively useful for finding issues that are very difficult to find in any other way, although they come at a cost: the extra checks slow code execution, which makes it a less realistic test. Changing the code timing can also reveal other race conditions, which are valuable to find, even if they rarely occur under typical conditions.
Once your automatic checks have passed, then you can move on to manual checks and code reviews, as described in the next section.
Using static testing
Static testing involves carefully reviewing the code to think through its implications and possible issues. It lets you find bugs before the code is even run by highlighting edge cases that haven’t been handled and good coding practice. If your company already runs code reviews, check that they always consider these cases and testing.
In terms of the review types listed in Chapter 3, How to Run Successful Specification Reviews, this is an inspection, stepping in detail through the code to identify and solve technical problems by domain experts.
Static testing should review the unit tests, which are written alongside the code. Apply the ideas in this book to ensure the unit tests comprehensively verify the individual functions within each feature. The tests can even be written before the code as part of Test Driven Development (TDD). In TDD, the developer writes unit tests based on their proposed implementation, which initially fails. As they write the code to fulfill those functions, the tests start to pass, and when all tests pass, the implementation is complete. Thinking through the planned implementation in that detail is a useful exercise, although it can feel slower to write the tests before the code.
The key areas to consider in static testing are as follows:
- Code format
- Code conciseness
- Defensive coding
- Removing extra debug logging
- Checking against the specification
- Design choices
- Unit testing
Each of these is considered in this section.
Code format
Static testing begins with style guides for your organization, such as the placement of brackets and tabs. If you’ve ever seen code such as the following, then you’ll know the pain of varying function cases, bracket locations, and tab lengths:
function_a() {
      print("This is function A")
}
FunctionB()
{
  print("Function B behaves the same but looks different")
}
These have been the source of passionate debate in the past and were a fine example of bike-shedding, also known as the law of triviality, as proposed by C. Northcote Parkinson, where minor but visible changes receive far greater discussion than more important but harder-to-understand decisions.
These can also be checked by linting, which enforces a particular style to ensure that everyone in the development team works in the same way. Generally, the choice of style is less important than ensuring everyone is consistent.
Code conciseness
More interestingly, static testing examines the behavior of the code itself. Is the code DRY (short for, Don’t Repeat Yourself) rather than WET (short for, Write Everything Twice) within reason? Writing code once makes it maintainable because if you need to change it, there is only one place to update it. Consider this example of a function to create a new user:
create_user(permission)
{
     if(permission == ADMIN)
     {
           user = create_user()
           make_admin(user)
     }
     else
     {
           user = create_user()
     }
      return user
}
Clearly, this can be simplified. Since both branches of the if statement create the user, that should be run once, beforehand:
create_user(permission)
{
     user = create_user()
     if(permission == ADMIN)
     {
           make_admin(user)
     }
     return user
}
This is logically identical but shorter, making it easier to read and maintain. Other examples are far more subtle or far-reaching. Writing neat, concise code sounds obvious but especially during updates, it can be tempting to make bare minimum changes, rather than refactoring large areas, which adds time and risk without altering the program’s behavior. Also, sometimes it is best to explicitly write code out to make it easier to read, rather than rigorously adding indirection to always avoid repetition. The cost of other developers’ time to read and understand the code can be greater than the benefits of conciseness. As ever, writing DRY code is a guideline rather than a rule.
Defensive coding
Do functions validate their inputs? Each function should make no assumptions about the data it receives and should discard and log any invalid inputs. Does the code raise understandable errors if it receives unexpected data? This is a vital part of code resilience, which is covered in greater detail in Chapter 7, Testing of Error Cases. You not only need those checks but also clear warnings to help you debug when that error occurs in practice. For example, the following checks should be present for a function accepting strings or integers:
create_user(str name, int age)
{
     if(name == "")
           throw(error, "Username is blank")
     if(age < 18)
           throw(error, "Users must be 18 or over")
     if(age > 130)
           throw(error, "Age value is too large")
     …
}
This ensures the function will catch any errors and clearly state the problem it found.
Code functionality
Given that code is understandable, concise, and written defensively against invalid inputs, you can move on to its functionality. Remove any debug values or extra logging, of course, and check that all configured values are correctly set. Whether they’re hardcoded or optional, the program default should match the specification.
Refer to the technical specification and check that each statement is correctly implemented. If you only check the code that is written, you won’t spot absent functionality, so add an explicit step to check for anything the development team missed. Using the specification also provides an excellent way to run through the program flow from beginning to end.
Unit tests
At the lowest level, white-box testing involves writing unit tests to cover each line of code individually. You will need to identify the purpose and function of each line so you can write a test to check that the output is correct. That might be as simple as checking an assignment works or testing two branches of an if statement.
For most lines, the main challenge comes from deciding the variety of inputs they could receive. Datasets might be empty, variables could be null, or numbers may be out of range. There should be tests to cover those error conditions as well as the happy-path scenarios.
The principles for writing system tests listed in Chapter 4, Test Types, Cases, and Environments, apply just as well to unit tests: make each test independent of the others; each test should cover one piece of functionality, give tests clear names, and aim to have lots of tests that are clearly grouped and prioritized. With those goals in place, your tests can be thorough, easy to debug, and organized.
The tests you need will be as varied as the lines of code, but they are usually clear and have an obvious mapping to the code itself.
In terms of the project, reviewing the unit tests is an important handover between the development and test teams. Unit tests should be produced along with the feature, so your first task is to review what is already there to avoid duplication and identify gaps. This is where you start to apply the lessons from this book in terms of what should be tested.
Most of the tests in this book don’t require programming knowledge, but when checking the code, you have to be proficient in whatever language is used. For this reason, these can be a more specialized form of testing. Identifying issues requires not only that you understand the code but understand it well enough to spot problems introduced by the developers. That isn’t easy but is massively beneficial, and certain checks apply across a broad range of coding. Next, we consider the many different ways to measure the coverage you have achieved.
Measuring code coverage
At its lowest level, white-box testing involves stepping through lines of code to design test cases for them. The development team often writes the unit tests themselves. As such, I won’t go into detail on their implementation, but as a tester, you can still check their design and coverage. There are nine major measures of code coverage:
|
Coverage type |
Detail | |
|
1 |
Function |
Function coverage ensures that every function has been called at least once. |
|
2 |
Statement |
Statement coverage checks that each line of the program has been run at least once. |
|
3 |
Decision |
Decision (or branch) coverage ensures that each logical branch of a program has been run at least once. |
|
4 |
Condition |
Condition coverage ensures that each variable in conditional statements takes all possible values at least once. |
|
5 |
Modified condition/decision |
Modified condition/decision coverage ensures that each variable in a conditional statement has affected the statement outcome at least once. |
|
6 |
Multiple condition |
Multiple condition coverage ensures that every possible combination of variables is checked for each conditional statement. |
|
7 |
Parameter value |
Parameter value testing uses equivalence partitioning to ensure that all main types of parameter input have been tested at least once. |
|
8 |
Loop |
Loop coverage ensures that loops have been run multiple times. |
|
9 |
State |
State coverage ensures that each state in a finite state machine has been tested. |
Table 6.2 – Types of code coverage
These different code coverage measures provide very different levels of testing, from patently incomplete to unreasonably exhaustive. To measure the coverage of your tests in each of these areas, you divide the coverage you have by the total possible coverage. That’s laid out in the Calculating code coverage section.
As is often the case, the primary skill is deciding how much testing to perform by understanding the different approaches and choosing the one relevant to your project. The following sections show how to implement them so you can evaluate their strengths and weaknesses.
The types of coverage in Table 6.2 are ordered roughly by the amount of testing they provide, starting from function coverage, which offers the bare minimum of testing.
Function coverage
The least-stringent measure of code coverage is function coverage. This ensures that all the functions within a module have been called at least once. That means that at least one set of function parameters has been tried, but this still leaves many possible statements and code paths untested. Just because you called a function doesn’t mean you have run every line within it, let alone every code branch.
You can augment function coverage with other forms of testing, particularly parameter coverage, trying different function parameters, and decision coverage to test different code branches. However, on its own, it leaves significant gaps.
Like the other forms of code coverage, there is a simple formula to measure how much function testing you have achieved, described next.
Calculating code coverage
You can measure all these types of code coverage in an equivalent way. This is vital as it shows how much testing you’ve done and how much you still have to do. The calculation is straightforward: you need to know the total number of entities you are measuring, for instance, the number of functions for function coverage, and the number you have tested.
For example, if there are 20 functions in 1 module and you have tested 15 of them, then your test coverage is 75%:
Function test coverage = (Number of functions tested) / (Total number of functions) x 100%
Function test coverage = 15 / 20 x 100%
Function test coverage = 0.75 x 100% = 75%
That style of calculation applies to statements, decisions, and each of the other types of code coverage considered here. Various tools are available to automatically analyze your code and produce that measure to save you from doing it manually. Be sure to check which type of coverage your tool measures. The number is only meaningful if you understand what check it has performed.
The next most stringent form of code coverage, after checking functions, is to measure how many statements in the code have been tested, as described in the next section.
Statement coverage
The most basic form of code coverage is statement coverage, which simply checks that each line of code has been run at least once while checking for correctness.
Real-world example – 100% code coverage
On one product I tested, the development team proudly told me that they had 100% code coverage on a new module. Skeptical that anything could reach total coverage, I did some exploratory testing and rapidly found several issues.
Going back to the development team, I asked what the 100% figure applied to. It turned out only the backend code had 100% coverage, not the frontend, where I had found issues. Also, it was only statement rather than decision coverage or other, more comprehensive measures. No code is ever fully tested, even if your code coverage calculation hits 100%.
Beware of statement coverage! While you may be able to report that 100% of your code has been tested, it is far from complete. Even data structures as simple as if statements and loops can pass statement coverage tests but still contain critical bugs, let alone more complex program flows such as object inheritance and decorators.
Consider the following simple example program with only four blocks of code to test:

Figure 6.1 – Program initialization with a single if statement
Figure 6.1 is a control flow graph, which logically maps out different parts of a program’s functionality. This allows it to be easily visualized and understood, which is particularly important when measuring the test coverage you have achieved and the gaps that might remain.
In the preceding example, by logging in as an administrator, you can test all code blocks with a single test. That moves through the statements in order – A, B, C, and D – and should pass correctly. However, running an if statement once is not enough – there are two different outcomes it can result in, and you need to check that both can run successfully. If the user is not an administrator, the program flow is A, B, and D. In that case, the application will start without passing through block C, which initializes the program, so it will fail.
Statement testing is also inadequate where compound or complex statements include multiple elements. If you simply count lines you have run, you may miss testing multiple statements on a single line. Even if you split out those statements, complex lines may require several tests. For instance, the ternary operator in C includes a conditional check and two output branches on a single line of code and would need more than one check.
It is good coding practice to keep statements simple and separate, as that not only improves readability but also means that measuring your statement coverage gives a more accurate view of the actual percentage you have tested.
Statement coverage has significant limitations as a measure of code coverage. The next level of testing provides far more comprehensive testing by testing each decision or branch within the code.
Decision coverage
In Figure 6.1, there are four code blocks: A, B, C, and D. While statement coverage tests each of those, it does not test the different paths between them. Those are labeled 1, 2, 3, and 4 in the diagram. You can reach all four code blocks by only traversing paths 1, 2, and 4. Considering decision coverage clearly shows you’ve missed out branch 3.
In this case, branch 3 does generate an error – only block C initializes the application. If you are not an administrator, block C does not run, and the application starts before it is initialized. Even though you had 100% statement coverage testing, relying on statement coverage alone would miss a critical bug.
Decision coverage ensures you have taken all possible code paths through a given code block. This is also known as branch coverage since each decision generates another branch for you to test.
This provides far more complete testing than function or statement coverage and, while it still leaves gaps that we will consider later, can be a happy medium to ensure you have run all the critical paths.
The challenges of decision coverage are working out all possible decisions and branches. Figure 6.1 has a clear if statement with two possible outcomes. More complex data structures, such as callbacks and object inheritance, will require careful analysis. In addition, it may not be clear what values you should try for different variables. Booleans can simply be set to true or false, but other fields have massive spaces of possibilities. As shown in Chapter 5, Black-Box Functional Testing, there are common categories you should try for common data types, but you will have to consider the specific values for your application. See the Understanding parameter coverage section for more details.
Decision coverage is also deficient when there are complex conditional checks. Consider an if statement with a three-way OR gate taking Boolean variables:
If ((A || B || C) then …
You can reach 100% decision coverage with two tests:
- Case 1:
A: true, B: false, C: false
- Case 2:
A: false, B: false, C: false
That would result in the statement evaluating as both true and false, so the criteria for 100% decision coverage is satisfied. However, variables B and C were false throughout the test. If there is a problem when they are true, these tests will miss it. To catch those cases, you could use condition coverage.
Understanding condition coverage
Condition coverage is not practical to measure code coverage. It has neither the ease of measurement of decision coverage nor the thoroughness of modified condition/decision coverage described as follows. I include it here for completeness and to show how it differs from the other measures, but I don’t recommend that you use it.
Consider an if statement of the following form:
If ((A || B || C) then …
Condition coverage requires each variable to take all possible values at least once within the test plan. The preceding statement could be satisfied with two test cases:
- Case 1:
A: true, B: false, C: true
- Case 2:
A: false, B: true, C: false
Those two tests check that each variable can be set to true and false, and that the statement evaluates accurately in each case. However, condition coverage is sometimes a weaker criterion than decision coverage because condition coverage doesn’t require you to test every outcome of conditional statements. The only requirement is that variables take all possible values.
In the preceding example, (A || B || C) evaluates to true in both case 1 and case 2. A separate condition of condition/decision coverage requires both that the variables take all values and conditional statements evaluate all outcomes at least once.
Understanding condition/decision coverage
Condition/decision coverage simply combines the requirements of condition coverage and decision coverage, requiring that each conditional statement evaluates both true and false and that each variable takes all possible values at least once within the test plan.
Consider the if statement again:
If ((A || B || C) then …
For the preceding statement, condition/decision coverage could be satisfied with two test cases:
- Case 1:
A: true, B: true, C: true
- Case 2:
A: false, B: false, C: false
In those cases, each of A, B, and C take both the values, and the statement overall evaluates to both true and false.
However, even with each of the variables taking each possible value, we still haven’t thoroughly tested that if statement. Note that in the preceding two test cases, B and C being true never affects the outcome of the decision. Because A is true in case 1, the value of the OR statement overall will be true regardless of their values. To check if B and C are correctly evaluated, we need a stricter criterion known as modified condition/decision coverage.
Understanding modified condition/decision coverage
Modified condition/decision coverage builds on the other forms of conditional testing requirements and extends them. It requires the following coverage:
- Decision coverage: This means that each possible outcome from a decision is invoked at least once.
- Condition coverage: This means that each variable has taken all possible values at least once.
In addition, it requires that each variable has independently affected each decision’s outcome at least once.
Modified condition/decision coverage requires not only that every variable in an expression should take all possible values but that each of them actively determines the outcome of the if statement. This checks for errors in the evaluation and checking of each part of a conditional statement individually. This level of coverage is vital to find bugs within complex expressions. Consider the if statement again:
If ((A || B || C) then …
With the following test cases:
- Case 1:
A: true, B: true, C: true
- Case 2:
A: false, B: false, C: false
While they meet the requirements for condition/decision coverage, the decision’s outcome never relies on true B or C. If those conditions cannot be met, or if there is an error, in that case, these tests will not find it. To meet modified condition/decision coverage, we need a set of four tests:
- Case 1:
A: true, B: false, C: false
- Case 2:
A: false, B: true, C: false
- Case 3:
A: false, B: false, C: true
- Case 4:
A: false, B: false, C: false
In cases 1 to 3, each of the variables A, B, and C is true on its own. The expression will only evaluate to true if they correctly evaluate to true, so you have tested the expression’s dependency on them. You then need a fourth test to check that the expression overall can correctly evaluate to false.
While this is useful when A, B, and C are simple variables, it becomes even more critical when they are complex expressions, possibly involving multiple function calls each.
Many compilers and interpreters will avoid evaluating code if they don’t need to. In that case, if A is true, then (A || B) is true regardless of the value of B. There is no need to evaluate B, so the program may not do so. If B is a variable, that may not change the program’s outcome, but B might be a series of function calls in its own right. While A is true, you are not running or testing that code. Only by requiring B to be true independently of A can you ensure that all the available code is run.
However, this has still not covered every possible condition. We have three Boolean values giving a total of eight potential cases. Testing all those cases requires a stricter criterion known as multiple-condition coverage and, while undoubtedly comprehensive, may require too many tests to justify.
Understanding multiple condition coverage
Multiple condition coverage is easier to understand and more comprehensive than modified condition/decision coverage: you must test all possible combinations for a given set of inputs into a decision. While good in theory, this rapidly becomes too time-consuming to achieve in practice and involves the repetition of very similar cases.
For our three-way OR conditional, multiple condition coverage requires eight tests in total:
If ((A || B || C) then …
The following test cases meet the criteria for multiple condition coverage:
- Case 1:
A: true, B: true, C: true
- Case 2:
A: true, B: true, C: false
- Case 3:
A: true, B: false, C: true
- Case 4:
A: false, B: true, C: true
- Case 5:
A: true, B: false, C: false
- Case 6:
A: false, B: true, C: false
- Case 7:
A: false, B: false, C: true
- Case 8:
A: false, B: false, C: false
It is simple to generate these cases, compared to working out which states are needed for modified condition/decision coverage, but they are very repetitive. It seems highly unlikely that it will work when A, B, and C are all true, for instance, but fail when A and B are true but C is false.
There is also a massive time cost associated with multiple condition coverage. If your conditional statement has n Boolean inputs, you will need 2n tests to test it fully. That exponential increase based on the complexity of the checks makes it impractical to achieve compared to other measures of code coverage:
|
Code coverage type |
Test steps required to test “If (A || B || C) then…” |
|
Statement coverage |
1 |
|
Decision coverage |
2 |
|
Condition coverage |
2 |
|
Condition/decision coverage |
2 |
|
Modified condition/decision coverage |
4 |
|
Multiple condition coverage |
8 |
Table 6.3 – Number of tests required by different coverage types
This example starkly shows the measurable trade-off between the time you can devote to testing and the level of coverage you can achieve. See the Choosing the appropriate test coverage section for more on these comparisons.
While conditions will end up with binary choices within if statements, the variables feeding into them can be far more complex. They may be strings or function calls capable of taking many possible values. A further level of test coverage considers those inputs into conditional variables, as described next.
Understanding parameter value coverage
The inputs to the conditions we have considered so far were simple Boolean variables. In practice, conditional statements will operate on many variable comparison operators. Parameter value coverage works alongside the coverage types described previously by considering the different types of values variables can take within conditional statements.
Parameter value coverage applies equivalence partitioning to divide up the possibly infinite range of values into a finite subset suitable for testing. Chapter 5, Black-Box Functional Testing, describes common variable types and classes of values, such as negatives, decimals, and the value 0 for numeric fields or blank, capitalized, or special characters for string fields.
To satisfy parameter value coverage, each variable within a conditional statement has to include at least one value from each class of possible values. You will need to work out the classes of fields relevant to your variables and an example from each category to use in your tests, and you will need to repeat that for each conditional field. When you combine this with function coverage, you must pass each value into each function call to check for correctness.
Parameter value testing can rapidly expand into a vast test plan, so you will need to prioritize the tests you choose to include, both for the time they take to write and the time required to run them.
As well as if statements, loops have their own branching logic, which requires special consideration when evaluating code coverage. These are described next.
Understanding loop coverage
Along with if statements, loops are a fundamental aspect of code design. Due to their unique behavior, they also require dedicated test procedures. Statement coverage can be satisfied by only running the loop once, and decision coverage suggests you only need to check whether the loop is run or not. However, loop coverage is stricter and considers cases unique to running loops.
The main behaviors for loop coverage are as follows:
- Zero times around the loop
- One time around the loop
- Multiple times around the loop
- The maximum number of times around the loop
As with if statements, the first critical test is whether that branch is taken at all, so you need to check what happens if the loop is not executed. You then need two separate cases to cover if the loop is executed once or multiple times. Finally, you need to try the maximum number of cycles around the loop to check whether it can run successfully in the longest case.
For infinite loops, there is no maximum length to aim for, so you will have to set a pragmatic upper bound to reach instead. That should be longer than any customer can realistically trigger, or at least long enough to hit a steady state of repetition.
In his book Software Testing Techniques, Boris Beizer adds the following possible test cases for loops:
- One less than the minimum number of times around the loop
- A typical number of times around the loop
- One less than the maximum number of times around the loop
- One more than the maximum number of times around the loop
Not all of those may be possible for any given loop, and the bugs they find will be obscure. However, if you are after the maximum possible coverage, those are cases to consider.
Loops rarely exist in isolation. You will need to combine this loop testing with the coverage for branches described previously to check that if statements work correctly within loops at different stages. Between the many tests you can perform for both loops and if statements, you will hit a combinatorial explosion of possibilities to try, so you will need to prune those down. For more detail, see the Mapping dependent and independent variables section in Chapter 5, Black-Box Functional Testing. In general, you should aim to cover the most common, likely cases and identify unusual or obscure cases that have not been correctly thought through.
As well as if statements, loops are routinely nested within one another. Your most extensive possible test plan would be to test all the loop conditions listed previously against all the others for each loop. If the loops were nested four deep, that would give you 84 = 4,096 different test cases, minus the cases where loops aren’t run. To avoid that combinatorial explosion, you again need to identify which paths are either likely to see heavy use or are most likely to contain bugs. Using only the preceding four main tests reduces the number of tests to hundreds rather than the thousands in our example, so you will need to reduce that still further to produce a practical test plan. Again, this is where the skill of testing is required to identify the possible problems for your particular system.
These test cases have considered tests line by line, looking at individual if statements, function calls, and loops. You can also take a more abstract view of the program and measure coverage there, as shown in state coverage.
Understanding state and path coverage
Many applications include state machines for parts of their processing, which lets them transition from some starting state, through a series of temporary intermediate stages, to some outcome states, usually the success or failure of an operation.
The state machine should be included in the technical documentation for that code or may be recorded in the code itself, with a variable explicitly tracking the current state. If neither is the case, then getting that documented is your first task. Note that this is technical documentation beyond what is produced for the feature specification (see Chapter 2, Writing Great Feature Specifications). That specification only describes what the behavior should be; there are many ways it could be implemented, and you need those details here.
Once the states are clear, ensuring state coverage is as simple as checking your testing moves the application through all the available states. Consider this simplified example state machine, which sets up a new connection between two systems:

Figure 6.2 – A simple state machine
There is a single starting state and two possible outcomes, either success or failure. You can test this with two tests, one to reach each of those end states. However, state coverage is analogous to statement coverage and has the same weaknesses – at branches, it does not cover the different routes the application can take. We need a new measure of coverage, analogous to decision (branch) coverage, to count those other routes. That is known as path coverage.
Using path coverage, we need at least three tests to cover the preceding program, one for the success path and two for the failure cases. This simple example only serves to illustrate the different considerations. Any realistic program will be far more complex and will require additional analysis. This is an important topic, and there are more details in the Considering states and transitions section.
Choosing appropriate test coverage
Given the many different ways of measuring test coverage and the levels of testing they provide, you have to choose which is suitable for your application. That depends greatly on the risks associated with your program. If your software is for aviation or emergency services, lives may depend on finding bugs. If you work in automated trading or satellite services, tens of millions of pounds could be lost if there is a critical error. In those cases, modified condition/decision coverage could be a requirement.
If, on the other hand, you are working on a less critical area or with a smaller user base, a lower standard for testing might be suitable initially. You can always revisit the tests and require a higher standard later on, based on the bugs you find.
The lighter forms of unit testing, such as a statement or decision coverage, have notable advantages and disadvantages:
|
Advantages |
Disadvantages |
|
Quicker to write |
Incomplete test coverage |
|
Quicker to run |
May give a false sense of security |
|
Easier to measure | |
|
Easier to understand |
Table 6.4 – Advantages and disadvantages of lighter forms of unit test coverage
Heavier forms of unit testing, such as modified condition/decision coverage, have the reverse advantages, being slower to write and run but, crucially, providing more complete test coverage.
Code coverage software can automatically measure the coverage you have achieved, although that is not without caveats. First, be sure what type of coverage it is measuring. If it is only statement coverage, be aware of the gaps that can leave in the program execution.
While it can be helpful to measure the coverage so precisely, beware of chasing numbers rather than thinking through the critical areas of testing. It might be better to leave some simple code areas with only statement coverage so you can run modified condition/decision coverage for particularly complex or sensitive areas. It is impossible to test code fully, so don’t sit back and relax if your measure reports 100% coverage. What form of testing have you achieved 100% in? And what gaps remain? One crucial area is understanding the limitations of unit tests compared to system tests.
Systematically stepping through each line of code and trying each possible condition provides some confidence that there are no surprises at the lowest level. However, these are unit tests rather than system tests, leaving the possibility for unexpected behavior when two modules work together. In this section, we have strayed from the system tests that this book focuses on. As described in Chapter 4, Test Types, Cases, and Environments, unit tests can rigorously cover small sections of code but cannot find bugs that only appear when you run code together. Breaking down the code simplifies the tests that need to be written, which is why unit testing only gets this section rather than the rest of the book being devoted to the broader considerations of system testing.
Next, we turn to system-level considerations again, this time informed by knowledge of the application’s inner workings, and look at how to test messages flowing between modules.
Testing modules and messages
When considering information flow within your application, you need to identify which information is local and remote for each module. How is the information passed around within the system?
This doesn’t necessarily require reading the code but needs at least a block-diagram-level understanding of the data generation, storage, and movement.
The modules may be as obvious as different physical machines, or they could be separate virtual machines or containers, other services, or, at the lowest level, different blocks of code that can only be identified by code inspection. All of these require messages to be passed between them, which need to be specified and can host different classes of issues.
Watch out for third-party modules imported to perform specific tasks. The development team will be less familiar with their code, so they are more likely to be surprised, and any fixes may take longer since they will have to work around how the third-party module behaves.
Once you have identified the different modules, carefully list all the information passed between them. You need to test each field for the full range of values it can support in the same way you try the user inputs. Like black-box testing, look for equivalent partitions of data in the messages. For instance, you can apply the list of different types of text input to text fields passed between modules as well as when entered by users.
Real-world example – The secret new protocol
In one product I worked on, we displayed the details of our users’ meetings that day, so they could dial in and connect to them. A new feature would give them their whole calendar on our app – not just today, but the ability to see future days’ meetings as well.
The feature was clear, and the user interface was well specified, so we prepared and ran a test plan thoroughly testing its functional aspects. When it went live, there were immediate problems. All the meetings disappeared – today’s and those in the future, so they couldn’t connect to any of them.
Unknown to the test team, we had implemented a new protocol to pass information around our system to get the details of future meetings. While that had worked correctly in our small development and test environments, it couldn’t handle the load of our live environment. We hadn’t planned sufficient load testing and had a major test escape as a result. It showed that you can only fully test a feature by talking to the development team and understanding the implementation.
When considering messages between different modules within a system, there are three classes of errors to look out for:
- Errors within modules
- Mismatches of meaning between modules
- Limitations in the messages between modules
First are problems local to individual modules. You can find these with black-box testing, but by considering the code architecture, you can ensure you test every module, whereas you may miss some otherwise.
Secondly, when modules send information, two new classes of errors are possible: mismatches between the handling of some values and limitations of the transport. For simplicity, let’s consider a client-server application with information being sent between them, potentially over the public internet. However, these considerations apply just as well to two code modules running within the same machine.
To find mismatches between different modules, you can again turn to the list of value types from Chapter 5, Black-Box Functional Testing, and make sure they mean the same to both the client and the server. For example, the client may accept negative numbers and happily send them off to the server, which then reports an error or treats them incorrectly. Part of the feature specification should state what happens in every case: if negative numbers are invalid, the client should reject them, so its behavior needs to change. If they are valid, then the server should be altered to accept them.
When raising bugs about mismatches between different systems, it can be difficult to tell which is in the wrong. The message may fail, but is that because the client has sent invalid information or because the server has rejected something valid? Only careful examination of the code, the message, and the specification can tell you for sure. Unusual but valid behavior from the client may trigger an error on the server. Then either side could be fixed, depending on how busy the development teams are and how extensive the changes would be to resolve it. Perhaps it is simpler to stop the client from sending the unusual message than to add support for it on the server.
Important note
The art of raising bugs is beyond the scope of this book, but beware when reporting bugs about messages between modules. It may be that quite different development teams are responsible for the client and the server, and each may blame the other for these borderline cases. Fixes can be delayed because both sides think it is the other’s responsibility. Even if the behavior and the problem are perfectly clear, they may disagree about where to fix it. The different teams may need to meet and agree on the owner before it can be resolved.
The technique of error guessing from black-box testing is vital here too. Edge value and boundary conditions can also cause problems between modules. The client may accept values less than or equal to 100, whereas the server only accepts values less than 100. You may have covered these cases with black-box testing, but by examining the architecture, you can be sure that you have tested all the boundary conditions on all the module interfaces.
The third class of problem when testing messages between modules is limitations on the messages themselves. Possibly the client code happily handles negative numbers internally, and the server code handles negative numbers too. Still, the message implies that all numbers must be positive, and any negative numbers are to be converted to invalid values. The same tests that check mismatches between modules will also find issues of that type in the message specification, so these may not need more tests but may require a different solution to fix them.
Messages can also be limited due to their size. What combination of inputs will produce the largest possible message, for instance, the highest number of configured entities or the longest possible string values? You should try all of those on each message interface. Loading can also trigger bugs. This is considered in more detail in 2, Load Testing, so here I will just note that high loads may result in the application dropping messages or delays in processing. You can only ensure you have stress tested these interfaces by identifying all modules and their messages.
Real-world example – One too many edge servers
In one company where I worked, clients would connect to our infrastructure via several edge servers. As our client base grew, we did many new code releases and extended our infrastructure.
One day, we had reports of many clients failing to connect. We were baffled – there hadn’t been a new code release, and the system had been fine the day before. The only change we had made was adding another edge server, providing extra capacity to connect to our system. We rapidly undid that change, and the clients recovered.
When they first connected, we sent the clients a list of possible edge servers. It turned out that that message was limited in length, and adding one extra edge server had made the message too long for the clients to read. We had to raise that limit before extending the system any further.
There may also be rate limits on the messages between different parts of the system, which can become overloaded, leading to dropped messages and errors. These are considered further in Chapter 11, Destructive Testing, and Chapter 12, Load Testing, but both these tests rely on you correctly identifying the modules and messages as part of white-box testing.
The testing of messages between modules also applies to messages on public APIs, considered next.
API testing
As described in Chapter 5, Black-Box Functional Testing, when APIs are released publicly, they can be tested using black-box techniques. There, you are checking publicly documented messages without knowing how the system implements message handling. APIs can also be semi-public, with some documented commands and others only available for internal use, or they can be purely internal.
The considerations that apply when testing those APIs also apply to messages between components within a system. The approach to testing them is simple enough: their documentation is their specification. There should be internal documents describing the implementation of internal protocols, just as there are for public interfaces, and you can design your tests against those. If that documentation doesn’t exist, your first task is to ensure it’s written.
Armed with that information, you need to systematically step through every field of every message to ensure it is correctly received. The skill is partitioning the inputs, as described in the previous chapter, to cover the important classes and identify dependent variables that need every combination checked.
Some fields will have a limited range of values they can take, so trying each one is a simple case. For freeform inputs such as text or numeric entries, see the list of different partitions in the previous chapter.
It is harder to identify which fields interact with each other and where you need to try every combination. For instance, you may need to check that every user type can exist in every state within a system. Most fields should be independent, and you do not need to check them against each other, which reduces the total number of test cases.
Testing external, third-party APIs is especially important because it can be hard to know in advance what data an external system might return to you. The API may be well documented, or you may be relying on previous messages to understand what it sends, in which case the data might change in the future. While systematic checks can ensure that your system rejects invalid data, you might have to accept it if a live system starts sending it to you. By testing, you can be sure of your system behavior, and by recording incoming messages, you can make sure your application correctly handles those cases in the future.
However, testing against third parties is both unreliable and antisocial. Other providers may not appreciate your auto tests constantly sending them repetitive requests. In addition, network issues or problems with the external system will result in test failures for you. Those need investigation but are not errors with your application and will waste valuable time you could spend elsewhere. It’s far more reliable to test against applications and networks that you control. Then if there are errors, at least they are your errors to fix.
Real-world example – Beware stateful, dumb APIs
In one company, we used a third-party API for part of our functionality. We stored entities with the third party, so they had a list of everything that existed, and we kept our own list, which we used to access the entities as required.
Unfortunately, there was no correction mechanism on the interface, and no way to check our list against theirs and fix mismatches. Even more unfortunately, there were known ways we could get out of sync. If we deleted an entity and then restored it from backup, for instance, we would delete the entity on the third party but had no way to recover it. Then we believed that entity existed, but they thought it was deleted.
More unfortunately still, when we were out of sync, we got into a loop of infinitely retrying the doomed operation. We regularly had to manually fix issues because we were overloading the third-party service with the number of requests we made. The code was behaving as designed; the weakness was in the design itself.
As we saw in Chapter 4, Test Types, Cases, and Environments, you can test interfaces against stubs and mocks. Where resourcing permits, these are particularly useful for integration tests, so you can isolate different parts of the system and test only against them. On the plus side, this gives you complete control over the messages you send, so you can exercise every possibility. On the downside, they are expensive to write, especially if you already have an application that sits on that interface. A mock also risks finding low-priority bugs as it can send messages that the actual application never would. While they might provoke issues, that case would never arise in real life.
Where mock applications are vital is if you don’t have a live application to drive the interface. For instance, you might provide an API from a server but let your users write client APIs against it. Then you may have to handle any input because external API users might send any inputs to you. In that case, prepare a client library so you have an application to test with. Scripts to use that library may be fully automated in test runs that perform actions, check outcomes, and report the results. Or scripts may be semi-automated, which need to be started manually and have a tester check them. Either way, you will need to write and maintain the code to send these messages.
The risk is that you end up testing the mock rather than the program itself. Ideally, scripts should be written by someone who didn’t write the code implementation and share no common code. That way, they serve as a genuinely independent check on the live code. You should keep the mock as simple and reliable as possible, so you can spend your time finding bugs in the live code rather than the mock you are testing against. Despite their drawbacks, mocks are an important tool, especially for automated testing.
Testing against real third parties should be limited to a final manual check that the system works once all other tests have passed. The bulk of automated testing should use internal tools so you have reliability and control and can run at high rates to test for behavior under load. For more on those tests, see Chapter 12, Load Testing, and Chapter 13, Stress Testing.
Finally, check how much code the API shares with other interfaces. Ideally, an API is simply another route onto functions that run regardless of whether the API, user interface, or some other system calls them. Look out for functions where that isn’t the case, and the API has its own implementation for some or all of its processing. Mismatches between its behavior and that of other interfaces can cause many bugs.
APIs can also cause the application to transition between different states, each of which you’ll need to test separately. That requires extra consideration as part of white-box testing, which we consider next.
Considering states and transitions
Many applications will exist in different states during processing. Even stateless applications without persistent storage have transient state machines as connections are requested and confirmed, for instance, or they process incoming messages and send responses. An essential part of white-box testing is identifying and testing all those states, the transitions between them, and the errors that can occur.
Some states may be evident from the specification, such as users who have entered their email address but have not yet confirmed it or chosen a password and have not yet logged in. Those states and their transitions will already be covered as part of black-box testing.
However, many other states may not be obvious to users, which need to be discovered and understood as part of white-box testing. One piece of code might accept incoming web requests but then move them on to different threads or queues for processing. By working with the developers, you need to map out all those sequences to check the transitions between each state. This includes transitions leading to error states, which are often not apparent from usual user interactions. Chapter 7, Testing of Error Cases, describes that in more detail.
Having identified the states, you need to write tests to check each one. This will require you to visit all the states and traverse every transition. When you attempt to describe the code in a simple state machine, as described here, it may become apparent that no one diagram captures all the interactions, and the code can take different paths in different situations. This may happen if the developers hadn’t thought of this code as a state machine and hadn’t implemented it in a structured way. If that’s the case, consider delaying the feature so that it can be done properly; otherwise, the complexity of a poorly implemented state machine might introduce many bugs.
For the different state machines, consider these questions:
- What is the starting state?
- Are there different configurations possible even from the start of the state machine?
- What are all the state entry points?
- For instance, if you can create a new user from a web page, an API call, or an app, add a test for each
- Are there any states that loop back to earlier states?
- Are there any failure modes that move you between states?
- What are all the state exit points, including failure modes?
- Are any states really separate and behave differently based on a variable or environment?
- You may need to split up a state if it has very different modes of working in different situations, especially if its inputs and outputs differ
- Have you identified all the transitions and added a test for each of them?
- In all but the simplest cases, checking each transition requires at least as many tests as checking all the states
- What sequences of transitions might interact with each other?
- What are the end states?
You can generate many tests by applying those questions to the state machine for your application, as demonstrated in the following example.
State transition test example
Consider this example state machine:
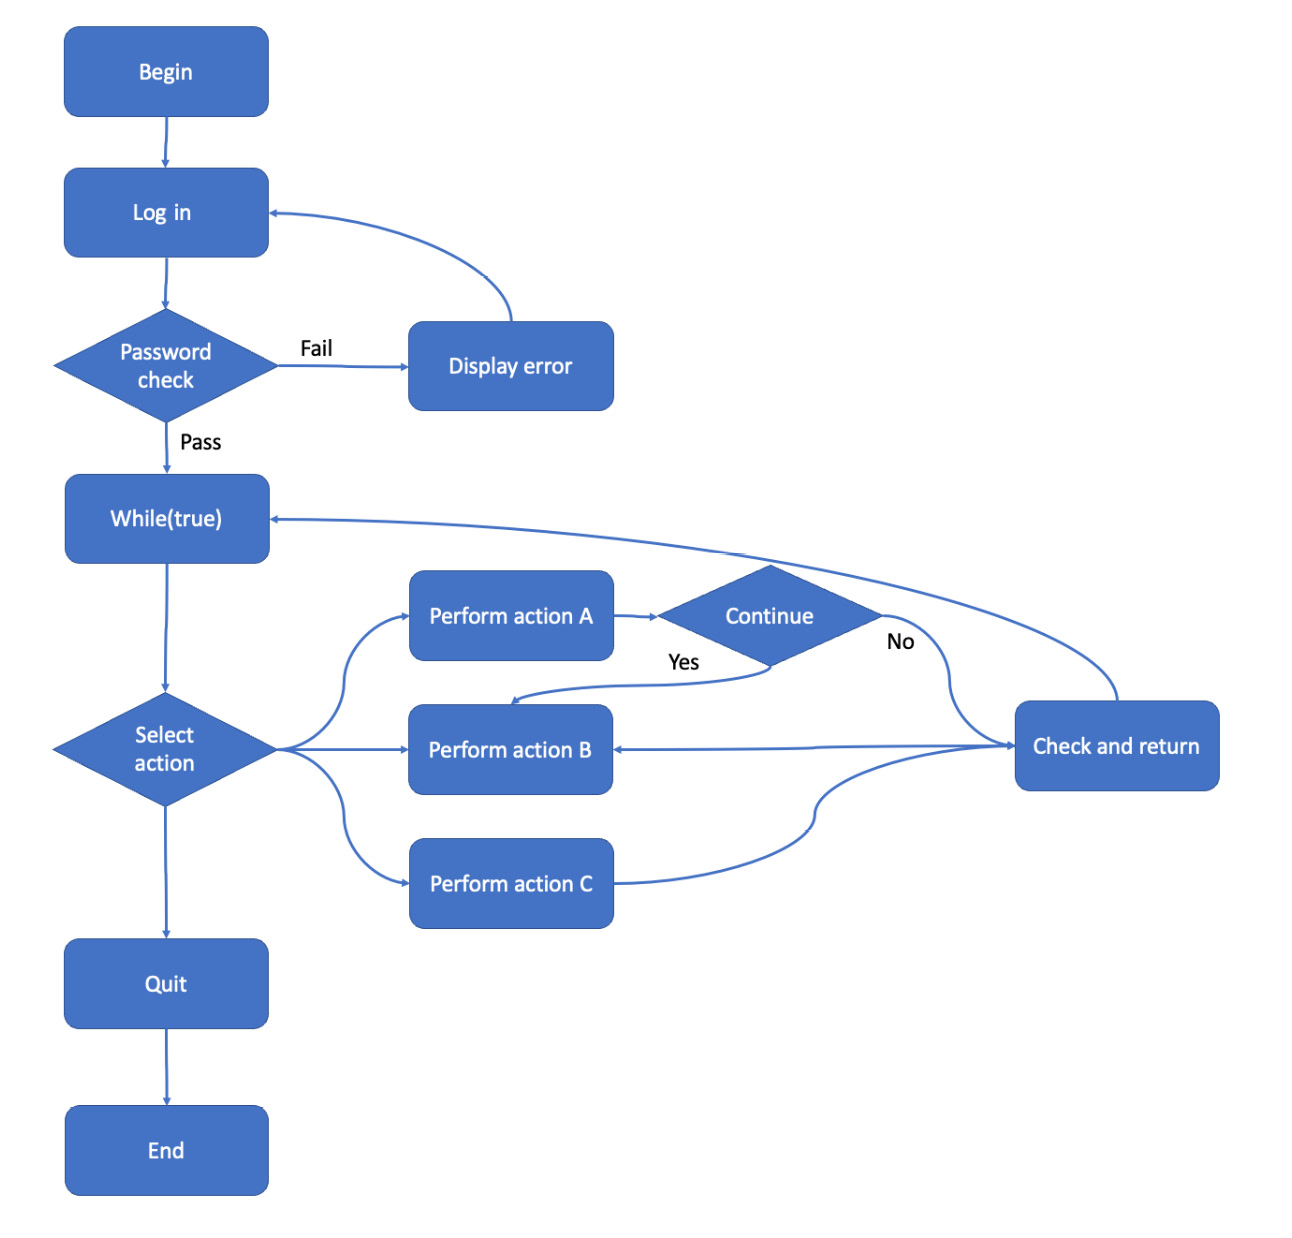
Figure 6.3 – An example state machine
In this simple application, users log in, then select from four options: action A, action B, action C, or to quit. Until they quit, the program loops so they can choose another action. Actions A and B are linked so that after performing action A, you can continue to action B.
You can test every state in this application with three tests:
|
Test |
Login |
First action |
Second action |
|
1 |
Fail, then Pass |
Action A. Continue? No |
Quit |
|
2 |
Pass |
Action B |
Quit |
|
3 |
Pass |
Action C |
Quit |
Table 6.5 – Tests achieving state coverage for the example state machine
However, despite testing every state, you have not tested every transition. That doesn’t check the option to continue from action A to action B. You need an additional test to check all possible transitions:
|
Test |
Login |
First action |
Second action |
Third action |
|
1 |
Fail, then Pass |
Action A. Continue? No |
Quit |
– |
|
2 |
Pass |
Action A. Continue? Yes |
Action B |
Quit |
|
3 |
Pass |
Action B |
Quit |
– |
|
4 |
Pass |
Action C |
Quit |
– |
Table 6.6 – Tests achieving transition coverage for the example state machine
With those four tests, you can check all states and transitions. Look out for instances in your application when state coverage is not sufficient to provide transition coverage. Prioritize your tests so the important transitions do have tests, and if you choose not to test them all, make sure you have at least identified them so you can make an informed decision.
Even with all the transitions tested, there could still be issues depending on the combination of states the application passes through.
N-switch coverage
You have now tested all states and transitions. However, this program includes two loops. The result of one loop may affect subsequent runs. If a login failure simply adds an error message to the page, for instance, then two login failures in a row might show the error message twice. Or if action A is invalid after performing action B, these tests will not find that error.
Visiting each stage once is known as 0-switch coverage, as named by Professor Tsun S. Chow in his 1978 paper, Testing Software Design Modeled by Finite-State Machines. He suggested measuring the sequences of states that you visit. If those sequences are one state long, you have 0-switch coverage. Considering a series of n states together, you have n-1 switch coverage.
To achieve 1-switch coverage and find errors in sequences of two states in our example program, we need additional test cases:
|
Test |
Login |
First action |
Second action |
Third action |
|
1 |
Fail, then Fail, then Pass |
Action A. Continue? No |
Quit | |
|
2 |
Fail, then Pass |
Action B |
Quit | |
|
3 |
Fail, then Pass |
Action C |
Quit | |
|
4 |
Pass |
Action A. Continue? No |
Action A |
Quit |
|
5 |
Pass |
Action A. Continue? Yes |
Action B |
Quit |
|
6 |
Pass |
Action A. Continue? No |
Action C |
Quit |
|
7 |
Pass |
Action B |
Action A |
Quit |
|
8 |
Pass |
Action B |
Action B |
Quit |
|
9 |
Pass |
Action B |
Action C |
Quit |
|
10 |
Pass |
Action C |
Action A |
Quit |
|
11 |
Pass |
Action C |
Action B |
Quit |
|
12 |
Pass |
Action C |
Action C |
Quit |
Table 6.7 – Tests achieving 1-switch coverage for the example state machine
Test 1 covers the case of multiple login failures. Tests 1 to 3 cover the cases of login failure followed by each of the actions performed once. Tests 4 to 12 try the case of successful login followed by all permutations of pairs of actions A, B, and C in sequence. If there is a bug when you perform action B, then action A, this level of testing will find it.
Of course, with an infinite loop, you can extend this indefinitely through 2-switch, 3-switch coverage, and so on. These uncover bugs that are more obscure and less likely to be hit, so you can choose what level you want to achieve. A vital test principle is always to be aware of what you’re not covering, even if you deliberately choose not to spend the time testing it.
Some combinations of transitions will be related, and others will be independent. We have considered multiple login failures and different combinations of actions, and both could hide bugs. But what if you have a login failure before performing actions A, B, and C? For 1-switch coverage, we should include those too. However, those two parts of the system are unrelated: once you have logged in, it shouldn’t matter how many login failures you had previously. You can prune your list of possible test cases by identifying unrelated areas that aren’t linked in practice.
In this case, there are so many combinations of actions, A, B, and C, that we will need to log in many times. In that case, you may as well add variety to the login since you will be running several other tests. Look out for other opportunities to add variation. If one area of the code is particularly complex and requires many tests to try all its paths, don’t run all those paths with the same username, for instance. Since you are running those tests anyway, try them with many different usernames in case there is an interaction.
After each transition, you need to check the condition of the system. For state machines with an explicit variable tracking their state, you should start by checking that variable. Then consider the possible entrance and exit possibilities. This may mean that certain buttons or UI elements are visible to allow you to transition to the next step or that the application responds to specific API messages or inputs. Work out everything that distinguishes each state from the next so you can check them all.
Some programs are too complex to be described with a single-state machine. Those require a different approach to testing, considered next.
Checking asynchronous applications
The examples here have considered simple synchronous, single-threaded applications. In multi-threaded and asynchronous applications, different code sections can run out of sequence or in parallel depending on external events. While you can test that each function works correctly, it is much harder to test their interactions. You can’t define a single-state machine, and it’s best to find bugs with load testing. That is described in detail in Chapter 12, Load Testing.
Asynchronous applications involve sending messages from a subsystem of an application and pausing further processing or continuing with other tasks until it receives responses. That encompasses a vast range of possible uses, but there are a common set of checks to apply to them, as follows:
- Duplicate messages
- Out-of-order messages
- Missing update messages
- Missing response messages (timeouts)
This section considers each of these cases.
Duplicate messages
Using unreliable transport mechanisms, it can be hard to avoid sending duplicate messages without adding excessive latency. For each asynchronous message, how does the far end handle receiving duplicate messages? Is that subsystem guaranteed to be idempotent, such that receiving multiple messages won’t change its state? Whatever the theory, check its behavior in practice.
Conversely, how does your application respond to receiving duplicate messages? If those are simple acknowledgments, they can be safely ignored. However, if you receive duplicate commands, it might not be clear whether both messages are genuine requests. Does your application disambiguate messages, for instance, with sequence numbers, in which case, does that mechanism work for all message types? If it doesn’t, could duplicate requests trigger duplicate tasks, and what effects might that have? Duplicate data processing tasks might just result in pointless work, but user-facing requests such as sending emails might result in customers getting duplicate messages. Either case is a bug, of differing severities, and they may need significant work to avoid them.
Out-of-order messages
Asynchronous processes mean delays could cause messages to be delivered out of order. Consider the following sequence:
- Master task spawns Child Task A.
- Child A spawns Grandchild Task B.
- Task B completes and signals its result to the Master, but the message is lost.
- Child A completes and signals its results to the Master task.
- Task B resends its result and succeeds.
From the Master task’s point of view, this is invalid. Each task further down the chain should complete before its parent, but here Task B appears to have been completed after its parent, Task A.
Anywhere messages should appear in a given order, reverse them to check the warnings that are raised and what state it leaves your system in. It should be possible to check the state and automatically recover, despite the lost message.
Missing update messages
Often, two systems are designed to maintain the same state, with update messages indicating any changes. That might be a scheduling application reading your calendar, a statistics program reading sales figures, or one of many other similar situations. Update messages such as webhooks are an efficient way to stay up to date without the need for polling, but if a message is lost, the two systems will be out of sync.
What happens if your system receives an update for an entity it doesn’t know about or discovers a gap in a time sequence? There should be dedicated logic to identify such situations and correct them, so you’ll need to check if that works.
Missing response messages
The opposite case of receiving duplicate messages is if your application sends a command but fails to get a response within its timeout. Did the command not reach the destination, or did the acknowledgment fail to come back? In this case, your application needs a way to check on the status of the destination to see whether it has already acted on the command message. You could send another command, but that risks the destination carrying it out twice.
There are various techniques to avoid these problems, so if your application has this pattern, you’ll need to discover which yours uses and ensure it works correctly.
All these asynchronous problems are likely sources of bugs. Your application will probably only encounter them rarely, so they may not be a priority, but they will happen eventually and could cause significant issues.
Error guessing and identifying problem areas like this are necessary for white-box testing as well as black-box testing. Armed with the knowledge of the code structure and implementation, you can choose where to test and how best to trigger issues, as described in the next section.
Error guessing
Just as you need to choose the values of the inputs you will use for black-box testing, you also need to select the values for white-box testing. These also require equivalence partitioning and the careful choice of examples to represent each partition. As ever, the requirement here is to challenge the code as much as possible and try to provoke errors.
The lists from Chapter 5, Black-Box Functional Testing, are helpful. Instead of integers being entered into a web page or sent as part of an API, in this case, they will be passed between functions, but the same range of interesting cases still applies. How does the function handle negative numbers, decimals, or large values? Likewise, strings and other data types.
Watch out for historical anomalies in the code. For instance, sometimes data or configuration is stored one way up to a certain release and then a different way after that. Sometimes it is worthwhile to go back and migrate the old data to the new system, but that can be uneconomical, leaving the old configuration in place for old entities. With white-box testing, you can see those hidden partitions that are not visible publicly. Most likely, both cases are supposed to function identically, but they require test cases for both the old and new versions.
Another great source of bugs is repeated areas of code. If the same or similar functionality is implemented in two different ways, the development team must remember to update both locations whenever there is a change. If they don’t, users will see inconsistent behavior. White-box testing can reveal those poor coding practices and the bugs they cause, so watch out for them. The correct resolution is to refactor the code so it only exists in one place.
Functions have a range of valid inputs they can accept, so ensure that error checking is in place to handle any unexpected data. If a function assumes that a database query will return a single entry, what happens if there are multiple entries or none at all? Chapter 7, Testing of Error Cases, covers that error checking in more detail.
With the code available for inspection, you can see possible values that may cause issues in that function. You can find potential divide-by-zero problems or null pointers with code inspection. Finding these issues requires a different set of skills that were described briefly in the Code analysis section, and the variables types and the cases to consider (described previously) are a good start.
After each test, you then need to check the state of the system. White-box testing gives the ability to perform more thorough checks than other forms of testing, as the next section shows.
White-box checks
Just as in black-box testing, in white-box tests, you not only have to decide what test cases to run but also how to check that those tests have passed. When you have access to the code in white-box testing, you can do this at several levels.
At the level of individual lines of code under unit tests, you can specify the exact outputs of the different functions. Once again, this has all the strengths and weaknesses of unit testing – it is precise and comprehensive but cannot find errors when the functions are combined.
While running system tests, white-box knowledge lets testers see the code’s behavior in more detail. This lets you find other classes of issues that might cause subtle or invisible problems for users, such as inefficiencies in the code or two wrongs making a right, as described next.
Checking code inefficiencies
Code inefficiencies can include code that initially tries to do the wrong thing but there are retries, which means the operation eventually works. This might not cause customers issues beyond an imperceptible delay, but it means the function wastes time on a pointless request every time it runs. You should raise these as bugs, as covered in more detail in Chapter 10, Maintainability. Have a zero-tolerance approach to errors, and understand every warning within the logs while testing.
Retries may not even raise warnings, in which case only code inspection or careful examination of the logs will show the problem. When message-sending fails, you have two chances to catch the issue – both the sender and the recipient should log the problem. If they don’t, then logs also need improving.
You need white-box testing to determine whether the logs go to a sufficient level of detail. While there needs to be a summary log, suitable for someone not familiar with that area of code, the log also needs to have a level of detail so you can trace its main function calls to find unnecessary loops and repetitions, as well as the successful completion of functions.
Checking for two wrongs making a right
White-box testing also lets you find mistakes in the form of two wrongs making a right. In this case, a value may be written incorrectly into a database or populated in a message. Still, the consumer of that information expects the incorrect value, so the code works as expected in most situations. It may only break during different tests, which should use the wrong value, or when the code is next altered. This can be the case especially when a single developer owns code for both the reading and writing of a field. If they have understood the field value incorrectly, then the code for writing the value and reading it will be consistent but will not meet the specification. Only by examining the fields themselves can you spot that error.
Examining specific loglines is particularly important when testing for the absence of behavior, such as fixing an application crash. Sometimes it might be possible to run on the old version and reproduce the issue, but if that isn’t realistic or possible, a log line can indicate that the crashing condition has been hit but is now handled correctly.
White-box testing lets testers check on the data structures written to longer-term storage, such as files and databases. These need to be specified by the developers since they are implementation details that neither the product managers nor testers will initially know. Once documented, testing can check these alongside the customer-visible effects of features.
In white-box checks, you are looking for invalid data within database fields. They should be made as strict as possible to prevent invalid data from being written in; if you find bad data later, it can be tough to tell when and why it was added, so it is far better to prevent it at the time. The requirements on database fields should have strict checking applied as early as possible because making classes of data invalid later also causes problems if some already exist. Then you need to migrate that data before upgrades are possible. Fixing databases later is an operational headache, so check that invalid data is correctly rejected as part of white-box testing.
Finally, in this chapter, we’ll consider mixing black- and white-box testing techniques, known as gray-box testing.
Gray-box testing
In this chapter, I have drawn a hard distinction between black-box testing with no knowledge of the code and its architecture versus white-box testing with full access. In practice, that is neither realistic nor desirable. Some code architecture will be obvious even to casual users – an app is connecting to servers, for instance, or different development teams work on separate parts of the application, so the code is never truly black-box. Then you can proceed through levels of detail. Testers without coding experience can still understand the system’s architecture, its modules, states, and transitions, which can be sketched as block diagrams. Beyond that, you can follow the flow of the functions, and finally, you can step through the code line by line.
Each level provides useful extra information; you can go as deep as time and your coding skills will allow.
In a complex, multi-layered system, for instance, it can be tempting to raise bugs against the visible interfaces to the system – against the customer app rather than the server backend, against the web interface rather than the database and processes that drive it. With good knowledge of the code architecture, white-box testing can guard against that. Even if it isn’t clear where a problem lies, the user interface is often less complex than the systems it connects to, and those are more likely to be the source of problems. Knowledge of the different modules and their logs should let testers correctly isolate the problem before communicating it to the development team.
After initially performing exploratory testing from a naive point of view to mimic the customer experience (see Chapter 1, Making the Most of Exploratory Testing), part of the feature specification review should be to gather as much detail about the implementation as possible to inform the testing (see Chapter 3, How to Run Successful Specification Reviews). Some classes of bugs and conditions can only be identified by understanding how the code works, making white-box testing a crucial part of system test design.
Summary
In this chapter, you have learned about the importance of white-box testing and the strengths it brings to a test plan.
Code analysis and static testing let you find bugs before you run the application by analyzing the code itself. Unit tests can provide comprehensive testing of the lowest-level functionality, and its coverage can be measured in many different ways. These provide varying levels of coverage, so it’s important to know how you measure your coverage.
By identifying the different modules and how information is passed around within the system, you can identify mismatches in module behavior or errors in system messages. The same considerations apply to API testing, where you can also step through the messages and fields using the guides to variable type testing described in Chapter 5, Black-Box Functional Testing.
Understanding the different states an application goes through means you can test them and their transitions thoroughly. At the lowest level, white-box testing involves checking each line of code, which is unit testing rather than system testing.
Throughout white-box testing, you need to use the techniques of equivalence partitioning and error guessing to decide on the best test inputs to cover the maximum number of cases. White-box testing also opens up much more detailed checking you can do, not just on the user-visible functionality but also checking on the contents of internal system messages and database entries.
Finally, we saw that the distinction between black- and white-box testing is artificial and does not occur in real life, where testers are always somewhat aware of the architecture of the code they are testing. And that is a good thing – the more details you know about the code’s implementation, the better testing you can perform.
In the next chapter, we will leave the happy-path working case and consider what happens when the code goes wrong by examining invalid inputs and error cases.