Network Security
Networks create an interesting access and security paradox. Users on a network almost always push for freer access to information and files. System administrators almost always push for more restrictive access to information and files so that they can more effectively monitor use and secure access to sensitive information.
Network security is usually based on limiting or blocking operations from remote systems.
Network security comprises three aspects: firewall, authentication, and authorization.
Firewall Systems
The purpose of creating a firewall network security system is to ensure that all of the communication between a local network and an external network conforms to your local network security policy. A network security policy can be permissive or restrictive. A permissive policy might allow access to all services unless specifically denied. A restrictive policy might deny access to all services unless specifically allowed.
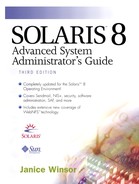
You can set up a firewall system to help protect the resources in your network from outside access. A firewall system acts as a barrier between your internal network and outside networks, as illustrated in Figure 79.
Figure 79. Firewall Security Protects in Layers
The firewall has two functions.
It acts as a gateway that passes data between the networks.
It acts as a barrier that blocks the free passage of data to and from the network.
CAUTION.
A firewall prevents unauthorized users from accessing hosts on your network. Maintain strict and rigidly enforced security on the firewall. However, an intruder who can break into your firewall system may be able to gain access to all of the other hosts on the internal network.
A firewall system should not have any trusted hosts. A trusted host is one from which a user can log in without being required to type in a password. The firewall system should not share any of its file systems or mount any file systems from other servers.
You can use ASET to make a system into a firewall and to enforce high security on a firewall system. Refer to Chapter 21, “Using the Automated Security Enhancement Tool (ASET),” for more information on ASET.
Good reference books on firewalls are Firewalls & Internet Security: Repelling the Wily Hacker by Steven Cheswick and William Bellovin and Building Internet Firewalls by D. Brent Chapman and Elizabeth D. Zwicky. Also refer to Solaris Security by Peter H. Gregory. (See the bibliography at the end of the book.)
Authentication and Authorization
Authentication is the method used to verify the identity of a user so that you can allow or deny access because you know the person is who he says he is. You can set up authentication at both the system and the network level. Once a user gains access to a remote system, authorization is a list of actions that are allowed or denied for users who have been authenticated. Then, their authorizations can be determined based on their verified identities.
The types of authentication and authorization that can help protect your systems on the network against unauthorized use are listed in Table 109
Monitoring Login Security Information
The following sections describe the following ways to monitor login information.
Display a user's login status.
Temporarily disable user logins.
Save failed login attempts.
Displaying a User's Login Status
Use the logins command to display the status of logged in users. Using the logins command with no arguments displays a list of all user and system login accounts. Use the options listed in Table 110 to control the output displayed by the logins command.
| Option | Description |
| -a | Add two password expiration fields to the display. The fields show how many days a password can remain unused before it automatically becomes inactive; they also show the date that the password expires. |
| -d | List logins with duplicate UIDs. |
| -m | Display multiple group membership information. |
| -o | Format the output into one line of colon-separated fields. |
| -p | Display logins with no passwords. |
| -s | Display all system logins. |
| -t | Sort output by login name instead of by UID. |
| -u | Display all user logins. |
| -x | Print an extended set of information about each specified user. The extended information displays the home directory, login shell, and password aging information, each on a separate line. The password information includes password status (PS for password, NO for no password, or LK for locked). If the login is password protected, status is followed by the date the password was last changed, the number of days required between changes, and the number of days allowed before a change is required. |
| The password aging information shows the time interval during which the user will receive a password expiration warning message at logon before the password expires. | |
| -g group | List all users belonging to the group, sorted by login. You can specify multiple groups as a comma-separated list. |
| -l login | List the requested login. You can specify multiple logins as a comma-separated list. Depending on the nameservice lookup types set in /etc/nsswitch.conf, the information can come from the /etc/passwd and /etc/shadow files and other nameservices. |
The logins command has the following syntax.
/usr/bin/logins [-admopstux] [-g group1,group2...] [-l login1,login2...]
You can group options. When you group options, any login that matches any criteria is displayed. When you combine the -l and -g options, a user is listed only once, even if the user belongs to more than one of the specified groups.
NOTE
You must be superuser to run the logins command.
The following example shows the output of the logins command, which is used with no arguments.
paperbark% su
Password:
# logins
root            0       other           1       Super-User
daemon          1       other           1
bin             2       bin             2
sys             3       sys             3
adm             4       adm             4       Admin
uucp            5       uucp            5       uucp Admin
nuucp           9       nuucp           9       uucp Admin
ppp             10      uucp            5       Solstice PPP 3.0 pppls
listen          37      adm             4       Network Admin
lp              71      lp              8       Line Printer Admin
printadm        100     sysadmin        14      Grant solaris.admin.printer* rights
sysadmin        101     sysadmin        14      System Administrator rights
winsor          1001    staff           10
ray             1002    staff           10
des             1003    staff           10
rob             1004    staff           10
nobody          60001   nobody          60001   Nobody
noaccess        60002   noaccess        60002   No Access User
nobody4         65534   nogroup         65534   SunOS 4.x Nobody
#
NOTE
The printadm and sysadm logins shown in the above example are actually role login accounts that grant specific system administration rights to users assigned to those roles. See Chapter 23, “Role-Based Access Control,” for more information about role accounts and rights. |
The following example displays an extended set of login status information for user winsor.
# logins -x -l winsor
winsor          1001    staff           10
                        /export/home/winsor
                        /bin/csh
                        PS 000000 -1 -1 -1
#
The following example shows a list of user accounts with no password.
# logins -p
ray             1002    staff           10
des             1003    staff           10
rob             1004    staff           10
#
The following example shows extended login status for all user accounts on a stand-alone system.
# logins -xu
printadm        100     sysadmin        14      Grant solaris.admin.printer* rights
                        /home/printadm
                        /bin/pfsh
                        PS 000000 -1 -1 -1
sysadmin        101     sysadmin        14      System Administrator rights
                        /home/sysadmin
                        /bin/pfsh
                        PS 000000 -1 -1 -1
winsor          1001    staff           10
                        /export/home/winsor
                        /bin/csh
                        PS 000000 -1 -1 -1
ray             1002    staff           10
                        /export/home/ray
                        /bin/csh
                        NP 000000 -1 -1 -1
des             1003    staff           10
                        /export/home/des
                        /bin/csh
                        NP 000000 -1 -1 -1
rob             1004    staff           10
                        /export/home/rob
                        /bin/csh
                        NP 000000 -1 -1 -1
nobody          60001   nobody          60001   Nobody
                        /
                        /sbin/sh
                        LK 082587 -1 -1 -1
noaccess        60002   noaccess        60002   No Access User
                        /
                        /sbin/sh
                        LK 082587 -1 -1 -1
nobody4         65534   nogroup         65534   SunOS 4.x Nobody
                        /
                        /sbin/sh
                        LK 082587 -1 -1 -1
#
NOTE
The logins command lists role accounts—such as printadm and sysadm in the previous example—as user accounts. See Chapter 23, “Role-Based Access Control,” for more information about role accounts and rights. |
Temporarily Disabling User Logins
You can temporarily disable logins in one of two ways to prevent new login sessions.
Bring the system to run level 0 (single-user mode).
Create an /etc/nologin file.
When a system will not be available for an extended time, you can create an /etc/nologin file to prevent users from logging in to the system. When a user logs in to a system that has an /etc/nologin file, the message in the /etc/nologin file is displayed and the user login is terminated. Superuser logins are not affected by the /etc/nologin file.
Use the following steps to create an /etc/nologin file.
1. |
Become superuser. |
2. |
Use any editor to create a file named /etc/nologin. |
3. |
Type the message to display to users when they log in to the system. If possible, include specific information about when logins will be permitted or how users can find out when they can access the system again. |
4. |
Save the changes and close the file. |
The following example shows the text of a nologin file.
# cat /etc/nologin
No Logins Are Currently Permitted

The system will be unavailable until 12 noon on Friday, October 24
#
Saving Failed Login Attempts
The loginlog file contains one entry for each failed attempt. Each entry contains the user's login name, TTY device, and time of the attempt.
NOTE
The loginlog file may grow quickly. To use the information in this file and prevent it from getting too large, check and clear its contents regularly. If this file shows a lot of activity, it may suggest that someone is trying to break into the computer system. If you regularly track information from the loginlog file, consider creating a cron entry to track and clear out the loginlog file.
Use the following steps to create a loginlog file.
1. |
Become superuser. |
2. |
Type touch /var/adm/loginlog and press Return. |
3. |
Type chmod 700 /var/adm/loginlog and press Return. |
4. |
Type chgrp sys /var/adm/loginlog and press Return. |
5. |
Make sure the log works by trying to log in to the system six times with the wrong password. |
6. |
Sharing Files
A network server can control which files are available for sharing via NFS. It can also control which clients have access to the files and what type of access is permitted to those clients. In general, the file server can grant read/write or read-only access either to all clients or to specific clients. Access control is specified when resources are made available with the share command.
A server can use the /etc/dfs/dfstab file to list the file systems it makes available to clients on the network. See the Solaris System Administrator's Guide, Third Edition for more information about sharing files (see bibliography at the end of this book).
Restricting Superuser (root) Access
In general, superuser on a local system is not allowed root access to file systems shared across the network. Unless the server specifically grants superuser privileges, a user who is logged in as superuser on a client cannot gain root access to file systems that are remotely mounted on the client. The NFS system implements this restriction by changing the user ID (usually 60001) of the requester to the user ID of the user named nobody. The access rights of user nobody are the same as those given to the public or to a user without credentials for a particular file. For example, if the public has only execute permission for a file, then user nobody can execute only that file.
An NFS server can grant superuser privileges on a shared file system on a per-host basis, using the root=hostname option to the share command.
Controlling and Monitoring Superuser Access
The next sections describe the following ways to restrict and monitor superuser access.
Restrict superuser login to the console.
Monitor who is using the su command.
 Grant only specific rights to specific users or roles.
Restricting Superuser Logins to the Console
The superuser account has complete control over the entire operating system. It has access to and can execute essential system programs. For this reason, there are almost no security restraints for any program that is run by superuser.
You can protect the superuser account on a system by restricting access to a specific device through the /etc/default/login file. For example, if superuser access is restricted to the console, root can log in to a system only from the console. If individuals remotely log in to the system to perform administrative functions, they must first log in with their user logins and then use the su command to become superuser.
NOTE
Restricting superuser login to the console is the default setup when a system is installed.
Use the following steps to restrict superuser (root) login to the console.
1. |
Become superuser. |
2. |
Edit the /etc/default/login file and remove the # comment from the beginning of the #CONSOLE=/dev/console line. |
3. |
Save the changes to the file. |
4. |
Use rlogin to try to log in remotely to the system as superuser and verify that the operation fails. |
Monitoring Who Is Using the su Command
You can monitor su attempts with the /etc/default/su file, which is part of the syslog subsystem. By using this file, you can enable the /var/adm/sulog file to monitor each time the su command is used to change to another user.
NOTE
Enabling the /var/adm/sulog file to monitor su use is the default setup when a system is installed.
The sulog file lists all uses of the su command, not only those used to switch user to superuser. The entries show the date and time the command was used, whether or not it was successful (+ or -), the port from which the command was issued, and the name of the user and the switched identity.
Use the following steps to monitor who is using the su command.
1. |
Become superuser. |
2. |
Edit the /etc/default/su file and remove the remove the # comment from the beginning of the #SULOG=/var/adm/sulog line. |
3. |
Save the changes to the file. |
4. |
Use the su command several times and, as superuser, display the contents of the /var/adm/sulog file. |
The following example shows the tail of the /var/adm/sulog file.
castle% su
Password:
# tail -20 /var/adm/sulog
SU 10/07 10:35 + pts/3 winsor-root
SU 10/07 15:05 + console root-daemon
SU 10/07 15:54 + console root-daemon
SU 10/07 16:28 + pts/3 winsor-root
SU 10/08 08:23 + console root-daemon
SU 10/08 09:43 + pts/3 winsor-root
SU 10/08 12:39 + pts/3 winsor-des
SU 10/08 12:39 - pts/3 winsor-ray
SU 10/08 12:40 - pts/3 winsor-ray
SU 10/08 12:40 - pts/3 winsor-ray
SU 10/08 12:40 + pts/3 winsor-root
SU 10/08 12:44 + console root-daemon
SU 10/08 12:56 + pts/3 winsor-root
#
Grant Only Specific Rights to Specific Users or Roles.
Starting with the Solaris 8 release and enhanced in the Solaris 8 Update 3 release, you can grant specific rights to users or to roles to perform specific system administration tasks. See Chapter 23, “Role-Based Access Control,” for more information about rights and roles.
Using Privileged Ports
Secure RPC is a method of providing additional security that authenticates both the host and the user making a request. Refer to Chapter 22, “Using Authentication Services,” for more information about Secure RPC. If you do not want to run Secure RPC, a possible substitute is the Solaris privileged port mechanism. A privileged port is built by the superuser with a port number of less than 1024. After a system has authenticated the client's credentials, it builds a connection to the server via the privileged port. The server then verifies the client credential by examining the connection's port number.
Non-Solaris clients might not, however, be able to communicate through the privileged port. If they cannot, you might see error messages such as Weak Authentication NFS request from unprivileged port.
Automated Security Enhancement Tool (ASET)
The ASET security package provides automated administration tools that enable you to control and monitor system security. You specify a security level—low, medium, or high— at which ASET runs. At each higher level, ASET's file control functions increase to reduce file access and tighten your system security. See Chapter 21, “Using the Automated Security Enhancement Tool (ASET),” for more information.