
8. Advanced Installation Procedures: WAN Boot and Live Upgrade
Objectives
The following test objectives for exam CX-310-202 are covered in this chapter:
Configure a WAN boot installation and perform a Live Upgrade installation.
• You’ll understand the differences between a WAN boot installation and a custom JumpStart installation.
• You’ll learn the requirements for a WAN boot installation.
• You’ll learn how to configure and perform a secure WAN boot installation across a wide area network.
• You’ll learn how to perform an operating system upgrade while the system is running.
Outline
Configure the WAN Boot and JumpStart Files
Boot the Client from the Local CD/DVD
Boot the Client Interactively from the OBP
Boot the Client Noninteractively from the OBP
Boot the Client with a DHCP Server
Creating a New Boot Environment
Displaying the Status of the New Boot Environment
Upgrading the New Boot Environment
Activating the New Boot Environment
luactivate on the x86/x64 Platform
lucreate on the SPARC Platform
Maintaining Solaris Live Upgrade Boot Environments
Removing Software Packages from a Boot Environment
Adding Software Packages from a Boot Environment
Removing Patches on an OS Installed on a Boot Environment
Adding Patches to an OS Installed on a New Boot Environment
Deleting an Inactive Boot Environment
Changing the Name of a Boot Environment
Changing the Description of a Boot Environment
Viewing the Configuration of a Boot Environment
Suggested Reading and Resources
Study Strategies
The following strategies will help you prepare for the test:
• Practice the step-by-step examples provided in this chapter on a Solaris system. Because WAN boot is built on JumpStart, be sure you thoroughly understand how to set up a custom JumpStart installation, as described in Chapter 7, “Advanced Installation Procedures: JumpStart, Flash Archive, and PXE.”
• Understand how to configure a WAN boot server.
• Understand how to initiate a WAN boot installation from the client.
• Be familiar with all the configuration files and scripts that are associated with a WAN boot installation.
• Know the requirements for performing a Solaris Live Upgrade.
• Understand how to perform a Live Upgrade on a system, including a system that has limited disk space.
Introduction to WAN Boot
Objective:
• Configure a WAN boot installation
A WAN boot installation enables a system administrator to boot and install software over a wide area network (WAN) by using HTTP. WAN boot is used to install the Solaris OS on SPARC-based systems over a large public network where the network infrastructure might be untrustworthy. x86/x64-based systems currently cannot be installed using a WAN boot installation. You can use WAN boot with security features to protect data confidentiality and installation image integrity.
Chapter 7 describes how to perform a custom JumpStart installation. A WAN boot installation performs a custom JumpStart installation, but it goes beyond a custom JumpStart installation in that it provides the following advantages:
• JumpStart boot services are not required to be on the same subnet as the installation client.
• WAN boot provides a scalable process for the automated installation of systems anywhere over the Internet or other WANs.
• A WAN boot installation is more secure than a custom JumpStart installation for the following reasons:
• The WAN boot client and server can authenticate using SHA hash algorithms.
• The Solaris 10 OS can be downloaded to the WAN boot client using HTTPS.
EXAM ALERT
Understand the advantages of a WAN boot installation over a JumpStart installation.
WAN Boot Requirements
EXAM ALERT
Understand all the requirements of a WAN boot installation.
Before you can perform a WAN boot installation, you need to make sure that your system meets the minimum requirements for a WAN boot. It’s best if the WAN boot client system’s OpenBoot PROM (OBP) supports WAN boot, which requires a minimum of OpenBoot firmware version 4.14. You can check your PROM version as follows:
# prtconf -V<cr>
OBP 4.0.12 2002/01/08 13:01
Or you can check it as follows:
# eeprom | grep network-boot-arguments<cr>
If the variable network-boot-arguments is displayed, or if the preceding command returns the output network-boot-arguments: data not available, the OBP supports a WAN boot installation.
If the client’s OBP does not support WAN boot, you can still perform a WAN boot installation by utilizing WAN boot programs from a local CD/DVD.
The WAN boot client must have
• A minimum of 512MB of RAM
• An UltraSPARC II processor or newer
• At least 2GB of hard drive space
For clients with OpenBoot firmware that does not support WAN boot, perform the WAN boot installation from the Solaris Software CD1 or DVD. This option works in all cases when the current OBP does not provide WAN boot support.
WAN boot requires a web server configured to respond to WAN boot client requests. If you want to use HTTPS in your WAN boot installation, the web server software must support SSL. In addition, Flash Archives must be available to the web server. Traditional JumpStart images, such as a spooled image of the CD/DVD that performed a pkgadd-style install, do not work with WAN boot. Flash Archives are the only format supported.
In addition, the WAN boot server must meet these requirements:
• Must be a SPARC or x86-based system running Solaris 9 release 12/03 or higher.
• Must be configured as a web server and must support HTTP 1.1 minimum. If you want to use HTTPS in your WAN boot installation, the web server software must support SSL version 3.
• Must have enough disk space to hold the Flash Archive.
• Must have a local CD or DVD.
• Must be running Solaris 9 release 12/03 or higher.
• Must be configured as a web server, and must support HTTP 1.1 minimum.
NOTE
Solaris 10 version This chapter was written using Solaris 10 05/08. If you are installing a more recent version of Solaris 10, be sure to read the Solaris 10 release notes that accompany that release. Review any new installation issues or requirements associated with a Solaris Live Upgrade before beginning the upgrade.
WAN Boot Components
To perform a WAN boot installation, you must first configure the WAN boot server. This involves configuring the web server, an optional DHCP server, and a JumpStart server. Configuring the WAN boot server is described later in this chapter.
Before describing the WAN boot process, it’s necessary to define some of the WAN boot files and components that you’ll see used throughout this chapter:
• wanboot program: A second-level boot program that is used to load the miniroot, installation, and configuration files onto the WAN boot client. The wanboot program performs tasks similar to those that are performed by the ufsboot and inetboot second-level boot programs.
• wanboot-cgi: A Common Gateway Interface (CGI) program on the web server that services all client requests. It parses the WAN boot server files and client configuration files into a format that the WAN boot client expects.
• bootlog-cgi: A CGI program on the web server that creates a log of all client activity in the /tmp/bootlog.client file.
• wanboot.conf: A text file in which you specify the configuration information and security settings that are required to perform a WAN boot installation.
• WAN boot file system: Files used to configure and retrieve data for the WAN boot client installation are stored on the web server in /etc/netboot. The information in this directory is transferred to the client via the wanboot-cgi program as a file system, referred to as the WAN boot file system.
• WAN boot miniroot: A version of the Solaris miniroot that has been modified to perform a WAN boot installation. The WAN boot miniroot, like the Solaris miniroot, contains a kernel and just enough software to install the Solaris environment. The WAN boot miniroot contains a subset of the software found in the Solaris miniroot.
• JumpStart and JumpStart configuration files: These terms are described fully in Chapter 7.
• Install server: Provides the Solaris Flash Archive and custom JumpStart files that are required to install the client.
• WAN boot server: A web server that provides the wanboot program, the configuration and security files, and the WAN boot miniroot. The WAN boot server is described later in this chapter.
EXAM ALERT
Understand all the WAN boot components. Pay special attention to the wanboot-cgi program.
The WAN Boot Process
When the WAN boot client is booted, OpenBoot uses configuration information to communicate with the wanboot-cgi program on the WAN boot server and request a download of the wanboot program from the server. Alternatively, the client can request the wanboot program from the local CD/DVD.
After the download, the client executes the wanboot program. The wanboot program performs the following functions on the client:
• wanboot requests a download of authentication and configuration information from the WAN boot server. The information gets transmitted to the client by the server’s wanboot-cgi program using HTTP or HTTPS.
• wanboot requests a download of the miniroot from the WAN boot server, and the information is transmitted using either HTTP or HTTPS.
• wanboot loads the UNIX kernel into RAM and executes the kernel.
The kernel loads and mounts the WAN boot file system and begins the installation program.
The installation program requests a download of the Flash Archive and custom JumpStart files from the install server and installs the Solaris Flash Archive. The archive and files are transmitted using either HTTP or HTTPS.
The installation program begins a custom JumpStart installation to install the Solaris Flash Archive on the client.
The WAN Boot Server
The WAN boot server provides the boot and configuration data during the WAN boot installation. The WAN boot server can be a single server, or the functions can be spread across several servers.
• Single server: Centralize the WAN boot data and files on one system by hosting all the servers on the same machine. You can administer all your different servers on one system, and you need to configure only one system as a web server.
• Multiple servers: If you want to distribute the installation data and files across your network, you can host these servers on multiple machines. You could set up a central WAN boot server and configure one or more install servers to host the Solaris Flash Archives.
For the examples in this book, I’ll use the single-server method.
You will configure three components on the WAN boot server:
• The web server
• The optional DHCP server
• The JumpStart server
Before beginning the WAN boot setup, I recommend that you gather all the information you will need, as provided in the following lists:
WAN boot server information:
• Path to the WAN boot miniroot
• Path to the custom JumpStart files
• Path to the wanboot program
• URL of the wanboot-cgi program
• Path to the client’s subdirectory in the /etc/netboot hierarchy
WAN boot client information:
• IP address for the client’s router
• The client’s IP address
• The client’s subnet mask
• The client’s hostname
• The client’s MAC address
Configure the WAN Boot Server
The first step of setting up the WAN boot server is to configure it as a web server, as described in Step By Step 8.1. In this example, you configure the Apache version 2 web server for an unsecure WAN boot installation.
STEP BY STEP
8.1 Configuring the Apache Web Server
1. Move the unused index files from the Apache document root directory:
# cd /var/apache2/htdocs<cr>
# cp index.html.en index.html<cr>
# mkdir INDEX<cr>
# mv index.html.* INDEX<cr>
2. Update the primary Apache configuration file with the WAN boot server’s IP address:
# cp /etc/apache2/httpd.conf-example /etc/apache2/httpd.conf<cr>
# vi /etc/apache2/httpd.conf<cr>
Edit the following line:
ServerName 127.0.0.1
Replace the IP address with the hostname of the WAN boot server. My server is named “sunfire,” so I’ll change the line to the following:
ServerName sunfire
Save and exit the file.
3. Start the Apache web server:
# svcadm enable apache2<cr>
4. Verify that the web server is running on port 80 by issuing the following command:

Configure the WAN Boot and JumpStart Files
After configuring the web server, you are ready to set up the files necessary to perform a WAN boot. These files must be made accessible to the web server by storing them in the WAN boot server’s document root directory, which in our example will be the /var/apache/htdocs directory. Step By Step 8.2 describes the process of setting up these files.
STEP BY STEP
8.2 Configuring the WAN Boot and JumpStart Files for an Unsecure WAN Boot Installation
1. Place the Solaris 10 DVD into the DVD drive. If you are using a CD, place CD #1 into the CD-ROM drive.
2. Create the directories needed for the WAN boot configuration in the /var/apache/htdocs directory:
# cd /var/apache2/htdocs<cr>
a. Create the wanboot directory. This directory will contain the WAN boot miniroot image needed to start the JumpStart process over HTTP.
# mkdir wanboot<cr>
b. Create the install directory. This directory will contain the remote root file system.
# mkdir install<cr>
c. Create the miniroot directory. This directory will contain the ramdisk image used to start the client boot process.
# mkdir miniroot<cr>
d. Create the config directory. This directory will contain the WAN boot JumpStart configuration files.
# mkdir config<cr>
3. Create the /var/apache2/htdocs/flash directory, and place your Flash Archive file in it.
4. Set up the WAN boot install server using the setup_install_server command. Because I will be using a Flash Archive for the installation, it is not necessary to spool the entire contents of the DVD/CD onto the server.
Use the -b option to install the boot image only into the /var/apache2/htdocs/install directory and the -w option to copy the WAN boot miniroot image into the /var/apache2/htdocs/wanboot directory:
# cd /cdrom/sol_10_508_sparc/s0/Solaris_10/Tools<cr>
# ./setup_install_server -b -w /var/apache2/htdocs/wanboot/
/var/apache2/htdocs/install<cr>
The system responds with the following:
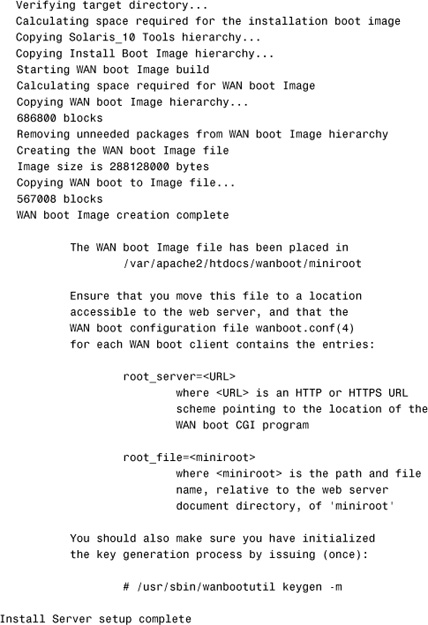
5. Copy the architecture-specific wanboot program from the CD/DVD to the wanboot directory on the WAN server:
# cd /cdrom/cdrom0/s0/Solaris_10/Tools/Boot/platform/sun4u/<cr>
# cp wanboot /var/apache2/htdocs/wanboot/wanboot.s10_sparc<cr>
6. Copy the CGI scripts into the web server software directory, and set the file permissions:
# cp /usr/lib/inet/wanboot/wanboot-cgi /var/apache2/cgi-bin/wanboot-cgi<cr>
# chmod 755 /var/apache2/cgi-bin/wanboot-cgi<cr>
# cp /usr/lib/inet/wanboot/bootlog-cgi /var/apache2/cgi-bin/bootlog-cgi<cr>
# chmod 755 /var/apache2/cgi-bin/bootlog-cgi<cr>
7. Create the /etc/netboot hierarchy. The WAN boot installation programs will retrieve configuration and security information from this directory during the installation. Create the /etc/net-boot directory, and set the permissions:
# mkdir /etc/netboot<cr>
# chmod 700 /etc/netboot<cr>
# chown webservd:webservd /etc/netboot<cr>
8. Configure the install server WAN boot parameters in the /etc/netboot/wanboot.conf file. Open the file using the vi editor:
# vi /etc/netboot/wanboot.conf<cr>
Make the following entries, and save the file:
boot_file=/wanboot/wanboot.s10_sparc
root_server=http://192.168.1.109/cgi-bin/wanboot-cgi
root_file=/wanboot/miniroot
signature_type=
encryption_type=
server_authentication=no
client_authentication=no
resolve_hosts=
boot_logger=http://192.168.1.109/cgi-bin/bootlog-cgi
system_conf=system.conf
In the sample wanboot.conf file, my web server’s IP address is 192.168.1.109. Substitute your web server’s IP address for the root_server and boot_logger entries.
Also in the example, the boot_logger is set to log all messages to the WAN boot server in the /tmp directory. If you leave this line blank, all log messages will be displayed on the WAN boot client’s console.
The wanboot.conf file parameters and syntax are described in the next section.
9. Configure the client configuration file pointer parameters in the /etc/netboot/system.conf file. Open the file using the vi editor:
# vi /etc/netboot/system.conf<cr>
Make the following entries, and save the file:
SsysidCF=http://192.168.1.109/config
SjumpsCF=http://192.168.1.109/config
In the sample system.conf file, my web server’s IP address is 192.168.1.109. Substitute your web server’s IP address in both lines.
NOTE
File ownership Set the file ownership on the following files so that they are owned by the web server:
# chown webservd:webservd /var/apache2/cgi-bin/wanboot-cgi
/etc/netboot/wanboot.conf /etc/netboot/system.conf<cr>
Your system may be different, so be sure to verify the web server ownership. You can check by running the following command:
# ps -ef |grep httpd<cr>
webservd 5298 5297 0 Sep 18 ? 0:00 /usr/apache2/bin/httpd -k start
10. Change to the /var/apache2/htdocs/config directory, and configure the client installation parameters by creating a profile. Configuring the profile for a JumpStart installation is covered in detail in Chapter 7. Refer to that chapter for instructions. You will configure the profile for a WAN boot client the same as you would for a JumpStart installation. You could also use a template supplied on the CD/DVD in the /cdrom/cdrom0/s0/Solaris_10/Misc/jumpstart_sample directory. For this example, I made the following entries in the profile, and I named the file profile:
# cd /var/apache2/htdocs/config<cr>
# more /var/apache2/htdocs/config/profile<cr>
install_type flash_install
archive_location http://192.168.1.109/flash/archive.flar
partitioning explicit
filesys c0t0d0s0 free /
filesys c0t0d0s1 512 swap
I placed the Flash Archive in the /var/apache2/htdocs/flash directory and named the file archive.flar.
11. In the /var/apache2/htdocs/config directory, create the sysidcfg file. Configuring the sysidcfg file for a JumpStart installation is covered in detail in Chapter 7. Refer to that chapter for instructions. You will configure the sysidcfg file for a WAN boot client the same as you would for a JumpStart installation. For this example, I made the following entries in the sysidcfg file, and I named the file sysidcfg:
# more /var/apache2/htdocs/config/sysidcfg<cr>
timeserver=localhost
system_locale=C
network_interface=eri0 { default_route=none netmask=255.255.255.0
protocol_ipv6=no }
timezone=US/Central
nfs4_domain=dynamic
terminal=vt100
name_service=NONE
security_policy=NONE
root_password=dT/6kwp5bQJIo
In the sample sysidcfg file, the eri0 network interface and encrypted root password are unique for the system. Substitute the values used in this example with the network device and root password (cut and pasted from your system’s /etc/shadow file) that are specific to your system.
12. Copy the sample rules file from the CD/DVD:
# cd /var/apache2/htdocs/config<cr>
# cp /cdrom/sol_10_508_sparc/s0/Solaris_10/Misc/jumpstart_sample/rules .<cr>
Configuring the rules file for a JumpStart installation is covered in detail in Chapter 7. Refer to that chapter for instructions. You will configure the rules file for a WAN boot client the same as you would for a JumpStart installation. For this example, I made the following entry in the rules file:
# more rules<cr>
any - - profile -
After creating the rules file, check it using the check script, as described in Chapter 7:
# ./check<cr>
Validating rules...
Validating profile profile...
The custom JumpStart configuration is ok.
If the check script is not in the /var/apache2/htdocs/config directory, copy it there from the CD/DVD:
# cp /cdrom/sol_10_508_sparc/s0/Solaris_10/Misc/jumpstart_sample/
check/var/apache2/htdocs/config<cr>
13. Verify the configuration of the WAN boot server:
# bootconfchk /etc/netboot/wanboot.conf<cr>
#
No output appears if the server has been configured successfully.
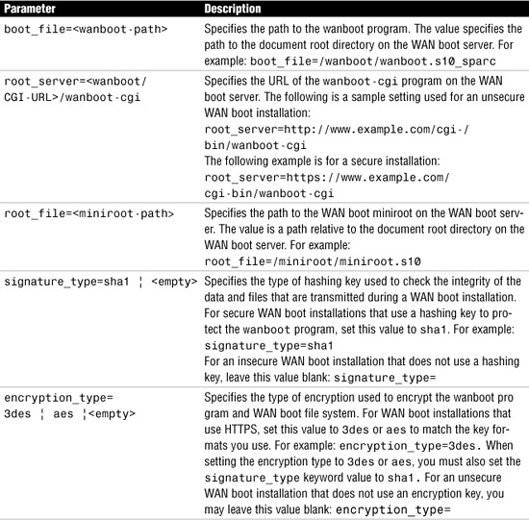
The wanboot.conf File
EXAM ALERT
Understand the purpose of the wanboot.conf file and the configuration information it contains.
The wanboot.conf file is a plain-text configuration file that is stored in the client’s subdirectory located in the /etc/netboot directory. It is the repository for WAN boot configuration data (file paths, encryption type, signing policies). The following WAN boot installation programs and files use it to perform the WAN boot installation:
• WAN boot file system
• WAN boot miniroot
Each line in the wanboot.conf file has the following syntax:
<parameter>=<value>
Parameter entries cannot span lines. You can include comments in the file by preceding the comments with the # character.
Table 8.1 describes each wanboot.conf parameter.
Table 8.1 wanboot.conf File Parameters

Booting the WAN Boot Client
EXAM ALERT
Understand the OBP commands used to initiate the four types of WAN boot installation methods described in this section.
You have four options when booting and installing the WAN boot client:
• Installing with local CD/DVD media: If your client’s OBP does not support a WAN boot, this method allows you to boot the client from a local CD/DVD and then continue the installation via the WAN boot server.
• Interactive installation: Use this method if you want to be prompted for the client configuration information during the boot process, before the OS is installed.
• Noninteractive installation: Hands-off installation. All the client information is configured on the WAN boot server so that no questions are asked during the installation process.
• Installing with a DHCP server: Configure the network DHCP server to provide the client configuration information during the installation.
The following sections describe how to boot a client using the various methods.
Boot the Client from the Local CD/DVD
Some older SPARC stations have OpenBoot PROM versions that do not support a WAN boot. It’s still possible to use WAN boot to install the OS on these systems, but you need to perform the WAN boot from CD/DVD rather than directly from the OpenBoot PROM. When you use a local CD/DVD, the client retrieves the wanboot program from the local media, rather than from the WAN boot server. The instructions to boot from a CD/DVD are described in Step By Step 8.3. They can be performed on any SPARC-based client.
STEP BY STEP
8.3 Booting a SPARC System from a Local CD/DVD
1. Power on the system, and insert the Solaris software DVD or the Solaris Software #1 CD in the CD-ROM/DVD drive. From the OpenBoot ok prompt, type
ok boot cdrom -o prompt -F wanboot - install<cr>
The following options are used with the boot command:
• cdrom: Instructs the OBP to boot from the local CD-ROM.
• -o prompt: Instructs the wanboot program to prompt the user to enter client configuration information.
• -F wanboot: Instructs the OBP to load the wanboot program from the CD-ROM.
• -install: Instructs the client to perform a WAN boot installation.
After you enter the boot command, the system responds with the following:
Boot device: /pci@1f,0/pci@1,1/ide@d/cdrom@0,0:f File and args:
-o prompt -F wanboot - install
<time unavailable> wanboot info: WAN boot messages->console
<time unavailable> wanboot info: Default net-config-strategy: manual
The boot prompt appears:
boot>
2. At the boot> prompt, issue the prompt command:
boot> prompt<cr>
3. The system prompts you for the client’s network interface settings and encryption keys to be entered. Each prompt is described next:
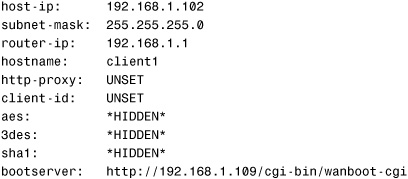
Enter the client’s IP address:
host-ip? 192.168.1.102<cr>
Enter the client’s subnet mask value:
subnet-mask? 255.255.255.0<cr>
Enter the IP address of the network router:
router-ip? 192.168.1.1<cr>
Enter the client’s hostname:
hostname? client1<cr>
You may leave the remaining prompts blank by just pressing Enter. They are not needed for an unsecure installation.
http-proxy?<cr>
client-id?<cr>
aes?<cr>
3des?<cr>
sha1?<cr>
Enter the information for the WAN boot server (use the IP address of the WAN boot server):
bootserver? http://192.168.1.109/cgi-bin/wanboot-cgi<cr>
The system responds with the following error, which you can ignore:
Unknown variable ‘/192.168.1.109/cgi-bin/wanboot-cgi’; ignored boot>
4. At the boot> prompt, use the list command to display and verify the settings:
boot> list<cr>
The system responds with a summary of the information you entered:
5. Initiate the WAN boot installation with the go command:
boot> go<cr>
The system begins to boot from the WAN boot server, and the following information is displayed:

After downloading the WAN boot miniroot, the system reboots:
Mon Sep 22 18:35:10 wanboot info: WAN boot messages->192.168.1.109:80
SunOS Release 5.10 Version Generic_127127-11 64-bit
Copyright 1983-2008 Sun Microsystems, Inc. All rights reserved.
Use is subject to license terms.
Configuring devices.
Network interface was configured manually.
192.168.1.102
Beginning system identification...
syslogd: line 24: WARNING: loghost could not be resolved
Searching for configuration file(s)...
Sep 22 11:28:01 client eri: SUNW,eri0 : 100 Mbps full duplex link up
Using sysid configuration file http://192.168.1.109/config/sysidcfg
Search complete.
Discovering additional network configuration...
Completing system identification...
Starting remote procedure call (RPC) services: done.
At this point, the Solaris installation program begins the boot process and installation over the WAN. The client is configured according to the configuration files on the WAN boot server, and the Flash Archive is extracted and installed. If the WAN boot programs do not find all the necessary installation information, the wanboot program prompts you to provide the missing information.
Boot the Client Interactively from the OBP
Use the interactive installation method, as described in Step By Step 8.4, if you want to install keys and set client configuration information from the command line during the installation. Your OBP must support WAN boot to perform this type of installation.
STEP BY STEP
8.4 Booting the Client Interactively from the OBP
At the ok prompt on the client system, begin by setting the network-boot-arguments variable in OBP.
1. At the ok prompt on the client system, set the network-boot-arguments variable in OBP:
ok setenv network-boot-arguments host-ip=<client-IP>,
router-ip=<router-ip>,subnet-mask=<value>,hostname=<client-name>,
http-proxy=<proxy-ip:port>,bootserver=<wanbootCGI-URL><cr>
The network-boot-arguments variable instructs the OBP to set the following boot arguments:
• host-ip=<client>: Specifies the client’s IP address.
• router-ip=<router-ip>: Specifies the network router’s IP address.
• subnet-mask=<value>: Specifies the subnet mask value.
• hostname=<client-name>: Specifies the client’s hostname.
• http-proxy=<proxy-ip:port>: An optional variable used to specify the IP address and port of the network’s proxy server.
• bootserver=<wanbootCGI-URL>: Specifies the URL of the web server’s wanboot-cgi program. The URL value for the bootserver variable must not be an HTTPS URL. The URL must start with http://.
2. Boot the client from the network using the network boot argument variables:
ok boot net -o prompt - install<cr>
Resetting ....
net -o prompt - install instructs the client to boot from the network. It also instructs the wanboot program to prompt the user to set the key values for the client system at the boot> prompt. If you are performing an insecure installation that does not use keys, go directly to step 3. For a secure WAN boot installation using HTTPS, the information entered at the boot> prompt is as follows:
boot> 3des=<key-value><cr>
where 3des=<key-value> specifies the hexadecimal string of the 3DES key.
If you use an AES encryption key, use the following format for this command:
boot> aes=<key-value><cr>
At the next boot> prompt, type the hashing key value:
boot> sha1=<key-value><cr>
where sha1=<key-value> specifies the hashing key value.
Obtain the client’s SHA1 key value on the WAN boot server by using the wanbootutil command. The wanbootutil keygen command is used to create and display client and server HMAC, SHA1, 3DES, and AES keys by typing the following:
# wanbootutil keygen -d -c -o net=<network-IP>,cid=<client-ID>, type=sha1<cr>
where:
• -d: Generates and stores per-client 3DES/AES encryption keys, avoiding any DES weak keys.
• -c: Displays a key of the type specified by the key type, which must be either 3des, aes, or sha1.
• -o: Specifies the WAN boot client and/or key type.
• net=<network-IP>: The IP address of the client’s subnet.
• cid=<client-ID>: The ID of the client you want to install. The client ID can be a user-defined ID or the DHCP client ID.
• type=<key-type>: The key type that you want to install on the client. Valid key types are 3des, aes, and sha1.
The hexadecimal value for the key is displayed:
b482aaab82cb8d5631e16d51478c90079cc1d463
Obtain the client’s 3DES key value on the WAN boot server by typing the following:
# wanbootutil keygen -d -c -o net=<network-IP>,cid=<client-ID>,type=3des<cr>
The hexadecimal value for the key is displayed:
9ebc7a57f240e97c9b9401e9d3ae9b292943d3c143d07f04
3. After you enter the client key values, start the boot process by typing go:
boot> go<cr>
The system begins the boot process and installation over the WAN. If the WAN boot programs do not find all the necessary installation information, the wanboot program prompts you to provide the missing information.
Boot the Client Noninteractively from the OBP
Use this installation method to boot the client without any interaction after entering the initial boot command. For you to perform this type of interactive boot, your system’s OpenBoot PROM must support WAN boot. After setting up the WAN boot server, follow these instructions to boot the client:
1. At the ok prompt on the client system, set the network-boot-arguments variable in OBP:
ok setenv network-boot-arguments host-ip=<client-IP>,
router-ip=<router-ip>,subnet-mask=<value>,hostname=<client-name>,
http-proxy=<proxy-ip:port>,bootserver=<wanbootCGI-URL><cr>
2. Boot the client from the network using the network boot argument variables:
ok boot net - install<cr>
Resetting . . . .
The system begins the boot process and installation over the WAN. If the WAN boot programs do not find all the necessary installation information, the wanboot program prompts you to provide the missing information.
Boot the Client with a DHCP Server
If you configured a DHCP server to support WAN boot options, you can use the DHCP server to provide client configuration information during bootup and installation. Before you try to boot with a DHCP server, make sure your client’s OBP supports a WAN boot installation, as described earlier in this chapter.
To boot a client using a DHCP server, you must first configure your DHCP server to supply the following information:
• The Proxy server’s IP address: Specified using the SHTTPproxy option on your DHCP server.
• The location of the wanboot-cgi program: Specified using the SbootURI option on your DHCP server.
I won’t go into the details of setting up a DHCP server on the network. This topic is covered in the Solaris Installation Guide published by Sun Microsystems for each version of the Solaris 10 operating system.
After you’ve configured the DHCP server, follow these instructions to boot the client:
1. At the ok prompt, set the network-boot-arguments variable:
ok setenv network-boot-arguments dhcp,hostname=<client-name><cr>
The network-boot-arguments variable instructs the OBP to set the following boot arguments:
• dhcp: Instructs the OBP to use the DHCP server to configure the client.
• hostname=<client-name>: Specifies the hostname that you want assigned to the client.
2. Boot the client from the network using the network boot argument variables:
ok boot net - install<cr>
Resetting . . . .
The system begins the boot process and installation over the WAN. If the WAN boot programs do not find all the necessary installation information, the wanboot program prompts you to provide the missing information.
Solaris Live Upgrade
Objective:
• Perform a Live Upgrade installation
Solaris Live Upgrade significantly reduces downtime caused by an operating system upgrade by allowing the system administrator to upgrade the operating system, or install a Flash Archive, while the system is in operation. The Live Upgrade process involves creating a duplicate of the running environment and upgrading that duplicate. The current running environment remains untouched and unaffected by the upgrade. The upgrade does not necessarily need to be a complete OS upgrade; it could simply consist of adding a few OS patches. In addition, you could use Solaris Live Upgrade to clone an active boot environment for purposes other than an OS upgrade. It’s a great way to simply create a backup of the current boot disk.
When the upgrade is complete, the upgrade is activated with the luactivate command and a system reboot. If, after testing, you want to go back to the old operating environment, you can reboot to the old environment anytime.
Solaris Live Upgrade enables you to perform the following tasks on a running system:
• Upgrade the operating system to a new OS release or new patch level. In fact, this is the recommended way to do all patching and OS upgrades.
• Resize the boot disk configuration, such as changing file system types, sizes, and layouts on the new boot environment.
• Maintain numerous boot images, such as images with different patch levels, or a different OS release.
Live Upgrade Requirements
Solaris Live Upgrade is included in the Solaris 10 operating environment. However, you must ensure that the system meets current patch requirements before attempting to install and use the Solaris Live Upgrade software on your system. For the Solaris 10 05/08 release, these patches are listed in the Sun Microsystems info doc 206844, which can be found on Sun’s web-site. You can also locate the list of patches by searching for “Live Upgrade Patch” at http://sunsolve.sun.com.
TIP
An important point about the Live Upgrade software The release of the Live Upgrade software packages must match the release of the OS you are upgrading to. For example, if your current OS is the Solaris 9 release, and you want to upgrade to the Solaris 10 10/08 release, you need to install the Solaris Live Upgrade packages from the Solaris 10 10/08 release. Therefore, you probably will install a more current version of the Solaris Live Upgrade software than what is currently on your system.
Step By Step 8.5 describes the process of installing the required Solaris Live Upgrade packages.
STEP BY STEP
8.5 Installing the Solaris Live Upgrade Packages
1. Insert the CD/DVD from the version of Solaris OS that you will be upgrading to.
2. Remove the existing Live Upgrade packages:
# pkgrm SUNWlucfg SUNWlur SUNWluu<cr>
3. Install the packages in the following order:
# pkgadd -d <path_to_packages> SUNWlucfg SUNWlur SUNWluu<cr>
where <path_to_packages> specifies the absolute path to the software packages on the CD/DVD. Currently (as of the Solaris 10 05/08 release), the Live Upgrade packages are located on CD #2 using the following path:
/cdrom/sol_10_508_sparc_2/Solaris_10/Product
4. Verify that the packages have been installed successfully:

The disk on the new boot environment must be able to serve as a boot device. The disk might need to be prepared with format or fdisk before you create the new boot environment. Check that the disk is formatted properly, and verify that the disk slices are large enough to hold the file systems to be copied.
When you create a new inactive boot environment, the root (/) file system does not need to be on the same physical disk as the currently active root (/) file system, as long as the disk can be used as a boot device. In fact, it’s preferable that the new boot environment be put on a separate disk if your system has one available.
Disk space requirements for the new boot environment vary, depending on which software packages are currently installed and what version of the OS you are upgrading to. Therefore, to estimate the file system size that is needed to create the new boot environment, start the creation of a new boot environment, as described in the upcoming section “Creating a New Boot Environment.” The size is calculated. You can then abort the process.
Solaris Live Upgrade Process
After installing the necessary patches and software packages to support Solaris Live Upgrade, you need to create a new boot environment. Creating the new boot environment involves copying the critical file systems from an active boot environment to the new boot environment. This task is covered in the next section.
After you have created a new boot environment, you perform an upgrade on that boot environment. When upgrading the inactive boot environment, you do not affect the active boot environment. The new files merge with the inactive boot environment critical file systems, but shareable file systems are not changed. The following list describes critical and shareable file systems:
• Critical file systems are required by the Solaris OS. These file systems are separate mount points in the /etc/vfstab file of the active and new (inactive) boot environments. These file systems are always copied from the source to the new boot environment. Critical file systems are sometimes called nonshareable file systems. Examples of critical file systems are root (/), /usr, /var, and /opt.
• Shareable file systems are user-defined files such as /export that contain the same mount point in the /etc/vfstab file in both the active and inactive boot environments. Like a shareable file system, all swap slices are shared by default. Shareable file systems are not copied, but they are shared. Updating shared files in the active boot environment also updates data in the inactive boot environment.
Rather than upgrading the new boot environment, you could install a Flash Archive on the new boot environment. When you install the Solaris Flash Archive, the archive replaces all the files on the existing boot environment as if you performed an initial installation.
The final step in the Live Upgrade process is to activate the new boot environment. Activating a boot environment makes it bootable on the next reboot of the system. You can also switch back quickly to the original boot environment if a failure occurs on booting the newly active boot environment or if you simply want to go back to the older version of the OS.
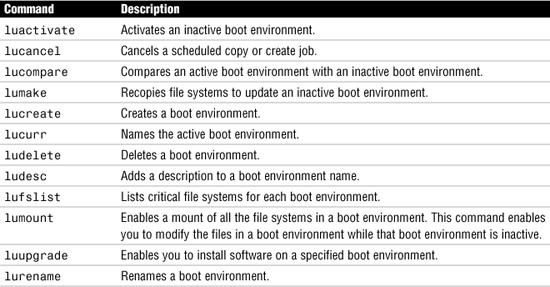
Solaris Live Upgrade is performed from the command line using the commands listed in Table 8.2.
Table 8.2 Solaris Live Upgrade Commands
You can also use the lu command to get into the Live Upgrade utility to perform any of the Live Upgrade functions. A bitmapped terminal is not required; the menu will be displayed on any ASCII terminal. Sun Microsystems no longer recommends the use of the lu utility. Sun recommends that you issue the Live Upgrade commands from the command line, as done in this chapter.
Creating a New Boot Environment
Creating a new, inactive boot environment involves copying critical file systems from the active environment to the new boot environment using the lucreate command. The syntax for the lucreate command is as follows, along with some of its more common options:
lucreate [-A ‘<description>’] [-c <name>] [-x <file>]
-m <mountpoint>:<device>:<ufstype> [-m ...] -n <name>
where:
• -A <description>: (optional) Assigns a description to the boot environment.
• -c <name>: (optional) Assigns a name to the active boot environment. If you do not specify a name, the system assigns one.
• -m <mountpoint>:<device>:<ufstype>: Specifies the /etc/vfstab information for the new boot environment. The file systems that are specified as arguments to -m can be on the same disk, or they can be spread across multiple disks. Use this option as many times as necessary to create the number of file systems that are needed to support the new boot environment.
<mountpoint> can be any valid mount point. A - (hyphen) indicates a swap partition. <device> can be any of the following:
• The name of a disk device
• An SVM volume (such as /dev/md/dsk/<devicename>)
• A Veritas volume (such as /dev/md/vxfs/dsk/<devicename>)
• The keyword merged can be used in the <device> field, indicating that the file system at the specified mount point is to be merged with its parent.
<ufstype> can be one or more of the following keywords: ufs, xvfs, preserve, mirror, attach, detach, swap.
• -n <name>: The name of the boot environment to be created. The name must be unique for the system.
• -x <file>: (optional) Excludes the file or directory from the new boot environment.
First, you need to select an unused disk slice where the new boot environment will be created. It must be on a bootable disk drive. If a slice is not available, you need to create one. If your system has only a single disk, you can still perform a Solaris Live Upgrade, but you need enough space on the disk to create an empty slice large enough to hold the new boot environment.
In Solaris 10 10/08, for a bootable ZFS root pool, the disks in the pool must contain slices. The simplest configuration is to put the entire disk capacity in slice 0 and then use that slice for the root pool. This process is described later in this section. Migrating a UFS root (/) file system to a ZFS root pool is beyond the scope of this chapter. Refer to “Solaris 10 10/08 Installation Guide: Solaris Live Upgrade and Upgrade Planning” for information on migrating from a UFS file system to a ZFS root pool.
Every system configuration varies, so covering all the possible various disk scenarios is not possible. For simplicity, and to cover the topics that you will encounter on the exam, I’ll describe a very common configuration.
In my example, I have a system with two 36GB hard drives: c0t0d0 and c0t1d0. The current boot drive is c0t0d0, and I want to upgrade the OS to Solaris 10 05/08.
To create the new boot environment on c0t1d0, I’ll use the lucreate command:
# lucreate -A ‘My first boot environment’ -c active_boot -m
/:/dev/dsk/c0t1d0s0:ufs -n new_BE <cr>
Several lines of output are displayed as the new boot environment is being created and copied. The following messages appear when the operation is complete:
<output truncated>
Population of boot environment <new_BE> successful.
Creation of boot environment <new_BE> successful.
#
The previous command created a new boot environment with the following characteristics:
• The description of the new boot environment is “My first boot environment.”
• The current (Active) boot environment is named “active_boot.”
• A file system is created on the secondary disk (c0t1d0) for root (/).
• The new boot environment is named “new_BE.”
Optionally, I could create a new boot environment where root (/) and /usr are split into two separate file systems. To split the root (/) file system into two file systems, issue the following command:
# lucreate -A ‘My first boot environment’ -c active_boot -m
/:/dev/dsk/c0t1d0s0:ufs -m /usr:/dev/dsk/c0t1d0s3:ufs -n new_BE<cr>
In the previous examples, swap slices are shared between boot environments. Because I did not specify swap with the -m option, the current and new boot environment share the same swap slice. In the following example, I’ll use the -m option to add a swap slice in the new boot environment, which is recommended:
# lucreate -A ‘My first boot environment’ -c active_boot -m
/:/dev/dsk/c0t1d0s0:ufs -m -:/dev/dsk/c0t1d0s1:swap -n new_BE<cr>
If you want a shareable file system to be copied to the new boot environment, specify the mount point of the file system to be copied using the -m option. Otherwise, shareable file systems are shared by default, and they maintain the same mount point in the /etc/vfstab file. Any change or update made to the shareable file system is available to both boot environments. For example, to copy the /data file system to the new boot environment, issue the following command:
# lucreate -A ‘My first boot environment’ -c active_boot -m
/:/dev/dsk/c0t1d0s0:ufs -m /data:/dev/dsk/c0t1d0s4:ufs -n new_BE<cr>
You can also create a new boot environment and merge file systems in the new BE. For example, in the current boot environment (active_boot) we have root (/), /usr and /opt. The /opt file system is combined with its parent file system /usr. The new boot environment is name new_BE. The command to create this new boot environment is as follows:
# lucreate -A ‘My first boot environment’ -c active_boot -m
/:/dev/dsk/c0t1d0s0:ufs -m /usr:/dev/dsk/c0t1d0s1:ufs
-m /usr/opt:merged:ufs -n new_BE<cr>
In some cases, you might want to create an empty boot environment. When you use the lucreate command with the -s - option, lucreate creates an empty boot environment. The slices are reserved for the file systems that are specified, but no file systems are copied. The boot environment is named, but it is not actually created until it is installed with a Solaris Flash Archive. The following example creates an empty boot environment:
# lucreate -A ‘My first boot environment’ -s - -c active_boot -m
/:/dev/dsk/c0t1d0s0:ufs -n new_BE<cr>
If you are running Solaris 10 10/08 and are currently using a ZFS root pool, you can either create a new ZFS boot environment within the same root pool or create the new boot environment on a new root pool. The quickest method is to create a new boot environment with the same ZFS root pool. The lucreate command creates a snapshot from the source boot environment, and then a clone is built from the snapshot. The amount of space required varies; it depends on how many files are replaced as part of the upgrade process.
To create a new boot environment within the same root pool, issue the following command:
# lucreate -c current_zfsBE -n new_zfsBE<cr>
The system displays the following output (the entire process took less than a minute):
Analyzing system configuration.
No name for current boot environment.
Current boot environment is named <current_zfsBE>.
Creating initial configuration for primary boot environment
<current_zfsBE>.
The device </dev/dsk/c1t0d0s0> is not a root device for any boot
environment; cannot get BE ID.
PBE configuration successful: PBE name <current_zfsBE> PBE Boot Device
</dev/dsk/c1t0d0s0>.
Comparing source boot environment <current_zfsBE> file systems with the
file system(s) you specified for the new boot environment. Determining
which file systems should be in the new boot environment.
Updating boot environment description database on all BEs.
Updating system configuration files.
Creating configuration for boot environment <new_zfsBE>.
Source boot environment is <current_zfsBE>.
Creating boot environment <new_zfsBE>.
Cloning file systems from boot environment <current_zfsBE> to create boot
environment <new_zfsBE>.
Creating snapshot for <rpool/ROOT/s10s_u6wos_07b> on
<rpool/ROOT/s10s_u6wos_07b@new_zfsBE>.
Creating clone for <rpool/ROOT/s10s_u6wos_07b@new_zfsBE> on
<rpool/ROOT/new_zfsBE>.
Setting canmount=noauto for </> in zone <global> on
<rpool/ROOT/new_zfsBE>.
Creating snapshot for <rpool/ROOT/s10s_u6wos_07b/var> on
<rpool/ROOT/s10s_u6wos_07b/var@new_zfsBE>.
Creating clone for <rpool/ROOT/s10s_u6wos_07b/var@new_zfsBE> on
<rpool/ROOT/new_zfsBE/var>.
Setting canmount=noauto for </var> in zone <global> on <rpool/ROOT/
new_zfsBE/var>.
Population of boot environment <new_zfsBE> successful.
Creation of boot environment <new_zfsBE> successful
#
A second option when creating a new boot environment from a ZFS root pool is to create the new boot environment on another root pool. You need to be aware of a few requirements for the new root pool:
• The ZFS storage pool must be created with slices rather than whole disks. The pool must have an SMI label. An EFI-labeled disk cannot be booted.
• On the x86 platform only, the ZFS pool must be in a slice with an fdisk partition.
• If you mirror the boot disk later, make sure you specify a bootable slice and not the whole disk, because the latter may try to install an EFI label.
• You cannot use a RAID-Z configuration for a root pool. Only single-disk pools or pools with mirrored disks are supported. You will see the following message if you attempt to use an unsupported pool for the root pool:
ERROR: ZFS pool <pool-name> does not support boot environments
The process of creating a new boot environment on another root pool is described in Step By Step 8.6.
STEP BY STEP
8.6 Creating a New Boot Environment in Another Root Pool
1. Create a new ZFS pool on a slice located on a secondary disk. You must create the root pool on a disk slice. For the example, I’ll be performing the steps on an x86-based Solaris system. I’ve already used the format command to put the entire disk capacity of c1d1 in slice 0. I’ll use that slice when I create the root pool:
# zpool create rpool2 c1d1s0<cr>
Creating a ZFS pool is described in Chapter 9, “Administering ZFS File Systems.”
2. Create the new boot environment on rpool2:
# lucreate -n new_zfsBE -p rpool2<cr>
The new boot environment is named new_zfsBE. Because I didn’t use the -c option to name the current boot environment, it is given a default name, as shown in the following output:
Checking GRUB menu...
Analyzing system configuration.
No name for current boot environment.
INFORMATION: The current boot environment is not named - assigning name
<s10x_u6wos_07b>.
Current boot environment is named <s10x_u6wos_07b>.
Creating initial configuration for primary boot environment
<s10x_u6wos_07b>.
The device </dev/dsk/c0d0s0> is not a root device for any boot
environment; cannot get BE ID.
PBE configuration successful: PBE name <s10x_u6wos_07b> PBE Boot Device
</dev/dsk/c0d0s0>.
Comparing source boot environment <s10x_u6wos_07b> file systems with the
file system(s) you specified for the new boot environment. Determining
which file systems should be in the new boot environment.
Updating boot environment description database on all BEs.
Updating system configuration files.
The device </dev/dsk/c1d1s0> is not a root device for any boot
environment; cannot get BE ID.
Creating configuration for boot environment <new_xfsBE>.
Source boot environment is <s10x_u6wos_07b>.
Creating boot environment <new_xfsBE>.
Creating file systems on boot environment <new_xfsBE>.
Creating <zfs> file system for </> in zone <global> on
<rpool2/ROOT/new_xfsBE>. Creating <zfs> file system for </var> in zone
<global> on <rpool2/ROOT/new_xfsBE/var>.
Populating file systems on boot environment <new_xfsBE>.
Checking selection integrity.
Integrity check OK.
Populating contents of mount point </>.
Populating contents of mount point </var>.
Copying.
Creating shared file system mount points.
Copying root of zone <testzone>.
zoneadm: zone 'testzone': illegal UUID value specified
Copying root of zone <testzone2>.
Creating compare databases for boot environment <new_xfsBE>.
Creating compare database for file system </var>.
Creating compare database for file system </rpool2/ROOT>.
Creating compare database for file system </>.
Updating compare databases on boot environment <new_xfsBE>.
Making boot environment <new_xfsBE> bootable.
Updating bootenv.rc on ABE <new_xfsBE>.
File </boot/grub/menu.lst> propagation successful
Copied GRUB menu from PBE to ABE
No entry for BE <new_xfsBE> in GRUB menu
Population of boot environment <new_xfsBE> successful.
Creation of boot environment <new_xfsBE> successful.
#
You have several other options when creating a new boot environment:
• Creating a boot environment from a different source (other than the active boot environment)
• Merging file systems in the new boot environment
• Reconfiguring swap in the new boot environment
• Creating a boot environment with RAID-1 (mirrored) volumes
• Migrating a UFS root (/) file system to a ZFS root pool
NOTE
Creating a boot environment Refer to the Sun Microsystems “Solaris 10 5/08 Installation Guide: Solaris Live Upgrade and Upgrade Planning” for more information.
Displaying the Status of the New Boot Environment
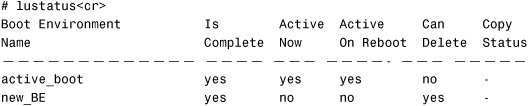
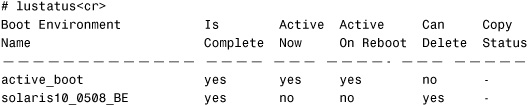
Verify the status of the new boot environment using the lustatus command:

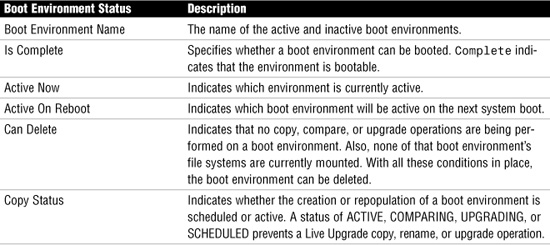
Table 8.3 describes the columns of information that are displayed.
Table 8.3 lustatus Information
At this point, the new boot environment is set up. You can even test it by booting to c0t1d0 from the OBP.
Upgrading the New Boot Environment
After creating the new boot environment, you will use the luupgrade command to upgrade the new boot environment.
The luupgrade command enables you to install software in a specified boot environment. Specifically, luupgrade performs the following functions:
• Upgrades an operating system image on a boot environment. The source of the image can be any valid Solaris installation medium.
• Runs an installer program to install software from an installation medium.
• Extracts a Solaris Flash Archive onto a boot environment.
• Adds or removes a package to or from a boot environment.
• Adds or removes a patch to or from a boot environment.
• Checks or obtains information about software packages.
• Checks an operating system installation medium.
The syntax is
luupgrade [-iIufpPtTcC] [<options>]
where the options are as follows:
• -l <logfile>: Error and status messages are sent to <logfile>, in addition to where they are sent in your current environment.
• -o <outfile>: All command output is sent to <outfile>, in addition to where it is sent in your current environment.
• -N: Dry-run mode. Enables you to determine whether your command arguments are correctly formed.
• -X: Enables XML output.
• -f: Extracts a Soloris Flash Archive onto a Boot Environment.
The following luupgrade options apply when you’re upgrading an operating system:
• -u: Upgrades an OS.
• -n <BE_name>: Specifies the name of the boot environment to receive the OS upgrade.
• -s <os_path>: Specifies the pathname of a directory containing an OS image. This can be a directory, CD-ROM, or an NFS mount point.
The following luupgrade options apply when you’re upgrading from a Solaris Flash Archive:
• -n <BE_name>: Specifies the name of the boot environment to receive the OS upgrade.
• -s <os_path>: Specifies the pathname of a directory containing an OS image. This can be a directory on an installation medium such as a CD-ROM, or it can be an NFS or UFS directory.
• -a <archive>: Specifies the path to the Flash Archive.
The following luupgrade options apply when you add or remove software packages:
• -p: Adds software packages.
• -P: Removes software packages.
• -n <BE_name>: Specifies the name of the boot environment to receive the OS upgrade.
• -s <pkgs_path>: Specifies the pathname of a directory containing software packages to add.
• -O: Used to pass options to the pkgadd and pkgrm commands.
I’ll describe how to upgrade the new boot environment using both a Solaris CD/DVD (Step By Step 8.7) and a Flash Archive (Step By Step 8.8).
In the first example, I have a Solaris x86-based system with two disk drives and running Solaris 10 release 08/07. I’ve created the new boot environment, which is as follows:
Step By Step 8.7 describes how to update the new boot environment named new_BE on c0d1. In the example, I’ll update the system to Solaris 10 release 05/08 from the local DVD. I’ve already installed the Live Upgrade packages and patches from the Solaris 10 05/08 release as described earlier in this chapter.
STEP BY STEP
8.7 Performing a Solaris Live Upgrade from a Local DVD
1. Insert the Solaris 10 05/08 DVD into the DVD-ROM.
2. Issue the luupgrade command:
# luupgrade -u -n new_BE -s /cdrom/cdrom0<cr>
Several lines of output are displayed as the new boot environment is being upgraded. The following messages are displayed when the operation is complete:
Upgrading Solaris: 100% completed
...<output has been truncated>
The Solaris upgrade of the boot environment <new_BE> is complete.
Installing failsafe Failsafe install is complete
#
When using Live Upgrade to install a Flash Archive, use the lucreate command with the -s option, as described earlier in this chapter. When the empty boot environment is complete, a Flash Archive can be installed on the boot environment, as described in Step By Step 8.8.
STEP BY STEP
8.8 Upgrading from a Flash Archive from a DVD
1. Insert the Solaris 10 05/08 DVD into the DVD-ROM.
2. Issue the luupgrade command:
# luupgrade -f -n new_BE -s /cdrom/cdrom0 -a /export/home/flash.flar<cr>
where -a /export/home/flash.flar is the name of the Flash Archive.
Several lines of output are displayed as the new boot environment is being upgraded. The following messages are displayed when the operation is complete:
<output has been truncated> Upgrading Solaris: 100% completed
...<output has been truncated>
The Solaris upgrade of the boot environment <new_BE> is complete. Installing failsafe Failsafe install is complete
#
Activating the New Boot Environment
Activating the upgraded boot environment with the luactivate command will make it bootable at the next reboot. In addition, you can use the luactivate command to switch back to the old boot environment if necessary. To activate a boot environment, the following requirements must be met:
• The boot environment must have a status of “complete.”
• If the boot environment is not the current boot environment, you cannot have mounted the partitions of that boot environment using the luumount or mount commands.
• The boot environment that you want to activate cannot be involved in a comparison operation (lucompare).
• If you want to reconfigure swap, make this change prior to booting the inactive boot environment. By default, all boot environments share the same swap devices.
In the previous section, I upgraded the OS on an x86/x64-based system. Before I activate the new boot environment, I’ll check the status again:
![]()
The status shows “Complete,” so I’m ready to issue the luactivate command. The syntax for the luactivate command is as follows:
# luactivate [-s] [-l] [-o] < new_BE ><cr>
where:
• <new_BE>: Specifies the name of the upgraded boot environment you want to activate.
• -o <out_file>: All output is sent to the <out_file> file in addition to your current environment.
• -l <errlog>: Error and status messages are sent to the <errlog> file in addition to your current environment.
• -s: Forces a synchronization of files between the last-active boot environment and the new boot environment. The first time a boot environment is activated, the files between the boot environments are synchronized. With subsequent activations, the files are not synchronized unless you use the -s option. “Synchronize” means that certain critical system files and directories are copied from the last-active boot environment to the boot environment being booted.
The luactivate command performs the following tasks:
• The first time you boot to a new boot environment (BE), the Solaris Live Upgrade software synchronizes this BE with the BE that was last active.
• If luactivate detects conflicts between files that are subject to synchronization, it issues a warning and does not perform the synchronization for those files. However, activation can still complete successfully, in spite of such a conflict. A conflict can occur if you make changes to the same file on both the new boot environment and the active boot environment. For example, you make changes to the /etc/vfstab file in the original boot environment. Then you make other changes to the /etc/vfstab file in the new boot environment. The synchronization process cannot choose which file to copy for the synchronization.
• luactivate checks to see whether upgrade problems occurred. For example, important software packages might be missing. This package check is done for the global zone as well as all nonglobal zones inside the BE. The command can issue a warning or, if a BE is incomplete, can refuse to activate the BE.
• On a SPARC system, luactivate determines whether the bootstrap program requires updating and takes steps to update if necessary. If a bootstrap program changed from one operating release to another, an incorrect bootstrap program might render an upgraded BE unbootable.
• luactivate modifies the root partition ID on a Solaris x86/x64-based disk to enable multiple BEs to reside on a single disk. In this configuration, if you do not run luactivate, booting of the BE will fail.
luactivate on the x86/x64 Platform
To activate the upgraded boot environment on the x86/x64-based platform, issue the luactivate command:
# luactivate -s new_BE<cr>
The system displays the steps to be taken for fallback in case problems are encountered on the next reboot. Make note of these instructions, and follow them exactly if it becomes necessary to fall back to the previous boot environment:
System has findroot enabled GRUB
Generating boot-sign, partition and slice information for PBE <active_BE>
A Live Upgrade Sync operation will be performed on startup of boot
environment <new_BE>.
Generating boot-sign for ABE <new_BE>
Generating partition and slice information for ABE <new_BE>
Boot menu exists.
Generating multiboot menu entries for PBE.
Generating multiboot menu entries for ABE.
Disabling splashimage
Re-enabling splashimage
No more bootadm entries. Deletion of bootadm entries is complete.
GRUB menu default setting is unaffected
Done eliding bootadm entries.
**********************************************************************
The target boot environment has been activated. It will be used when you reboot. NOTE: You MUST NOT USE the reboot, halt, or uadmin commands. You MUST USE either the init or the shutdown command when you reboot. If you do not use either init or shutdown, the system will not boot using the target BE.
**********************************************************************
In case of a failure while booting to the target BE, the following process needs to be followed to fallback to the currently working boot environment:
1. Boot from the Solaris failsafe or boot in Single User mode from Solaris Install CD or Network.
2. Mount the Parent boot environment root slice to some directory (like /mnt). You can use the following command to mount:
mount -Fufs /dev/dsk/c0d0s0 /mnt
3. Run <luactivate> utility with out any arguments from the Parent boot environment root slice, as shown below:
/mnt/sbin/luactivate
4. luactivate, activates the previous working boot environment and indicates the result.
5. Exit Single User mode and reboot the machine.
**********************************************************************
Modifying boot archive service
Propagating findroot GRUB for menu conversion.
File </etc/lu/installgrub.findroot> propagation successful
File </etc/lu/stage1.findroot> propagation successful
File </etc/lu/stage2.findroot> propagation successful
File </etc/lu/GRUB_capability> propagation successful
Deleting stale GRUB loader from all BEs.
File </etc/lu/installgrub.latest> deletion successful
File </etc/lu/stage1.latest> deletion successful
File </etc/lu/stage2.latest> deletion successful
Activation of boot environment <new_BE> successful.
In addition, when you activate a boot environment on an x86/x64-based system, the luactivate command modifies the menu.lst file (GRUB boot menu), as shown in Figure 8.1.
FIGURE 8.1 Modifying the menu.lst file.
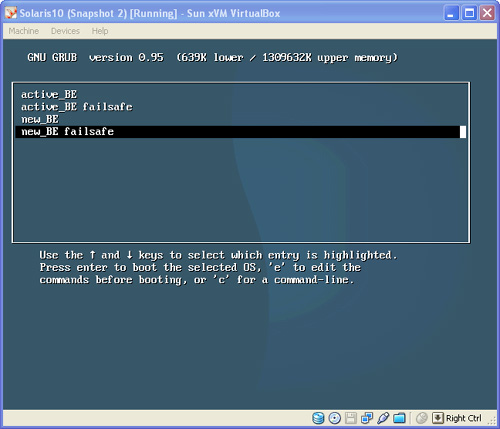
The next time you boot, you can choose the boot environment directly from the GRUB menu without using the luactivate command. However, when you switch between boot environments with the GRUB menu, files are not synchronized. If a boot environment was created with the Solaris 8, 9, or 10 3/05 release, the boot environment must always be activated with the luactivate command. These older boot environments do not appear on the GRUB menu.
Keep in mind a couple cautions when using the GRUB menu to boot to an alternate boot environment:
• The GRUB menu is stored on the primary boot disk, not necessarily on the active boot environment disk. Be careful if you change the disk order in the BIOS. Changing the order might cause the GRUB menu to become invalid. If this problem occurs, changing the disk order back to the original state fixes the GRUB menu.
• The menu.lst file contains the information that is displayed in the GRUB menu. Do not use the GRUB menu.lst file to modify Solaris Live Upgrade entries. Modifications could cause Solaris Live Upgrade to fail. The preferred method for customization is to use the eeprom command when possible.
For more information on booting x86/x64-based systems and the GRUB menu, refer to Solaris 10 System Administration Exam Prep (Exam CX-310-200), Part I.
After you run the luactivate command on an x86/x64-based system and then shut down for a reboot, you must use the shutdown or init command. This is necessary only when you’re performing the first reboot after running the lucreate command. The reboot, halt, and uadmin commands do not switch boot environments, and the system boots to the last-active boot environment.
luactivate on the SPARC Platform
To activate the upgraded boot environment on the SPARC platform, issue the following command:
# luactivate new_BE<cr>
The system displays the steps to be taken for fallback in case problems are encountered on the next reboot. Make note of these instructions, and follow them exactly if it becomes necessary to fall back to the previous boot environment:
****************************************************************
The target boot environment has been activated. It will be used when you reboot. NOTE: You MUST NOT USE the reboot, halt, or uadmin commands. You MUST USE either the init or the shutdown command when you reboot. If you do not use either init or shutdown, the system will not boot using the target BE.
****************************************************************
In case of a failure while booting to the target BE, the following process needs to be followed to fallback to the currently working boot environment:
1. Enter the PROM monitor (ok prompt).
2. Change the boot device back to the original boot environment by typing: setenv boot-device /pci@1f,0/pci@1/scsi@8/disk@0,0:a
3. Boot to the original boot environment by typing: boot
****************************************************************
Activation of boot environment <new_BE> successful.
#
After running the luactivate command on a SPARC system, when you shut down for a reboot, you must use the shutdown or init command. This is because it’s important to run the shutdown scripts necessary to perform the upgrade. The reboot and halt commands do not switch boot environments, and the system boots to the last-active boot environment.
During the first boot of a new boot environment, data is copied from the source boot environment. This list of files copied is maintained in /etc/lu/synclist.
Verify that the OS has been upgraded to the Solaris 10 /05/08 release with the following command:
# cat /etc/release<cr>
Solaris 10 5/08 s10s_u5wos_10 SPARC
Copyright 2008 Sun Microsystems, Inc. All Rights Reserved.
Use is subject to license terms.
Assembled 24 March 2008
Maintaining Solaris Live Upgrade Boot Environments
You can perform various administrative tasks on an inactive boot environment:
• Adding and removing packages for an OS installed on a new boot environment
• Removing patches on an OS installed on a boot environment
• Adding patches to an OS installed on a new boot environment
• Updating the contents of a previously configured boot environment
• Checking for differences between the active boot environment and other boot environments
• Deleting an inactive boot environment
• Changing the name or description of a boot environment
• Viewing the configuration of a boot environment
These administrative tasks are described in the following sections.
Removing Software Packages from a Boot Environment
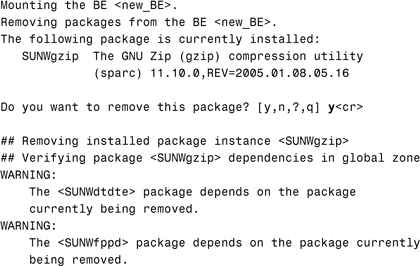
The following example uses the luupgrade command with the -P option to remove the SUNWgzip software package from the OS image on an inactive boot environment named new_BE:
# luupgrade -P -n new_BE SUNWgzip<cr>
where:
• -P: Used to remove the named software packages from the boot environment.
• -n <BE_name>: Specifies the name of the boot environment where the package is to be removed.
The system responds with the following output:

Adding Software Packages from a Boot Environment
The following example uses the luupgrade command with the -p option to add the SUNWgzip software package to the OS image on an inactive boot environment named new_BE:
# luupgrade -p -n new_BE -s /cdrom/sol_10_508_sparc_2/Solaris_10/Product SUNWgzip<cr>
where:
• -p: Used to add the named software packages from the boot environment.
• -s <path-to-pkg>: Specifies the path to a directory containing the package or packages to be installed.
• -n <BE_name>: Specifies the name of the boot environment where the package is to be added.
The system responds with the following output:
Validating the contents of the media </cdrom/sol_10_508_sparc_2/Solaris_10/Product>.
Mounting the BE <new_BE>.
Adding packages to the BE <new_BE>.
Processing package instance <SUNWgzip> from
</cdrom/sol_10_508_sparc_2/Solaris_10/Product>
The GNU Zip (gzip) compression utility(sparc) 11.10.0,REV=2005.01.08.05.16
Copyright 1992-1993 Jean-loup Gailly
This program is free software; you can redistribute it and/or modify
it under the terms of the GNU General Public License as published by
the Free Software Foundation; either version 2, or (at your option)
any later version.
This program is distributed in the hope that it will be useful,
but WITHOUT ANY WARRANTY; without even the implied warranty of
MERCHANTABILITY or FITNESS FOR A PARTICULAR PURPOSE. See the
GNU General Public License for more details.
You should have received a copy of the GNU General Public License
along with this program; if not, write to the Free Software
Foundation, Inc., 675 Mass Ave, Cambridge, MA 02139, USA.
Using </a> as the package base directory.
## Processing package information.
## Processing system information.
2 package pathnames are already properly installed.
## Verifying package dependencies.
## Verifying disk space requirements.
## Checking for conflicts with packages already installed.
## Checking for setuid/setgid programs.
This package contains scripts which will be executed with super-user
permission during the process of installing this package.
Do you want to continue with the installation of <SUNWgzip> [y,n,?] y<cr>
Installing The GNU Zip (gzip) compression utility as <SUNWgzip>
## Installing part 1 of 1.
160 blocks
Installation of <SUNWgzip> was successful.
Unmounting the BE <new_BE>.
The package add to the BE <new_BE> completed.
#
Removing Patches on an OS Installed on a Boot Environment
The following example uses the luupgrade command to remove a software patch named 119317-01 from the OS image on an inactive boot environment named new_BE:
# luupgrade -T -n new_BE 119317-01<cr>
where -T is used to remove a patch from the named boot environment.
Adding Patches to an OS Installed on a New Boot Environment
The following example uses the luupgrade command to add a software patch named 11931701 to the OS image on an inactive boot environment named new_BE:
# luupgrade -t -n 'new_BE' -s /tmp/119317-01 119317-01<c>r>
where:
• -t: Adds a patch or patches to an inactive boot environment.
• -s: Specifies the path to the directory containing the patch.
Other tasks, such as updating an existing boot environment and checking for differences between boot environments, are beyond the scope of the CX-310-202 exam and this book. If you would like more information on these topics, refer to Sun Microsystems’ Solaris 10 5/08 Installation Guide.
Deleting an Inactive Boot Environment
Use the ludelete command to delete an inactive boot environment. The following limitations apply to the ludelete command:
• You cannot delete the active boot environment or the boot environment that is activated on the next reboot.
• You cannot delete a boot environment that has file systems mounted with lumount.
• You can only delete a boot environment that has a status of complete.
• x86/x64-based systems: Starting with the Solaris 10 1/06 release, you cannot delete a boot environment that contains the active GRUB menu.
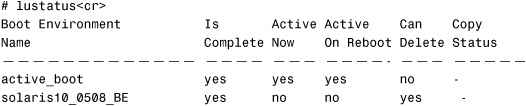
The following boot environments are available on the system:

Notice that the “Can Delete” field is marked yes for the new_BE boot environment. To remove the new_BE boot environment, issue the following command:
# ludelete new_BE<cr>
The system responds with this:
Determining the devices to be marked free.
Updating boot environment configuration database.
Updating boot environment description database on all BEs.
Updating all boot environment configuration databases.
Boot environment <new_BE> deleted.
#
Changing the Name of a Boot Environment
You can rename a boot environment using the lurename command. In the following example, I rename the boot environment from new_BE to solaris10_0508_BE:
# lurename -e new_BE -n solaris10_0508_BE<cr>
where:
• -e <name>: Specifies the inactive boot environment name to be changed.
• -n <newname>: Specifies the new name of the inactive boot environment.
The system responds with this:
Renaming boot environment <new_BE> to <solaris10_0508_BE>.
Changing the name of BE in the BE definition file.
Changing the name of BE in configuration file.
Updating compare databases on boot environment <solaris10_0508_BE>.
Changing the name of BE in Internal Configuration Files.
Propagating the boot environment name change to all BEs.
Boot environment <new_BE> renamed to <solaris10_0508_BE>.
#
Verify that the name was changed with the lustatus command:
Changing the Description of a Boot Environment1
It’s a good idea to have a description associated with each boot environment on your system. You can create a description when you create the boot environment using the lucreate -A option or after the boot environment has been created using the ludesc command.
In the following example, I add a description to an existing boot environment:
# ludesc -n solaris10_0508_BE “Solaris 10 05/08 upgrade”<cr>
where -n <BEname> specifies the boot environment name, followed by the description enclosed in double quotes (“ ”).
The system responds with this:
I can view the description by using the ludesc command with the -n option followed by the boot environment’s name:
# ludesc -n solaris10_0508_BE<cr>
The system responds with this:
.Solaris 10 05/08 upgrade.#
In the output, ludesc does not append a newline to the display of the BE description text string.
Viewing the Configuration of a Boot Environment
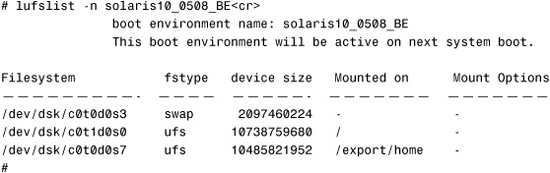
Use the lufslist command to display the configuration of a particular boot environment. Where the lustatus command is used to display the status of a boot environment, the lufslist command displays the disk slice, file system type, and file system size of each boot environment mount point:
# lufslist -n solaris10_0508_BE<cr> boot environment name: solaris10_0508_BE This boot environment will be active on next system boot.
Summary
This chapter has described how to configure a WAN boot installation and perform a Solaris Live Upgrade installation.
You read about how to use a WAN boot installation to install the operating system securely and insecurely over a WAN and how to use a Solaris Live Upgrade to copy and update an existing OS.
For the certification exam, you need to understand the advantages of a WAN boot installation over other methods used to install the OS. Understand the requirements for a WAN boot installation, and know which types of media you can use with a WAN boot install. Finally, know how to perform a WAN boot installation. Go back and perform the steps I’ve outlined in this chapter to become familiar with the process and the files that are associated with a WAN boot installation.
For the Solaris Live Upgrade portion of the certification exam, you should know the system requirements and the various Live Upgrade commands described in this chapter. Understand the use and, in some cases, limitations associated with each command.
The next chapter describes ZFS file systems and how they’ve revolutionized disk storage. As of the Solaris 10 05/08 release, Solaris Live Upgrade cannot be performed on a ZFS file system. New in the Solaris 10 10/08 release, administrators can migrate from a UFS file system to a ZFS file system during a Solaris Live Upgrade.
Key Terms
• Boot environment
• bootlog-cgi
• CGI
• DES
• DHCP
• Document root directory
• Encryption
• Fallback
• Flash Archive
• GRUB
• Hashing
• HMAC
• HTTPS
• Key
• SHA1
• Solaris Live Upgrade
• SSL
• sysidcfg file
• URL
• WAN
• wanboot-cgi
• wanboot.conf
• WAN boot installation
• WAN boot miniroot
• wanboot program
• WAN boot server
Apply Your Knowledge
Exercises
Perform Step By Steps 8.2, 8.3, and 8.7.
Exam Questions
• 1. Which of the following describe the advantages of a WAN boot installation over a JumpStart installation? (Choose four.)
A. Boot services are not required to be on the same subnet as the installation client.
• B. A WAN boot installation is more secure than a custom JumpStart installation.
• C. A WAN boot provides a scalable process for the automated installation of systems.
• D. A WAN boot supports all SPARC-based systems.
• E. A WAN boot supports all x86-based systems.
2. Before you can perform a WAN boot installation, you need to make sure that the WAN boot client meets the minimum requirements for a WAN boot installation. Which of the following are requirements that your system must meet before it can be used as a client in a WAN boot installation? (Choose two.)
• A. A minimum OpenBoot firmware version of 4.14
• B. The WAN boot client must have a minimum of 512MB of RAM.
• C. The WAN boot client must have a SPARC II processor or newer.
• D. x86 systems must support a PXE boot.
3. Before you can perform a WAN boot installation, you need to make sure that your server meets the minimum requirements for a WAN boot installation. Which of the following are requirements that your server must meet before it can be used as a WAN boot server?
• A. The WAN boot server must be a SPARC or x86-based system running Solaris 9 release 12/03 or higher.
• B. The WAN boot server must be a SPARC system running Solaris 9 release 12/03 or higher.
• C. The WAN boot server must be a SPARC or x86-based system running Solaris 10 or higher.
• D. A WAN boot requires a web server to be configured, and it must support SSL version 3.
4. Which of the following is a second-level boot program that is used to load the miniroot, installation, and configuration files onto the WAN boot client?
• A. ufsboot
• B. wanboot-cgi
• C. bootlog-cgi
• D. wanboot program
• E. wan boot miniroot
5. OpenBoot uses configuration information to communicate with this program on the WAN boot server and request a download of the wanboot program from the server. Which of the following services all WAN boot client requests and parses the WAN boot server files and client configuration files into a format that the WAN boot client expects?
• A. wanboot program
• B. wanboot-cgi
• C. bootlog-cgi
• D. HTTP
6. On the WAN boot server, where does the wanboot program reside?
• A. In an NFS shared (exported) directory on the WAN boot server
• B. Either in an NFS shared (exported) directory on the WAN boot server or on the client’s local CD or DVD
• C. In the WAN boot server’s document root directory
• D. In /etc/netboot on the WAN boot server
7. Which of the following is a file in which you specify the configuration information and security settings (file paths, encryption type, signing policies) that are required to perform a WAN boot installation?
• A. wanboot
• B. wanboot.conf
• C. bootlog.conf
• D. /etc/netboot
8. Which of the following can be used to supply the operating system during a WAN boot installation?
• A. Local CD/DVD
• B. A spooled image of the DVD or CDs
• C. Flash Archive
• D. Any image supported by JumpStart is also supported by WAN boot.
9. Which commands (issued on the WAN boot client) can be used to initiate the WAN boot installation? (Choose two.)
• A. ok boot net - install
• B. ok boot cdrom -o prompt -F wanboot - install
• C. ok boot net - wanboot
• D. ok boot net
• E. ok boot -F wanboot - install
10. In terms of a Solaris Live Upgrade, which of the following are examples of shareable file systems? (Choose two.)
• A. /
• B. /usr
• C. swap
• D. /export
11. Which of the following are requirements for performing a Solaris Live Upgrade? (Choose two.)
• A. Ensure that the system meets current patch requirements.
• B. The release of the Live Upgrade software packages must match the release of the OS you are upgrading to.
• C. Only SPARC-based systems can use Solaris Live Upgrade.
• D. The root (/) file system of the new inactive boot environment must be on the same physical disk as the currently active root (/) file system.
12. Creating a new, inactive boot environment involves copying critical file systems from the active environment to the new boot environment. Which command is used to accomplish this?
• A. luactivate
• B. lumake
• C. lucopy
• D. lucreate
• E. luupgrade
Answers to Exam Questions
1. A, B, C, D. All the answers describe advantages of a WAN boot installation over a JumpStart installation except answer E. x86/x64-based systems cannot be installed using a WAN boot installation. For more information, see the section “Introduction to WAN Boot.”
2. B, C. Although it’s best if the WAN boot client system’s OpenBoot PROM (OBP) supports WAN boot, it is not a requirement. You can still perform a WAN boot installation by utilizing WAN boot programs from a local CD/DVD. The WAN boot client must have a minimum of 512MB of RAM, and the WAN boot client must have a SPARC II processor or newer. x86/x64-based systems cannot be installed using a WAN boot installation. For more information, see the section “WAN Boot Requirements.”
3. A. The WAN boot server must be running Solaris 9 release 12/03 or higher, it must be configured as a web server, and it must support HTTP 1.1 minimum. The server can be a SPARC or x86-based system. For more information, see the section “WAN Boot Requirements.”
4. D. The wanboot program is a second-level boot program that is used to load the miniroot, installation, and configuration files onto the WAN boot client. The wanboot program performs tasks similar to those that are performed by the ufsboot or inetboot second-level boot programs. For more information, see the section “Understanding the WAN Boot Process.”
5. B. When the WAN boot client is booted, OpenBoot uses configuration information to communicate with the wanboot-cgi program on the WAN boot server and to request a download of the wanboot program from the server. wanboot-cgi is a Common Gateway Interface (CGI) program on the web server that services all client requests. It parses the WAN boot server files and client configuration files into a format that the WAN boot client expects. For more information, see the section “Understanding the WAN Boot Process.”
6. C. The files necessary to perform a WAN boot must be made accessible to the web server by storing them in the WAN boot server’s document root directory. For more information, see the section “Configure the WAN Boot and JumpStart Files.”
7. B. The wanboot.conf file is a text file in which you specify the configuration information and security settings that are required to perform a WAN boot installation. For more information, see the section “The wanboot.conf File.”
8. C. Traditional JumpStart images, such as a spooled image of the CD/DVD that performed a pkgadd-style install, or a local DVD/CD, do not work with WAN boot. Flash Archives are the only format supported. For more information, see the section “WAN Boot Requirements.”
9. A, B. When the OBP supports WAN boot, you use the boot net - install command to boot the WAN boot client. If the OBP does not support WAN boot, you can still boot using the WAN boot programs located on the local CD/DVD as follows: boot cdrom -o prompt -F wanboot - install. For more information, see the section “Booting the WAN Boot Client.”
10. C, D. Shareable file systems are user-defined files such as /export that contain the same mount point in the /etc/vfstab file in both the active and inactive boot environments. Like a shareable file system, all swap slices are shared by default. Shareable file systems are not copied, but they are shared. For more information, see the section “Solaris Live Upgrade Process.”
11. A, B. You must ensure that the system meets current patch requirements before attempting to install and use the Solaris Live Upgrade software on your system. In addition, the release of the Live Upgrade software packages must match the release of the OS you are upgrading to. The disk on the new boot environment must be able to serve as a boot device. However, when you create a new inactive boot environment, the root (/) file system does not need to be on the same physical disk as the currently active root (/) file system, as long as the disk can be used as a boot device. For more information, see the section “Live Upgrade Requirements.”
12. D. Creating a new, inactive boot environment involves copying critical file systems from the active environment to the new boot environment using the lucreate command. For more information, see the section “Creating a New Boot Environment.”
Suggested Reading and Resources
“Solaris Installation Guide: Solaris Live Upgrade and Upgrade Planning,” Sun Microsystems part number 820-4041-11, available at http://docs.sun.com.
“Solaris Installation Guide: Network-Based Installations,” Sun Microsystems part number 820-4040-10, available at http://docs.sun.com.