9. Administering ZFS File Systems
Objectives
The following test objectives for exam CX-310-202 are covered in this chapter:
• Describe the Solaris ZFS file system, create new ZFS pools and file systems, modify ZFS file system properties, mount and unmount ZFS file systems, destroy ZFS pools and file systems, work with ZFS snapshots and Clones, and use ZFS datasets with Solaris Zones. In addition, you’ll learn the following about ZFS file systems:
• Why the Solaris ZFS file system is a revolutionary file system when compared to traditional Solaris file systems. You’ll also learn about the features and benefits of ZFS and how ZFS file systems differ from traditional Solaris file systems.
• How to create and remove ZFS pools and ZFS file systems.
• How to view and modify ZFS file system properties.
• Mounting and unmounting ZFS file systems.
• Creating ZFS snapshots.
• Cloning ZFS file systems.
• How to set up a bootable ZFS root file system during the installation of the operating system.
• Using ZFS datasets with Solaris Zones.
Outline
ZFS Hardware and Software Requirements
Creating a Basic ZFS File System
Using Disks in a ZFS Storage Pool
Using Files in a ZFS Storage Pool
Displaying ZFS Storage Pool Information
Adding Devices to a ZFS Storage Pool
Attaching and Detaching Devices in a Storage Pool
Converting a Nonredundant Pool to a Mirrored Pool
Detaching a Device from a Mirrored Pool
Taking Devices in a Storage Pool Offline and Online
Saving and Restoring a ZFS Snapshot
Replacing a ZFS File System with a ZFS Clone
Replacing Devices in a Storage Pool
Adding a ZFS Dataset to a Nonglobal Zone
Delegating a ZFS Dataset to a Nonglobal Zone
Suggested Reading and Resources
Study Strategies
The following strategies will help you prepare for the test:
• Practice the Step By Step examples provided in this chapter on either a SPARC-based or x86-based Solaris system. It is recommended that your Solaris system have at least three spare disks.
• Understand all the ZFS terms described in this chapter, as well as system requirements that are outlined.
Introduction to ZFS
ZFS is a 128-bit file system that was introduced in the 6/06 update of Solaris 10 in June 2006. ZFS comes from the acronym for “Zettabyte File System,” mainly because “Zetta” was one of the largest SI prefixes. The name referred to the fact that ZFS could store 256 quadrillion zettabytes of data. Since then, we simply call it ZFS, and it is no longer an acronym for anything.
ZFS represents an entirely new approach to managing disk storage space. It revolutionizes the traditional Solaris file systems described in Solaris 10 System Administration Exam Prep (Exam CX-310-200), Part I. ZFS does not replace those traditional file systems, nor is it an improvement on that existing technology, but it is a fundamental new approach to data management. ZFS was designed to be more robust, more scalable, and easier to administer than traditional Solaris file systems.
ZFS allows for 256 quadrillion zettabytes of storage. All metadata is allocated dynamically, so there is no need to preallocate I-nodes or otherwise limit the scalability of the file system when it is first created. All the algorithms were written with scalability in mind. Directories can have up to 256 trillion entries, and no limit exists on the number of file systems or number of files that can be contained within a ZFS file system.
As you learn about ZFS, it’s best to try to forget everything you know about traditional file systems and volume management. ZFS is quite different and much easier to administer.
ZFS Storage Pools
With conventional file systems, we add disks to the system and then divide those disks into one or more file systems. As we add data to a file system, the file system begins to fill up. If we need more space, we manually allocate more space to that file system. Sometimes we allocate too much space to one file system while another file system fills up. To get more free disk space, we either add another disk or take away space from another file system. Taking away space from an existing file system typically requires backing up, destroying, and rebuilding the existing file system.
With ZFS, disk space is not allocated to a file system, much as we do not worry about allocating physical memory when we add DIMMs (dual inline memory modules) to a server. When I add RAM to a server, I don’t partition it and allocate the RAM to each application one chip at a time. I simply install the DIMMs and let the kernel manage it all. That is precisely what ZFS does to the disks installed on a server. ZFS has no slices, no file system consistency checks, no initialization or mount procedures. There is just a pool of disks, and ZFS manages how the storage gets allocated.
ZFS uses storage pools, called “zpools,” to manage physical storage. Block devices (disks or disk slices) make up the zpool. Your server may have one or more zpools.
When I create a ZFS file system, I specify which zpool the file system belongs to. I do not, however, specify the size of the file system. The file system takes data blocks from the zpool as it needs the storage space. I can limit how much space the ZFS file system takes from the zpool, or I simply let ZFS use as much as it needs. When I run out of space in the zpool, I add another block device to increase the size of the zpool. ZFS allocates the space as it is needed. As with the Solaris Volume Manager (SVM), described in Chapter 3, “Managing Storage Volumes,” ZFS file systems can span multiple devices. However, ZFS differs from SVM in that we do not need to allocate blocks of storage to each file system as it is created.
ZFS Is Self-Healing
ZFS is a transactional file system that ensures that data is always consistent. Traditional file systems simply overwrite old data as data changes. ZFS uses copy-on-write semantics, in which live data is never overwritten, and any sequence of operations is either entirely committed or entirely ignored. This mechanism ensures that the ZFS file system can never be corrupted through loss of power or a system crash. In addition, there is no need for an fsck equivalent. The most recently written pieces of data might be lost, but the file system itself is always consistent.
NOTE
ZFS file system The ZFS transactional file system should not be confused with file system journaling, described in previous chapters. The journaling process, which is used on traditional file systems, records an action in a separate journal. The journal can be replayed if a system crash occurs. The journaling process introduces unnecessary overhead, however, because the data needs to be written twice. This often results in a new set of problems, such as when the journal can’t be replayed properly.
In a ZFS file system, every block is checksummed to prevent silent data corruption.
NOTE
What is a checksum? A checksum is a value used to ensure that data is stored without error. It is derived by calculating the binary value in a block of data using a particular algorithm and storing the calculated results with the data. When data is retrieved, the checksum is recalculated and matched against the stored checksum. If the checksums are the same, the data has not changed. If the checksums are different, the data has been changed, corrupted, or tampered with.
Furthermore, in a replicated (mirrored or RAID) configuration, if one copy is damaged, ZFS detects it and uses another copy to repair it. In a mirrored ZFS file system, ZFS checksums each block as it is returned from disk. If there’s a disparity between the 256-bit checksum and the block, ZFS terminates the request and pulls the block from the other member of the mirror set, matching the checksums and delivering the valid data to the application. In a subsequent operation, the bad block seen on the first disk is replaced with a good copy of the data from the redundant copy, essentially providing a continuous file system check-and-repair operation. Performance is not negatively affected on newer systems, because performance is maintained by delegating a single core of a multicore CPU to perform the checksums.
Simplified Administration
ZFS greatly simplifies file system administration as compared to traditional file systems. The system administrator will find it easy to create and manage file systems without issuing multiple commands or editing configuration files. You’ll find it easy to mount file systems, set disk quotas, enable file compression, and manage numerous file systems with a single command. All these tasks are described in this chapter.
ZFS Terms
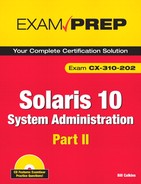
Before I describe how to manage ZFS, Table 9.1 defines some terms that you will need to understand for this chapter.
Table 9.1 ZFS Terminology

ZFS Hardware and Software Requirements
The system must meet the following requirements before ZFS can be utilized:
• The machine must be a SPARC or x86/x64 system that is running Solaris 10 6/06 release or newer.
• The minimum disk size that can be used in a ZFS environment is 128MB. The minimum amount of disk space for a storage pool is approximately 64MB.
• For good ZFS performance, at least 1GB or more of memory is recommended.
• Multiple controllers are recommended for a mirrored disk configuration, but this is not a requirement.
ZFS RAID Configurations
ZFS supports the following RAID (Redundant Array of Inexpensive Disks) configurations:
• RAID-0: Data is distributed across one or more disks with no redundancy. If a single disk fails, all data is lost.
• RAID-1: Mirrored disks where two or more disks store exactly the same data, at the same time. Data is not lost as long as one mirror set survives.
• RAID-Z: A ZFS redundancy scheme using a copy-on-write policy, rather than writing over old data. Using a dynamic stripe width, every block of data is its own RAID-Z stripe so that every write is a full stripe write. RAID-Z is similar to RAID-5, but RAID-Z eliminates a flaw in the RAID-5 scheme called the RAID-5 write hole.
Creating a Basic ZFS File System
The easiest way to create a basic ZFS file system on a single disk is by using the zpool create command:
# zpool create pool1 c1t1d0<cr>
NOTE
Pool terminology The terms storage pool, zpool, and pool are used interchangeably. All three terms refer to a logical group of block devices describing the layout and physical characteristics of the available storage in a ZFS file system.
In the previous example, I created a RAID-0 zpool named “pool1” on a 36GB disk named “c1t1d0.” Notice that I did not specify a slice, so the entire 36GB disk is assigned to the zpool.
If the disk has an existing file system, you receive the following error:
invalid vdev specification
use ‘-f’ to override the following errors:
/dev/dsk/c1t1d0s0 contains a ufs filesystem.
/dev/dsk/c1t1d0s2 contains a ufs filesystem.
To force the system to overwrite the file system, type this:
# zpool create -f pool1 c1t1d0<cr>
#
The system returns to the prompt if successful.
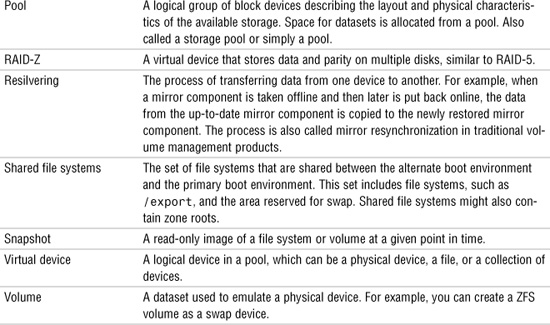
When I issue the df -h command, I see that the following /pool1 file system is ready for data:
The previous zpool create command created a zpool named “pool1” and a ZFS file system in that pool, also named “pool1.” The /pool1 directory should be empty or, better yet, must not exist before the storage pool is created. ZFS creates this directory automatically when the pool is created. As you can see, the ZFS file system is mounted automatically after it is created.
The pool1 pool is 33GB, the entire size of my disk (minus 3GB for overhead). The /pool1 file system has 33GB available. Now, I’ll create another ZFS file system in the same zpool:
# zfs create pool1/data<cr>
I’ve just created a ZFS file system named /pool1/data in the pool1 zpool. The new file system is called a descendant of the pool1 storage pool; pool1 is its parent file system.
A df -h command shows the following information:

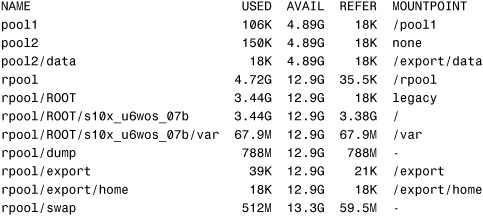
Again, the /pool1/data file system has 33GB available. Each of the file systems has access to all the space in the zpool. Now, I’ll create a 1GB file in the /pool1/data file system:
# mkfile 1g /pool1/data/largefile<cr>
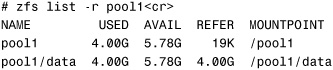
The df -h command displays the following storage information for each of the ZFS file systems:

Notice how the available space has decreased for each file system.
The example I’ve shown is a quick and easy way to create a ZFS file system. However, you may want more control over the hierarchy of the file systems, which I’ll describe later.
Renaming a ZFS File System
You can rename a ZFS file system using the zfs rename command. In the following example, the zfs rename command is used to rename the pool1/data file system to pool1/documents:
# zfs rename pool1/data pool1/documents<cr>
Listing ZFS File Systems
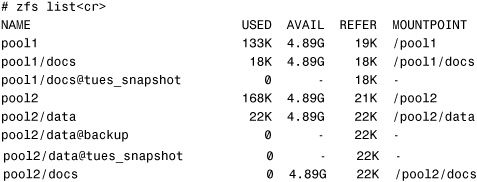
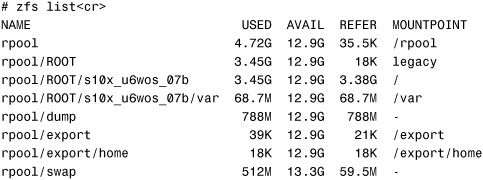
List all the active ZFS file systems and volumes on a machine using the zfs list command:
# zfs list<cr>
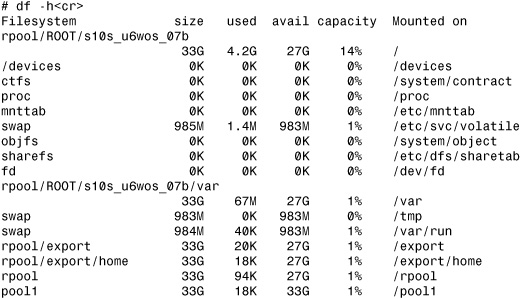
All the file systems and volumes on this particular system are displayed:
The information displayed includes the following:
• NAME: The name of the dataset.
• USED: The amount of space consumed by the dataset and all its descendents.
• AVAIL: The amount of space available to the dataset and all its children. This space is shared with all the datasets within that pool. The space can be limited by quotas and other datasets within that pool.
• REFER: The amount of data accessible by this dataset, which might or might not be shared with other datasets in the pool.
• MOUNTPOINT: The mount point used by this file system. If the value is legacy, the file system is mounted manually using the mount command.
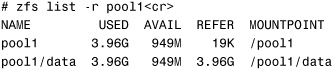
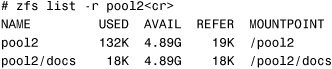
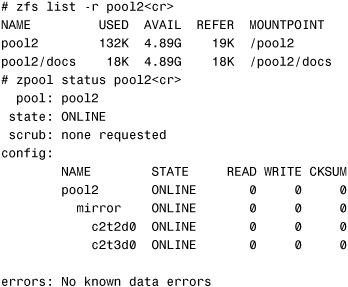
To recursively list only the datasets in the pool2 storage pool, use the -r option followed by the pool name:

Removing a ZFS File System
Use the zfs destroy command to remove a ZFS file system.
CAUTION
Destroying data The zfs destroy and zpool destroy commands destroy data. You receive no confirmation prompt after the command is executed. Make certain that you are destroying the correct file system or storage pool. If you accidentally destroy the wrong file system or pool, you’ll lose data. You can attempt to recover the pool using zpool import, but you risk losing all the data in that pool.
I’ll use the zfs destroy command to remove the /pool1/data file system created earlier:
# zfs destroy pool1/data<cr>
Destroying a file system can fail for the following reasons:
• The file system could be in use and busy.
When a file system is busy, you can forcibly remove it using the -f option. In the following example, I forcibly remove the pool1/data file system:
# zfs destroy -f pool1/data<cr>
CAUTION
The -f option Use the -f option with caution, because it will unmount, unshare, and destroy active file systems, causing unexpected application behavior.
• The file system has children. In other words, it is a parent file system, and other ZFS file systems are created under it:

For a ZFS file system with children, use the -r option to recursively destroy the parent file system named pool1/data and all its descendants:
# zfs destroy -r pool1/data<cr>
• The ZFS file system has indirect dependents such as clones or snapshots associated with it.
Use the -R option to destroy a file system and all its dependents, but use extreme caution when using this option. You receive no confirmation prompt, and you could remove dependents that you did not know existed. In the following example, I’ll remove the file system named pool1/data and all its dependents:
# zfs destroy -R pool1/data<cr>
NOTE
Object sets ZFS supports hierarchically structured object sets—object sets within other object sets. A child dataset is dependent on the existence of its parent. A parent cannot be destroyed without first destroying all children. The -R option to the zfs destroy command overrides this and automatically removes the parent and its children.
You can view a dataset’s dependencies by looking at the properties for that particular dataset. For example, the origin property for a ZFS clone displays a dependency between the clone and the snapshot. The zfs destroy command lists any dependencies, as shown in the example when I try to destroy the pool1/data@today snapshot:

Removing a ZFS Storage Pool
Use the zpool destroy command to remove an entire storage pool and all the file systems it contains. Earlier in this chapter, I created a storage pool named pool1. I’ll remove pool1 using the following command:
# cd /<cr>
# zpool destroy pool1<cr>
When I destroy the storage pool, everything in that pool is also destroyed. In this example, the /pool1 and /pool1/data ZFS file systems that I created earlier have been removed.
If you accidentally destroy a pool, you can attempt to recover it by using the zpool import command. When you destroy a pool, ZFS marks that pool as destroyed, but nothing is actually erased. This space will get used over time, so the amount of time that this destroyed pool remains available for recovery will vary. List your destroyed pools using the zpool import command with the -D option:
# zpool import -D<cr>
The system responds with this:
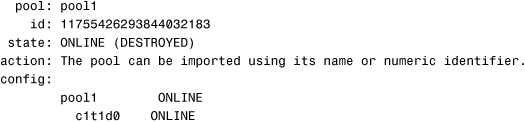
In the output produced from zpool import, you can identify the pool1 pool that was destroyed earlier. To recover the pool, issue the zpool import command again using the -D and -f options, and specify the name of the pool to be recovered:
# zpool import -Df pool1<cr>
The -f option forces the import of the pool, even if the pool has been destroyed.
Now, list the pool:

The pool has been recovered, and all the data is accessible.
ZFS Components
The following are considered ZFS components:
• Disks
• Files
• Virtual devices
Follow these rules when naming ZFS components:
• Empty components are not permitted.
• Each component can contain only alphanumeric characters in addition to the following:
• Underscore (_)
• Hyphen (-)
• Period (.)
• Pool names must begin with a letter, except for the following restrictions:
• The beginning sequence c[0-9] is not allowed.
• The name “log” is reserved and cannot be used.
• A name that begins with “mirror,” “raidz,” or “spare” is not allowed, because these name are reserved.
• Pool names cannot begin with a percent sign (%).
• Dataset names must begin with an alphanumeric character.
• Dataset names must not contain a percent sign (%).
Using Disks in a ZFS Storage Pool
The most basic element in a storage pool is a physical storage device, which can be either a disk or a slice on a disk. The only requirement is that the device must be at least 128MB in size.
It is recommended that an entire disk be allocated to a storage pool. Although disk slices can be used in storage pools, it makes administration more difficult, and performance could be adversely affected. When using an entire disk for ZFS, there is no need to format the disk. ZFS formats the disk for you using an EFI disk label, and slice 0 encompasses the entire disk. For more information on disk slices and EFI disk labels, refer to Solaris 10 System Administration Exam Prep (Exam CX-310-200), Part I.
Using Files in a ZFS Storage Pool
You can use UFS files as virtual devices in your ZFS storage pool. Use this feature for testing purposes only, because any use of files relies on the underlying file system for consistency. If you create a ZFS pool backed by files on a UFS file system, you are relying on UFS to guarantee correctness and synchronous semantics and not fully utilizing the benefits of ZFS.
I’ll create a ZFS pool on a file located in a UFS file system when I don’t have any physical devices; I’ll do this strictly for testing purposes. The example in Step By Step 9.1 creates a ZFS pool in a UFS file.
STEP BY STEP
9.1 Using a UFS File for a ZFS Storage Pool
1. Use the mkfile command to create an empty file in the /export/home file system. I’ll use the -n option, which only “reserves” the space and does not actually allocate disk blocks to the file system until data is written to the file:
# mkfile -n 200m /export/home/zfsfile<cr>
2. Create a ZFS pool and file system named “tempzfs” on the UFS file:
# zpool create tempzfs /export/home/zfsfile<cr>
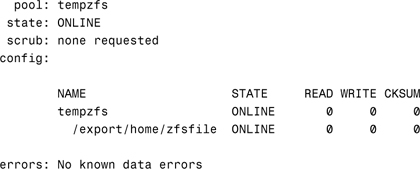
3. Verify the status of the new pool:
# zpool status -v tempzfs<cr>
The system displays the following information:
Mirrored Storage Pools
At least two disks are required for a mirrored storage pool. It’s recommended that each of these disks be connected to separate disk controllers. A storage pool can contain more than one mirror. A two-way mirror consists of two disks, and a three-way mirror consists of three disks.
When creating a mirrored pool, a separate top-level device is created. Use the following command to create a two-way mirror device:
# zpool create pool2 mirror c2t2d0 c2t3d0<cr>
This pool was created using two 5GB disks. The df -h command shows that the following file system has been created:
pool2 4.9G 1K 4.9G 1% /pool2
RAID-Z Storage Pools
RAID-Z provides a mirrored storage pool, but it also provides single or double parity fault tolerance. Single parity is similar to RAID-5, and double-parity RAID-Z is similar to RAID-6. Like RAID-5, RAID-Z can handle a whole-disk failure, but it can also be more proactive and actually detect and correct any corruption it encounters. When ZFS reads a RAID-Z block, ZFS compares it against its checksum. If the data disks didn’t return the right answer, ZFS reads the parity and then does reconstruction to figure out which disk returned the bad data. It then repairs the damaged disk and returns good data to the application. ZFS also reports the incident through Solaris FMA (Fault Management Architecture) so that the system administrator knows that one of the disks is silently failing.
Use the zpool create command to create a single RAID-Z (single-parity) device that consists of three disks:
# zpool create pool3 raidz c2t2d0 c2t3d0 c2t4d0<cr>
This RAID-Z pool is created from three 5GB disks. The df -h command shows the following information:
pool3 9.8G 24K 9.8G 1% /pool3
You need at least two disks for a single-parity RAID-Z configuration and at least three disks for a double-parity RAID-Z configuration. Create a double-parity RAID-Z configuration by using the raidz2 keyword:
# zpool create pool3 raidz2 c2t2d0 c2t3d0 c2t4d0<cr>
Displaying ZFS Storage Pool Information
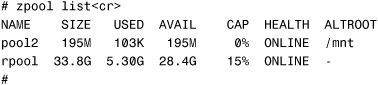
You can display status information about the usage, I/O statistics, and health of your ZFS pools using the zpool list command. To display basic status information about all the storage pools installed on the system, type the following command:
# zpool list<cr>
The system displays this:

To display information about a specific pool, specify the pool name:

The information displayed includes the following:
• NAME: The pool’s name.
• SIZE: The pool’s total size. The size represents the total size of all top-level virtual devices.
• USED: The amount of space allocated by all the datasets.
• AVAILABLE: The unallocated space in the pool.
• CAPACITY: The space used, calculated as a percentage of total space.
• HEALTH: The pool’s current health status.
• ALTROOT: The alternate root of the pool if an alternate exists. Alternate root pools are used with removable media, where users typically want a single file system and they want it mounted wherever they choose. An alternate root pool is created using the -R option, as shown in the example where I create a new pool named pool2 using /mnt as the alternate root path.
zpool list shows the following information:
In addition, pools can be imported using an alternate root. An example is a recovery situation, where the mount point must not be interpreted in the context of the current root directory, but under some temporary directory where repairs can be made.
Instruct the system to display only specific information about the pool:
# zpool list -o name,size pool1<cr>
The system displays only the name and the total size for pool1:
NAME SIZE
pool1 9.94G
pool2 4.97G
rpool 17.9G
The following storage pool I/O statistics can also be displayed for each pool:
• USED CAPACITY: The amount of data currently stored in the pool or device.
• AVAILABLE CAPACITY: The amount of space available in the pool or device.
• READ OPERATIONS: The number of read I/O operations sent to the pool or device.
• WRITE OPERATIONS: The number of write I/O operations sent to the pool or device.
• READ BANDWIDTH: The bandwidth of all read operations (including metadata), expressed as units per second.
• WRITE BANDWIDTH: The bandwidth of all write operations, expressed as units per second.
Use the following command to list all the I/O statistics for each storage pool:
# zpool iostat<cr>
The system displays the following:
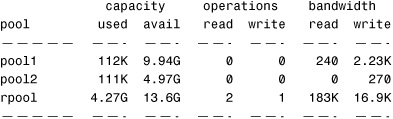
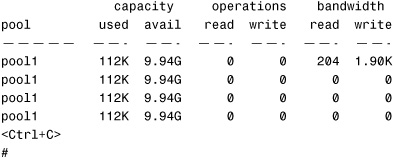
All the statistics displayed are cumulative since the system was booted. It’s best to specify an interval with the zpool command, where the first line of output is cumulative and the next lines represent activity since the previous stat. The following command displays current stats every 2 seconds until Ctrl+C is pressed:
# zpool iostat pool1 2<cr>
The system displays the following:
Last, view the health of the storage pools and devices using the zpool status command. The health of the storage pool is determined by the health of the devices that make up the pool. Use the zpool status command to obtain the health information:
# zpool status<cr>
The system displays the following:

The following two options are available with the zpool status command:
• The -v option displays verbose output. The default is to display verbose output.
• The -x option can be used to display only the status of pools that are exhibiting errors or are otherwise unavailable:
#zpool status -x<cr>
all pools are healthy
The health status of each device falls into one of the following states:
•ONLINE: The device is normal and in good working order. In this state, it’s possible for some transient errors to still occur.
•DEGRADED: The virtual device has experienced a failure, but the device can still function. This state is most common when a mirror or RAID-Z device has lost one or more constituent devices. The pool’s fault tolerance might be compromised, because a subsequent fault in another device might be unrecoverable.
•FAULTED: The virtual device is inaccessible due to a total failure. ZFS is incapable of sending data to it or receiving data from it. If a top-level virtual device is in this state, the pool is inaccessible.
•OFFLINE: The administrator has taken the virtual device offline.
•UNAVAILABLE: The device or virtual device cannot be opened. In some cases, pools with UNAVAILABLE devices appear in DEGRADED mode. If a top-level virtual device is UNAVAILABLE, nothing in the pool can be accessed.
•REMOVED: The device was physically removed while the system was running. Device removal detection is hardware-dependent and might not be supported on all platforms.
The health of the storage pool is determined by the health of all its top-level virtual devices. If all virtual devices are ONLINE, the storage pool is ONLINE. If a virtual device is FAULTED, the pool is also FAULTED.
The following example displays the health status of a pool with a failed disk drive:

Notice the link displayed in the output. This link (http://www.sun.com/msg/ZFS-8000-2Q) points to an online article to visit for more information. It provides up-to-date information on the problem and describes the best recovery procedure.
Adding Devices to a ZFS Storage Pool
Add more space to a storage pool using the zpool add command. The additional space becomes available immediately to all datasets within the pool.
The following example shows a storage pool named pool1 with a dataset named /pool1/data:
Storage pool1 currently has a single 5GB disk (c2t2d0).
Add another 5GB disk drive (c2t3d0) to the pool:
# zpool add pool1 c2t3d0<cr>
Another check of the storage pool shows that the size has been increased:
A check of the storage pool shows the status of the two disk drives:

Attaching and Detaching Devices in a Storage Pool
Add another device to a mirrored storage pool using the zpool attach command. The following example shows a two-way mirrored storage pool named pool2 with a dataset named /pool2/docs:
A check of the storage pool shows the mirror’s status:
To convert this pool to a three-way mirror, attach another 5GB disk (c2t4d0) to the pool:
# zpool attach pool2 c2t3d0 c2t4d0<cr>
A check of the storage pool shows the mirror’s status:
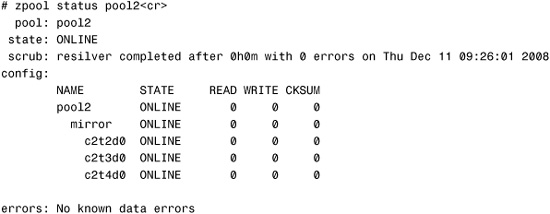
The three-way mirror is online, and resilvering is complete.
Converting a Nonredundant Pool to a Mirrored Pool
Use the zpool attach command to convert a nonredundant pool into a mirrored (redundant) storage pool. Step By Step 9.2 describes the process.
STEP BY STEP
9.2 Convert a Nonredundant Pool to a Mirrored Storage Pool
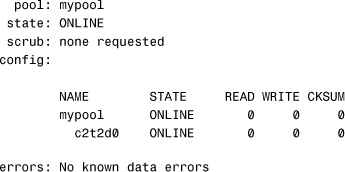
1. Create a nonredundant storage pool:
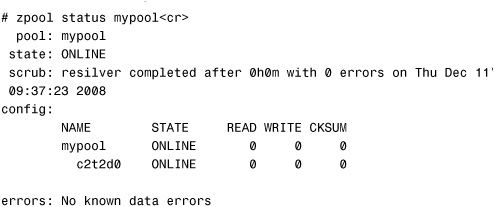
# zpool create mypool c2t2d0<cr>
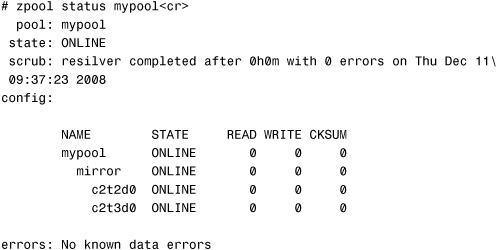
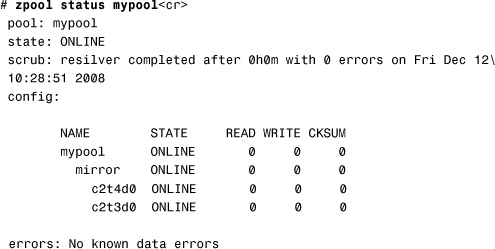
Verify the pool:
# zpool status mypool<cr>
The system displays this:
2. Attach a second disk to the pool to create a mirrored (redundant) pool:
# zpool attach mypool c2t2d0 c2t3d0<cr>
Verify the creation of the redundant pool:
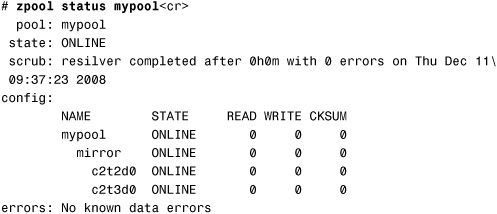
Notice that the STATE is ONLINE and resilvering is complete.
Detaching a Device from a Mirrored Pool
Use the zpool detach command to detach a device from a mirrored storage pool. For example, in the previous section we created a redundant pool name mypool. The current status is as follows:
To detach the device c2t3d0 and convert the mirror back to a nonredundant pool, issue the zpool detach command:
# zpool detach mypool c2t3d0<cr>
A check of the storage pool shows the status:
Notice that the zfs status shows that a resilvering operation was performed. ZFS did not perform a resilvering operation when the c2t1d0 device was detached. The message refers to the previous resilver operation that was performed when the pool was originally mirrored. The scrub message gets updated only when a ZFS scrub or resilvering operation completes. That message remains until the next operation. Because the detach operation did not perform a scrub, the old message still appears.
NOTE
A device cannot be detached from a nonredundant pool.
Taking Devices in a Storage Pool Offline and Online
To temporarily disconnect a device from a storage pool for maintenance purposes, ZFS allows a device to be taken offline using the zpool offline command. Taking a device offline is not the same as detaching a device, which was described earlier. Offlining a device is meant to be a temporary state, whereas detaching a device is a permanent state.
In the following example, a redundant storage pool named mypool is set up on a server. A check of the status shows the following information about that pool:

Take the c2t2d0 device offline using the following command:
# zpool offline mypool c2t2d0<cr>
The pool’s status has changed, as displayed by the following zpool status command:
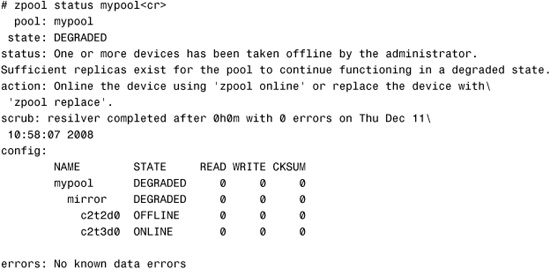
The offline state is persistent, and this device remains offline even after the system has been rebooted.
While the device is offline, data can still be written to the mypool storage pool. All the data gets written to the c2t3d0 device, and there is no redundancy.
To bring the c2t2d0 device back online, issue the following command:
# zpool online mypool c2t2d0<cr>
A device can be brought back online while the file system is active. When a device is brought back online, any information that was previously written to the storage pool is resynchronized to the newly available device.
NOTE
Offlining a device Note that you cannot use device onlining to replace a disk. If you offline a device, replace the drive, and try to bring it online, the device remains in a faulted state.
ZFS History
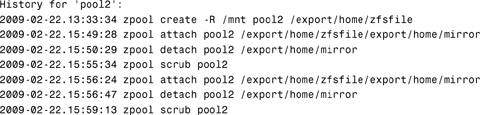
The system administrator can view all the operations that have been performed on a ZFS pool by viewing the history. Use the zpool history command:
# zpool history pool2<cr>
The system displays all the history for that pool:
Use the -l option to display the log records in long format:
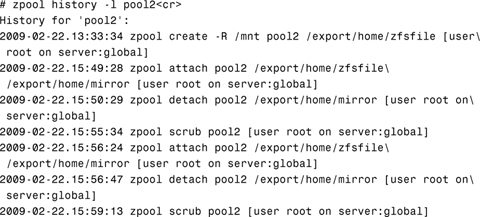
The -i option displays internally logged ZFS events in addition to user-initiated events.
ZFS Properties
When you create ZFS file systems, a default set of properties control the behavior of the file systems and volumes. These properties are divided into two types: native and user-defined.
Native properties either export internal statistics or control ZFS file system behavior. In addition, native properties are either read-only or settable. User properties have no effect on ZFS file system behavior, but you can use them to annotate datasets in a way that is meaningful in your environment.
Many settable properties are inherited from the parent and are propagated to its descendants. All inheritable properties have an associated source indicating how the property was obtained. The source can have the following values:
• default: A value of default means that the property setting was not inherited or set locally. This source is a result of no ancestor’s having the property as source local.
• local: A local source indicates that the property was explicitly set on the dataset by using the zfs set command.
• inherited from <dataset-name>: <dataset-name> specifies where that property was inherited.
ZFS dataset properties are managed using the zfs set, zfs inherit, and zfs get commands. Use the zfs get command with the all keyword to view all the dataset properties for the storage pool named pool1:
# zfs get all pool1<cr>
The system displays the list of properties:
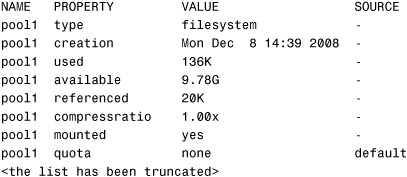
Table 9.2 lists some of the more common native read-only ZFS file system properties. These properties cannot be set, nor are they inherited. For a complete set of ZFS properties, see the ZFS man pages by typing man zfs at the command prompt.
Table 9.2 Native Read-Only ZFS Properties

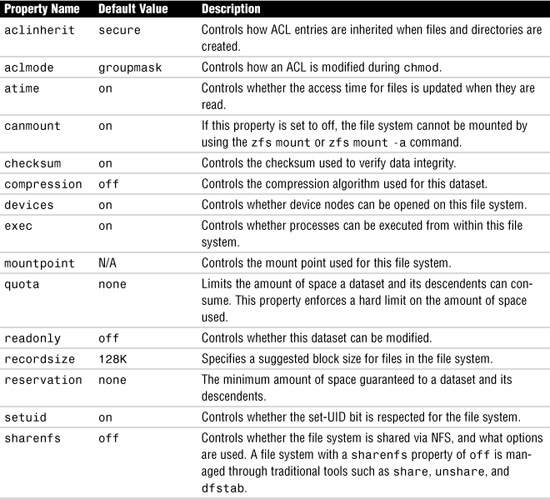
Table 9.3 lists the settable ZFS properties. These are properties whose values can be both retrieved and set. These properties are set using the zfs set command, described later in this section. Most of these properties are inherited from the parent, with the exception of “quota” and “reservation.”
Table 9.3 Settable ZFS Properties

In addition to the native properties that have been described, ZFS supports arbitrary user properties. The user properties have no effect on the ZFS behavior, but they can be used to annotate datasets with meaningful information. The user properties must conform to the following rules:
• Contain a colon (:) character to distinguish them from native properties.
• Contain lowercase letters, numbers, and the following punctuation characters: :, +, ., _.
• The maximum user property name is 256 characters.
Typically, the property name is divided into the following two components, but this namespace is not enforced by ZFS:
<module>:<property>
• Arbitrary strings that are always inherited and are never validated.
• The maximum user property value is 1,024 characters.
Here are two examples of user properties:
dept:users=finance
backup:frequency=daily
Setting ZFS Properties
You can modify any of the ZFS settable properties using the zfs set command. The syntax is as follows:
zfs set <property>=<value>
Only one property can be set or modified during each zfs set invocation.
The following command sets the file system quota to 25GB. This prevents the pool1/data file system from using all the space in the pool:
# zfs set quota=25G pool1/data<cr>
View a specific property using the following command:
# zfs get quota pool1/documents<cr>
The system displays the following:
NAME PROPERTY VALUE SOURCE
pool1/documents quota 25G local
In this example, I’ll create a user-definable property named backup:frequency and set the value to daily:
# zfs set backup:frequency=daily pool1/documents<cr>
Now I’ll use the -s option to list the properties by source type. The valid source types are local, default, inherited, temporary, and none. The following example uses the -s option to list only properties that were set locally on pool1:
# zfs get -s local all pool1/documents<cr>
The system displays this:

The following illustrates how properties are inherited. In this example, I have a storage pool named pool1 and a ZFS file system in that pool named pool1/documents. I’ll start by setting the compression property on the storage pool named pool1:
# zfs set compression=on pool1<cr>
NOTE
Compression In addition to reducing space usage by two to three times, compression reduces the amount of I/O by two to three times. For this reason, enabling compression actually makes some workloads go faster.
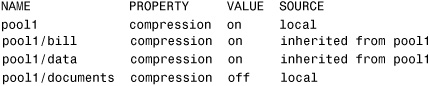
Use the -r option to recursively display the compression property for all the children of the pool1 dataset:
# zfs get -r compression pool1<cr>
The system displays only the compression property:

Notice that compression is set to on for pool1 but is set to off for pool1/documents, which was a previously created dataset.
Now, I’ll create two new file systems in pool1:
# zfs create pool1/bill<cr>
# zfs create pool1/data<cr>
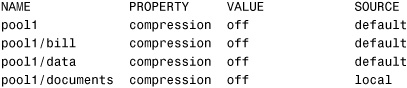
Check the compression property for all the datasets in pool1:
# zfs get -r compression pool1<cr>
The system displays the following information. Notice that compression in pool1/bill and pool1/data was automatically set to on:

The compression property for both datasets was inherited from pool1.
When you issue the zfs inherit command, the compression property goes back to its default value for all the datasets:
# zfs inherit compression pool1<cr>
# zfs get -r compression pool1<cr>
The system displays the following:
Notice that compression=off for all the datasets in pool1. The use of the -r option clears the current property setting for all descendant datasets. Therefore, you can use the zfs inherit command to clear a property setting for all the datasets in a pool.
Setting the compression property again automatically sets it for all the datasets except pool1/documents:
# zfs set compression=on pool1<cr>
# zfs get -r compression pool1<cr>
The system displays the following:
Mounting ZFS File Systems
As you can see by now, a ZFS file system is automatically mounted when it is created. It is not necessary to manually mount a ZFS file system, as was required with traditional file systems. At boot time, ZFS file systems are automatically mounted by SMF via the svc://system/filesystem/local service. It is not necessary to make an entry in the /etc/vfstab file for a ZFS file system to be mounted at boot time.
Use the zfs mount command to list all currently mounted file systems that are managed by ZFS:
ZFS uses the value of the mountpoint property when mounting a ZFS file system. For example, the mountpoint property for the pool2/data file system can be displayed as follows:
# zfs get mountpoint pool2/data<cr>
NAME PROPERTY VALUE SOURCE
pool2/data mountpoint /pool2/data default
The ZFS file system is automatically mounted on /pool2/data, as shown in the output from the following df -h command:
pool2/data 4.9G 18K 4.9G 1% /pool2/data
When the pool2/data file system was created, the mountpoint property was inherited. However, a file system’s mount point can be changed simply by changing the mountpoint property. For example, change the mount point on pool2/data to /export/data:
# zfs set mountpoint=/export/data pool2/data<cr>
Whenever the mountpoint property is changed, the file system is automatically unmounted from the old mount point and remounted to the new mount point.
Now the df -h command shows the following information:
pool2/data 5128704 18 5128563 1% /export/data
Notice how I was able to change the mount point to /export/data without creating the /export/data directory. ZFS creates the mount point directories as needed and removes them when they are no longer needed.
Mounted ZFS file systems can be unmounted manually using the zfs umount command. For example, to unmount the /export/data file system, issue the following command:
# zfs umount /export/data<cr>
The file system can be mounted as follows:
# zfs mount pool2/data<cr>
Notice how the dataset name is specified (pool2/data) rather than the mountpoint property value /export/data.
The mountpoint property could be set to none, preventing the file system from being mounted:
# zfs set mountpoint=none pool2<cr>
Now, /pool2 does not show up when the df -h command is executed. This can be useful for the following reason. When I create a ZFS file system using the following command:
# zpool create pool1<cr>
# zfs create pool1/data<cr>
Two file systems are created: /pool1 and /pool1/data I typically don’t want users putting files directly into the top-level file system named /pool1 Therefore, I simply don’t mount /pool1 by setting the mountpoint property to none With the mountpoint property set to none, the /pool1 file system does not get mounted. A listing of the system’s file systems shows the following:
The descendants of pool1 inherited the mountpoint property, so /pool1/data also was set to none:

Therefore, I’ll change the pool1/data mountpoint property to /pool1/data:
# zfs set mountpoint=/pool1/data pool1/data<cr>
Now, /pool1 is not mounted and /pool1/data is mounted:

ZFS mount properties can be changed temporarily. Temporary properties revert to their original settings when the file system is unmounted. In the following example, the readonly property is temporarily changed to on for a file system that is currently mounted:
# zfs mount -o remount,ro pool2/data<cr>
To temporarily change a property on a file system that is currently mounted, you must use the special remount option.
Display the readonly property using the following command:
# zfs get readonly pool2/data<cr>
The readonly value is displayed:
NAME PROPERTY VALUE SOURCE
pool2/data readonly on temporary
Legacy Mount Points
File systems can also be managed through the legacy mount command and the /etc/vfstab file. If you set the file system’s mountpoint property to legacy, ZFS will not automatically mount and manage this file system. The file system must be managed using the legacy commands mount and umount and the /etc/vfstab file. Step By Step 9.3 describes how to set up a ZFS file system using a legacy mount point.
STEP BY STEP
9.3 Set up a Legacy Mount Point for a ZFS File System
1. Find an unused disk that is available for use in a ZFS storage pool.
a. Use the format command to find all the available disks on your system:
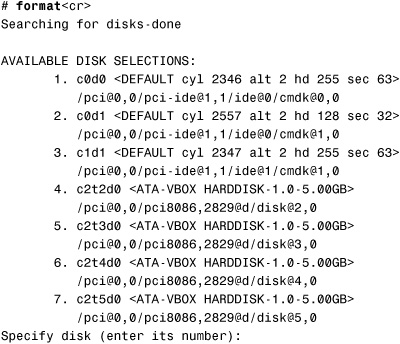
All the available disks are listed.
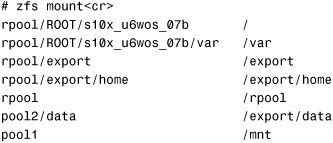
b. Check which disks ZFS is using:
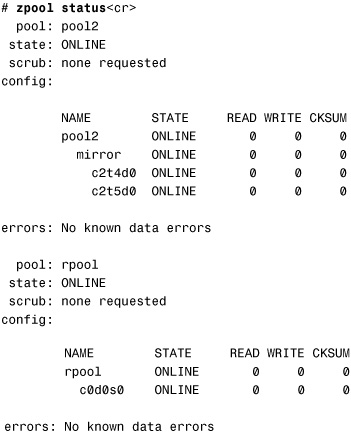
In the output, notice that c2t4d0 and c2t5d0 are in use for the pool2 mirror and that c0d0s0 is in use for rpool.
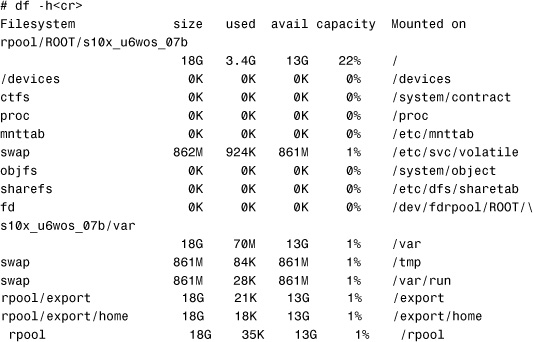
c. Make sure that none of the disks are being used for traditional file systems by issuing the df -h command and checking for mounted slices, SVM, or Veritas volumes.
2. After verifying that the disk was not being used, I chose c2t2d0 Create a ZFS pool and file system on that disk:
# zpool create pool1 c2t2d0<cr>
Verify that /pool1 is mounted by issuing the df -h command.
3. Change the mountpoint property to legacy:
# zfs set mountpoint=legacy pool1<cr>
The df -h command verifies that the /pool1 file system is no longer mounted.
4. Create a directory for the mount point:
# mkdir /data<cr>
5. Mount the ZFS file system:
# mount -F zfs pool1 /data<cr>
Use the df -h command to verify that the file system is mounted as /data.
6. To automatically mount the ZFS file system at bootup, make the following entry in the /etc/vfstab file:
pool1 - /data zfs - yes -
Legacy mount points must be managed through legacy tools. Any attempt to use ZFS tools will result in an error. Any mount point properties are set explicitly using the mount -o command and by specifying the required mount options.
Sharing ZFS File Systems
ZFS can automatically share file systems as an NFS resource by setting the sharenfs property to on Using this method, ZFS file systems do not need to be shared using the /etc/dfs/dfstab file or the share command. The sharenfs property is a comma-separated list of options that are passed to the share command. When the sharenfs property is set to off, the file system is not managed by ZFS and can be shared using traditional methods, such as the /etc/dfs/dfstab file. All ZFS file systems whose sharenfs property is not off are shared during boot.
The default is to set all ZFS file systems as unshared. Share a file system using the zfs set command:
# zfs set sharenfs=on pool2/data<cr>
Issue the share command, and you’ll see that the file system is now shared:
# share<cr>
The system displays all active shares:
- /pool2/data rw “ ”
The sharenfs property is inherited, and file systems are automatically shared on creation if their inherited property is not off For example, create a new file system:
# zpool create pool2 c2t3d0<cr>
Turn on sharenfs for pool2:
# zfs set sharenfs=on pool2<cr>
Create a new file system under pool2:
# zfs create pool2/data<cr>
List the sharenfs property for pool2 and its descendants:
# zfs get -r sharenfs pool2<cr>
The sharenfs property is inherited, as shown in the output:

File systems are initially shared writeable To set them as readonly, change the sharenfs property to readonly:
# zfs set sharenfs=ro pool2/data<cr>
The share command shows the following active shares:

ZFS file systems can be unshared using the zfs unshare command:
# zfs unshare pool2/data<cr>
The command unshares the /pool2/data file system.
If the sharenfs property is off, ZFS does not attempt to share or unshare the file system at any time. This setting enables you to administer the NFS resource through traditional means such as the /etc/dfs/dfstab file. For more information on administering NFS, refer to Chapter 2, “Virtual File Systems, Swap Space, and Core Dumps.”
ZFS Web-Based Management GUI
Throughout this chapter I’ve described how to manage ZFS from the command line. If you prefer a GUI interface, you can use the ZFS web-based interface to manage ZFS. Use this GUI to perform the following tasks:
• Create a new storage pool
• Add capacity to an existing pool
• Move (export) a storage pool to another system
• Import a previously exported storage pool to make it available on another system
• View information about storage pools
• Create a file system
• Create a volume
• Take a snapshot of a file system or volume
• Roll back a file system to a previous snapshot
You first need to start the SMC web server by executing the following command:
# /usr/sbin/smcwebserver start<cr>
You can set the server to start automatically at bootup by enabling the SMF service:
# /usr/sbin/smcwebserver enable<cr>
Access the Administration console by opening a web browser and entering the following URL:
https://localhost:6789/zfs
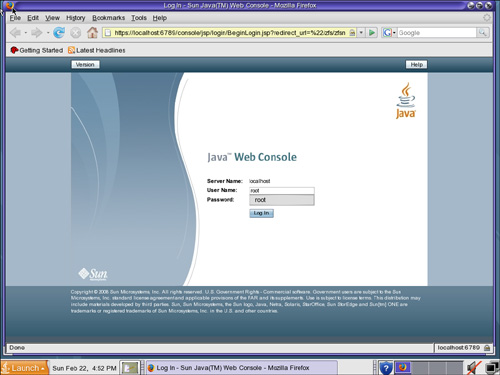
The Java Web Console login screen appears, as shown in Figure 9.1.
FIGURE 9.1 Web Console login screen.
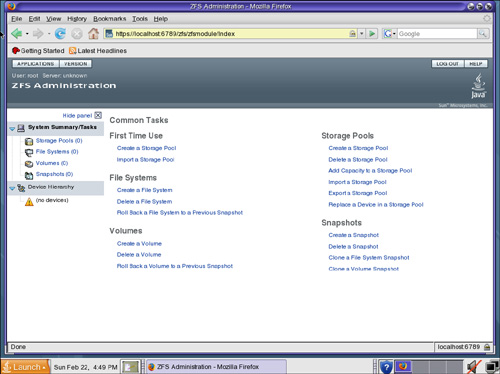
At the Java Web Console screen, enter the administrator login and password and then click the Log In button to proceed. The ZFS Administration window appears, as shown in Figure 9.2.
FIGURE 9.2 ZFS administration window.
ZFS Snapshots
A ZFS snapshot is a read-only copy of a ZFS file system. A snapshot can be created quickly, and it initially consumes no space within the pool. The snapshot simply references the data in the file system from which it was created. As the file system from which the snapshot was created changes, the snapshot grows and consumes space in the storage pool. Use the snapshot feature to create backups of live file systems.
ZFS snapshots provide the following features:
• The snapshot persists across reboots.
• The snapshot does not use a separate backing store. However, the snapshot consumes space from the same storage pool as the file system from which it was created.
• Snapshots are created almost instantly.
• Any snapshot can be used to generate a full backup, and any pair of snapshots can be used to generate an incremental backup.
• The number of snapshots that can be taken is virtually unlimited. The theoretical maximum is 264.
As you’ll see, snapshots are a great tool for backing up live file systems.
Creating a ZFS Snapshot
Create a snapshot using the zfs snapshot command followed by the name of the snapshot. The snapshot name follows this format:
<filesystem>@<snapname>
or
<volume>@<snapname>
For example, to take a snapshot of the pool2/data file system, the name of the snapshot could be pool2/data@tues_snapshot.
Issue the following command to create the snapshot of the /pool2/data file system:
# zfs snapshot pool2/data@tues_snapshot<cr>
Listing ZFS Snapshots
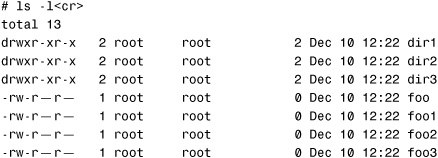
After creating the snapshot, list all the snapshots on the system by issuing the following command:

The snapshot is stored in the /pool2/data file system, but you can’t see it because the snapdir property is set to hidden Change that property to visible:
# zfs set snapdir=visible pool2/data<cr>
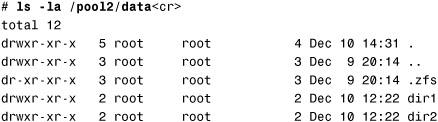
Now, when you list the contents of the /pool2/data file system, you see the snapshot directory named .zfs:
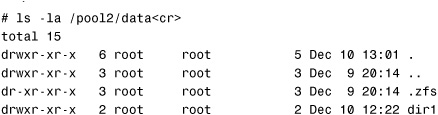
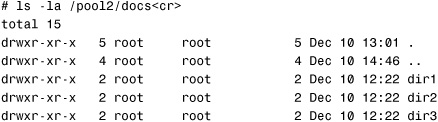
Change into the snapshot directory:
# cd /pool2/data/.zfs/snapshot/tues_snapshot<cr>
Issue the ls -la command. You see a read-only copy of the /pool2/data file system:
This is an exact duplicate of the /pool2/data file system, as it looked when the snapshot was taken earlier. As data is added to and changed in the /pool2/data file system, this snapshot does not change or update. Because it’s a read-only snapshot, you can copy data from this directory, but you cannot modify it.
Saving and Restoring a ZFS Snapshot
A snapshot can be saved to tape or to a disk on the local system or a remote system. Use the zfs send command to save the snapshot to tape:
# zfs send pool2/data@tues_snapshot > /dev/rmt/0<cr>
To retrieve the files from tape, use the zfs recv command:
# zfs recv pool2/data@tues_snapshot < /dev/rmt/0<cr>
This restores the snapshot to the storage pool it came from.
Rather than saving the snapshot to tape, you can save the snapshot to disk on a remote system:
# zfs send pool2/data@tues_snapshot | ssh host2 zfs recv newpool/data<cr>
The snapshot is sent to the remote host named “host2” and is saved in the /newpool/data file system.
Compress a ZFS snapshot stream using the following command:
# zfs send pool2/data@tues_snapshot | gzip > backupfile.gz<cr>
Now the backup.gz file can be sent via FTP to another system for a remote backup.
Destroying a ZFS Snapshot
To remove the snapshot from the system, use the zfs destroy command:
# zfs destroy pool2/data@tues_snapshot<cr>
NOTE
Destruction A dataset cannot be destroyed if snapshots of the dataset exist. In addition, if clones have been created from a snapshot, they must be destroyed before the snapshot can be destroyed.
Renaming a ZFS Snapshot
You can rename a snapshot within the pool and the dataset from which it came using the zfs rename command:
# zfs rename pool2/data@tues_snapshot pool2/data@backup<cr>
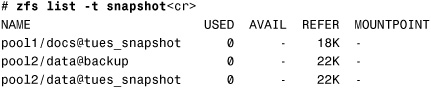
List the snapshots on the system to verify the name change:
# zfs list -t snapshot<cr>
NAME USED AVAIL REFER MOUNTPOINT
pool2/data@backup 0 - 22K -
Rolling Back a ZFS Snapshot
Roll back a ZFS snapshot to discard all changes made to a file system since a specific snapshot was created. Using the zfs rollback command, the file system reverts to the state at the time the snapshot was taken.
Step By Step 9.4 describes how to revert the /pool2/data file system to the most recent snapshot.
STEP BY STEP
9.4 Roll Back a Snapshot and ZFS File System
In this exercise, we’ll use the zfs rollback command to revert the /pool2/data file system to the most recent snapshot.
1. List the snapshots currently available on the system:

Four snapshots are listed.
2. List the contents of the /pool2/data file system:
3. Roll back the /pool2/data file system to the tues_snapshot:

The error indicates that there is a more recent backup named weds_snapshot. You can only revert a file system to the most recent snapshot. To use the older tues_snapshot, you need to force ZFS to use the tues_snapshot and remove the weds_snapshot. You do this using the -r option:
# zfs rollback -r pool2/data@tues_snapshot<cr>
4. The zfs list command shows that the weds_snapshot was removed:
5. List the contents of the /pool2/data file system, and you’ll see that the file system has changed:
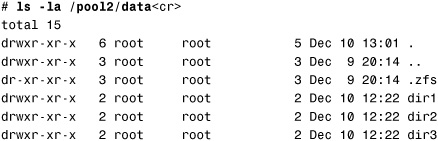
The dir3 directory, which was missing, has been restored.
ZFS Clones
A snapshot is a read-only point-in-time copy of a file system, and a clone is a writable copy of a snapshot. Clones provide an extremely space-efficient way to store many copies of mostly shared data such as workspaces, software installations, and diskless clients.
A clone is related to the snapshot from which it originated. After a clone is created, the snapshot from which it originated cannot be deleted unless the clone is deleted first.
The zfs clone command is used to specify the snapshot from which to create the clone. In the following example, a clone is created from the snapshot named pool2/data@tues_snapshot:
# zfs clone pool2/data@tues_snapshot pool2/docs<cr>
The zfs list command shows that a new ZFS file system named /pool2/docs has been created:
The contents are exactly the same as /pool2/data:
The clone must be created in the same storage pool that the snapshot is in. When you try to create the clone outside the pool2 storage pool, the following error is reported:
# zfs clone pool2/data@tues_snapshot pool1/data1<cr>
cannot create ‘pool1/data1’: source and target pools differ
Destroying a ZFS Clone
Destroy a ZFS cloned file system just like you would destroy any other ZFS file system—by using the zfs destroy command:
# zfs destroy pool2/docs<cr>
Clones must be destroyed before the parent snapshot can be destroyed. In the following example, I’ll try to destroy the tues_snapshot before I destroy the file system that was cloned from that snapshot:
# zfs destroy pool2/data@tues_snapshot<cr>
cannot destroy ‘pool2/data@tues_snapshot’: snapshot has dependent clones
use ‘-R’ to destroy the following datasets: pool2/docs
Replacing a ZFS File System with a ZFS Clone
An active ZFS file system can be replaced by a clone of that file system using the zfs promote command. This feature makes it possible to destroy the “original” file system—the file system that the clone was originally created from. Without clone promotion, you cannot destroy the “original” file system of an active clone.
In the preceding section, I created a clone named /pool2/docs This clone was created from a snapshot of the /pool2/data file system. To replace the /pool2/data file system with the clone named /pool2/docs, follow the steps described in Step By Step 9.5.
STEP BY STEP
9.5 Replace a ZFS File System with a ZFS Clone
In this exercise, the /pool2/data file system will be replaced by its clone, /pool2/docs.
1. Create a snapshot of the /pool2/data file system:
# zfs snapshot pool2/data@tues_snapshot<cr>
2. Create a clone of the snapshot:
# zfs clone pool2/data@tues_snapshot pool2/docs<cr>
3. Promote the cloned file system:
# zfs promote pool2/docs<cr>
4. Rename the /pool2/data file system:
# zfs rename pool2/data pool2/data_old<cr>
5. Rename the cloned file system:
# zfs rename pool2/docs pool2/data<cr>
6. Remove the original file system:
# zfs destroy pool2/data_old<cr>
zpool Scrub
Cheap disks can fail, so ZFS provides disk scrubbing. Like ECC memory scrubbing, the idea is to read all data to detect latent errors while they’re still correctable. A scrub traverses the entire storage pool to read every copy of every block, validate it against its 256-bit checksum, and repair it if necessary.
The simplest way to check your data integrity is to initiate an explicit scrubbing of all data within the pool. This operation traverses all the data in the pool once and verifies that all blocks can be read. Scrubbing proceeds as fast as the devices allow, although the priority of any I/O remains below that of normal operations. This operation might negatively impact performance, but the file system should remain usable and nearly as responsive while the scrubbing occurs. To initiate an explicit scrub, use the zpool scrub command:
# zpool scrub pool1<cr>
You can stop a scrub that is in progress by using the -s option:
# zpool scrub -s pool1<cr>
Replacing Devices in a Storage Pool
If a disk in a storage pool fails and needs to be replaced, swap out the disk and use the zpool replace command to replace the disk within ZFS.
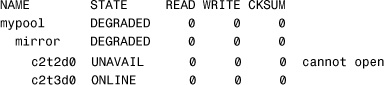
In the following example, a zpool status shows that mypool is in a DEGRADED state:
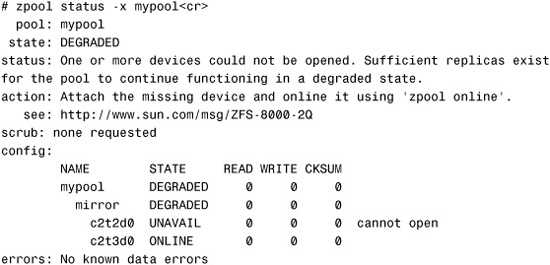
Notice in the output that the storage pool is a mirror but is in a DEGRADED state. This means that the virtual device has experienced failure but still can function. The zpool status output shows that c2t2d0 is in an UNAVAIL state, which means that the device cannot be opened. The physical disk is either disconnected or has failed. The mirror continues to operate.
The steps for replacing a failed disk in a ZFS pool are as follows:
1. Offline the disk using the zpool offline command.
2. Remove the disk to be replaced.
3. Insert the replacement disk.
4. Run the zpool replace command.
Step By Step 9.6 describes the process of replacing a failed disk in a mirrored storage pool with another disk.
STEP BY STEP
9.6 Replace a Disk in a Mirrored Storage Pool
A mirrored storage pool named mypool has a failing disk drive (c2t2d0) A spare disk (c2t4d0) that is already connected to the system can be used as a replacement. Follow these steps to replace the failing disk with the replacement disk:
1. Take the failed disk offline:
# zpool offline mypool c2t2d0<cr>
2. Replace the failed disk with the good disk:
# zpool replace mypool c2t2d0 c2t4d0<cr>
3. Check the pool’s status:
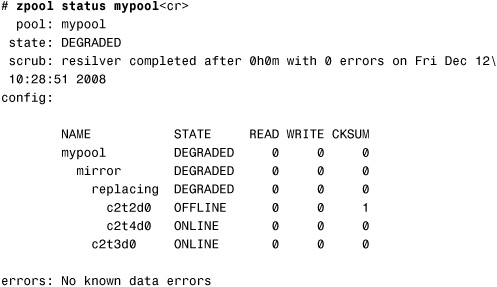
Note that the preceding zpool status output might show both the new and old disks under a replacing heading. This text means that the replacement process is in progress and the new disk is being resilvered.
After a few minutes, the zpool status command displays the following:
Now that the c2t2d0 disk has been offlined and replaced, the physical disk can be removed from the system and replaced.
A ZFS Root File System
New in the Solaris 10 10/08 release is the ability to install and boot from a ZFS root file system. Here are the new features:
• The ability to perform an initial installation where ZFS is selected as the root file system.
• You can use the Solaris Live Upgrade feature to migrate a UFS root file system to a ZFS root file system. In addition, you can use Solaris Live Upgrade to perform the following tasks:
• Create a new boot environment within an existing ZFS root pool.
• Create a new boot environment within a new ZFS root pool.
During the initial installation of the Solaris OS, you’re given the option to install on a UFS or ZFS root file system. Select a ZFS file system, and everything is set up automatically.
The entire installation program is the same as previous releases, with the following exception: A screen prompts you to select either a UFS or ZFS file system:

After you select the software to be installed, you are prompted to select the disks to create your ZFS storage pool. This screen is similar to those in previous Solaris releases, except for the following text:
![]()
You can select the disk or disks to be used for your ZFS root pool. If you select two disks, a mirrored two-disk configuration is set up for your root pool.
After you have selected a disk or disks for your ZFS storage pool, the following screen is displayed:

From this screen you can make changes such as the name of the ZFS pool, dataset names, and pool size. You also can size your swap and dump devices. In addition, you can choose how you want the /var file system created and mounted.
The following is an example of a ZFS root pool after the OS has been installed:
Using ZFS for Solaris Zones
ZFS can be used with Solaris zones, but keep in mind a few points:
• The root file system of a nonglobal zone can reside on ZFS starting with the Solaris 10 10/08 release. Prior to this release, the zonepath of a nonglobal zone should not reside on a ZFS file system.
• The global administrator can add a ZFS file system or a ZFS clone to a nonglobal zone with or without delegating administrative control.
• You can add a ZFS volume as a device to nonglobal zones.
• You cannot associate ZFS snapshots with zones at this time.
• A ZFS file system that is added to a nonglobal zone must have its mountpoint property set to legacy.
• ZFS storage pools cannot be created or modified from within a nonglobal zone.
• Currently you should not add a ZFS dataset to a nonglobal zone when the nonglobal zone is configured. This is due to an existing software bug, 6449301. Instead, add a ZFS dataset after the zone is installed.
Adding a ZFS Dataset to a Nonglobal Zone
A ZFS dataset that has been created in the global zone using the zfs create command can be added as a legacy file system to a nonglobal zone. Step By Step 9.7 describes how to do this.
STEP BY STEP
9.7 Adding a ZFS Dataset to a Nonglobal Zone
1. From the global zone, create a ZFS file system named /pool1/zone1 This dataset will be used as the zonepath for the nonglobal zone that will be created in step 2.

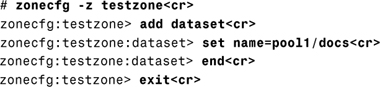
2. Create a nonglobal zone named “testzone”:
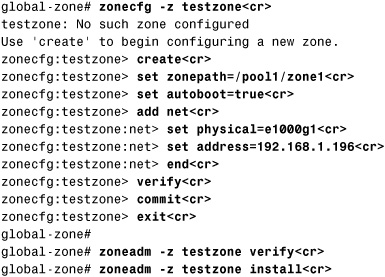
The system responds with this:

3. Make the zone ready, and boot it so that it is running:
global-zone# zoneadm -z testzone ready<cr>
global-zone# zoneadm -z testzone boot<cr>
4. Log in to the zone console, and finalize the installation by completing the system identification phase:
global-zone# zlogin -C testzone<cr>
5. Create a second ZFS file system in the global zone, to be used for the testzone:
global-zone# zfs create pool1/test_data<cr>
6. Set the mountpoint property to legacy:
global-zone # zfs set mountpoint=legacy pool1/test_data<cr>
7. Halt the zone, and add the new ZFS file system to the nonglobal zone:
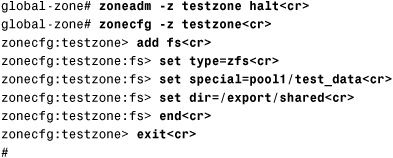
The pool1/test_data file system has been added and will be mounted in the nonglobal zone as /export/shared.
8. Boot the zone:
global-zone# zoneadm -z testzone boot<cr>
9. Log into the nonglobal zone (testzone), and verify that the file system has been added with the df -h command:
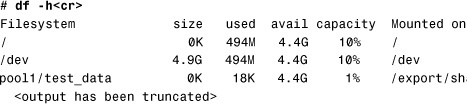
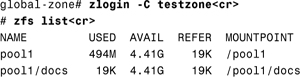
10. The ZFS file system has been added as a legacy file system mounted as /export/shared Therefore, when the zfs list command is executed, the nonglobal zone reports that no ZFS datasets are available:
# zfs list<cr>
no datasets available
#
Delegating a ZFS Dataset to a Nonglobal Zone
In the preceding section, a ZFS file system was added to the nonglobal zone as a legacy file system. In that scenario, the global zone administrator is responsible for setting and controlling the properties of that file system. The nonglobal zone administrator has no control over the ZFS properties of that dataset. In fact, to the nonglobal zone administrator, the dataset appears to be a traditional UFS file system.
To add a ZFS file system to a nonglobal zone that can then be administered within the nonglobal zone, the ZFS file system must be delegated to the nonglobal zone. The administrator of the global zone delegates the file system to the nonglobal zone. When the ZFS file system has been delegated, it is visible within the nonglobal zone via the zfs list command. The zone administrator can set ZFS file system properties, as well as create children. In addition, the zone administrator can take snapshots, create clones, and otherwise control the entire file system hierarchy.
To delegate a ZFS dataset to a nonglobal zone, follow the procedure described in Step By Step 9.8.
STEP BY STEP
9.8 Delegate a ZFS Dataset to a Nonglobal Zone
1. Halt the nonglobal zone:
globalzone# zoneadm -z testzone halt<cr>
2. Create the ZFS dataset named /pool1/docs:
global-zone# zfs create pool1/docs<cr>
3. Delegate the ZFS file system to the zone:
global-zone# zoneadm -z testzone boot<cr>
5. Log into the nonglobal zone console, and verify that the ZFS dataset is visible within that zone:
ZFS storage pools cannot be created or modified within a nonglobal zone. For example, in the preceding Step By Step, you cannot set the quota property on the pool1/docs dataset. However, you can create a ZFS file system under the pool1/docs dataset and set the quota property on that file system:
# zfs create pool1/docs/personal<cr>
# zfs set quota=50m pool1/docs/personal<cr>
A pool-level dataset can be added to a zone, but any command that modifies the pool’s physical characteristics is not allowed. This includes adding devices to or removing devices from the pool.
When a dataset is added to a nonglobal zone under the control of a zone administrator, its contents can no longer be trusted setuid binaries or other questionable contents could compromise the security of the global zone. To address this issue, ZFS uses the zoned property to indicate that the dataset has been delegated to a nonglobal zone. By listing this property on the pool1/docs dataset, we can see that the zoned property was turned on:
# zfs list -o zoned pool1/docs<cr>
ZONED
on
The zoned property is set when the nonglobal zone containing the ZFS dataset is first booted. When the zoned property is set to on, the dataset cannot be mounted or shared in the global zone. When the dataset is removed from the nonglobal zone, or if the zone is destroyed, the zoned property does not get reset to off The zoned property must be manually cleared by the global administrator if you want to reuse the dataset in any way. Change this property only when you are sure that this dataset is no longer in use by a nonglobal zone.
Summary
This chapter has described how to administer ZFS datasets. After reading this chapter, you should understand the advantages of a ZFS file system over traditional file systems. You also should understand how to create and remove a ZFS storage pool and file system.
You learned about the various ZFS configurations: RAID-0, mirrored, and RAID-Z storage pools. You should understand the advantages and disadvantages of each, and you should know how to create each type of storage pool.
You should understand how to display the ZFS datasets installed on your system and be able to identify which types of storage pools have been configured. You should also be able to identify all the components of a ZFS file system.
I also described the various health states of a ZFS dataset. You should know how to view the current state of ZFS datasets on your system, identify problems, and understand how to recover from problems such as a disk failure.
You learned about the properties that are associated with ZFS datasets. You should understand the purpose of these properties, and you should understand how to manage them.
ZFS snapshots were described. You should understand their purpose and how to create a ZFS snapshot, back up and restore a snapshot, list a snapshot, roll back a snapshot, and remove a snapshot. In addition, you should understand how to create a read-only clone and how to promote a clone to make it a writeable ZFS file system.
I described how to install a bootable root (/) ZFS file system during the installation of the OS.
Lastly, the chapter described how to utilize ZFS datasets in nonglobal zones.
There are many more topics to explore with ZFS file systems, but the topics I have covered in this chapter will get you off to a good start. Later, you may want to learn more about troubleshooting and recovering ZFS file systems.
This chapter concludes the study material for the CX-310-202 SCSA exam. I encourage you to use the practice exams on the enclosed CD-ROM to test your knowledge. If you fully understand all the material covered in this book, you should have no problem passing the exam. If you don’t score well on the practice tests, go back and review the topics you are weak in.
Before taking the exam, visit www.UnixEd.com and read up-to-date information about the exams, comments from others who have taken the exams, and test-taking tips. You’ll also find links to additional study materials. You want to be sure you are adequately prepared before spending $300 for the exam.
Key Terms
• Checksum
• Clone
• Dataset
• File system (ZFS)
• Global zone
• Mirror
• NFS
• Nonglobal zone
• Primary boot environment
• RAID-Z
• Resilvering1
• Rollback
• Root pool
• Snapshot
• Storage pool
• Virtual device
• Volume
• zpool
Apply Your Knowledge
Exercise
In this exercise, you’ll create a mirrored ZFS file system. In addition, you’ll modify the mount-point properties to override the default mount point. For this exercise, you’ll need a SPARC or x86-based Solaris system with two additional spare disk drives.
CAUTION
Destructive process This procedure destroys data on the disk. Be sure you have proper backups if you want to save any data on this system.
1. Use the format command to identify two spare disk drives. Write down the device names. On my system, I’ve identified spare disks. I’ll use c2t3d0 and c2t4d0 for this exercise.
2. Create the storage pool, and name it mypool:
# zpool create mypool c2t3d0 c2t4d0<cr>
3. Verify that the storage pool has been created and is online:
# zpool status mypool<cr>
4. Create two ZFS file systems in that pool—data1 and data2:
# zfs create mypool/data1<cr>
# zfs create mypool/data2<cr>
5. Set the quota property so that each file system has 50MB of space:
# zfs set quota=50m mypool/data1<cr>
# zfs set quota=50m mypool/data2<cr>
6. Verify that the property has been set on each dataset:
# zfs get quota mypool/data1 mypool/data2<cr>
7. Remove the pool and datasets from the system:
# zpool destroy mypool<cr>
Exam Questions
1. Before you can implement ZFS, you need to make sure that your system meets the requirements for supporting ZFS. Which of the following describe the hardware and software requirements your system must meet before you can implement ZFS? (Choose three.)
• A. The minimum disk size is 128MB.
• B. The minimum amount of disk space for a storage pool is 64MB.
• C. For a mirrored storage pool, the system must have multiple disk controllers.
• D. 1GB of RAM is recommended for ZFS.
• E. 1GB of RAM is required for ZFS.
2. Which of the following statements are true of Solaris ZFS file systems? (Choose two.)
• A. ZFS replaces traditional Solaris file systems.
• B. You cannot use ZFS on a bootable root (/) file system.
• C. There is no limit on the number of file systems or files that can be contained within a ZFS file system.
• D. ZFS can be used on a Solaris 10 system beginning with release 6/06.
3. You have been instructed to create a ZFS file system that meets the following specifications:
• The storage pool is to be named pool1.
• The storage pool will be a nonredundant device and will use c2t2d0 as a device.
• The ZFS file system is to be named docs.
• The ZFS file system must be mounted automatically at each boot.
Which of the following is the correct procedure to create a ZFS file system that meets these specifications?
• A. zpool create pool1 c2t2d0; zfs create pool1/docs
• B. zfs create pool1/docs c2t2d0
• C. zpool create pool1/docs c2t2d0
Make an entry in the /etc/vfstab file.
• D. zpool create pool1/docs c2t2d0
4. You have the following ZFS datasets on your system:

Which command would you use to remove the /pool1/docs dataset?
• A. zpool destroy pool1
• B. zpool destroy pool1/docs
• C. zfs destroy pool1/docs
• D. zfs remove pool1/docs
5. When you check the status of your pool, the following information is displayed:
Which of the following describes the most likely problem?
• A. The mypool storage pool is unavailable.
• B. c2t2d0 has been taken offline.
• C. c2t2d0 has failed, but the storage pool is still available.
• D. c2t2d0 experienced a failure but still can function.
6. What is the correct sequence of steps required to replace a failed disk in a ZFS storage pool?
• A. Insert the replacement disk.
Run the zpool replace command.
• B. Offline the disk using the zpool offline command.
Remove the disk to be replaced.
Insert the replacement disk.
Run the zpool replace command.
• C. Run the zpool replace command.
Offline the disk using the zpool offline command.
Remove the disk to be replaced.
Insert the replacement disk.
• D. Remove the disk to be replaced.
Insert the replacement disk.
7. The following ZFS datasets are available on your system:

Which command would you use to create a ZFS file system named /pool2/docs?
• A. zpool create pool2/docs
• B. zfs create docs
• C. zfs create pool2/docs
• D. zfs set mountpoint=/pools/docs pool2
8. You have been instructed to create a three-way mirrored storage pool on a server. The specifications are as follows:
• The following spare devices are available: c1t1d0, c2t1d0, c3t1d0, c4t1d0, c3t2d0, and c3t2d0.
• The storage pool is to be named mypool.
• Create two ZFS file systems in the mirrored storage pool named data and docs.
Which of the following describes the sequence of steps to be taken to create this storage pool?
• A. zpool create mypool mirror c1t1d0 c2t1d0 mirror c3t1d0 c3t2d0
zfs create mypool/data
zfs create mypool/docs
• B. zpool create mypool mirror c1t1d0 c2t1d0 mirror c3t1d0 c3t2d0
zfs create mirror mypool/data
zfs create mirror mypool/docs
• C. zpool create mypool -m3 c1t1d0 c2t1d0 c3t2d0
zfs create mypool/data
zfs create mypool/docs
• D. zfs create mypool/data mirror c1t1d0 c2t1d0 mirror c3t1d0 c3t2d0
zfs create mypool/docs mirror c1t1d0 c2t1d0 mirror c3t1d0 c3t2d0
9. The following ZFS datasets exist on your server:

You need to restrict the amount of storage space that the files in /pool1/docs can consume, and you want to limit the file system to a maximum of 5GB. Which command would you execute?
• A. zfs create 5g pool1/docs
• B. zfs set reservation=5g pool1/docs
• C. zfs create quota=5g mypool/bill
• D. zfs set quota=5g mypool/docs
10. The following ZFS datasets exist on your server:

You want to change the /pool1/docs file system so that the mount point is named /export/docs, and you want this name to be persistent across reboots. Which of the following describes how to make this happen?
• A. zfs rename pool1/data /export/docs
• B. Change the /etc/vfstab file so that the mount point is set to /export/docs for the pool1/docs dataset.
• C. zfs set mountpoint=/export/docs pool1/data
• D. The name of the ZFS storage pool (pool1) cannot be changed to /export without destroying the pool and re-creating it with the new name.
11. The following ZFS datasets exist on your server:

You want to make /pool1 invisible to the users, but you want pool1/docs and pool1/data to be available and visible. Which of the following describes how to make this happen?
• A. umount /pool1
• B. zfs umount /pool1
• C. zfs set mountpoint=none pool1
zfs set mountpoint=/pool1/data pool1/data
• D. zfs set mountpoint=none pool1
12. The following ZFS datasets exist on your server:

The /pool1/data file system contains an active database that must remain operational 24 hours a day, seven days a week. Which of the following is the best way to back up this data on a daily basis without taking down the database?
• A. fssnap -F zfs -o bs=/var/tmp /pool1/data
ufsdump 0ucf /dev/rmt/0 /dev/fssnap/0
• B. zfs snapshot pool1/data@tues_snapshot
zfs send pool1/data@tues_snapshot >/dev/rmt/0
• C. zfs snapshot pool1/data@tues_snapshot
ufsdump 0ucf /dev/rmt/0 pool2/data@tues_snapshot
• D. zfs snapshot pool1/data@tues_snapshot
zfs recv pool1/data@tues_snapshot >/dev/rmt/0
13. You’ve been instructed to create a ZFS file system and have been given the following specifications:
• Create the file system on the following devices: c1t1d0, c3t1d0, c4t1d0.
• Name the storage pool “mypool” and the file system “data.”
• Use a RAID-Z dataset.
Which of the following is the correct command to issue?
• A. zpool create raidz mypool c1t1d0 c3t1d0 c4t1d0
zfs create mypool/data
• B. zpool create mypool/data raidz c1t1d0 c3t1d0 c4t1d0
• C. zpool create mypool raidz c1t1d0 c3t1d0 c4t1d0
zfs create mypool/data
• D. zpool create mypool c1t1d0 c3t1d0 c4t1d0
zfs create raidz mypool/data
14. Which command displays only the status of pools that are exhibiting errors or are otherwise unavailable?
• A. zpool status -x
• B. zfs list
• C. zfs list -x
• D. zpool status -v
15. The following ZFS datasets exist on your server:
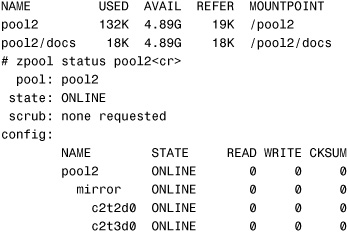
Which command is used to take c2t3d0 out of the storage pool temporarily for maintenance?
• A. zfs offline mypool c2t3d0
• B. zpool demote mypool c2t3d0
• C. zpool detach mypool c2t3d0
• D. zpool offline mypool c2t3d0
16. You have been given a snapshot of the pool2/data file system (pool2/data@tues_snapshot), and you have been instructed to create a new file system from this snapshot. The snapshot must be writable, and the new file system must be named /pool2/docs Which of the following is the command sequence used to build this new file system?
• A. zfs rollback pool2/data@tues_snapshot pool2/docs
• B. zfs clone pool2/data@tues_snapshot pool2/docs
• C. zfs send pool2/data@tues_snapshot
zfs recv pool2/docs
• D. zfs clone pool2/data@tues_snapshot pool2/docs
zfs promote pool2/docs
Answers to Exam Questions
1. A, B, D. The minimum disk size that can be used in a ZFS environment is 128MB. The minimum amount of disk space for a storage pool is approximately 64MB. Answer C is incorrect because although multiple controllers are recommended, this is not a requirement. Answer D is correct because 1GB of RAM is recommended. Answer E is incorrect because 1GB of RAM is not required. For more information, see the section “ZFS Hardware and Software Requirements.”
2. C, D. Directories can have up to 248 (256 trillion) entries, and no limit exists on the number of file systems or number of files that can be contained within a ZFS file system. Answer D is correct because ZFS was not implemented in Solaris 10 until release 6/06. Answer A is incorrect because ZFS does not replace traditional Solaris file systems. They can be used together. Answer B is incorrect because with Solaris 10 release 10/08, ZFS supports bootable, root (/) file systems. For more information, see the section “Introduction to ZFS.”
3. A. Use the zpool create command to create the storage pool, and use the zfs create command to create the ZFS file system in the storage pool. Answer B is incorrect because zfs create is not used to create a storage pool. Answers C and D are incorrect because you cannot use the zpool command to create both the pool and a dataset in that pool. For more information, see the section “Creating a Basic ZFS file System.”
4. C. Use the zfs destroy command to remove a ZFS file system. Answers A and B are incorrect because the zpool destroy command destroys the entire storage pool. Answer D is incorrect because zfs remove is an invalid command. For more information, see the section “Destroy a ZFS File System.”
5. C. c2t2d0 cannot be opened and has failed. The pool is still available but is no longer fault-tolerant. Answer A is wrong because the pool is still available, but in a degraded state. Answer B is wrong because if the disk was taken offline, it would be marked as offline. Answer D is wrong because the disk, c2t2d0, cannot be opened and cannot function. For more information, see the section “Displaying ZFS Storage Pool Information.”
6. B. Answers A, C, and D do not describe the proper sequence of steps required to replace a failed disk. For more information, see the section “Replacing Devices in a Storage Pool.”
7. C. Use the zfs create command to create a ZFS file system in an existing pool. Answer B is incorrect because it does not specify the pool. Answer A is wrong because the zpool create command is used only to create the initial pool. Answer D is wrong because the zfs set command is used to set a property on an existing file system. For more information, see the section “Creating a Basic ZFS File System.”
8. A. Use the following command to create the three-way mirror: zpool create mypool mirror c1t1d0 c2t1d0 mirror c3t1d0 c3t2d0 Answer B is wrong because zfs create mirror is invalid syntax. Answer C is wrong because –m3 is an invalid option for the zpool command. Answer D is wrong because mirror is an invalid option for the zfs create command. For more information, see the section “Attaching and Detaching Devices in a Storage Pool.”
9. D. Use the zfs set quota=5g command to set the maximum size on a ZFS file system. Answer B is wrong because the reservation property specifies the minimum amount of space guaranteed to a dataset and its descendents and is not used to limit the size of the file system. Answer C is wrong because the file system is already created. For more information, see the section “Setting ZFS Properties.”
10. C. Change a ZFS file system’s mount point by changing the mountpoint property using the zfs set command. Answer A is wrong because you cannot change the name of a storage pool using the zfs rename command. Answer B is wrong because you cannot use the /etc/vfstab file to set a mount point for a ZFS file system that is not set up as a legacy file system. Answer D is wrong because the mount point can be changed using the zfs set command; the pool does not need to be renamed. For more information, see the section “Mounting ZFS File Systems.”
11. C. Answer C is correct because when you set the mountpoint property to none for pool1, all the descendants also become invisible. You then must set the mountpoint property for the descendant to make it visible again. Answer A is wrong because you cannot unmount a ZFS storage pool. Answer B is wrong because if you unmount /pool1, /pool1/data will also be unmounted. Answer D is wrong because if you set the mountpoint to none on pool1, the descendant pool1/data will also be unmounted. For more information, see the section “Mounting ZFS File Systems.”
12. B. Answer A is wrong because the fssnap command syntax is incorrect, and a ZFS snapshot should be used to take a snapshot of a live ZFS file system. Answer C is wrong because the ufsdump command is not used to back up a ZFS snapshot to tape. Answer D is wrong because the zfs send command should be used to save a snapshot to tape, not zfs recv For more information, see the section “ZFS Snapshots.”
13. C. Answers A and B are wrong because the zpool create command syntax is incorrect. Answer D is wrong because the raidz pool is created with the zpool create command, not the zfs create command. For more information, see the section “RAID-Z Storage Pools.”
14. A. The -x option can be used with the zpool status command to display only the status of pools that are exhibiting errors or are otherwise unavailable. Answers B and C are wrong because the zfs list command does not display the health status of a storage pool. Answer D is wrong because the -v option displays verbose output and displays all the pools, whether or not they are exhibiting errors. For more information, see the section “Displaying ZFS Storage Pool Information.”
15. D. Use the zpool offline command to temporarily disconnect a device from a storage pool for maintenance purposes. Answers A and B are invalid commands. Answer C is wrong because the zpool detach command is used to permanently remove a disk from a storage pool. For more information, see the section “Offlining and Onlining Devices in a Storage Pool.”
16. B. Answer A is wrong because the zfs rollback command is not used to clone a file system. Answer C is wrong because the zfs send and zfs recv commands are not used to create a clone of a ZFS file system. Answer D is wrong because the zfs promote command is not required. For more information, see the section “ZFS Clones.”
Suggested Reading and Resources
Solaris ZFS Administration Guide by Sun Microsystems, available at http://docs.sun.coim, part number 819-5461-14.