In this chapter
Desktop personal computers store information on hard disk drives. These days drives average 4GB–20GB in size, with drives in newer high-end systems hitting as much as 40 or 60GB. (Older systems, however, might have hard drives of only 500MB, and possibly smaller.) The hard drive stores the operating system and application files installed on the system. It typically also includes all the personal and business data that has been loaded or created on that system. The software and data represent a significant investment in money and effort that would be lost if your hard disk were damaged or erased.
Today's personal computers are reliable and economical data processing machines. Like all other machines, however, computers are subject to failures and operator errors. Table 9.1 lists some hardware and software problems discussed in this chapter and suggests ways to prevent these problems.
Table 9.1. Hardware and Software Problems and Prevention Techniques
Always be cautious about your computer's environment. With the low cost of surge suppressors and desktop UPS systems, you would be wise to use one of them. If lightning or another sort of power surge destroys your brand-new Pentium III system, you will regret not spending $60 on an uninterruptible power supply (UPS)/surge suppressor.
Your computer might perform erratically when it is too hot. Because circuits are unreliable when they overheat, you might get jumbled data. Make sure that your computer has room to breathe by cleaning the air vents and allowing plenty of space for air to circulate.
You generate static electricity on your body when humidity is low, when you wear synthetic fabrics, or when you walk on carpet. Just by touching your keyboard while carrying a static charge, you can send an electrical shudder through your computer, causing a data jumble or circuit failure. Fortunately, you can avoid static problems by touching your grounded system cabinet before touching the keyboard. If static electricity is a serious problem for you, ask your dealer about antistatic products, which are inexpensive and easy to use.
Finally, be sure to keep your computer clean and free of dust. It is usually a good idea to use a can of compressed air to blow out the dust that accumulates over time. Take special care to keep the fan outlet on the power supply clean and free of anything that will impede airflow.
Compared to floppy disks, hard disks have many advantages. Hard disks are faster, have larger storage capacities and root directories, support multiple partitions, and never require a disk swap. A file on a hard disk can be many times the size of a file on a floppy disk. Commands such as COPY and XCOPY enable you to keep a few duplicate files on a floppy for backup purposes, but DOS provides a pair of special programs specifically designed for the big jobs: Microsoft Backup (MSBACKUP.EXE) and Microsoft Backup for Windows 3.x (MWBACKUP.EXE).
Note
Starting with Windows 95, Microsoft has moved to a graphical backup program. The version of DOS that is installed with Windows 9x does not include the command-prompt backup utility.
For more information on using the Windows 95/98/ME backup utility, see Que's Special Edition Using Windows 95, Special Edition Using Windows 98, or Special Edition Using Windows Millennium.
By default, the Setup program installed one of these programs when you installed DOS on your computer. If your system has Microsoft Windows 3.1, however, you have the option of installing both programs. As you might expect, Microsoft Backup for Windows can be used only within Microsoft Windows. The DOS version, however, can be used either at a command prompt or in a DOS window within Microsoft Windows.
Note
If you do not now use Microsoft Windows but plan to add that operating environment to your system later, you must reinstall DOS to install the Windows version of the backup program.
Both backup programs are full-featured programs that enable you to perform the following tasks:
Copy files from a hard disk to another disk, usually a floppy disk.
Restore the copied files to their original location or to another disk of your choice.
Compare files on your backup copies with the originals to ensure their validity.
Both programs have several types of menus and many options to enable you to copy only those files you want to copy and to ease the process of making backups regularly. Because the programs are similar, this chapter focuses on MSBACKUP. Relevant differences in the Windows version are noted.
Tip
The files copied to the backup disk do not have the same format as files on your hard disk or files copied with the COPY or XCOPY commands. The directories of disks written by the backup programs show only one file per disk, taking all the available space, as in the following example:
Volume in drive A is DEFAULT FUL
 Directory of A:

CC30914A 001   1,457,664 09-14-93   6:02a
        1 file(s)    1,457,664 bytes
                             0 bytes free
These files might actually contain the data that originally appeared in many files on your hard disk, along with information about their original location. Before you can use these files, you must restore them by using the Restore portion of one of the Backup programs.
Both versions of the Backup program can read backup disks created by the other version. You need not worry, therefore, about losing access to backup data if you switch from one version of the program to the other.
Backup disks contain not only special copies of files but also directory information about each file. This information enables the programs to copy the backup files to their original locations in the directory tree.
The Backup programs can spread a single file across more than one floppy disk. This capability enables you to copy to multiple disks files that are too big to fit on a single disk. If a backup operation uses more than one disk, each disk is linked internally to the next disk to form a backup set.
During the backup operation, each disk in a set is filled to capacity before the next disk is requested. If a file is only partially written to a backup disk when the disk reaches full capacity, the remainder of the file is written to the next disk in the set.
Like XCOPY, the Backup programs can copy files selectively. You can specify a directory or branch of directories, a filename, a filename patterned after a wildcard, and additional selection switches. By taking advantage of the programs' selectivity, you can maintain more than one set of backup disks, each set having its own logical purpose.
You can, for example, keep one backup set that contains every file on your hard disk. This set is insurance against data loss resulting from a hard disk failure or crash. You might have another backup set that contains only the files that have their archive attributes turned on. With an archive set for each day of the week, you can recover a week's worth of data between complete backups. When your hard disk fails, you replace it, restore using the full set, and then update with the daily sets.
You can lose the data on your hard disk in many ways. If you have not replicated the data, you might be forced to re-create the data and suffer the consequences of permanent data loss if you cannot re-create the data.
Before you can create backups of your data with either backup program, you must first test the program for compatibility. The test is performed automatically the first time you run the program. A special program runs through some of the backup program's menus, making selections as though you were running the program yourself. This program tests your floppy disk drives and the speed of your processor chip and hard disk. Periodically, dialog boxes appear and ask you for permission to continue. You respond by selecting “buttons” similar to those you might have seen in dialog boxes in the DOS Shell and the DOS Editor. You select options in the same way: by pressing the highlighted letter, by moving the highlight to the desired button with the Tab or Shift+Tab key, or by clicking the desired button. In the DOS version, a highlighted button has pointers at its left and right ends and is a different color from the other buttons. In the Windows version, the highlighted button is simply a different color.
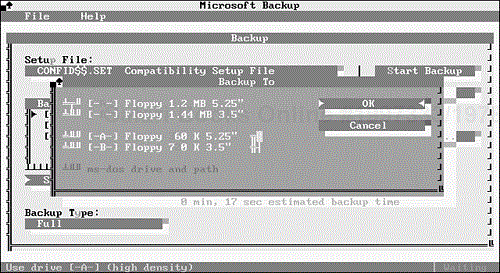
The program then displays a dialog box that gives you the option of choosing the drive and medium you want to use for the compatibility test (see Figure 9.1). To select a different capacity disk, move the highlight to the appropriate entry with the cursor keys; then press the spacebar. Choose OK when the setting conforms to your choice. (If you have only one low-density drive, this option is not available.) If you have two drives of the same type, the program uses both, alternating backup disks between the drives.
The program then selects a group of files to back up and completes a backup. This procedure requires two floppy disks of the type you selected. Make sure that they do not contain any data you want to save because the disks will be erased completely. The program instructs you when to insert the disks. When the backup is complete, the program compares the data on the backup disks with the source files to verify that the backup is accurate.
Note
Even after you configure one of the backup programs, you still have to configure the second program. However, the backup files that either program creates can be read by the other program.
Your computer will probably pass the compatibility test. If it does, you can proceed to make backups with the program. However, the program might display the following warning message:
DMA Buffer size too small. You will not be able to perform a backup,
compare, or restore until the DMA buffer size is increased. See
'Troubleshooting' in your MS-DOS manual.
If this message appears, and you have an 80386 or 80486 microprocessor, use the DEVICE command to load the memory manager EMM386.EXE in your CONFIG.SYS file. Add the parameter D=64 to the command, as shown in the following line:
DEVICE:C:DOSEMM386.EXE D=64
If you have an 8088 or 80286 microprocessor and do not use an expanded memory manager, you will not encounter this problem; but the program might still fail the compatibility test. (See Chapter 19, “Configuring Your Computer,” for details on EMM386.EXE and the CONFIG.SYS file.)
When you finish running the tests, the programs save your configuration information to disk so that it can be used whenever you run the backup program again.
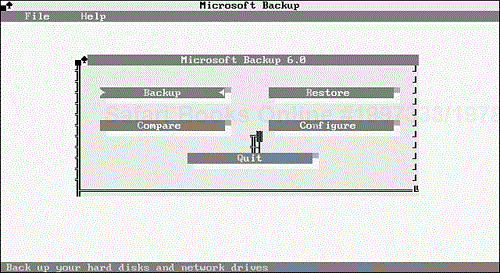
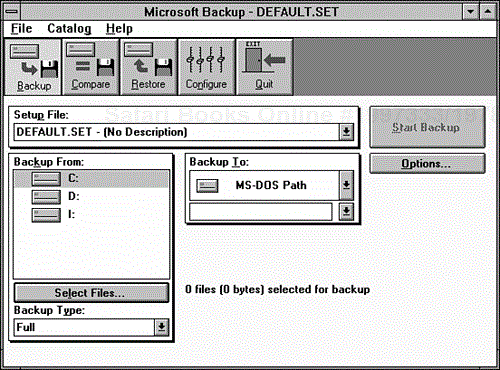
Both the DOS and Windows backup programs have five basic functions: Backup, Compare, Restore, Configure, and Quit. In the DOS version, the dialog box shown in Figure 9.2 contains buttons representing each function. In the Windows version, the functions are represented by a series of icons near the top of the screen (see Figure 9.3).
The functions are listed here:
Backup duplicates all or selected files from your hard disk onto floppy disks.
Compare compares the files in a set of backup floppy disks to their source on the hard disk to verify that the copies are accurate.
Restore copies the files on your backup floppy disks to the hard disk, in either their original location or a new location, or to another floppy disk in usable form.
Configure enables you to select default settings for the program. In the DOS version, you can choose the following actions:
Change the number of rows of text shown on the screen
Switch to a display using normal text characters rather than the graphics characters shown in the illustrations here
Adjust the way your mouse behaves
Change the screen colors
Quit enables you to exit the program.
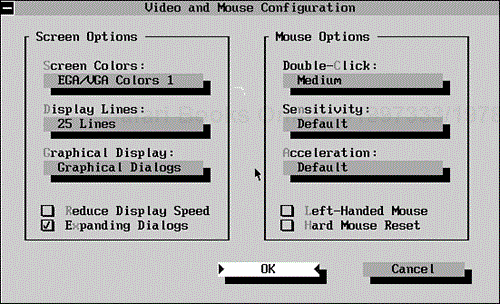
The Configure options, which appear in Figure 9.4, are similar to the options found on the DOS Shell's Options menu. You can also select a different drive or disk capacity for your backups or send your backups to a DOS path—that is, a directory on your hard disk.
→ For more information on using DOS Shell, see Chapter 4, “Using the DOS Shell,” p. 57 .
Both programs have pull-down menus at the top of the screen. The File menu enables you to load and save setup files—files that contain all the settings you will use for a particular type of backup or restore. The File menu also enables you to print catalog files containing a list of the files that have been backed up. Both backup programs have a Help menu as well, which explains techniques and procedures. The Windows Backup program has a third menu, a Catalog menu, which enables you to select catalog files for restoration or comparison. This menu does not appear in the DOS version; however, you can select catalog files after you have chosen to perform a restore or compare.
Depending on your backup requirements, the following three specific types of backups can be performed using MSBACKUP:
A full backup copies every file on your hard disk. Keep at least two full backup sets so that you can re-create your system if your hard disk is destroyed; you need not make both copies at the same time.
An incremental backup copies only new files or files that have been changed since the last full or incremental backup was performed. You use an additional set of disks for the incremental backup set. You might complete several backups between full backups, depending on how many files you work with and how large the files are. Each time you perform an incremental backup, you add any files that are new or have been modified since the previous new or incremental backup.
A differential backup copies only files that are new or have been changed since the last full backup and requires a separate set of disks from the full backups. With a differential backup, however, you reuse the same floppy disks for each backup until you perform your next full backup.
The distinction between incremental and differential backups lies with the archive bit. When you perform a full backup, the backup programs turn off the archive attribute for any file that is backed up. When you modify or create a file, DOS turns on the new or modified file's archive attribute.
When you perform an incremental backup, the backup programs turn off the archive bit so that each incremental backup includes only files created or modified since the previous incremental backup. When you perform a differential backup, however, the backup programs do not turn off the archive bit. Therefore, every file modified or created since the previous full backup is copied. The differential backup is appropriate if you work with the same few files daily and do not need several generations of each file.
You can perform a full backup weekly, monthly, or at some other interval. The intervening (incremental or differential) backup intervals reduce your risk of data loss between full backups. The time between performing intermediate backups depends on the amount of risk to your data you are willing to take. In a business setting, you might reduce your risk to an acceptable level by performing an intermediate backup every other day. If your PC activity level is high, you might have to perform an incremental backup daily. If your PC activity is minimal, a differential backup once every two weeks might be frequent enough to reduce your risk to a manageable level.
In addition to these three types of backups, you can create backup sets for special purposes. You can select files to include in, or exclude from, the backup. You can select these files individually, by directory, according to a wildcard pattern, by date, or by attribute, and save the selections in a setup file. You learn how to select files for backups later in this chapter.
The syntax for the MSBACKUP command is shown in the following line:
MSBACKUP filename /video
Both switches are optional. filename is the name of a setup file. If you created setup files for different types of backups, you can load one automatically by specifying the file on the command line. If you do not specify a setup file, MSBACKUP loads DEFAULT.SET and applies the settings to the drive specified in that file. If no drive is specified, MSBACKUP applies the settings to the default drive.
/video specifies the type of video display to be used. Use /LCD for laptops or other LCD screens, /BW for black and white, or /MDA for monochrome displays, including those attached to Hercules-type adapters. Do not specify a video type for a color display.
By default, MSBACKUP uses the path contained in the MSDOSDATA environment variable to determine where to look for configuration information. If this environment variable does not exist, the program searches the directory from which MSBACKUP was started. If it is not located there, MSBACKUP uses default values and creates a configuration information file in that directory. To add this environment variable, add the following line to your AUTOEXEC.BAT file:
SET MSDOSDATA=C:DOS
You can change the path to the right of the equal sign to any other valid directory you want to use for your backup configuration information.
Now that you understand how Microsoft Backup (MSBACKUP.EXE) and Microsoft Backup for Windows 3.x (MWBACKUP.EXE) work, it is time to see how to use them to perform your backup procedures. The following sections explain how to perform these tasks.
In this section, you learn how to complete a full backup. First, you learn how to use MSBACKUP and then Microsoft Backup for Windows.
To perform a full backup in DOS, follow these steps:
Enter the following command:
MSBACKUP
The program scans drive C (unless you specified a different drive and saved the information in the default setup file,
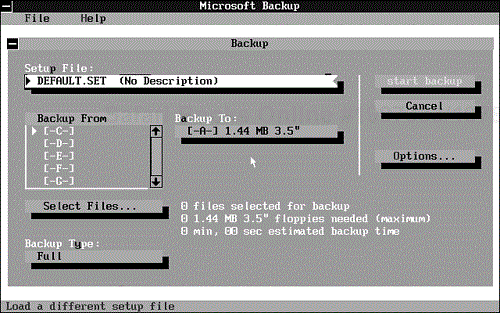
DEFAULT.SET), reads its directories, and then presents its opening screen.Choose the Backup button. As shown in Figure 9.5, the default setup file is loaded, and the selected backup type is Full. To perform a full backup, select the drive to back up from the Backup From list by double-clicking the appropriate drive, or by using the cursor-movement keys to move the highlight to the drive and pressing the spacebar. You might choose more than one drive. Each time you choose a drive, Backup scans the drive and adds the selected files to the totals.
As you select files to back up, the Backup screen shows you exactly what is required. A message similar to this one appears:
1,316 files (with catalog) selected for backup
24 1.44 MB 3.5" floppies needed (maximum)
15 min, 50 sec estimated backup time
Backup formats any target disks that are not formatted and compresses the data on the backup disks so that the capacity of the disks required might be less than the amount of data you need to back up.
Choose Start Backup. The program begins by creating a backup catalog, listing the files to be backed up and the options chosen. The following message appears:
Insert diskette #1 in drive A:
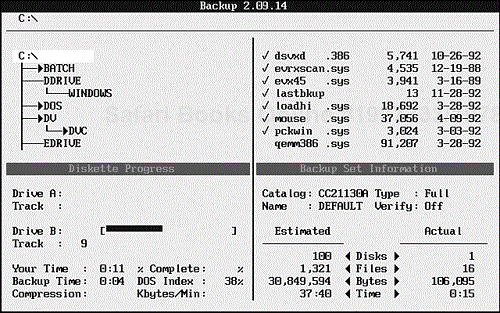
As the backup progresses, a display similar to Figure 9.6 appears.
When the disk is full, the program prompts you to insert the next disk, and so on until the backup is complete.
As you remove each disk, label it “Full Backup #nn,” in which nn is the number of the disk in the series. Date the label, also. When the backup is complete, the opening screen reappears.
The first time you use a series of disks for a backup, compare the backups to the originals to verify that the disks are readable and accurate. You don't want to discover that your backup is unusable when you want to use it to recover a hard disk!
To perform a compare, follow these steps:
Choose Compare. A screen similar to the main Backup screen appears.
Choose Backup Set Catalog, and select the setup file you used for the backup. (If you haven't saved any setup files, it will be
DEFAULT.SET.)Select the drive or drives from the Compare From list; the number of files to compare changes from 0 to the number of files you backed up.
The program prompts you to insert each disk in turn, and a progress screen keeps you apprised of events.
At the end of the process, the dialog box indicating that no errors were found or that the errors were corrected will probably appear. If this is not the case, you might want to discard the disks that contain the errors, replace them with new ones, and repeat the backup.
Tip
When you quit the program, you might be told that you have not saved your changes in the DEFAULT.SET setup file. In this case, you are asked whether you want to save your changes or discard them. You might find it more helpful to save your settings explicitly to other files that you can load either from within the program or from the command line. To save a backup setup, choose Save As from the File menu, and specify a filename and, optionally, a drive and directory where the setup file should be stored. The program automatically supplies the extension .SET.
The procedure for performing a full backup in Windows is essentially the same as for DOS. The primary difference is the appearance of the screen. When the program loads, you see a message warning you not to use your disk drives while a backup, restore, or compare operation is in progress. You can prevent this message from reappearing each time you load the program by checking the Disable This Message box. Otherwise, you proceed the same way you would in DOS. You can work in other programs while the backup is proceeding. A beep informs you when you must change disks.
Two types of intermediate backups are possible: incremental and differential. The difference depends on the status of the archive bit for selecting files. The incremental backup resets the archive bit after completion, and the differential backup does not reset it.
To perform an incremental backup, choose Backup Type and then choose Incremental from the dialog box. The backup proceeds in the same way as the full backup. Mark each disk in the set with the number and date belonging to the increment for this backup.
You might perform an incremental backup every Tuesday and Friday, for example, and run a full backup every two weeks. Under this plan, you accumulate four incremental backup sets before you have to repeat the backup cycle and reuse the disks.
Note
No matter what type of backup you perform, the backup programs erase the target disks; therefore, each incremental backup must start on a new target disk. You cannot add backup files to disks that have been used as part of a set. By default, the backup programs warn you when the disk you are using is part of an existing backup set and give you the options of overwriting the disk, placing a different disk in the drive, or canceling the backup.
If you use the differential backup method, you have just one intermediate backup set. The first time you do an intermediate backup in a backup cycle after a full backup, start with disk number 01 in your intermediate backup set. You might need more than one disk to complete the backup. Because the differential method does not reset the archive bit, the next intermediate backup set includes all the files included in the first intermediate backup set. Consequently, you can reuse the same backup disks for each intermediate backup set. To perform a differential backup, select Differential from the Backup Type dialog box and proceed as you would with a full backup.
The differential method has the advantage of using fewer backup disks than the incremental method. On the other hand, you retain only one intermediate copy of your files that have been modified or created since the previous full backup. If you think you might need to examine successive iterations of a file, use the incremental method.
You are not limited to full and intermediate backups of entire disks. You can specify any file or group of files to be included in a backup. When you complete a project, for example, you might want to back up all the files associated with that project in a special series for archival purposes. Or you might want to back up such files daily in a series of incremental or differential backups. Both backup programs provide the means to make any number of special-purpose backups.
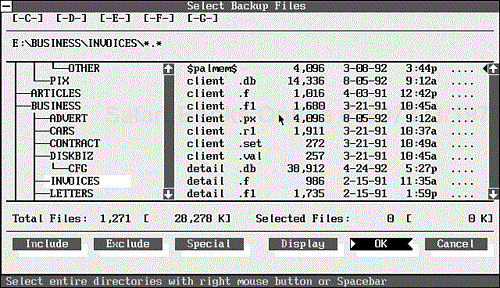
To select a group of files for a special backup, first make sure that your backup type is Full. Otherwise, you cannot include files that do not have their archive bit set. Next, choose Select Files. The backup program scans the default (or selected) drive to see how many files and directories are on it and displays a screen similar to the DOS Shell, with drives at the top, directories at the left, and files at the right (see Figure 9.7). The status line displays the following message:
Select entire directories with right mouse button or Spacebar
You also see a series of buttons at the bottom of the screen. The Shell-like window and buttons provide two different (although complementary) ways to select files for backing up. These procedures differ somewhat in the two backup programs.
When you choose Select Files and go to the selection screen, you see that the root directory of the current drive is highlighted. To select an entire directory, move the highlight to it; then double-click, press the spacebar, or click once with the right mouse button. A pointer appears next to the root directory, and check marks appear next to the filenames. To select only some of the files in a directory, select the files individually in the file window, or select the directory containing them and then deselect the files you want to exclude. To select or deselect a file, follow the same procedure you use to select a directory.
When only some of the files in a directory are selected, the pointer next to the directory name changes to the > symbol.
Press Alt+N to select the Include button and then choose OK. This action selects all the files in all the subdirectories of the root directory—that is, the entire drive. Choose OK; the Backup screen reappears.
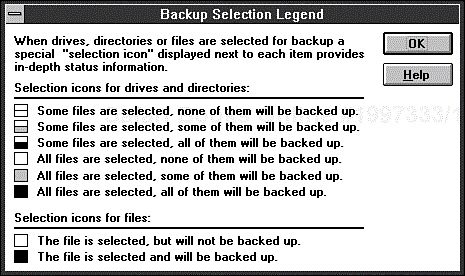
You select files and directories for backup in Microsoft Backup for Windows 3.x the same way as in MSBACKUP. The main difference is the manner in which selection information is displayed. A series of symbols lets you know in detail which directories have some or all files selected and whether some or all of the selected files will be backed up. (Files might be selected and not backed up if you have chosen an intermediate type of backup, or if you have given the program explicit instructions not to back up some of the selected files, as described in the next section.) Choosing the Legend button displays the description of the symbols, as shown in Figure 9.8.
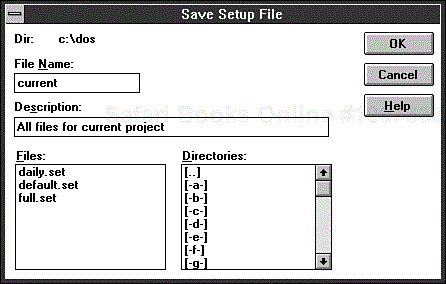
If you want to reuse the selections you have made, be sure to save the selections in a setup file; if you don't do so, your selections are saved in the DEFAULT.SET file. To save your selections in a setup file, choose Save Setup As from the File menu. The Save Setup File dialog box appears, enabling you to give the backup set a name and description (see Figure 9.9). You can optionally choose a different drive and directory for the setup file. (The default is C:DOS.) Figure 9.9 shows the Windows version of the dialog box, but the DOS version is similar.
The next time you want to perform a backup of this type, load the setup file. In the DOS version, you can load the setup file from the command line or by choosing Open Setup from the File menu. In the Windows version, you can load the setup file from within the program using the same command. (The Open Setup File dialog box is similar to the Save Setup File dialog box.) Under some mysterious circumstances, you sometimes have to choose the appropriate drive from the Backup From list to activate your selections; usually, however, you do not.
The buttons at the bottom of the file selection screen give you many ways to select files to include in or exclude from a backup. These buttons also control other aspects of the program:
Include and Exclude enable you to specify a path to include or exclude, and a filename. The filename might include a wildcard pattern. You can optionally check a box to include all subdirectories of the specified path.
In addition to selecting files to include, you might want to exclude the following types of files, even from a full backup:
Configuration files that are regenerated or updated every time you use an applications program
Backup files created by applications programs (usually having the extension
.BAK, or some other extension including the characters B and K)Temporary files (usually having the extension
.TMPor an extension including the$sign)
Special enables you to exclude read-only, hidden, system, or copy-protected files, or select files by date.
Display enables you to determine whether the files appear in the file window sorted by name, extension, size, date, or attribute, and whether selected files appear before unselected files when the screen is refreshed.
The Display button in Microsoft Backup for Windows 3.x, in addition to the functions available in
MSBACKUP, enables you to determine which of the directory data appears in the file window. You can selectively exclude the file date, file time, file size, and file attributes. You can also rearrange the display so that the directory window appears above the file window rather than to its left.
Microsoft Backup for Windows includes two other buttons:
Legend displays the Backup Selection Legend window (refer to Figure 9.8).
Print enables you to print a list of the files selected for backup, either to the printer or to a file. (You can print the contents of the setup file from either program by choosing Print from the File menu.)
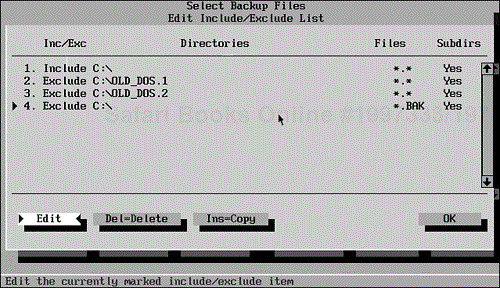
When you choose Include or Exclude, the dialog box contains a button labeled Edit Include/Exclude List. Choosing this button produces the dialog box shown in Figure 9.10. You can select an entry to copy, delete, or edit.
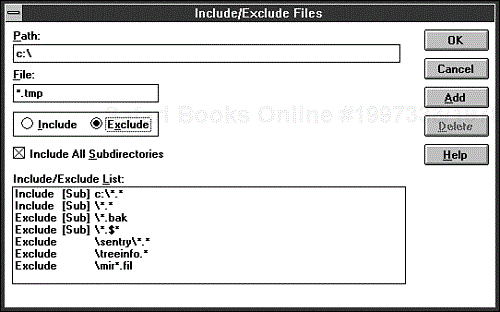
To edit a selection, choose Edit. This command displays the Edit dialog box (see Figure 9.11). In this dialog box, you can specify a drive, path, and filename, including wildcard patterns. You can choose whether to include or exclude the specified files and whether to apply the selection to subdirectories of the current directory.
To use the Edit dialog box effectively, you first must copy an existing specification in the Edit Include/Exclude List dialog box (refer to Figure 9.10). Then select one of the copies and choose Edit. After you reach the Edit dialog box, you can enter any specifications you want.
Tip
In MSBACKUP, you need not include a drive name in a specification for inclusion or exclusion. By not specifying a drive name, you can apply the same specifications to any or all drives and select the drives from the Backup From list. In Microsoft Backup for Windows 3.x, you must include a drive name. However, you can load a setup file created by MSBACKUP in Microsoft Backup for Windows.
In Microsoft Backup for Windows 3.x, a single dialog box contains the list of included and excluded file specifications and the fields for editing specifications (see Figure 9.12). You do not have to edit existing specifications. You can just enter your criteria (which must include a drive name) and choose Add.
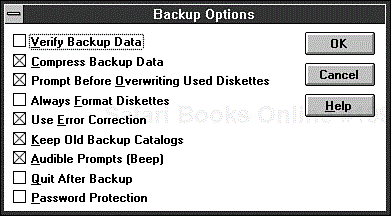
Both backup programs give you additional options concerning their behavior. To view or change these options, use the Options button on the Backup screen. Figure 9.13 shows the resulting dialog box in Microsoft Backup for Windows 3.x, with the default options selected. The options—and the defaults—are the same in MSBACKUP.
The Backup Options dialog box contains the following options:
Verify Backup Data forces the backup program to read the file from the backup disk after it is written and compare it to the original file. This process ensures that the backup is safe and accurate. When you use this option, however, the backup takes nearly twice as long.
Compress Backup Data causes the program to compress the data before writing it to the backup disk. Compression results in the backup requiring fewer disks and might reduce the time required.
Prompt Before Overwriting Used Diskettes causes the program to display a warning before writing backup data on a used disk. You can then choose to overwrite the files on the backup disk or use a different disk.
Always Format Diskettes forces the program to format every backup disk before writing to it so that the backup programs always format an unformatted disk or a badly formatted disk. Choosing this option increases the time required for a backup.
Use Error Correction adds special coding to each backup disk to make recovering the data easier if the backup disks become damaged or worn out. This option decreases the amount of data you can fit on each backup disk, but the extra margin of safety is worth the loss.
Keep Old Backup Catalogs prevents the programs from erasing the previous catalog when you perform a full backup. If, as suggested, you have two separate full backup series, leave this option selected so that you can use the catalogs to locate files to be restored.
Audible Prompts (Beep) causes the computer to beep every time a prompt appears.
Quit After Backup automatically closes the program when your backup procedure is complete. This option is useful when you are running
MSBACKUPfrom a batch file or running Microsoft Backup for Windows in the background.Password Protection enables you to enter a password, which will thereafter be required to access the backup data or catalog.
Performing a backup operation is akin to buying an insurance policy. You hope you never have to use it, but if disaster strikes, you have a way to replace the loss. To reinstate lost data onto your hard disk, choose the Restore button in either program.
Note
The DOS backup programs can restore only data backed up with one of these programs or with one of the Norton backup programs, published by Symantec Corporation. DOS includes an external RESTORE command, which is the only command that can read files copied to a backup set by the BACKUP command from earlier versions of DOS. Consult the “Command Reference” later in this book for details on the use of this command.
The Restore option enables you to restore an individual file, selected files, or an entire hard disk.
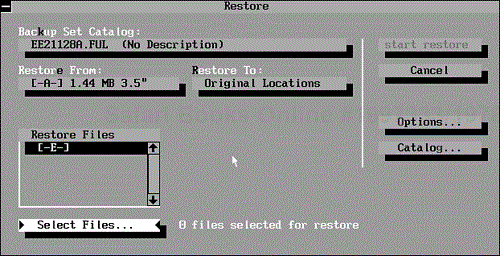
Both backup programs provide the same facilities when restoring files, but they're arranged somewhat differently. When you choose Restore, the program loads the most recent backup set catalog and displays the Restore screen shown in Figure 9.14. The catalog's name appears in the Backup Set Catalog field. The drive and capacity used for the backup appear in the Restore From field, and Original Locations appears in the Restore To field.
To choose another backup set for restore, select Backup Set Catalog and choose one of the other files listed. If the file is not in the default catalog directory (C:DOS), choose Catalog and then choose Load; then select the drive and directory from the appropriate list before choosing the catalog file.
If your hard disk contains no catalog file for the backup series from which you want to restore, choose Catalog and then Retrieve. The program asks you to place the last disk of the backup series in your drive, and the backup program reads the catalog from the disk. If the program cannot read the catalog, the catalog is missing, or the disk is damaged, choose Catalog and then Rebuild. The program asks you to insert each backup disk from the series beginning with disk 01. The backup program reconstructs the catalog from the data on the backup disks.
Note
The Catalog command appears on a button in MSBACKUP and on the menu bar in Microsoft Backup for Windows 3.x.
By default, the programs restore files to their original locations. If the file's original directory is no longer on the destination disk, the program creates the directory before restoring the file. The programs make directory entries for files that are no longer on the destination disk and allocate the next available space in the FAT for the restored file's allocation.
You can restore to other drives or other directories. To do so, choose Restore To, and select Other Drives or Other Directories. You might want to use this option to restore an older version of a file without destroying your current version. By default, the programs automatically overwrite existing files of the same name in the same location. If you choose either of the alternative locations, you have a chance to enter both a drive name and directory path after you begin the restore.
You can restore all or only some of the files in a backup set. To restore all the files, select the drive or drives in the Restore Files list. This action selects all the files in the backup set that were originally on the selected drive.
To select individual files to restore, choose Select Files. You again see a screen similar to the DOS Shell screen. However, only those drives included in the backup appear on the drive bar, and no filenames appear in the file window if the current directory did not include any files that were backed up. In Microsoft Backup for Windows 3.x, directories that contain no files in the backup set appear in light gray. You select files and directories to restore in the same way you selected files and directories for backup.
When the correct entries appear in all fields of the Restore screen, choose Start Restore. Like the Backup module, the Restore module prompts you for the disks of the backup set.
Note
Restoring a full backup set to a freshly formatted disk eliminates any file fragmentation that might have existed on the disk when you backed up the files. Restoring an incremental backup set, however, might result in fragmented destination files. As you might recall, fragmentation doesn't affect the file's integrity, but it might slow disk performance slightly.
When you restore files, keep the following guidelines in mind:
This section presents an example of restoring files. Assume that you are using a backup policy that includes a weekly full backup on Friday and an incremental backup each Wednesday. You have two backup sets. The first set from Friday contains all files. The second set contains only files modified or created after Friday, but before Thursday.
Caution
If you have copy-protected files on your hard disk when you do a backup, they might not restore properly to a destination disk. Ideally, you uninstall copy-protected software using the manufacturer's suggested procedure before you perform the backup; then you reinstall the copy-protected programs after the restore operation. This practice might not be practical, however. Keep in mind that you might have to reinstall copy-protected software after restoring a complete disk.
Now suppose that you are saving a worksheet file on Thursday morning when a worker begins to use a large drill next door. DOS reports the following message:
General Failure on drive C:
You abort the spreadsheet session and run CHKDSK or SCANDISK to ensure that your FAT and directory system are in order. (Chapter 7, “Preparing and Maintaining Disks,” covers the operation of both CHKDSK and SCANDISK.) DOS reports hundreds of lost clusters.
You have had an electrical noise–induced hard disk failure. You have no choice but to reformat your hard disk and then fall back to your backup disks. This process requires the steps discussed in the following paragraphs.
You first have to reboot your computer with a DOS startup disk in drive A because the DOS utilities on your hard disk might be corrupt. After you format your hard disk, copy the external DOS commands back to the hard disk from the DOS master disks. You must use MSBACKUP for the restore because you have not yet restored Windows. Use the PATH command to set a search path to the DOS directory so that DOS can locate the MSBACKUP command.
In case of total disk failure, restore your backup sets in chronological order. Restore your latest full backup set first. Locate the disks from your full backup set and put them in their proper order. Then, issue the MSBACKUP command. You probably will have to configure the program all over again. After you have completed this process, choose Restore.
Put the last disk into drive A, and choose Catalog and then Retrieve. Select the appropriate drive or drives in the Restore Files list. Choose Start Restore.
DOS lists the full path and filenames of the files being restored on the progress screen. When all the files from the first disk are restored to the hard disk, DOS prompts you for the next disk in the backup set. This cycle repeats until you have completed the restore operation.
After restoring the full backup set, you must restore the incremental backup set. Because you want to restore all the files in the incremental backup set, you use the same procedures you used to restore the full backup set. The operation proceeds in the same fashion.
After both backup sets are restored, run CHKDSK or SCANDISK to ensure that the hard disk is in order. Keep both backup sets intact until you have determined that your hard disk is performing correctly. Run CHKDSK or SCANDISK several times during the day. If all is in order, perform a full backup at the end of the day.
This section discusses how to perform a selective restore operation. Assume that last week you accidentally deleted the database file CLIENT.DB from your INVOICES directory. You discovered the error today and have already tried, unsuccessfully, to use the UNDELETE command. Luckily, an up-to-date version of the CLIENT.DB file is on your most recent backup set.
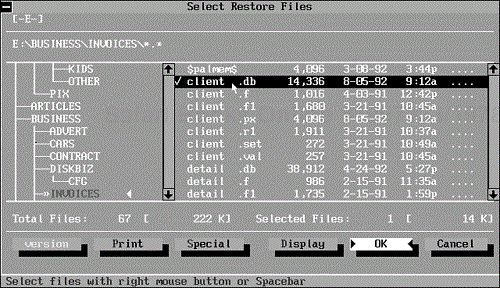
To restore only the BUSINESSINVOICESCLIENT.DB file from the backup set, load the backup program you use, choose Restore, select the appropriate backup set, and choose Select Files.
You again see a tree and file window, as shown in Figure 9.15. Select the file from the file window.
As in the complete restore example, RESTORE prompts you to insert the first disk. You can insert the first disk, or if you know the disk number that holds the CLIENT.DB file, you can insert that disk. RESTORE bypasses any files on the source disk that are not included in the destination parameter you gave in the command. When RESTORE encounters the file BUSINESSINVOICESCLIENT.DB, the program lists the filename on the progress screen and copies the file to the destination disk.
In working with computers, you probably have encountered situations in which the computer didn't do what you wanted it to do. Frustrating as these situations can be, they simply represent a misunderstanding between you and your computer.
Computer viruses are quite different; viruses are supposed to do harm to your computer. Viruses are programs, written by unscrupulous programmers, designed to make copies of themselves and spread from one computer to another, just as a biological virus spreads in people. Usually, viruses also damage your computer by destroying legitimate data and programs. Creating a virus is against the law, but depraved programmers still spread viruses for the same reason that vandals throw bricks through windows—to cause senseless damage.
To protect yourself, you must understand how viruses work. The following sections explain computer viruses in detail.
Computer viruses come in thousands of variations, each of which works a little differently. How viruses spread from one computer to another, and the damage they do, depends on how the virus is written.
A virus begins in the hands of an experienced but morally corrupt programmer who is either malicious or insensitive to the damage caused. The programmer usually starts with an existing program (anything from a game to a word processing program) and adds a few carefully crafted instructions that modify the workings of the program. This person then distributes the altered program to other users, either on a floppy disk or through an electronic bulletin board.
When the unsuspecting recipient runs the altered software, the program might appear to work correctly, but the added code—the virus—performs some type of operation that the victim doesn't want. This operation might delete important files or erase the hard disk entirely. The virus also might display a taunting message. The most dangerous viruses, however, do no immediate damage; they might alter the operating system by planting a kind of time bomb. Days, weeks, or months after the original infected program ran, the operating system might suddenly go wild, deleting files and destroying data.
Worse, most viruses are designed to spread to other computers. Between the time when a virus infects a computer and the time when it begins to damage that computer, the virus might copy itself onto every floppy that the victim inserts into the computer. Because the victim is unaware that the computer is infected until the virus begins to do damage, he or she might unwittingly spread hundreds of copies to friends.
Strange as it might seem, more than 10,000 viruses exist today. You should be concerned about computer viruses, and you should be serious about protecting your system. However, you might derive some comfort from knowing that your computer can become infected in only one of two ways:
Loading and running infected software. Your chance of infecting your computer decreases greatly if you get software only from reputable software companies. When you load software from bulletin boards or from an illegal source, your chances of encountering a virus increase.
Booting from an infected floppy disk. Many viruses spread when a computer boots from a floppy disk that carries the virus. Beware of disks that weren't formatted by you or by someone you trust.
Your best defense against viruses is a virus-scanning program. Such a program can scan files and disks, looking for telltale sequences of instructions that have been identified as parts of known viruses. Used correctly, a good virus program can protect you against the vast majority of known viruses before they damage your computer.
DOS includes two programs—Microsoft Anti-Virus (MSAV) and Microsoft Anti-Virus for Windows (MWAV)—that can scan your memory and disk for hundreds of known viruses. You can use these programs to detect and destroy viruses.
Note
Windows 9x and the accompanying version of DOS no longer include the Microsoft Anti-Virus program. I recommend that you purchase a third-party application, such as Symantec's Norton Antivirus. You can find more information about it at http://www.symantec.com/.
Caution
Although the Microsoft Anti-Virus program is included with DOS 6.22, I highly recommended that you use a new third-party program that has updated signature files for all the new viruses that are cropping up every day.
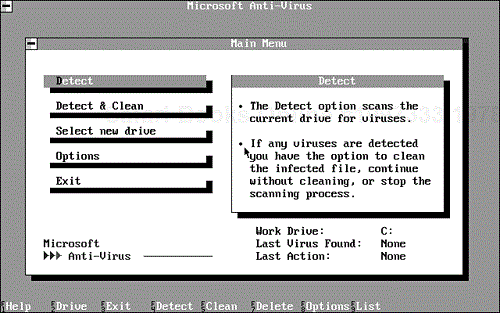
In its simplest use, you can start MSAV simply by typing MSAV at the DOS prompt. You can select the functions you want to perform from MSAV's menu. Figure 9.16 shows the main MSAV menu.
The following list describes the options in this menu:
Detect looks for viruses and tells you what it finds, but it does not destroy viruses.
Detect & Clean looks for viruses and destroys any it finds.
Select New Drive enables you to specify the drive on which Detect or Detect & Clean runs.
Options enables you to configure various options that determine how MSAV works.
Exit terminates MSAV.
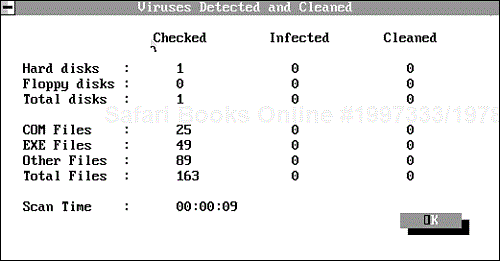
The most common operation you will perform is scanning for viruses. To scan the currently logged drive for viruses, select Detect (or press F4). MSAV scans the current drive for viruses and reports on how many files it searched and how many viruses it found (none, you hope). Figure 9.17 shows a sample report after MSAV has done its work.
With luck, you will never face the unpleasant prospect of finding a virus on your system. However, if MSAV finds a virus during its scan, it displays a dialog box telling you which virus it found and which file contained the virus, and asking what you want to do. If you select Continue, MSAV keeps looking for more viruses. If you select Clean, MSAV destroys the virus and then continues searching.
If you want to tell MSAV to scan your disk and clean any viruses it finds, select Detect & Clean. MSAV cleans any viruses it finds.
If you want to scan a different drive, choose Select New Drive (or press F2) and select the drive you want to scan.
The complete command-line syntax of the DOS version of Microsoft Anti-Virus is shown here:
MSAV drive: /S /C /R /A /L /N /P /F videoswitches /VIDEO
If you specify the drive parameter, MSAV scans the indicated drive; otherwise, it scans the currently logged drive.
The /S switch tells MSAV to immediately invoke the Detect function, causing it to scan the specified drive. However, with this option, MSAV doesn't remove any viruses it finds. The /C switch tells it to scan and remove the viruses it finds.
The /R switch tells MSAV to create a scan report. MSAV creates a file called MSAV.RPT, which lists the number of files MSAV scanned, the number of viruses detected, and the number of viruses removed. MSAV.RPT is always created in the drive's root directory.
The /A switch causes MSAV to scan all drives except A and B. The /L switch causes MSAV to scan all hard disks on your computer, but not drives on a network.
The /N switch causes MSAV to run without using the graphical user interface. If it detects a virus, it returns a special exit code (86). This switch is useful when you're scanning for viruses within a batch file.
The /P switch runs MSAV with a command-line interface rather than a graphical user interface. Normally, MSAV displays filenames as it scans. The /F switch tells MSAV not to display filenames. Use this switch only with the /N or /P switch.
MSAV also recognizes many switches that control how it uses the screen. These switches are shown in Table 9.2. You can use the /VIDEO switch to display all these options.
Table 9.2. MSAV Options for Controlling Display
After you have used MSAV to scan a drive, you might notice that each directory contains a file called CHKLIST.MS. This file contains identifying information (called checksums) about the files in that directory. Each time MSAV scans the files in that directory again, it can compare the current status of the file against information in the CHKLIST.MS file. If a file has become infected since the CHKLIST.MS file was created, the checksums indicate that a change has occurred.
The CHKLIST.MS files don't require much disk space, but if you want to free some disk space, you can start MSAV and press F7 to tell MSAV to delete all CHKLIST.MS files.
If you don't want MSAV to create CHKLIST.MS files in the future, start MSAV and select Options (or press F8), and turn off Create New Checksums.
If you are interested in learning about the viruses known to MSAV, you can use MSAV's List feature to access its list of viruses. Start MSAV and press F9 to see MSAV's virus list.
You can use the scrollbars to scan through the list of known viruses, or you can search for a particular virus by entering its name in the blue box and selecting Find Next.
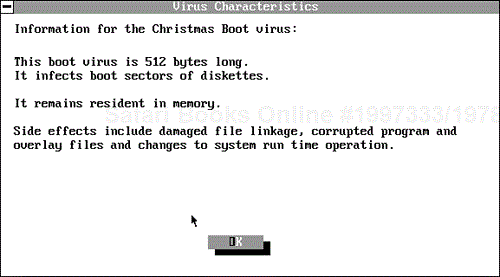
When you find a virus about which you would like more information, click the virus's name. MSAV displays information about the virus, such as the sample shown in Figure 9.18.
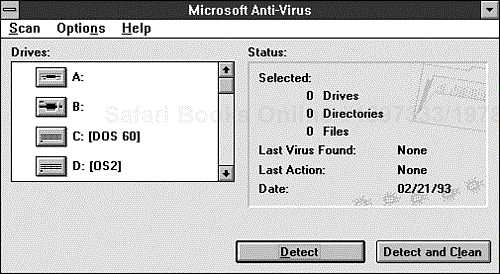
The Windows version of Microsoft Anti-Virus, MWAV, is almost identical in its operation to the DOS version. When you invoke MWAV, you see the dialog box shown in Figure 9.19. Select the drive you want to scan, and then click Detect to scan without removing viruses, or Detect and Clean to scan for viruses and remove any viruses found.
By selecting the Scan menu, you can access most of the other options described with MSAV in the preceding section. This menu includes Delete CHKLIST Files, which deletes all the CHKLIST.MS files on your disk, and Virus List, which enables you to access MWAV's virus list.
Most users can protect themselves against viruses by following these steps:
Before you load any software from floppy disks, scan all the disks with MSAV or MWAV. Click Select New Drive, select your floppy disk drive, and execute Detect for each disk.
After you install new software and before you run it, run MSAV or MWAV on your hard disk.
If you download software from bulletin boards, run MSAV or MWAV on your hard disk before you run that software.
Never boot from a floppy disk that you have not scanned for viruses (with MSAV or MWAV) or that you did not format yourself.
Sooner or later, virtually all PC users format a disk accidentally. The UNFORMAT command provides you with your best chance to undo the damage. UNFORMAT is designed to restore the previous format of hard and floppy disks. It also can help you recover from accidental change or damage to a hard disk's partition table.
UNFORMAT is one of those DOS commands that was originally part of commercial products. Microsoft has licensed the code for the UNFORMAT command from Central Point Software. UNFORMAT came to the DOS package from Central Point's PC Tools.
UNFORMAT has two primary uses:
To recover files after an accidental format
To rebuild a damaged partition table on your hard disk
Because UNFORMAT completely rebuilds a disk's FAT, root directory, and boot record, you should use this command only as a last resort. The degree of success you have in recovering all files depends on which version of DOS you used to format the disk, what switches you used, and what you have done to the disk since you reformatted it.
Caution
If the disk that you accidentally formatted is a hard disk, do not install DOS on it because the DOS files will overwrite files you want to recover. Do not copy or save files of any kind to the reformatted hard disk. If you have to reboot the computer, use a bootable floppy disk.
Note
The FORMAT command creates a MIRROR image file during the safe format procedure. The MIRROR image file contains a copy of the disk's FAT, root directory, and boot record. It saves this information in a normally unused portion of the disk. At the same time, FORMAT creates a hidden file named MIRORSAV.FIL, which contains information required by DOS to locate the MIRROR image file. The MIRORSAV.FIL file is given the hidden attribute, so it is not “visible” by the DIR command unless you use the /AH switch. If you use the /U switch with FORMAT, however, no MIRROR image file is created, and UNFORMAT does not work.
When you want to use UNFORMAT after an accidental format, use the following syntax:
UNFORMAT d: /J /L /P /TEST /U
d: is the drive that contains the disk to be unformatted.
/J causes UNFORMAT to verify that the MIRROR image file accurately reflects the current disk information.
/L searches a formatted disk and lists the file and directory names found.
/P sends all output to a printer.
/TEST provides a test run to indicate whether UNFORMAT can unformat a disk successfully.
/U attempts to unformat a disk without the benefit of a MIRROR image file.
When you want to use UNFORMAT to rebuild a hard disk partition table, use the following syntax:
UNFORMAT /PARTN /L /P
/PARTN causes the command to try to rebuild the hard disk partition tables.
/L displays the current partition table.
/P sends all output to a printer.
Suppose that you just accidentally formatted a hard disk (or used the DOS RECOVER command incorrectly—see Appendix F,“Command Reference,” for a discussion of RECOVER). In this case, you need to use UNFORMAT, which uses the information stored in the MIRROR image file to restore the FAT, root directory, and boot record to their preformatting condition.
To unformat a disk that was safe-formatted, type the following command at the DOS prompt:
UNFORMAT d:
(Remember to replace the d: with the letter of the drive that contains the disk you want to unformat.) UNFORMAT first tells you to insert a disk into the specified drive and press Enter.
When you follow these instructions, the computer beeps and displays a screen similar to this:
Restores the system area of your disk with
the image file created by MIRROR

WARNING!            WARNING!

This should be used ONLY to recover from the inadvertent use
of the DOS FORMAT command or the DOS RECOVER command.
Any other use of UNFORMAT may cause you to lose data!
Files modified since the MIRROR file was created may be lost.
As you can see, UNFORMAT first tries to scare you by giving you messages such as WARNING! Then, it settles down and searches the disk for the MIRROR file created the last time the disk was formatted. It then displays a message similar to the following:
The last time MIRROR was used was at hh:mm on mm-dd-yy.
For the hh:mm and mm-dd-yy information in this message, UNFORMAT substitutes the time and date at which MIRROR.FIL was created. UNFORMAT again causes your computer to beep and then displays the following message, substituting the correct drive letter for d:
The MIRROR image file has been validated.

Are you SURE you want to update the SYSTEM area
of your drive d (Y/N)?
If you choose to use the MIRROR information, UNFORMAT restores the FAT, root directory, and boot record stored in the MIRROR file. Unfortunately, UNFORMAT might have problems fully restoring fragmented files. If UNFORMAT cannot restore a file due to fragmentation, it displays a prompt asking whether you want the file erased or truncated. This incapability to deal with file fragmentation severely limits the usefulness of UNFORMAT. Hard disks begin to fragment files from the first day you start using them.
Don't think of the UNFORMAT command as a magic bullet that will keep you and your disks from peril. Rather, think of it as a last-ditch chance to save you from a mistake that has only a 50/50 chance of being totally successful. Nothing will save you from data losses better than a rigorously applied system of disk backups.
Even if a MIRROR image file is not available for a formatted disk, the UNFORMAT command might be able to recover most of the data. This process takes more time than if a MIRROR image file were available, however, and it does not recover files that were in the disk's root directory.
To use UNFORMAT to unformat a hard disk on which no current MIRROR image file exists, use the following syntax:
UNFORMAT d: /U /L /TEST /P
Replace d: with the letter of the drive that contains the accidentally formatted disk.
The /U switch stands for “unformat” and tells UNFORMAT that you are not using a MIRROR image file created by FORMAT.
The optional /L parameter causes UNFORMAT to list all files and directories found during the UNFORMAT operation. Similarly, /P causes UNFORMAT to send the entire UNFORMAT process to your printer.
Use the /TEST option to run a simulation of the process so that you can see which files UNFORMAT can recover before any changes are written to the hard disk.
After you execute the command, UNFORMAT displays the following message:
CAUTION !!

This attempts to recover all files lost after a
FORMAT, assuming you've NOT been using MIRROR. This
method cannot guarantee complete recovery of your files.

The search-phase is safe: nothing is altered on the disk.
You will be prompted again before changes are written to
the disk.
Using drive d:
Are you SURE you want to do this?
If so, type Y; to cancel the operation, press any other key.
To continue with the unformat operation, press Y and then press Enter. Press any other key to cancel the process. While searching the disk, UNFORMAT displays the following message:
Searching disk
pp% searched, mm subdirectories found.
Files found in the root: 0
Subdirectories found in the root: mm
UNFORMAT does not find any root-level files, but it substitutes for mm the number of root-level subdirectories it finds. (Refer to Chapter 5, “Understanding Files and Directories,” for a discussion of files and the root directory.) As UNFORMAT searches the disk, the command continually updates the last message, substituting the percentage of the disk read for pp and the number of subdirectories found for mm.
After UNFORMAT completes its search of the disk's data, the command lists the subdirectories found. Depending on which version of the FORMAT command you used, UNFORMAT might or might not be able to recover the names of subdirectories. If it cannot, UNFORMAT gives each subdirectory a name in the format SUBDIR.nnn, with nnn representing a number ranging from 1 to 512. If UNFORMAT can find the subdirectory names, it displays them and then displays a message similar to this one:
Walking the directory tree to locate all files_

Path=D:
Path=D:DIRNAME
Path=D:
In this message, D is the drive name, and DIRNAME is the subdirectory name. This message is repeated for each subdirectory found. UNFORMAT then lists the number of files found, including subdirectories, and displays the following warning:
Files found: nn
Warning!  The next step writes changes to disk.
Are you sure you want to do this?

If so, type Y; to cancel the operation, press any other key.
To proceed with the unformat operation, press Y and then Enter. Again, UNFORMAT has problems dealing with fragmented files, so you have to decide whether to truncate or delete fragmented files.
UNFORMAT also enables you to recover from a corrupted hard disk partition table. Such an error normally generates this DOS message:
Invalid drive specification
To recover from this problem, you first must issue the UNFORMAT command with the /PARTN switch and then use UNFORMAT without this parameter to restore the FAT, root directory, and boot sector.
To recover from a corrupted hard disk partition table, follow these steps:
Boot your computer (with a floppy disk, if necessary) and display the DOS prompt.
Change to a drive that contains the
UNFORMATfile,UNFORMAT.COM. If your only hard disk is inaccessible because of partition-table corruption, use a copy of DOS on a floppy disk. (You can findUNFORMAT.COMon the startup disk, one of the disks used during DOS installation.)Type the following command at the DOS prompt:
UNFORMAT /PARTN
UNFORMATprompts you to insert the disk containing the filePARTNSAV.FILand to type the name of that disk drive.Insert the disk that contains the copy of the partition table created by
MIRROR.Type the letter of this drive and press Enter.
MIRRORrebuilds the partition table from the filePARTNSAV.FILfound on the floppy disk. AfterUNFORMATrebuilds the partition table, the program prompts you to insert a master DOS disk into drive A and press Enter. To complete this process, you need a bootable backup disk that contains your system files and theUNFORMATcommand.Insert a bootable DOS disk into drive A and then press Enter.
UNFORMATcauses your computer to reboot.Use the copy of
UNFORMATon the floppy to restore the FAT, root directory, and boot record, following the steps described in “Recovering from an Accidental Format” earlier in this chapter.
Because of the way DOS deletes files, reversing the process is relatively easy, but only if you act promptly. When DOS deletes a file, it changes the first character in the filename recorded in the directory area of the disk so that the target file no longer is listed. As far as DOS is concerned, the file is gone. DOS does not erase the filename entry completely, or overwrite any data in the file, until it needs the space for another file.
Eventually, as you add new files to the disk, DOS reallocates the disk space assigned to the deleted file, causing new data to overwrite the old data. Soon, the file and its data are gone permanently. But if you use the UNDELETE command before DOS has a chance to overwrite a deleted file's data, you can reverse the DELETE operation.
Note
If you discover that you accidentally deleted a file, immediately try to recover it. The longer you wait, the less likely you are to recover the file completely by using the UNDELETE command.
UNDELETE provides three levels of protection against losing accidentally deleted files: delete sentry, delete tracking, and standard. Both the delete sentry and delete tracker options require you to load the memory-resident portion of UNDELETE, which requires just over 13KB of memory.
Delete sentry gives you the highest level of protection by creating a hidden subdirectory called SENTRY. As files are deleted, the memory-resident portion of UNDELETE moves copies of the files into this directory without changing the FAT entry for the file. UNDELETE regulates the amount of disk space that can be taken up by files stored in the SENTRY directory to about 7% of the disk's total space. As files are deleted and the SENTRY directory fills up, the oldest files in the directory are deleted for real to make room for recent additions.
Delete tracker's protection is one step down from the sentry. It uses a hidden file named PCTRACKER.DEL to record information about deleted files. When files are deleted, the delete tracker feature releases the file's FAT entry, making the disk space available to another file. You can undelete the file as long as no other file has been written to that location. Using delete tracker makes undelete operations easier because it stores the file's original names but does nothing to protect the file's location on the disk from being overwritten. Delete tracker, however, uses much less disk space.
The standard level of protection depends on a deleted file's directory entry and disk location remaining intact. If neither location has been overwritten, the standard undelete protection simply restores the directory entry as being no longer deleted. Despite the standard method's relative lack of protection, most DOS users rely on the standard method because memory is not lost due to loading the memory-resident version of UNDELETE, and disk space is not used to store deleted files or information about deleted files.
The UNDELETE command has the following two syntactical forms:
UNDELETE FileNameExpression /DS|/DT|/DOS

UNDELETE /LIST|/ALL|/PURGE[drive]|/STATUS|/LOAD|/UNLOAD |/S[drive]
Tdrive[-entries]]
The FileNameExpression of the first form specifies the file or files to be undeleted. You can use wildcards to indicate multiple files. By default, if you do not specify a filename, DOS attempts to undelete all deleted files in the current directory. If you do not specify a method using the three switches of the first form, DOS attempts to use delete sentry if available, then tracking if available, and then DOS standard if neither of the other methods is available.
The /DS switch tells DOS to use the delete sentry method, recovering only files stored in the SENTRY directory. You are prompted to confirm undeletion of each file.
The /DT switch instructs DOS to use the delete tracking method of recovering the specified files. You are prompted to confirm undeletion of each file.
/DOS causes DOS, in its attempt to undelete files, to rely on the information still stored in the DOS directory instead of using one of the other more protective methods.
/LIST displays a list of the files that can be recovered without attempting to recover them.
The /ALL switch attempts to recover all deleted files without a confirmation prompt for each file. When used with this switch, UNDELETE first attempts to use the delete sentry method if available, then tries the delete tracking method, and finally if neither of these methods is available, uses information directly from the DOS directory.
/LOAD causes UNDELETE to install itself in memory. If no UNDELETE.INI file is found, it is created.
/UNLOAD removes the memory-resident portion of UNDELETE from your system's memory, disabling the delete sentry and delete tracking methods of file recovery.
/PURGE deletes the contents of the SENTRY directory on the specified drive. If no drive is specified, UNDELETE searches the current drive for the directory.
/STATUS lists the type of delete protection in effect for each of the drives currently protected with sentry or tracking.
/S enables delete sentry protection on the specified drives using the information found in UNDELETE.INI. If this file is not found, it is created. Normally, you establish delete sentry protection by adding a line in AUTOEXEC.BAT.
/T enables the delete tracking protection on the specified drives using information from UNDELETE.INI. If this file is not found, it is created. The -entries portion of this parameter specifies the maximum number of files that can be tracked. Valid values range between 1 and 999. Normally, you establish delete tracking protection by adding a line in AUTOEXEC.BAT.
To install delete sentry or delete tracking, you ideally put a command line in your AUTOEXEC.BAT file to load the UNDELETE command with its deletion tracking or delete sentry option. These options load a memory-resident portion of the regular UNDELETE command. You specify which option you want to use by including in the command-line switches that load UNDELETE as a resident program.
Suppose that you want to recover a file and have installed UNDELETE with the delete sentry option. Change to the directory that contains the deleted file and then type the following command:
UNDELETE filename.ext
Be sure to substitute the name of the file that you want to recover for filename.ext. When you press Enter, DOS displays a message similar to this one:
UNDELETE - A delete protection facility

Copyright  1987-1993 Central Point Software, Inc.
All rights reserved.

Directory: C:SPREADSHQPRODAT
File Specifications: filename.ext
   Searching Delete Sentry control file...
    Delete Sentry control file contains    1 deleted files.
   Searching deletion-tracking file....
    Deletion-tracking file contains    0 deleted files.

    Of those,       0 files have all clusters available,
                    0 files have some clusters available,
                    0 files have no clusters available.

   MS-DOS directory contains    0 deleted files.
   Of those,        0 files may be recovered.

Using the Delete Sentry method.
   Searching Delete Sentry control file....
   filename.ext    4037   11-29-01    4:58p  ...A Deleted 12-5-01 1:32a

This file can be 100% undeleted. Undelete (Y/N)?n
This message indicates, in place of filename.ext, the name of the file you specified. The message then indicates the total number of deleted files by this name listed in the Delete Sentry directory; the total number of files by this name in the deletion tracking file; the number of files by this name that have all clusters available and, therefore, are recoverable; the number of partially recoverable files; and the number of files that are not recoverable.
Next, the DELETE command's message might indicate that the deleted file still is listed in the MS-DOS directory. Such a file might have been deleted when UNDELETE was not resident in memory as well as when delete tracking was active.
Finally, the UNDELETE message lists the first file matching filename.ext that DOS found in the Delete Sentry directory. If this file is recoverable (that is, if the file's clusters have not yet been reallocated to another file), DOS asks whether you want to undelete the file. To recover the file, press Y. DOS recovers the file and displays the following message:
File successfully undeleted.
The UNDELETE message also lists any other files with the same name in the Delete Sentry directory. The files are listed one by one, starting with the most recently deleted files. For each file, UNDELETE asks whether you want to recover the file. If additional files with the same name are listed in the deletion tracking file, UNDELETE repeats the procedure for each of these files.
If recovering a file creates a duplicate filename in the directory, UNDELETE displays the following message:
The filename already exists. Enter a different filename.

Press "F5" to bypass this file.

If you want to recover this file, type a unique filename (one that
does not already exist in the current directory). Otherwise, press F5
to skip this file.
Note
You might have created and deleted same-named files in a particular directory more than once. (In fact, every time you save a file on which you are working, you delete the preceding version and create a new one.) So, don't be alarmed or confused if UNDELETE asks more than once whether you want to recover a particular file. Normally, you recover the most recently deleted version of the file and discard the others.
Occasionally, by the time you realize that you need to recover an accidentally deleted file, other files might have reused some of the file's clusters. In such a case, UNDELETE displays the following message:
Only some of the clusters for this file are available.
Do you want to recover this file with only the available clusters? (Y/N)
Press Y to recover the available bytes or N to skip the file. If you wait too long before attempting to recover a file, you might not be able to recover the file because other files are using all its clusters. In this case, UNDELETE tells you so and displays this message:
Press any key to continue
Sometimes, even though most of a file still is on disk, the clusters in the first part of the file might have been reused by another file. In such a case, UNDELETE loses its “map” to the rest of the file and displays the following message:
Starting cluster is unavailable. This file cannot be recovered
with the UNDELETE command. Press any key to continue.
If you want to know which deleted files you still can recover, type the following command:
UNDELETE /LIST
UNDELETE displays, from the Delete Sentry directory, the deletion tracking file, the DOS directory, and a list of deleted files from the current directory.
Tip
If a deletion tracking list is too long to fit in one screen, you can press Ctrl+S to pause the display. Press any key on the keyboard to resume scrolling. Do not use redirection or the MORE filter; these actions create disk files that might overwrite some or all of the data that you want to recover.
Caution
If you delete all the files in a directory and then delete the directory, you cannot recover any of the deleted files from that directory. UNDELETE cannot recover a deleted directory.
The UNDELETE command is a product of Central Point Software, licensed by Microsoft Corporation for distribution as part of DOS.
If you were not using the UNDELETE command's resident portion when you accidentally deleted the file that you want to recover, you can try to recover the file by using the information stored in the DOS directory. To do so, type the following command:
UNDELETE filename.ext /DOS
Substitute for filename.ext the name of the file that you want to recover. UNDELETE displays a message similar to the following one:
Directory: C:SPREADSHQPRODAT
File Specifications: filename.ext

      Delete Sentry Control file not found.
      Deletion-tracking file not found.
      MS-DOS Directory contains 1 deleted files.
      Of those,   1 files may be recovered.

Using the MS-DOS Directory.

  filename    ext    4037   11-29-01    4:58p   ...A
Undelete (Y/N)?
Press Y to recover the file or N to skip the file. After you press Y, UNDELETE displays the following prompt:
Enter the first character of the filename.
Because the DOS directory no longer has any record of this first character, you must supply the letter. Type the letter that you want UNDELETE to use as the beginning letter of the filename. UNDELETE recovers the file and displays the following message:
File successfully undeleted.
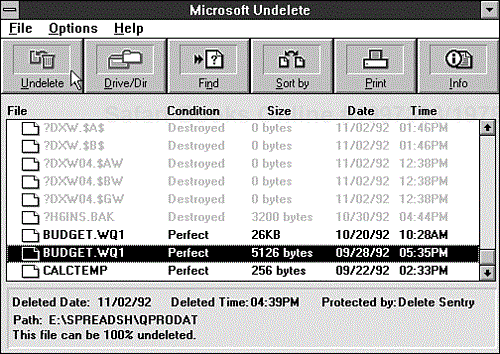
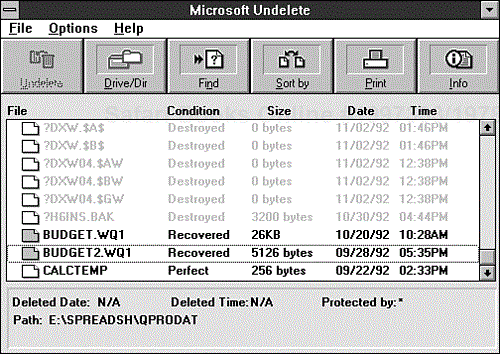
If you use Microsoft Windows 3.x, the DOS Setup program probably installed the Windows utilities in their own program group in the Windows Program Manager. The Windows Tools group includes an Undelete program. When you open this program, Windows displays a screen similar to the one shown in Figure 9.20, listing the deleted files in whatever directory was current when you started Windows. The following sections explain how to set up and use Microsoft Undelete for Windows.
Note
Starting with Windows 95, Microsoft no longer includes the DOS-based UNDELETE program. Instead, it offers a new feature called the Recycle Bin, which is located on the desktop and stores the files that are deleted until you empty it.
Because this program is GUI based, if you delete anything from a command prompt, it is gone forever. It is recommended that any file deletion in Windows 9x be done from Explorer.
If you have installed the DOS version of UNDELETE in your AUTOEXEC.BAT file, you do not need to configure Microsoft Undelete. If you have not installed UNDELETE, however, choose Configure Delete Protection from the Options menu. This command displays a dialog box in which you can choose one of the following options:
Delete Sentry
Delete Tracker
Standard (no delete protection)
You already have seen what each of these options does. If you install Delete Protection through Windows, UNDELETE is automatically installed in your AUTOEXEC.BAT file.
If the default directory does not contain the file that you want to recover, click the Drive/Dir button or choose Change Drive/Directory from the File menu. A dialog box appears in which you can type the correct directory path in a text box or choose the directory from a list box. When you click OK, the main window shows the deleted file in your chosen directory (refer to Figure 9.20). When you select a file, Windows displays the following information below the directory window:
The date and time when the file was deleted, if known (this information is available only if Delete Sentry is used)
The protection method in use when the file was deleted, if any (if none, Windows displays the message
Protected by: DOS)The current drive and directory
The probability that the file can be recovered
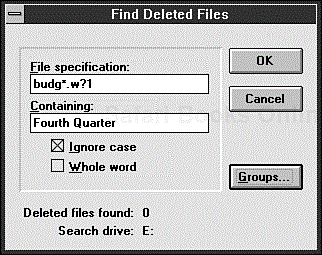
If the directory in which the deleted file was stored is not current, click the Find button or choose Find Deleted File from the File menu. The Find Deleted Files dialog box appears (see Figure 9.21).
In this dialog box, you can type the name of the file that you want to find and also some text from the file; this information helps Undelete locate the correct version of the file. If you want to narrow the search further, click the Groups button to display a list of all the file types whose extensions are associated with a program in Windows. You can narrow the search more by clicking one or more of the listed groups. After you finish specifying what to search for, click OK.
If Undelete finds any matching files, it displays the files in the directory window.
When you see the file that you want to recover, select it and then perform one of the following actions:
You can select more than one file by clicking each file or by moving the selection bar to each file and pressing the spacebar.
If you use either of the first two methods, Undelete simply recovers the file in its current location. If the prognosis for recovery is not good, however, you might want to use the Undelete To command so that you can recover the file to another drive.
You might have to search the disk to find the data that was in the file. If you're not successful the first time, Undelete To enables you to try again without disturbing the data on the original disk.
If you use the Undelete command and recover the file, the information in the Condition column changes to read Recovered, as shown in Figure 9.22.
If you try to recover a file whose name is being used by another file, the message File already exists appears. Click OK, and you see a dialog box in which you can enter a new name for the file. As you can see in Figure 9.22, both files named BUDGET.WQ1 have been recovered, but one has been renamed.
Microsoft Undelete includes several other options that are not available when you try to recover a deleted file from the DOS prompt:
Sorting—. The Sort By button and the Sort By command (Options menu) enable you to sort the filenames displayed in the Undelete window by name, date, size, directory date and time, deletion date and time, or condition.
Printing—. You can group the files in the display by directory and then print them by clicking the Print button or choosing Print List from the File menu.
Displaying information—. You can click the Info button or choose File Info from the File menu to display a box in which all the information about a deleted file is conveniently grouped in one place.
Selecting files—. The Options menu contains two commands that you can use to select groups of files for recovery. Choose Select by Name to display a dialog box in which you enter a filename. If you include a wildcard pattern in the filename, all matching files are selected. You then can choose the Unselect by Name command to narrow the selection.
Deleting files—. If you installed the delete sentry option, you can choose Purge Delete Sentry File from the File menu to get rid of all the files—or selected files—in the Delete Sentry directory. You might want to use this command if you are running low on disk space and need to install a new program.
Every PC user should develop a backup policy—a defined method of backing up data regularly. The policy you develop depends on different factors. As you learned earlier in this chapter, you can choose from three different primary backup types: full, differential, and incremental. The decision to be made here is whether to use only full backups every time, or perform incremental or differential backups between full backups.
Deciding on which backups to perform can depend on many factors, such as the amount of data to be backed up, backup capacity and speed, and time constraints. If you have 2GB of data to back up, for example, and your tape drive can back up only 500MB per hour, the full backup will require four hours. But consider what you would do if you had only three hours to perform a backup during the week and six hours on the weekend. Obviously, in this case, you could not perform a full backup every night.
Incremental and differential backups come into play here. After you decide when you will be performing the full backup, you then need to decide whether to perform incremental or differential backups in between. The main difference between these two types is that differential backups do not modify the archive setting for files, so every file changed since the last full backup is backed up. An incremental backup backs up only files that have been added or changed since the last full or incremental backup.
Taking these factors into account, you then need to decide which type of backup works better for you. Obviously, an incremental backup is going to be faster over multiple nights than a differential backup because it is backing up only files changed since the last full or incremental backup. The drawback to this choice is that you must restore the full backup set and then each incremental backup set. If you use differential backups between full backups, you would need to restore only the full backup and then the last differential backup because each differential backup set includes all files changed since the last full backup.

