
In this chapter
Computers on the market today have many similarities. They are based on the same family of computer chips, and they have similar components, such as memory, hard disks, and power supplies. Still, the differences between various makes and models of personal computers are greater today than ever before. DOS gives you the tools to fine-tune the operation of every element of your computer system, an exercise often called configuring your system. You can adjust a bewildering number of settings; how you manipulate these settings greatly affects how efficiently your PC works. Sadly, the people who do not understand how to configure their PCs greatly outnumber the people who do. By reading this chapter, you can become one of the latter.
Fortunately, the folks at Microsoft realize that configuring a modern PC can be challenging for most users, and perhaps the most important tool that Microsoft includes with DOS is MemMaker, a tool that performs the hardest part of the configuration automatically. If you want to call yourself a PC guru, you need to understand the configuration process; but if you're a novice user, the worst part of working with MS-DOS just disappeared.
The default configuration of DOS, which might be adequate for many users, is designed as a “lowest common denominator,” intended to work with the greatest number of systems. As PC technology advances, DOS also must enable users of the most up-to-date systems to take full advantage of their computers' most powerful features. This chapter describes how to use DOS to create the optimal configuration for your computer system, whether your system is a plain vanilla PC or a banana split with all the toppings.
Whether you use your own computer or a computer owned by your employer, someone has invested a significant sum of money in the system. This chapter helps you discover how to configure your computer to operate most efficiently—how to get the “most bang for the buck.” You generally can improve the performance of software running on your PC in two ways: You can increase the amount of memory available to the software, and you can increase the speed at which your system or its components operate. You can tackle these efficiency-oriented goals in two general ways:
Add or replace hardware
Use software to attain an optimal configuration for your existing hardware resources
DOS fits into the software category. This chapter teaches you how to use DOS to increase the amount of memory available to applications. The chapter also explains how to use special device drivers and utility programs to enhance the performance of your hard disk, which in turn enhances software performance.
MS-DOS certain features that every DOS user needs. Regardless of the type of computer you use or the software you run, you must be capable of creating directories, accessing files, and printing to your printer. Many other features, however, might not be important to you, depending on the type of computer you have and how you use it. If you plan to use a mouse with DOS, DOS must load the mouse-handling functions when your computer boots. If you don't plan to use a mouse, loading the mouse-handling functions ties up valuable memory, a sacrifice you don't want to make.
To give you the flexibility of using only the parts of DOS that you need, DOS consists of a base portion (which contains the features that everybody needs) and a series of what you might think of as “plug-in modules” (pieces of programs that give DOS the instructions it needs to perform certain tasks). Because you can decide which of the optional modules to use, you don't waste memory-loading features you don't need.
These plug-in modules are called device drivers because they generally give DOS the information needed to access various types of hardware devices. In addition to the device drivers that come with DOS, some add-on hardware comes with a device driver that enables your system to recognize and use the hardware. If, for example, you buy a mouse to use with your computer, you also must load the appropriate device driver so that DOS knows how to control the mouse.
Most device drivers are loaded in your CONFIG.SYS file. One of the most important tasks this file performs is to tell DOS which device drivers to load when the computer boots. The DEVICE command tells DOS to load a device driver and uses the following syntax:
DEVICE = filespec /switches
filespec is the complete filename (and optional disk and path) for the device driver file, and /switches are any switches the device driver software needs.
If you buy a Microsoft mouse, for example, you also get a device driver called MOUSE.SYS that tells DOS how to use the mouse. If you place MOUSE.SYS in the root directory of your C drive, you can load MOUSE.SYS by adding the following command to CONFIG.SYS:
DEVICE = C:MOUSE.SYS
(The spaces around the equal sign in this syntax are optional.)
You can load as many device drivers as you need, but you must use a separate DEVICE command for each driver you install.
Most users create a special subdirectory called DRIVERS or SYS and put the driver files in this directory so that they are out of the way of daily files. If you put the driver files in a separate subdirectory, you must specify the pathname as part of the name of the device driver, as shown in the following examples:
DEVICE = C:DRIVERSMOUSE.SYS

DEVICE = C:SYSMOUSE.SYS
Table 19.1 lists the device driver files included with DOS 6.22
Table 19.1. DOS 6.22 Device Drivers
The most commonly used device drivers are discussed in this chapter. Refer to Appendix F,“Command Reference,” for the syntax of the drivers not covered here.
Note
When you install DOS, you might notice that DOS installs two files that appear to be device drivers because they end in the .SYS extension: COUNTRY.SYS and KEYBOARD.SYS. Despite their extension, these files are not device drivers; they are used internally by other DOS commands, and you cannot use them in your CONFIG.SYS file.
In Chapter 1, “DOS and the Personal Computer,” you learned about memory and how it relates to your PC. With that understanding in mind, you are ready to learn how you can make the most of your PC's memory.
→ To learn more about the CONFIG.SYS file and how it works, see “Starting DOS,” p. 23.
In terms of optimizing your computer, the most significant feature offered by DOS is the capability to load most of the operating system software into extended memory. By doing so, DOS provides more conventional memory for applications, ultimately improving the performance of your system.
Before DOS or applications software can use extended memory, you must add a command to your CONFIG.SYS file to load an Extended Memory Manager—a driver that provides a standard way for applications to address extended memory so that no two programs use the same portion of extended memory at the same time. DOS 4.0 and later versions include the Extended Memory Manager HIMEM.SYS.
HIMEM.SYS manages memory according to the rules set out in the Extended Memory Specification (XMS) Version 2.0. According to this specification, three areas of memory above the conventional 640KB barrier can be made available for programs to use:
Upper memory area (UMA)—. This area consists of the 384KB of memory above 640KB up to 1MB and is divided into many different-size blocks, called upper memory blocks (UMBs).
High memory area (HMA)—. This is a single block of memory essentially consisting of the first 64KB of extended memory. However, the HMA slightly overlaps the upper memory area; the last 16 bytes of the upper memory area are the first 16 bytes of the high memory area. (Most people are not aware of this slight overlap, and it can be a good way to win bar bets.)
Extended memory blocks (XMS memory)—. This portion of memory includes all memory above 1,024KB. When extended memory is managed by an Extended Memory Manager, you refer to the memory as XMS memory.
Note
The terms used to describe DOS memory can be maddening. Try not to confuse high memory with upper memory.
When used on an x86 PC, HIMEM.SYS provides HMA and XMS memory to programs that know how to use it. To access upper memory, however, the PC must have at least an 80386 CPU or higher, and you must include one of the following device driver commands in CONFIG.SYS after HIMEM.SYS is loaded:
DEVICE=EMM386.EXE RAM

DEVICE=EMM386.EXE NOEMS
Refer to the next section for a full discussion of EMM386.EXE.
The syntax for using HIMEM.SYS is shown in the following:
DEVICE=d:pathHIMEM.SYS /A20CONTROL:ON|OFF /NUMHANDLES=n /EISA /HMAMIN=n/INT15=xxxx /MACHINE:xx /SHADOWRAM:ON|OFF /CPUCLOCK:ON|OFF /QUIET
d: is the disk drive where the HIMEM.SYS resides, and path is the directory containing the device driver file. If HIMEM.SYS is contained in the DOS directory on your C drive, for example, you include the following command in CONFIG.SYS:
DEVICE=C:DOSHIMEM.SYS
In most cases, you need only this command to activate the Extended Memory Manager. In special cases, however, you might need to use one of the available switches described in the following paragraphs. The next section continues the discussion of loading DOS into upper memory.
According to XMS specifications, only one program at a time can use the high memory area. The switch /HMAMIN=n sets the minimum amount of memory that must be requested by an application before the application is permitted to use HMA. If you load DOS into HMA, you can omit this switch, as explained in the section “Loading DOS into High Memory” later in this chapter.
When the Extended Memory Manager assigns memory to a particular program, it assigns one or more extended memory block handles to the program. The /NUMHANDLES=n switch indicates the maximum number of handles available. The number n must be between 1 and 128. The default is 32 handles, usually a sufficient number. Each reserved handle requires an additional 6 bytes of memory. Unless you are running software that complains about not having enough extended memory handles, you probably do not need this option.
Most current versions of commercial software support the XMS specification for addressing extended memory. Some older versions of programs, however, use a different method of addressing extended memory, known as the Interrupt 15h (INT15h) interface. If you work with software that uses the INT15h interface and you want to load DOS into HMA, add the /INT15=xxxx switch. The number xxxx indicates the amount of extended memory you want HIMEM.SYS to assign to the INT15h interface. This number must be from 64 to 65,535 (kilobytes), and the default is 0. If you assign some of your extended memory to the INT15h interface, that memory is not available to programs that expect the XMS interface.
Internally, DOS uses a wire called the A20 memory address line to access the high memory area. What the A20 address line is and how DOS uses it are not important here, but not all brands of PCs handle the A20 line in the same way. Normally, HIMEM.SYS can detect how your computer uses its A20 line, but if it is incorrect, HIMEM.SYS displays the following error message:
Unable to control A20
If you see this message, use the /MACHINE:xx switch in the HIMEM.SYS command to specify which type of A20 handler your machine uses. For xx in the /MACHINE switch, insert the code that matches your computer. You can find the text codes in the Code column and the number codes in the Number column in Table 19.2. If you see the error message but your computer is not listed in Table 19.2, try the switch /MACHINE:1.
Table 19.2. A20 Handler Codes
| Code | Number | Computer |
|---|---|---|
at
| 1 | IBM PC/AT |
ps2
| 2 | IBM PS/2 |
pt1cascade
| 3 | Phoenix Cascade BIOS |
hpvectra
| 4 | HP Vectra (A and A+) |
att6300plus
| 5 | AT&T 6300 Plus |
acer1100
| 6 | Acer 1100 |
toshiba
| 7 | Toshiba 1600 and 1200XE |
wyse
| 8 | Wyse 12.5MHz 286 |
tulip
| 9 | Tulip SX |
zenith
| 10 | Zenith ZBIOS |
at1
| 11 | IBM PC/AT (alternative delay) |
at2
| 12 | IBM PC/AT (alternative delay) |
css
| 12 | CSS Labs |
at3
| 13 | IBM PC/AT (alternative delay) |
philips
| 13 | Philips |
fasthp
| 14 | HP Vectra |
IBM 7552
| 15 | IBM 7552 Industrial Computer |
Bull Mioral
| 16 | Bull Mioral 60 |
DELL
| 17 | DELL XBios |
Before DEVICE=HIMEM.SYS in CONFIG.SYS, you might have listed a device driver that also uses the A20 line. By default, HIMEM.SYS takes control of A20 even though the line is turned on when HIMEM.SYS loads. HIMEM.SYS warns you when this condition occurs by displaying the following message:
Warning: The A20 Line was already enabled!
Determine see whether you really intend to have both drivers installed at one time. If so, you can prevent HIMEM.SYS from taking control of A20 by adding the switch /A20CONTROL:OFF (the default setting is /A20CONTROL:ON).
All PCs store some of their basic operating instructions in read-only memory (ROM); however, computers usually cannot access instructions from ROM as fast as they can access instructions from RAM. If you have plenty of memory and an 80386 (or better) computer, you can usually increase the performance of your computer by asking the computer to copy the instructions from ROM into an upper memory block (which is RAM). This technique is known as shadow RAM.
Shadow RAM uses some of your upper memory blocks. If you prefer to increase the amount of upper memory available for device drivers and memory-resident programs, use the /SHADOWRAM:OFF switch. As HIMEM.SYS loads, the following message appears:
Shadow RAM disabled.
In some cases, DOS cannot turn off shadow RAM. Instead, DOS displays a message telling you that shadow RAM is in use and cannot be disabled. (Check your hardware documentation for other methods of disabling shadow RAM.)
The /CPUCLOCK:ON switch ensures that HIMEM.SYS does not slow your computer's clock speed, the speed at which your computer processes instructions. (Any change in clock speed does not affect your computer's real-time clock, which keeps time of day.) On the front panel of many PCs is an LED or other indicator that indicates the current clock speed. To prevent the clock speed from slowing, add the /CPUCLOCK:ON switch to the DEVICE=HIMEM.SYS command in CONFIG.SYS.
If you are using a machine that uses an Extended Industry Standard Architecture (EISA) bus with more than 16MB of memory, HIMEM.SYS does not normally allocate all the extended memory. Use the /EISA switch to tell HIMEM.SYS to automatically allocate all available extended memory.
When HIMEM.SYS loads, it usually prints status messages. If you want HIMEM.SYS to load without the usual status messages, add the /QUIET switch.
DOS enables you to load most of the operating system into an area of extended memory known as the high memory area (HMA), the first 64KB of extended memory (except the first 16 bytes, which overlap the upper memory area). After the device driver HIMEM.SYS is loaded into the computer's memory, the command DOS=HIGH in CONFIG.SYS loads DOS into high memory.
The next time you boot the computer, DOS uses about 14KB of space in conventional memory and loads the remainder of the operating system into the HMA. If, however, you don't use this command in CONFIG.SYS or don't have extended memory installed in your computer, DOS occupies more than 62KB of memory. By loading the operating system into high memory, DOS 6.2 can free about 47KB of conventional memory.
Because expanded memory was introduced before extended memory, many PC applications were written to take advantage of expanded memory, not extended memory. Today, however, extended memory is far less expensive and much more common. The DOS device driver EMM386.EXE enables applications to use extended memory as though it were expanded memory, freeing you from the need for the special memory boards and device drivers that expanded memory requires. Thus, EMM386.EXE emulates expanded memory by using extended memory.
Note
The device driver HIMEM.SYS, discussed earlier, must be loaded before EMM386.EXE. HIMEM.SYS makes extended memory available, and EMM386.EXE enables you to use some or all extended memory as though it were expanded memory. Do not use EMM386.EXE if you are using another driver from a third-party software vendor as an expanded memory manager.
Some applications today can use either expanded memory or extended memory by accessing whichever is available. If you have a choice, use extended memory, which is faster.
In addition to its role as an expanded memory emulator, EMM386.EXE also is a UMB provider, working with HIMEM.SYS to provide upper memory blocks (UMBs) into which you can load device drivers and memory-resident programs. See the next section, “Loading Device Drivers and TSRs into Upper Memory,” for further discussion of providing UMBs.
The syntax of the command for EMM386.EXE, used as a device driver, is shown in the following:
DEVICE=EMM386.EXE ON|OFF|AUTO memory W=ON|OFF
    Mx|FRAME=address /Pmmmm Pn=address X=mmmm-nnn
    I=mmmm-nnn B=address L=minxms A=altregs H=handles
    D=nnn RAM NOEMS MIN=n /VERBOSE ROM=mmmm-nnnn NOVCPI
     WIN=mmmm-nnnn NOMOVEXBDA NOHIGHSCAN ALTBOOT NOHI
In most cases, one of the following commands is sufficient:
DEVICE=EMM386.EXE RAM

DEVICE=EMM386.EXE NOEMS
The first command loads the expanded memory emulator and allocates 256KB of extended memory to be used as expanded memory. The RAM switch enables upper memory. The second command also enables upper memory but tells EMM386 not to allocate extended memory for use as expanded memory.
Sometimes you might need the remaining switches for the EMM386.EXE device driver to customize your computer for use with particularly demanding software or hardware. You can specify ON, OFF, or AUTO in the EMM386.EXE device driver command to indicate whether your computer starts in the EMM386.EXE active, inactive, or automatic mode, respectively. By default, the device driver is active, and EMM386.EXE makes extended memory available. However, some applications might not run properly when EMM386.EXE is active because EMM386.EXE places the computer in a mode known as Virtual 8086 mode. When you use EMM386.EXE as a device driver, the driver loads in memory and remains active (ON) unless you specify otherwise by using the OFF switch.
The OFF switch starts the computer with EMM386.EXE loaded in memory but inactive. The XMS memory allocated as EMS memory is unavailable for any purpose. You can activate the driver by entering the following command at the DOS command prompt:
EMM386 ON
The OFF switch is not compatible, however, with the RAM or NOEMS switches, discussed later in this section.
Use AUTO if you want EMM386.EXE to activate only when an application requests EMS memory. This setting provides maximum compatibility with software that might not work properly in Virtual 8086 mode. Like the OFF switch, AUTO is not compatible with the RAM or NOEMS switches.
Tip
Even though EMM386.EXE activates when an application requests EMS memory, the driver does not automatically deactivate when the application terminates. To turn off the driver, you must issue the following command at the command prompt:
EMM386 OFF
The memory parameter enables you to specify the amount of XMS memory you want EMM386.EXE to allocate as EMS memory. Type the number of kilobytes in the range from 16 to 32,768. EMM386.EXE rounds any number you type down to the nearest multiple of 16. All unallocated memory remains available as XMS memory. The default EMS memory allocated is 256KB.
As a general rule, allocate only as much EMS memory as is required by your applications. Any memory allocated as EMS memory is no longer available as XMS memory. Most of the newer DOS applications, especially games, require the maximum amount of XMS you can make available. If none of your applications need expanded memory, use the NOEMS option so that no memory is allocated as expanded memory.
Use the L=minxms switch, in which minxms is the number of kilobytes, to indicate the minimum XMS memory that EMM386.EXE is to allocate. This parameter overrides the memory parameter.
If you installed a Weitek math coprocessor chip—a special computer chip that improves the performance of computation-intensive software, such as computer-aided design (CAD) software—use the W=ON switch. By default, the device driver does not support this type of coprocessor. You also can turn on or off support for the Weitek coprocessor by entering one of the following commands at the DOS prompt:
EMM386 W=ON

EMM386 W=OFF
In some circumstances, you might want to use upper memory for device drivers and memory-resident programs, but you don't need EMS memory. In this case, use the NOEMS switch with the EMM386.EXE driver to free the maximum amount of upper memory and to provide no EMS memory. You might intend to run Windows 3.1 on your computer, for example. Because Windows can use all your XMS memory, this software doesn't need EMS memory.
The /VERBOSE switch causes EMM386 to print status and error messages when it loads. Normally, EMM386 suppresses these messages. You can abbreviate /VERBOSE as /V.
EMM386 scans the upper memory area (UMA) for all available free memory. Unusual architectures might confuse EMM386, causing trouble when your computer boots or while you use the computer. The NOHIGHSCAN parameter limits EMM386's scanning of the UMA. If you experience problems when you use EMM386, adding the NOHIGHSCAN parameter might solve the problem.
EMM386 loads part of itself into the upper memory area. If one of your programs needs extra upper memory blocks, and you're willing to give up some of your conventional memory, the NOHI parameter causes EMM386 to load all of itself into conventional memory, and does not use any UMA.
The remaining switches available for use with EMM386.EXE are highly technical and beyond the scope of this book. Refer to your DOS User's Guide or the Technical Reference manual for more information.
In addition to enabling you to run DOS in high memory, DOS provides the capability of loading memory-resident programs and device drivers into upper memory blocks, freeing more conventional memory for other applications. DOS can access this area of memory in 80386 and 80486 PCs (including SXs) that have 1MB or more of memory.
To load device drivers or memory-resident programs, also called terminate-and-stay-resident (TSR) programs, into upper memory, the following conditions must be met:
Your computer has an 80386 or better CPU.
HIMEM.SYSis loaded as a device driver.EMM386.EXEis loaded as a device driver with theRAMorNOEMSswitch.The command
DOS=UMBappears in theCONFIG.SYSfile.
If you also want to use the command DOS=HIGH to load DOS into high memory, you can combine the two commands as shown in the following:
DOS=HIGH, UMB
You can load two types of programs into upper memory: device drivers and memory- resident programs (TSRs). You already know that device drivers normally are loaded using the DEVICE command. When you want to load a device driver into upper memory, however, you use the DEVICEHIGH command. The syntax for this configuration command is as follows:
DEVICEHIGH=filename.ext /switches
Note
The switches in the syntax for the preceding command are any switches you use for the file that you are loading, not for the DEVICEHIGH command itself.
To load into upper memory the screen driver ANSI.SYS, for example, you need the following command in CONFIG.SYS:
DEVICEHIGH=C:DOSANSI.SYS
When you boot the computer, DOS attempts to load ANSI.SYS into the upper memory area.
Note
DEVICEHIGH and LOADHIGH recognize two switches: /L and /S. When you use MemMaker to automatically configure your PC, it might use these switches in the commands it generates. These switches are not intended for use by users.
To load a memory-resident program into upper memory, precede the program's startup command with LOADHIGH. (You can use the abbreviation LH in place of LOADHIGH.) The syntax for the command for LOADHIGH is as follows:
LOADHIGH programname /switches
As an example, assume that you want to load DOSKEY (discussed in Chapter 18, “Mastering DOSKEY and Macros”) into upper memory each time you start your computer. To do so, you add the following command to your AUTOEXEC.BAT file:
LOADHIGH DOSKEY
The next time you reboot the computer, DOS attempts to load DOSKEY into upper memory. DOS does not load a program into upper memory if the program requests that DOS allocate more memory during initialization than is available in the largest available upper memory block. If DOS is not successful when it tries to load device drivers or TSRs into the upper memory area, it loads the program into conventional memory instead.
So that you can make the most efficient use of DOS's memory management utilities, DOS also enables you to display the amount of free and used memory at any point during a DOS session. Use the MEM command for this purpose.
The syntax for the MEM command is as follows:
MEM /CLASSIFY /DEBUG /FREE /MODULE modulename /PAGE
Most of these options (/DEBUG, /FREE, and /MODULE) are primarily of interest to programmers. For any option, you can specify just the first letter, such as /C in place of /CLASSIFY, for example.
With no switches, MEM gives a basic report of how the memory on your machine is being used. The following provides a sample of a basic MEM report from a typical computer with 8MB of memory:
Memory Type        Total  =   Used  +   Free
-------------      ------     -----    ------
Conventional         640K       79K      562K
Upper                 71K       33K       38K
Reserved             384K      384K        0K
Extended (XMS)*    7,097K    2,537K    4,560K
-------------      ------    ------    ------
Total memory       8,192K    3,033K    5,159K

Total under 1 MB     711K      112K      599K

Total Expanded (EMS)                7,488K (7,667,712 bytes)
Free Expanded (EMS)*                4,800K (4,915,200 bytes)

* EMM386 is using XMS memory to simulate EMS memory as needed.
  Free EMS memory may change as free XMS memory changes.

Largest executable program size       561K (574,752 bytes)
Largest free upper memory block        22K  (22,016 bytes)
MS-DOS is resident in the high memory area.
Even this most basic report includes a wealth of information:
This computer has 640KB of conventional memory, of which 79KB is currently in use, leaving 562KB free.
This computer loaded
EMM386, which found 71KB available in upper memory blocks; 33KB of the 71KB is currently in use.This computer has 7,097KB of extended memory, 2,537KB of which is in use.
The computer has 599KB of memory available below 1MB, representing the memory available for loading programs and device drivers on this machine.
The largest program you can load into conventional memory is 561KB.
The largest free upper memory block is 22KB. Consequently, you cannot load “high” any program or device driver that requires more memory than 22KB.
Most of DOS has been loaded into the high memory area because the command
DOS=HIGHappeared in theCONFIG.SYSfile.
With the /CLASSIFY switch, MEM lists all DOS programs and device drivers currently loaded. Along with the information shown previously, MEM lists this additional information if you use /CLASSIFY:
Modules using memory below 1 MB:

  Name           Total       =   Conventional   +   Upper Memory
  --------   ---------------    ---------------     --------------
  MSDOS       18,029   (18K)     18,029   (18K)          0    (0K)
  HIMEM        1,168    (1K)      1,168    (1K)          0    (0K)
  EMM386       3,120    (3K)      3,120    (3K)          0    (0K)
  DBLSPACE    37,664   (37K)     37,664   (37K)          0    (0K)
  COMMAND      3,184    (3K)      3,184    (3K)          0    (0K)
  MOUSE       17,088   (17K)     17,088   (17K)          0    (0K)
  SETVER         816    (1K)          0    (0K)        816    (1K)
  ANSI         4,240    (4K)          0    (0K)      4,240    (4K)
  SMARTDRV    29,024   (28K)          0    (0K)     29,024   (28K)
  Free       613,472  (599K)    574,976  (562K)     38,496   (38K)
This sample report shows the programs and device drivers currently loaded and displays the amount of conventional and upper memory used by each:
MSDOSis the portion of MS-DOS that did not get loaded into the high memory area.HIMEMis theHIMEM.SYSdevice driver.EMM386is theEMM386.EXEdevice driver.DBLSPACEis the DoubleSpace device driver.COMMANDis the DOS command interpreter.MOUSEis the mouse device driver.SETVERis the device driver used to modify how DOS reports version information.ANSIis theANSI.SYSdevice driver, which this computer loads.SMARTDRVis the device driver for caching information going to and from disk drives.
Tip
MEM /C often displays more than a screenful of information. The /P option tells MEM to pause after each screenful of data and wait for you to press a key before continuing.
After you identify a driver or memory-resident program that appears to be the right size to fit in the available UMB, edit CONFIG.SYS or AUTOEXEC.BAT to add DEVICEHIGH or LOADHIGH to the appropriate command. Reboot your computer and issue the MEM /C command again to see whether the driver or program loaded.
Arriving at the optimal combination of device drivers and memory-resident programs loaded into upper memory might require some experimentation. DOS loads programs in the largest available UMB first, so try loading the largest drivers and programs first by placing their startup commands earliest in CONFIG.SYS or AUTOEXEC.BAT. To alleviate some of the trial-and-error necessary in arriving at the optimal memory arrangement, DOS now provides the MemMaker utility, which is described in the following section.
Understanding and configuring a PC's memory is one of the most challenging activities most users face. Because most users usually configure their computer's memory once, they never really get a chance to build any experience fiddling with the configuration. After several years of watching users stumble at configuring their PCs, Microsoft finally offered help. DOS includes MemMaker, a utility that analyzes your PC and makes the appropriate changes to your CONFIG.SYS and AUTOEXEC.BAT files so that your computer uses its memory most effectively.
Tip
Some people use Windows or a particular application so often that they add a command to the end of their AUTOEXEC.BAT file to start the application automatically every time they boot. If you have added such a command that takes you automatically into Windows or any other program, read this warning carefully. If, on the other hand, you find yourself at the DOS prompt when your computer boots, you can skip this warning.
MemMaker does its work in three phases, and between each phase it reboots your computer. Each time MemMaker causes your computer to reboot, your AUTOEXEC.BAT file starts your application as usual, preventing MemMaker from continuing its work. You must exit these programs for MemMaker to perform the next phase.
You can take Understanding two different paths to configure your memory with MemMaker. One is to follow the Express Setup. The other path you can choose is the Custom Setup.
Express Setup is the easier path to choose. You have little interaction with Express Setup, other than pressing Enter when MemMaker prompts you to do so. MemMaker searches through the upper memory area to find open memory addresses. It then sorts device drivers and TSRs that you load in memory to see the optimum loading order. Finally, it updates your CONFIG.SYS and AUTOEXEC.BAT files for two reasons. MemMaker ensures that HIMEM.SYS and EMM386.EXE load to manage memory and that the DOS=UMB directive is in CONFIG.SYS to provide the link to upper memory blocks. In addition, MemMaker inserts DEVICEHIGH and LOADHIGH before the device drivers and TSRs that load in upper memory.
Note
Although MemMaker adds the device drivers HIMEM.SYS and EMM386.EXE and the upper memory block directive HIGH=UMB, it does not ensure that DOS loads into upper memory with the directive DOS=HIGH. Before you use MemMaker, ensure that your system loads DOS in the high memory area by inserting DOS=HIGH in your CONFIG.SYS file and rebooting your computer. After you are running DOS in the high memory area (the MEM command tells you that DOS is in the high memory area), run MemMaker.
Tip
If you start an application such as Windows from your AUTOEXEC.BAT file, place the word REM in front of the startup command (in this case, in front of WIN) before using MemMaker. REM causes DOS to ignore the rest of the command so that you don't have to exit your application during each MemMaker phase. When MemMaker has completed its work, remove REM so that your application again starts automatically each time you boot.
Tip
An easy way to run MemMaker is to use the /BATCH switch. From the command line, type MEMMAKER /BATCH. This command runs MemMaker in automatic mode, accepting all the default answers.
Custom Setup is similar to Express Setup in that it scans the upper memory area for open address space, sorts device drivers and TSRs for optimal order, and updates your AUTOEXEC.BAT and CONFIG.SYS files. As you might expect, however, you can customize how MemMaker performs these tasks. The following list shows the elements you can customize using Custom Setup:
Specify any TSRs that are not to be included in optimization.
Aggressively scan the upper memory area.
Set aside upper memory for Windows use.
Use an area of upper memory set aside for the Monochrome Display Adapter (MDA) if you are using only an EGA or VGA display (but not SuperVGA).
Keep any special memory inclusions or exclusions that you specified with
EMM386.EXE.Move the Extended BIOS data area in upper memory blocks.
Now that you understand what MemMaker can do to optimize your computer's memory, you are ready to use MemMaker. The following two sections explain how to use MemMaker with Express Setup and Custom Setup.
Follow these steps to run MemMaker using Express Setup:
At the DOS prompt, type
MEMMAKERand press Enter.MemMaker asks whether you want to continue. Press Enter to continue.
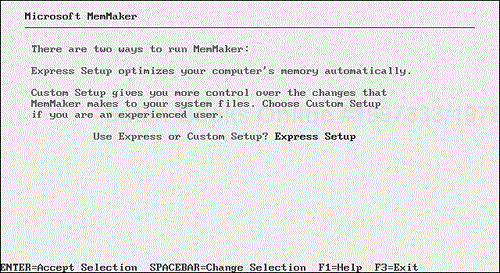
MemMaker asks whether you want Express or Custom Setup, as shown in Figure 19.1. For most users, an Express Setup does an excellent job. Unless you are very knowledgeable about PCs and want to guide MemMaker's every step, press Enter to select an Express Setup.
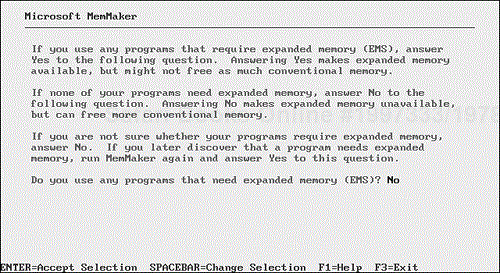
MemMaker asks whether you intend to use EMS (expanded) memory, as shown in Figure 19.2. Answer
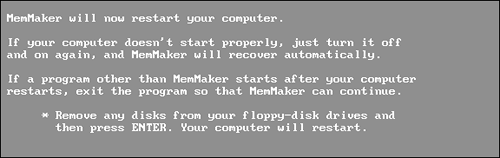
YorN, and press Enter. (If the answer you want is already showing, just press Enter.)When you see a screen indicating that MemMaker must reboot the computer, as shown in Figure 19.3, press Enter to reboot. (If your computer does not start correctly, turning it off and back on reboots it.)
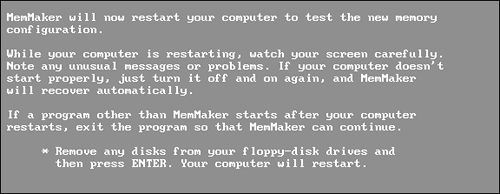
When your computer reboots, MemMaker automatically begins the next phase of its work, telling you that it has calculated the optimal configuration for your computer. MemMaker displays another screen, as shown in Figure 19.4, that asks you to press Enter so that MemMaker can reboot again. Press Enter to continue.
During the reboot, your computer executes the
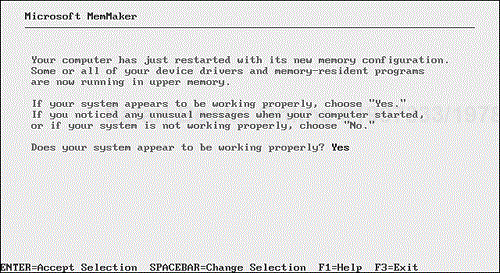
CONFIG.SYSandAUTOEXEC.BATfiles that MemMaker created. Although MemMaker should do an excellent job of configuring your computer for peak performance, there is always a chance that it can make a mistake. As your computer boots, watch carefully for any errors produced by the device drivers and programs that you load from yourCONFIG.SYSandAUTOEXEC.BATfiles.After your computer completes its reboot, MemMaker begins its last phase. MemMaker displays the message shown in Figure 19.5, asking whether you saw any errors during boot. If your computer booted without errors, press Enter.
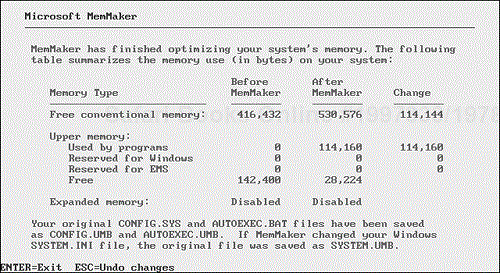
MemMaker displays a table showing how the changes affected your available memory. A sample is shown in Figure 19.6. This report tells you how much of each type of memory you had available before and after MemMaker made its changes. In this example, MemMaker adjusts commands in
AUTOEXEC.BATandCONFIG.SYSso that several device drivers and TSR programs are loaded into upper memory, freeing up about 114KB of conventional memory. MemMaker also tells you that it has saved your originalAUTOEXEC.BATandCONFIG.SYSfiles asAUTOEXEC.UMBandCONFIG.UMBin case you later discover a problem and want to return to using your original files.When you finish examining this report, press Enter to exit MemMaker.
Follow these steps to run MemMaker using Custom Setup:
At the DOS Prompt, type
MEMMAKERand press Enter.MemMaker asks whether you want to continue. Press Enter.
MemMaker asks whether you want Express or Custom Setup (refer to Figure 19.1). Press the spacebar to select Custom Setup and then press Enter to continue.
MemMaker asks whether you intend to use EMS memory (refer to Figure 19.2). Press the spacebar to choose Yes or No. After you have made the desired selection, press Enter.
MemMaker now displays Advanced Options that enable you to customize the settings used when optimizing memory. Each advanced option requires a Yes or No answer. Use the spacebar to answer. Use the down- and up-arrow keys to move from one option to the next. The following list explains the options that you have to set:
Specify which drivers and TSRs to include in optimization? Answering Yes enables you to leave out of optimization TSRs that must be loaded into memory in a specific sequence or that give MemMaker trouble during optimization.
Scan the upper memory area aggressively? If you answer Yes, MemMaker includes the
HIGHSCANparameter in theEMM386.EXEline ofCONFIG.SYS. AlthoughEMM386.EXEnormally scans the address range C600-EFFF for available upper memory, addingHIGHSCANinstructsEMM386.EXEto scan the address range C600-F7FF.Optimize upper memory for use with Windows? If you answer Yes,
EMM386.EXEsets aside upper memory for use by Windows. This provides more memory for DOS programs that you run from Windows. If you do not run DOS programs from Windows, choose No.Use monochrome region (B000-BFFF) for running programs? Answer Yes if you have installed an EGA or VGA display adapter but not a monochrome or SuperVGA display adapter. The address range B000-BFFF can be used as upper memory if you have an EGA or VGA display adapter installed.
Keep current EMM386 memory exclusions and inclusions? If you currently are using
EMM386.EXEand have specific addresses specified to include or exclude, answer Yes to this question.Move Extended BIOS Data Area from conventional to upper memory? Normally,
EMM386.EXEmoves the Extended Bios Data Area (EBDA) to upper memory. If any unusual problems occur while you're running MemMaker, however, answer No to this option.
After you answer all the Advanced Options correctly, press Enter to continue with MemMaker.
MemMaker searches your hard disk for a copy of Windows. If it finds Windows, MemMaker displays the directory in which the copy of Windows resides. If this directory is incorrect, type the correct directory. Press Enter to continue.
From this point, MemMaker behaves exactly as in the Express Setup. Refer to the previous section, picking up with step 5.
One of the most frustrating problems to encounter using DOS is trying to run a program and discovering that you do not have enough memory available.
If you are trying to run a new application and encounter this problem, you can take some steps to try to resolve it:
Your
CONFIG.SYSfile loadsHIMEM.SYSfirst and thenEMM386.EXE. Together, these two drivers allow access to extended memory and upper memory blocks.Unless you are running applications that need expanded memory, use the
NOEMSoption forEMM386.EXEso that all extended memory is available as XMS memory.Load DOS into the high memory area and make upper memory available to DOS by entering the command
DOS=HIGH,UMB.Use the
DEVICEHIGHcommand for as many drivers as possible in yourCONFIG.SYSfile. You cannot useDEVICEHIGHforHIMEM.SYSorEMM386.EXE, and some other device drivers might not load properly withDEVICEHIGH. Experiment and useMEM/Cto determine whether the drivers loaded properly.Use
LOADHIGHfor any TSRs you load in yourAUTOEXEC.BATfile. Because some TSRs might not work correctly when loaded high, experiment until you determine what TSR you can load high.If you own a 386 computer or better, your
CONFIG.SYSfile begins with the following:DEVICE=C:DOSHIMEM.SYS DEVICE=C:DOSEMM386.EXE NOEMS DOS=HIGH,UMB
Using the MEM command is very important in this case to see how much memory is available for programs. Another point to keep in mind is that you need to avoid loading any drivers that are unnecessary. If the application you are trying to run does not require sound, for example, and you have a sound card, try not loading the sound drivers.
Tip
One useful trick is to make multiple start configurations for different uses. If you have a game that requires a lot of memory, for example, and the only way to get it to run is not to load your tape drive driver, make a new startup configuration for it and use the DOS menu function.
To find out more details about creating multiple configurations, refer to Chapter 2, “Starting DOS.“
If your computer is typical, it spends a lot of its time accessing data and programs on hard disk. Speeding up your hard disk is probably the single most significant change you can make to increase the overall speed of your system. Although most later systems have a fast, IDE-based hard drive, you can configure DOS to make the most of it.
The BUFFERS command in CONFIG.SYS tells DOS how much memory to reserve for file transfers. DOS sets aside an area of RAM called a buffer for temporary storage of data being transferred between the disk and an application.
When DOS is asked to retrieve information from a disk, it reads the information in increments of whole sectors (512 bytes). Excess data not required from that sector is left in the buffer. If this data is needed later, DOS does not need to perform another disk access to retrieve the data. Similarly, DOS tries to reduce disk activity when it writes information to the disk. If less than a full sector is to be written to the disk, DOS accumulates the information in a disk buffer. When the buffer is full, DOS writes the information to the disk. This action is called flushing the buffer. To make sure that all pertinent information is placed into a file, DOS also flushes the buffers when a program closes a disk file.
Whenever a disk buffer is used, DOS marks it to indicate that it has been used recently. When DOS needs to reuse buffers for new information, it takes the buffer that has not been used for the longest time.
The net effect of DOS's use of buffers is to reduce the number of disk accesses by reading and writing only full sectors. By reusing the least-recently used buffers, DOS retains information more likely to be needed next. Your programs and, therefore, DOS run faster.
You can control the number of buffers available for DOS to use. Each buffer uses up some of your memory but results in faster disk access. The syntax for the BUFFERS command is shown in the following:
BUFFERS = n, m
The n parameter is the number of disk buffers you want DOS to allocate. A single buffer is about 512 bytes long (plus 16 bytes used by DOS). Use a number from 1 to 99. If you do not give the BUFFERS command, DOS uses a default value between 2 and 15, depending on the size of your disk drives, the amount of memory in your system, and the version of DOS you are using. Table 19.3 lists the different default buffer configurations.
Table 19.3. Default Number of Disk Buffers
| Buffers | Hardware |
|---|---|
| 2 | 360KB floppy disk drive |
| 3 | Any other hard or floppy disk drive |
| 5 | More than 128KB of RAM |
| 10 | More than 256KB of RAM |
| 15 | More than 512KB of RAM |
The m parameter is a number in the range 1 through 8 that specifies the number of sectors DOS reads each time it is instructed to read a file. This feature is sometimes called a secondary cache or a look-ahead buffer. When files most often are read sequentially, this type of buffer increases performance. Do not use this secondary cache feature if you are using or plan to use a disk caching program such as SMARTDRV.SYS., discussed in Chapter 7, “Preparing and Maintaining Disks.”
Increasing the number of buffers generally improves disk performance, up to a point. The recommended number of buffers increases with the size of your hard disk. Consider the suggested buffer numbers listed in Table 19.4 when adding a BUFFERS command to CONFIG.EXE. Using a number higher than the recommended number of buffers probably uses more memory without further improving speed.
Table 19.4. Suggested Number of Disk Buffers
| Hard Disk Size | Buffers |
|---|---|
| Less than 40MB | 20 |
| 40MB to 79MB | 30 |
| 80MB to 119MB | 40 |
| 120MB or more | 50 |
If you have an 85MB hard disk and are not using a hard disk caching program, for example, you might include the following BUFFERS command in CONFIG.SYS:
BUFFERS=40,8
In addition to the commands covered earlier in this chapter, you can use many other commands in CONFIG.SYS or AUTOEXEC.BAT to customize your computer configuration. The following sections discuss other useful commands: FCBS, FILES, LASTDRIVE, SHELL, INSTALL, REM, and SWITCHES.
The FCBS configuration command enables you to use programs written for DOS 1.1; some DOS users find FCBs indispensable. FCB is an acronym for file control block. FCBs serve as one way a program can access a file. This method of file access was used by DOS 1.1 to communicate with programs. Later versions of DOS borrow a Unix-like method for controlling files, called handles (discussed in “Using the FILES Command” in this chapter). Although FCBs can be used with any version of DOS, only DOS 2.0 and higher can use handles.
The syntax for the FCBS command in the CONFIG.SYS file is as follows:
FCBS = maxopen
The maxopen parameter is a number between 1 and 255 that sets the maximum number of unique FCBs that programs can open at one time. The default number is four. You don't need to use this command in CONFIG.SYS unless you have a program that was designed to work with DOS 1.1 and the program cannot open all the required files (a message to this effect appears). In this case, use the FCBS command to increase the number of FCBs that can be open at one time.
You pay a small price in RAM to use the FCBS command. For each number greater than four that maxopen exceeds, DOS uses about 40 bytes.
FILES is the configuration command used in DOS 2.0 and higher to allow for Unix-like file handling. Unix and later versions of DOS use a file handle (a number corresponding to the filename) instead of file control blocks to access files. You never have to deal with file handles directly. Each application program gives the operating system the name of the file or device you want to use. The operating system gives the program a handle, and the program uses that handle to manipulate the file or device.
To include the FILES command in CONFIG.SYS, use the following syntax:
FILES = n
The n parameter is a number (8, which is the default, through 255) that determines the number of files that can be open at one time during a DOS session. Each additional file beyond eight increases the size of DOS by 39 bytes.
If you do not specify the FILES command, DOS starts with eight file handles and immediately takes five handles for the standard devices, leaving only three handles for your programs. This number is almost never large enough for applications you are likely to run. On most systems, increase the number of handles to 20 or 30.
The LASTDRIVE configuration command informs DOS of the maximum number of disk drives on your system. Generally, LASTDRIVE is a command used with networked computers or with the pretender commands (such as SUBST).
If you do not use the LASTDRIVE command, DOS assumes that the last disk drive on your system is one more than the number of physical drives and RAM disks you are using. If your LASTDRIVE command specifies a letter corresponding to fewer drives than the number physically attached to your computer or created as RAM disks, DOS ignores the command. The LASTDRIVE command enables you to tell DOS how many disk drives, real or apparent, are on your system, including network drives and directories (if any) and drives created with the SUBST command.
If you want to use the LASTDRIVE command in CONFIG.SYS, use the following syntax:
LASTDRIVE = x
The x parameter is the letter for the last disk drive on your system. The letters A through Z in upper- or lowercase are acceptable.
The SHELL command was originally implemented to enable programmers to replace the DOS command interpreter (COMMAND.COM) with other command interpreters. The SHELL command is more commonly used, however, to perform the following two functions:
Inform DOS that the command interpreter is in another directory, not in the boot disk's root directory.
Expand the size of the environment—an area of RAM that stores named variables used by DOS and applications. Commands such as
PATHandPROMPTstore their current settings as environment variables. To display the contents of the environment, typeSETat the command prompt and press Enter.
Caution
SHELL is a tricky command; use it with caution. If used incorrectly, the SHELL command can lock up your system. Keep a bootable floppy disk handy for restarting your computer in case you run into a problem.
The syntax for the SHELL command is as follows:
SHELL = filespec parameters
The filespec parameter is the path and filename of the command processor and should be COMMAND.COM if you are using the standard DOS command processor. The SHELL command doesn't take any other parameters or switches, but you can add command-line parameters or switches available for use with the command processor. The parameters for COMMAND.COM are explained in the next few paragraphs.
When used from the command line, COMMAND loads a copy of the command processor into memory. A common use of COMMAND is as a parameter of the SHELL command. The syntax for COMMAND is as follows:
COMMAND d:path device /E:size /P /C string /K:filename /MSG
The d:path parameter specifies the disk drive and path that contain the command processor if it is not located in the root directory. Always use this parameter when including COMMAND in the SHELL configuration command. This parameter has the additional effect of setting an environment variable named COMSPEC, which informs DOS and other programs of the location and name of the current command processor.
/E:size is an optional switch that sets the environment space. The size parameter is a number between 160 and 32,768 that denotes the amount of memory reserved for the environment. (If you do not specify a multiple of 16, DOS rounds the size parameter up to the next highest multiple of 16.) By default, DOS reserves 256 bytes for the environment.
The /P switch instructs DOS to load the command processor permanently. Without the /P switch, DOS loads COMMAND.COM only temporarily into memory. When you are using COMMAND with the SHELL command in CONFIG.SYS, be sure to use the /P switch.
The /C switch and string parameter work together. This combination causes DOS to load the command processor, execute any command represented by string, and then unload the command processor.
The /MSG switch tells DOS to store all its error messages in memory rather than read them from the disk. This feature can speed operation. More importantly, if you are running a system that has only floppy disks, you sometimes remove the disk that contains COMMAND.COM from the disk drive. Without the /MSG switch, DOS cannot access error messages contained on disk within the COMMAND.COM file itself. Use this switch only if you are running DOS from floppy disks. You also must use the /P switch any time you use the /MSG switch.
The /K parameter tells DOS to run a program or batch file. Use this switch only when you're running COMMAND from the DOS prompt and not as part of the SHELL command in CONFIG.SYS.
The DOS Setup program adds the following command to the default CONFIG.SYS file:
SHELL=C:DOSCOMMAND.COM C:DOS/P
This configuration command tells DOS that COMMAND.COM is the command interpreter and that it is located in the DOS directory on the C drive. The /P switch causes the command interpreter to be loaded permanently, not temporarily, in memory.
The preceding SHELL command enables you to place a copy of COMMAND.COM in C:DOS and delete the copy in the root directory. This practice helps you maintain a clean root directory and protects COMMAND.COM from being replaced by an older version that might be on a floppy disk you are copying. If you accidentally copy the disk to the root directory, you don't overwrite the current version of COMMAND.COM.
Occasionally, you create such a long PATH command in AUTOEXEC.BAT that you fill the available environment space, causing DOS to display the following message:
Out of environment space
If this message appears, use COMMAND with the SHELL command and the /E switch to specify a larger environment space. The following command used in CONFIG.SYS, for example, increases the environment to 384 bytes:
SHELL=C:DOSCOMMAND.COM /E:384
If you already have a SHELL command in CONFIG.SYS, you can add the /E switch. Combining the two preceding SHELL commands, for example, you can include the following command in CONFIG.SYS:
SHELL=C:DOSCOMMAND.COM C:DOS/P /E:384
The INSTALL configuration command enables you to load memory-resident programs from within CONFIG.SYS. In versions of DOS before 4.0, you had to load these programs from the DOS prompt or through a batch file, such as AUTOEXEC.BAT. You can save several kilobytes of memory by loading a program from CONFIG.SYS with INSTALL rather than from the command line or a batch file as an executable program. DOS 4.0 and later versions support loading any of the following programs by using INSTALL:
FASTOPEN.EXEKEYB.COMNLSFUNC.EXESHARE.EXE
→ For more information about these programs, see Appendix F,“ Command Reference,” p. 583.
The following is the syntax for using INSTALL in CONFIG.SYS:
INSTALL = filespec parameters
The filespec parameter is the path and filename information of the utility you want to load, whereas parameters specifies any parameters or switches required by the utility you want DOS to load.
You might be able to use INSTALL with some memory-resident non-DOS programs. Do not use INSTALL, however, to load a memory-resident program that uses environment variables or shortcut keys or that uses COMMAND.COM. The program you install with this command must have the extension .COM or .EXE.
The REM configuration command is equivalent to the REM batch file command. This command enables you to insert remarks into your CONFIG.SYS file. You can leave notes to yourself (or others) explaining what particular lines do. Such documentation in a CONFIG.SYS file is especially helpful if you use non-DOS device drivers for your hardware. You also can temporarily remove a CONFIG.SYS statement by prefacing the statement with a REM command. After you test the new configuration, you can return easily to the old configuration by simply removing the REM command.
The syntax for the REM command is as follows:
REM remarks
The remarks parameter can be any string of characters that fits on a single line in the CONFIG.SYS file.
The SWITCHES configuration command enables you to set any of four options that control how four of DOS's features operate. The syntax of the SWITCHES command is as follows:
SWITCHES = /K /W /N /F
You can specify one or more of these four switches in a single SWITCHES command.
The /K switch turns off the enhanced keyboard functions. This command works like the ANSI.SYS /K switch. Some software cannot work with the enhanced keyboard. Use this command to disable the enhanced keyboard so that the software functions properly. If you use the SWITCHES=/K command in CONFIG.SYS and also install ANSI.SYS as a device driver, add the /K switch to the DEVICE=ANSI.SYS line as well.
The /W switch specifies that the WINA20.386 file has been moved to a directory other than the root directory. Use this switch if you moved WINA20.386 to another directory and are using Windows in enhanced mode.
Normally, you can use the F5 or F8 keys during the first two seconds of booting to bypass some or all the commands in CONFIG.SYS or AUTOEXEC.BAT. The /N switch tells DOS to ignore F5 or F8 during boot.
Normally, DOS displays this message at the beginning of the boot process and then pauses for two seconds before continuing:
Starting MS-DOS
The /F switch tells DOS to skip the two-second pause.
As you already know, Ctrl+Break and Ctrl+C are helpful but not foolproof panic buttons you can use to stop commands. The response to a Ctrl+Break or Ctrl+C is not instantaneous. Although only an “Oh, no” second might pass from the time you press the panic button until DOS responds, you still have time to wonder why DOS takes so long to respond. The reason is that DOS is busy doing other things most of the time and looks for Ctrl+Break only at intervals. You can use the BREAK command in CONFIG.SYS to tell DOS when to check for this key sequence. BREAK does not enable or disable the Break key; the BREAK command only controls when DOS checks for the Break key.
The syntax for the BREAK command can be either of the following:
BREAK=ON

BREAK=OFF
The default setting for this command is OFF.
If you use the command BREAK=ON in CONFIG.SYS, DOS checks to see whether you pressed Ctrl+Break whenever a program requests some activity from DOS (performs a DOS function call). If you use the command BREAK=OFF, DOS checks for a Ctrl+Break only when DOS is working with the video display, keyboard, printer, or asynchronous serial adapters (the ports at the back of the computer).
Because DOS manages disks in a logical rather than a strictly physical way, DOS can pretend that a disk's identity is different from the disk's name. DOS provides the following three commands that pretend that a disk's identity has changed:
ASSIGN—. Redirects disk operations from one disk to anotherJOIN—. Attaches an entire disk as a subdirectory to the directory structure of another diskSUBST—. Makes a directory of a disk appear to commands as a separate disk
→ For detailed information on these commands, see Chapter 11, “ Controlling Your Environment,” p. 293.
DOS provides other commands to control devices and report system information, which are briefly discussed in this section.
→ These commands are explained in greater detail in Appendix F,“Command Reference,” beginning on p. 583.
The SET command displays the current environment settings and enables you to make new variable assignments.
The PRINT command enables you to print text files on your printer while you continue to do other PC work. This “background” printing can be a great timesaver if your applications don't have a similar feature.
The MODE command is a multifaceted device-control command. MODE can establish the height and width of your screen's lines and characters and control the speed of your serial ports. MODE can redirect the output from a parallel printer port to a serial port. You also can use MODE in association with code-page support for international character sets on the PC. You might want to browse through the MODE section of the “Command Reference.