
As discussed in the Chapter 4, you can create a Web site in Expression Web 2 on your local machine or on a remote Web server. However, there may be times when you need to move an existing Web site from one location to another. For example, you might be taking over the maintenance of an existing Web site from another Web designer, or perhaps you’ve been hired to redesign an existing Web site and you want to use some of the content that’s already been created.
Expression Web 2’s Import Web Site wizard is a convenient and powerful way to import Web site content. Using the Import Web Site wizard, you can easily control how a Web site is imported. You can choose whether to use the FrontPage Server Extensions, FTP, and so on, and in some cases, you can also specify how Expression Web 2 decides whether to import certain files.
Caution
Always remember that Web sites are copyrighted material. Current laws as of this writing automatically provide for a common-law copyright on any published Web site.
You can use the Import Web Site wizard to import any Web site you wish, but it is illegal to use the content or the design of someone else’s site without their express written permission.
The Import Web Site wizard is accessed by selecting File, Import, Import Web Site Wizard. Let’s have a look at the steps that are involved in importing a Web site.
In step 1, you will need to choose how the Web site’s files are imported. You can choose among the following methods of importing a Web site:
FrontPage Server Extensions
WebDAV
FTP
File System
HTTP
All of these methods except the FrontPage Server Extensions method use the Publish feature of Expression Web 2 to import the remote Web site. After you’ve specified the necessary information for Expression Web 2 to open the remote Web site, the remote Web site is published to the destination you’ve selected.
Tip
Keep in mind that when you import a Web site, you aren’t necessarily moving the Web site from a remote location to your local machine. The act of importing a site is really just the process of copying the Web site from one location to another.
→ | For more information on using the Publish feature in Expression Web 2, see Chapter 3, “Publishing a Web Site,” p. 43. |
If the remote Web site is running FrontPage Server, the first option in the Import Web Site wizard is the best one to choose.
After selecting this method, enter the URL of the remote Web site in the Web Site Location text box shown in Figure 5.1. Use the same URL that you would use when viewing the Web site in a Web browser.

Caution
If the remote Web server has the FrontPage Server Extensions installed, make sure you use this option when importing the Web site. If you don’t, the files that provide the FrontPage Server Extensions with configuration information won’t be imported.
You have the option of including subsites by checking the Include Subsites check box. You can also import a Web site using the Secure Sockets Layer (SSL)
→ | For more information on both subsites and SSL, see “Web Sites and Subsites,” p. 29. |
To proceed to the next step, click the Next button. If the FrontPage Server Extensions are not installed on the remote Web site, you will be notified that you cannot import the Web site, as shown in Figure 5.2.

Tip
When you see the dialog shown in Figure 5.2, you should first check to see if the FrontPage Server Extensions are installed on the remote Web site. If you find that they are installed and you still get this dialog, check with your host to find out what might be wrong.
Assuming the FrontPage Server Extensions are located on the site, you’ll be prompted for a username and password to import the Web site. The username and password you will need to enter are assigned by the administrator of the Web site or by the hosting company.
If the remote Web server supports Web Distributed Authoring and Versioning (WebDAV), you can use this option to import a site. WebDAV is similar to using the FrontPage Server Extensions option, but the FrontPage Server Extensions are not required for WebDAV.
When using WebDAV, you don’t have the option of including subsites when you import a Web site. However, you can import using SSL when using the WebDAV method by checking the Use Encrypted Connection (SSL) check box.
Just as with the FrontPage Server Extensions method, you will need to enter a username and password when importing a Web site using WebDAV.
→ | For more information on WebDAV, see “Server Options for Publishing,” p. 44. |
To use the File Transfer Protocol (FTP) to import a Web site, choose the FTP option. You need a username and password to import a Web site using FTP.
To import a Web site using FTP, enter the FTP address of the remote Web site in the Web Site Location text box, as shown in Figure 5.3. Depending on the configuration of the remote site, you may also need to enter a root directory in the Root Directory text box, and you may additionally need to enable passive FTP by checking the Use Passive FTP check box.

→ | For more information on the different options available with FTP, see “Server Options for Publishing,” p. 44. |
After you’ve entered the necessary information, click the Next button to continue. You’ll be prompted for a username and password before you can proceed to the next step.
The File System method is often used when importing a Web site from a local file system. However, it can also be used to import a Web site from any location to which you have access via the file system. In other words, in addition to importing from a local drive, you can also use either a UNC (universal naming convention) path or a mapped drive to import using this method.
Note
The file system method is often used in an office network environment where many file servers are available.
A UNC path consists of a server name and a share name and is in the format \servershare. For example, to access a share called websites on a server named server1, you would use the UNC path \server1websites.
Tip
Windows automatically sets up a share for the root of every drive on your computer. You can access any share by using the format \server<drive>$. For example, to access the root of the C drive on a computer named desktop, you would use the UNC path \desktopc$.
You will need to use an Administrator account to access these shares.
Because Expression Web 2 provides support for disk-based Web sites, you can also choose to include subsites when using the File System method by checking the Include Subsites check box.
The Hypertext Transfer Protocol (HTTP) method is used to import a Web site that you don’t have access to via any of the previously discussed methods. This is the only method that does not require authorization to complete the import process.
The HTTP import process is quite different from the other import methods. In fact, you can import any Web site that you can get to on the Internet using this method. Instead of actually publishing the Web site during the import process, the HTTP import method can be configured to follow hyperlinks from the home page.
When you choose the HTTP method to import a Web site, the Import Web Site wizard adds the Set Import Limits step, as shown in Figure 5.4.

Note
The Set Import Limits step actually appears as the third step in the wizard. I am covering it here only because it’s unique to the HTTP method of importing.
In this step, you can specify exactly how the Import Web Site wizard decides what to import using the following check boxes:
Import the Home Page Plus Linked Pages # Levels Deep—. When a Web site is imported, Expression Web 2 will follow hyperlinks to the depth that you specify. For example, if you specify
2for the number of levels, Expression Web 2 will import the home page, all pages linked to directly from the home page, and all pages linked to directly from those pages.Import a Maximum of # KB—. Use this option when you want to put a cap on the amount of content that gets imported. This is particularly useful if you have metered bandwidth or a slower Internet connection.
When this option is chosen, Expression Web 2 will import the home page of the Web site and will then follow all links from that page. It will continue to follow links and import files until the maximum limit is reached.
Import Only HTML and Image Files—. When this box is checked, Expression Web 2 will only import images and HTML files. Other files such as script files, CSS files, Flash files, and so on will not be imported.
Tip
By default, Expression Web 2 will import all files that are reachable from the home page and all child pages.
Note

If Expression Web 2 skips the Set Import Limits step when importing via HTTP, see “Import Web Site Wizard Skips Set Import Limits Step” in the “Troubleshooting” section of this chapter.
Note
If you are prompted for your username and password even though you’ve entered them correctly, see “Username and Password Not Accepted” in the “Troubleshooting” section of this chapter.
The second step of the Import Web Site wizard (shown in Figure 5.5) is where you’ll specify the destination location for the imported Web site. This can be a UNC path, a disk location, or an HTTP location. However, when specifying an HTTP location, the Web site must have the FrontPage Server Extensions installed.
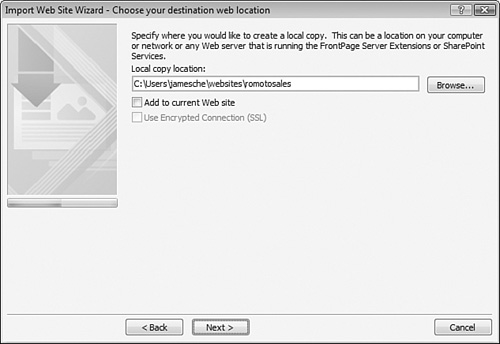
If you already have a Web site open in Expression Web 2, check the Add to Current Web Site check box if you’d like the imported Web site to be added to the open Web site. If you require additional security, you can specify that SSL be used to import the site if you use an HTTP path for the destination.
After you’ve specified all the necessary information, click the Finish button in the last step of the wizard to finish the import process. If you’ve chosen HTTP as your method of importing, the Web site will begin importing immediately. Otherwise, you’ll be presented with the Copy Web Site view, as shown in Figure 5.6. You can then complete the import process by using the Copy Web Site view to copy the files and folders.
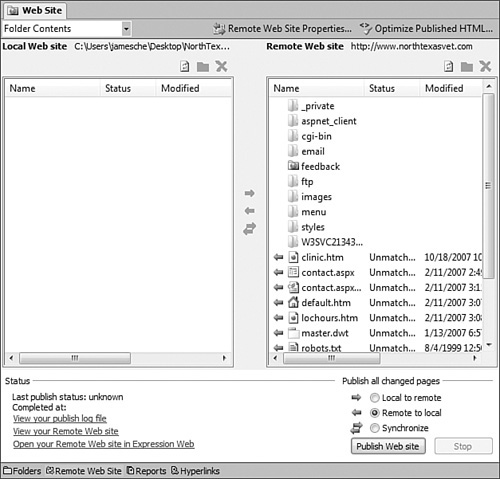
For details on using the Copy Web Site view, see “Publishing Content,” p. 50. |
→ | For details on how to troubleshoot importing a Web site using HTTP, see “Troubleshooting HTTP Publishing,” p. 55. |
I’m choosing HTTP as my import method, but when I run through the wizard, I don’t have the option of choosing the import limits.
It’s likely that the Web site you are trying to import is configured with the FrontPage Server Extensions. If Expression Web 2 detects that the FrontPage Server Extensions are installed on the remote Web site, it will automatically use the FrontPage Server Extensions option when importing the Web site.
You’ll have the option of choosing what to import when you are presented with the Copy Web Site dialog at the end of the process.
I’m trying to import a Web site. I’m asked for my username and password, and even though I’ve entered the correct information, I’m still being rejected.
The most likely cause of this is an incorrect password. Take care to type the characters correctly and make sure that your Caps Lock isn’t on. If you’re positive that you’ve entered the information correctly, check with the hosting company or administrator of the remote Web server.
After seeing how Expression Web 2 handles importing a Web site, you might be asking yourself why you wouldn’t want to simply publish a Web site instead of importing it. In many cases, it really doesn’t matter. However, there is at least one reason why importing a Web site can be extremely useful.
Many tricks of the trade in Web design are learned by examining how other Web designers accomplish certain tasks. By importing a Web site, you can learn new Web design techniques. As long as there is a link on a page to a particular file, Expression Web 2 will import it via the Import Web Site wizard’s HTTP method. This is a powerful tool for discovering new Web design techniques.
However, if you import someone else’s Web site for this purpose, keep in mind that anything you import from another Web site is copyrighted and cannot be reused without explicit consent from the site’s owner.