
Expression Web 2 gives you plenty of choices when creating new Web pages. Not only can you choose between standard HTML pages, ASP.NET Web pages and files, and PHP files, but you can also create new pages that have an existing CSS layout.
To create a new Web page in Expression Web 2, select File, New, Page to display the New dialog shown in Figure 7.1.

The left side of the New dialog contains a list of page types. When a page type is selected, the list at the right is populated with numerous pages that can be created.
Many of the page types listed aren’t really pages in the traditional sense. For example, if you select ASP.NET as the page type, you’ll see that you have options such as Web Configuration and Site Map, neither of which are actual Web pages.
Creating a page is literally as easy as selecting the type of page in the New dialog and clicking OK. After you create the new page, you’ll need to add content to it before it will serve any useful purpose. When using the New dialog to create new pages, you have several different types of page formats from which to choose.
Table 7.1 shows the page formats available when you select General in the New dialog and where you can find more information on certain formats.
Table 7.1. General Page Formats
Type | Description | More Information |
|---|---|---|
HTML | Creates a standard, blank HTML page. | |
ASPX | Creates an ASP.NET Web form. When you choose this option, you will also have the option of choosing a programming language for the page. | For more information on ASP.NET Web forms, see Chapter 28, “Using Standard ASP.NET Controls.” |
| Creates a PHP file for use with PHP scripts. | For more information on using PHP, see Chapter 35, “Using PHP in Expression Web 2.” |
CSS | Creates an empty CSS file. | For more information on CSS files, see Chapter 17, “Creating Style Sheets.” |
Master Page | Creates a new ASP.NET Master Page that can be used as a template for other ASP.NET pages. | For more information on ASP.NET Master Pages, see Chapter 30, “Using ASP.NET Master Pages and User Controls.” |
Dynamic Web Template | Creates a new Dynamic Web Template. Other pages can then be attached to the Dynamic Web Template to create a consistent look and feel for your Web site. | For more information on Dynamic Template Web Templates, see Chapter 21, “Using Dynamic Web Templates.” |
JavaScript | Creates a new JavaScript file (with a .js file extension). JavaScript entered in that file can then be used on one or more pages by linking the file to the desired page. | For more information on JavaScript files, see Chapter 24, “Client-side Scripting.” |
XML | Creates a new, empty XML file. | For more information on XML files, read Special Edition Using XML from Que Publishing. |
Text File | Creates an empty text file. | |
Create from Dynamic Web Template | Creates a new page based on a Dynamic Web Template. After choosing this option, you will be prompted for the Dynamic Web Template on which the page should be based. | |
Create from Master Page | Creates a new ASP.NET Web form based on an ASP.NET Master Page. After choosing this option, you will be prompted for the Master Page on which the page should be based. |
The page types shown in Table 7.2 are available when you choose ASP.NET in the New dialog.
Table 7.2. ASP.NET Page Formats
Type | Description | More Information |
|---|---|---|
ASPX | Creates a new ASP.NET Web form. This is the same option available in the General section. | |
Master Page | Creates a new ASP.NET Master Page. This is the same option available in the General section. | |
Web User Control | Creates a new ASP.NET user control that can then be inserted into an ASP.NET Web form. | For more information on ASP.NET user controls, see Chapter 33, “Using ASP.NET Web Parts.” |
Web Configuration 2.0 | Creates a new Web configuration file (called | For more information on using the |
| Creates a new Web configuration file (called | ASP.NET 3.5 applications allow for that can be used to the use of ASP.NET AJAX. For more information on using ASP.NET AJAX, see Chapter 34, “ASP.NET AJAX Extensions.” |
Site Map | Creates a new ASP.NET site map that can be used in conjunction with ASP.NET navigation controls. | For more information on ASP.NET site maps, see Chapter 29, “Using ASP.NET Navigation Controls.” |
Create from Master Page | Creates a new page based on an existing ASP.NET Master Page. This is the same option available in the General section. |
When you choose the CSS Layouts option in the New dialog, you will have the option of selecting from a series of page layouts. When you choose a particular layout, Expression Web 2 creates a new CSS file as well as a new HTML page, and then links the new CSS file to the HTML page. Code will also be added to both the HTML page and the CSS file that creates the layout you choose.
After choosing the desired layout, you can modify the CSS file to customize the appearance of the page.
→ | For more information on modifying CSS files, see Chapter 18, “Managing CSS Styles,” p. 315. |
Tip
The CSS Layouts option allows you to easily create page layouts that are CSS-based instead of using tables or other traditional layout techniques. CSS-based layouts are growing in popularity, largely because today’s browsers are able to render them consistently. However, if you choose to use a CSS layout, you’ll want to check your site carefully in a variety of browsers.
The Style Sheets section offers a wide assortment of pre-created CSS files that you can use in your Web site. Unfortunately, Expression Web 2 doesn’t provide a preview of the styles present in the CSS files, so you will need to apply one to your Web site to see what kind of formatting it will provide.
These CSS files are a great way to move to CSS, as long as you are willing to do some modification to them when they don’t give you what you want. For example, in my experience, the colors applied by these CSS files are a bit loud and unpleasant in appearance. However, they are easily modified.
The Frames Pages section provides a series of frame layouts. When you choose one of the frame layouts, Expression Web 2 will create all the pages that make up the layout for you.
→ | For more information on using frames, see Chapter 10, “Using Frames,” p. 175. |
Adding content often is more than just entering and configuring text. In many cases, you’ll also be adding graphic files, Flash animations, video files, and other files.
To import files into your Web site, select File, Import, File to display the Import dialog shown in Figure 7.2.

Click the Add File button to import one or more files. You can also click Add Folder to import a folder and all the files inside that folder. Once you’ve added files or folders, they will appear in the list in the Import dialog. If you’d like to change the name of an imported file, select the file and click the Modify button.
To complete the import process, click OK. The files will not be imported into the Web site until you click OK.
Tip
Files and folders that are added to the Import dialog will remain there until you complete the import process, remove them, or close the Web site. That means you can add files or folders and then click Close and import them later.
If you close a Web site with files still on the import list, Expression Web 2 will ask if you want to import them before closing the Web site.
![]() You might not realize it, but Expression Web 2 actually is part of a suite of products. Included in the Expression suite is a product called Expression Design, a product well-suited to creating graphics for Web sites. However, for many years, the graphics product of choice for Web professionals has been Adobe Photoshop.
You might not realize it, but Expression Web 2 actually is part of a suite of products. Included in the Expression suite is a product called Expression Design, a product well-suited to creating graphics for Web sites. However, for many years, the graphics product of choice for Web professionals has been Adobe Photoshop.
Note
Photoshop’s largest market is professional digital photographers, but it’s also an excellent tool for creating Web site graphics.
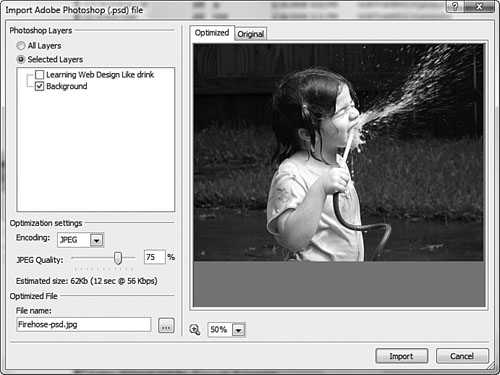
Expression Web 2 introduces the capability to import Photoshop files (.psd files) directly into your Web site. To import a Photoshop file, select File, Import, Adobe Photoshop PSD. Browse to a PSD file and click Open to access the Adobe Photoshop PSD Import dialog shown in Figure 7.3.

Tip
You must have a Web site open in Expression Web 2 before you can access the Adobe Photoshop PSD Import feature.
You have the option of choosing between importing the flattened image or importing a selection of layers, assuming the Photoshop file was saved with layer information. In Figure 7.3, the flattened image is selected. Figure 7.4 shows the same Photoshop file with only one layer selected, effectively removing the text layer when the file is imported.
Tip
To see how the Photoshop file will look when imported, click the Import Preview tab at the top of the Adobe Photoshop PSD Import dialog.
You have the option of importing your Photoshop file as a JPEG image, a GIF image, or a PNG image by selecting the desired format in the Encoding drop-down, shown previously in Figure 7.4. If you choose JPEG (the default), you’ll also have the option of specifying the JPEG quality as a percentage by dragging the JPEG Quality slider, or by entering an explicit value in the JPEG Quality text box. Neither GIF nor PNG offer any additional options.
When you’re ready to import your image, enter a filename in the File Name text box (shown previously in Figure 7.3) and click Import. By default, your image will be imported into the folder that is selected in the Folder List, but you can override that by selecting a different folder using the “...” button next to the File Name text box.
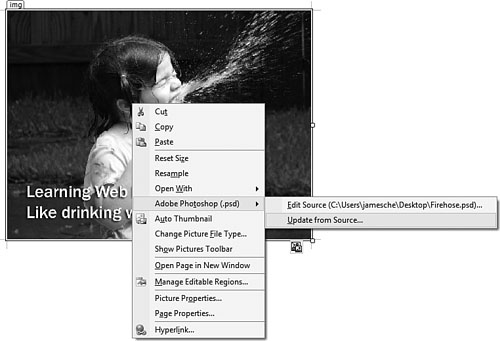
Expression Web 2 stores the layers in the Photoshop file you imported and also maintains a connection to the original .psd file. Therefore, Expression Web 2 can update the image in your Web site if the source .psd file changes. To update the image in your Web site with the latest changes in the source .psd file, right-click the image and select Adobe Photoshop (.psd), Update from Source as shown in Figure 7.5.
Expression Web 2 will launch the Import Adobe Photoshop (.psd) dialog as shown previously in Figure 7.3. If you’d like to simply update the image without making changes to your import settings, click Import.
If you’d like to edit the original .psd file in your .psd editor, select Edit Source from the menu as shown in Figure 7.5. Selecting this will launch the editor associated with .psd files on your computer and open the original source file for editing. After you’ve made your changes in your .psd editor, you must right-click the image in Expression Web 2 and select Adobe Photoshop (.psd), Update from Source to update the image with your changes.
Caution
Expression Web 2 relies on the site’s metadata to keep the connection to the original .psd file. Therefore, if you uncheck Manage the Web Site Using Hidden Metadata Files in the Site Settings dialog, the connection between the imported image and the .psd file will be broken.
Tip
There are a few limitations in the Photoshop import feature. The Photoshop file you are importing must be RGB color, indexed color, or grayscale, and it must be 8 bits per channel. You’ll also lose any transparency information in layers, even if you are importing to a file format that supports transparency.
Adding text to a Web page in Expression Web 2 is similar to creating a document in your favorite word processor. Many of the same tools are available. In fact, if you use Microsoft Office versions prior to the 2007 version, you’ll find that many of the toolbars and hotkeys when entering text are the same.
I’m not going to go into the details of basic text formatting because I’m sure you already understand how to bold and italicize text. Instead, I’ll explain how to work with HTML-specific formatting.
Before you start formatting text in your Web page, you should become familiar with how Expression Web 2 applies formatting. Because Expression Web 2 is designed to create standards-compliant Web sites, it will most often use CSS to apply formatting. How it goes about doing so is based on the Style Application setting.
The current Style Application setting is displayed in the Status Bar when a Web page is open. To adjust the Style Application setting, right-click on the Style Application area of the Status Bar, select Mode, and then select the desired mode, as shown in Figure 7.6.
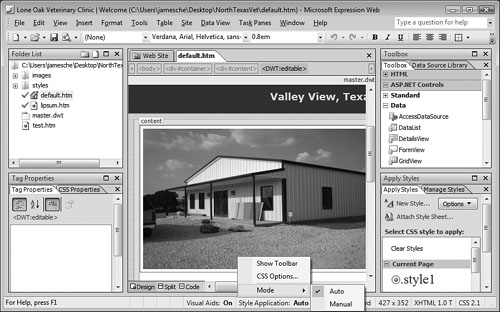
By default, the Style Application setting is set to Auto. In this mode, Expression Web 2 will apply formatting using CSS rules that are configured on the CSS tab of the Page Editor Options dialog.
→ | For more information on using the CSS tab in the Page Editor Options dialog, see Chapter 15, “Configuring Page Editor Options,” p. 261. |
When the Style Application setting is Manual, Expression Web 2 will automatically display the Style Application toolbar shown in Figure 7.7. The Style Application toolbar allows you to specify how to apply styles when edits are made.
When the Style Application setting is set to Auto (the default), you are at the mercy of Expression Web 2 when it comes to where CSS styles get defined. In many cases, that’s a suitable situation. However, you may want more granular control over where styles are created. For example, you might have a CSS file attached to the current page, and you may want to ensure that all newly created CSS styles are created inside that CSS file.
By setting the Style Application to Manual, you will be able to use the Style Application toolbar to specify where new styles are created using the Target Rule drop-down, as shown in Figure 7.7. Based on what is currently selected, the following options are available in the Target Rule drop-down.
An existing CSS element—. If the selected page element already has a CSS class or ID applied to it, you can select the CSS ID or class from the Target Rule drop-down. If you then make modifications to the selected element, Expression Web 2 will modify the CSS class or ID applied to it.
Inline Style—. If the selected element has an inline style applied to it, selecting Inline Style from the Target Rule drop-down will cause the inline style to be modified when formatting is changed.
New Inline Style—. Formatting changes will be reflected in a new inline style.
New Auto ID—. Causes Expression Web 2 to create a new, auto-generated CSS ID for any formatting changes that are applied. Expression Web 2 will create the new CSS ID in an embedded style sheet inside the current page.
New Auto Class—. Causes Expression Web 2 to create a new, auto-generated CSS class for any formatting changes that are applied. As with the New Auto ID option, the CSS class is created in an embedded style sheet in the current page.
Apply New Style—. Allows you to create a new style using the New Style dialog. The location for the new style can be specified in the New Style dialog.
→ | For more information on creating and editing CSS styles, see Chapter 17, “Creating Style Sheets,” p. 293. |
In a word processing application, the font you apply to text will always be the font the viewer of the document sees. Web pages don’t work that way. For you to see text formatted in a particular font on a Web page, that font must be installed on your machine. If it’s not, the browser will substitute a font you have.
Note
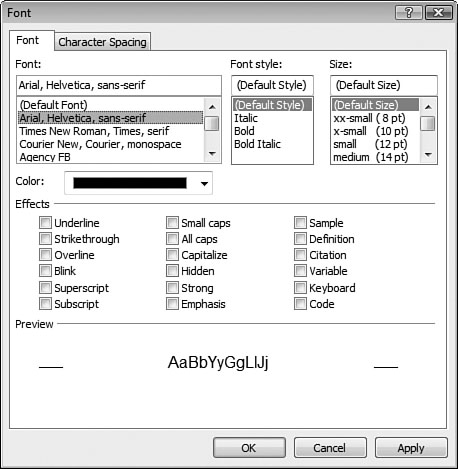
There are some fonts that are installed on almost all computers; Arial, Helvetica, and sans-serif are considered the safest of all fonts. Times New Roman (a serif font) is another common font. It is the font Expression Web 2 uses by default.
It’s a good idea to always specify a series of fonts to use and specify a generic font (such as sans-serif and monospace) as the last choice. You can easily configure fonts in Expression Web 2 by selecting Format, Font to display the Font dialog shown in Figure 7.8. Alternatively, you can use the Font drop-down on the main toolbar.
→ | For information on customizing and configuring font families, see Chapter 15, “Configuring Page Editor Options,” p. 261. |
Font size is one of those things that many developers take for granted. Many Web designers say that you should always use pixel dimensions (for example, 12 px) for font sizes. In fact, if you want your site to be as user-friendly and accessible as possible, you should use relative font sizes.
→ | For complete details on making your site compliant with accessibility standards, see Chapter 19, “Accessibility Features in Expression Web 2,” p. 343. |
When you use the Font Size drop-down on the toolbar or adjust the font size using the Font dialog, Expression Web 2 will automatically use relative font sizes. The following code shows a CSS style that defines a relative font size that will equate to approximately 14 pt type:
.mainText {
  font-size: medium;
}
→ | For more information on CSS styles, see Chapter 17, “Creating Style Sheets,” p. 293. |
Using relative fonts is a good idea because it gives your site visitor control over the size of the text. When you change the text size in your browser, text that is sized with a relative font size will resize accordingly while text that is sized with an absolute size will remain the same size.
Expression Web 2 provides tools to create hyperlinks quickly and easily. To create a hyperlink, select the text or graphic you’d like to use for the link and then select Insert, Hyperlink to display the Insert Hyperlink dialog shown in Figure 7.9.

Tip
You can also right-click on the selection and select Hyperlink from the menu to display the Insert Hyperlink dialog.
Along the left edge of the Insert Hyperlink dialog are four buttons that define the type of hyperlink to create. By default, Existing File or Web Page is selected. You can also choose to create a link to a place in the current document (an HTML bookmark), a link to a new document, or an e-mail address.
By default, hyperlinks to other pages or other Web sites will load into the current browser window. In many cases, that may be exactly what you want, especially when linking to files within your own Web site. However, if you are linking to another site or if you have some other reason for wanting the current page to still be available after someone clicks your link, you’ll want to override that default behavior.
To change the window in which a hyperlink opens, specify the target for the hyperlink. Click the Target Frame button in the Insert Hyperlink dialog to display the Target Frame dialog shown in Figure 7.10. Expression Web 2 provides a list of common target frames, but you can also specify your own frame name when you are targeting a specific frames page.

→ | For more information on using frames, see Chapter 10, “Using Frames,” p. 175. |
Tip
To open a new window that is a specific size or at a specific position, do not use a hyperlink target. Instead, use the Open Browser Window behavior so you can fully control the new window.
New windows opened using this method can be named with any name you choose, and you can then use that name as the target for any hyperlinks you want to load in the window.
→ | For more information on using the Open Browser Window behavior, see Chapter 23, “Using Behaviors,” p. 395. |
When you’re using ASP.NET, PHP, or another server-side technology, you may need to pass information to the Web server in a hyperlink in the form of a querystring. A querystring is appended to the end of a hyperlink as a series of names and values. Code that runs on the Web server can access the values that are passed by referencing the name in the querystring.
The hyperlink below passes a value called prod with a value of 6:
cool.aspx?prod=6
Note that a question mark appears before the querystring value.
You can easily create a querystring hyperlink in Expression Web 2 by clicking the Parameters button in the Insert Hyperlink dialog. Doing so will display the Hyperlink Parameters dialog. In Figure 7.11, you see the hyperlink parameter that created the hyperlink shown previously.
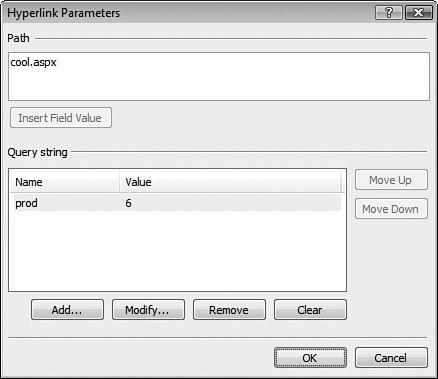
The Hyperlink Parameters dialog is convenient if you have a lot of parameters and you want to work with them often, but I find it just as easy to type parameters manually.
Most hyperlinks take you to the top of the page that is linked to, but it’s also possible to link to a specific point in a page using an HTML bookmark.
Tip
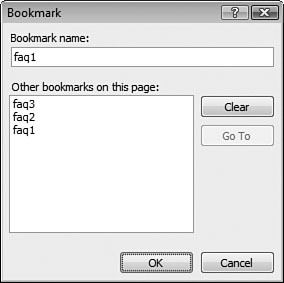
HTML bookmarks are often used on FAQ pages so that readers can easily navigate directly to a specific place in the page.
An HTML bookmark defines a point within a document. To create a link to an HTML bookmark, you first must create the bookmark in the page. Place the insertion point on the line where you want the bookmark, and then select Insert, Bookmark to display the Bookmark dialog, as shown in Figure 7.12.
After a bookmark has been created, you can link to the bookmark using the Bookmark button in the Insert Hyperlink dialog to display the Select Place in Document dialog, as shown in Figure 7.13. Select the bookmark for your hyperlink to link to that point in the document.
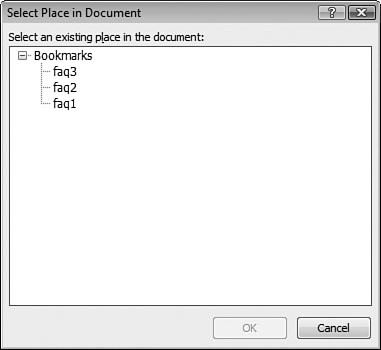
You can link to bookmarks on pages in external Web sites as well. When you click the Bookmark button, Expression Web 2 will parse the remote page for bookmarks and display them in the Bookmark dialog.
To make your Web site accessible, include a title attribute for all your links. The title attribute is configured using the ScreenTip button in the Insert Hyperlink dialog. The text you enter for the ScreenTip will appear as a pop-up when a site visitor hovers over the link. It will also be read by screen readers.
Nothing will ruin a professional appearance faster than spelling errors. Even if you’re not a bad speller, you’re bound to make a mistake or two, so having background spell-checking is quite a convenience.
Expression Web 2 actually uses the spell-checking feature from Microsoft Office. This affords you a couple of advantages. First, you benefit from the fact that Office’s spell-checker is mature and therefore reliable and robust. Second, if you also have Office installed on your computer, Expression Web 2 will share the custom dictionary from your Office applications. Therefore, any words you add to your dictionary in Word will also be recognized in Expression Web 2.
Expression Web 2 will underline words it believes to be misspelled with a red line. Right-clicking on the underlined text will present you with a menu, allowing you to ignore the problem or take some action to correct it.
Note

If spelling errors are not highlighted as you enter text, see “Spelling Errors Not Underlined” in the “Troubleshooting” section of this chapter.
To configure the spelling options, select Tools, Spelling, Spelling Options to display the Spelling Options dialog shown in Figure 7.14. You can then change the spelling options or edit the words in your custom dictionary.

Properties for a specific page are configured using the Page Properties dialog. You can access page properties by opening a page and selecting File, Properties.
The Page Properties dialog has five tabs.
The General tab (shown in Figure 7.15) allows you to easily configure the page title, description, keywords, and other general information.
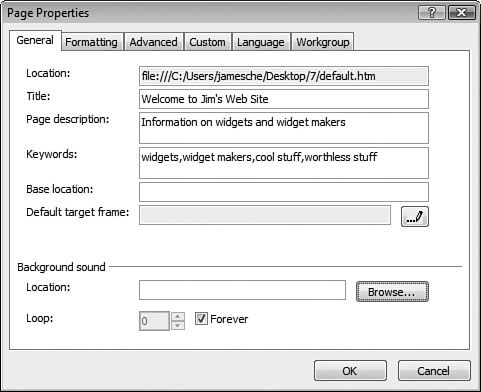
The title you enter in the General tab will display in the title bar of the Web browser when the page is viewed. The description and keywords you enter will be added as META tags on the page to aid in search engine indexing.
You can also specify a base location, also known as a base href. The base href is the base URL for the page. For example, if you enter http://www.mysite.com/products as the base href, a link that points to software.htm will actually link to http://www.mysite.com/products/software.htm. This is convenient when your site’s directory structure changes often. By using a base href, you can easily update the absolute location of all links by changing one property of the page.
Tip
If a Dynamic Web Template or ASP.NET Master Page is applied to the current page, many of the options in the Page Properties dialog will likely be disabled because they will be controlled by the Dynamic Web Template of Master Page.
The Default Target Frame property allows you to specify a default frame for links that don’t explicitly specify a frame. This is most often used when you want links on a particular page to open in a new window. By setting the default target to New Window, you can force all links to open in a new window by default.
A background sound can also be set on the General tab. The sound is then played when the page is loaded. You can also choose to loop the sound a specific number of times or infinitely. Keep in mind that most people find background sounds annoying and are likely to leave your site if you force them to listen to a background sound. Before you choose to add a background sound, give it careful consideration.
The Formatting tab (see Figure 7.16) contains properties for a background image, hyperlink colors, and other page colors.

In addition to specifying a background image, you can also specify that an image be added as a watermark. A watermark background will remain stationary when the page is scrolled.
Hyperlink color and other page colors are also configured on the Formatting tab. Color changes made here are added to the page as embedded style sheets.
→ | For more information on style sheets, see Chapter 17, “Creating Style Sheets,” p. 293. |
The Advanced tab (shown in Figure 7.17) contains settings for the page margins. Margin entries made here are applied to the page as an inline style on the <body> tag.

The Custom tab (shown in Figure 7.18) configures META tags for the current page. The top section is for system variables (HTTP-EQUIV META tags) and the bottom section is for user variables such as keywords and description META tags.

As shown in Figure 7.18, any keywords and description information entered on the General tab will carry over to the Custom tab.
Note
An in-depth discussion of the META element is outside the scope of this book. If you’d like more information on this powerful HTML element, see www.informit.com/guides/content.asp?g=webdesign&seqNum=75&rl=1.
The Language tab (shown in Figure 7.19) configures the language for your page. The language setting determines the page encoding for the page.

Web browsers rely on the page encoding and language settings to determine how to properly display your page. Make sure you have correctly set these for the language and region you are targeting. In almost all cases, the default settings are fine. However, if you are designing a page for a specific region or language, make sure you set the encoding appropriately and test the site for the correct appearance.
![]() The Language tab also enables you to control whether Expression Web 2 includes a byte order mark (BOM) on your page. A byte order mark is a hidden sequence of characters at the beginning of a file that can be used to determine encoding characteristics of the file. Some file types (such as PHP files) can experience problems when a BOM is added to the page, so Expression Web 2 enables you to configure which file types will and will not have a BOM added by default. You can override these settings in the Language tab for a particular file as shown previously in Figure 7.19.
The Language tab also enables you to control whether Expression Web 2 includes a byte order mark (BOM) on your page. A byte order mark is a hidden sequence of characters at the beginning of a file that can be used to determine encoding characteristics of the file. Some file types (such as PHP files) can experience problems when a BOM is added to the page, so Expression Web 2 enables you to configure which file types will and will not have a BOM added by default. You can override these settings in the Language tab for a particular file as shown previously in Figure 7.19.
→ | For more information on configuring BOM settings in Expression Web 2, see Chapter 15, “Configuring Page Editor Options,” p. 261. |
It’s quite common for a Web designer to reuse code in several pages. Whether you’re reusing a single line of code or a code block, one thing you want to do is avoid typos at all costs. Code snippets can prevent typos and also add a high degree of convenience to code reuse.
To insert a code snippet into your page, switch to Code View and press Ctrl-Enter. Select the desired code snippet from the list, as shown in Figure 7.20, and it will be added to your page automatically.

Note
If you press Ctrl-Enter and code snippets are not displayed, see “Code Snippets Don’t Display” in the “Troubleshooting” section of this chapter.
To add, delete, or modify existing code snippets, select Tools, Page Editor Options and then click the Code Snippets tab in the Page Editor Options dialog, as shown in Figure 7.21.

You can add a new code snippet by clicking Add and entering the required information. You can control where the insertion point appears after inserting the snippet by adding a pipe symbol (|) to the snippet code. If you add two pipe symbols, all code between the two pipe symbols will be automatically selected when the snippet is inserted.
When you add your own snippets, they are stored in an XML file located in the AppDataRoamingMicrosoftExpressionWeb 2Snippets folder in your profile directory. To move your snippets to another machine or back them up (something I strongly recommend), you can simply back up the Snippets.xml file in the Snippets folder.
By default, when you double-click most files in the Folder List, Expression Web 2 will open that file in its own window. In most cases, that’s what you want to happen, but in some cases, you might want to override that behavior so that certain file types are opened in a different application.
Note
Some file types (such as images) are not opened in Expression Web 2 by default when you double-click them in the Folder List.
To specify the application to open for a specific file type, select Tools, Application Options and click the Configure Editors tab. The dialog for configuring editors (shown in Figure 7.22) contains a list of file extensions along with the associated editor or editors for each. Available editors can be rearranged in the list or moved to the top of the list so that it is used as the default editor. When a file is double-clicked in the Folder List in Expression Web 2, it will be opened in the default editor for that file type.
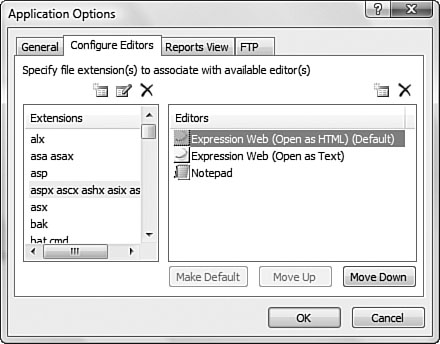
The following buttons are available on the Configure Editors tab as shown in Figure 7.22:
New Extension—. Allows you to add a new file extension and configure the appropriate editors for it.
Modify Extension—. Allows you to change the selected extension. For example, if HTML is selected, you can click Modify Extension to change the extension to HTM. This does not modify the application used to edit that file type.
Delete Extension—. Removes the selected extension from the list. If the file type is then double-clicked in Expression Web 2, you will be prompted to select which program should be used to edit that file type.
New Editor—. Adds a new editor for the selected file type.
Delete Editor—. Deletes the selected editor from the selected file type.
To configure a new file extension, click the New Extension button to display the Open With dialog as shown in Figure 7.23. Enter the file extension (with no dot in front of it) and select the program to use for editing that file type from the list of available applications. If the program you’d like to use for the new file type is not listed, click Browse for More and browse to the executable for the application you’d like to use.

To configure a new editor for an existing file type, select the file type, and then click the New Editor button to display the Open With dialog. Select the editor or click Browse for More and browse to the executable. You can then use the Move Up, Move Down, or Set as Default buttons to adjust the hierarchy of the new editor.
To select from one of the listed editors when editing a file, right-click the file in the Folder List and choose Open With as shown in Figure 7.24. Choose the desired editor from the list to open the selected file in that editor.

I have noticed a few words that are definitely misspelled in my Web site, but Expression Web 2 did not underline them with a red line.
You’ve probably configured the spelling options so that spelling errors are not visible. Select Tools, Spelling, Spelling Options and make sure Check Spelling As You Type is checked and Hide Spelling Errors is not checked.
I’m pressing Ctrl-Enter on my Web page, but I don’t get the option of inserting a code snippet. Instead, the insertion point just keeps moving down a line each time I press Ctrl-Enter.
You can insert a code snippet only when you are in Code View. In Design View, Ctrl-Enter inserts a single line break. In Code View, Ctrl-Enter brings up the Code Snippets IntelliSense pop-up.
Because Microsoft targeted Expression Web 2 toward designers rather than developers, support for writing code in Expression Web 2 is limited. PHP and JavaScript developers will find some IntelliSense and color coding (features that are missing for ASP.NET developers), but even those features are limited.
The lack of these coding features is more than just an inconvenience; it can lead to coding errors that are hard to find and incredibly frustrating. Code snippets can help alleviate such problems.
As your Web site grows in complexity, you’re likely to accumulate quite a bit of code that you use regularly on your pages. By creating code snippets for sample code that you find on the Internet or code that you write yourself, you can always have access to a quick and easy repository of code that you can easily insert without unintentionally creating errors in your Web site.