
In the most basic sense, HTML provides a description of a Web page. It tells a browser things such as “this text should be green,” “there should be a graphic here,” or “this text should link to a particular location.” In other words, HTML is primitive. It’s so primitive, as a matter of fact, that even the earliest Web developers realized its limitations quickly. They yearned for a way to define the layout of a Web page.
In the early days of HTML, the models for disseminating information in written form were newspapers, magazines, and scientific journals. If a Web developer wanted to try and present information in the same manner in a Web page, he or she was just out of luck. HTML did not provide the means to precisely control layout. As browsers developed, Web designers found themselves even more frustrated as the few features that did allow for some layout techniques were removed. There had to be a better way.
In 1994, CSS was unveiled to the Web development community. I can remember the advent of CSS, and I don’t remember it being a big deal. However, as time has progressed and as CSS has matured, it has gained in importance. In today’s world of Web development, you’re severely impacted (and not in a positive way) if you aren’t well-versed in how to use CSS effectively.
Microsoft has traditionally fallen behind in support for CSS. FrontPage, Microsoft’s Web development platform prior to Expression Web 2, suffered from poor CSS support. FrontPage’s weakness was highlighted to a greater extent due to the fact that Macromedia Dreamweaver (now Adobe Dreamweaver), FrontPage’s primary competitor, had excellent support for CSS. Something had to change if Microsoft was going to stay in the Web design game.
That something was Expression Web 2. The support for CSS in Expression Web 2 was vastly improved over any of Microsoft’s previous Web development tools, and that tradition continues in Expression Web 2. In the next couple of chapters, we will explore the CSS capabilities of Expression Web 2. When we’re finished, you’ll have all the skills needed to confidently manage all your CSS needs in Expression Web 2.
CSS is well-suited to applying formatting to page elements. For example, you can change font color, size, and style using CSS. You also can change the position of text, tables, images, and so on. However, CSS isn’t alone in its ability to format page elements. HTML has tags and attributes that provide similar functionality. The HTML <font> tag, for example, has a color attribute, a size attribute, a face attribute, and the like, and all of these can be used to apply formatting to text. Given that fact, why even worry about CSS?
Tip
Formatting page elements using HTML is quickly being replaced by CSS. In fact, the most recent HTML recommendation from the W3C suggests that most HTML formatting techniques be avoided in favor of CSS.
To gain a full understanding of why you would want to use CSS instead of traditional HTML formatting techniques, let’s look at an example. The code in Listing 17.1 shows a simple Web page using only HTML to apply formatting.
Example 17.1. A Simple Web Page
 1     <html>
 2     <head>
 3          <title>Welcome</title>
 4     </head>
 5     <body>
 6     <p>
 7          <font face="Arial" size="4" color="black">
 8          <b>Welcome to our Web site!</b>
 9          </font>
10     </p>
11     <p>
12          <font face="Arial" size="2" color="navy">
13          We have plenty to offer. Browse around and
14          <a href="mailto:[email protected]">let us know</a>
15          what you think.
16          </font>
17     </p>
18     <p>
19          <font face="Arial" size="4" color="black">
20          <b>Company News</b>
21          </font>
22     </p>
23     <p>
24          <font face="Arial" size="2" color="navy">
25          We're going public! Don't miss our IPO this Wednesday.
26          </font>
27     </p>
28     </body>
29     </html>
Figure 17.1 shows the page from Listing 17.1 in a browser window.
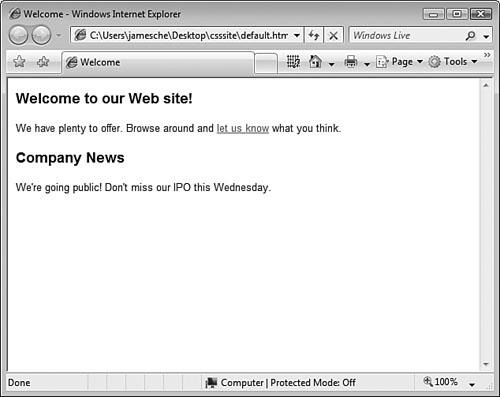
As you can see, it’s easy to get the formatting you want using simple HTML. Now let’s imagine that I’ve used this same HTML formatting technique throughout an entire Web site. What happens if I need to change the font from Arial to Verdana? Worse yet, what happens if I need to change the font to Verdana and I also need to change the color and size of the headings?
The only way to take care of such tasks across a large site would be to use search and replace to change the code. But if I use search and replace, I have to allow my Web design tool to make widespread changes across my site in bulk. What if my Web site includes some articles on CSS and I have included the word “Arial” in those articles? Unless I account for that in my search and replace, I could end up messing up the actual content of my site.
Caution
Making site-wide changes using any type of search and replace tool is risky. Computers are notoriously bad at recognizing the context in which words are being used, and if you rely on a computer program to determine what content to change in your site, you are opening yourself up to errors that may go undetected until a site visitor points them out.
CSS solves this problem perfectly because it allows you to separate your content from your formatting. By applying formatting with CSS, you can simply make changes to a CSS file and it will apply to all relevant formatting across the entire site.
Listing 17.2 shows the page from Listing 17.1 with formatting applied using CSS instead of HTML code.
Example 17.2. Page Formatting with CSS
 1     <html>
 2     <head>
 3          <title>Welcome</title>
 4          <link rel="stylesheet" type="text/css" href="styles/styles.css">
 5     </head>
 6     <body>
 7     <p class="pageHeading">
 8          Welcome to our Web site!
 9     </p>
10     <p class="stdContent">
11          We have plenty to offer. Browse around and
12          <a href="mailto:[email protected]">let us know</a>
13          what you think.
14     </p>
15     <p class="pageHeading">
16          Company News
17     </p>
18     <p class="stdContent">
19          We're going public! Don't miss our IPO this Wednesday.
20     </p>
21     </body>
22     </html>
This page looks much cleaner. It also has seven fewer lines of code than the page in Listing 17.1. That means less code for users to download, and that translates directly into pages that download faster.
Tip
The small example here actually decreased the size of this page by 1/3. On actual pages, using CSS for formatting can reduce the size of pages dramatically. Site visitors will have to download the CSS file the page links to, but the CSS file gets cached on the user’s end, so it only has to be downloaded once.
In Listing 17.2, I used CSS classes to apply formatting. Line 4 links a CSS file to the page. Inside that CSS file, I created two CSS classes, one called pageHeading and another called stdContent. Those CSS classes are applied to page elements using the HTML class attribute.
Note
CSS classes are only one way of applying CSS to a page. We’ll discuss all the methods of applying styles in the next couple of chapters.
As we progress through this chapter, I’ll demonstrate how easy it is to use the features provided in Expression Web 2 to format pages using CSS; but first, let’s briefly discuss how CSS can be applied to a page.
There are three different ways to apply CSS to your Web pages:
External Style Sheets—. External style sheets are files with a
.cssfile extension in which styles are defined for one or more pages.Embedded Style Sheets—. Embedded style sheets use the same syntax as external style sheets, but the CSS code exists within the HTML instead of within a separate file.
Inline Styles—. Inline styles are applied using the
styleattribute of an HTML tag.
It is uncommon to use only one of these techniques. Most Web developers use a combination of two or more techniques to define the styles for a particular Web site. However, there are benefits and drawbacks to each technique, and understanding those benefits and drawbacks is critical to using CSS correctly.
When most people think of CSS, they think of external style sheets. An external style sheet is a special file with a .css file extension. Inside this file, the styles for one or more pages are defined. The page in Listing 17.2 is formatted using an external style sheet.
Styles in an external style sheet can be defined using existing HTML tags, by creating custom style definitions known as CSS classes, or by using a combination of the two.
External style sheets are connected to pages using the HTML <link> tag. The following code creates a link to a style sheet called styles.css located in a styles directory:
<link rel="stylesheet" type="text/css" href="styles/styles.css" />
In the preceding code snippet, I’ve linked to a style sheet located in a folder named styles. In fact, a style sheet can be stored in any folder you choose, and it’s common for Web designers to create a specific folder structure for organizing style sheets.
Multiple external style sheets can be attached to a page. If multiple style sheets are attached, styles are processed in the order in which they appear on the page. This process is known as cascading.
Embedded style sheets look just like external style sheets, but instead of existing inside a separate file that is linked to a page, an embedded style sheet is actually part of the HTML code of the page.
Note
Embedded style sheets apply only to the page that contains them. Only external style sheets can be applied to multiple pages.
There are several reasons for using an embedded style sheet. Because an embedded style sheet overrides any of the styles that are configured in an external style sheet, embedded style sheets are often used to create page-specific styles while still using global styles that exist in an external style sheet.
It’s also common to use embedded style sheets in scenarios where there is no semblance of a Web site structure. For example, if you distribute software and you include an HTML file in the root of your software’s CD, you might use an embedded style sheet to define the CSS styles for the HTML file. You might also use an embedded style sheet if you send out HTML e-mail for a mailing list. I have several mailing lists to which I send mailings on a regular basis, and I use embedded style sheets to define the layout of those mailings.
Inline styles are applied directly to an HTML tag via the style attribute. The following code shows an inline style applied to a <p> tag:
<p style="font-family:Arial; color: gray">Some Text</p>
The use of inline styles is perfectly fine if it’s a deliberate decision. However, if you use inline styles indiscriminately, it can cause many problems because inline styles override a style defined anywhere else. In other words, if you have a page that is full of inline styles and you decide to move to external or embedded style sheets after those inline styles have been added, you’ll need to remove the inline styles from the page. If you don’t, styles that are defined in your external and embedded style sheets will be overridden by the inline styles.
Caution
Expression Web 2 sometimes applies formatting using inline styles. When making formatting changes to dialogs in Expression Web 2, it’s always a good idea to check the code to make sure you haven’t overridden a style or otherwise changed formatting in a way you didn’t intend.
Expression Web 2’s Find and Replace feature is an excellent tool for locating inline styles in your Web site. For more information on locating HTML attributes using the Find and Replace tool, see “Using HTML Rules in Find and Replace,” p. 283.
Expression Web 2 usually will use embedded style sheets instead of inline styles, and while embedded styles still override external styles, they are easier to locate and modify or remove.
We’ll cover the details of inline styles in the next chapter.
In case you haven’t picked up on it yet, I’m a big believer in learning by doing. In keeping with that philosophy, we’re going to learn how to create and use CSS in Expression Web 2 by creating a simple Web site and formatting it using CSS.
Open an existing Web site or create a new one-page Web site in Expression Web 2.
Open the page that Expression Web 2 creates in the Web site.
Enter the text
Welcome to Our Web Site.Select Heading 1 from the Style drop-down.
Enter a few sentences of text. Anything you choose is fine.
Press Enter to start a new paragraph.
Enter the text
Links.Select Heading 2 from the Style drop-down.
Enter some hyperlinks, one per line, to some sites of your choice.
Save the page.
→ | For more information on creating a Web site, see Chapter 2, “Creating a Web Site,” p. 27. |
→ | For more information on formatting text, see Chapter 7, “Creating Pages and Content,” p. 97. |
Tip
To generate some content for sample pages such as the one you just created, use the Lipsum Generator located at www.lipsum.com/.
When you select Heading 1 from the Style drop-down, Expression Web 2 wraps the paragraph with the <h1> tag. Selecting Heading 2 wraps the paragraph with the <h2> tag. By default, the browser determines what heading styles look like, but you can easily customize them using CSS.
Select File, New, CSS to create a new, blank style sheet. Add the code in Listing 17.3 to the empty style sheet.
Save the style sheet into the current Web site as styles.css.
CSS files have a fairly simple syntax. In this CSS file, there are two blocks of CSS code. The first block consists of Lines 1–6. The second block consists of Lines 8–13. Each block begins with an HTML selector. A selector is really just an HTML tag you are formatting with CSS.
This code snippet shows the syntax used in a CSS file:
selector,[selector]...
{
     <CSS formatting code for the selector(s)>
}
At least one selector must be specified. However, you can specify more than one if you wish by separating them with commas. Following the selector(s) is an opening curly brace followed by CSS formatting code. A closing curly brace closes off the code for the specified selector(s).
CSS code itself is in the following format:
css_property: value;
Note
There are numerous CSS properties and we won’t cover all of them in this book. For a detailed look at CSS, read CSS: The Definitive Guide from O’Reilly Publishing.
In Listing 17.3, the first block specifies the h1 and h2 selectors. Notice that both of these selectors appear on the same line and are separated by a comma. In this case, I am formatting both the <h1> and <h2> HTML tags with the CSS code in Lines 3–5. In Line 8, I have specified the p HTML selector, and that selector is formatted using the CSS code in Lines 10–12.
Now that we’ve created a CSS style sheet, we need to link it to our page so that the styles defined in the style sheet will apply to the page.
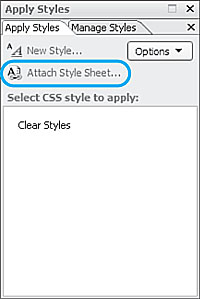
Choose Format, CSS Styles, Apply Styles to activate the Apply Styles task pane, as shown in Figure 17.2.
Click the Attach Style Sheet link in the Apply Styles task pane.
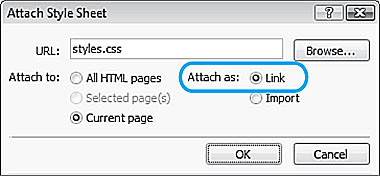
Click the Browse button in the Attach Style Sheet dialog, as shown in Figure 17.3.
In the Select Style Sheet dialog, navigate to the
styles.cssfile as shown in Figure 17.4.Select the
styles.cssfile and click Open.Make sure that the Link radio button is selected in the Attach Style Sheet dialog, as shown in Figure 17.3.
Click OK.

Note

If the Attach Style Sheet link in the Apply Styles task pane isn’t active, see “Attach Style Sheet Link Is Disabled” in the “Troubleshooting” section of this chapter.
After you click OK in the Attach Style Sheet dialog, you should see the formatting of the page change immediately. Figure 17.5 shows the original page without CSS formatting, and Figure 17.6 shows the page after applying the CSS style sheet.


Figure 17.6. Linking the CSS style sheet to the page in Figure 17.5 has changed the formatting. No other changes were made to this page.
After applying the style sheet, you might notice that the paragraph text on the page is probably a bit too small. Let’s edit the CSS file to increase the size of the text slightly.
Open
styles.cssinside Expression Web 2. Leavedefault.htmopen as well so that you can quickly see the effect of your changes to the style sheet.Change the CSS code for the
pselector from this:font-size: 9px
to this:
font-size: 11px
Switch to
default.htmand review the change.Save the changes to
styles.css.
Note
If you are prompted to save styles.css as an embedded file, see “Prompted to Save Embedded File” in the “Troubleshooting” section of this chapter.
Notice that the changes made to the style sheet immediately changed the text size in default.htm, but those changes in formatting didn’t actually cause a change to the default.htm file itself. In other words, you don’t have to save default.htm after making a change to the style sheet. In fact, this is a good illustration of the power of CSS. If you had 1,000 pages linked to styles.css, a change to styles.css would immediately affect all those pages without directly making any change to the pages themselves. You should now be starting to really grasp the importance of using CSS to develop Web sites efficiently.
So far, we’ve looked at changing the formatting of text elements using CSS. However, CSS also has powerful positioning capabilities.
You’ve probably heard of absolute positioning. Absolute positioning is the technique of positioning elements on a page using an X,Y coordinate system. Using this technique, the upper-left pixel on the page is at location 0,0. As you progress across the page horizontally, the X coordinates increase and as you progress down the page vertically, the Y coordinates increase. Using this method, it’s possible to precisely plot a point on a page.
Absolute positioning is accomplished using CSS exclusively. In fact, one of the drawbacks to using HTML is that it has no concept of placement on a page other than basic alignment. For example, you can choose to align a paragraph on the right edge, left edge, or center of a page, but if you want more precise alignment, you’ll need to use tables or insert a resizable page element adjacent to the object you’re attempting to align. This approach is clumsy at best and a source of extreme frustration for Web developers.
One of the reasons why absolute positioning is a great solution is that it uses the pixel as a system of measurement. Regardless of screen resolution, computer type, or browser flavor, a pixel is always going to be a universal measurement. If you position a graphic 200 pixels from the left edge of a page, that graphic will be exactly 200 pixels in distance from the edge on every computer that displays your Web page.
Tip
Absolute positioning may not be the Holy Grail that it first appears to be. There are some weird behaviors that you may notice if you use absolute positioning often. A good resource to keep track of weird behavior regarding CSS positioning is the Position Is Everything Web site located at www.positioniseverything.net.
Let’s position a graphic on default.htm using CSS positioning.
Create a new folder in the current Web site. Name the folder
images.Import a graphic file of your choice into the
imagesfolder. You can use the sample graphic in theExamplesCh17Filesfolder on the CD that accompanies this book.Place the cursor at the left of the first line on
default.htmand press Enter to add a new line at the top of the page.Add the image you imported in step 2.
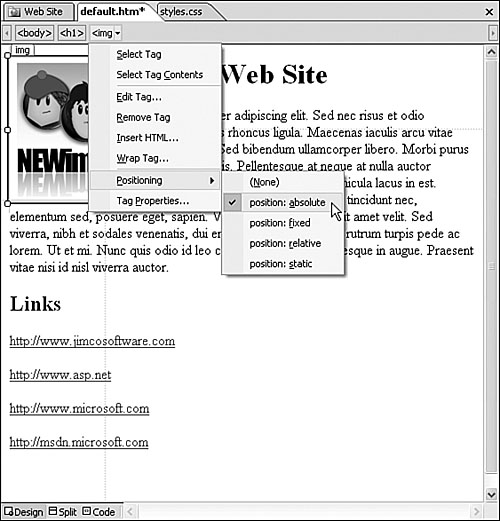
Click the down arrow on the
<img>Quick Tag Selectorand select Positioning, position: absolute, as shown in Figure 17.7.Place the mouse cursor over the Block Selector, as shown in Figure 17.8, and drag the image to a new location.

→ | For more information on adding graphics to a Web page, see Chapter 14, “Using Graphics and Multimedia,” p. 237. |
→ | For more information on using the Quick Tag Tools, see Chapter 13, “Using the Quick Tag Tools,” p. 223. |
→ | For more information on positioning objects, see Chapter 7, “Creating Pages and Content,” p. 97. |
Even though you made no modifications to the styles.css file, the image you just moved actually uses inline CSS for positioning. A quick view of the code for the image is all that’s needed to confirm that point. Here is the <img> tag after being repositioned:
<img src="images/newimage.jpg" width="216" height="162" style="position: absolute;
top: 259px; left: 232px; z-index: 1">
→ | For more information on inline styles, see Chapter 18, “Managing CSS Styles,” p. 315. |
Your exact tag will differ slightly depending on where you positioned the image, but you’ll still see the same basic syntax. The style attribute added to the <img> tag now contains the following settings:
position: absolute—. Specifies that the image should be positioned absolutely on the page.top: 259px—. Positions the image 259 pixels from the top of the page. Your value will likely be different.left: 232px—. Positions the image 232 pixels from the left edge of the page. Your value will likely be different.z-index: 1—. Sets the z-position for the image. Z-position0is the surface of the page. Higher z-positions appear above content with lower z-positions.
→ | For more information on z-position, see Chapter 25, “Using Layers,” p. 437. |
If you remember my previous comments on using inline styles, you might begin to question why Expression Web 2 chooses an inline style for the positioning of this image. In many cases, the position of absolutely positioned page elements is page-specific. Therefore, positioning those elements using inline styles is the most efficient method.
There are some cases where objects may be absolutely positioned on all pages. For example, you might have a menu that appears on all your pages. If you were going to position that menu absolutely, you’d likely want to control its position using an external style sheet so you could easily reposition it on all pages by simply changing a single CSS file. A CSS class is the perfect solution for such a task.
So far, we’ve looked at using HTML selectors (h1, h2, and p) inside a style sheet. These work fine when you want to control the formatting or placement of all instances of those particular tags, but they don’t work so well for positioning tasks, such as the earlier menu example.
Take our image, for example. If we want to change the method of positioning and use an external style sheet instead of an inline style, we could add the img selector to styles.css and specify positioning for that selector. However, if we do that, we are going to alter the positioning of all images on all the pages that link to styles.css. That’s obviously not what we want to do. Wouldn’t it be nice if we could define our own explicit way of referring to our logo image inside the CSS file? We could then define some CSS code that would apply only to the logo image and not other images. That’s precisely what CSS classes were designed to do.
The syntax for a CSS class is almost identical to what you’ve already seen. The difference is that CSS classes are preceded by a dot. The following CSS code defines a new CSS class called logo:
.logo
{
     CSS Code
}
To apply the logo CSS class to an element on our page, the HTML class attribute is used. The following <img> tag will use the CSS properties assigned to the logo CSS class:
<img src="images/logo.jpg" class="logo" height="120" width="190" alt="My Company">
Tip
When the CSS class is defined in the HTML tag, there is no dot in front of the name. The dot only appears in the style sheet.
Let’s change default.htm so that the logo on it is positioned using a CSS style.
Add the following code to
styles.css:.logo { position: absolute; top: 259px; left: 232px; z-index: 1; }Save
styles.css.Switch to
default.htm.Select the image.
In the Apply Styles task pane, click the down arrow next to Inline Style and select Remove Inline Style, as shown in Figure 17.9. This will remove the inline style that was applied when we dragged the image into position earlier.
Make sure the image is selected, and then select the
.logoclass from the Apply Styles task pane, as shown in Figure 17.10.


As soon as you click on the .logo class in the Apply Styles task pane, the image should jump to the position specified in the style sheet.
Note
If you don’t see the logo class in the Apply Styles task pane, see “CSS Class Not Visible” in the “Troubleshooting” section of this chapter.
→ | For more details on using the Apply Styles task pane, see Chapter 18, “Managing CSS Styles,” p. 315. |
The power of CSS classes is only partially illustrated by our simple example. You can actually define several CSS classes in a style sheet and apply all of them to an HTML selector by separating each class name with a space. The following HTML code applies the logo and headImg classes to an image:
<img class="logo headImg" src="images/logo.jpg" height="120" width="190">
The order of CSS classes is important. Classes are applied in the order in which they appear, so in the preceding example, settings defined in the headImg class will override the settings defined in the logo class.
This technique can be taken a step further by specifying multiple classes in the CSS file itself. Consider the following CSS code:
div.newsHead.monthHead
{
     font-face: Arial;
}
In this case, the defined style will only be applied to HTML <div> tags with a class attribute containing both the newsHead and the monthHead CSS classes. Therefore, the CSS code would apply to the HTML tag
<div class="newsHead blogContent monthHead">
but would not apply to the HTML tag
<div class="newsHead blogContent">
Tip
When we created the logo CSS class, an HTML selector was not specified. Therefore, the logo CSS class applies to any HTML tag with a class attribute value of logo. Technically, the CSS definition for the logo class as we defined it is *.logo, meaning that it applies to all tags.
If we had wanted to limit the logo class so that it only applied to the img selector, we could have defined it as img.logo.
In addition to the capabilities available using selectors and classes, CSS also includes a number of pseudo-elements and pseudo-classes that allow you to apply complex formatting easily.
Link and dynamic pseudo-classes are the most common pseudo-classes by far. If you’ve used CSS in your pages before, you’ve probably used these pseudo-classes without realizing it.
Link pseudo-classes allow you to define a different appearance for HTML hyperlinks based on whether a link has been visited. The :link pseudo-class formats an unvisited link, and the :visited pseudo-class formats a visited link.
The following CSS code formats links in blue and visited links in red:
a:link    { color: blue; }
a:visited { color: red; }
Note
The syntax that is most common includes the a selector, but the CSS specifications do not require it.
Dynamic pseudo-classes take link pseudo-elements one step further by allowing you to format hyperlinks based on the current state of a link. The :hover pseudo-class formats a hyperlink over which the mouse is hovering; the :focus pseudo-class formats a hyperlink that has the focus; and the :active pseudo-class formats a hyperlink that is currently being activated.
The following CSS code builds on the previous code by specifying that links have an overline and underline when hovered over, a bolded font when they have the focus, and are italicized when the links are active:
a:hover    { text-decoration: underline overline; }
a:focus    { font-weight: bold; }
a:active   { font-style: italic; }
Note
If you’ve applied the :hover pseudo-class but it doesn’t seem to be taking effect, see “:hover Pseudo-Class Doesn’t Work” in the “Troubleshooting” section of this chapter.
Pseudo-elements allow Web designers to apply formatting that would otherwise be impossible to obtain. The current CSS specification defines two pseudo-elements: the :first-line pseudo-element and the :first-letter pseudo-element.
The :first-line pseudo-element allows you to style the first line of a paragraph. The following code will make all characters in the first line of a paragraph uppercase:
p:first-line { text-transform: uppercase; }This pseudo-element is incredibly powerful because applying this formatting using any other method would be impossible in most cases. The content that appears on the first line of a paragraph is often dictated by the width of the browser window. As the browser window is resized, the word-wrap feature of the browser will cause the specific words that appear on the first line to change. The :first-line pseudo-element deals with that perfectly and will automatically style only the characters that appear on the first line.
Caution
Keep in mind that pseudo-elements may not render in all browsers. Test carefully in multiple browsers when using pseudo-elements.
The :first-letter pseudo-element allows for styling the first character in a paragraph. This pseudo-element is often used for drop caps or other effects that are often seen in printed media. The following CSS formats the first character in a paragraph to large, blue type:
p:first-letter { font-family: Times New Roman; font-size: 14px; color: blue; }Note
Pseudo-elements are not rendered in the Design View of Expression Web 2. To see the formatting of pseudo-elements, you will need to preview your page in a browser.
It may sound like rhetoric, but the power of CSS cannot be overstated in today’s world of Web design. As new standards are developed, CSS continues to surge in importance. This chapter has given you a small taste of what is possible using CSS. As you progress through the next chapter, you’ll discover just how easy it is to take advantage of CSS using Expression Web 2.
Note
For additional information on in-depth CSS topics, visit the CSS 2.1 specification on the W3C Web site at www.w3.org/TR/CSS21/cover.html.
I am trying to attach a style sheet to my page, but the link to attach a style sheet in the Apply Styles task pane is disabled.
To attach a style sheet using the Apply Styles task pane, you must be in Design View. If you have Code View activated, you won’t be able to click the link.
Switch to Design View, and you should be able to attach the style sheet without any problems.
I’m saving a page that contains a style sheet link and Expression Web 2 is prompting me to save the CSS file as an embedded file. What’s going on?
If your style sheet contains unsaved changes and you save a page that is linked to the style sheet, Expression Web 2 will prompt you to save the style sheet as well using the Save Embedded File dialog. Simply click OK in this dialog to save both pages.
You can avoid this dialog by always explicitly saving your style sheet after making changes to it.
I’ve created a CSS class in my style sheet, but when I try to apply that class using the Apply Styles task pane, it’s not visible.
Make sure the style sheet in which the class was created is linked to the page you are editing. If the style sheet is not linked to the page, the classes within the style sheet will not be available.
I’ve used the :hover pseudo-class to format my hyperlinks. Expression Web 2 doesn’t indicate that there’s any problem with my CSS code, but the effect doesn’t work.
You have probably added the :hover pseudo-class in the wrong order inside your CSS code. The :hover pseudo-class should appear after the :link and :visited pseudo-classes. Otherwise, the formatting specified in the :hover pseudo-element will be overridden.
One of the many useful capabilities of CSS is the positioning and formatting of background images. HTML has limited capabilities when it comes to background images. If you want a background image that isn’t tiled or that doesn’t scroll with the rest of the page, CSS is the way to go.
To specify a background image using CSS, use the background-image CSS property. The following CSS code sets the background image:
background-image: url("images/bground.jpg";This syntax can be used to specify the background image of any particular HTML element. However, if you want the background to apply to the page itself, you would specify the following body selector:
body { background-image: url("images/bground.jpg"; }By default, the background image will be tiled. You can force the background to appear only once instead of being tiled by using the background-repeat property. The following CSS code will display the background image without tiling:
body { background-image: url("images/bground.jpg"; background-repeat: no-repeat; }Finally, you can also specify that the background remain fixed during scrolling. This technique is often referred to as a watermarked background. The following code will cause the background to remain fixed while scrolling:
body { background-image: url("images/bground.jpg"; background-repeat: no-repeat;
background-attachment: fixed;}
Here’s a final tip for you that I am borrowing from my friend Tina Clarke of www.anyfrontpage.com. Expression Web 2 and Internet Explorer both have a nasty habit of displaying all pages with a white background color even if the Web designer doesn’t explicitly set the background color to white. Not all browsers default to a white background, so if you want your page to have a white background, make sure you explicitly specify it.
The following CSS code ensures that your page always has a white background:
body { background-color: #ffffff; }