
Chapter 10. ADO.NET
If you have ever read any programming books related to Microsoft development technologies, then you have already read a chapter just like this one. It seems that every Windows programming book has an obligatory chapter on database interaction. The reason for this widespread coverage comes as no surprise: Microsoft comes out with a new database technology every two years or so.
If you are new to Windows development, then you haven’t yet been briefed on the following sometimes conflicting, sometimes complementary database interaction tools:
- ODBC—Open DataBase Connectivity
- ISAM—Indexed Sequential Access Method
- DAO—Data Access Objects
- RDO—Remote Data Objects
- OLE DB—Object Linking and Embedding for Databases
- ADO—ActiveX Data Objects
When you look at this list, you might think, “Wow, that’s great. There are so many options to choose from.” You would be foolish to think this. This list isn’t great; it’s terrible. Imagine, just for a moment, that we weren’t talking about database interfaces, but about other, more practical issues. What if you had to replace the engine in your car every two years? What if the steering column had to be replaced annually? What if you had to replace the oil every 3,500 miles or three months, whichever came first? Could you imagine life in such a world?
Whenever Microsoft introduced a new database object technology into the mix, it was quickly followed by a flurry of reprogramming to bring older “legacy” Visual Basic (and other) applications up to the latest database technology. This wasn’t always possible, as time and budget constraints kept organizations on older platforms. I still maintain a quarter-million-line application that uses DAO, a somewhat older technology. Although it will be converted to .NET someday, the cost to move it from DAO to the more flexible ADO platform was prohibitive.
So far, it seems that ADO.NET (ActiveX Data Objects for .NET) is different. It’s been out for about six years (as of this writing), and Microsoft hasn’t yet teased programmers with a replacement. ADO.NET is quite flexible, and that flexibility will hopefully allow it to stretch itself over new advances in technology for the foreseeable future.
If you are familiar with the ADO technology, then prepare to forget it. ADO.NET is not the natural successor to ADO. It’s a completely new technology that is unrelated to ADO, and although it shares some terminology with ADO and other older tools, ADO.NET only does this to play with your mind.
What Is ADO.NET?
ADO.NET is a set of classes, included with the .NET Framework, that represents the primary method by which .NET applications interact with relational databases and other open and proprietary data management systems. But it’s not just for interaction; ADO.NET is, in reality, a partial in-memory relational database all by itself. You can create tables and relationships (joins) with ADO.NET objects, add and remove records, query tables based on selection criteria, and do other simple tasks that are typical of stand-alone relational database systems.
All classes included with ADO.NET appear in the System.Data namespace; other subordinate namespaces provide derived classes geared toward specific database platforms. For instance, the System.Data.SqlClient namespace targets SQL Server databases, while System.Data.OracleClient focuses on Oracle RDBMS systems. Other database providers can develop streamlined implementations of the various ADO.NET classes for use with their own systems, and supply them as a separate namespace.
ADO.NET implements a disconnected data experience. In traditional database programming, especially in desktop applications, the connection between an application and its database was fixed and long-term. When the program started up, the connection started up. When the program exited many hours later, the connection finally ended. But in a world of massively scalable web sites, keeping a database connected for hours on end is wasteful and often impossible.
ADO.NET encourages you to open data connections just long enough to get the data that fulfills your immediate needs. Once you have the data, you drop the connection until the next time you need to retrieve, insert, or update database content. If you issue the following SQL statement:
SELECT * FROM Customer WHERE BalanceDue > 0
you have a choice of (1) scanning through all the records once in a quick and simple manner; and (2) loading the data into an in-memory table-like object, closing the connection, and working with the loaded records as if they were the original. If you use the first method, you can take your sweet time waltzing through the records, taking many minutes to process each one. But this type of selfish behavior is frowned upon by ADO.NET. The goal is to get in and get out as quickly as you can.
Because of the disconnected nature of ADO.NET, some techniques common in database applications need to change. For instance, the long-term locking of database records during a user modification (“pessimistic concurrency”) is difficult to accomplish in ADO.NET’s disconnected environment. You will have to use other methods, such as transactions or atomic stored procedure features, to accomplish the same goals.
Overview of ADO.NET
ADO.NET divides its world into two hemispheres: providers and the DataSet. Imagine your kitchen as the world of ADO.NET, with your refrigerator representing the provider, and the oven/stove as the DataSet. The provider “provides” access to some content, such as food, or an Oracle database (which normally appears in the meat-and-cheese drawer). It’s a long-term storage facility, and content that goes in there usually stays in there for quite a while. If something is removed, it’s because it is no longer valid, or has become corrupted.
To use your oven, you select content from the long-term storage of the refrigerator, update it by mixing, heating, and rearranging the content, and eventually return it to the refrigerator where it will again sit in storage. This analogy isn’t perfect; in fact, something just doesn’t smell right about it. But it conveys the basic idea: Providers give you access to stored data, some of which can be moved into and processed through an application and its DataSet on a short-term basis.
Providers
Large database systems, such as SQL Server and Oracle, are stand-alone “servers” (hence the “SQL Server” name) that interact with client tools and applications only indirectly. These systems generally accept network connections from clients through a TCP/IP port or similar connection. Once authenticated, the client makes all of its requests through this connection before disconnecting from the system.
Back in the early 1990s, Microsoft implemented ODBC (based on other existing standards) as a common system through which clients would connect to database servers, as well as other simpler data sources. Clients no longer had to worry about all of the networking protocols needed to talk with a database; all of that code was included in the ODBC driver.
Microsoft later released a similar data connection system called OLE DB, based on ActiveX technology. OLE DB drivers for common systems soon appeared, although you could still get to ODBC resources through a generic ODBC driver built in OLE DB.
In .NET, both ODBC and OLE DB are replaced by providers, libraries of code that provide all of the communication between the database and your application. Providers are an integral part of ADO.NET, and you will have to use them to get to your databases. Fortunately, providers exist for the main database systems, and an “OleDb provider” exists for systems without their own providers.
Four primary objects make up the programmer’s view of the provider.
- The Connection object. This object directs communication between your program and the data source. It includes properties and methods that let you indicate the location or connection parameters for the data source. Multi-command transactions are managed at this object level.
- The Command object. This object takes the SQL statement you provide, and prepares it for transport through the Connection object. You can include parameters in your command for stored procedure and complex statement support.
- The DataReader object. The DataReader provides a simple and efficient way to retrieve results from a data query. It is used by other objects in ADO.NET to receive and redirect data for use within your program, but your code can use it directly to process the results of a SELECT statement or other data retrieval action.
- The DataAdapter object. This object is what makes communication between a DataSet and the rest of a provider possible. One of its primary jobs is to modify data manipulation statements (the SELECT, INSERT, UPDATE, and DELETE statements) generated by a DataSet into a format that can be used by the related data source.
Using these objects is a little involved, but not hard to understand. To connect to a typical relational database, such as SQL Server, and process data, follow these steps:
- Establish a connection to your data source using a Connection object.
- Wrap a SQL statement in a Command object.
- Execute that Command object in the context of the established Connection.
- If any results are to be returned, use either a DataReader to scan through the records, or use a combination of a DataAdaptor and DataSet (or DataTable) to retrieve or store the results.
- Close all objects that you opened to process the data.
Although the .NET Framework includes data providers for a few different data systems, the remainder of this chapter’s discussion focuses only on the SQL Server provider, exposed through the System.Data.SqlClient namespace.
Note
SQL Server 2005 includes support for a new feature called “User Instances,” for use with SQL Server 2005 Express Edition databases. This feature allows a low-privilege user to access a specific SQL Server Express database file without the need for an administrator to establish SQL Server security settings for that user. This feature is useful in environments where the related software was installed through the new ClickOnce deployment method (discussed in Chapter 24, “Deployment,”) without administrator involvement. It also requires specific reconfiguration of the SQL Server Express installation before use. For more information on this feature, reference the “Working with User Instances” article in the ADO.NET portion of the MSDN documentation supplied with your Visual Studio installation.
DataSets
If you are going to do more than just quickly scan the data that comes back from a DataReader query, you will probably use a DataSet to store, manage, and optionally update your data. Each DataSet provides a generic disconnected view of data, whether it is data from a provider, or data that you build through code. While each provider is tied to a specific database platform (such as Oracle) or communication standard (such as OLE DB), the objects in the DataSet realm are generic, and can interact with any of the platform-specific providers.
Three main objects make up the world of DataSets.
- The DataSet object. Each DataSet object acts like a mini-database. You can add as many tables to a DataSet as you like, and establish foreign-key relationships between the fields of these tables. The internals of each DataSet are an unfathomable mystery, but you can export an entire DataSet to XML, and load it back in again later if you must.
- The DataTable object. Each table in your DataSet uses a separate DataTable object, accessible through the DataSet’s Tables collection. DataTables are also useful as stand-alone objects. If you plan on only adding a single table to your DataSet, you might opt to just use a DataTable object alone without a DataSet. Within each DataTable object, separate DataColumn and DataRow objects establish the field definitions and the actual data values respectively.
- The DataRelation object. Use the DataRelation objects, stored within a DataSet’s Relations collection, to establish field-level relationships and constraints between columns in your DataTable objects.
Although data sets are most often used with providers, you can use them independently to build your own in-memory collection of tables and relationships. This is similar to the “client-side record sets” that you could build with pre-.NET ADO objects, although the features included with ADO.NET make the DataSet much more powerful than the older Recordset.
Note
Visual Basic 2005 includes “Typed DataSets,” a feature used to integrate a DataSet with a specific data or record format. You may find them useful in your applications, but I won’t be discussing them in this book.
DataSets Versus No DataSets
When used together, providers and DataSets give an end-to-end interface to individual data values, from the fields in your database tables, to the in-memory items of a DataRow record. Figure 10-1 shows this object interaction.
Figure 10-1. Providers and DataSets in action
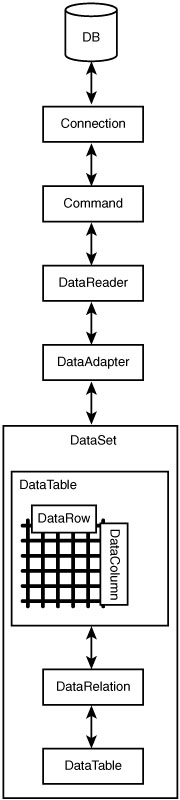
When you interact with data from an external database, you always use the provider classes, but it’s up to you whether you want to also use DataSets. There are pros and cons in both methods, some of which appear in Table 10-1.
Table 10-1. The Pros and Cons of Using DataSets
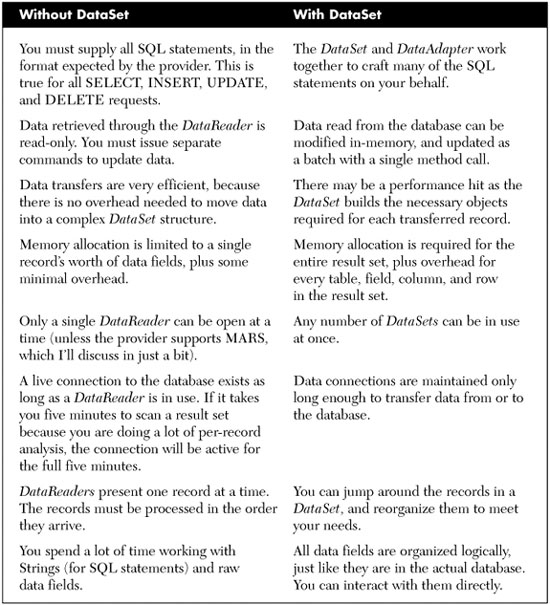
For me, the last entry in Table 10-1 is the clincher. The job of a programmer is to control the software experience of the user, and the more control, the better. That’s why I generally hate “wizards” and “code generators” that take control away from me, the developer. There are limits to my paranoia, though; I put up with the basic template code supplied by Visual Studio when creating new projects. Still, you’ll see my code-controlling personality in the Library Project, with my heavy dependence on DataReaders over DataSets. When I do store data long-term, I usually just stick the data in a DataTable without a containing DataSet.
MARS Support
I mentioned something called MARS in Table 10-1. MARS stands for Multiple Active Result Sets. Normally, a single Connection object only allows a single DataReader to be in use at any given moment. This limitation is bi-directional. If you are scanning a DataReader via a SELECT statement, you cannot issue INSERT, UPDATE, or DELETE statements on that same connection until you close the DataReader.
With the introduction of MARS, a single connection can now handle multiple data transmission activities in either direction. SQL Server adds MARS support with its 2005 release; Oracle has supported MARS-like features since the initial .NET release.
MARS connections seem like a feature you would always want to enable. But they do add additional overhead to your application that can slow it down. Also, MARS does not always mix well with multi-threaded applications.
Connecting to SQL Server with Visual Studio
Visual Studio has many built-in tools that make working with data as simple as drag-and-drop. Well, it’s not really that quick. But by answering a few questions and dragging-and-dropping one item, you can build an entire application that lets you edit data in your database. Let’s try it together.
Creating a Data Source
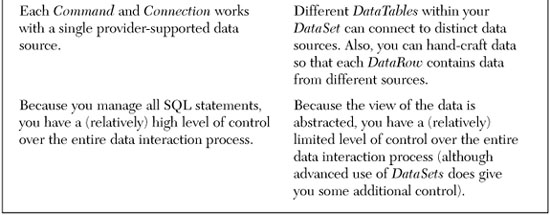
Start up a new Windows Forms project in Visual Studio—just a plain Windows Forms project, not one of the Library-specific projects. Selecting the Data ![]() Show Data Sources menu command brings up the Data Sources panel, as shown in Figure 10-2.
Show Data Sources menu command brings up the Data Sources panel, as shown in Figure 10-2.
Figure 10-2. Where are the data sources?
New projects don’t include any data sources by default, so we need to add one. Click on the Add New Data Source link in the Data Sources panel. The Data Source Configuration Wizard guides you through the data source creation process.
- The first step asks, “Where will the application get data from?” Select “Database” and click the Next button.
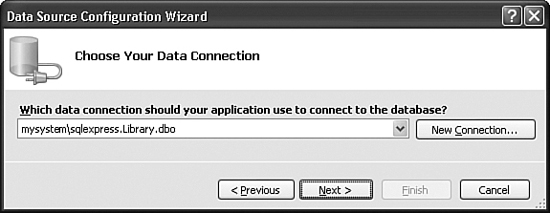
- The second step asks, “Which data connection should your application use to connect to the database?” We’ll have to create a new connection for the Library database we designed way back in Chapter 4, “Designing the Database.” Click the New Connection button.
- The Add Connection dialog appears to collect the details of the new connection. In the Data source field, click the Change button to choose the type of connection. Select “Microsoft SQL Server” from the list that appears. (It’s possible that this Change Data Source sub-dialog popped up automatically on your system.)
- Back on the Add Connection form, fill in the Server name field with the name of your SQL Server instance. Hopefully, this drop-down list already has the instances listed, but if not, you’ll have to enter it yourself. The default for SQL Server Express is the name of your system with “SQLEXPRESS” attached. If your system name is “MYSYSTEM,” the instance name would be “MYSYSTEMSQLEXPRESS.”
- Configure your authentication settings in the Log on to the server section. I used standard Windows Authentication, but it depends on how you set up the database in Chapter 4.
- In the Connect to a database section, either select or type in “Library” for the database name.
- Click the Test Connection button to make sure it all works. When you’re finished, click the OK button to create the new connection.
- OK, we’re back on the Data Source Connection Wizard form. The connection we just created should now appear in the list, as shown in Figure 10-3. Click Next.
Figure 10-3. The new database connection, ready to use
- The next panel asks whether this data source should become part of the configurable settings for this project. We’ll get into the settings features of Visual Basic in Chapter 14, “Application Settings.” For now, just accept the default and click OK.
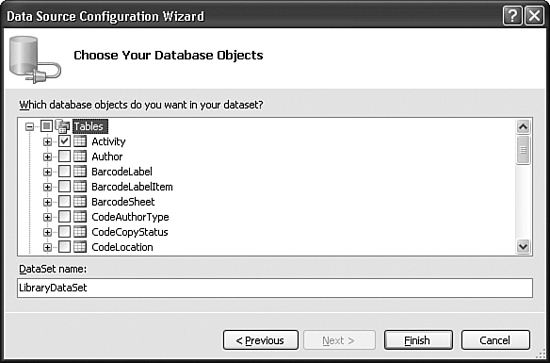
- We’re almost there. Only 27 more steps to go! Just kidding. This is the last step in creating the data source. The final panel shows a list of the data-generating features in the Library database. Open the Tables branch, and select Activity, as shown in Figure 10-4. Then click Finish.
Figure 10-4. The final activity is selecting the Activity table
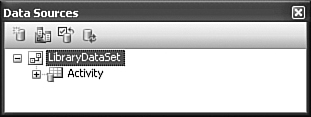
Check out the Data Sources panel shown in Figure 10-5. It includes the new “LibraryDataSet” data source with its link to the Activity table.
Figure 10-5. Finally, a real data source
Using a Data Source
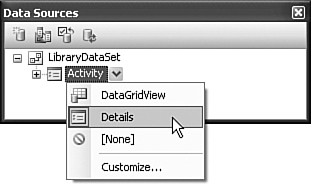
So, what is this data source anyway? It is simply a link to some portion of your database, wrapped up in a typical .NET object. Now that it’s part of your project, you can use it to access the data in the Activity table through your project’s code, or by drag-and-drop. In the Data Sources panel, you will find that the Activity entry is actually a drop-down list. Select “Details” from the list, as shown in Figure 10-6.
Figure 10-6. Select the Details view instead of DataGrid
Finally, drag-and-drop the Activity entry onto the surface of Form1. When you let go, Visual Studio will add a set of controls to the form, plus a few more non-user-interface controls just below the form (see Figure 10-7).
Figure 10-7. A complete program without writing a single line of code
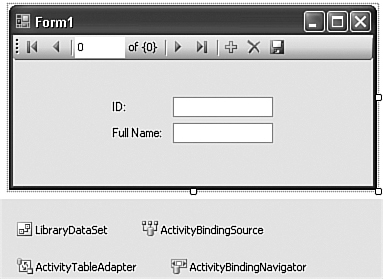
By just dragging-and-dropping, Visual Studio added all of the necessary controls and links to turn your form into a turbo-charged Activity table editor. Try it now by pressing the F5 key. In the running program, you can use the Microsoft Access-style record access “VCR” control to move between the records in the Activity table. You can also modify the values of each record, add new records, or delete existing records (but please restore things back to their original state when you are done; we’ll need all of the original records later). Talk about power! Talk about simplicity! Talk about unemployment lines! Who needs highly-paid programmers like us when Visual Studio can do this for you?
Data Binding
In reality, Visual Studio isn’t doing all that much. It’s using a feature called “data binding” to link the on-form fields with the data source, the Library database’s Activity table. Data binding is a feature built into Windows Forms controls that allow them to automatically display and edit values in an associated data source, such as a database. It’s all sorted out through the properties of the control.
Select the FullNameTextBox control added to this project’s form, and then examine its properties. Right at the top is a property section named “(DataBindings).” Its Text sub-property contains “ActivityBindingSource - FullName,” a reference to the ActivityBindingSource non-user-interface control also added by Visual Studio. ActivityBindingSource, in turn, contains a reference to the LibraryDataSet object, the data source we created earlier. That data source links to SQL Server, to the Library database, and finally to the Activity table and its FullName field. Piece of cake!
If you count up all of the objects involved in this data-binding relationship, you come up with something like 5,283 distinct objects. It’s no wonder that Visual Studio did so much of the work for you. Data binding provides a lot of convenience, but it also takes away a lot of your control as a developer. Although there are properties and events that let you manage aspects of the data binding and its update process, most of the essential code is hidden away inside of the data binding portions of .NET. You may not touch, taste, fold, spindle, or mutilate it, and that’s just bad. A quick look at one of my core programming beliefs says it all: Good software includes maximum control for the developer, and minimum control for the user.
Part of your job as a developer is to provide a highly scripted environment for the user to access important data. This requires that you have control over the user’s experience through your source code. Certainly you will defer much of that control to others when you use any Microsoft or tools supplied by third-parties. As long as those tools allow you to control the user experience to your level of satisfaction, that’s great. But I’ve always been disappointed with data binding, except for the read-only display of data from the database. Similar features were in Visual Basic long before .NET arrived, and they have always made it difficult for the developer to control the various data interactions on the form.
Fortunately, if you eschew the data-binding features, Visual Basic will pass to you the responsibility of managing all interactions between the database and the user.
Interacting with SQL Server in Code
Communicating with a database yourself is definitely more work than dragging-and-dropping data sources, but whoever said programming was a cake walk?
Building the Connection String
The first step on the road to the data-controlling lifestyle is to connect to the database using a connection string. If you have used ADO, then you are already familiar with the connection strings used in ADO.NET, for they are generally the same. You probably also know that it is through connection strings that Microsoft keeps a tight rein on Windows developers. It’s not that they are complex; they are nothing more than strings of semicolon-separated parameters. But the parameters to include, and their exact format, are the stuff of legend. The MSDN documentation included with Visual Studio does provide some examples of connection strings, but not much detail. A third-party resource, http://www.connectionstrings.com, also provides numerous examples of valid connection string formats.
The connection string we will use to connect to the Library database, fortunately, isn’t overly complex. If you use your Microsoft Windows login to connect to the database, the following string will meet your needs (as one unbroken line):
![]()
where instance_name is replaced by the name of your SQL Server instance or data source. The connection string we built visually earlier used “MYSYSTEMSQLEXPRESS” for its data source name.
To use SQL Server user IDs and passwords, try this format.
![]()
Of course, replace the user ID (sa) and password (xyz) with your own settings. If you want to include MARS support in your connection, add another semicolon-delimited component:
MultipleActiveResultSets=true
Note
There are other connection string options that let you connect to a SQL Server Express (SSE) database file directly, alter the “user instancing” method (often used with ClickOnce-deployed databases), and make other adjustments. Although it is somewhat scattered about, you can find these options documented in the MSDN documentation that comes with Visual Studio.
Establishing the Connection
Use the connection string to create a SqlConnection object, and then open the connection.
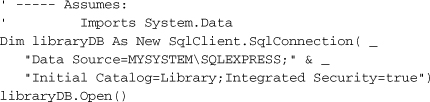
Make sure you replace “MYSYSTEM” with your own system’s name. This entire block of code sure seems a lot easier to me than those 10 or 15 steps you had to follow earlier when setting up the connection through Visual Studio.
Using SQL Statements
Once the connection is open, you can issue SELECT, INSERT, UPDATE, DELETE, or any other DML or DDL statement accepted by the database. A SqlCommand object prepares your SQL statement for use by the open connection. Here’s a statement that returns the description for entry number 1 in the Activity table.
SELECT FullName FROM Activity WHERE ID = 1
Creating a SqlCommand object that wraps around this statement is easy. The constructor for the SqlCommand object takes a SQL statement, plus a SqlConnection object.
Dim sqlStatement As New SqlClient.SqlCommand( _
"SELECT FullName FROM Activity WHERE ID = 1", libraryDB)
Processing the Results
The only thing left to do is to pass the SQL statement to the database, via the connection, and retrieve the results as a SqlDataReader object. Once we get the data, process each record using that object’s Read method. You access individual fields by name through the default Item collection.
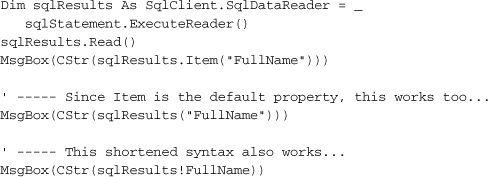
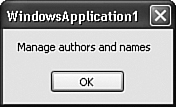
Taking all these blocks of code together displays the message shown in Figure 10-8.
Figure 10-8. Basic data retrieved from a database
When you’re finished, make sure that you close all of the connections you opened.
sqlResults.Close()
libraryDB.Close()
Modifying Data
Making changes to database tables is coded just like data retrieval, but no SqlDataReader is needed. Instead of using the ExecuteReader method, use the ExecuteNonQuery method, which returns no results.

SQL Server 2005 has a convenient new feature that will return a single field from a new record created via an INSERT statement. If you look back at the Library Project’s database design, you will see that the ID fields in many of the tables are generated automatically. Traditionally, if you wanted to immediately retrieve the ID field for a new record, you first had to INSERT the record, and then perform a separate SELECT statement, returning the new record’s ID field.
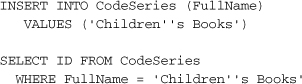
A new OUTPUT INSERTED clause in SQL Server 2005 combines both of these statements into a single action.
![]()
When the INSERT is complete, SQL Server returns the ID field as a result set, just as if you had issued a separate SELECT statement. The SqlCommand’s ExecuteScalar method is a simple way to retrieve a single value from a SQL statement.

Database Transactions
Transactions enable “all or nothing” actions across multiple SQL statements. Once started, SQL statements issued within the context of the transaction either all complete, or none of them complete. If you have ten data updates to perform, but the database fails after only five of them, you can roll back the transaction. The database reverses the earlier statements, restoring the data to what it was before the transaction began. (Updates from other users are not affected by the rollback.) If all statements succeed, you can commit the entire transaction, making all of its changes permanent.
For SQL Server databases, transactions are managed through the provider’s SqlTransaction object. Like the other ADO.NET statements, it’s easy to use. A transaction begins with a BeginTransaction method call on the connection.
Public atomicSet As SqlClient.SqlTransaction = _
libraryDB.BeginTransaction()
To include a SQL statement in a transaction, assign the SqlTransaction object to the SqlCommand object’s Transaction property.
sqlStatement.Transaction = atomicSet
Then call the appropriate Execute method on the command. When all commands complete, use the transaction’s Commit method to make the changes permanent.
atomicSet.Commit()
If, instead, you need to abort the transaction, use the Rollback method.
atomicSet.Rollback()
Summary
There are programmers in this world who never have to access a database, who never worry about connections or transactions or record locking or INSERT statements or referential integrity. Yes, there are such programmers in the world—five, maybe six at last count. All other programmers must include code that manages external data of some sort, whether in a relational database, or an XML file, or a configuration file. ADO.NET is one of the .NET tools that make such data management easy. It’s a lot different from the old ADO system, and I am still not convinced that having disconnected data 100 percent of the time is the way to go. But when I consider the power and flexibility of ADO.NET, I can’t help feeling sorry for those six programmers who never use databases.
Project
It’s likely that more than 50 percent of the code in the Library Project will directly involve database access, or manipulation of the data retrieved through ADO.NET. Constantly creating new Command and DataReader objects, while simple, is pretty hard on the fingers. Because so much of the code is repetitive, the code in this chapter’s project will try to centralize some of that basic, boilerplate code.
Project Access
Load the “Chapter 10 (Before) Code” project, either through the New Project templates, or by accessing the project directly from the installation directory. To see the code in its final form, load “Chapter 10 (After) Code” instead.
Reference the Data Namespaces
The Library Project code has references to several of the important .NET namespaces, such as System, System.Windows.Forms, and Microsoft.VisualBasic. However, it doesn’t yet reference any of the ADO.NET namespaces. (Recall that “referencing” means accessing a .NET DLL in a project and using its types in your code.) Before using them in code, we need to create references to them. This is done through the project properties window, on the References tab. You’ll see a list of those assemblies already referenced by the application (see Figure 10-9).
Figure 10-9. References included in the Library Project
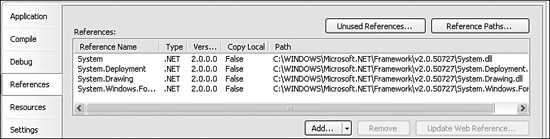
To add new references, click the Add button just below the list, and select Reference if prompted for the type of reference to add. On the Add Reference form, the .NET tab should already be active. It’s pretty amazing to see just how many .NET assemblies are installed on your system already. But don’t just sit there gawking: Select both System.Data and System.Xml from the component list, and then click the OK button. The list of references in the project properties should now include both of the selected namespace libraries.
We can now refer to classes in the System.Data namespace directly. But typing “System.Data” before each use of a data-related class will get tedious. We could sprinkle “Imports System.Data” statements throughout the files in the project, but Visual Studio provides a more centralized solution. Since you still have the References tab open, look down to the Imported namespaces section. The large checklist indicates which namespaces should be automatically imported throughout your application. These namespaces don’t require separate Imports statements in your code, but your source code acts as if you had added them anyway. Go ahead and select the checkbox next to the “System.Data” entry in this list. Then close the project properties window.
Most of the new code for this chapter appears in the General.vb file, so open it now. We will use two project-level (global) variables to manage the primary database connection to the Library database. The first variable, LibraryDB, is a SqlConnection object that uses our connection string for the Library database. A related object, HoldTransaction, will hold a SqlTransaction object when a transaction is in effect. Add these two lines to the General module. I put them just before the existing CenterText method.
Insert Snippet
Insert Chapter 10, Snippet Item 1.
Public LibraryDB As System.Data.SqlClient.SqlConnection
Public HoldTransaction As System.Data.SqlClient.SqlTransaction
Connecting to the Database
Because the Library Project will depend so much on the database, we will build the SqlConnection object when first starting up the application.
Not-Really-Best Practices Warning
Maintaining the connection throughout the application goes against the advice I provided earlier that database connections should be short-lived. However, to keep the code as simple as possible for purposes of tutorial demonstration, I have chosen this approach. Also, because the Library Project is designed for a small installation base, it does not have the requirement of being highly scalable.
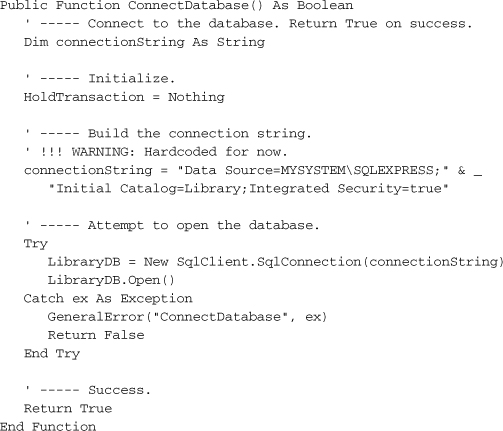
The ConnectDatabase procedure contains all the code needed to create this object. For now, I’ve just hard-coded the connection string into the routine. In a later chapter, we’ll include that connection information as part of a configuration system. Add the following routine to your General module. Make sure you change the reference to “MYSYSTEM” to whatever is needed on your own system.
Insert Snippet
Insert Chapter 10, Snippet Item 2.
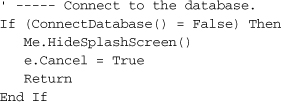
This project’s “main” routine is actually the MyApplication_Startup application event, from the ApplicationEvents.vb source code file. (That’s one that you will have to use the “Show All Files” button to see.) To build the connection object at startup, add the following code to the end of that event handler.
Insert Snippet
Insert Chapter 10, Snippet Item 3.
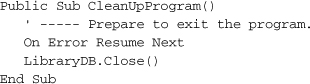
When the user exits the Library application, the code will call the CleanUpProgram method to properly dispose of the connection object. Return to the General.vb module, and add the following method.
Insert Snippet
Insert Chapter 10, Snippet Item 4.
To simplify things, we’ll call this routine from the application’s MyApplication_Shutdown event handler, back in the ApplicationEvents.vb file.
Insert Snippet
Insert Chapter 10, Snippet Item 5.
CleanUpProgram()
Interacting with the Database
Now that the database connection is established, it’s time to do something with it. The first four centralized routines implement much of the code we discussed earlier: the creation of data readers and tables, and the processing of general SQL code. Add them to the General module.
Insert Snippet
Insert Chapter 10, Snippet Item 6.
This snippet adds the following seven routines.
- Function CreateDataTable. Given a SQL statement, retrieve its results from the database, and put it all in a DataTable object. A SqlDataAdapter connects the SqlDataReader with the DataTable.
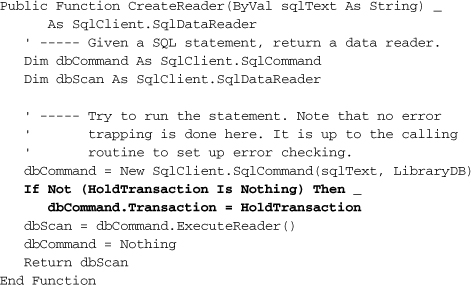
- Function CreateReader. Given a SQL statement, retrieve its results from the database, returning the associated SqlDataReader object.
- Sub ExecuteSQL. Sends a SQL statement to the database for processing.
- Function ExecuteSQLReturn. Sends a SQL statement to the database for processing, returning a single result value.
- Sub TransactionBegin. Begins a new transaction.
- Sub TransactionCommit. Commits the transaction, making all changes permanent.
- Sub TransactionRollback. Rolls back the transaction, undoing any changes that were part of the transaction.
None of these routines include their own error-processing code; they either suppress errors with an “On Error Resume Next” statement, or rely on the calling routine to trap errors. This lets the calling routine take specific action based on the type of error generated. All of these routines are pretty similar to each other. Here is the code for CreateReader; one interesting part is the use of the HoldTransaction object when a transaction is in effect.
Processing Data Values
Building SQL statements by hand involves a lot of string manipulation, plus conditional processing for those times when data may be missing. For instance, if you want to store a text value in the database, you have to prepare it for use by a SQL statement (special processing for single quote marks), but if the text value is zero-length, you pass the word “NULL” in the statement instead. All of this data preparation can clog up your code, so why not centralize it? The eight routines in this section either prepare data for use in SQL statements, or adjust retrieved data for use in the application.
Insert Snippet
Insert Chapter 10, Snippet Item 7.
- DBCombo. Takes the numeric code associated with a selected item in a ComboBox control and returns it as a string. If no item is selected, or if the value is –1, the routine returns “NULL.”
- DBDate(String). Given a string containing a formatted date, returns a date ready for use in a SQL statement.
- DBDate(Date). Given a true date value, returns a string date ready for use in a SQL statement.
- DBGetDecimal. Returns a decimal number from a result set, even if the field contains a NULL value.
- DBGetInteger. Returns an integer number from a result set, even if the field contains a NULL value.
- DBGetText. Returns a string from a result set, even if the field contains a NULL value.
- DBNum. Prepares a number for use in a SQL statement.
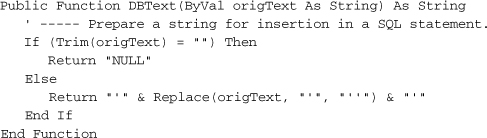
- DBText. Prepares a string for use in a SQL statement.
Here is the code for the DBText routine. Strings in SQL statements must be surrounded by single quotes, and any embedded single quotes must be doubled.
System-Level Configuration
The last blocks of code support the quick update and retrieval of system-wide configuration values stored in the SystemValue table of the Library database. The GetSystemValue routine returns the current setting of a configuration value when supplied with the value name. SetSystemValue updates (or adds, if needed) a named configuration value. Both of these routines appear in the General module.
Insert Snippet
Insert Chapter 10, Snippet Item 8.
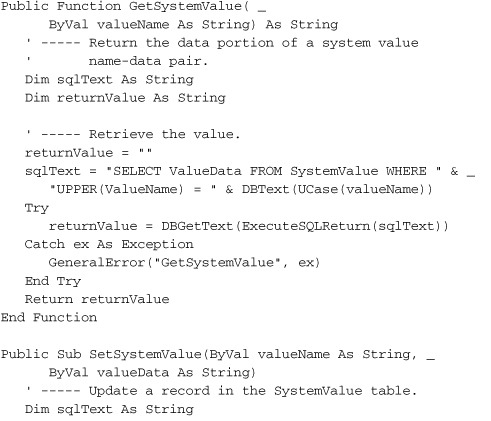
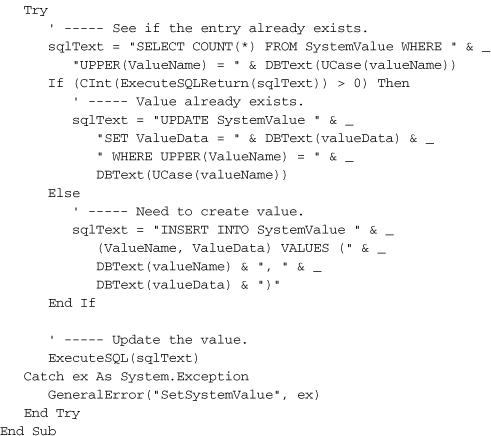
The GetSystemValue routine is clear. It simply retrieves a single value from the database. The SetSystemValue has to first check whether the configuration value to update already exists in the database. If it does, it modifies the records. Otherwise, it adds a full new record. To determine whether the record exists, it requests a count of records matching the system value name. It queries the database through our new ExecuteSqlReturn method, which returns a single value from a query. In this case, the value is the count of the matching records.
![]()
Using the GetSystemValue routine is easy, so let’s use it right now. Go back to the MyApplication_Startup event handler in ApplicationEvents.vb, and add the following code to the end of the routine.
Insert Snippet
Insert Chapter 10, Snippet Item 9.
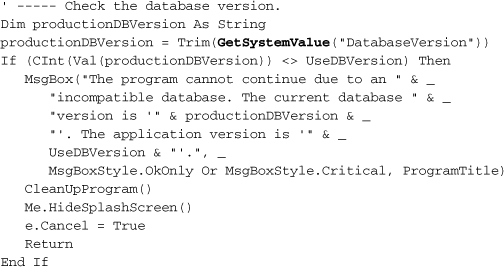
Once in a while, I found it necessary to modify the structure of a database to such an extent that older versions of an application either crashed, or would cause major data headaches. To prevent this, I added a database version setting, “DatabaseVersion,” and use this code block to test against it. If the program doesn’t match the expected database version, it will refuse to run.
Now that we have some basic database access tools, we’re ready to start adding some real data interaction code to the Library application.