
Chapter 15. Files and Directories
Software development in the 21st century has really turned programmers into a bunch of softies (no pun intended). In the old days of computers, developers had to solder programs into the computer by hand. Complex calculations could take days to set up, and one misplaced wire meant lead poisoning or worse. The suffering was real, and older issues of Popular Electronics are riddled with articles by former programmers who went crazy in their attempt to craft one more ballistics calculation algorithm.
Life improved tremendously for programmers when John von Neumann and others suggested that a computer could store internally the logic for an algorithm, and process it directly from memory instead of through hard-wired configurations. Engineers were soon putting their programs onto punch cards and paper tapes. The danger of lead poisoning was quickly replaced by the larger evil of paper cuts.
Punch cards were great—until you dropped your stack that took you hours or days to assemble. Some programmer somewhere dropped one too many card stacks and proclaimed, “That’s it! I’m going to invent the hard disk and related technologies such as IDE and SCSI. Sure I’ll become fabulously wealthy, but at least I won’t have to deal with these stupid cards anymore.”
And thus was born the file system, the structured storage of programs and information on a disk surface. File systems have been a part of Microsoft technologies since Bill Gates first wooed IBM. It’s no coincidence that the “DOS” in “MS-DOS” stands for Disk Operating System. Bill knew how essential file systems were, and so do you.
In this chapter, we’ll talk about interactions with files and directories, the main units of storage and organization in the Windows file system. We’ll also see some of the technologies and features .NET provides to manipulate files and their content. Just make sure you turn the pages carefully; I wouldn’t want you to get a paper cut.
Traditional Visual Basic File Management
Visual Basic has included significant file management features since its first release. In fact, there are more features in Visual Basic that deal with file and directory manipulation than with pretty much anything else.
Most of the functions that allow you to read and modify file content use a file handle, a numeric identifier that refers to a specific open file. This file handle is generated with the FreeFile function, and must be obtained before calling any of the traditional Visual Basic file features.

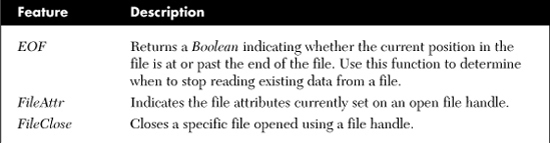
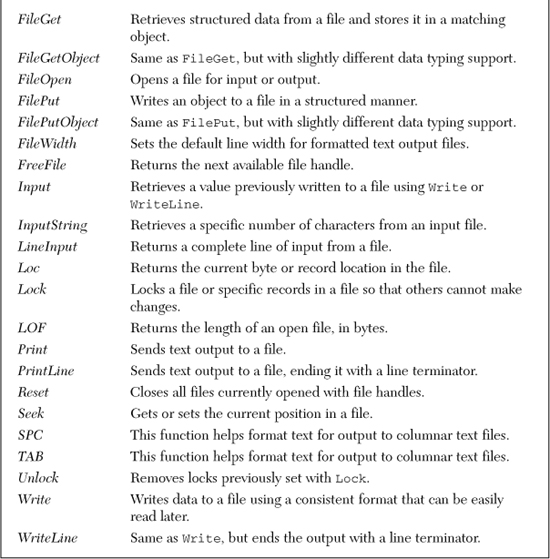
File handle-based file manipulation works just fine, but it is so early-’90s. It’s not really a .NET technology, and is not object-based at all (unless you consider that an Integer is an object). Therefore, we won’t be covering it in this book, or using it in the Library Project. Table 15-1 lists the major Visual Basic features that use file handles. If you need to know about the handle-based features in Visual Basic, or if your work involves migrating pre-.NET Visual Basic applications, use this table to help you locate full feature details in the technical documentation supplied with Visual Basic.
Table 15-1. Visual Basic Features That Use File Handles
Manipulating Files Through Streams
The .NET Framework includes a new object-oriented approach to reading and writing files: streams. The abstract Stream object, found at System.IO.Stream, defines a generic interface to a chunk of data. It doesn’t matter where that data is: In a file, in a block of memory, in a String variable. If you have a block of data that can be read or written one byte at a time, you can design a derived stream class to interact with it.
Stream Features
The basic features of a Stream object include the Read and Write methods that let you read or write bytes. As data is read from or written to a stream, the Stream object maintains a “current position” within the stream that you can adjust using the Seek method, or examine using the Position property. The Length property indicates the size of the readable data. The class also exposes variations of these basic features to allow as much flexibility as possible.
Not every stream supports all features. Some streams are read-only, forward-only constructs that don’t support writing or seeking. Other streams support all possible features. The features available to you depend on the type of stream you use. Because Stream itself is abstract, you must create an instance of one of its derived classes. .NET defines several useful streams ready for your use:
- FileStream. The FileStream object lets you access the content of a file using the basic methods of the generic Stream class. FileStream objects support reading, writing, and seeking, although if you open a read-only file, you won’t be able to write to it.
- MemoryStream. A stream based on a block of raw memory. You can create a memory stream of any size, and use it to temporarily store and retrieve any data.
- NetworkStream. This class abstracts data coming over a network socket. Whereas most of the derived stream classes reside in System.IO, this class sits in System.Net.Sockets.
- BufferedStream. Adds buffering support to a stream to improve performance on streams with latency issues. You wrap a BufferedStream object around another stream to use it.
- CryptoStream. This stream allows you to attach a cryptographic service provider to it, resulting in encrypted output from plain input, or vice versa. Chapter 11, “Security,” includes examples that use this type of stream.
- DeflateStream and GZipStream. Lets you use a stream to compress or decompress data as it is processed, all using standard compression algorithms.
Streams are useful on their own, but you can also combine streams so that an incoming network stream can be immediately encrypted, compressed, and stored in a block of stream memory.
Using a Stream
Using a stream is simple; first you create it, and then you start reading and writing bytes left and right. Here’s some sample code I wrote that moves data into and out of a memory stream. It’s loosely based on the code you’ll find in the MSDN documentation for the MemoryStream class.
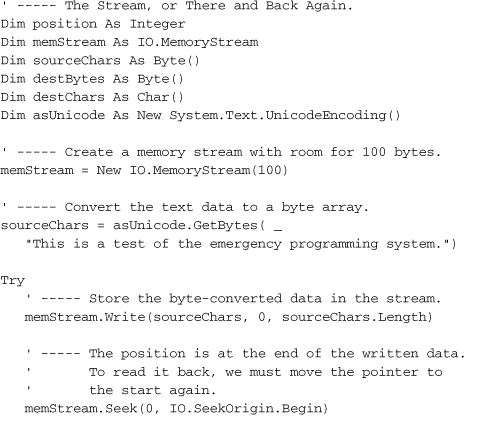
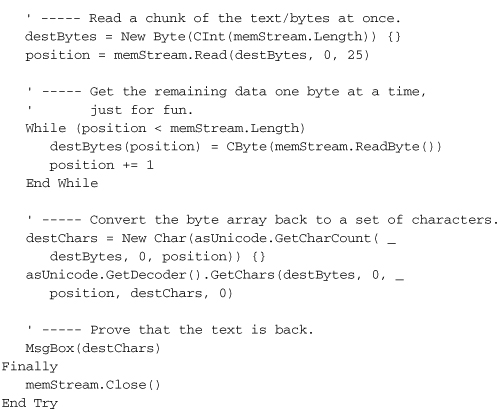
The comments hopefully make the code clear. After creating a memory stream, I push a block of text into it, and then read it back out. (The text stays in the stream; reading it did not remove it.) Actually, the stream code is pretty simple. Most of the code deals with conversions between bytes and characters. If it looks overly involved, that’s because it is.
Beyond Stream Bytes
For me, all that converting between bytes and characters is for the birds. When I write business applications, I typically deal in dates, numbers, and strings: customer names, order dates, payment amounts, and so on. I rarely have a need to work at the byte level. I sure wish there was a way to send this byte stuff down a programming stream of its own so I wouldn’t have to see it anymore.
Lucky me! .NET makes some wishes come true. Although you can manipulate streams directly if you really want to or need to, the System.IO namespace also includes several classes that provide a more programmer-friendly buffer between you and the stream. These classes—implemented as distinct readers and writers of stream data—provide simplified methods of storing specific data types, and retrieving them back again.
The readers and writers are designed for single-direction start-to-finish processing of data. After creating or accessing a stream, you wrap that stream with either a reader or a writer, and begin traversing the extent of the stream from the beginning. You always have access to the underlying stream if you need more fine-tuned control at any point.
There are three main pairs of readers and writers:
- BinaryReader and BinaryWriter. These classes make it easy to write and later read the core Visual Basic data types to and from a (generally) non-text stream. The BinaryWriter.Write method includes overloads for writing Bytes, Chars, signed and unsigned integers of various sizes, Booleans, Decimals and Doubles, Strings, and arrays and blocks of Bytes and Chars. Curiously missing is an overload for Date values.
The BinaryReader counterpart includes separate Read methods for each of the writable data types. The ReadDouble method returns a Double value from the stream, and there are similar methods for the other data types.
- StreamReader and StreamWriter. These classes are typically used to process line-based text files. The StreamReader class includes a ReadLine method that returns the next text line in the incoming stream as a standard String. The related StreamWriter.Write method includes all the overloads of BinaryWriter.Write, and also has a version that lets you format a string for output. The reader includes features that let you read data one character at a time, a block at a time, or an entire file at a time.
- StringReader and StringWriter. This pair of classes provides the same features as the StreamReader and StreamWriter, but uses a standard String instance for data storage instead of a true Stream.
There is one additional pair—TextReader and TextWriter—that provides the base class for the other non-binary readers and writers. You can’t create instances of them directly, but they do let you treat the stream and string versions of the readers and writers generically.
With these new tools, it’s easier to process non-Byte data through streams. Here’s a rewrite of the simple memory stream code I wrote earlier, adjusted to use a StreamReader and StreamWriter.

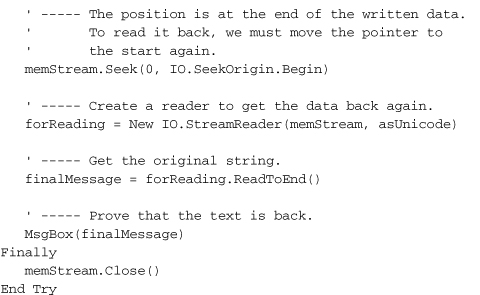
That code sure is a lot nicer without all of that conversion code cluttering up the works. (It could be simplified even more by leaving out all of the optional Unicode encoding stuff.) Of course, everything is still being converted to bytes under the surface; the memory stream only knows about bytes. But StreamWriter and StreamReader take that burden away from us, performing all of the messy conversions on our behalf.
Reading a File via a Stream
Most Stream processing involves files, so let’s use a StreamReader to process a text file. Although we already decided in Chapter 14, “Application Settings,” that INI files are a thing of the past, it might be fun to write a routine that extracts a value from a legacy INI file. Consider a file containing this text.
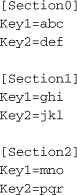
Now there’s something you don’t see everyday, and with good reason! Still, if we wanted to get the value for Key2 in section Section1 (the “jkl” value), we would have to fall back on the GetPrivateProfileString API call from those bad old pre-.NET programming days. Or, we could implement a StreamReader in a custom function all our own.
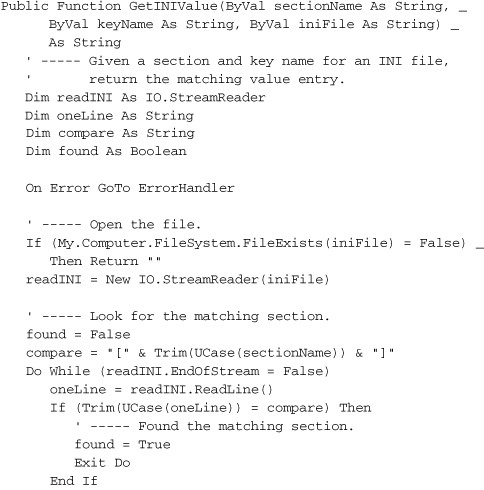
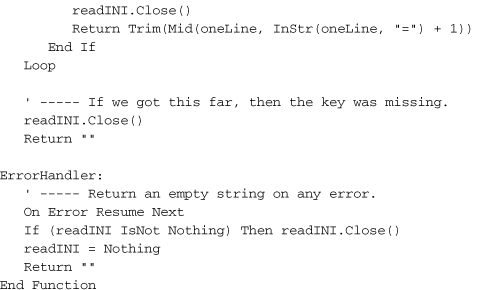
This routine isn’t an exact replacement for GetPrivateProfileString; it doesn’t support a default return value, or perform file caching for speed. You could improve the routine with better error handling. But it does retrieve the value we seek, and it does it by reading the INI file one line at a time through a StreamReader.
MsgBox(GetINIValue("Section1", "Key2", iniFilePath))
' ----- Displays 'jkl'
File Management with the My Namespace
The My namespace includes several file management features in its My.Computer.FileSystem branch, including features that create streams for reading and writing.
My Namespace Versus Visual Basic Commands
Most of the My.Computer.FileSystem object’s members exist to replace or supplement file management features already present in Visual Basic. Table 15-2 lists some of the long-standing file and directory interaction features in Visual Basic, and their equivalents in My.Computer.FileSystem.
Table 15-2. Two Ways of Doing the Same Thing
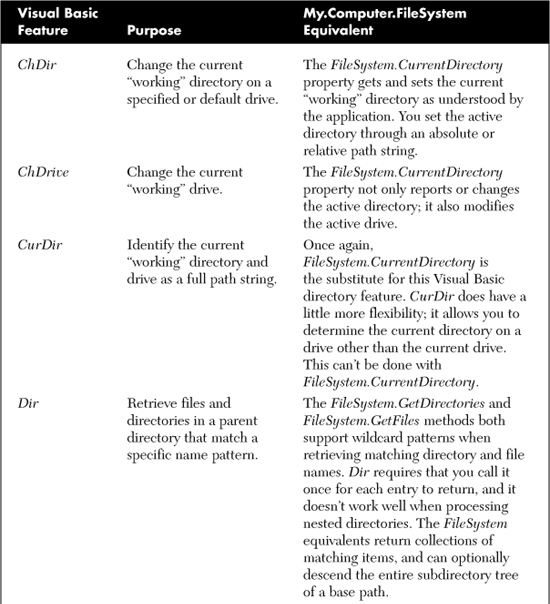
Why would Microsoft introduce so many new My features that duplicate existing Visual Basic features? Perhaps it’s a way to bring consistency to file-based programming practices through a more object-oriented approach. Or maybe it’s yet another move by Microsoft, the United States government, the Knights Templar, Burger King, and other groups set on world domination by controlling you, your family, and your community through the “hidden hand” of extra-long source code statements.
Reading and Writing Files Through My
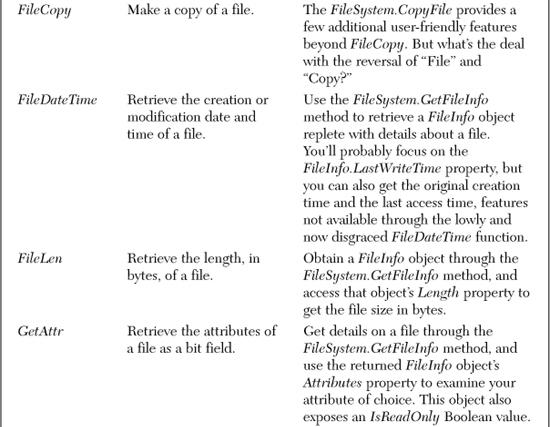
The My.Computer.FileSystem.OpenTextFileReader and parallel OpenTextFileWriter methods provide shortcuts to the filename-based constructor for StreamReader and StreamWriter objects. This statement:
![]()
Dim inputStream As New IO.StreamReader(fileNamePath)
For me, the second version is better due to its terse nature, but it’s between you and your source code review team as to which one you will use.
If you want to load the entire contents of a file into either a String or a Byte array, there’s no need to open a stream now that My includes the My.Computer.FileSystem.ReadAllText and related ReadAllBytes methods. This statement dumps the entire content of a file into a String.
![]()
The My.Computer.FileSystem.WriteAllText and WriteAllBytes methods do the same thing, but in the opposite direction. There’s an append Boolean argument that lets you either append or replace the new content relative to any existing content in the file.
My.Computer.FileSystem.WriteAllText( _
fileNamePath, dataToWrite, True) ' True=append
One feature that has always been missing from Visual Basic is the ability to conveniently scan a delimited file (such as tab-delimited or comma-delimited) or a fixed-width-field file, and extract the fields on each line without a lot of extra parsing code. Visual Basic now includes the Microsoft.VisualBasic.FileIO.TextFieldParser object that simplifies this process. This object lets you indicate either a field delimiter (such as the tab character) or an array of column sizes. Once you associate it with a file path, it reads each data line, breaking up the distinct fields for you into a string array. The My.Computer.FileSystem.OpenTextFieldParser method opens the file and defines the parsing method in one fell swoop.
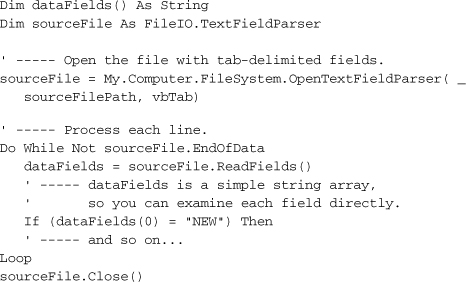
The TextFieldParser can also detect comment lines and ignore them silently. I am sure that it’s using a StreamReader secretly hidden inside the object’s black box. While the internals are hidden from view, the exposed features of this object make it a snap to process field-based text files.
Summary
Managing and manipulating files isn’t brain surgery. But with the file system as a major focus of any operating system, tools and methods for reading and updating files just seem to multiply like rabbits. The .NET Framework uses the Stream as its primary file interaction method, so this should help make things simpler. Of course, it piles dozens of wrapper classes on top of the basic stream, but that’s another issue.
As for the management of files and directories, .NET is going in the opposite direction, giving you more and more language and object features to perform the same basic tasks. Beyond the traditional Visual Basic and My namespace features introduced in this chapter, there are additional duplicate features in the .NET class libraries. Use the methods that meet your needs, and “file” the others away for future reference.
Project
I have some good news and some bad news. The bad news is that the Library Project does not make direct reads or writes of standard files, and has no need for file streams. That means we won’t be adding any code to the project in this chapter at all. The good news is that we still have interesting things to talk about. Besides, I figured that since you had reached the half-way point of the book, you could use a break.
Project Access
Chapter 15 does not include any project templates, so don’t bother looking in Visual Studio for them.
Configuring Log Output
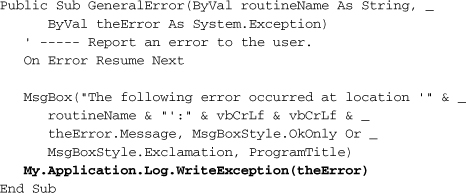
Whenever an error occurs in the Library application, the GeneralError routine first shows the error message to the user, and then logs it to any configured “log listeners.”
So, who’s listening? If you are running the program within Visual Studio, Visual Basic always configures a log listener that displays the text in the Immediate Window panel. But that doesn’t do much good in a compiled and deployed application.
You can design your own log listeners, but .NET also includes several predefined listeners, all of which can be enabled and configured through the application’s app.config file. If you access the “After” version of the project in Chapter 14, you will find content in its app.config file that sets up one such listener. Here’s a portion of that file, showing just the relevant sections.
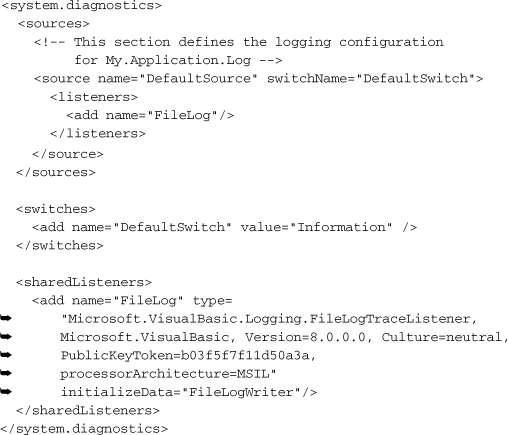
The <sharedListeners> section defines the details for a particular log listener. In this case, it’s the FileLogTraceListener listener, a class in the Microsoft.VisualBasic.Logging namespace. It’s enabled in the <source>/<listeners> section, where it’s included through an <add> tag. There’s a lot of stuff here that seems bizarre or extremely picky (such as the public key token). Fortunately, it’s all documented in MSDN if you ever need the details.
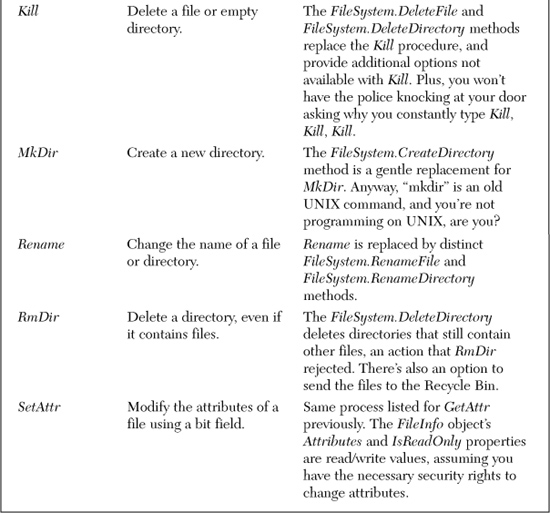
The FileLogTraceListener listener sends relevant logging data to an application-specific log file. By default, the file resides in the following:
![]()
The username part is replaced by the name of the current logged-in user. The Company, Product, and Version parts represent the company name, product name, and version number of your assembly as defined in its assembly attributes. AppName is the name of your application with the “.exe” extension stripped off. On my system, the log file for the Library Project appears here.
![]()
If you don’t like that location, you can change the output to any location you choose. To do it, you’ll need to alter the <add> tag in the <sharedListeners> section, adding two additional attributes to that tag.
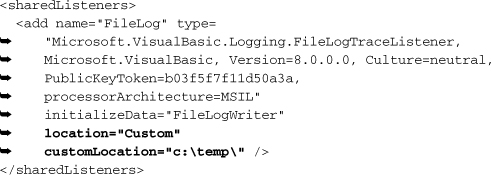
The new location and customLocation attributes do the trick. Set the customLocation attribute to the directory where the log file should go. These attributes link to properties of the same name in the FileLogTraceListener class. Visual Studio’s documentation describes these properties and attributes, plus others that are available for you to configure through app.config.
This app.config change is based on an MSDN article named “How to: Write Event Information to a Text File” that you can search for in your online help. (Use the Search feature, not the Index feature.)
Other Log Output Options
Another MSDN article, “Walkthrough: Changing Where My.Application.Log Writes Information,” describes how to send log output to more than just a simple text file. It discusses ways to log application information to the system Event Log, to a delimited file, to an XML-formatted file, and to the console display.
Some of the changes you need to make to the app.config file are, again, mysterious, so I’ll just list them here for your examination. Add the following content to the app.config file to define the available listeners.
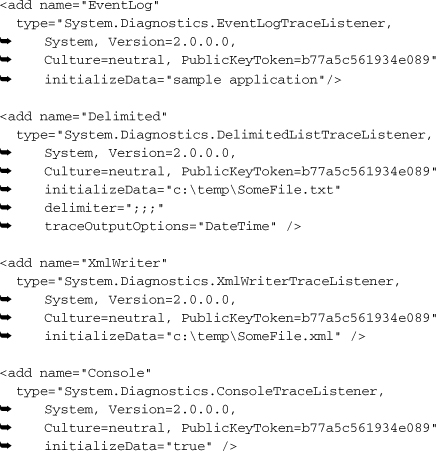
The initializeData attribute in each entry contains the values sent to the arguments of the relevant class constructor. Other attributes (except for type) modify the properties of the same name in the class specified through the type attribute. For all the options available to you for each listener, look up its class entry in the Visual Studio documentation.
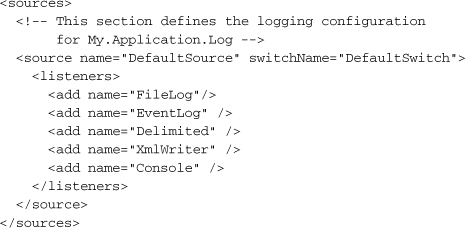
To enable any of these listeners, use an <add> tag in the <source>/<listeners> section. The following XML block enables all the listeners defined in this chapter project.
Obtaining a Barcode Font
Because we have a little time left, let’s talk about obtaining a barcode font. The Library Project will include barcode printing support, but only if you have a barcode font installed on your system. It’s no emergency, but you should obtain one before you reach Chapter 17, “GDI+,” where we develop the barcode configuration code.
When you downloaded the code for this book, it didn’t include a barcode font. It’s all due to licensing issues and the like, you understand. But barcode fonts are easy to get. You can purchase a professional barcode font if you want to, and if you plan on deploying this project into an actual library setting, you probably should. But if you’re only reading this book for the great humor, you can download one of the many free barcode fonts available on the Internet. I’ve included some links to barcode font providers on the Web site where you obtained the source code for this book. Even if you don’t plan on using the barcode printing features, I recommend that you download a free barcode font just so you can try out some of the Chapter 17 features.
Once you’ve installed the font, you will need to tell the Library program to use it. The settings form designed in the previous chapter included a selection field for this font. It’s the Barcode Font Name field on the System-Wide tab of the Maintenance form. You can see it in the middle of Figure 14-6. I made it a system-wide setting because it seemed best to have all administrators in a single library using a common font.
If your font is a “Code 3 of 9” barcode font (also called “Code 39”), make sure you select the Barcode is “Code 39” or “Code 3 of 9” field on that same form. (The provider of the font will let you know if it is a Code 3 of 9 font or not.) These fonts require an asterisk before and after the barcode number. Selecting this field will cause the Library program to add the asterisk characters automatically.
Well, I’m getting tired of talking about files, be they fonts or config files. In the next chapter, we’ll go back into the world of code and its fraternal twin, data.