
Chapter 11. Security
Secrets are funny things. With billions of people on the planet, there is no shortage of really interesting events and stories, but none of them will hold our interest if there is a secret to be discovered somewhere else. For instance, former Associate Director of the FBI, W. Mark Felt, revealed himself to be the famous Deep Throat of Watergate fame, but not before 30 years of speculation and whispering about this secret identity had passed by. Other secrets are just as intriguing, even if we are in on the secret. Superman is fascinating in part due to his secret alter ego, Clark Kent. Many books include the word “Secret” in their titles to make them and their topics more interesting, titles such as Japanese Cooking Secrets.
In this era of information overload and increasingly permissive moral standards on television, secrets seem to be scarce. But everyone has important information that they need to keep protected from others, and that includes the users of your programs. Fortunately, .NET programs and related data can be as secure as you need, if you use the security features available to you in the .NET Framework.
Here’s a secret that I’ll expose right now: I really don’t know that much about computer security issues. Back in the early ’80s, I worked for a computer vendor that was coming out with its own UNIX System V implementation. They needed to confirm that it would be sufficiently secure for governmental sales, and I was tasked with building a bibliography of computer security resources, including the famous “Orange Book,” a government security standards document whose title has no rhyme.
Although I don’t recall many of the security details, I do remember that it would take several city garbage trucks to haul away all of the available materials on computer security. The bibliography I developed was over 40 pages long! And that was just the table of contents. One article that I do recall was quite interesting. It discussed how passwords are generated in UNIX systems, at least back when AT&T was in charge. The interesting part was that the entire algorithm was printed in a publicly available book. Anyone could examine the book and see how the passwords were generated. And if you were familiar with UNIX, you knew that each user’s encrypted password was stored in plaintext in the file /etc/passwd. But it wasn’t a big deal. Although the method for deriving the password was public knowledge, and although you could see everyone’s encrypted password, UNIX was still considered secure enough for use even in the military.
Security Features in .NET
Security in .NET involves many features, but they fall generally into three major areas.
- Internal Security. Classes and class members in .NET can be protected via user-based or role-based security. This Code Access Security (CAS) exists to keep unauthorized users from accessing powerful libraries of .NET features. Only those users meeting a minimum or specific set of rights can use those protected features.
- External Security. Because anyone can develop and distribute a .NET application, it’s important to protect system resources from malicious code. This is a big issue, especially with the ongoing reports of hackers taking advantage of “buffer overrun” problems in released software from Microsoft and other vendors. Just as CAS keeps code from accessing certain features of a class, it interacts with the operating system to keep rogue code from accessing some or all files and directories, registry entries, network resources, hardware peripherals, or other .NET assemblies based on in-effect security policies.
- Data Security. Programs and computer resources aren’t the only things that need to be protected. Some highfalutin users think that their precious data is so important, that it deserves to be protected through “special” software means. Encryption, digital signatures, and other cryptographic features provide the “special” support needed for such data.
Because the Library Project interacts with a major external resource—a SQL Server database—it does deal with External Security issues, although indirectly through ADO.NET and system security policies. Still, because of this book’s focus on typical business application development, this chapter will not discuss either internal security or external security issues. Instead, it will focus on data security topics, especially the encryption of data.
Cryptography and Encryption
Knowing a secret is one thing. Keeping it safe and protected from others is another. Making sure an enemy doesn’t alter it while we’re blabbing—I mean, confiding—it to someone else is still another issue. Confirming that a secret coming from someone else is reliable is yet another issue. Making sure that I get the best deal on car insurance is again another issue entirely.
Clearly, data security is about more than just keeping a piece of data protected from prying eyes. And it’s not only prying eyes that concern us. Just yesterday I experienced the Windows “blue screen of death” when I tried to synchronize the data on my desktop system with my electronic handheld scheduler. The potential for data corruption through the normal everyday use of technology is vast. Fortunately, the word processor I am using to type this chapter is free f![]() ôm su©h ¢or®uptioñ¡
ôm su©h ¢or®uptioñ¡
Keeping Secrets
When people think about encryption and data security, they generally focus on the “keeping secrets” aspect. The ability to cryptographically encode content, keep it from an adversary, and still have it decoded by you or an associate at some later time is important. Encryption techniques range from simple language aberrations (such as Pig Latin) and replacement ciphers (letter substitutions, used in cryptogram puzzles) to complex enigma-machine-quality encoding systems.
Software-enabled encryption is now a part of our everyday experience. When you make credit card purchases from web sites, the chance is pretty good that your credit card information is encrypted and transferred in 128-bit secret fidelity.
Typical encryption methods make use of one or more keys, plus a combination of hashing functions and encryption algorithms, to convert sensitive content into a form that is not easily accessible without the original or related key. Symmetric cryptography is the name used for encryption methods using a single secret key.
Public-key encryption—also know as asymmetric cryptography—uses a pair of keys to encrypt and decrypt data. One of the keys, a public key, can be given to anyone who cares about communicating with you securely. You can even give it to your enemies; it’s public. The related private key is kept safe for your use; you never show it to anyone, not even your mother. Content encrypted using one of the keys (and an encryption algorithm) can only be decrypted later using the other key. If your friend encrypts some information using the public key, nobody except you will be able to decrypt it, and it will require your private key. You can also encrypt data with your private key, but anyone would be able to decrypt it with the public key. We’ll see uses for this seemingly insecure action a little bit later.
Data Stability
Data encryption helps ensure the integrity of a block of data, even if that data is not encrypted. If you send someone an email during a lightning storm, there is certainly the chance that some or all of the email content could be electronically altered before it reaches the recipient. Let’s say that some static in the transmission line just happens to cause one sentence of the content to be duplicated. Let’s say that some static in the transmission line just happens to cause one sentence of the content to be duplicated. How would you know whether it was the author trying to make some clever point, or simply a computer glitch?
Including a checksum with the content can help identify data problems during transmission. A checksum—sometimes called a hash value—takes the original content and passes it through a function that generates a short value that “represents” the original data. Checksum functions (or hashing algorithms) are very sensitive to even single-byte changes on the content, whether that single byte was altered, repositioned, added, or removed from the original data. By generating a checksum both before and after data transmission, you can confirm whether the content changed at all during the transfer.
Checksums represent a unidirectional encryption of the original data. It is impossible to use the checksum to obtain the original data content. That’s all right, though, because the purpose of a checksum is not to deliver content secretly, but to deliver it unchanged. Bidirectional encryption is what I talked about in the “Keeping Secrets” section. If you have the right key and the right algorithm, bidirectional encryption restores original content from encrypted content.
Identity Verification
Let’s say that you receive an email from your boss that says, “Order 50 copies of Tim Patrick’s newest book, and hurry.” How do you know this message is reliable, or really from your boss? In this case, the content alone should prove that it is trustworthy. But if you really wanted to verify the source, and your boss was unavailable, you could employ digital signatures to confirm the identity of the sender.
One method of using digital signatures employs public-key encryption to transmit an agreed-upon password or message, and passes that encrypted content along with the larger email. For instance, your boss could encrypt the text “I’m the boss” using his private key. When you receive the email, you could decrypt the digital signature using your boss’s public key. If the decryption resulted in the “I’m the boss” message, you would know that the message did, in fact, come from your boss.
Encryption in .NET
The data encryption and security features included with .NET appear in the System.Security.Cryptography namespace. Most of the classes in this namespace implement various well-known encryption algorithms that have been accepted by organizations and governments as dependable encryption standards. For instance, the DESCryptoServiceProvider class provides features based on the Data Encryption Standard (DES) algorithm, an algorithm originally developed by IBM in the mid-1970s.
Symmetric Cryptography
Symmetric cryptography uses a single secret key to both encrypt and decrypt a block of data. Although these algorithms are often quite fast (when compared to asymmetric cryptography), the need to share the full secret key with others in order to share data may make them inherently less secure. Still, for many applications, “secret key encryption” is sufficient.
The .NET Framework includes support for four symmetric encryption algorithms.
- Data Encryption Standard (DES), a 56-bit block cipher with primary support through the DESCryptoServiceProvider class. This algorithm is generally secure, but due to its small key size (smaller keys are more easily compromised), it is inappropriate for highly sensitive data.
- RC2 (Rivest Cipher number 2), a 56-bit block cipher with primary support through the RC2CryptoServiceProvider class. The cipher was originally developed by Lotus for use in its Lotus Notes product. It is not excitingly secure, but for this reason, it was given more favorable export freedoms by the United States government.
- Rijndael (derived from the names of its two designers, Daemen and Rijmen), a variable bit (between 128 to 256 bits) block cipher with primary support through the RijndaelManaged class. It is related to a similar algorithm named Advanced Encryption Standard (AES), and is the most secure of the secret key algorithms provided with .NET.
- Triple DES, a block cipher that uses the underlying DES algorithm three times to generate a more secure result, with primary support through the TripleDESCryptoServiceProvider class. Although more secure than plain DES, it is still much more vulnerable than the Rijndael or AES standard.
The various “provider” classes are tools that must be used together with other cryptography classes to work properly. For instance, this sample code (based on code found in the MSDN documentation) uses the DESCryptoServiceProvider and CryptoStream classes, both members of System.Security.Cryptography, to jointly encrypt and decrypt a block of text.
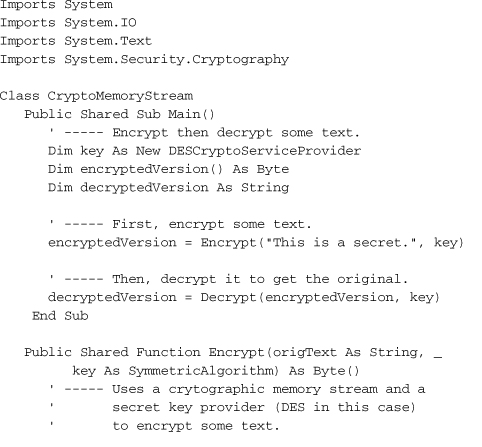
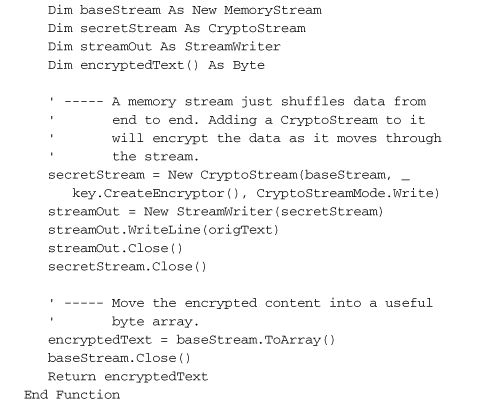
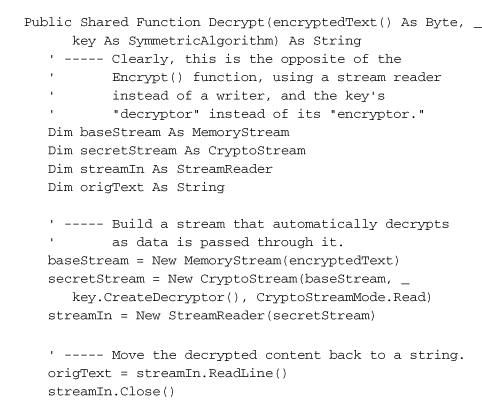

This code combines a DES encryption class with a Stream, a common tool in .NET applications for transferring data from one state or location to another. (Streams are a primary method used to read and write files.) Streams are not too hard to use, but the code still seems a little convoluted. Why doesn’t the DESCryptoServiceProvider class simply include Encrypt and Decrypt methods? That’s my question, at least. I’m sure it has something to do with keeping the class generic for use in many data environments. Still, as chunky as this code is, it’s sure a lot easier than writing the encryption code myself. And it’s general enough that I could swap in one of the other secret key algorithms without very much change in the code.
Asymmetric Cryptography
In secret key cryptography, you can use any old key you wish to support the encryption and decryption process. As long as you keep it a secret, the content of the key itself isn’t really too important. The same cannot be said, though, of asymmetric (public key) cryptography. Because separate keys are used to encrypt and decrypt the data, specific private and public keys must be crafted specifically as a pair. You can’t just select random public and private keys and hope that they work together.
The components used to support asymmetric cryptography include “generators” that emit public and private key pairs. Once generated, these keys can be used in your code to mask sensitive data. And due to the large key size, it’s very difficult for anyone to hack into your encrypted data.
Public key encryption is notoriously slow; it takes forever and a day to encode large amounts of data using the source key. This is one of the reasons that the Founding Fathers didn’t use public key encryption on the Declaration of Independence. Because of the sluggish performance of asymmetric encryption, many secure data systems use a combination of public-key and secret-key encryption to protect data. The initial authorization occurs with public-key processes, but once the secure channel opens, the data passed between the systems gets encrypted using faster secret-key methods.
.NET includes two public key cryptography classes for your encrypting and decrypting pleasure.
- Digital Signature Algorithm (DSA), an algorithm designed by the United States government for use in digital signatures, with primary support through the DSACryptoServiceProvider class.
- The RSA algorithm (named after its founders: Ron Rivest, Adi Shamir, and Len Adleman), an older though generally secure asymmetric algorithm, with primary support through the RSACryptoServiceProvider class.
I won’t be using asymmetric encryption in the Library Project. While the code needed to use these providers is interesting, and while the background information on prime number generation and large number factorization is fascinating, such discussions are beyond the scope of this book.
Hashing
Although hashing algorithms do not give you the ability to encrypt and decrypt data at will, they are useful in supporting systems that secure and verify data content. In fact, hashing is the one cryptography component that we will directly code in the Library Project, so stay alert.
Coming up with a hashing algorithm is easy. It took the best minds of the National Security Agency and the Massachusetts Institute of Technology to come up with reliable secret-key and public-key encryption systems, but you can develop a hashing algorithm in just a few minutes. A few years ago, I wrote my own hashing algorithm that I used for years in business applications. That fact alone should prove how simple and basic they can be. Here’s a hashing algorithm I just made up while I was sitting here.
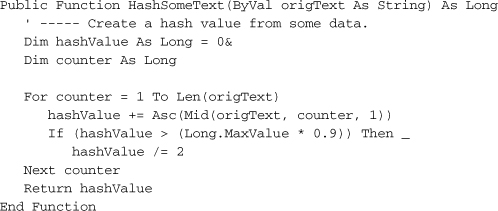
In the code, I just add up the ASCII values of each character in the text string, and return the result. I do a check in the loop to make sure I don’t exceed 90% of the maximum Long value; I don’t want to overflow the hashValue variable and generate an error. Although HashSomeText does generate a hashed representation of the input data, it also has some deficiencies.
- It’s pretty easy to guess from the hash value whether the incoming content was short or long. Shorter content will usually generate small numbers, and larger output values tend to indicate longer input content.
- It’s not very sensitive to some types of content changes. For instance, if you rearrange several characters in the content, it probably won’t impact the hash value. Changing a character will impact the value, but if you change one character from “A” to “B” and another nearby letter from “T” to “S,” the hash value will remain unchanged.
- The shorter the content, the greater the chance that two inputs will generate the same hash value.
Perhaps you want something a little more robust. If so, .NET includes several hashing tools.
- Hash-based Message Authentication Code (HMAC) calculated using the Secure Hash Algorithm number 1 (SHA-1) hash function, made available through the HMACSHA1 class. It uses a 160-bit hash code. There are no specific restrictions on the length of the secret key used in the calculation. While suitable for low-risk situations, the SHA-1 algorithm is susceptible to attack.
- Message Authentication Code (MAC) calculated using the Triple-DES secret key algorithms (described earlier), made available through the MACTripleDES class. The secret key used in the calculation is either 16 or 24 bytes long, and the generated value is 8 bytes in length.
- Message-Digest algorithm number 5 (MD5) hash calculation, made available through the MD5CryptoServiceProvider class. MD5 is yet another super-secret algorithm designed by Ron Rivest (that guy is amazing), but it has been shown to contain some flaws that could make it an encoding security risk. The resulting hash value is 128 bits long.
- Like the HMACSHA1 class, the SHA1Managed class computes a hash value using the SHA-1 hash function. However, it is written using .NET managed code only. HMACSHA1 and some of the other cryptographic features in .NET are simply wrappers around the older Cryptography API (CAPI), a pre-.NET DLL library. SHA1Managed uses a 160-bit hash code.
- Three other classes—SHA256Managed, SHA384Managed, and SHA512Managed—are similar to the SHA1Managed class, but use 256-bit, 384-bit, and 512-bit hash codes, respectively.
Each of these algorithms uses a secret key that must be included each time the hash is generated against the same set of input data. As long as the input data is unchanged, and the secret key is the same, the resulting hash value will also remain unchanged. By design, even the smallest change in the input data generates major changes in the output hash value.
Other Security Features
That about sums up the major security features in .NET. There are a few other interesting security-related features that I won’t discuss in detail, but they deserve at least a passing mention.
User Authentication and My.User
The Visual Basic My.User object includes several authentication features that can help you design security-enabled code. One useful member is the Name property, which supplies the name of the current authenticated user. The IsInRole method tells you whether or not the active user is included in, say, the Administrators security group.
For Windows Forms applications, the members of My.User will typically refer to the logged-in Windows user. However, you can use other authentication systems that meet your special development needs. Options include using the Internet-based Microsoft Passport system, other third-party authentication systems, or your own custom-designed user management system.
The SecureString Class
It’s amazing that with all of these advanced tools, programmers still spend much of their time building and parsing string data. Fortunately, .NET includes a plethora of useful string manipulation tools. Unfortunately, they aren’t very secure. You may recall that .NET strings are immutable; once created, they are never changed. Eventually, they will be destroyed by the garbage collection process. But until then, they sit around in memory, just waiting for some hacker-designed code to peruse. Internally, string data is stored as plain text, so if someone can get to the memory, they can copy the content for nefarious purposes.
SecureString to the rescue! The System.Security.SecureString class lets you store strings and get them back, but internally, the content of the string is encrypted. If anyone obtained the internal content of the class, it would look like gibberish.
Summary
When you write a business application for some other organization or department, you might not care all that much about the security and integrity of the data managed by the software tool. As long as the data gets from the user’s fingertips to the database and back, it’s all hunky-dory.
Although such views may work for many applications, there are systems and users that expect much more in the way of security. Sometimes, you need to ensure the security and integrity of the data managed by the application, especially if it will leave the confines of your software or associated database. The security features found in the System.Security.Cryptography namespace provide a fun variety of data hiding and restoration options.
Project
This chapter will see the following security-focused features added to the Library Project.
- The “login” form, which authenticates librarian and other administrative users.
- Security group and user management forms.
- A function that encrypts a user-supplied password.
- Activation of some application features that depend on user authentication.
Project Access
Load the “Chapter 11 (Before) Code” project, either through the New Project templates, or by accessing the project directly from the installation directory. To see the code in its final form, load “Chapter 11 (After) Code” instead.
Authentication Support
Because all of the library’s data is stored in a SQL Server database, we already use either Windows or SQL Server security to restrict access to the data itself. But once we connect to the database, we will use a custom authentication system to enable and disable features in the application. It’s there that we’ll put some of the .NET cryptography features into use.
Before adding the interesting code, we need to add some global variables that support security throughout the application. All of the global elements appear in the General.vb file, within the GeneralCode module.
Insert Snippet
Insert Chapter 11, Snippet Item 1.

Although we added it in a previous step, the LibrarySecurity enumeration is an important part of the security system. Its elements match those found in the Activity table in the Library database. Each enumeration value matches one element in the SecurityProfile array that we just added to the code.
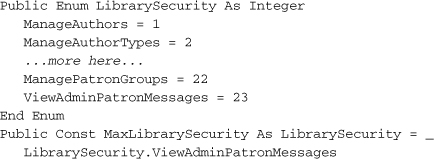
All of the newly added global variables store identity information for the active administrator. When a patron is the active user, the program sets all of these values to their default states. Because this should be done when the program first begins, we’ll add an InitializeSystem routine that is called on startup. It also appears in the General module.
Insert Snippet
Insert Chapter 11, Snippet Item 2.
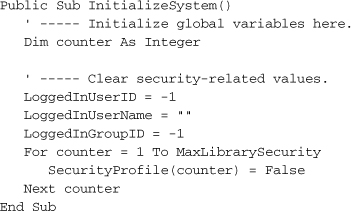
(The SecurityProfile array has items that range from 0 to MaxLibrarySecurity, but the loop at the end of this code starts from element 1. Because the Activity table starts its counting at 1, I decided to just skip element 0.) The InitializeSystem method is called from the MyApplication_Startup event in the ApplicationEvents.vb file, just before establishing a connection to the database. Let’s add that code now.
Insert Snippet
Insert Chapter 11, Snippet Item 3.
' ----- Perform general initialization.
InitializeSystem()
Each time that an administrator tries to use the system, and each time that the administrator logs off and returns the program to patron mode, all of the security-related global variables must be reset. This is done in the ReprocessSecuritySet method, added to the General module.
Insert Snippet
Insert Chapter 11, Snippet Item 4.
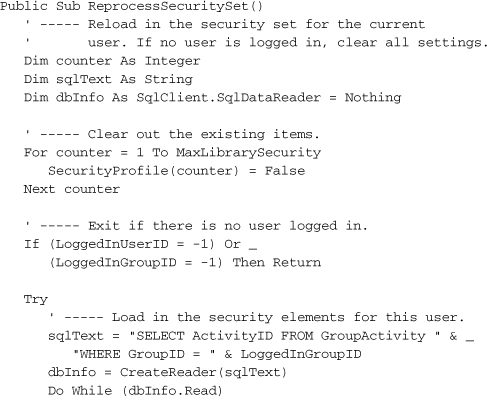
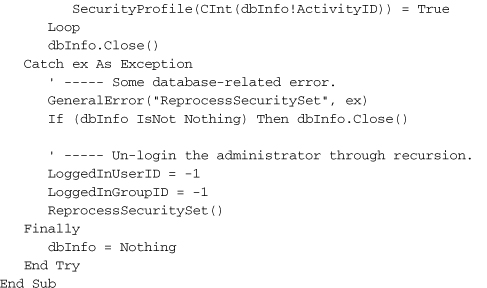
This routine uses code built in Chapter 10, “ADO.NET,” and other earlier chapters. When it detects an authorized user (the LoggedInUserID variable), it creates a SqlDataReader object with that user’s allowed security features, and stores those settings in the SecurityProfile array. Once loaded, any array element that is True represents an application feature that the administrator is authorized to use. I’ll discuss the GroupActivity table a little later in this project section.
If a database error occurs during processing, the code resets everything to patron mode, making a recursive call to ReprocessSecuritySet to clear the SecurityProfile array. (Recursion occurs when a routine directly or indirectly calls itself.)
Encrypting Passwords
The entire content of this chapter has been building to this very moment, the section where I reveal the winner of the next presidential election. Wait! Even better than that, I will use one of the .NET hashing methods to encrypt an administrator-supplied password before storing it in the database. One of the tables in the Library database, the UserName table, stores the basic security profile for each librarian or other administrative user, including a password. Because anyone who can get into the database will be able to see the passwords stored in this table, we will encrypt them to make them a little less tempting. (For patrons simply using the program, there shouldn’t be any direct access to the database apart from the application, but you never know about those frisky patrons.)
To keep things secure, we’ll scramble the user-entered password, using it to generate a hash value, and store the hash value in the database’s password field for the user. Later, when an administrative user wants to gain access to enhanced features, the program will again convert the entered password into a hash value, and compare that value to the on-record hashed password.
Each .NET hashing function depends on a secret code. Because the Library Project will only perform a unidirectional encryption, and it will never ask any other program to re-encrypt the password, we’ll just use the user’s login name as the “secret” key. I decided to use the HMACSHA1 hashing class, mostly for its ability to accept a variable-size key. Although it is reported to have security issues, that shouldn’t be a problem for the way that we’re using it. I mean, if someone actually got into the database trying to decrypt the passwords stored in the UserName table, they would already have full access to everything in the Library system.
Of course, the encryption code requires references to the System.Security.Cryptography namespace. We’ll also need a reference to System.Text for some of the support code. Add the relevant Import statements to the top of the General.vb code file.
Insert Snippet
Insert Chapter 11, Snippet Item 5.
Imports System.Text
Imports System.Security.Cryptography
The actual jumbling of the password occurs in the EncryptPassword routine, making its entrance in the General module.
Insert Snippet
Insert Chapter 11, Snippet Item 6.
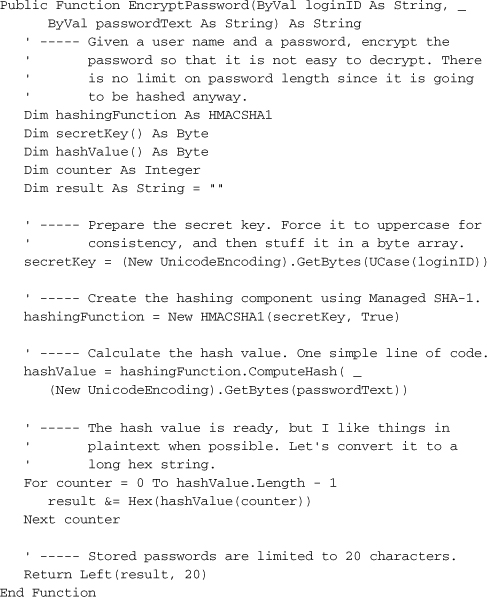
The primary methods of interacting with the security providers in .NET are via a byte array or a stream. I opted to use the byte array method, converting the incoming string values through the UnicodeEncoding object’s GetBytes method. Once stored as a byte array, I pass the login ID and password as arguments to the HMACSHA1 class’ features.
Although I could store the output of the ComputeHash method directly in a database field, I decided to convert the result into readable ASCII characters so that things wouldn’t look all weird when I issued SQL statements against the UserName table. My conversion is basic: Convert each byte into its printable hexadecimal equivalent using Visual Basic’s Hex function. Then just string the results together. The UserName.Password field only holds 20 characters, so I chop off anything longer.
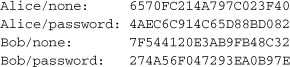
Just to make sure that this algorithm generates reasonable output, I called EncryptPassword with a few different inputs.
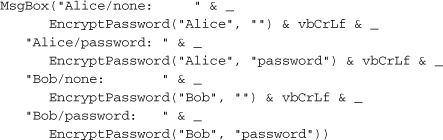
This code generated the following message.
Undoing Some Previous Changes
The UserName, GroupName, and GroupActivity tables in the database define the security profiles for each administrative user. Every user (a record in UserName) is part of one security group (a GroupName record). Each group includes access to zero or more enhanced application features; the GroupActivity table identifies which features match up to each security group record.
To manage these tables, we need to add property forms that edit the fields of a single database record. We already wrote some of the code awhile back. Chapter 8, “Classes and Inheritance,” defined the BaseCodeForm.vb file, a template for forms that edit single database records. That same chapter introduced the ListEditRecords.vb file, the “parent” form that displays a listing of already-defined database records. Our record editor for both users and security groups will use the features in these two existing forms.
Rant Alert
Your friendly author, Tim Patrick, is about to rant on and on about something that really bugs him. Why not join him in this rant?
When we designed the code for BaseCodeForm.vb in Chapter 8, my goal was to show you the MustInherit and MustOverride class features included with Visual Basic. They are pretty useful features. Unfortunately, they just don’t mix well with user interface elements, and here’s why: Visual Studio actually creates instances of your forms at design time so that you can interact with them inside the editor. If you were to delve into the source code for, say, a TextBox control, you would find special code that deals with design-time presentation of the control. Interesting? Yes. Flexible? Yes. Perfect in all cases? No.
The problem—and problem is putting it mildly—is that Visual Studio won’t (actually, can’t) create an instance of a class defined as MustInherit. That’s because you must inherit it through another class first before you create instances. What does this mean to you? It means that if you try to design a form that inherits from a MustInherit form template, Visual Studio will not present the user interface portion of the form for your editing enjoyment. You can still access the source code of the form, and if this is how you want to design the inherited form, that’s fine. But you and I are looking for simplicity in programming, and we plunked down good money for Visual Studio, so we’re certainly going to use its visual tools to edit our visual forms.
The upshot of all this ranting—and I’m almost at the end of my rant, but you can keep going on if you want—is that we must change the BaseCodeForm.vb file, removing the MustInherit and MustOverride keywords, and making other appropriate adjustments. I’ve already made the changes to both the before and after templates of the Chapter 11, “Security,” code.
This is part of the reality of programming in a complex system like Visual Studio. Sometimes, even after you have done all of your research and carefully mapped out the application features and structure, you run in to some designer- or compiler-specific behavior that forces you to make some change. Once you learn to avoid the major issues, you find that it doesn’t happen too often. But when it does occur, it can be a great time to rant.
Managing Security Groups
So, back to our GroupName record editor. I haven’t added it to the project yet, so let’s add it now. Because it will inherit from another form in the project, we have to allow Visual Studio to instantiate the base form by first compiling the application. This is easily done through the Build ![]() Build Library menu command.
Build Library menu command.
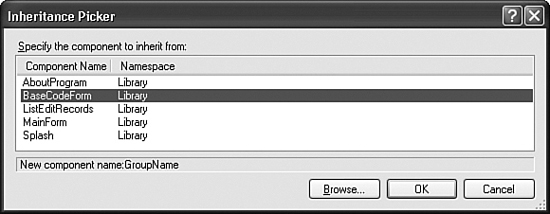
To create the new form, select the Project ![]() Add Windows Form menu command. When the Add New Item window appears, select “Inherited Form” from the Templates list. Enter “GroupName.vb” in the Name field, and then click the Add button. When the Inheritance Picker form appears (see Figure 11-1), select “BaseCodeForm” from the list, and click OK. The new GroupName form appears, but it looks remarkably like the BaseCodeForm form.
Add Windows Form menu command. When the Add New Item window appears, select “Inherited Form” from the Templates list. Enter “GroupName.vb” in the Name field, and then click the Add button. When the Inheritance Picker form appears (see Figure 11-1), select “BaseCodeForm” from the list, and click OK. The new GroupName form appears, but it looks remarkably like the BaseCodeForm form.
Figure 11-1. Who says you can’t pick your own relatives?
Add two Label controls, two TextBox controls, two Button controls, and a CheckedListBox control from the Toolbox, and set their properties using the following settings.
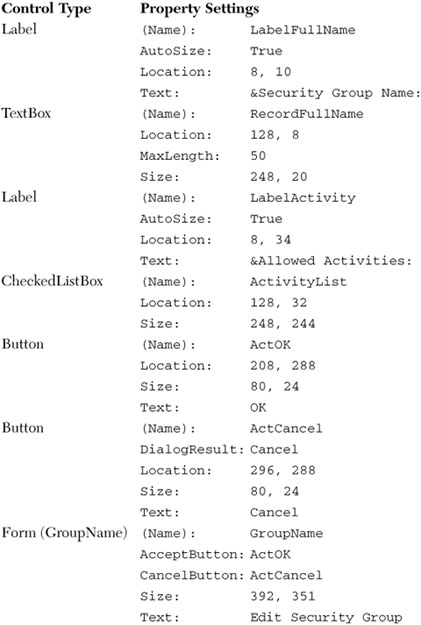
Don’t forget to adjust the tab order of the controls on the form.
Let’s add the code all at once. Add the next code snippet to the class source code body.
Insert Snippet
Insert Chapter 11, Snippet Item 7.
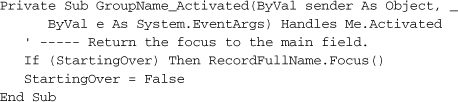
Hey, that’s nearly 300 lines of source code. Good typing. The class includes two private members. ActiveID holds the ID number of the currently displayed GroupName database record, or –1 when editing new records. The StartingOver flag is a little more interesting. Remember that we are using a shared summary form to display all of the already-entered GroupName records. To allow this generic form, ListEditRecords.vb, to work with the different record editors, we pass an instance of the detail form (GroupName.vb in this case) to the summary form.
ListEditRecords.ManageRecords(New Library.GroupName)
Within the ListEditRecords form’s code, the instance of GroupName is used over and over, each time the user wants to add or edit a GroupName database record. If the user edits one record, and then tries to edit another, the leftovers from the first record will still be in the detail form’s fields. Therefore, we will have to clear them each time we add or edit a different record. The StartingOver flag helps with that process by resetting the focus to the first detail form field in the form’s Activated event.
The related PrepareFormFields private method does the actual clearing and storing of data with each new Add or Edit call. For new records, it simply clears all entered data on the form. When editing an existing record, it retrieves the relevant data from the database, and stores saved values in the various on-form fields. The following statements display the stored group name in the RecordFullName field, a TextBox control.

Most of the routines in the GroupName form provide simple overrides for base members of the BaseCodeForm class. The CanUserAdd method, which simply returns False in the base class, includes actual logic in the inherited class. It uses the SecurityProfile array we added earlier to determine if the current user is allowed to add group records.

If you look through the added code, you’ll find overrides for all of the BaseCodeForm members except for the UsesSearch and SearchForRecord methods. The derived class accepts the default action for these two members.
The user adds, edits, and deletes group name records through the AddRecord, EditRecord, and DeleteRecord overrides, respectively, each called by code in the ListEditRecords form. Here’s the code for EditRecord.
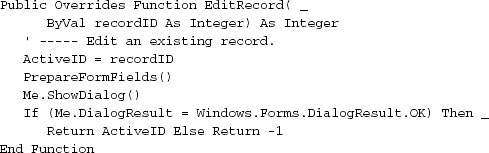
After storing the ID of the record to edit in the ActiveID private field, the code loads the data through the PrepareFormFields method, and prompts the user to edit the record with the Me.ShowDialog call. The form sticks around until some code or control sets the form’s DialogResult property. This is done in the ActOK_Click event, and also through the ActCancel button’s DialogResult property, which Visual Basic will assign to the form automatically when the user clicks the ActCancel button.
The AddRecord routine is just like EditRecord, but it assigns –1 to the ActiveID member to flag a new record. The DeleteRecord routine is more involved, and uses some of the database code we wrote in the last chapter.
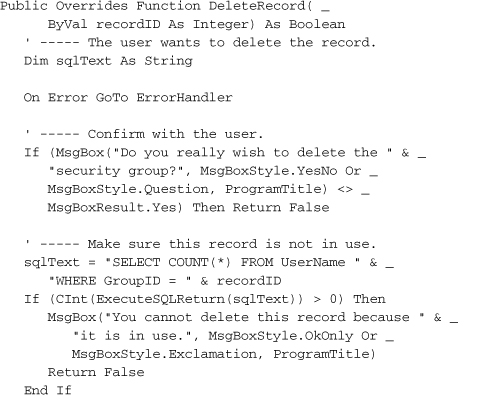
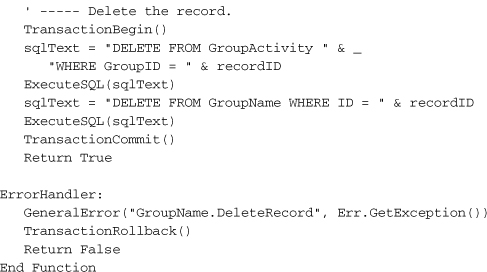
After confirming the delete with the user, a quick check is done to see if the group is still being used somewhere in the UserName table. If everything checks out fine, the record is deleted using a SQL DELETE statement. Because we need to delete data in two tables, I wrapped it all up in a transaction. If an error does occur, the error handler at the end of the routine will roll back the transaction through TransactionRollback.
Database Integrity Warning
If you have a background in database development, you have already seen the flaw in the delete code. Although I take the time to verify that the record is not in use before deleting it, it’s possible that some other user will use it between the time I check the record’s use and the time when I actually delete it. Based on the code and database configuration I’ve presented so far, it would indeed be an issue. When I designed this system, I expected that a single librarian would manage administrative tasks such as this, so I didn’t worry about such conflicts and “race conditions.”
If you are concerned about the potential for deleting in-use records through code like this, you can enable referential integrity on the relationships in the database. I established a relationship between the GroupName.ID and UserName.GroupID fields, but it’s for informational purposes only. You can reconfigure this relationship to have SQL Server enforce the relationship between the tables. If you do this, then it will not be possible to delete an in-use record; an error will occur in the program when you attempt it. That sounds good, and it is, but an overuse of referential integrity can slow down your data access. I will leave this configuration choice up to you.
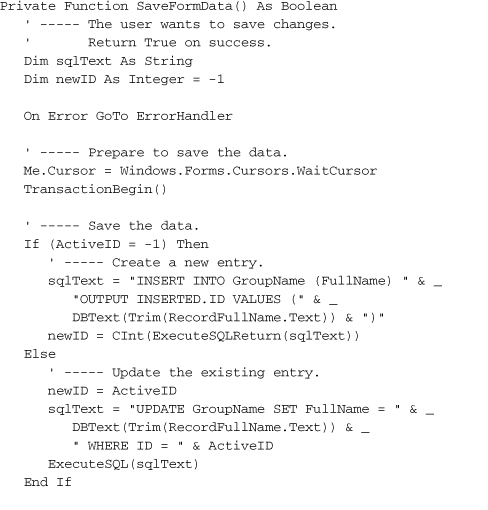
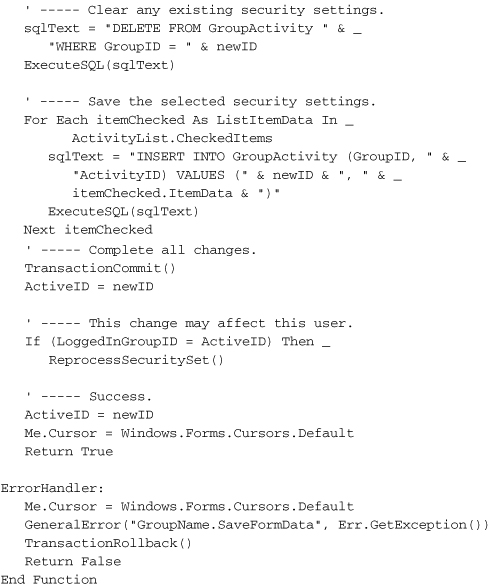
When the user is done making changes to the record, a click on the OK button pushes the data back out to the database. The ActOK_Click event handler verifies the data, and then saves it.
![]()
The ValidateFormData method does some simple checks for valid data, such as requiring that the user enter the security group name, and that it is unique. If everything looks good, the SaveFormData routine builds SQL statements that save the data.
Be sure to check out the other routines in the GroupName form; they exist to support and enhance the user experience.
Managing Users
We also need a form to manage records in the UserName table. Because the code for that form generally follows what we’ve already seen in the GroupName form, I won’t bore you with the details. I’ve already added UserName.vb to your project, but to prevent bugs in your code while you were in the middle of development, I disabled it (at least in the “Before” version of the code). To enable it, select the file in the Solution Explorer window. Then in the Properties panel, change the Build Action property from “None” to “Compile.”
The only interesting code in this form that is somewhat different from the GroupName form is the handling of the password. To keep things as secure as possible, I don’t actually load the saved password into the on-form Password field. It wouldn’t do any good anyway because I’ve stored the encrypted version.
Because I use the user’s Login ID as the secret key when encrypting the password, I must regenerate the password if the user ever changes the Login ID. The private OrigLoginID field keeps a copy of the Login ID when the form first opens, and checks for any changes when resaving the record. If changes occur, it regenerates the password.
passwordResult = EncryptPassword(Trim(RecordLoginID.Text), _
Trim(RecordPassword.Text))
Using the UserName and GroupName editing forms requires some additional code in the main form. Add it to the body of the General module.
Insert Snippet
Insert Chapter 11, Snippet Item 8.
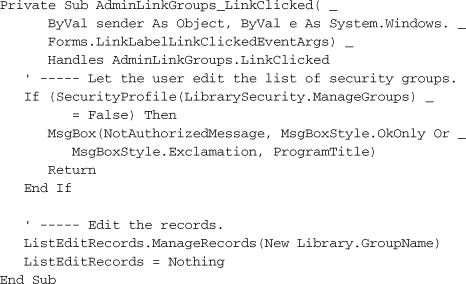
The AdminLinkGroups and AdminLinkUsers controls are web-style link labels that we added to the program a few chapters back. The LinkClicked event—not the Clicked event—triggers the display of the code editor. Here’s the code to edit the GroupName table.
Per-User Experience
Now that we have all of the security support code added to the project, we can start using those features to change the application experience for patrons and administrators. It’s not polite to tempt people with immense power, so it’s best to hide those features that are not accessible to the lowly and inherently less powerful patron users.
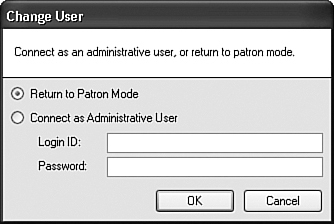
First, let’s provide the power of differentiation by adding the administrative login form, shown in Figure 11-2.
Figure 11-2. The official Library Project administrative login form
I’ve already added the ChangeUser.vb form to the project. If you’re using the “Before” version of this chapter’s code, select ChangeUser.vb in the Solution Explorer. Then change its Build Action property (in the Properties panel) from “None” to “Compile,” just as you did with the UserName.vb form.
All of the hard work occurs in the form’s ActOK_Click event. If the user selects the Return to Patron Mode option, all security values are cleared, and the Main form hides most features (through code added later).
This form gets connected into the application through the Main form’s ActLogin _Click event. Open the MainForm.vb file, double-click on the Login button in the upper-right corner, and add the following code to the Click event template that appears.
Insert Snippet
Insert Chapter 11, Snippet Item 9.
' ----- Prompt the user for patron or administrative mode.
ShowLoginForm()
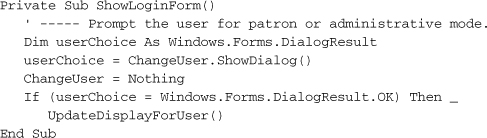
That wasn’t much code. Add the ShowLoginForm method’s code to the form as well.
Insert Snippet
Insert Chapter 11, Snippet Item 10.
Let’s also enable the F12 key to act as a login trigger. Add the following code to the Select Case statement in the MainForm_KeyDown event handler.
Insert Snippet
Insert Chapter 11, Snippet Item 11.

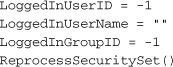
The ShowLoginForm routine calls another method, UpdateDisplayForUser, that hides and shows various display elements on the main form based on the security profile of the current user. Add it to the MainForm class code. I won’t show the code here, but basically it looks at the LoggedInUserID variable, and if it is set to –1, it hides all of the controls for advanced features.
Insert Snippet
Insert Chapter 11, Snippet Item 12.
Currently, when you run the application, all of the advanced features appear, even though no administrator has supplied an ID or password. Calling UpdateDisplayForUser when the Main form first appears solves that problem. Add the following code to the end of the MainForm_Load method.
Insert Snippet
Insert Chapter 11, Snippet Item 13.
' ----- Prepare for a patron user.
UpdateDisplayForUser()
The last update (five updates, actually) involves limiting the major sections of the form to just authorized administrators. For instance, only administrators who are authorized to run reports should be able to access the reporting panel on the main form. Locate the TaskReports method in the Main form, and find the line that displays the panel.
PanelReports.Visible = True
Replace this line with the following code.
Insert Snippet
Insert Chapter 11, Snippet Item 14.
If (SecurityProfile(LibrarySecurity.RunReports)) Then _
PanelReports.Visible = True
We need to do the same thing in the TaskCheckOut, TaskCheckIn, TaskAdmin, and TaskProcess methods. In each case, replace the line that reads:
Panel???.Visible = True
with code that checks the security settings before showing the panel.
Insert Snippet
Insert Chapter 11, Snippet Items 15 through 18.
- Use Snippet 15 for TaskCheckOut.
- Use Snippet 16 for TaskCheckIn.
- Use Snippet 17 for TaskAdmin.
- Use Snippet 18 for TaskProcess.
Run the program, and you’ll see that it’s starting to look like a real application. If you want access to the enhanced features, try a Login ID of “admin” with no password. You can change that through the UserName form if you want!
Because we have a way to secure access to the data and features of the Library Project, let’s move to the next chapter and start focusing on the data, the focal point of any business application.