
Choose Backup Hardware
Depending on what you decided in Choose Local or Network Backups, you’re likely going to need one or more external hard drives or SSDs for your backups. (Even if you use network storage or a cloud backup service, you’ll need a separate external drive if you want to store a bootable duplicate.) You can find hard drives and SSDs with every imaginable combination of capacity, speed, interface, and case design—as well as devices that incorporate more than one hard drive or SSD in a single unit—and the selection changes constantly.
In this chapter, I start by addressing the increasingly important question of hard drives versus SSDs. Then I walk you through the calculations of how much storage capacity you’ll need for backups (see Decide on Capacity). Next, in Decide on a Storage Configuration, I help you understand whether you should be looking for standalone drives, a RAID or other multi-drive DAS enclosure, a NAS or similar network storage device, or drives you’ll hook up to another computer on your network that will function as a backup server. I end the chapter with a few thoughts on Hardware You Should Probably Avoid.
Choose Hard Drives, SSDs, or Both
In previous editions of this book, I took it for granted that almost all readers would use external hard drives for local backups. But the landscape is changing, and that’s no longer the obvious default. As I explained in The APFS File System and elsewhere, changes in macOS now make SSDs all but obligatory for bootable duplicates. And, although prices are still quite high for larger SSD capacities, some people may even consider SSDs reasonable choices for versioned backups.
The nice thing about using hard drives was that most people could purchase a single, inexpensive, high-capacity drive and partition it to use for both bootable duplicates and versioned backups (see Decide How Many Drives to Buy, later in this chapter). But because APFS is now mandatory, and booting from an APFS-formatted hard drive is excruciatingly slow, that approach no longer makes sense. Instead, the approaches you should now consider are the following:
Hard drive(s) only: If you’ve read Why Create Bootable Duplicates (or Not)? and determined that bootable duplicates aren’t sufficiently important to you to merit the additional cost of SSDs and the hassle of using multiple drives for your backups, you can choose one or more hard drives to hold your versioned backups and call it a day. Even if they’re formatted as APFS, mechanical hard drives are generally fast enough for backing up and restoring files; you just don’t want to boot from them.
SSD(s) only: If you do want to make bootable duplicates, if speed and convenience are your top priorities, and if you can afford it given the amount of data you have (see Decide on Capacity, next), you can buy one or more high-capacity external SSDs and partition them for both bootable duplicates and versioned backups. (Or, if you prefer, buy one SSD for duplicates and another for versioned backups.) Note that if you ever intend to boot an M-series Mac from your SSD, you should buy a Thunderbolt 3 or 4 SSD and not just a USB 3.x model, even though both use the USB-C connector.
Hard drive(s) plus SSD(s): If you want to make bootable duplicates but can’t quite afford enough SSD storage to cover versioned duplicates, you can buy a smaller-capacity SSD plus a smaller-capacity hard drive.
If you choose to forgo bootable duplicates and back up your Mac(s) over a network, you’ll almost certainly be storing the backups on a hard drive, either built into a NAS or connected to another Mac (see Network Backups). Given the speed bottleneck of even a fast, wired network, SSDs provide little value for network backups.
Decide on Capacity
Apart from whether it’s an SSD or a hard drive, the most important consideration in a backup drive is its capacity—how many terabytes of data it will hold. In general, the bigger, the better. In fact, I could simply recommend, as a rule of thumb, that you get the largest drive you can afford. However, if you can’t afford an especially large drive, or if the amount of data you have to back up is exceptionally large, you may want more guidance. So, figure out the size you’ll need for duplicates, then the size you’ll need for versioned backups, and finally the total size to look for.
Duplicate Size
If you’re creating a bootable duplicate, you’ll store on your external SSD an exact, complete copy of your Mac’s startup volume. (If you use a NAS or other network storage destination, you’ll need an entirely separate drive for this purpose.) But the volume that stores your duplicate needs to be only as large as the amount of data on your startup volume, not necessarily the whole disk.
For example, if your Mac came with 1 TB of storage but you’ve filled up only 500 GB of that space, you can fit a duplicate on a 500 GB disk or partition. (If you’re creating Bootable Duplicates with Versioning, you’ll need to add more space to accommodate the older versions.) Over time, though, you’ll add more files to your Mac, so if you cut it that close, you’ll soon outgrow your backup drive. Therefore, I suggest that you allot at least one and a half times the amount of space currently occupied on your startup volume for a duplicate. So, if you have 500 GB of data on your startup volume, you want at least 750 GB for the duplicate. More space is better, to give you even more room to grow.
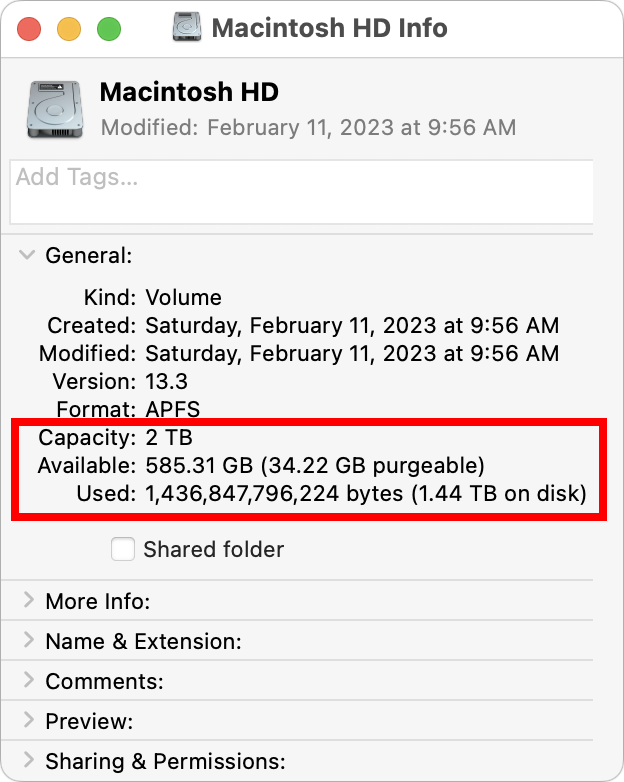
To find out how much space on your startup volume is being used, select the your disk’s icon in the sidebar of any Finder window. Then press ⌘-I to display the Info window (Figure 1), which lists, among other things, the volume’s total capacity, available (free) space, and used space. You can’t always trust the Used figure, because it may not include “purgeable” space—that is, data that can be safely overwritten. Instead, subtract the Available figure from the Capacity figure to find out how much space is being used.
Follow the same procedure if you choose to make duplicates of non-startup volumes (such as external disks used for supplemental storage; see Create a Data-Only Duplicate). You can either add the figures and buy a single huge drive (but see also Consider RAIDs and RAID-Like Tech) or buy separate backup drives for each one.
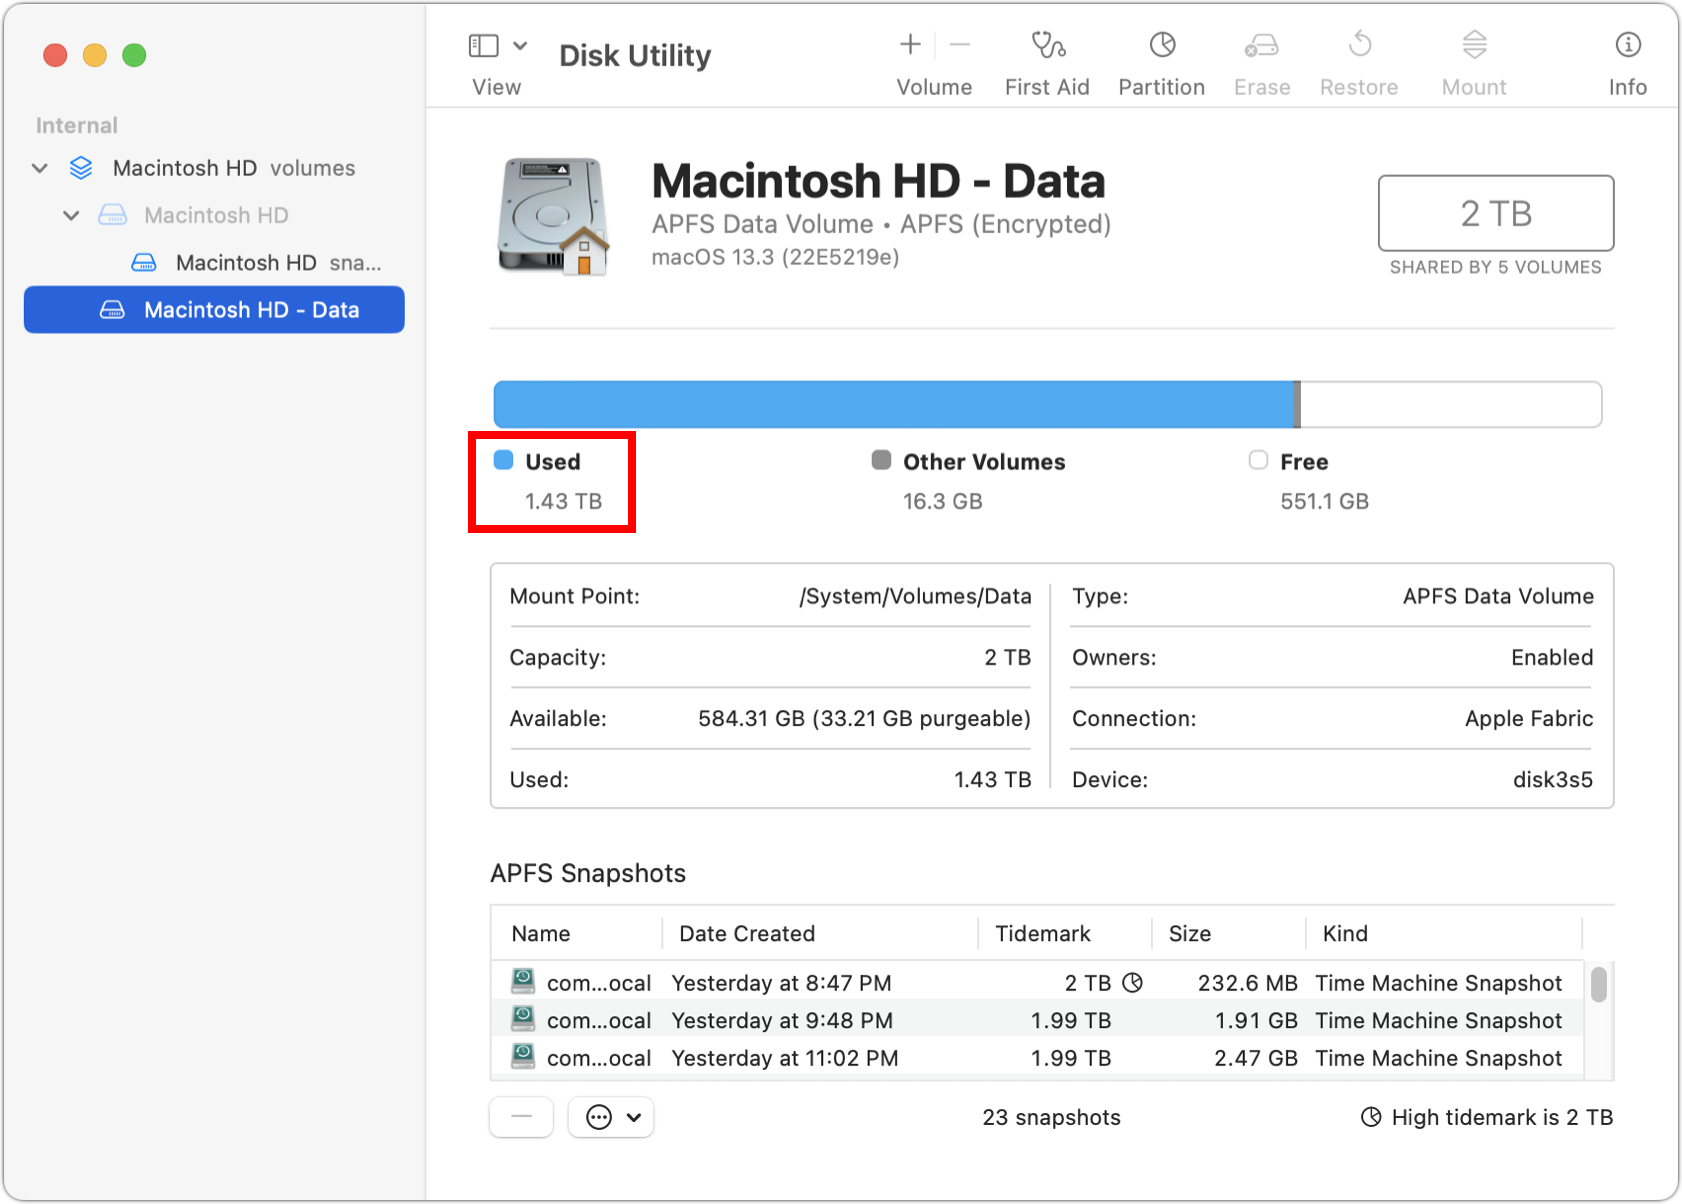
What about data-only duplicates (see Create a Data-Only Duplicate)? Since you’re not duplicating the system, you need slightly less space—only enough space for the Data volume. But you can’t easily find that volume’s size in the Finder. Instead, open Disk Utility (in /Applications/Utilities) and select the Data volume, called Macintosh HD - Data by default, in the sidebar (Figure 2). The amount of space used appears under Used.
Versioned Backup Size
Time Machine requires that your destination volume have, as a bare minimum, 1.2 times the space occupied by the data you’re backing up. (That gives some extra space to store multiple versions of at least some files.) So, as a first pass, multiply the value you calculated from the Get Info window by 1.2 to find out the smallest volume size Time Machine can use. (If you plan to back up additional disks to the same backup volume, be sure to factor in their sizes before multiplying by 1.2.)
I must emphasize that multiplying by 1.2 gives you a rock-bottom minimum. You’ll be far better off setting aside 1.5, 2, or even 3 times the amount of space used on your disk for backups. The reason is simple: the more space Time Machine has to work with on the destination drive, the more backups it can store—and the further back in time you can reach when you restore data.
If you’re not using Time Machine, the general principle still holds that you’ll want more free space than is currently occupied on your drive, with a bit of a cushion. Most other backup software offers compression, deduplication, and/or delta encoding, all of which make your files take up less space on the backup drive than they otherwise would. So, for most people, having free space equal to 1.5 times the amount of data you want to back up should be adequate. But, again, more space is always better.
Total Size
If you’re using separate drives for your versioned backup and a bootable duplicate (if any), you’re done; you already know how large those drives should be. I’ve mentioned a few times that I no longer routinely recommend storing versioned backups and a bootable duplicate on two partitions of the same drive, but if you do go that route—on an external SSD, remember!—you must now add those two numbers together. For example, if you have 500 GB worth of data, you might choose to allot 750 GB for a duplicate and another 750 GB for versioned backups, bringing the total to a tidy 1.5 TB. That means you should look for a 1.5 TB or larger-capacity drive. But also consider the next-larger size, which is typically 2 TB. If the cost difference is small, as it probably will be, you’ll be glad for that extra capacity later on.
You can use a single drive to back up more than one Mac (as I discuss later, in Choose Local or Network Backups and, more specifically—in the context of Time Machine—in Use a Single Backup Disk with Multiple Macs). And if you have a few Macs, each with only a modest amount of data to back up, combining backups on a single drive makes sense. Be sure to calculate the space needed for all the Macs you intend to back up and add them together before deciding which drive to buy.
Now that you have a total, keep that number handy as you go through the rest of the chapter. If you’re looking at a very large number for your total storage capacity—that is, more than you can fit on even the largest hard drive you can find—don’t panic. We’ll address that issue shortly.
Decide on a Storage Configuration
Back in Choose Local or Network Backups, you decided whether you’ll attach your backup storage directly to your Mac, access it over your network, or do both. Now that you also know how much storage space you’ll need, you have additional decisions to make:
For local (directly connected) devices:
Will you use one or more individual hard drives or SSDs, or a multi-drive enclosure of some sort? Read Decide How Many Drives to Buy, followed by Consider RAIDs and RAID-Like Tech.
What interface should you use? Read Choose an Interface.
For network backups:
Will you use a standalone device (such as a NAS)—and if so, which one? Read Network Storage Devices.
Or, will you use external drives connected to a Mac on your network? Read Local Network Servers.
If you already know your area of interest, use the links above to jump right to a topic; otherwise, feel free to read through them all in turn.
Decide How Many Drives to Buy
Almost every Mac user who is setting up a backup regimen will need to buy or otherwise obtain at least one drive to hold backups. But do you need just one drive or several? And if you’re backing up to a NAS or the cloud, does that count as a drive? Although you could take any of numerous paths, here are my recommendations.
Drives for Local Backups
Let’s start with what I consider the default configuration, suitable for the vast majority of people with a single Mac: you have one external hard drive, large enough to hold your versioned backups (see Versioned Backup Size), plus, if you’re creating bootable duplicates, an external SSD the same size as your Mac’s internal storage. That’s the basic setup: one or maybe two drives.
Now, that starting point doesn’t take into account offsite backups (see Store an Extra Backup Offsite, later in the book). If you choose to use online backups for your secondary, offsite backup, you’re done; you already have what you need for two independent backup media, one of which is offsite. If, however, you want to store two backups on separate drives and manually rotate them between local and offsite locations, add a second drive for versioned backups. (I think a second bootable duplicate, rotated offsite, is overkill, but you could do that if you want.)
If you have more than one Mac, the calculus gets trickier. You can, of course, buy those same one or two drives for each of your Macs. However:
The more Macs you have, the stronger the argument for backing them all up over the network to a NAS, or to another Mac functioning as a server. If you do that, you might have zero external drives for local versioned backups.
If, for whatever reason, you prefer not to use network backups, you can still use a higher-capacity hard drive for Time Machine (or other versioned backups), manually moving it from Mac to Mac. In my opinion, that extra daily effort defeats the purpose of automated backups, but it would certainly lower your hardware costs.
Unfortunately, bootable duplicates of Big Sur and later work only with the architecture (Intel or M-series) on which they were created, so if you have a mixture of older and newer Macs, you can’t use a single duplicate for all of them. But just as I think it’s increasingly unnecessary to have bootable duplicates at all, having a separate bootable duplicate of each of your Macs is truly excessive.
Drives for Network Backups
If you’ve opted for network backups, your only decision is which NAS configuration to buy (see Network Storage Devices) or which drive you’ll connect to the Mac you’re using as a backup server (see Local Network Servers). Almost always, the result will be a single drive (or at least a single NAS—possibly with multiple drives).
Changing Your Setup
If you already had what once seemed like the proper number of drives but you’re now changing your setup (whether due to preference or necessity), you may end up repurposing an old drive. For example, a drive that was once used for both bootable duplicates and versioned backups might be used only for versioned backups from now on.
In such cases, the cleanest and most reliable approach is to reformat the drive using Disk Utility and restart your backups from scratch, though of course in the process you’ll erase all the old backups from that drive. In some cases, it is possible to remove an unneeded partition from a drive and expand an existing partition to fill up the now-unused space without losing any data; however, the exact method depends on the disk format and other variables, and the details are more complex than I can get into in this book.
Consider RAIDs and RAID-Like Tech
RAID stands for Redundant Array of Inexpensive Disks (or, more commonly now, Redundant Array of Independent Disks); it’s a way of combining several physical hard drives or SSDs into a single logical volume using either software (a software RAID) or a special hardware controller (a hardware RAID). Of the numerous ways to configure a RAID, two are particularly relevant to the discussion of backups:
Striped: A striped RAID (or RAID 0) alternates between two or more disks when writing segments of data. (So, the capacity of the RAID is equal to the total capacity of the member disks.) Striped RAIDs let you combine multiple disks into larger volumes with faster performance (since all disks can be accessed in parallel), but if an error occurs on any disk, the entire RAID will fail.
Mirrored: A mirrored RAID (or RAID 1) writes the same data simultaneously to two or more disks. (So, the RAID capacity equals the capacity of the smallest member disk.) If any one drive fails, another can take over instantly and seamlessly with no loss of data and no down time; you can then replace the faulty drive at your leisure.
RAIDs with more than two disks can have other configurations, including RAID levels 2 through 6 and several combinations of levels, thus providing the benefits of both striping and mirroring at the same time. (You can read about the various forms of RAID in Wikipedia.)
The industry-standard RAID types generally work best when all the drives have the same capacity, because a RAID assumes that data will be divided or distributed evenly across drives. If you have a mixture of sizes in a RAID, the smallest-capacity drive in the set defines the amount of space each drive can use, so any extra capacity is wasted. Some equipment manufacturers, however, use proprietary methods to avoid this limitation. For example, Synology Hybrid RAID (SHR), used in many Synology NAS models, can adapt to drives of differing sizes and still use all the capacity of each one.
Before I explain why you might care about a RAID, I want to mention a couple of technologies that look superficially like RAID but are in fact quite different underneath:
JBOD: Some manufacturers sell enclosures for multiple disks that share a power supply, controller, and interface(s)—but each of these disks is independently accessible from your computer. Although you could use software to combine them into a RAID, in their native state they’re JBOD (Just a Bunch of Disks).
Concatenation: You can also use either hardware or software to combine two or more independent disks into a single logical volume whose size is the total of all the disks combined. That might sound like a striped RAID, but the data doesn’t alternate between disks; it’s stored sequentially, so there’s neither a performance benefit as with RAID 0 nor data redundancy as with RAID 1—and if any one drive fails, the whole volume can fail. Concatenated disks sometimes go by the names BIG or SPAN (which don’t stand for anything) and are sometimes incorrectly referred to as RAIDs. The size of a concatenated volume is equal to the sum of the sizes of all its member disks.
Why You Might Care About a Striped RAID, JBOD, or Concatenated Storage
The highest-capacity individual hard drive mechanism available to the general public in early 2023 holds 22 TB, though drives with capacities as high as 26 TB exist. (At publication time, prices for 22 TB drives start at around $500.) But if you have more than 22 TB of data to back up, there’s a solution: a number of companies sell devices that appear to be external hard drives but hold more than 22 TB, because their cases contain multiple drive mechanisms (for example, two 12 TB disks). The enclosure’s circuitry combines the two disks into a larger volume; sometimes it’s a high-performance striped RAID 0 volume, sometimes it’s merely concatenated, and sometimes it’s JBOD but with hardware or software features that let you reconfigure it as a RAID (perhaps even a mirrored RAID 1, for more fault tolerance but half the capacity).
The good news is that such devices offer the benefit of a large, fast disk without making you cobble together your own hardware- or software-based RAID and deal with lots of boxes and cables. The bad news is that if you use RAID 0 and a mechanism in your enclosure dies, you could lose all the data on both drives. Even in the best case, you’ll have to send the device back to the manufacturer for repair. And, if one of two or more concatenated disks fails, you may not be able to get the data on the remaining disk(s) without the manufacturer’s intervention.
I’m not saying you should avoid such devices; I’m saying you should know what you’re getting into if you rely on them. Mathematically, your chances of losing the data on RAID 0 or concatenated disks are at least double that of a single mechanism of the same type. So if you get a multi-drive enclosure and have the choice, I suggest that you use RAID 1 or higher, because all levels of RAID beyond 0 offer redundancy to protect data in case of drive failure (along with a reduction in capacity).
Why You Might Care About a Mirrored RAID
Mirrored RAIDs have at least two copies of your data, so, unlike striped RAIDs, they protect you against drive failure. The downside is that you need twice as many drives for a given amount of capacity. There were once some interesting backup scenarios involving mirrored RAIDs, but nowadays (see the sidebar RAIDs as Startup Volumes, just above) the only value a mirrored RAID would provide is insurance against the failure of one of the drives you use for versioned backups. That’s not nothing, but it’s also not much, especially considering that you likely already have a separate copy of your versioned backups stored in the cloud or otherwise offsite.
Choose an Interface
Your hard drive, SSD, RAID, or other multi-drive enclosure will use one of several interfaces to connect to your Mac: Thunderbolt, Thunderbolt 2, Thunderbolt 3, Thunderbolt 4, USB4, and one or more of the many flavors of USB 3.x (see the sidebar USB 3.x, USB4, USB-C, and Thunderbolt 3 & 4, ahead). You can buy drives with various combinations of these interfaces. In general, drives with a single interface are less expensive than drives with more than one, and as single-interface drives go, USB 3.0 drives tend to be the cheapest, while Thunderbolt 4 is the most expensive. However, money isn’t the only consideration.
When considering which interface(s) to get, keep in mind the following factors:
Speed: In general, the faster the interface’s transfer speed, the less time it will take to back up and restore files. However, after an initial full backup, extra speed offers much less benefit for backups than it does for, say, real-time video editing; since backups typically happen in the background anyway, you may not notice the speed boost from a faster interface.
On paper, the theoretical speed with which these interfaces can transfer data goes in this order, from slowest to fastest: USB 3.0 and USB 3.1 Gen 1 (5 Gbps); Thunderbolt and USB 3.1 Gen 2 (10 Gbps); Thunderbolt 2 and USB 3.2 (20 Gbps); and Thunderbolt 3, Thunderbolt 4, and USB4 (40 Gbps). However, note that theoretical speeds don’t necessarily match up to real-world performance. In addition, be aware that for nearly all modern hard drives (though not necessarily SSDs), the bottleneck is their built-in SATA III interface, which maxes out at 6 Gbps. That means that for single hard drives, a higher-speed interface (such as Thunderbolt 2 or 3) won’t provide speed benefits over Thunderbolt or USB 3.1 Gen 2.
Hardware support: Recent Macs have ports supporting one or more of the following standards: USB 3.0, USB 3.1, Thunderbolt 3, and Thunderbolt 4 (see the sidebar USB 3.x, USB4, USB-C, and Thunderbolt 3 & 4, ahead). You should, however, think about not only what interface(s) your current Mac has but also what your next Mac will have. Apple has completely phased out the old FireWire and USB 2.0 interfaces. USB 3.0 is still hanging on, but barely, while USB 3.2, USB4, Thunderbolt 3, and Thunderbolt 4 (all of which share the same connector) are the interfaces most likely to be with us for years into the future.
The newest Macs with M-series chips feature Thunderbolt 3 or 4 ports that are mostly backward-compatible with USB 3.1 Gen 2, but some USB 3.1 SSDs don’t function as boot drives; for that purpose, the safe choice is drives that natively offer Thunderbolt 3 or 4.
So, what’s the bottom line? If your Mac supports Thunderbolt 3 or 4, the safest and most future-proof choice is to buy storage devices that use Thunderbolt 3 or 4 or USB4 (all of which are cross-compatible, so it doesn’t particularly matter which variety you get). But those interfaces also tend to be the most expensive at this point. The next-best choice—and the only right choice if your Mac lacks Thunderbolt 3 or 4—is USB 3.2, preferably one of the faster (20 Gbps) variants.
Evaluate Network Storage Options
If you know that you’ll be using network backups—alone or in combination with local drives—you’ll next want to figure out whether to use a standalone appliance for this purpose, and if so, which one (see Network Storage Devices, next), or whether to use another computer on your network as a backup server (see Local Network Servers).
Network Storage Devices
The term NAS, or network-attached storage, typically refers to a box containing one or more hard drives, a bit of computing power, and a wired or wireless network interface. (Sometimes NAS devices are simply called network drives.)
NAS devices are frequently marketed as backup (and all-purpose file storage) solutions for small networks. The idea is that you can set up a centralized file server without needing an additional computer, and every computer on your network can back up files to it. Some NAS equipment can also communicate with your home entertainment system, providing storage for audio and video. And NAS devices that use the Btrfs file system can take snapshots of your data manually or at scheduled intervals, which produces an effect similar to storing versioned backups or APFS snapshots: you can at any time restore your data to its state when a snapshot was taken.
Although a NAS device can indeed be useful in many situations, you should keep in mind a few important considerations when thinking about using one as a backup destination:
Some NAS models can run their own backup software (that is, the NAS runs the server app, and each of your Macs runs a client). That’s a perfectly valid setup, but because you can’t install just any arbitrary backup software on any given NAS, you may be stuck with whatever app the manufacturer offers, or whatever third-party options may be available for that particular platform. This approach may limit your flexibility and prevent you from setting up your backups in precisely the way you’d prefer.
If your NAS can’t run its own backup software, or if you’re unhappy with the software it offers, you can still use it for push backups (see Network Backup Approaches) and run the backup app of your choice on each Mac. Performance and reliability may take a hit over what client-server backups offer, however.
Irrespective of the points above, many NAS models support Time Machine. If the model you choose does, you can follow the manufacturer’s instructions to set it up as a destination for your Macs. But be sure to confirm compatibility before you make your purchase.
You can’t create a bootable duplicate onto a NAS (and even if you could, you wouldn’t be able to boot your Mac from it).
And don’t forget, your NAS itself should be backed up to another destination; see Back Up a NAS.
All that said, with the right hardware and software a NAS can make an excellent storage medium for versioned backups of several computers’ files, and thus is a valuable component of a broader backup strategy. Indeed, since the last version of this book, I’ve begun using a NAS for my own family’s Time Machine backups, a setup I find more reliable and convenient than using a Mac as a Time Machine server (see Use a Mac as a Time Machine Server), as I did previously.
Local Network Servers
If, in your home or office, a Mac or PC is functioning as a file server, it’s worth considering whether you could use a network volume as a backup destination. After all, a full-blown computer is likely to give you both better performance and a greater choice of backup software than even the fanciest NAS. (And, if you have the computer already, you won’t need to buy another device.) On the other hand, if a computer is functioning as a backup server, it will probably need to be on all the time, and the backups may make it less responsive at other work.
In general, if you have control over the server yourself and it’s not already bogged down with other tasks, using it for backups is a reasonable idea. I strongly recommend adding a separate physical hard drive (or more than one), and either configuring the server as a Time Machine server (see Use a Mac as a Time Machine Server) or installing client-server backup software (see Network Backup Approaches). Otherwise, your backups will be commingled with other files, making it difficult to store them offsite and potentially creating a security risk.
If you don’t personally have control over the server (for example, if it’s a shared company server), resist the urge to use it for backups. You could easily use up more space and network bandwidth than you should (thus incurring the wrath of your IT department), and you’ll have less control over your data than if you use local media.
Hardware You Should Probably Avoid
I’ve said that hard drives of one kind or another are your all-around best bet as a storage medium and that online storage is worth considering as an easy, secure alternative to rotating physical media offsite. But there are other kinds of backup hardware, and I want to head off all the “Yeah, but what about…” inquiries.
So, here’s a quick rundown of hardware I think you should probably not consider:
Time Capsules: Apple’s former entrant into the NAS category, the Time Capsule (which went through a number of iterations and names) was an AirPort base station with a built-in hard drive, optimized for wirelessly backing up the Macs on your network with Time Machine. A lot of people (including me) loved their Time Capsules, and many are still in use. But that’s a dead-end technology; they won’t be updated, you can’t upgrade the hard drives or the Wi-Fi radios, and good luck fixing them if you encounter a problem. If you haven’t already said goodbye to your Time Capsule in favor of something more modern, I suggest giving serious thought to doing so before your hardware dies and takes your backups with it!
Optical media: The various flavors of recordable CDs and DVDs are collectively known as optical media. Apple has moved past optical drives in Macs, and even if your older Mac does have an optical drive, it will be slower and have a much smaller capacity than a hard drive. The data on optical discs can deteriorate to the point where it’s unreadable, sometimes in just a few years (see Consider Long-Term Archive Storage). And who knows if you’ll be able to attach an optical drive of any kind to the Mac you might own in five or ten years? If you used optical media in the past, I recommend moving to hard drives for backups right now.
USB flash drives: You can buy USB 2 or USB 3 flash drives (often called thumb drives) that will store as much as 2 TB in a very small space. These drives are handy for moving data from place to place, and they’re fine for making quick extra backup copies of truly critical files as you work. But for regular backups, you probably want something with greater capacity, speed, and reliability (such as you’d get from a full-blown external SSD in a Thunderbolt or USB enclosure). On the other hand, I think flash drives are an increasingly logical choice for partial backups while on the road.
SD cards: Some Mac models include built-in SD card slots, which are primarily designed to let you easily transfer data from your digital camera or camcorder; you can also connect them to any Mac with a cheap USB adapter. But since the SD card mounts as a regular Finder-accessible volume, you can easily use it to store backups, too. What I said just previously about USB flash drives applies here: there’s nothing wrong with them in principle, but they’re currently too limited in capacity and speed to use as one’s main backup medium. That said, where a flash drive would work for a quick backup on the go, an SD card should work equally well.
Tape drives: Drives that store your data on digital tape cartridges of one kind or another are common in big businesses, but they’re more cumbersome than hard drives, they require a lot of media swapping (or a robot to do it for you), and they’re relatively expensive (that is, the drives are expensive; the media itself isn’t). For home or small-office users, they’re a poor choice.