
Configure and Use Time Machine
If you’ve decided to use Time Machine for versioned backups, read this chapter to learn everything you need to know about that. (If you’ve chosen other software for versioned backups, skip ahead to Use Other Versioned Backup Software.) We’ll walk through the details of setting up Time Machine, backing up and restoring files, and other activities.
As I explained in Decide Whether Time Machine Is Best for You, my enthusiasm for Time Machine is not what it once was. I still use it, but not as my only form of versioned backups, and not on all my Macs. Therefore, even though this chapter is fairly long, I make no attempt to be comprehensive here, especially when it comes to troubleshooting.
Time Machine Basics
Time Machine has three visible components:
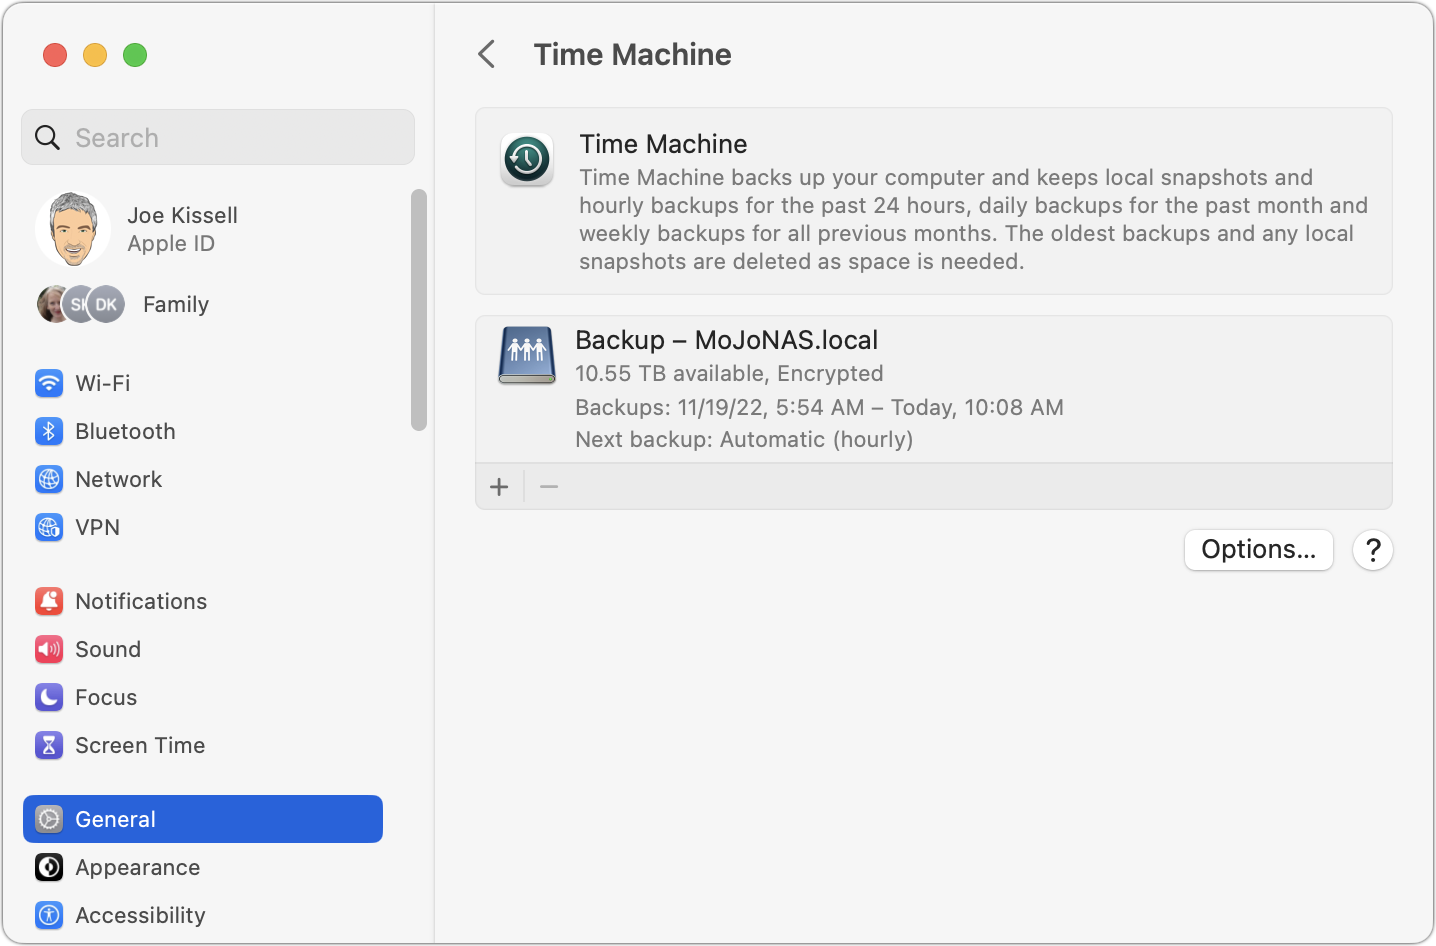
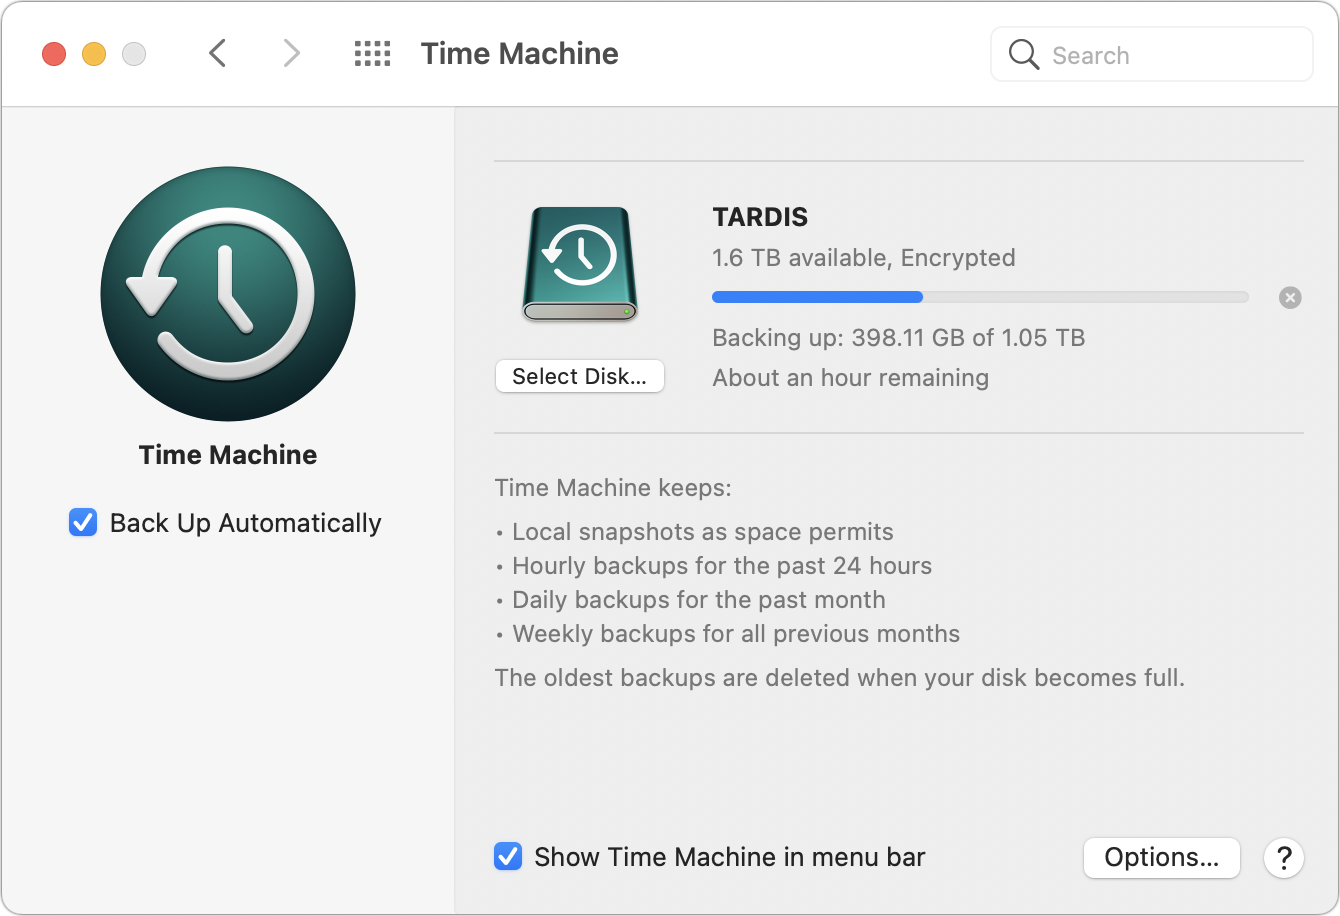
A pane in System Settings (Ventura or later; Figure 7) or System Preferences (Monterey or earlier; Figure 8).
An app found in the Applications folder, in Launchpad, and, optionally, in the Dock (Figure 9).
A Time Machine
 menu in the main menu bar.

Configure a Destination
Assuming you’ve followed the steps in the preceding chapter, you already have a hard drive or SSD formatted and ready to go; this could be a standalone device connected to your Mac, a NAS, or a drive attached to another Mac on your network. (If you’re planning to use another Mac as a Time Machine server and you haven’t set that up yet, you should do so first—see Use a Mac as a Time Machine Server—and then come back to this topic.)
The next step is to tell Time Machine which destination(s) to use. The steps vary depending on which version of macOS you’re using.
Configure a Destination in Ventura or Later
To set up a Time Machine destination in Ventura or later:
Go to System Settings > General > Time Machine.
Click Add Backup Disk.
A dialog appears (Figure 10), listing all local and network volumes eligible to be a destination disk and the amount of free space on each local disk.

Figure 10: Available local and network volumes appear in this dialog; select the one you want to use and click Set Up Disk. Select a volume and click Set Up Disk. Another dialog (Figure 11) appears.

Figure 11: Set up encryption and a disk usage limit here. Optionally, but strongly recommended, leave Encrypt Backup selected, enter and repeat a password, and enter a hint (see the sidebar About Time Machine Encryption, above). To forgo encryption, turn off Encrypt Backup.
For local volumes only, a Disk Usage Limit control also appears. If you’re content with using the entire volume for Time Machine (and, in most cases, that is preferable), leave Disk Usage Limit set to None. However, if you want to use only a portion of the volume for Time Machine and leave extra space for other uses, select Custom and use the slider to specify the maximum amount of space your Time Machine backups can occupy.
Click Done.
Normally, Time Machine then runs hourly, but you can change the frequency if hourly backups are too frequent for your needs. To do this, click the Options button in System Settings > General > Time Machine and choose an option from the “Back up frequency” pop-up menu: Manually, Automatically Every Hour (the default), Automatically Every Day, or Automatically Every Week.
Now, skip ahead to About Time Machine’s Scheduled Runs.
Configure a Destination in Monterey or Earlier
To set up a Time Machine destination in Monterey or earlier:
Open System Preferences > Time Machine.
Click Select Backup Disk.
A dialog appears (Figure 12), listing all local and network volumes eligible to be a destination disk and the amount of free space on each local disk.

Figure 12: Available local and network volumes appear in this dialog (specifics vary according to your version of macOS); select the one you want to use and click Use Disk. Select a volume.
Optionally, but strongly recommended, select “Encrypt backups” (see the sidebar About Time Machine Encryption, above).
Click Use Disk. If you enabled encryption, also enter and repeat a password, enter a hint, and click Encrypt Disk.
You can optionally select more than one destination; if you do, Time Machine alternates destinations with each hourly run. To select another destination, click Select Disk, select another disk, and click Use Disk. You’re prompted to choose whether you want to replace the previous backup disk or back up to both disks. Click Use Both. (To add still more destinations, scroll down in the list of destinations and click Add or Remove Backup Disk. If you select more than two destination disks, you won’t be asked again whether you want to replace the existing destination.)
On the Time Machine preference pane, the Back Up Automatically checkbox is selected, and a timer begins a two-minute countdown before your first backup begins. (You may prefer to turn it off until you’ve excluded files from Time Machine, which I discuss shortly.)
About Time Machine’s Scheduled Runs
Time Machine runs hourly by default, unless you changed the frequency in System Settings in Ventura or later (see above) or using a third-party utility; see Modify the Backup Interval.
Your only visible indication that Time Machine is currently backing up files is a subtle change to the Time Machine menu ![]() icon: in Catalina and earlier, a little triangle appears at the bottom of the icon
icon: in Catalina and earlier, a little triangle appears at the bottom of the icon ![]() , while in Big Sur or later you get a pair of chasing arrows
, while in Big Sur or later you get a pair of chasing arrows ![]() . The menu displays more information about the current backup status.
. The menu displays more information about the current backup status.
During each of Time Machine’s runs, it backs up only the files that have changed since its previous run (except files you’ve excluded, as I discuss next). If an app stores its data as a package (a folder that looks like a file in the Finder), Time Machine backs up only changed items within the package. (Among many other apps, Keynote, GarageBand, and DEVONthink use packages for their data.)
Exclude Files from Time Machine
By default, Time Machine backs up all the files on your startup disk as well as any other locally connected APFS or Mac OS Extended volumes, which is usually exactly what you want. Starting in Big Sur, Time Machine excludes the signed system volume (and backs up only your data volume, called Macintosh HD - Data by default); because it’s next to impossible to damage the system files, there would be little point to including them. Whatever your macOS version, in a few situations you may want to exclude certain items from what Time Machine would otherwise back up.
One obvious reason to exclude items is a lack of space: if you have too much data on your main disk(s) to fit comfortably on your backup destination, something has to go. Out of concern for privacy or security, you may prefer to leave certain sensitive files out of your backups. Another big reason, especially with a destination disk formatted as Mac OS Extended, is performance: some files are so large and change so frequently that they keep Time Machine busy doing virtually continuous backups. Yet another reason is that if you have a drive attached that contains a bootable duplicate, you don’t want Time Machine to back that up too! Read Items to Consider Excluding, shortly ahead, for advice about what Time Machine should not back up.
How to Exclude Items
To make sure an item doesn’t get backed up:
Open System Settings > General > Time Machine (Ventura or later) or System Preferences > Time Machine (Monterey or earlier).
Click Options and, in the dialog that appears, do one of the following:
Click the plus
 button, navigate to the item you want to exclude, select it, and click Exclude.
Drag any item (a file, folder, or volume) from the Finder into the list of excluded items in the dialog.
Click Done (Ventura or later) or Save (Monterey or earlier).
Unfortunately, Time Machine offers no way to automatically exclude files that meet certain criteria, regardless of their location—for example, all files over 2 GB or all disk images. The only way to automatically exclude a set of files whose members may change over time is to exclude the folder that contains them. However, see the sidebar Using Smart Folders for Exclusions, just ahead.
If you use multiple destination disks for Time Machine, bear in mind that whatever you exclude from Time Machine will be omitted from all Time Machine backup disks.
If you later want to stop excluding something from Time Machine, repeat these instructions, but in step 2 select the item and click the minus ![]() button.
button.
Items to Consider Excluding
If you’re using only Time Machine for backups—and in particular if you don’t also have a full duplicate (bootable or otherwise)—then you shouldn’t exclude anything, because Time Machine can only restore what it backed up. However, if you do have a duplicate, you can save space and improve Time Machine’s performance by excluding certain items, such as these:
Virtual machine disk images: Apps that let you run Windows (or other operating systems) on your Mac typically store your entire virtual machine installation in a special disk image file. These files can reach tens of gigabytes, and since they change every time you run the virtual machine, Time Machine attempts to back them up with each run. That’s not so much of a problem when Time Machine uses an APFS-formatted destination, as that enables it to copy on the portions of files that changed, but on Mac OS Extended destinations, this process can bog down your Mac and waste space on your backup disk. In that situation, I suggest excluding them from Time Machine and backing them up separately—except note the following:
Parallels Desktop lets you disable Time Machine backups for all your virtual machines without using the Time Machine preference pane. (With a virtual machine running, go to Actions > Configure > Backup and select “Do not back up with Time Machine.”) Alternatively, you can select SmartGuard in the same window to enable automatic snapshots, which reduce the amount of data a backup app must copy on each run; you can make Time Machine even more efficient when backing up these snapshots, by clicking Details and then selecting Optimize for Time Machine.
VMware Fusion by default stores disk images in
~/Documents/VirtualMachines, with the extension.vmwarevm. Technically, the file with the.vmwarevmextension is a package (again, a special folder that looks and acts like a file); the actual disk image file inside the package has an extension of.vmdk. But it’s easiest to exclude the entire.vmwarevmfile.VirtualBox keeps its disk images in
~/Library/VirtualBox/VDIwith an extension of.vdi.
Certain other large disk images: Disk images (typically with the extension
.dmgor.sparseimage) serve many useful purposes, such as providing a convenient way to package and distribute downloadable software. You can also create your own disk image using Disk Utility, optionally encrypting it so that all the files within are protected with a password. However, most disk images that you may have created yourself, for whatever reason, have the same defect as virtual machine disk images: every time any file inside changes, the whole file changes, forcing Time Machine to back up the entire image again. That’s not a big deal if the image is small, but if it’s in the range of hundreds of megabytes or larger, it will cause problems with Time Machine. So, you might want to add such files to the list of items to be excluded and back them up in a different way (for example, as part of a duplicate).
Beyond the items just listed, you might in some cases want to consider excluding the following:
System files: As noted earlier, Time Machine automatically excludes the signed system volume in Big Sur and later; however, in Catalina and earlier the files that make up macOS—the contents of your
/Systemand/Libraryfolders, various invisible files and folders at the main level of your disk, and the apps included with macOS, such as Mail and Safari—are all included by default in a Time Machine backup. If you’re running out of space on your backup disk and you already have a bootable duplicate or two (see Create and Use a Duplicate), you could exclude the system files to save space.To exclude the system files, add the folder
/Systemto the list of items to be excluded. The alert shown in Figure 13 appears; click Exclude All System Files.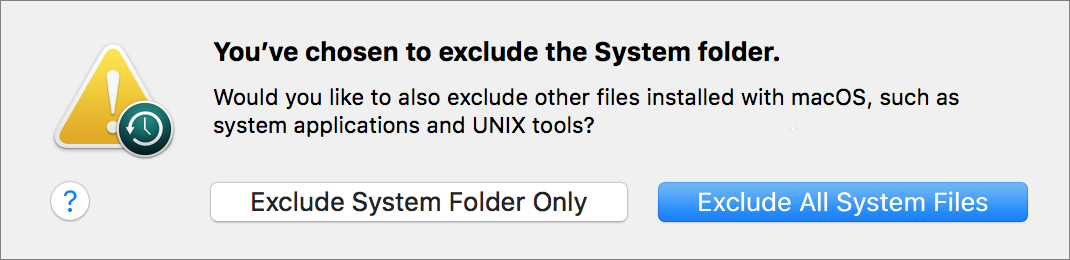
Figure 13: When you tell Time Machine to exclude your System folder, this alert asks if you want to exclude all of macOS. Other local volumes: Time Machine doesn’t back up other network volumes mounted on your Mac; however, it normally does back up other local volumes, including external USB and Thunderbolt drives and additional internal drives. If the data on any of these volumes isn’t particularly valuable—for example, disks mainly used as scratch space for Photoshop—you can save a significant amount of space on your backup disk by adding them to the list of items to be excluded. In addition, if the drive containing your bootable duplicate is connected to your Mac, you should tell Time Machine to avoid backing up that volume; it already is a backup, so backing it up again wouldn’t be particularly helpful, and it would massively increase the amount of storage space and time that Time Machine needs.
Downloads: Your
~/Downloadsfolder may contain a number of large files that disappear quickly (because you delete them after you install software or relocate the files to other folders). If so, exclude that folder.Video: If you download movies or TV shows regularly and then delete them right after you watch them, you can save tons of space on your backup drive by excluding the folder containing those files (typically
~/Music/iTunes/iTunes Media/Moviesand~/Music/iTunes/iTunes Media/TV Shows). But do this only if you’re sure you can download the movies again if necessary. (Movies and TV shows purchased from the iTunes Store, for example, can be downloaded again for free as long as they’re still in Apple’s catalog.)
Manage Your Time Machine Schedule
Apple believes that most Time Machine users will back up either to a local drive that’s always connected or to a network volume that’s always available. However, if you travel with a laptop, or if for any other reason your destination disk isn’t always available, Time Machine still works fine—with some qualifications.
For one thing, Time Machine puts its regular snapshots in a hidden location on your startup disk even when your destination disk is disconnected, and then transfers those locally stored snapshots to your usual Time Machine disk once it becomes available (see Local Snapshots).
However, local snapshots provide only limited protection, so if you expect to spend long periods of time during which your regular Time Machine destination disk is unavailable, consider using a supplemental backup, such as a cloud backup service or a portable hard drive.
Prevent or Force Time Machine Backups
Sometimes you may want Time Machine not to run, even though its destination disk is connected. You may, for example, want to make sure every last bit of your computer’s CPU and disk speed is available to devote to some important task, or you may want to keep a noisy external drive quiet for part of the day. Any time you want to suspend Time Machine from running backups, you can. In Ventura or later, go to System Settings > General > Time Machine, click Options, and choose Manually from the “Back up frequency” pop-up menu; in Monterey or earlier, open the Time Machine preference pane and deselect Back Up Automatically. Time Machine remembers all its settings, and resumes backups whenever you reselect it.
On the other hand, in some situations you may want to make sure Time Machine immediately backs up your files. For example, you may have recently saved or downloaded an important document, but the next scheduled Time Machine run isn’t for another 45 minutes. To force an immediate backup, even if Time Machine is off, choose Back Up Now from the Time Machine ![]() menu or right-click (or Control-click) the Time Machine icon in the Dock and choose Back Up Now from the contextual menu. (To immediately stop a backup in progress, choose Stop Backing Up from Time Machine’s Dock menu or Skip This Backup from the Time Machine
menu or right-click (or Control-click) the Time Machine icon in the Dock and choose Back Up Now from the contextual menu. (To immediately stop a backup in progress, choose Stop Backing Up from Time Machine’s Dock menu or Skip This Backup from the Time Machine ![]() or
or ![]() menu.) Note that this doesn’t work with local snapshots (again, see the sidebar Local Snapshots); it applies only when your regular Time Machine volume is available.
menu.) Note that this doesn’t work with local snapshots (again, see the sidebar Local Snapshots); it applies only when your regular Time Machine volume is available.
Regardless of how regularly Time Machine runs, the way it purges older backups can, in some cases, delete files you thought were backed up; read the sidebar The Time Machine Schedule Problem, next. If you want to alter the frequency of Time Machine’s regular backups to something other than hourly, see Modify the Backup Interval, just ahead.
Modify the Backup Interval
Time Machine normally runs every hour, though starting in Ventura you can change that interval to daily or weekly; see Configure a Destination in Ventura or Later. But what if you’re running an earlier version of macOS, or you’d like Time Machine to run every three hours or twelve hours? You can adjust the backup interval using a free utility. TimeMachineEditor lets you set Time Machine’s backup interval to any number of hours and choose arbitrary recurring backup times (such as hourly on Mondays and Fridays, or every Saturday and Thursday at 6:15 A.M.). And you can opt to have backups run automatically when the Time Machine disk is mounted, when your Mac wakes up, or both. One oddity is that TimeMachineEditor automatically deselects the Back Up Automatically checkbox on the Time Machine preference pane in Monterey and earlier. But don’t worry about this, because that checkbox (or switch) affects only Time Machine’s default hourly backups.
Restore Data with Time Machine
Once you have Time Machine set up and running, it normally does its thing silently in the background, without intruding on your work. You can continue ignoring it until you need to restore something—a missing file or folder, or a previous version of a file you still have. This is where Time Machine’s unique 3D restoration interface comes in; you should try restoring some files now, whether you need them or not, partly to make sure your backup is working properly, but mostly for the experience of flying back through time!
Restore Files and Folders in the Finder
If you notice that a file or folder is missing, or that you’ve accidentally changed it and need an older version, follow these steps to retrieve an item from your Time Machine backup:
In the Finder, make sure the window that contains the item you want to restore (or the one that used to contain it, if it’s been deleted) is frontmost. You can do this by clicking anywhere in the window. (Not certain where the missing item was stored? Skip ahead to Restore Files and Folders Using Spotlight.)
Click the Time Machine icon in the Dock or choose Enter Time Machine from the Time Machine
menu.The frontmost window moves to the center of the screen, the background blurs, and additional copies of the window recede into the background in a 3D “time warp” display (Figure 14). In this book, I refer to this view as the Time Machine screen.

Figure 14: Go “back in time” to a previous version of your data. To locate the file or folder you want, do one of the following:
To the right of the stacked windows, click the top arrow (for “back in time”). Time Machine zooms back to the most recent backup in which that window’s contents were different. Keep clicking to continue zooming back through previous versions of that window. Click the bottom arrow to move forward in time.
Use the controls along the right edge of the screen to jump to a particular backup. As you hover your pointer over the small horizontal lines, they zoom in to display the date and (for recent backups) time of each backup. Click a line to jump right to that version of the window. (If you’ve only just set up Time Machine, you won’t see many dates here.) As you zoom backward or forward in time, the date and time of the backup you’re currently viewing is shown at the right between the arrow buttons.
If you’re unsure whether a file is the one you want, click once to select it and press the Space bar to activate Quick Look, which gives you a live, full-size preview of the file. To close the Quick Look window, click the X icon
 in the upper-left corner.
Once you’ve selected the item you want to restore, decide whether you want to restore it to its original location or somewhere else:
To restore to the original location, click the Restore button. Time Machine immediately restores the selected item, and returns you to the Finder. (Time Machine may prompt you to enter an administrator password for certain items.)
You can use this procedure even if you want to restore an older version of a file but keep the current version. After you click Restore and the Finder reappears, you’ll see an alert asking whether you want to replace the existing file, keep both copies (in which case the one already in that location is renamed with “(original)” at the end), or keep the original (thus canceling the restoration).
To restore to a different location from the original, right-click (or Control-click) the item and choose “Restore ‘filename’ to” from the contextual menu, navigate to the desired destination, and click Choose.
If you decide against restoring any files, instead click the Cancel button or press Esc (Escape).
Restore Files and Folders Using Spotlight
Although you can, on the Time Machine screen, navigate around your Mac manually, you could spend a lot of time searching for a file at different times in different locations on your disk if you don’t know where it is. No worries: Spotlight to the rescue!
If you know something about a missing file or folder, such as a word in its title or its contents, you can use Spotlight to find it within your Time Machine backups. Follow these steps:
Click the Time Machine icon in the Dock or choose Enter Time Machine from the Time Machine
menu. The Time Machine screen appears.Type something in the Spotlight search field in the toolbar of the window, optionally specifying additional search criteria.
Using the back and forward arrows or the controls on the right of the screen, navigate to an earlier point in time. Each time you move to another backup, the Spotlight window changes to reflect the results of the search at the time that backup was performed.
When you find the desired file, select it and click Restore. Time Machine copies it to its original location. To restore to a different location, right-click (or Control-click) the item and choose “Restore ‘filename’ to” from the contextual menu, navigate to the new location, and click Choose.
Restore Data Within Apps
When Time Machine was first introduced, Apple made a big deal about how it could restore not only entire files in the Finder but also individual items within apps, such as pictures in iPhoto, contacts in Address Book (later renamed Contacts), and messages in Mail. GarageBand 4 through 6 (a.k.a. GarageBand ’08 through GarageBand ’11) could also restore projects from within the app using Time Machine. But Apple dropped in-app Time Machine support from GarageBand 10 and iPhoto ’11 (version 9.2 and later), and never included it in Photos (which replaced iPhoto). That left Contacts and Mail as the only apps with built-in Time Machine support, and even those two apps lost Time Machine integration in Big Sur. So the instructions I provide here are only for those running Catalina or earlier, and only for Contacts and Mail.
Restore Within Contacts
To restore one or more contacts in Contacts:
In Contacts, switch to any view in which the contact you’re looking for should appear—for example, a search for that contact name.
Click the Time Machine icon in the Dock or choose Enter Time Machine from the Time Machine
menu. Contacts becomes the center of the Time Machine screen.Using the arrow buttons, or the navigation controls on the right side of the screen, browse your backups until you find one in which the desired contact or contacts appear.
Select one or more contacts and click Restore.
Unfortunately, restoring contacts with Time Machine doesn’t restore groups. In addition, contacts restored from a Time Machine backup can, in some cases, later be overwritten by iCloud, which may think its version of the data is more recent. I know of no other way to restore individual entries from Contacts, but if you use iCloud to sync your contacts, you can restore all your contacts from an earlier version of iCloud’s archive. To do this, sign in to your iCloud account in a web browser, click your picture (or placeholder for your picture) in the upper-right corner of the page, and choose iCloud Settings from the menu that appears. Click Data Recovery in the navigation bar at the top of the settings page, then click Restore Contacts and follow the instructions.
Restore Within Mail
Even in Catalina, the last version of macOS to support Time Machine inside some apps, I found Time Machine restoration within Mail to be flaky and inconsistent. If you’re still using Catalina or earlier and you find that Time Machine fails to play nicely with Mail, I’m sorry to say I know of no cure. (The alternative is to restore the individual message files and then import them into Mail; see the sidebar Restoring Email from a Backup.)
Assuming things work as they should, you can follow these steps to restore one or more mailboxes or messages in Mail:
With Mail in the foreground, click the Time Machine icon in the Dock or choose Enter Time Machine from the Time Machine
menu. Mail becomes the center of the Time Machine screen.Navigate to a mailbox you want to restore or a mailbox in which a message you’re looking for should appear. (You can’t select smart mailboxes, unfortunately.)
Using the arrow buttons, or the navigation controls on the right side of the screen, browse your backups until you find one in which the desired mailbox(es) or message(s) appears.
Select one or more mailboxes or messages and click Restore.
When restoring messages, Mail creates a new local mailbox (in the On My Mac section of its sidebar) and, inside that, a second mailbox called Recovered Messages; the restored items are put in this mailbox. From there, you can drag them to another location. (Restored mailboxes are put directly in the On My Mac section of the sidebar.) If you later restore more messages in Mail without first deleting the Recovered Messages mailbox, Mail creates yet another mailbox, Recovered Messages 1—incrementing the number each time. (Not the most intuitive system, eh?)
Switch to Another Time Machine Backup
If you’re backing up just one Mac to just one Time Machine disk, you can skip this section. But if you’re backing up multiple Macs or backing up to more than one destination disk, you may need a way to tell Time Machine to show you a different set of backups from the one you’re currently using, in order to restore (or delete) items from it. (You might also need to use this procedure to see backups from your existing Mac if you’ve recently restored your entire disk from a Time Machine backup, if you’ve changed its name in System Settings > General > Sharing or System Preferences > Sharing, or if your logic board has been replaced.)
To browse other Time Machine backups:
Make sure the volume with the backups you want to view is mounted in the Finder.
Right-click (or Control-click) the Time Machine icon in the Dock and choose Browse Other Time Machine Disks from the contextual menu, or Option-click the Time Machine icon in your menu bar and choose Browse Other Backup Disks from the contextual menu.
In the window that appears, select the backup you want to use and click Use Selected Disk. The Time Machine screen appears.
You can now recover or delete items in the usual way.
Restore Your Startup Volume Using Time Machine
If a major disk crash or other catastrophe requires you to restore your entire startup volume rather than merely individual files or folders, you can do so with Time Machine, by way of recovery mode:
Make sure the drive containing your Time Machine backup is available:
If you back up directly to an external drive, plug it in.
If you back up over a network to a drive connected to another Mac using Time Machine Server (see Use a Mac as a Time Machine Server), make sure that the server Mac is turned on and that both Macs are connected to the same network.
If you back up to a NAS, I suggest connecting to it with an Ethernet cable (if your Mac has an Ethernet port or adapter) rather than using Wi-Fi, as that will speed up the restoration. In addition, anecdotal evidence suggests that you’ll get better performance if, after connecting the Ethernet cable, you turn off your Mac’s Wi-Fi for the duration of the process.
Restart your Mac in recovery mode (see Something Recovery Something).
Select Restore from Time Machine Backup and click Continue. Read the instructions, then click Continue again.
Select your Time Machine backup disk. If the disk was encrypted, enter its password when prompted. (If you selected a network destination, click Connect. You may be prompted to enter its disk password; do so, and click Connect again. Then select the volume you want to restore.) Click Continue once more.
If the Time Machine disk contains backups for more than one volume, select the one you want from the Restore From pop-up menu. Then select the particular backup you want to restore—likely the most recent one (the first one in the list). Click Continue.
On the Select a Destination screen, select your internal disk. Click Restore. If prompted, confirm that you want to restore your data.
Time Machine restores your data. When it finishes, follow the instructions to restart your Mac.
Restore an External Disk with Time Machine
Let’s say you’re using Time Machine to back up an external disk, but that drive dies, and you need to restore its data. The ordinary way of using Time Machine won’t work, because you’d need to navigate to the location where the data is missing—but you can’t, since that drive doesn’t work! What can you do?
One way to solve the problem is to obtain a replacement drive and give it the same format and name as the old drive. Then, open a window on that drive and click the Time Machine Dock icon (or choose Enter Time Machine from the Time Machine ![]() menu). Navigate to the most recent backup and select all the top-level items. To restore the data, right-click (or Control-click), choose “Restore # Items to” from the contextual menu, and select the new drive. Once the data has been restored, follow the instructions in Restarting Time Machine Backups After a Restore to associate the new drive with the old backup.
menu). Navigate to the most recent backup and select all the top-level items. To restore the data, right-click (or Control-click), choose “Restore # Items to” from the contextual menu, and select the new drive. Once the data has been restored, follow the instructions in Restarting Time Machine Backups After a Restore to associate the new drive with the old backup.
If that doesn’t work for any reason—or if you have to restore the data to a different location—the path of least resistance is to Restore Files Without Time Machine.
Restore Files Without Time Machine
If you ever need to restore files and Time Machine isn’t working for some reason, you can browse the contents of your Time Machine disk in the Finder and then drag any file to your desktop (or another folder) to copy it to your main disk. (You should always avoid opening files directly on your backup disk.) But be aware that Time Machine stores files on your backup disk in one of three different ways:
When you connect a Mac OS Extended Time Machine drive directly to your Mac, Time Machine stores backups for your computer in a folder like this:
volume name/Backups.backupdb/computer nameInside that folder, you’ll find a timestamped folder for each individual backup Time Machine is currently storing. (There’s also an alias named Latest that, when opened, shows you the latest backup.)
By contrast, when Time Machine backs up a Mac over a network, it puts a sparse bundle disk image at the top level of the volume whose name is similar to your computer’s name, as in:
volume name/MacBook_Pro.sparseimageIf you double-click that disk image to mount it in the Finder, you’ll see the list of folders with each stored Time Machine backup.
On a locally connected drive formatted as APFS, Time Machine stores snapshots (which look like disks with the Time Machine icon) at the top level of the disk. If you’re backing up multiple Macs to a single APFS disk, Time Machine creates a separate volume for each one (within the same APFS container), mounting each in the Finder. You can browse through the contents of the snapshots, which reflect the exact hierarchy of your disk, just as you would any other disk or folder.
Delete Files from a Time Machine Backup
When your backup volume gets close to being full, Time Machine automatically deletes old backups to make space for new ones. It doesn’t warn you about this, but the first time it happens—and optionally thereafter—Time Machine does inform you that it has just deleted some backups, suggesting that you select a different disk to avoid having more files deleted. (If, instead, you’d like to migrate your Time Machine backups to a larger volume, see Migrate to a Larger Time Machine Disk, later.) Be that as it may, these automated deletions may not occur in the way you expect; I lay out the details in The Time Machine Schedule Problem, ahead.
Sometimes you may need to remove Time Machine backups before they would automatically be deleted—for example, if you’re concerned about sensitive information being stored in a backup that other people might be able to access.
Time Machine doesn’t let you purge just one instance of a particular file from your backups, and although it once let you remove all instances of a single file from a certain location, that’s no longer an option either. You can still delete a single entire snapshot (that is, all the files from a particular hourly run of Time Machine), but whereas that was previously just a menu command, now it requires a trip to Disk Utility (in Monterey or later) or Terminal (in Big Sur).
To delete all the files Time Machine backed up during a particular hourly run, follow these steps:
Click the Time Machine Dock icon or choose Enter Time Machine from the Time Machine
menu to show the Time Machine screen.Using the arrow buttons or the timeline control on the side of the screen, navigate to the snapshot you want to delete. Note that if it occurred within the last day, you’ll delete just that hourly run; if it occurred earlier, you’ll delete the only remaining backup for a particular day or week. Make a note of the date and time, then click Cancel.
If you’re running Monterey or later, do the following:
Open Disk Utility (in
/Applications/Utilities).In the sidebar, select your Time Machine volume.
If you don’t see an APFS Snapshots area at the bottom of the main Disk Utility pane, choose View > Show APFS Snapshots.
Wait for the APFS Snapshots list to fill in. If the list is still blank after a few minutes—as seems to happen frequently, due to an apparent bug—skip to the Big Sur directions in step 4.
Locate the snapshot whose Date Created matches the date and time you recorded in step 2 and select it.
Click the minus
 button, then click Delete to confirm.
If you’re running Big Sur, do this:
Open Terminal (in
/Applications/Utilities).Type
tmutil listbackupsand press Return.The screen displays a (possibly quite lengthy) list of timestamps for all Time Machine snapshots, in a format like
2021-04-22-153527, where the first three segments are the year, month, and date and the last segment is the hour, minute, and second in 24-hour format; the timestamp in this example is April 22, 2021, 3:35:27 P.M.Locate the snapshot whose timestamp matches the date and time you recorded in step 2 and copy the complete timestamp.
Enter this command:
sudo tmutil delete -d "/Volumes/volume name" -t timestampReplace volume name with the name of your Time Machine disk and timestamp with the timestamp from step c just above. For example:
sudo tmutil delete -d "/Volumes/DeLorean" -t 2021-04-22-153527When prompted to enter your administrator password, type it and press Return.
Time Machine removes the entire snapshot from its backup—a process that may take quite some time.
Use a Mac as a Time Machine Server
If you plan to hook up your external drive(s) directly to each Mac, or if you use a NAS or Time Capsule, there’s nothing to see here; skip ahead to Use a Single Backup Disk with Multiple Macs. But if you’d like a Mac on your network to function as a Time Machine server for the rest of your Macs, read on.
Apple has baked Time Machine server capability right into macOS. Any Mac running High Sierra or later can (with enough storage space and the right settings) host Time Machine backups for all the rest of the Macs on your network.
One catch is that you have to know where to find this rather well-hidden feature. In addition, the setup is somewhat fiddly, and the details vary depending on your version of macOS, the file system you use, and whether you want to back up your local Mac (as well as network Macs) using the same drive.
Here’s how to set up a Mac as a Time Machine server:
Make sure the Mac that will function as the server is running High Sierra or later. For best results, this Mac should also be left on and awake all the time, because other Macs will be able to back up and restore data using Time Machine only when that’s the case.
Connect an external drive to this Mac just for Time Machine backups. (Although it’s sometimes possible to get away with a designated volume or folder on a drive that’s also used for other purposes—and I once suggested such an approach—I now recommend against that setup.) The name of this drive is up to you, but you may find it helpful to give it an obvious name, such as “Time Machine Backups.”
If you’re running Catalina or earlier, confirm that the volume on which your Time Machine backups are to be stored is formatted as Mac OS Extended (see APFS Evolves Further and Prepare Your Backup Drive).
If you’re running Big Sur or later, instead format the drive you’ll use for backups as APFS (Case-sensitive).
Optionally, but highly recommended based on my testing, create a sharing-only user. To do this, go to System Settings/System Preferences > Users & Groups. Then, in Ventura or later, click Add Account, enter your password when prompted, and click Unlock; in Monterey or earlier, click the lock icon and enter your credentials to unlock the pane. Now click the plus
button.From the New Account pop-up menu, choose Sharing Only. Fill in the fields for Full Name (which could be something like “Sharing User”), Account Name (for example, “sharinguser”), and Password (repeated) and click Create User.
Go to System Settings > General > Sharing (Ventura or later) or System Preferences > Sharing > File Sharing (Monterey or earlier), and make sure File Sharing is enabled. Then, in Ventura or later only, click the Info
 icon next to File Sharing.
Click the plus
button under the Shared Folders list, navigate to the backup volume you connected in step 2, select it, and click Add. The volume appears in the list.With the newly added backup volume selected, click Options. Select “Share files and folders using SMB.” If you’re using an older version of macOS that also has a “Share files and folders using AFP” checkbox, deselect it.
If you created a sharing-only user in step 5, make sure that user appears in the Users list on the right when the backup volume is selected. (If not, click the plus
button under Users, select the user in the dialog that appears, and click Select.) Set the permissions for that user, and anyone else who may be backing up to this Mac over the network, to Read & Write.If you’ll be using this newly designated Time Machine volume to back up the server Mac itself, in addition to other Macs on your network, I recommend that you store your local Mac’s Time Machine backup on a separate volume from the one you use for network backups, though those volumes could be located on the same physical drive; use Disk Utility to create another volume in the same APFS container (if you want the two volumes to share the disk space; see Add an APFS Volume) or to create a separate container (if you want to designate a specific portion of the disk space to each one; for general guidance, see Decide How Many Partitions and Volumes to Make). If you’re committed to using the same volume for both local and network backups, read the sidebar Sharing a Volume for Local and Network Backups, ahead.
Assuming you do keep local backups on a separate volume, you must now select your newly designated network backup volume in the Finder: choose File > Get Info (⌘-I), and authenticate by clicking the lock
 icon at the bottom and entering your credentials. Make sure each user who might use this volume for network backups (including the sharing-only user, if you created one in step 5) has Read & Write privileges for the drive. Now close the Info window.
Right-click (or Control-click) the backup volume in the Shared Folders list and choose Advanced Options from the contextual menu (Figure 15).
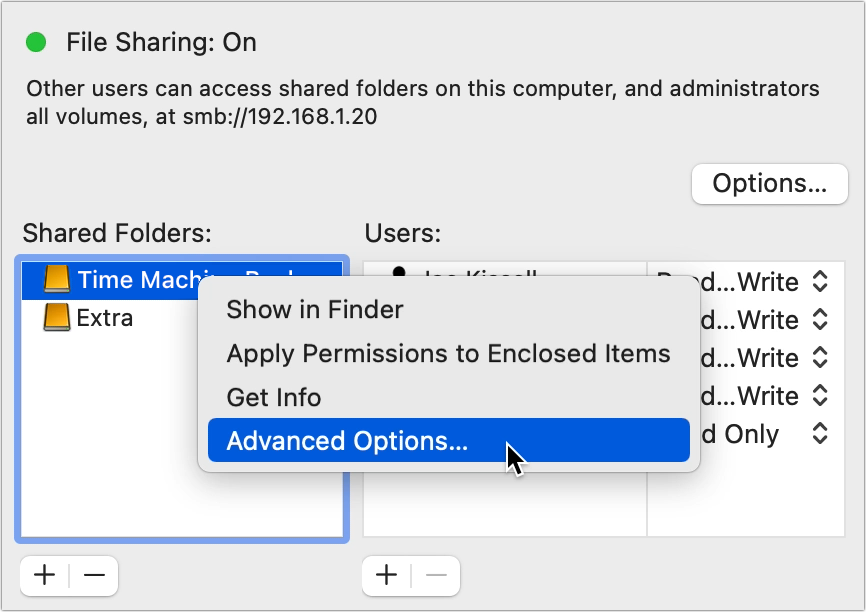
Figure 15: This is where the magic happens—and Apple didn’t make it excessively obvious! In the dialog that appears (Figure 16), select the “Share as a Time Machine backup destination” checkbox.

Figure 16: Configure options for your shared Time Machine folder here. All other settings here are optional:
If you want people without accounts on this Mac to be able to use it as a Time Machine destination (and you probably do), leave “Allow guest users” selected, as it is by default.
For increased security using the SMB protocol, select “Only allow SMB encrypted connections.”
To make sure Time Machine backups don’t expand to fill every last bit of space on your drive, check “Limit backups to” and enter the maximum total size of Time Machine backups. (Be as generous as you can afford to be, because it’s difficult to change this allotment later.)
Click OK, click Done in Ventura or later, and then close System Settings/System Preferences.
With these steps completed, you can connect to this Mac from your other Macs using either an existing user account or, preferably, the sharing-only user account you created in step 4. Then select the shared volume as a network destination in Time Machine on each of the other Macs, following the instructions in Configure a Destination.
One last thing: the Macs in your home or office can use your Time Machine server only when they’re on your local network. If a Mac will be used elsewhere for an extended period of time, make sure you have alternative backup arrangements (see Back Up While on the Road).
Use a Single Backup Disk with Multiple Macs
You can use Time Machine to back up more than one Mac to a given drive (either a local drive or a network destination). A single partition can store backups for any number of Macs, without getting them confused, as long as it has enough free space. In most cases, you can just plug in the drive (or connect to it over your network; refer back to Use a Mac as a Time Machine Server), select it on the Time Machine preference pane, and let the backup run; repeat the procedure with each Mac you want to back up.
In some situations, Time Machine may wonder whether you want the second computer to take over the backups you made with the first one or instead you want to add backups from the second computer while keeping the first one’s backups in place. Ordinarily, Start New Backup is the right choice here, but if you really do want the second Mac to take over the backups from the first one, instead click Claim Existing Backups.
If you’re physically moving the drive between machines, Time Machine should automatically recognize each Mac and back up on its regular schedule, without further intervention, after the first backup.
In previous versions of this book I described scenarios in which you might move a Time Machine drive between local and network connections, including a procedure enabling you to “seed” an initial Time Machine backup onto a locally connected hard drive and then connect the drive to another Mac to perform future backups over your network. To make a long story short, changes in Big Sur and later have made it difficult, and sometimes impossible, to swap a Time Machine drive between local and network connections (in either direction), so my professional advice is: just don’t.
Use Power Nap
If you have a Mac with an SSD, you can use a feature called Power Nap. (For details, see Apple’s support article What is Power Nap on Mac?.) With this feature enabled, your Mac periodically performs a variety of background tasks even while it’s asleep. One of these tasks, which occurs only when your Mac is connected to AC power (even though other aspects of Power Nap also work on battery power), is backing up with Time Machine.
On an M-series Mac, Power Nap is always on. On an Intel-based Mac, you can turn it on or off. The procedure varies based on your operating system and whether you’re using a laptop or a desktop Mac:
Desktop Mac: To specify whether Power Nap (including Time Machine backups) will function, go to System Settings/System Preferences > Energy Saver and select or deselect Enable Power Nap.
Laptop, Ventura or later: Go to System Settings > Battery > Options and choose Always, Never, or Only on Power Adapter from the Enable Power Nap pop-up menu.
Laptop, Monterey or Big Sur:
To specify whether Power Nap (not including Time Machine backups) will function while your computer is running on battery power, go to System Preferences > Battery > Battery and select or deselect “Enable Power Nap while on battery power.”
To specify whether Power Nap (including Time Machine backups) will function while your computer is plugged in, go to System Preferences > Battery > Power Adapter and select or deselect “Enable Power Nap while plugged into a power adapter.”
Laptop, Catalina or earlier:
To specify whether Power Nap (not including Time Machine backups) will function while your computer is running on battery power, click Battery and select or deselect “Enable Power Nap while on battery power.”
To specify whether Power Nap (including Time Machine backups) will function while your computer is plugged in, click Power Adapter and select or deselect “Enable Power Nap while plugged into a power adapter.”
Your selection takes effect when your Mac next sleeps.
Migrate to a Larger Time Machine Disk
When your Time Machine backup volume fills up, Time Machine will delete old files to make room for new ones, but sooner or later you may want to have more backup capacity—whether for more files, a longer history, or files from multiple users. So the natural solution is to switch to a bigger disk (or maybe from a local drive to a network destination with a larger disk).
If you simply switch disks on the Time Machine preference pane, you’ll have to start over with a brand-new full backup (though you can keep the old backup too, and if needed, connect it and use the Browse Other Time Machine Disks command to select it; see Switch to Another Time Machine Backup).
If you prefer to keep the continuity of your existing backups on the new drive, you can, but only if your Time Machine disk is formatted as Mac OS Extended; with APFS, sorry, you’re out of luck, as backups can’t be copied to another drive. And even with Mac OS Extended, you’ll have to jump through a few hoops.
In previous editions of this book, I included a set of instructions here that involved the use of Disk Utility’s restore feature; however, at some point changes in macOS broke that approach.
At this point, I can offer two alternatives—but, sadly, there’s no guarantee that either of them will work (and I have not tried either myself):
The Apple support article Transfer Time Machine backups from one backup disk to another describes a multi-step manual copying process to use Time Machine on a new disk. However, that article (last updated in November 2020) is outdated and no longer appears on Apple’s site. We know it doesn’t work for APFS volumes, and anecdotal evidence suggests it doesn’t always work for Mac OS Extended volumes, either.
A discussion thread on StackExchange called Clone Time Machine volume offers two potential approaches for those who have found that Apple’s instructions don’t work: either restart in recovery mode and use Disk Utility’s restore feature to copy your old Time Machine disk to a new one or clone the disk with SuperDuper!.
In my opinion, it virtually always makes more sense to start a new backup from scratch on a larger volume, while hanging onto the old drive (at least for a while) in case you need a previous backup.
Avoid or Solve Time Machine Problems
Although Time Machine has a very simple user interface, behind the scenes it’s doing some highly complex tasks. Like any sophisticated piece of software, it has bugs and flaws. Review these tips to prevent problems or fix ones that have already occurred.
Check for Hidden Exclusions
If a file or folder that you believe should be backed up is not appearing on the Time Machine screen (see Restore Data with Time Machine), first check to see that the item in question isn’t on the Exclude list (see Exclude Files from Time Machine).
Note, however, that under certain circumstances, Time Machine can exclude files and folders without showing them on the Exclude list! To check the inclusion/exclusion status of a file or folder, follow these steps:
Open Terminal (in
/Applications/Utilities).Type
tmutil isexcludedfollowed by a space (but don’t press Return yet).From the Finder, drag the file or folder you’re wondering about into the Terminal window. This puts the full path to that item on the same line, right after the command you just entered.
Press Return.
The next line will start with either [included] or [excluded], indicating whether the item is included in your Time Machine backups or not. If an item is excluded and you want it to be included, type tmutil removeexclusion followed by a space. Drag the item into the Terminal window, and press Return.
Restore Files After a Hardware or Name Change
Because of the way Time Machine stores its data, certain changes to your system could cause Time Machine to “lose” its backups—to seemingly forget which backups go with your disk, such that no existing backups appear when you visit the Time Machine screen, and your next backup starts over from scratch.
Among the changes that could trigger this condition are:
Restoring your entire disk (not just a few files or folders) from a Time Machine backup
Having your logic board replaced
Changing your Mac’s name in System Settings > General > Sharing (Ventura or later) or System Preferences > Sharing (Monterey or earlier)
In these cases, you can retrieve files from that previous set of backups and even reconnect Time Machine to your current disk. See the sidebar Restarting Time Machine Backups After a Restore, earlier, for details.
See What Time Machine Is Really Up To
To find out how much data (number of files or size) Time Machine backs up with each run, get details on any errors it encounters, or find clues to solving random problems, open Console (in /Applications/Utilities). Make sure the list of available logs is visible on the left (if not, choose View > Show Sources) and select system.log in the list under Reports. Then type backupd in the Search (or Filter) field to display only the entries involving Time Machine.
If you notice that Time Machine is regularly backing up much more data than what should have changed in the past hour, first follow the suggestions in this section and in Items to Consider Excluding. Then look for other especially large files that may be causing problems.
One easy way to find such files is to use BackupLoupe, which lists every snapshot that your Time Machine volume currently holds. Select any snapshot in the list and the app displays only the files and folders that were copied during that particular run, along with their sizes.
If you want even more detail about what Time Machine is doing, you can try Back-In-Time. This utility comes from Tri-Edre, the same company that makes the app Tri-BACKUP. When I first saw Back-In-Time, I was confused because I thought it did nothing more than show me the same files as on the Time Machine screen, but with a different interface. In fact, it lets you dig deeply into your Time Machine backups to see information that would be difficult to learn in any other way. You can:
See at a glance how many copies of each file Time Machine is storing
See at exactly which point in time a file appeared in, or was deleted from, a certain folder
List all the files copied during a certain backup run
Compare any two snapshots (in part or whole) to see what’s different between them, and even two versions of the same file to see what’s changed
You can also restore files or delete data from Time Machine—with more flexibility than Apple’s interface offers—directly in Back-In-Time.