
Create and Use a Duplicate
By long habit, I’ve used the term duplicate as a shortened form of “bootable duplicate,” since the whole point of a duplicate was that you could boot from it. Now, however, considering the numerous reasons one might have a duplicate that’s not bootable, I’m broadening my use of the term to include non-bootable duplicates (which, when speaking of startup disks, include only the read/write Data volume). This chapter covers both types. We begin with the bootable variety, and then (in Create a Data-Only Duplicate) talk about the non-bootable sort.
To review: Bootable duplicates stored on an external SSD let you get back to work quickly if your internal storage fails, give you a useful troubleshooting tool, and make upgrading to a new version of macOS safer. (Remember, though, that if the internal SSD on an M-series Mac dies completely, you’ll be unable to start up the Mac, even from an external, bootable SSD.) You can’t make a bootable duplicate by copying files in the Finder; you need a special utility. Lots of apps can do this, but in this chapter I focus on two—Carbon Copy Cloner and SuperDuper!—that specialize in this task and do an excellent job at it. (I also give ChronoSync a passing shout-out.)
Carbon Copy Cloner and SuperDuper! can make one-off duplicates or run automatically on a schedule, updating the duplicate with just the files that are new or changed since the last run and deleting files on the destination that are no longer on the source disk. (In Big Sur and later, these updates are limited to the Data volume, while a separate procedure is needed to update the operating system on the duplicate.) I recommend scheduling duplicates to update at least once a week (daily is even better).
Give the Destination Volume a Unique Name
If you didn’t do so when partitioning the drive (see Configure Your Drive), rename the destination volume for your bootable duplicate so that it’s different from your Mac’s regular startup volume. This will help eliminate confusion later on, especially when you’re testing your duplicate and restoring files. To change the name, select the volume in the Finder, right-click (or Control-click) it, choose Rename “volume name” from the contextual menu, type a new name, and press Return.
Create a Duplicate in Mojave or Catalina
The instructions that follow are all you need if you want to create a bootable duplicate in Mojave or Catalina. They’re also most of what you need to Create a Bootable Duplicate in Big Sur or Later or to Create a Data-Only Duplicate, but since those operations involve additional elements, I spell them out in more detail ahead. I cover only Carbon Copy Cloner and SuperDuper! here; if you’re using a different app, consult its documentation for instructions.
Create a Duplicate with Carbon Copy Cloner
Carbon Copy Cloner was one of the first tools available for creating a bootable duplicate of a macOS volume, and it has undergone numerous revisions over the years.
Carbon Copy Cloner was originally designed only for creating bootable duplicates, but it has gradually added more features. It now also optionally creates versioned backups of a sort and includes safety features that can protect you from the consequences of accidental file deletion (see Carbon Copy Cloner Tips).
In the instructions that follow, I deliberately avoid most of these extra features, and instead show you how to create a standard, run-of-the-mill duplicate that’s a true clone of the source volume. Consult the documentation that comes with Carbon Copy Cloner to learn about other ways of using the software to back up your disk.
To create a duplicate with Carbon Copy Cloner, follow these steps:
Launch Carbon Copy Cloner (Figure 17).
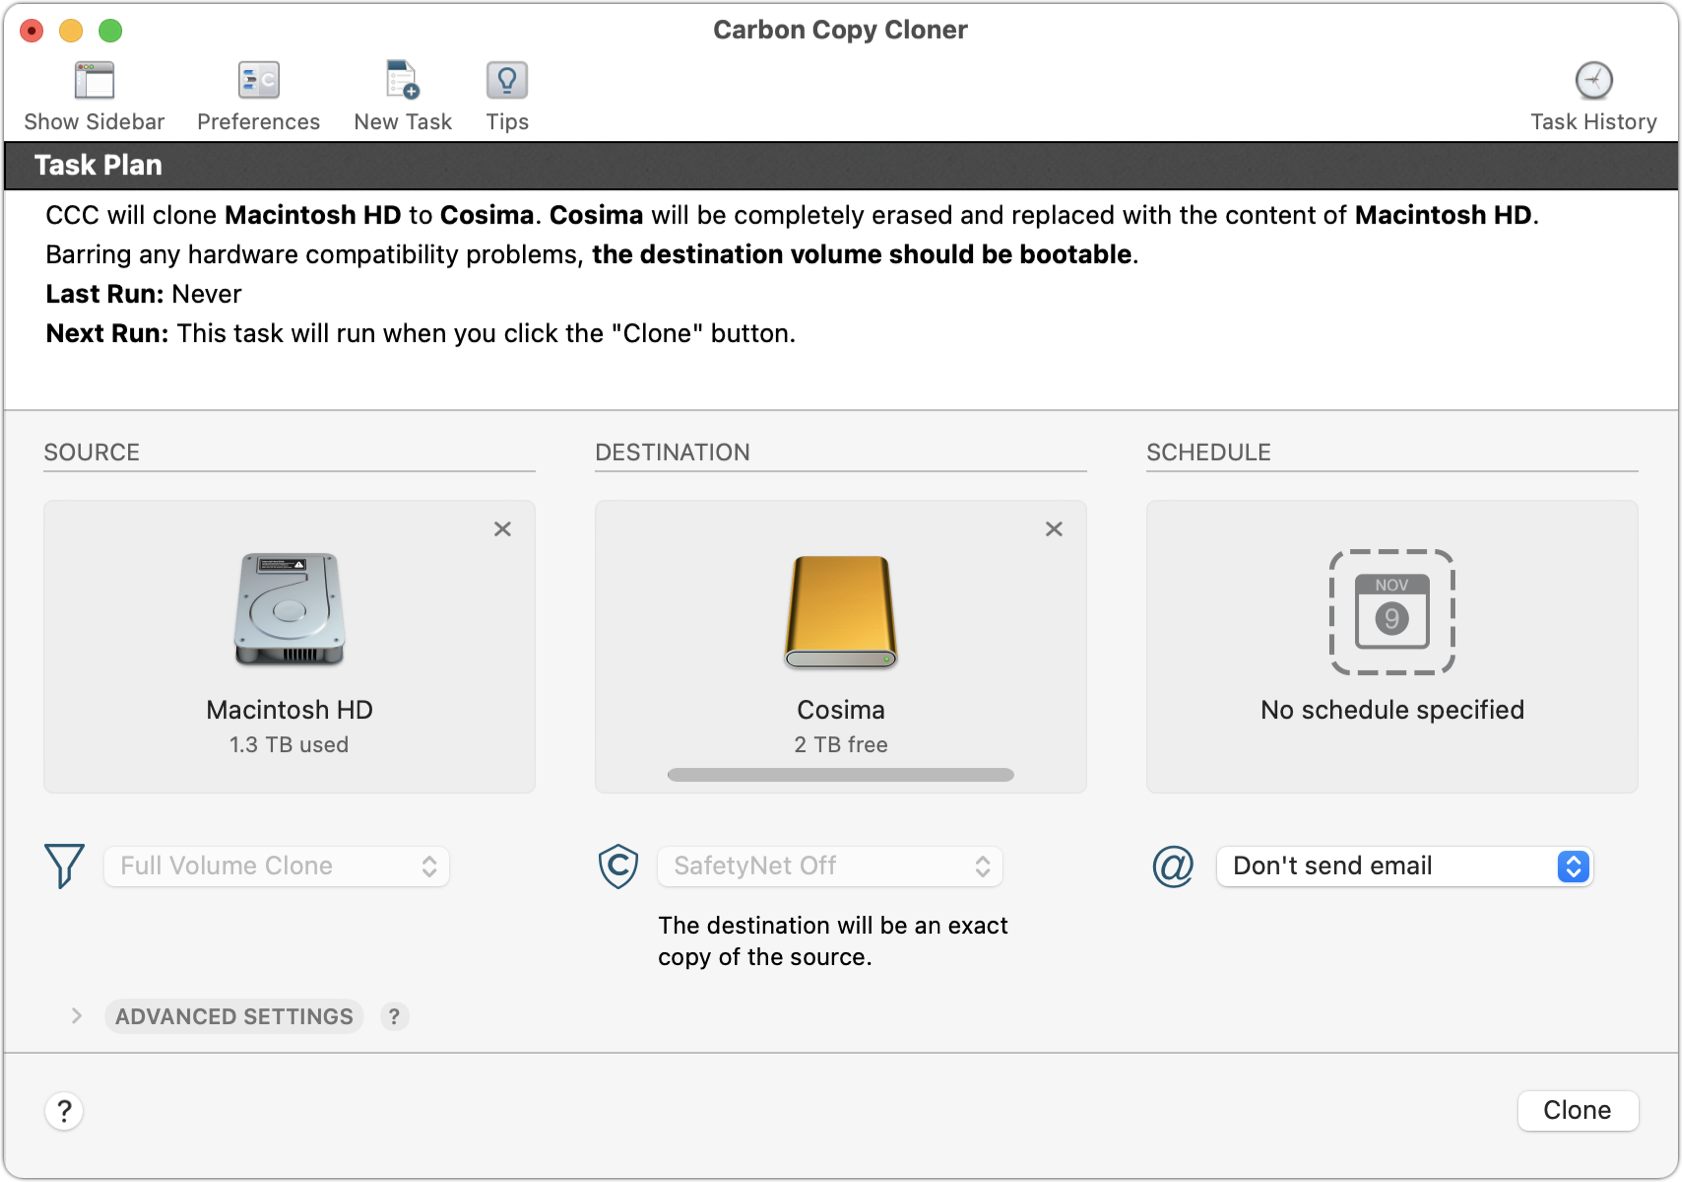
Figure 17: Carbon Copy Cloner shows you the basic elements of your backup—source, destination, options, and schedule—and a plain-English explanation. (Carbon Copy Cloner 5, the last version to run in Mojave, is shown here. Version 6 looks slightly different.) Click in the SOURCE area and select your startup volume from the popover that appears.
Click in the DESTINATION area and, from the popover that appears, select the disk or partition set aside for duplicates on your external disk.
Depending on your versions of Carbon Copy Cloner and macOS, and the type of source volume you’ve selected, you may see a dialog at this point with additional options. If so, click Allow CCC to Erase ‘volume name’ to let Carbon Copy Cloner erase the destination (even if it’s already empty) to prepare it for making a bootable duplicate.
Optional but recommended: click in the SCHEDULE area and, in the popover that appears, choose a frequency for scheduled updates of your bootable duplicate from the “Run this task” pop-up menu. Click Done.
Click Clone (or Start, in version 6), enter your administrator password, and click OK to make an immediate duplicate. Then be prepared to wait; it will take a while.
Click Save when prompted to do so. You can then quit Carbon Copy Cloner. (In fact, you can quit even if a backup is in progress; Carbon Copy Cloner can finish the backup even when the app is not running.)
If you set up a schedule in step 4, Carbon Copy Cloner updates your duplicate automatically (as long as the drive is available).
Create a Duplicate with SuperDuper!
SuperDuper! has a well-deserved reputation for its ease of use and reliability. The software comes in a full-featured paid version and a free version that lets you create duplicates but not update them incrementally. (Let me say that the incremental update capability is well worth the price!)
To create a duplicate with SuperDuper!, follow these steps:
Launch SuperDuper!.
You’ll see two pop-up menus at the top of the window (Figure 18); choose the source (your internal disk) from the one on the left and the destination (the disk or partition set aside for duplicates on your external disk) from the one on the right.
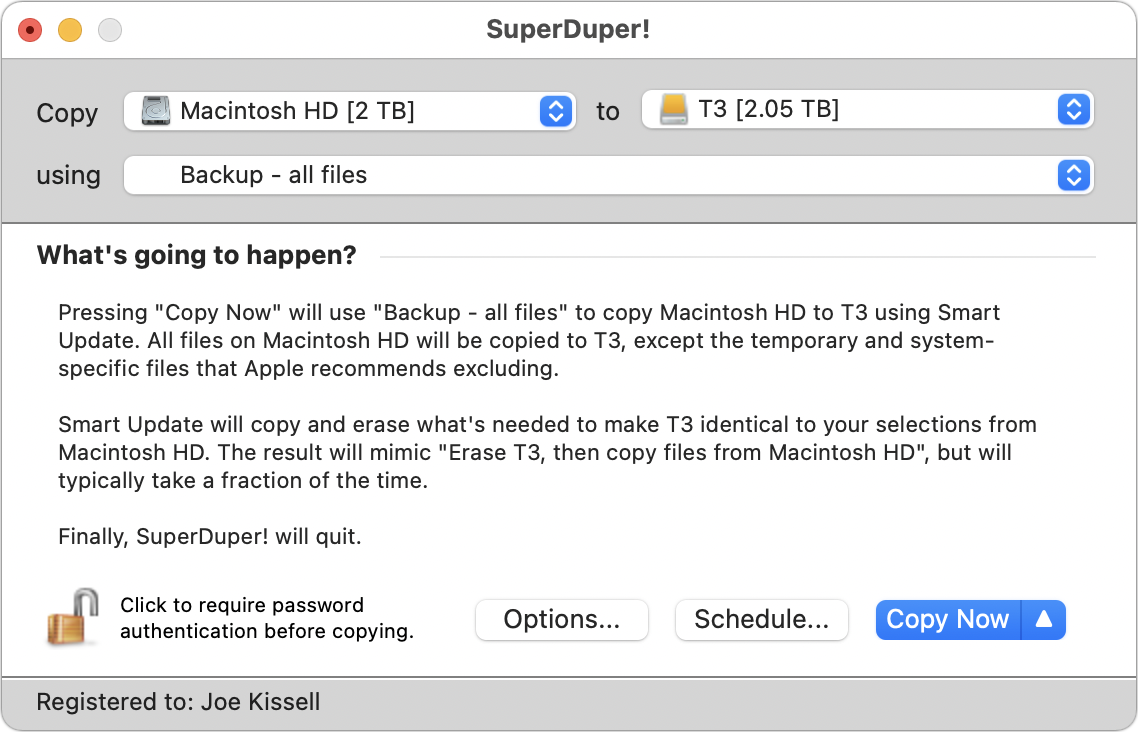
Figure 18: Much like Carbon Copy Cloner, the SuperDuper! window asks you for just a few pieces of information and clearly explains what will happen. From the “using” pop-up menu, choose “Backup - all files.”
If the lock icon in the lower-left corner is in the locked position, click it, enter your password, and click OK.
Click Options. On the General tab, choose “Smart Update destination from source” from the “During copy” pop-up menu and click OK. (Bear in mind that this option, which provides incremental updates, is available only in the paid version of SuperDuper!)
Do either of the following:
To make a duplicate immediately, click Copy Now, then click Copy to confirm that you want to do this. (Be prepared to wait; your first duplicate will take quite a while.)
To set this duplicate to occur on a schedule, click Schedule and select the day(s), week(s), and time to run the schedule; I recommend at least one day per week but preferably once a day, at a time when you aren’t actively using the Mac. Click OK.
Immediately or on the schedule you selected, SuperDuper! duplicates your internal drive to your external drive.
Create a Bootable Duplicate in Big Sur or Later
The instructions in Create a Duplicate with Carbon Copy Cloner and Create a Duplicate with SuperDuper! work well for Catalina and earlier, but making a bootable duplicate in Big Sur or later is more complicated. You can take any of four approaches, each of which can employ multiple techniques. Use whichever one you prefer; if you run into problems, you can always start over with a different method.
I’ve successfully made bootable duplicates of Big Sur and later in several different ways. In my testing to date, I’ve found no functional difference among these approaches, and downloading a standalone macOS installer or using recovery mode to perform the installation seemed to work equally well. However, because so many variables are involved (and both macOS and backup apps are constantly changing), it’s conceivable that one approach will work on your equipment and another will fail. So be prepared to start over with a different approach if your first attempt doesn’t succeed.
All of these options assume you’re starting with a blank destination drive. (If not, be sure to erase it using Disk Utility first; see steps 1–7 in Create a Data-Only Duplicate.) In addition, with all four approaches, the operating system on your duplicate will match the original only until the next update to macOS; thereafter, if you want to keep the operating system on the duplicate in sync, you’ll have to follow the steps in Update the System Volume Duplicate.
Option A: Create a One-Time Bootable Duplicate
In earlier versions of this book, I listed this approach as Option D—the last and least favorable choice—because both macOS and third-party cloning apps were in such a state of flux. Now, however, as long as you’re running macOS 11.4 or later, things have stabilized to the point where this is my go-to option, as it requires the fewest steps and can be done with the latest versions of Carbon Copy Cloner, SuperDuper!, ChronoSync, and other apps.
In this approach, the backup app erases the destination (even if you just erased it manually yourself) and creates a one-time bootable duplicate of your startup volume. By this I mean that your initial backup will function just as bootable duplicates always have, but the backup app will be unable to update macOS on the system volume without erasing the entire disk and redoing the backup from scratch.
Create a One-Time Bootable Duplicate in Carbon Copy Cloner
In Carbon Copy Cloner, start by following steps 1–3 in Create a Duplicate with Carbon Copy Cloner. Click the destination volume and choose Legacy Bootable Copy Assistant from the contextual menu. In the dialog that appears, click Allow CCC to Erase ‘volume name.’ Then proceed with the remaining steps. Carbon Copy Cloner informs you that after the initial backup, only the Data volume will be updated.
Create a One-Time Bootable Duplicate in SuperDuper!
In SuperDuper!, start by following steps 1–4 in Create a Duplicate with SuperDuper!. But in step 5, after clicking Options, choose “Erase destination, then copy files from source” from the “During copy” pop-up menu and click OK. Then proceed with step 6.
Create a One-Time Bootable Duplicate in ChronoSync
In ChronoSync 10.0 or later, start in the main ChronoSync Organizer window. Then:
Click “Use a setup assistant.”
Click Bootable Backup.
Click Get Started.
Click Request Admin Privileges and authenticate with your administrator username and password.
If you have more than one boot volume available, select the one you want to use as a source; if not, there’s nothing to select. Click Next Step.
Select the destination volume you want to use and click Next Step.
Decide whether you want to erase the entire destination drive or create a new APFS volume for your duplicate. (In most cases you’ll probably want to erase the drive.) Click Next Step.
Optionally rename the destination volume. Click Next Step.
Optionally select “Create and maintain an archive on the destination volume” if you want a versioned bootable duplicate (see Bootable Duplicates with Versioning). Click Next Step.
Optionally rename the task. Click Create Task, then click Proceed to confirm.
ChronoSync creates your bootable duplicate and saves the backup task. If you later run the same task again, ChronoSync updates just the Data volume—no further changes are required. (See Update the Data Volume Duplicate.)
Option B: Create a Data-Only Duplicate, Then Install macOS
The next option is to first duplicate just your Data volume onto an empty backup drive, then install macOS onto it (without overwriting the existing data).
Follow these steps:
Connect your Thunderbolt 3 or 4 external drive to your Mac, and make sure it’s empty. (If not, use Disk Utility to erase it; see steps 1–7 in Create a Data-Only Duplicate.
Use a backup app to duplicate just the Data volume from your startup disk onto the external drive; see Create a Data-Only Duplicate.
Either download a full macOS installer or boot in recovery mode, whichever approach you prefer:
Download: Download the full installer for the version of macOS you want. (This should be the same one in use on your startup volume.) Assuming you’re running the latest version of Ventura, you can use this link to download the installer. (For the latest version of Monterey, you can use this link, for the latest version of Big Sur, use this link, or for the latest version of Catalina, use this link.) Then run the installer.
Recovery mode: Enter recovery mode (see Something Recovery Something). Confirm that you’re connected to a Wi-Fi network. (If not, click the Wi-Fi icon on the menu bar, select a network, enter its password, and click Join.) Click Reinstall macOS Ventura (or Monterey or Big Sur or Catalina) to download and run the macOS installer.
When asked to select a destination, click Show All Disks and then select your external backup drive. Proceed with the installation.
When the installation is finished, your Mac will reboot from the external drive. If it works properly, you can go to System Settings > General > Startup Disk (Ventura or later) or System Preferences > Startup Disk (Monterey or earlier), select your internal startup volume, and restart.
Option C: Install macOS with Migration
In this approach, you install macOS onto an empty drive and then use Apple’s migration tools to copy over your personal data. If you later want to update the duplicate, you’ll have to separately perform the procedures in Update the Data Volume Duplicate and Update the System Volume Duplicate.
Follow these steps:
Connect your Thunderbolt 3 or 4 external drive to your Mac, and make sure it’s empty. (If not, use Disk Utility to erase it; see steps 1–7 in Create a Data-Only Duplicate.)
Either download a full macOS installer or boot in recovery mode, whichever approach you prefer:
Download: Download the full installer for the version of macOS you want. (This should be the same one in use on your startup volume.) Assuming you’re running the latest version of Ventura, you can use this link to download the installer. (For the latest version of Monterey, you can use this link, for the latest version of Big Sur, use this link, or for the latest version of Catalina, use this link.) Then run the installer.
Recovery mode: Enter recovery mode (see Something Recovery Something). Confirm that you’re connected to a Wi-Fi network. (If not, click the Wi-Fi icon on the menu bar, select a network, enter its password, and click Join.) Click Reinstall macOS Ventura (or Monterey or Big Sur or Catalina) to download and run the macOS installer.
When asked to select a destination, click Show All Disks and then select your external backup drive. Proceed with the installation. (Here, to avoid the “Conflict” message you would otherwise have to deal with later, after you select your user account you can uncheck “Copy account settings from account name.” Then click Install.)
When you get to the Migration Assistant screen, select “From a Mac, Time Machine backup or Startup disk” and click Continue.
If prompted, enter your password and click OK.
On the “Transfer information to this Mac” screen, select your Mac’s internal SSD (usually called Macintosh HD) and click Continue.
If your internal SSD is protected with FileVault, choose a user, enter that user’s password, and click Unlock to unlock FileVault.
On the “Select the information to transfer” screen, make sure everything is selected and click Continue.
If prompted, create secure passwords for each Administrator account. (These should be the same as your previous account passwords.) To do so, click Set Password, enter and confirm the password, and click Set Password; repeat for any remaining accounts. Click Continue.
If you see a screen that says “This Mac already has a user account with the same name as the one you are transferring. Do you want to replace the user on this Mac or keep both accounts?”, leave the default option (“Delete the existing user ‘username’ from this Mac and transfer ‘username’ from your other Mac.”) as is but uncheck “Keep the data from the deleted user in the Users folder.” Click Continue.
If prompted to provide the password from a user who is already authorized, click the Authorize button next to that username, enter that user’s password, and click OK. Then click Continue.
The migration will proceed, possibly taking multiple hours. When you see “Migration Complete,” click Done.
At this point your Mac will be running from the external drive. If it works properly, you can go to System Settings > General > Startup Disk (Ventura or later) or System Preferences > Startup Disk (Monterey or earlier), select your internal startup volume, and restart.
Option D: Install macOS, Then Create a Data-Only Duplicate
This option is like the preceding one, except that you don’t bother with the migration part; instead, you use your backup app to overwrite the Data volume on the backup drive with an exact copy of the one from your startup volume.
Follow these steps:
Connect your Thunderbolt 3 or 4 external drive to your Mac, and make sure it’s empty. (If not, use Disk Utility to erase it; see steps 1–7 in Create a Data-Only Duplicate.)
Either download a full macOS installer or boot in recovery mode, whichever approach you prefer:
Download: Download the full installer for the version of macOS you want. (This should be the same one in use on your startup volume.) Assuming you’re running the latest version of Ventura, you can use this link to download the installer. (For the latest version of Monterey, you can use this link, for the latest version of Big Sur, use this link, or for the latest version of Catalina, use this link.) Then run the installer.
Recovery mode: Enter recovery mode (see Something Recovery Something). Confirm that you’re connected to a Wi-Fi network. (If not, click the Wi-Fi icon on the menu bar, select a network, enter its password, and click Join.) Click Reinstall macOS Ventura (or Monterey or Big Sur or Catalina) to download and run the macOS installer.
When asked to select a destination, click Show All Disks and then select your external backup drive. Proceed with the installation.
When you get to the Migration Assistant screen, click Not Now in the lower-left corner. Then follow the usual initial setup steps, including setting up a user account. Choose whatever settings you like, as they’ll all be overwritten in a moment!
Go to System Settings > General > Startup Disk (Ventura or later) or System Preferences > Startup Disk (Monterey or earlier), select your internal startup volume, and restart.
Use your backup app of choice to update the new Data volume on the newly minted backup drive with data from your startup volume. To do this, see Update the Data Volume Duplicate.
Update a Bootable Duplicate in Big Sur or Later
Currently, there’s no way to update the signed system volume on a duplicate of Big Sur or later, regardless of whether your Mac has an Intel or an M-series processor. There’s reason for optimism that Apple will solve this problem in the future, but in the meantime you’ll have to go through two separate processes, one to update your backup drive’s Data volume and another to update its system volume.
Update the Data Volume Duplicate
Carbon Copy Cloner, SuperDuper!, and ChronoSync can all update the Data volume from a bootable duplicate of Big Sur or later, ignoring the system volume. (Other backup apps may be able to do it too; I haven’t tested this with other software.)
The process is exactly the same as updating a conventional bootable duplicate in SuperDuper!, and almost the same in Carbon Copy Cloner and ChronoSync, with the following adjustments:
Carbon Copy Cloner: Follow the steps in Create a Duplicate with Carbon Copy Cloner (even though you’re using Big Sur or later), selecting your startup volume as the source and your backup volume as the destination. You can’t and don’t have to specify the Data volume for either source or destination, as Carbon Copy Cloner figures that out automatically. Note that if you’ve already used Carbon Copy Cloner to create a one-time bootable duplicate, it automatically modifies that backup task afterward to create a data-only duplicate the next time, without any further steps required.
ChronoSync: Select your startup volume (with Admin access) as the source, and the duplicate (also with Admin access) as the destination. When ChronoSync notices that these volumes belong to an installation of Big Sur or later, it automatically uses the read/write Data volumes for both source and destination. Use “Mirror left-to-right” as the operation. Then perform the synchronization (which you can also schedule as you like).
Update the System Volume Duplicate
Whereas updating the Data volume can be put on a recurring schedule and occur without any intervention, the same is not true of the system volume. (Again, I hope that this will change at some point.) So, whenever you install an update to macOS on your main boot volume, that system will go out of sync with your bootable duplicate. This isn’t necessarily a problem—you can certainly use an older version of macOS with a newer version of your data—but if you want your duplicate to match the original, you must manually update it in one of the following ways:
Reboot and open Software Update. The easiest and quickest approach is to restart your Mac from the duplicate and allow Software Update to do its thing. While running from the duplicate, if you aren’t automatically prompted to install any available software updates, go to System Settings > General > Software Update (Ventura or later) or System Preferences > Software Update (Monterey or earlier), check for updates, and install them now.
Download the latest macOS installer and install on that volume. This approach requires more time and disk space, but if it strikes your fancy, knock yourself out. Download the full, standalone installer for the latest version of your operating system from Apple. (Assuming you’re using the then-current version of macOS, you can find it in the Mac App Store.) Run the installer, click Show All Disks when asked where to install macOS, and select your bootable duplicate. Allow the installation to proceed, keeping in mind that when it finishes, it will reboot from the duplicate. Go to System Settings > General > Startup Disk (Ventura or later) or System Preferences > Startup Disk (Monterey or earlier), authenticate, select your regular startup volume, and restart again.
Reboot in recovery mode and reinstall on that volume. Similar to the preceding option, you can restart your Mac in recovery mode (see Something Recovery Something), select Reinstall macOS, and select your bootable duplicate as the target. This has the advantage of not requiring you to manually download (and later delete) a large installer, but the disadvantage of having to reboot in recovery mode to get started.
Test Your Bootable Duplicate
After you’ve made your first bootable duplicate, be sure to verify that you can indeed start your Mac from it. To do this, make sure your bootable duplicate is connected to your Mac. Then follow the steps ahead for the type of Mac you’re using.
Test a Duplicate on an Intel-Based Mac
If you have an Intel-based Mac, follow these steps to test your bootable duplicate:
If your Mac has a T2 chip (see full list here), reboot in recovery mode, choose Utilities > Startup Security Utility, and select “Allow booting from external media” under External Boot; for details, see these instructions. (Do not change the Secure Boot setting.) Note, however, that doing this disables Apple Pay on your Mac; you’ll have to undo this setting later to reenable it. (See also the sidebar Apple Pay and Bootable Duplicates.)
Restart your Mac by choosing Apple > Restart and clicking Restart when prompted.
As soon as your Mac begins to restart, press and hold the Option key.
When your screen shows the volumes available for booting your computer, release the Option key, use the arrow keys to select your duplicate, and press Return. Your Mac should boot from the duplicate—but be aware that this may take considerably longer than booting from your regular startup disk.
To verify that your Mac has indeed started from the duplicate and not from your regular startup disk, choose Apple > About This Mac. The name of the current startup disk appears next to the label “Startup Disk.” (You did give your duplicate a different name from your regular startup disk, right?)
Choose Apple > Restart to start from your internal disk again. And again (as in step 5), confirm that you’ve booted from the correct startup disk; if you accidentally keep using your duplicate, problems and confusion could arise.
If you selected “Allow booting from external media” in step 1, go back and repeat that step now but select “Disallow booting from external media.” This should reenable Apple Pay.
If your Mac doesn’t start from the duplicate, go to System Settings > General > Startup Disk (Ventura or later) or System Preferences > Startup Disk (Monterey or earlier), select the duplicate, restart, and again check to see that your Mac has started from the correct volume. (Be sure to set your startup disk back to its customary volume afterward!) If not, verify that the drive’s partition map scheme and format are correct (see Prepare Your Backup Drive) and try creating the duplicate again.
Test a Duplicate on an M-Series Mac
On an M-series Mac, follow these steps to verify your bootable duplicate:
Shut down your Mac by choosing Apple > Shut Down.
Press and hold the power button until the text “Loading startup options” appears on screen.
Wait for the available startup volumes to appear; this may take 30 seconds or more.
Select your bootable duplicate and click Continue. Your Mac restarts.
If this is your first time booting from this duplicate (or if you’ve updated the version of macOS on the duplicate since the last time), you’re forced to take a quick detour:
After what may seem like a lengthy delay, an app called Boot Recovery Assistant runs, displaying a dialog that says “Authentication is required to verify startup disk.” Choose your username from the pop-up menu, fill in your password, and click OK. After a few moments, your Mac restarts again.
When the login screen appears, log in as usual. (In my testing, once the login screen appeared it sometimes took quite a while for it to respond to keyboard and mouse input. Be patient.)
To verify that your Mac has indeed started from the duplicate and not from your regular startup disk, choose Apple > About This Mac. The name of the current startup disk appears next to the label “Startup Disk.” (You did give your duplicate a different name from your regular startup disk, right?)
Choose Apple > Restart to start from your internal disk again. And again (as in step 6), confirm that you’ve booted from the correct startup disk; if you accidentally keep using your duplicate, problems and confusion could arise. If you’re still running from the duplicate (and not your internal SSD) after restarting, follow these steps to correct the problem:
Repeat steps 1–4, selecting your internal SSD as the startup volume.
When the macOS Recovery window appears, select a user whose password you know.
Click Next, enter the user’s password, and click Continue.
Click Restart.
You’ll likely find that Apple Pay no longer works on your Mac, but don’t panic. Follow the steps in the sidebar Apple Pay and Bootable Duplicates.
Create a Data-Only Duplicate
A complete duplicate of your startup volume would be bootable, but there are also reasons to create non-bootable duplicates:
If your Mac is running Catalina or later, macOS has a split system volume (see Catalina’s Split System Volume for details), in which a read-only system volume holds macOS itself, a read/write Data volume holds everything else, and macOS makes it appear as though these two are a single startup volume. Due to the increased difficulties in creating and maintaining bootable duplicates that encompass both of these sub-volumes, especially in Big Sur or later, you may choose to clone only the Data volume; that duplicate won’t be bootable, because it won’t contain an installation of macOS itself, but it will still have a complete and perfect copy of all your personal applications, files, and other data. (And you can later make it bootable if need be; see Option B: Create a Data-Only Duplicate, Then Install macOS.)
You may have disks other than your startup volume! If a secondary drive dies and you urgently need to get back to work with the data that was on it, having a duplicate that you can swap out in minutes is better than waiting the hours it would take to restore a whole drive from a versioned backup. (This is the same reasoning I apply to bootable duplicates.)
Some types of data you may store on a secondary drive don’t lend themselves well to versioned restoration. For example, if you restored a single photo from your Photos library, the Photos app might not display it. Photos relies on a database to tell it what items are where, and restoring the photo wouldn’t modify the database. You need to restore the entire library from a backup, not just an individual photo. And restoring that much data will likely go more quickly from a duplicate than from a versioned backup.
You can create and update duplicates of non-boot volumes following almost exactly the same procedure you use for your startup volume, and I refer to either variety as a data-only duplicate.
To make a data-only duplicate, start with a blank external disk (and make sure it’s an SSD if you think you might later want to make it bootable):
With the external drive attached, open Disk Utility.
Choose View > Show All Devices.
Select the topmost icon for the external drive in the list on the left.
Click Erase.
Fill in a name for the new volume, and make sure Format is set to APFS and Scheme is set to GUID Partition Map.
Click Erase.
When the Done button appears, click it. You’ll then have a new volume with the name you entered in step 5.
Now create the duplicate itself:
In Carbon Copy Cloner: Follow the steps in Create a Duplicate with Carbon Copy Cloner (as though you were creating a duplicate in Catalina or earlier), selecting the drive you want to back up as the source and your newly created volume as the destination. Even though the Source area will not be labeled as “Data,” the explanatory text at the top of the window will explain: “CCC will copy your applications, data and system settings from the source Data volume.”
In SuperDuper!: Follow the steps in Create a Duplicate with SuperDuper!, selecting the drive you want to back up as the source and your newly created volume as the destination. If you’re doing a data-only duplicate of your startup volume, select the Data volume as the source.
In ChronoSync: Create a new synchronizer task. For both Source Target and Destination Target, choose “Mounted Volumes (Admin access)” from the “Connect to” pop-up menu. Then choose the volume you want to duplicate (whether or not it’s a startup volume) as the source and your newly created volume as the destination. Choose “Mirror Left-to-right” from the Operation pop-up menu and click Synchronize.