Edit Images
So far, we’ve walked you through the basics of opening and viewing images in Preview. Now we dig into Preview’s little-known and surprisingly powerful editing features. As people who write about technology, we have some skin in the game. We work with screenshots every day and Preview is our go-to app for cleaning up and tweaking the images that appear in TidBITS articles and this book. Sure, we could use something like GraphicConverter, Pixelmator, or even Adobe Photoshop, but those tools are often overkill for the graphics tasks that many of us need to perform.
In this chapter, we start by looking at how to select content in an image. After that, we cover:
Inserting and Manipulating Basic Shapes and Using the Mask and Loupe Shapes
We end with a look at the Undo command and at how you can even open an older version of a file; see Remember Undo!
Selecting Content in Images
Once you understand how to use Preview’s tools, you’ll discover that you can edit images in ways that are far more subtle than you might think. But first, you must understand how to select image content.
Preview offers five different selection tools, each of which may be more or less appropriate depending on what you want to accomplish. You’ll use the Rectangular Selection tool the most, but the Elliptical Selection Tool, Lasso Selection Tool, and Smart Lasso Tool also can be helpful on occasion. Finally, the Instant Alpha Tool is extremely useful for making image backgrounds transparent.
You find these tools in the Markup toolbar (see Tour the Markup Toolbar). To access the first four selection tools, click the Selection Tools ![]() icon and choose from the drop-down menu. (You can access this menu only when you’re working on an image. When a PDF is open, only the Rectangular Selection
icon and choose from the drop-down menu. (You can access this menu only when you’re working on an image. When a PDF is open, only the Rectangular Selection ![]() tool is available.) For Instant Alpha, use the Instant Alpha
tool is available.) For Instant Alpha, use the Instant Alpha ![]() icon (Figure 35).
icon (Figure 35).

Rectangular Selection Tool
The Rectangular Selection tool should be selected by default when you’re viewing images. If not, choose Tools > Rectangular Selection or click the Selection Tools ![]() icon on the Markup toolbar and then choose Rectangular Selection.
icon on the Markup toolbar and then choose Rectangular Selection.
Using the Rectangular Selection tool is simple: drag within the image to create a selection box that’s the size of what you want to select. You can move the box by positioning your pointer inside it so the pointer becomes a hand. Once it does, drag to position the box as you like.
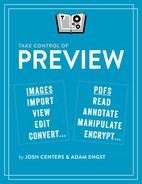
If the box isn’t quite the right size, drag any blue dot at its edges (Figure 36). (We call these dots “adjustment handles.”) As you tweak, Preview displays the box’s pixel dimensions in a small label—a handy aid when you’re trying to create an image with a specific measurement or aspect ratio. (This label won’t appear for a PDF; instead, choose Tools > Show Inspector, click the Crop ![]() icon, and look in the Selection area.)
icon, and look in the Selection area.)
But wait—there’s more! The Rectangular Selection tool offers a couple more tricks:
Press and hold the Shift key while dragging to restrict the selection to a perfect square. This is particularly handy when you’re making an avatar icon for websites that require square dimensions, as shown in Figure 36, above.
Hold down the Option key while making your selection box to expand it from the center.
Elliptical Selection Tool
The second choice when you click the Selection Tools ![]() icon on the Markup toolbar is Elliptical Selection
icon on the Markup toolbar is Elliptical Selection ![]() . It works just like the Rectangular Selection tool, except that it selects elliptical rather than rectangular areas.
. It works just like the Rectangular Selection tool, except that it selects elliptical rather than rectangular areas.
After dragging out an elliptical selection, you’ll see blue adjustment handles at its edges as well as additional handles at each corner of a rectangle surrounding the selection (Figure 37). The dots attached to the selection ellipse itself adjust one dimension at a time, whereas those on the corners of the rectangle enclosing the ellipse can adjust two dimensions at once. In other words, drag a corner to enlarge the entire ellipse or drag a side to change the ellipse’s shape.

Lasso Selection Tool
The third choice when you click the Selection Tools ![]() icon on the Markup toolbar is the Lasso Selection
icon on the Markup toolbar is the Lasso Selection ![]() . Use this tool to select an irregularly shaped object or portion of a graphic. With this tool, you can hand-draw a selection around any object (Figure 38).
. Use this tool to select an irregularly shaped object or portion of a graphic. With this tool, you can hand-draw a selection around any object (Figure 38).

The hard part of using this tool is that you have to do it in a single click-and-drag motion. Since the Lasso Selection has to form a closed shape, if you don’t close it yourself by ending back at the starting point, the selection closes itself with a straight line. There’s no way to resize it after the fact without starting over.
Smart Lasso Tool
The Lasso Selection tool works best when the irregularly shaped object you want is well separated from other parts of the image, as might be the case with a logo you want to extract from a scanned flyer. But in a photograph or complicated illustration you’re unlikely to be so lucky. For such situations, use the last option when you click the Selection Tools ![]() icon on the Markup toolbar—the Smart Lasso
icon on the Markup toolbar—the Smart Lasso ![]() tool. It tries to make up for the plain old Lasso tool’s deficiencies.
tool. It tries to make up for the plain old Lasso tool’s deficiencies.
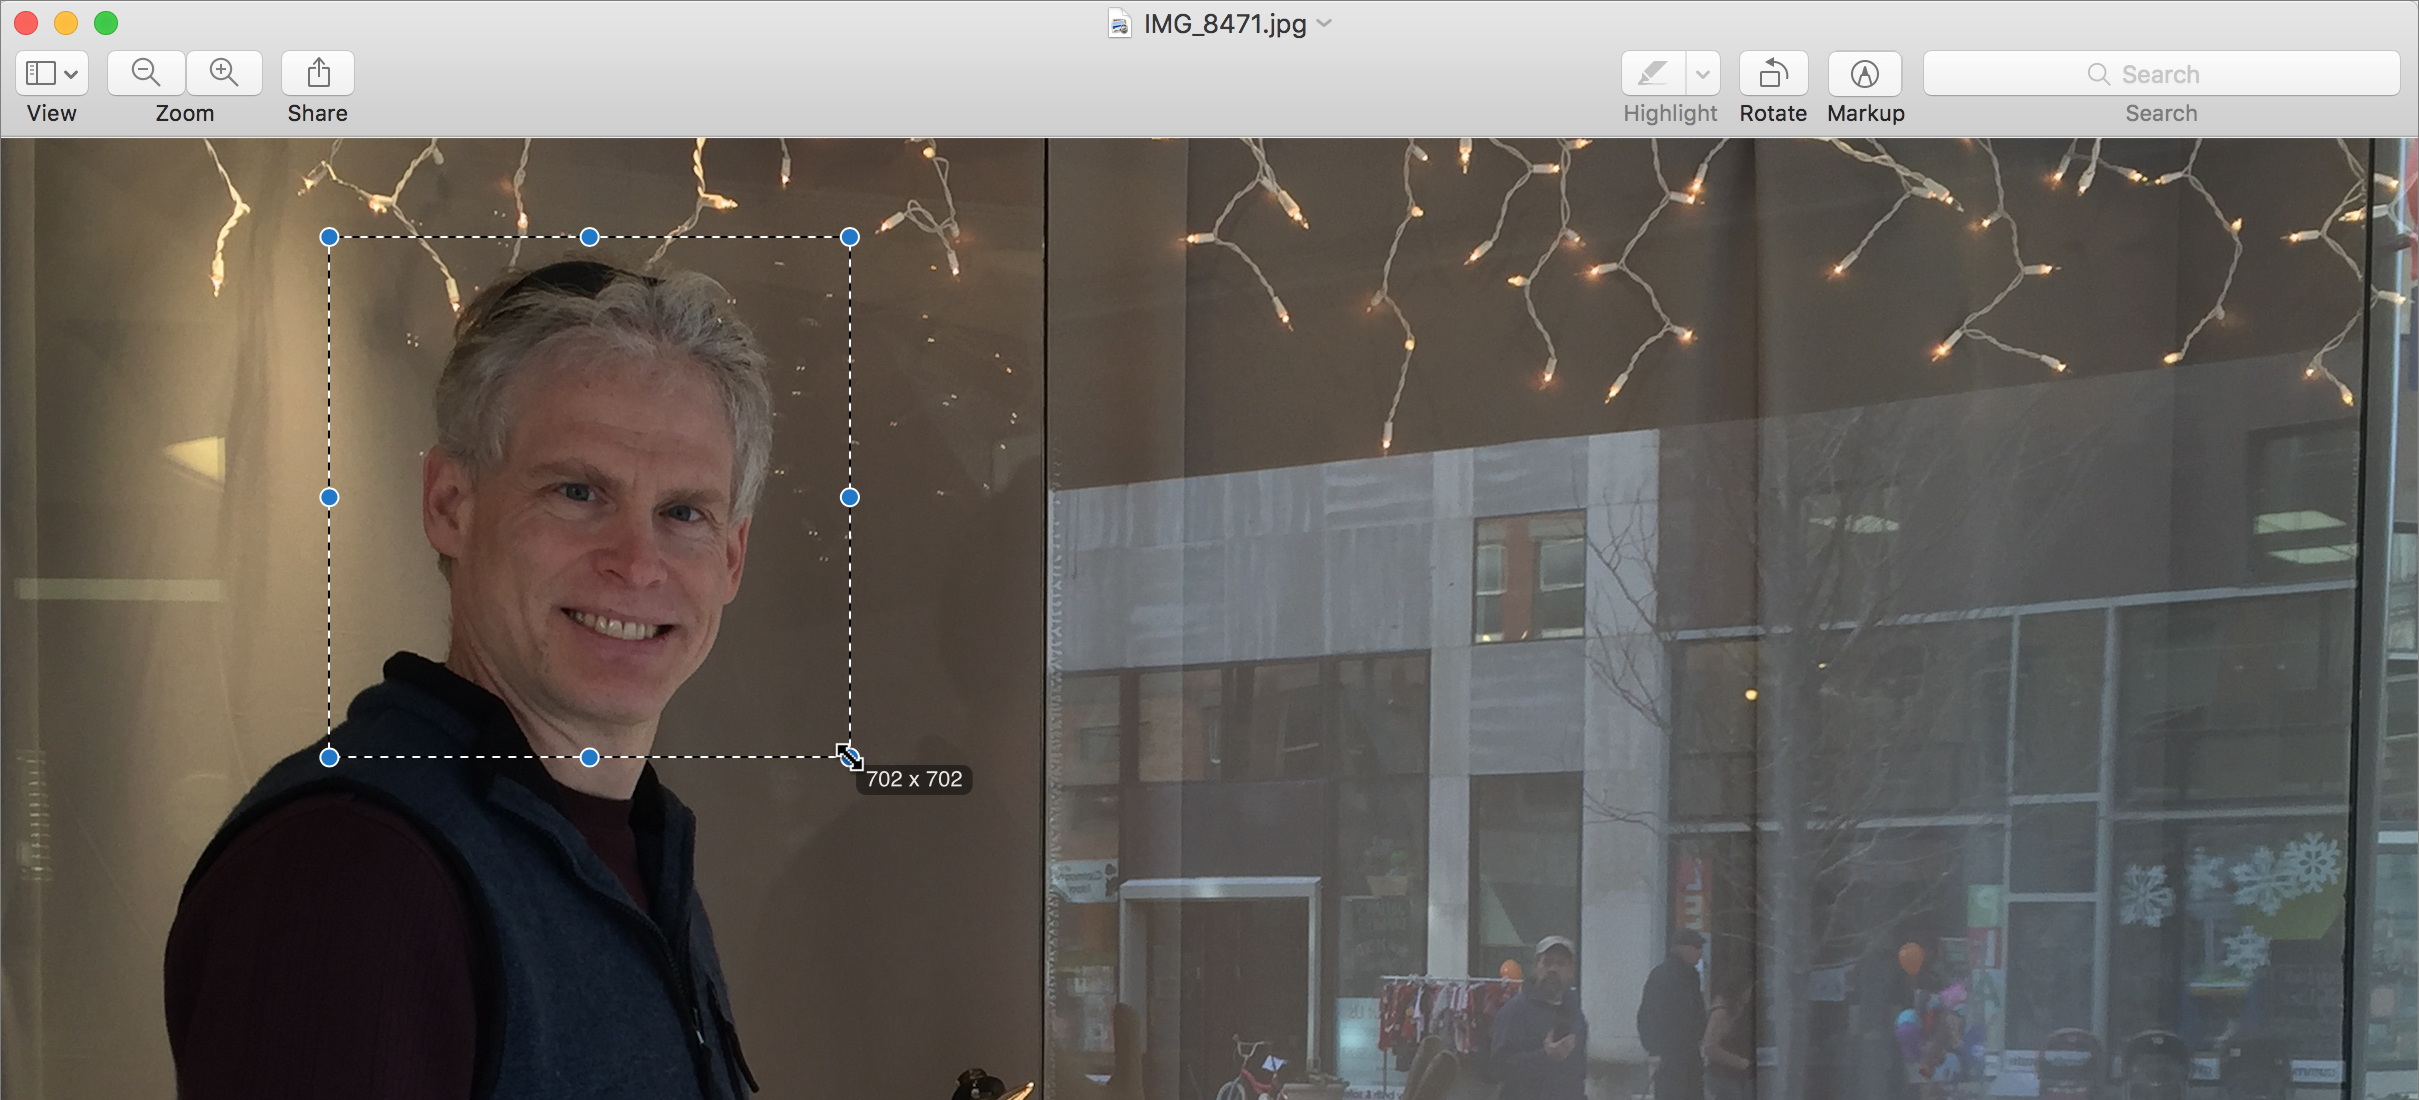
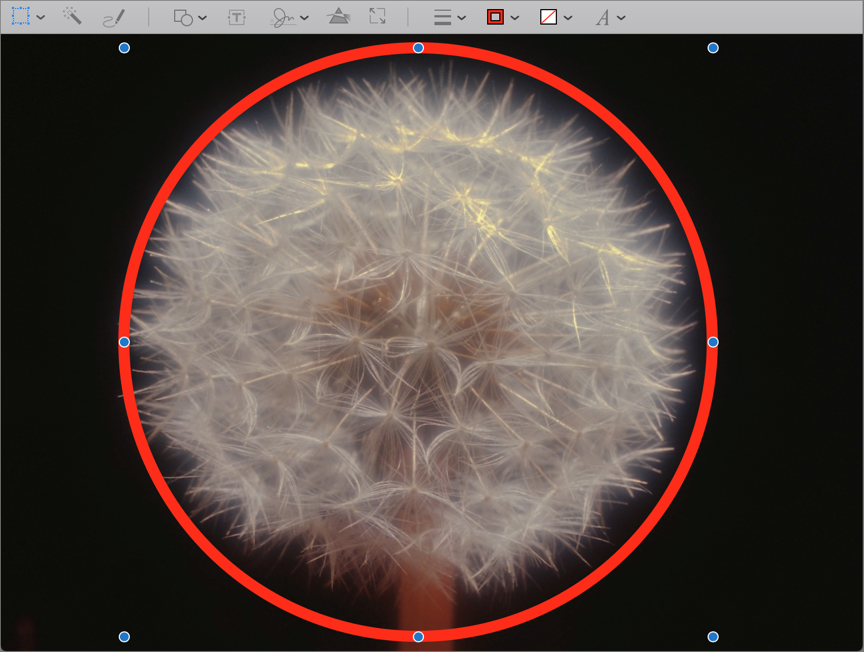
When you drag using Smart Lasso, a thick red line appears instead of a thin white one. Draw around the object you want to select; as you do, Preview tries to construct the selection intelligently (Figure 39). As with the Lasso tool, the Smart Lasso has to make a closed shape, so if you don’t close it yourself, it will do so using a straight line.

The Smart Lasso acts more like a brush than a selection tool, so if you miss an area, you can double back immediately. Although the Smart Lasso is more forgiving than the normal Lasso, you’ll likely need to experiment to get the results you want.
Instant Alpha Tool
Preview’s final selection tool is a one-trick pony that’s designed to remove a colored area from an image, replacing it with transparency. That’s essential when you want irregularly shaped images, such as logos or product photos, to float above a webpage’s background color or to have an image’s fill color match the page color.
Click the Instant Alpha ![]() tool on the Markup toolbar and then drag slightly on the colored area you want to delete. Preview selects the area you dragged over as well as any adjacent pixels that have the same color, highlighting them all in pink. Without releasing the mouse, you can continue to drag the pointer to adjust the Instant Alpha tool’s sensitivity to include additional colors (Figure 40).
tool on the Markup toolbar and then drag slightly on the colored area you want to delete. Preview selects the area you dragged over as well as any adjacent pixels that have the same color, highlighting them all in pink. Without releasing the mouse, you can continue to drag the pointer to adjust the Instant Alpha tool’s sensitivity to include additional colors (Figure 40).
Once you’re happy with what’s selected, lift your finger from the mouse button or trackpad to finalize your selection. You’ll see “marching ant” dashes around the selection. Then press Delete to remove the selected color, replacing it with transparency (represented by the window background color, gray by default, which you can customize in Configure Preview Preferences).
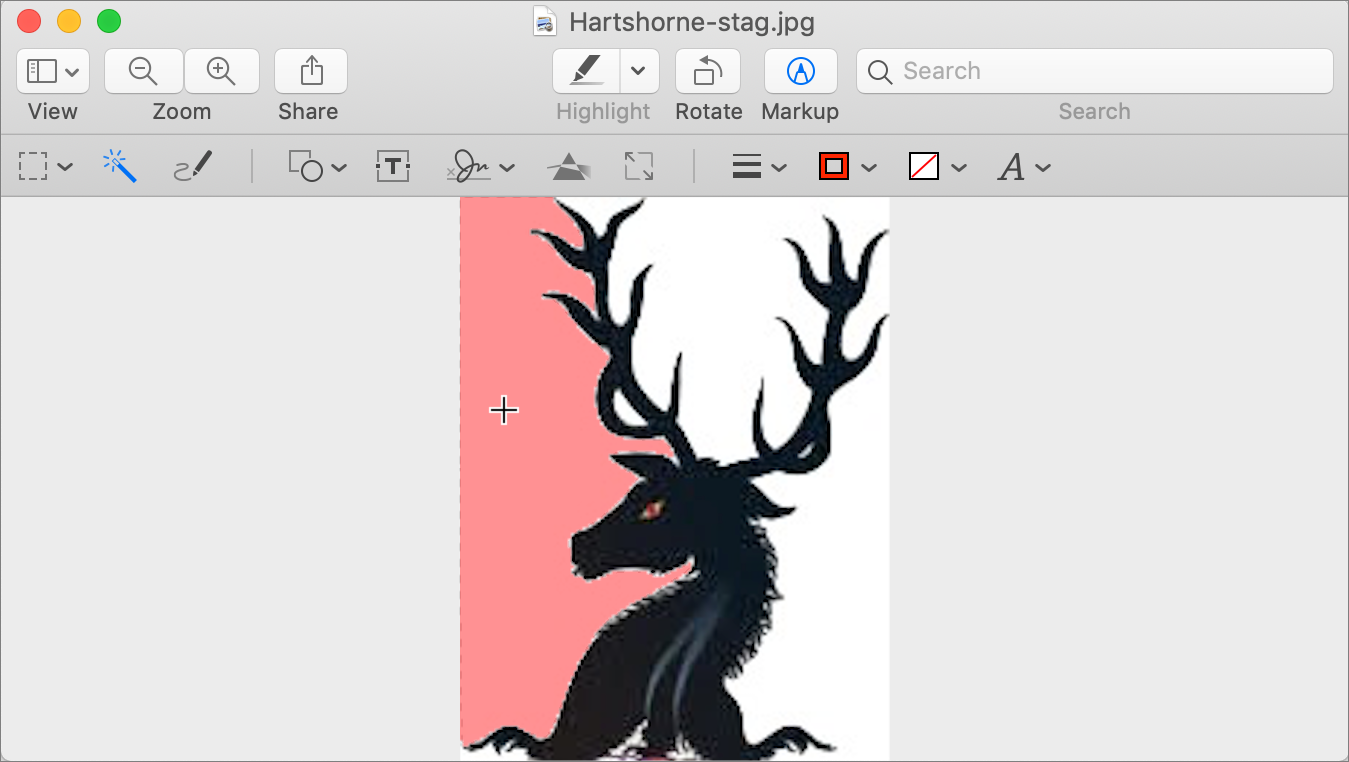
The Instant Alpha tool will select only areas that are contiguous. To remove an image’s entire background, you may need to select more than one section and delete it in turn (see Figure 41).
Although this may seem like a hassle, it’s actually a feature, not a bug. If Instant Alpha selected all the white pixels in Figure 41 (above), above, at once, it would also pick up the logo’s center and display text. When you pressed delete, all of those areas would become transparent, which might look truly strange on a webpage with a colored background.
Using the Instant Alpha tool on images with solid areas of color is straightforward. If you’re trying to remove a background that’s not a solid color, however, you’re in for a little more work. You’ll have to use the Instant Alpha tool multiple times, clicking in a different color each time and dragging slightly to tweak the selection’s sensitivity. In Figure 42, we’re on the third pass with Instant Alpha, with more to come.

If Instant Alpha can’t select the background color without also selecting some of what you want to keep, try zooming in so you can select carefully. Remember that you can always fall back on Preview’s other selection tools for the final cleanup.
Copying, Pasting, and Deleting Image Content
Once you’ve isolated the part of the image you want, you have a few options for working with your selection:
Move the selection: Is your selection the right size but slightly out of place? If you used the Rectangular Selection tool, Elliptical Selection tool, or Lasso tool, you can reposition your selection—not the underlying image itself, but the dashed line that indicates what part you want—with the pointer or the arrow keys.
Copy the selection for later pasting: Once you’ve selected what you want, press ⌘-C to copy it. Press ⌘-V to paste it into a different image, a different document, or just a different position in the same image. Once you have a copy in Preview, you can move and resize it (by dragging the blue adjustment handles), although it will always be essentially rectangular in Preview’s eyes, no matter how irregular it was to start.
Delete the selection: Once you’ve made your selection, press Delete to remove that part of the image, leaving a transparent hole indicated by the background color. This is most helpful when you’re trying to turn portions of an image transparent.
Let’s demonstrate how Preview can do much of the work of an expensive image-editing app. We’ll start with Figure 43, which is a cropped version of a screenshot of the iCloud pane of System Preferences.

Compare it with Figure 44, which we’ve edited heavily to replace the headshot, hide the email address that normally appears under the name, and fake the selected checkbox next to the Contacts line.

Here’s how we made the changes:
Replace the headshot: We went back to the photo in Figure 36 and used the Elliptical Selection tool with the Shift key down to select a perfect circle around Adam’s head. When we copied and pasted this selection into the screenshot of the iCloud preference pane, his head was too large. We resized it by dragging the blue adjustment handles and then repositioned it over the headshot that was previously in the screenshot.
Hide the email address: We could have obscured the email address that appears under the name with a rectangle shape (see Inserting and Manipulating Basic Shapes) but matching the color would have been more difficult (we would have had to use the Eyedropper tool in the Colors palette to capture the right gray). Instead, we used the Rectangular Selection tool to select and copy some of the gray background color near the headshot and then pasted that gray rectangle over the email address, making it seem as though it was never there. The rectangle needed a little non-proportional resizing to cover the email address completely.
Select the checkbox: To pretend that we had the Contacts checkbox selected, we again used the Rectangular Selection tool, but this time to select and copy the checkbox next to Photos (which had the right background color). Then we pasted that over the empty checkbox next to Contacts.
This isn’t serious photo manipulation—Preview isn’t the right tool to cut your niece’s ex-boyfriend out of family reunion pictures—but it’s exceedingly helpful in many situations.
Cropping Images
When you’re working with images, cropping is a necessary and frequently used feature. Use cropping to focus the eye on what’s important by removing distracting objects near the edge of the frame. For example, we did a lot of cropping for the screenshots in this book to home in on a particular window or button.
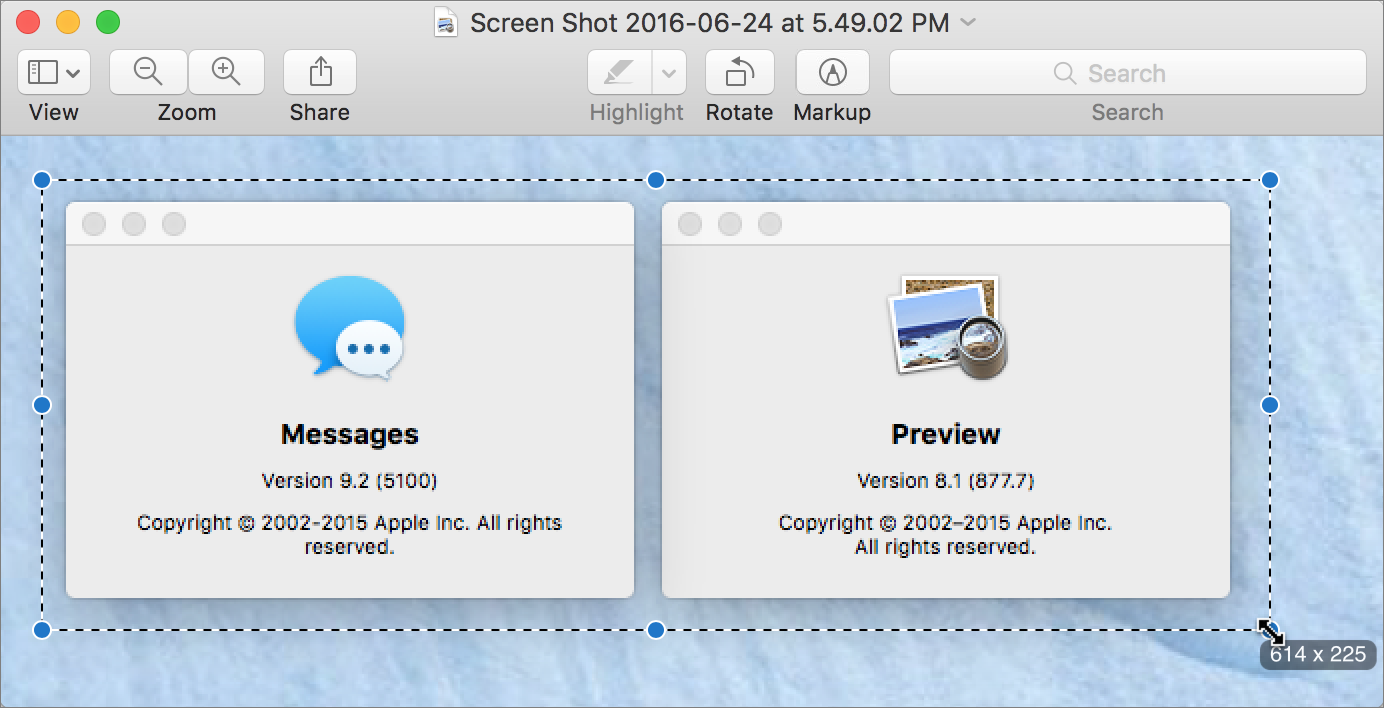
For basic cropping, use the Rectangular Selection tool to select the content that you want to keep. In Figure 45, for example, there is too much blue background, so we are tightening the focus to just the two windows and a small amount of the surroundings.
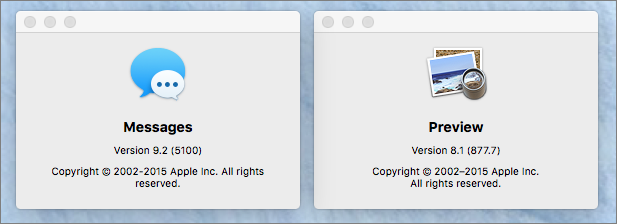
With your selection is in place, choose Tools > Crop or press ⌘-K to delete everything that’s not selected (Figure 46).
The basics of cropping are easy to pick up, but here’s a technique that simplifies creating precise selections around windows, dialogs, and other objects:
Don’t try to make a perfect selection on the first go around. Instead, if the object you want to keep is fairly small, drag out a rough selection around it that includes some of the background, and then press ⌘-K to make an initial crop. Alternatively, if the desired object already makes up most of the image, choose Edit > Select All or press ⌘-A to make a selection rectangle around the entire image.
Next, use the blue adjustment handle in the middle of each side of the selection rectangle to adjust each side. This is more precise than dragging the corner handles, as those resize the selection in two dimensions at once, and it can be hard to get both sides exactly right at the same time.
Once you’ve selected what you want, you’re ready to crop; however if you made a rectangular selection, consider copying instead. When you choose File > New from Clipboard, Preview creates a new document containing the copied data. This is a quick way to create a file containing your desired content and might be more appropriate in certain workflows. See Importing from the Clipboard.
Resizing Images
You’ve cropped out the parts of the image you don’t need, but it’s still too large, either in terms of dimensions or file size? No problem. Preview makes it easy to shrink the image.
Choose Tools > Adjust Size and a handy dialog appears (Figure 47). Play with the settings and either click OK to apply your changes or Cancel to back out.

Here’s a quick overview of what each of the controls does:
Fit Into: This pop-up menu gives you a set of predefined sizes. If your image doesn’t match the aspect ratio of the pre-defined size you choose, Preview fits the longer side of your image to the appropriate dimension, adjusting the shorter side proportionally. So a portrait image will always be fit to the height of the pre-defined size, and landscape images will be fit to the width. When you adjust the width and height yourself, this menu sets itself to Custom; you don’t need to choose that manually. Frankly, this menu is a confusing waste of time; just set the dimensions yourself in the fields below.
Width and Height: In these fields, you can set the width and height of the image manually. Use the pop-up menu on the right to set the unit of measurement to pixels, percent, inches, centimeters, millimeters, or points. Which unit you choose depends mostly on how you think about your output. For example, if you’re planning to use the image on a website, pixels makes the most sense. If the image is destined for print, a real-world measurement like inches, centimeters, or millimeters may be more helpful. If the actual size doesn’t matter, choose Percent in this menu.
Resolution: Here you can adjust the resolution of the image, in either pixels per inch or pixels per centimeter. Resolution is a tricky topic, but in short, for images destined for the screen, it’s usually irrelevant and can be ignored. For screen display, all you care about is how many pixels the image has—whether it’s 72 ppi or 144 ppi should make no difference in how it looks onscreen. Don’t assume that reducing the resolution will make the file size smaller either; it will if you select Resample Image because you’re throwing away pixels, but if you don’t resample the image, the file size will stay roughly the same and may even increase somewhat for JPEGs.
For images you want to print, resolution is important. If you have a 72 ppi image, it will need a lot more pixels to print at a decent size on paper than if it’s a 300 ppi image. But you can’t change the resolution to get better results because any change in resolution must either throw pixels away or add pixels in, neither of which is good for image quality. In short, unless you know what you’re doing, leave the resolution setting alone.
Scale Proportionally: In nearly all cases, leave Scale Proportionally selected, because otherwise your image will be stretched or squished in the dimensions that change. The only time it’s worth deselecting Scale Proportionally is when you need dimensions that are just slightly different from what you have, when the stretching or squishing won’t be noticeable.
Resample Image: As noted above, resampling changes the number of pixels in the image. Thus, you should leave this checkbox selected in most situations, particularly when the image is destined to be displayed on a screen and you want to control the pixel dimensions. In fact, if you deselect Resample Image, you can no longer choose Pixels in the pop-up menu next to Width and Height, Scale Proportionally is locked on (since disproportionate scaling would change the number of pixels), and any changes you make in Width and Height also change Resolution. All you can do then is change how large the image will print. Again, Photoshop Essentials has a nice explanation.
Resulting Size: This feedback area is useful to watch, particularly if you’re trying to reduce the file size of your image. As you adjust the image’s pixel dimensions, it tells you the resulting percentage size of the original image, the resulting file size, and the previous file size. Changing resolution while resampling doesn’t affect size much, and Preview doesn’t report on such changes.
Rotating Images
Every now and then, you end up with an image that’s upside down or generally not rotated the way you want. Happily, Preview makes it easy to make a change: choose either Tools > Rotate Left (⌘-L) or Tools > Rotate Right (⌘-R). You can also click the Rotate ![]() button in the main toolbar to rotate the image to the left or Option-click it to rotate the image to the right.
button in the main toolbar to rotate the image to the left or Option-click it to rotate the image to the right.
You also might find use for the next two in the Tools menu: Flip Horizontal and Flip Vertical. These tools rotate the image too, but around a horizontal or vertical center line. For example, Flip Horizontal can be helpful if you need a person’s headshot to face a different direction. Flip Vertical is useful when you need to flip a photo upside-down.
Inserting and Manipulating Basic Shapes
Whether you want to call out a particular interface element in a screenshot with a big red arrow or add a speech balloon to a picture of your cat, Preview lets you add shapes to your images without ever opening a dedicated image-editing app.
Shapes include a line, a line with an arrow on one or both ends, a rectangle with sharp or rounded corners, an ellipse, a speech balloon, a star, and a polygon. There are also two special shapes—a mask and a loupe—that we explain in Using the Mask and Loupe Shapes.
Working with Shapes
You can access Preview’s basic shapes under Tools > Annotate, and it’s worth noting the keyboard shortcuts there. However, it’s usually faster to use the Shapes ![]() icon on the Markup toolbar (Figure 48).
icon on the Markup toolbar (Figure 48).

To insert a new shape in your document, click the Shapes ![]() icon on the Markup toolbar and then either click a shape or drag the one you want into place.
icon on the Markup toolbar and then either click a shape or drag the one you want into place.
The shape is surrounded by blue adjustment handles (Figure 49); drag a handle to adjust the shape’s dimensions in that direction. Press Shift to maintain the shape’s aspect ratio, for example keeping a circle a circle instead of stretching it into an oval. Press Option while dragging a handle to resize the shape from the center—a handy trick when the shape is already centered over the spot you want to encompass. When you resize lines or arrows, pressing the Shift key constrains the line to a 45-degree angle.
As with selections, holding down the Shift or Option key changes how Preview resizes the shape:
Press Option while resizing an object by any selection handle, and it resizes from the center.
Shift-click a resize handle on a selected object to equalize its height and width. In particular:
Shift-click the midpoint resize handle on the top or bottom of the shape to make all sides equal to the current height.
Shift-click a midpoint side handle to make all sides equal to the current width.
Shift-click a corner handle to make equilateral sides that are the average of the length and width measurements.
You can, of course, move the shape, by placing your pointer on it anywhere other than on a handle. When your pointer becomes a hand, drag to move the shape. Or just click once to select the shape and then use the arrow keys to nudge it more precisely.
When you’re moving shapes, note that Preview shows a yellow guide when the center of the object you’re moving is aligned—horizontally or vertically—with the center of another object. Unfortunately, this guide only helps you align objects by their centers, not other edges.
You may at some point find yourself with multiple overlapping objects in an image. Every object lives on its own layer, and each new object appears on top of all the previous ones. To change that order, Control-click an object and choose from the pop-up menu that appears. Bring to Front and Send To Back put on object on the top or bottom of the pile, respectively, whereas Bring Forward and Send Backward move the selected object by one level in the layer pile.
The line, polygon, and star shapes offer additional possibilities:
Lines: When first inserted, lines are straight, but a green adjustment handle in the middle of the line lets you make it into a smoothly curved line.
Polygons: By default, inserting a polygon adds a hexagon to your document. But if you select it and look closely, you’ll see a green adjustment handle. Move that handle counter-clockwise to remove sides, down to three (a triangle), or clockwise to add sides, up to twelve (a dodecahedron).
Stars: The star shape works similarly to the polygon, except it has two green handles, one that adds or remove points and another that changes the length of the points (Figure 50).

Creative Ways to Use Shapes
If you’re wondering when you’d ever use shapes with your images, here are some ideas to get you started:
When you’re having technical difficulties, take a screenshot (see Taking Screenshots) and then use the Shapes tools to point out the problem(s). Send this to tech support or a helpful friend.
At TidBITS and Take Control we often use shapes (typically a red oval or rectangle with no fill) to draw attention to interface elements.
Use Preview’s speech bubbles to put words in the mouth of your cat or infant before sharing the photos with family and friends.
You can also use shapes to mark up PDF documents. See Adding Shapes and Text to a PDF.
Customizing Shapes
With Preview, you can do more than change a shape’s dimensions. Let’s look next at changing the style of a shape’s exterior line, which is called the stroke, as well as the shape’s interior color, which is called the fill. These options appear on the Markup toolbar (View > Show Markup toolbar).
Here’s what you can change:
Stroke style: Click the Shape Style
 icon to adjust the stroke of the selected shape. Interesting options include a dashed or rough stroke, as well as a drop shadow. If your shape is a line or an arrow, you can also choose where to place arrowheads (Figure 51).
Figure 51: To customize the shape’s look, adjust its style. Stroke color: Click the Border Color
 icon and pick a color.
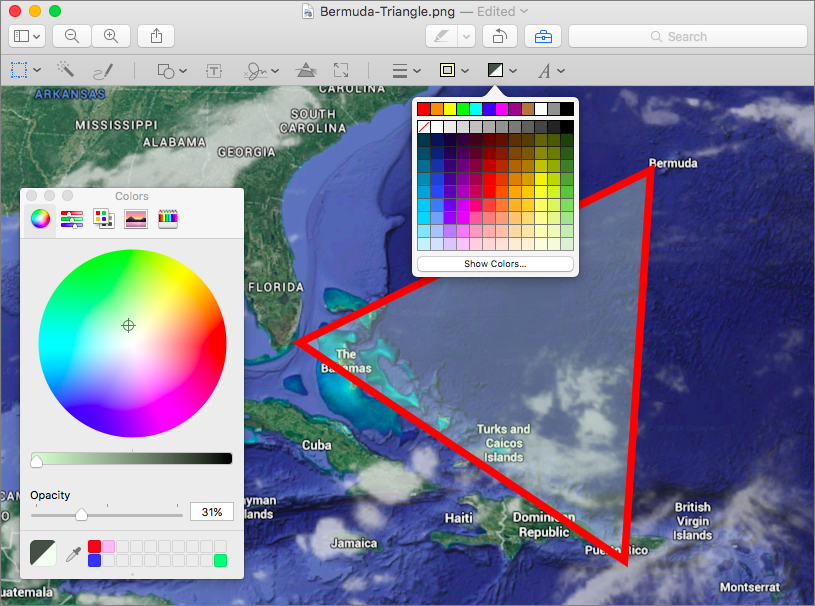
Fill color: Click the Fill Color
 icon and select a color (Figure 52). By default, it’s set to “no fill,” signified by a red line across a white square.
Creating Your Own Shapes with Sketch and Draw
If you’d rather draw shapes yourself, Preview lets you do that, too. In the Markup toolbar, click the Sketch ![]() icon. Your pointer turns into a pen. Drag to draw the desired shape.
icon. Your pointer turns into a pen. Drag to draw the desired shape.
What Preview does next depends on what you draw. If Preview thinks you are trying to draw a square, for instance, it automatically changes your drawing to be a proper square shape. Likewise with triangles, ovals, lines, arrows, and other shapes. Usually, if you draw an unidentifiable squiggle, Preview leaves the squiggle as is, but sometimes it tries to replace it with a smoothly drawn line.
Thankfully, if you don’t care for Preview’s interpretations, or if Preview couldn’t see that you meant to draw a speech bubble, you have a chance to correct it. After drawing a shape, look closely at the upper-left corner of the window, where a small popover appears with your original and a choice of possible replacement shapes (Figure 53). Click the shape you want, but be aware that you get only one shot, since the popover vanishes forever after you choose, or if you deselect the shape.

The Draw ![]() tool, which appears only if your Mac has a Force Touch trackpad, works similarly, with two main differences. First, Preview doesn’t attempt to guess that you’re trying to draw a shape—what you draw is what you get. Second, if you press more firmly on the trackpad while drawing, you get a thicker line; let up somewhat and the line gets thinner (Figure 54). We find it hard to control, but perhaps our fingers aren’t educated enough.
tool, which appears only if your Mac has a Force Touch trackpad, works similarly, with two main differences. First, Preview doesn’t attempt to guess that you’re trying to draw a shape—what you draw is what you get. Second, if you press more firmly on the trackpad while drawing, you get a thicker line; let up somewhat and the line gets thinner (Figure 54). We find it hard to control, but perhaps our fingers aren’t educated enough.

Using the Mask and Loupe Shapes
You’ll notice two more options when you click the Shapes ![]() icon on the Markup toolbar, Mask and Loupe. These offer an alternative way to call things out in your images:
icon on the Markup toolbar, Mask and Loupe. These offer an alternative way to call things out in your images:
Mask shape: The Mask shape is a sort of a reverse shape. Click the Shapes
 icon and then click the Mask
  icon. A rectangle appears on your image. Inside of it, the image remains the same, while everything outside darkens (Figure 55). You can use only a single mask on an image.
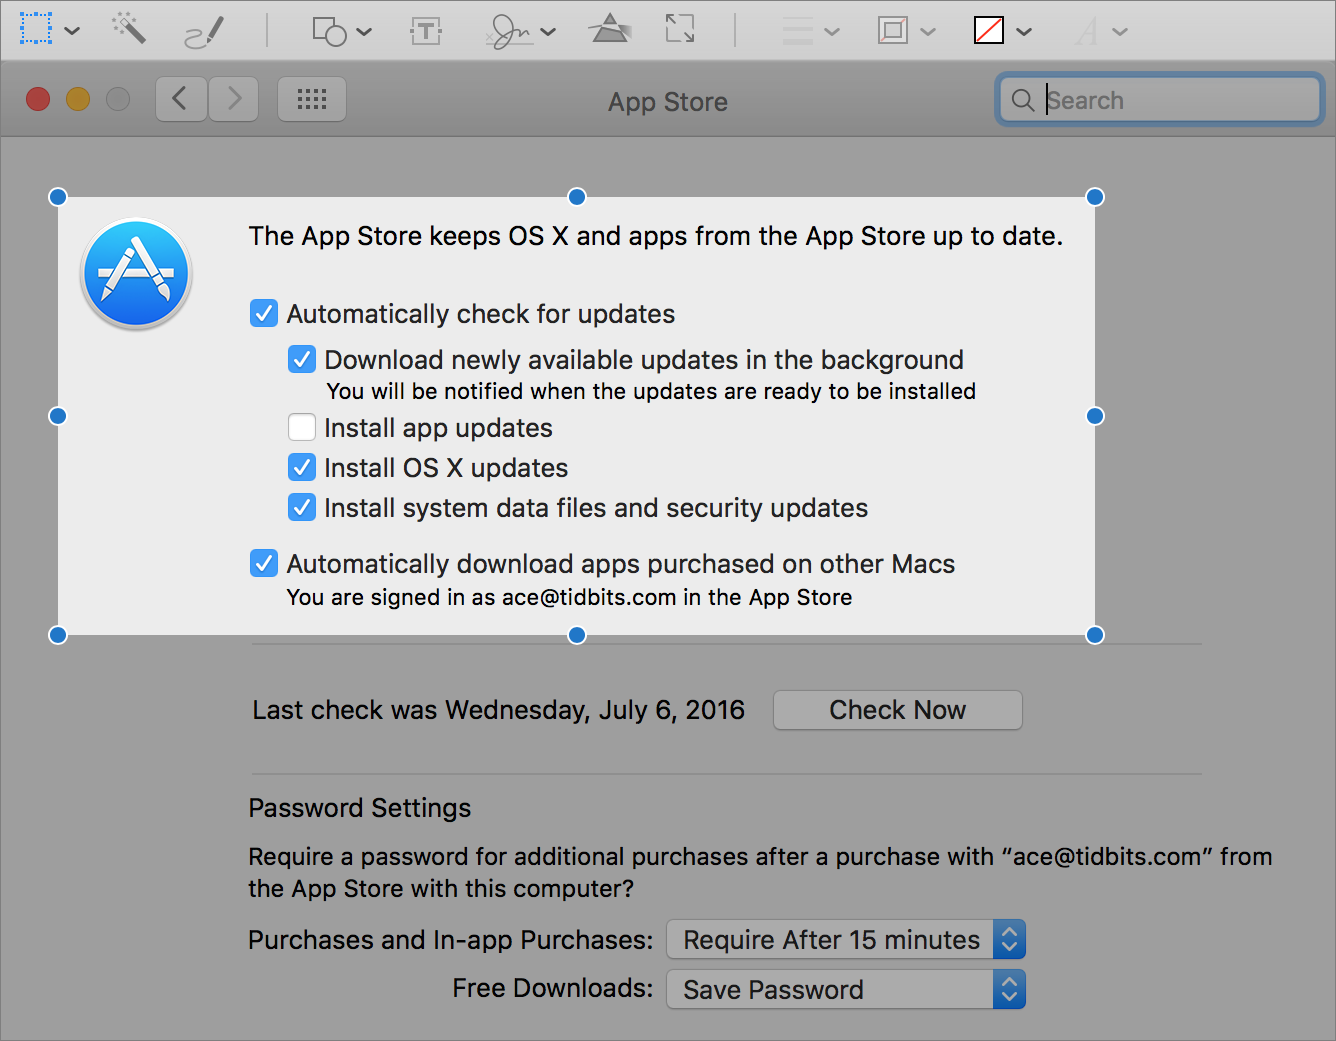
Figure 55: Mask highlights a rectangular area while darkening the surrounding area. The blue adjustment handles work as you’d expect to change the rectangle’s size. To position the rectangle over the portion of the image you want to highlight, you must, click outside the rectangle to select it, not inside, and then drag it into place with your pointer outside the rectangle.
Loupe shape: Use the Loupe shape to magnify small details in your image—you can insert multiple loupes. Be aware that this tool also distorts the image, which can be confusing to the viewer. To use it, click the Shapes
icon and then click the Loupe  icon. A circle, or loupe, appears on your image. You change the size of the loupe using the blue adjustment handle and adjust the zoom level with the green adjustment handle (Figure 56). You can also change the stroke style and color using those menus on the Markup toolbar.

Adding Text to Images
Shapes are great, but what about when you want to add text to an image? Preview gives you a rich set of options for doing so, in the form of text boxes and speech bubbles—or you can just add text to any shape:
Add a text box: The main way to insert text is to choose Tools > Annotate > Text or click the Text
 icon in the Markup toolbar. Preview inserts a text box, with “Text” as a placeholder that disappears when you start typing.
Move a text box: Try these techniques to move the text box easily. First, click anywhere else to deselect the text box, hover over the deselected text box until you see the hand pointer, and drag the box with the hand. Alternatively, if the text box is already selected, hover over the outlined edge to get the hand pointer and then drag.
Style text in a text box: To change the text’s typeface, point size, color, style, or alignment, select the text box and click the Text Style
 icon in the Markup toolbar. Then use the controls in the popover that appears (Figure 57).
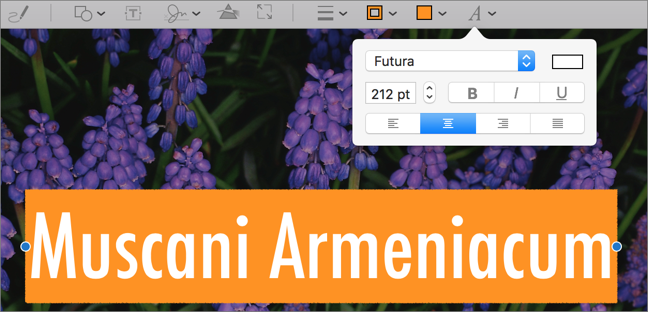
Figure 57: You can adjust the text style, along with the text box’s border and fill. Customize the color and more: Just as with regular shapes, you can click the Shape Style
icon to change the selected text box border’s stroke thickness and style. The Border Color icon lets you add a border to the text box and give it a color. The Fill Color  icon adds a background color to the text box, as has been done with the orange box in Figure 57, above.
Add speech bubbles: Speech bubbles are great for adding funny comments to photos. Insert one by choosing Tools > Annotate > Speech Bubble or click the Speech Bubble
 icon in the Shapes icon’s popover (Figure 58). Speech bubbles work just like regular shapes, with the addition of two green adjustment handles for controlling the tip and base of the arrow.
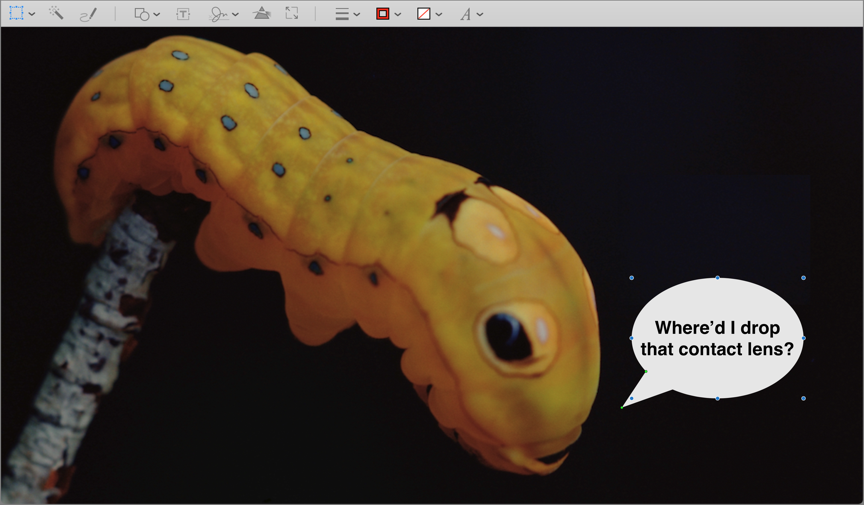
Figure 58: Speech bubbles are fun, but not exactly professional. Add text to shapes: It’s a cinch to add text to your speech bubble—just select it and begin typing. The surprise is that you can use this same technique for any shape other than the Mask and Loupe. In most cases, the text shows up inside the shape. If you select a line or arrow, however, the text appears off to one end (Figure 59).

Adjusting Colors
Preview includes some surprisingly robust image adjustment tools. The options under Tools > Adjust Color are essentially identical to those that first appeared in iPhoto many years ago. We’ll go through the Adjust Color window in parts.
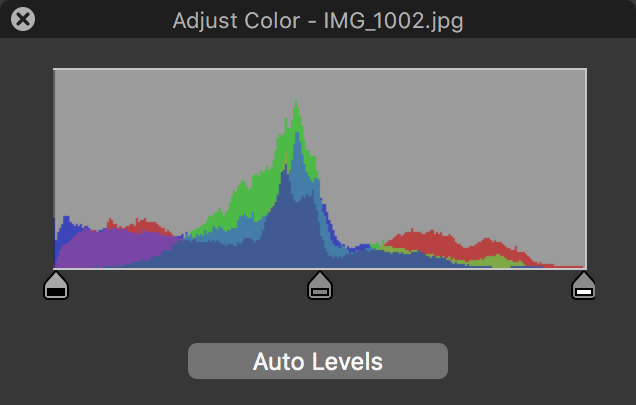
At the top of the Adjust Color window is a histogram with three drag handles with which you can adjust the image’s black point, midpoint, and white point (Figure 60). Click the Auto Levels button to make Preview reset the black and white points automatically, which usually improves the image a bit. Then play with each of the sliders to get a feel for how they lighten or darken the image. If you don’t like how things turn out, you can reset all of your changes with the Reset All button at the bottom of the window.
The rest of the sliders in the Adjust Color window are labeled. We recommend experimentation to see how each affects a given image. Remember, you can undo your adjustments at any time with the Reset All button.
The first four sliders are for manipulating lighting-related adjustments (Figure 61):
Exposure: If a photograph is too dark or too light due to being under-exposed or over-exposed, this slider lets you fix that. It’s mostly helpful when you need to brighten photos that were dimly lit.
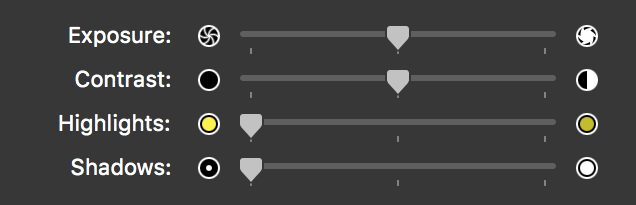
Figure 61: With the Exposure, Contrast, Highlights, and Shadows sliders, you can change lighting, contrast, and increase detail in light and dark areas. Contrast: This slider lets you control the difference between the lightest and darkest areas in a photo. It’s seldom worth messing with much, though increasing contrast a little bit can make an image look crisper and more detailed.
Highlights: This slider reveals detail in the brightest points of a photograph, which can be useful for making clouds more visible, for instance.
Shadows: The Shadows slider throws light on the darker parts of a photo, revealing detail that was previously hard to see. Since you’re most likely to use it on a dark photo, it probably lightens the entire photo as well.
The next four sliders give you control over color (Figure 62):
Saturation: Use this slider to adjust how saturated, or intense, the colors are. Moving the Saturation slider all the way to the left makes the image grayscale, which can be a useful effect, while sliding it to the right makes colors practically explode off the screen. If an image seems a little dull, try increasing saturation just a bit.

Figure 62: Saturation lets you control color intensity, Temperature and Tint increase or decrease the amount of specific colors, and Sepia provides a retro look. Temperature: With this slider, you can make the image cooler (more blue) or warmer (more yellow). If the photo was taken in unkind, greenish fluorescent lighting, the Temperature slider might improve the color a bit.
Tint: While the Temperature slider lets you make an image more blue or more yellow, the Tint slider does the same with green and red. To make the Temperature and Tint sliders easier to use, Apple provides a dropper
 tool; select it and then click a part of the image that should be a neutral gray or white. That sets both sliders automatically. Click the dropper in a few different spots to see how they differ in color. The best way to evaluate how well it has worked is to look at skin tones and make sure they look the way you expect.
Sepia: This slider is a one-trick pony; it reduces the saturation of the photo using sepia tones instead of grayscale. Crank it all the way up to give your image an “old-timey” feel.
Lastly, the Sharpness slider sits off by itself, and a Reset All button completes the contents of the Adjust Color window (Figure 63):
Sharpness: This slider can make your image blurrier or sharper. Blurrier might be helpful with an almost abstract sunset, but mostly you’ll want to sharpen photos to bring out more detail. Be careful not to go too far, though, since excessive sharpness can make the image look grainy.

Figure 63: The Sharpness slider is extremely useful for bringing out more detail in images, and if you go too far in your edits, Reset All takes you back to the original settings. Reset All: There’s no harm in experimenting wildly with all these sliders, and you can use ⌘-Z to undo multiple changes. But if you’ve made many edits that have taken the image down a path you don’t like, click Reset All to return it to its original look.
To give a visual example of what these controls can do for you, here’s a photo of Cornell University’s Dragon Day. Unfortunately, because it was an overcast day, it looks less like a celebration and more like a funeral procession (Figure 64). Let’s see if we can brighten things up.
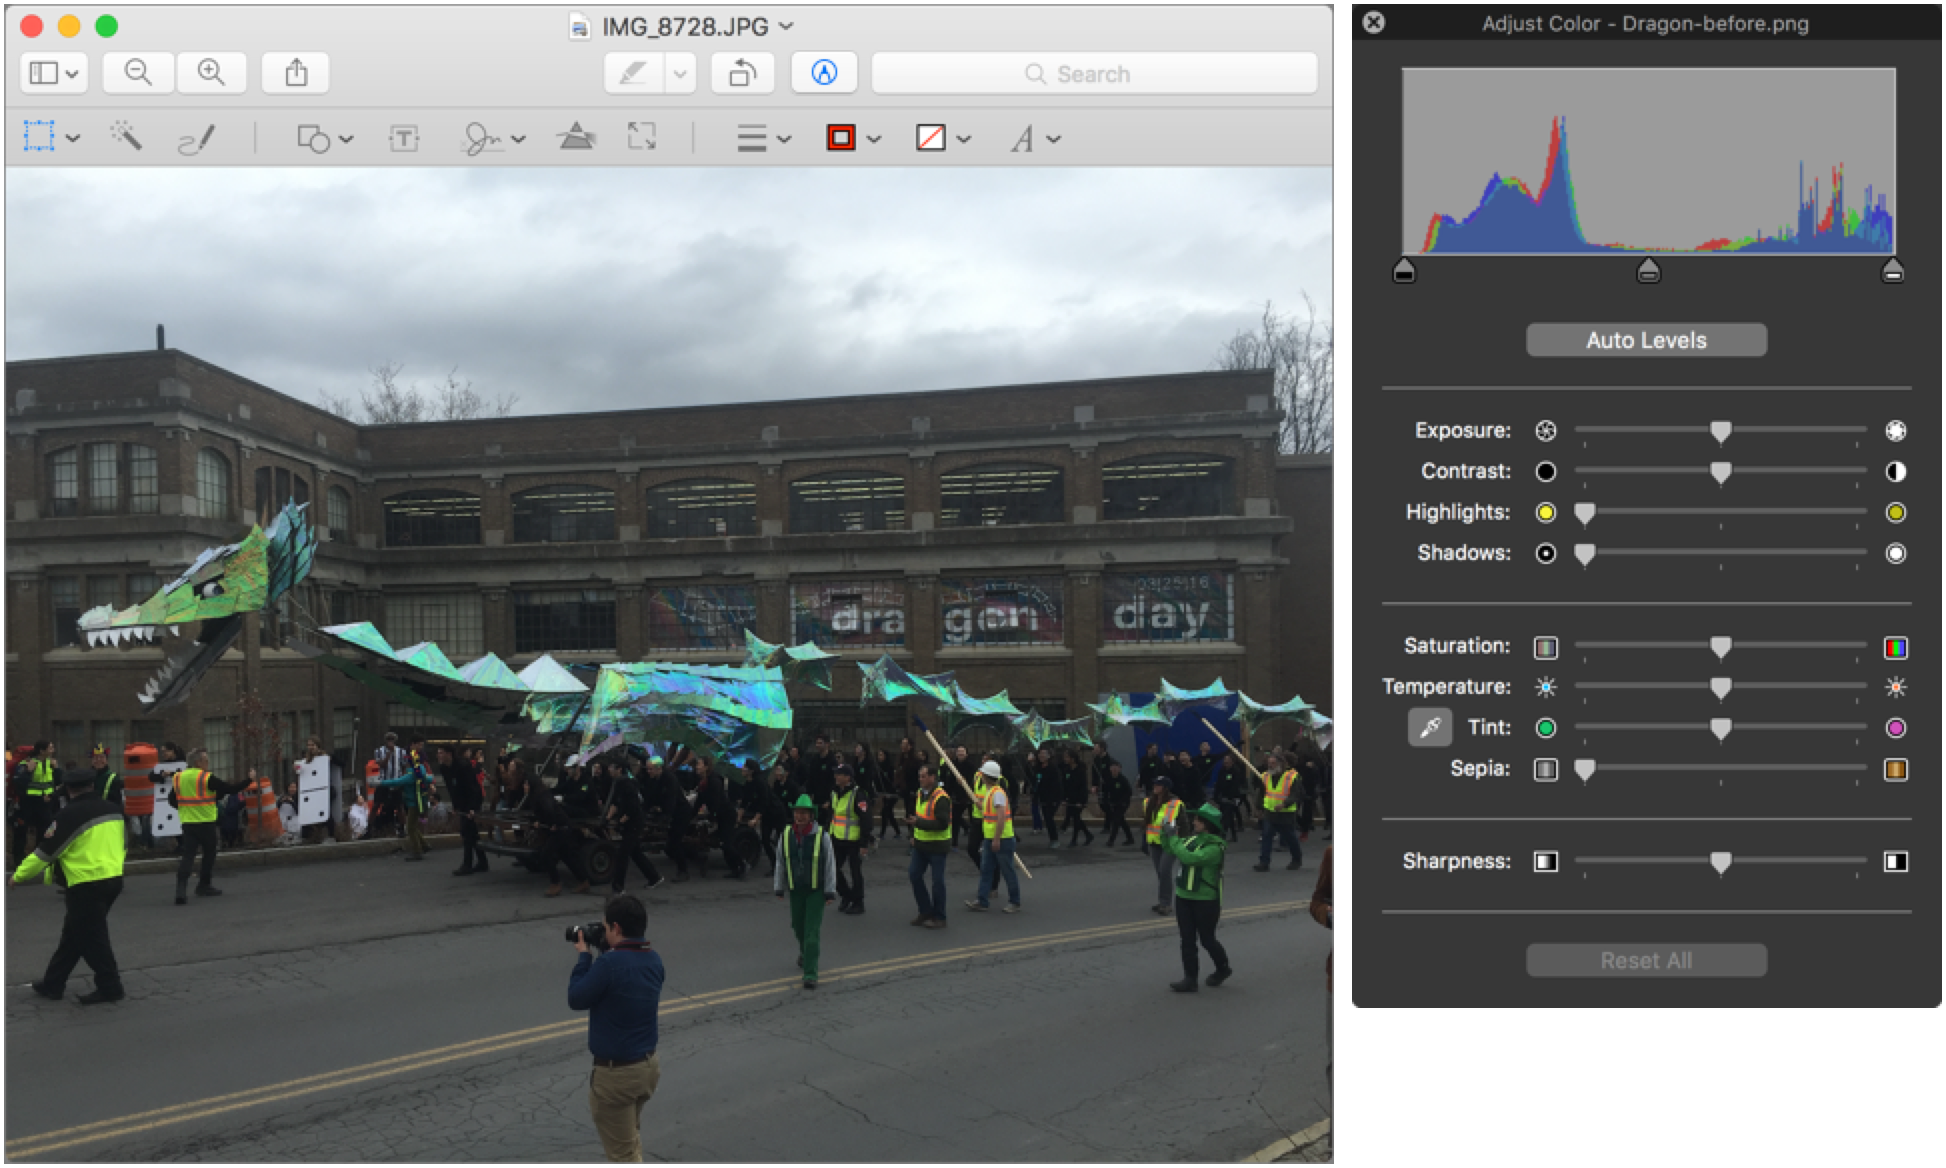
Here’s how we tweaked this photo to make it brighter and clearer (Figure 65):
Since the original was so dark and muddy, we boosted the Shadows slider first, which had the effect of bringing out detail in the dark areas and lightening the image overall. We could have done this with the Exposure slider too, but that would have blown out the sky.

Figure 65: By using Preview’s color and lighting controls, we were able to improve this photo significantly. Note how we’ve moved the Adjust Color window’s sliders from their default positions. Noticing that there wasn’t much going on at the left side of the histogram, we moved the black point slider in a bit, which made some fuzzy gray bits darker and more clearly defined.
To bring out the detail in the clouds and the bright spots of the dragon’s iridescent scales, we bumped the Highlights slider up a bit.
Next, in order to boost the color of the dragon, we increased the Saturation slider a little.
Rather than mess with Temperature and Tint manually, we selected the dropper tool and clicked on a white spot in the sky to warm up the image a bit with more yellow and red. You can see how the Temperature and Tint sliders moved right to reflect that change.
Finally, since most of the individual objects in the photo are quite small, we maxed out the Sharpness slider to make them pop. The human eye prefers sharp edges to smooth tones, so increasing sharpness often makes an image more pleasing, if less technically accurate.
The end result is a brighter, clearer photo. Now there’s a celebration!
Remember Undo!
The safest approach when editing an image is to make a copy before modifying it, but it’s easy to forget to do that. Should you find yourself with a badly edited image, you have two ways to undo the unwanted changes.
The first is the hoary Edit > Undo (⌘-Z) command, which lets you undo recent actions. Remember that anything you undo, you can redo with Edit > Redo (⌘-Shift-Z).
But if you’ve already saved and closed a file, and later reopened it, you can’t use the Undo command anymore. Thankfully, you can still revert to an older version, thanks to Preview’s support for the Modern Document Model (see the TidBITS article The Very Model of a Modern Mountain Lion Document for a thorough explanation). Choose File > Revert To, where you see one to three options depending on the state of the document:
Last Saved: This option appears only if you have made changes, saved them, and then made more. Use it to revert to the last saved version, but not all the way back to when you opened the image.
Last Opened: Use this option to get rid of all changes made to the file since you last opened it.
Browse All Versions: Choosing this option displays a Time Machine-like interface, with the current version of the document on the left and previous versions on the right (Figure 66).
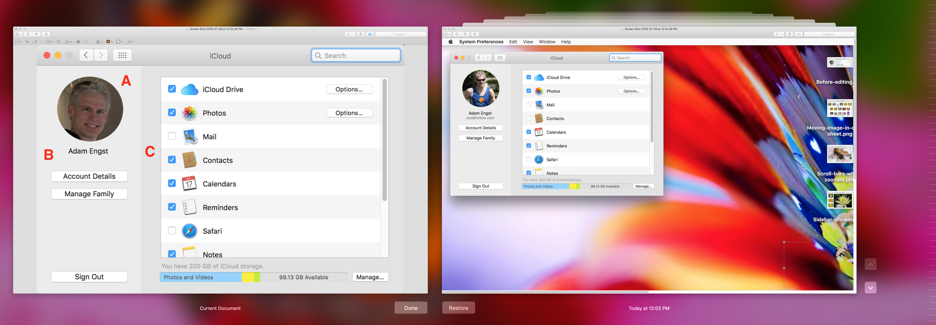
Figure 66: Even if you’ve saved unwanted changes to a file in Preview, you can revert to an older version with Browse All Versions. Use the arrow buttons or the horizontal lines at the right side of the screen to move between versions. Click Restore to restore the file to the version showing on the right, or click Done to cancel (you can also click either image’s red close
 button or press ⌘-W; alas, pressing Esc doesn’t work).
To recover a previous version without overwriting the changes you’ve made, press Option to transform the Restore button into Restore a Copy. Clicking it opens a copy of the selected version in Preview as an untitled document.