View and Manage Images
For many people, Preview’s primary function is as a viewer for both images and PDFs. Although much of what we cover in this chapter also applies to PDFs, our focus here is on the many ways you can view images in Preview.
We begin by making sure you can use the sidebar and its various views to full advantage, especially the Contact Sheet view, which is helpful for working with a large collection of images. We also cover Zooming Images and Viewing in Full-Screen Mode, plus Playing an Image Slideshow.
If you find yourself wanting to learn more about an image—what its pixel dimensions are, when it was created, and more—we discuss how to do that in Examining Image Metadata.
But that’s not all that Preview can do—you can also work with the files underlying the images you’re viewing. For instance, if you need to cull near-duplicates from a folder containing a large number of graphics, you don’t even need to leave Preview; see Managing Images.
Navigating Images via the Sidebar
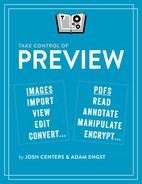
When it comes to navigating among multiple images, Preview’s sidebar is your friend. Preview tries to be smart about displaying this tool, so if you open multiple images, the sidebar automatically appears, as you can see in Figure 22.
You can hide the sidebar by choosing View > Hide Sidebar (⌘-Option-1). (In macOS 10.10 Yosemite, this command is named Content Only.) Note that this command is a one-way toggle; if Preview’s sidebar is showing, choosing Hide Sidebar makes it disappear and puts a checkmark next to the menu command. Choosing it again does nothing. To bring the sidebar back, you must instead choose another of the sidebar-related commands like View > Thumbnails.
If the sidebar is showing, you can also hide it and reveal it again by shrinking and expanding the window horizontally.
For viewing collections of images in the sidebar, you have two main options:
Thumbnails: This view, shown in the figure above, shows graphical previews of your images.
Table of Contents: Choose this view to display a text list of image filenames (Figure 23).

Regardless of which view you choose, clicking an item in the sidebar displays the associated image in Preview’s main pane. You can also navigate through the sidebar’s entries with the Up and Down arrow keys. You can also move between images by pressing Space and Shift-Space.
Viewing a Contact Sheet
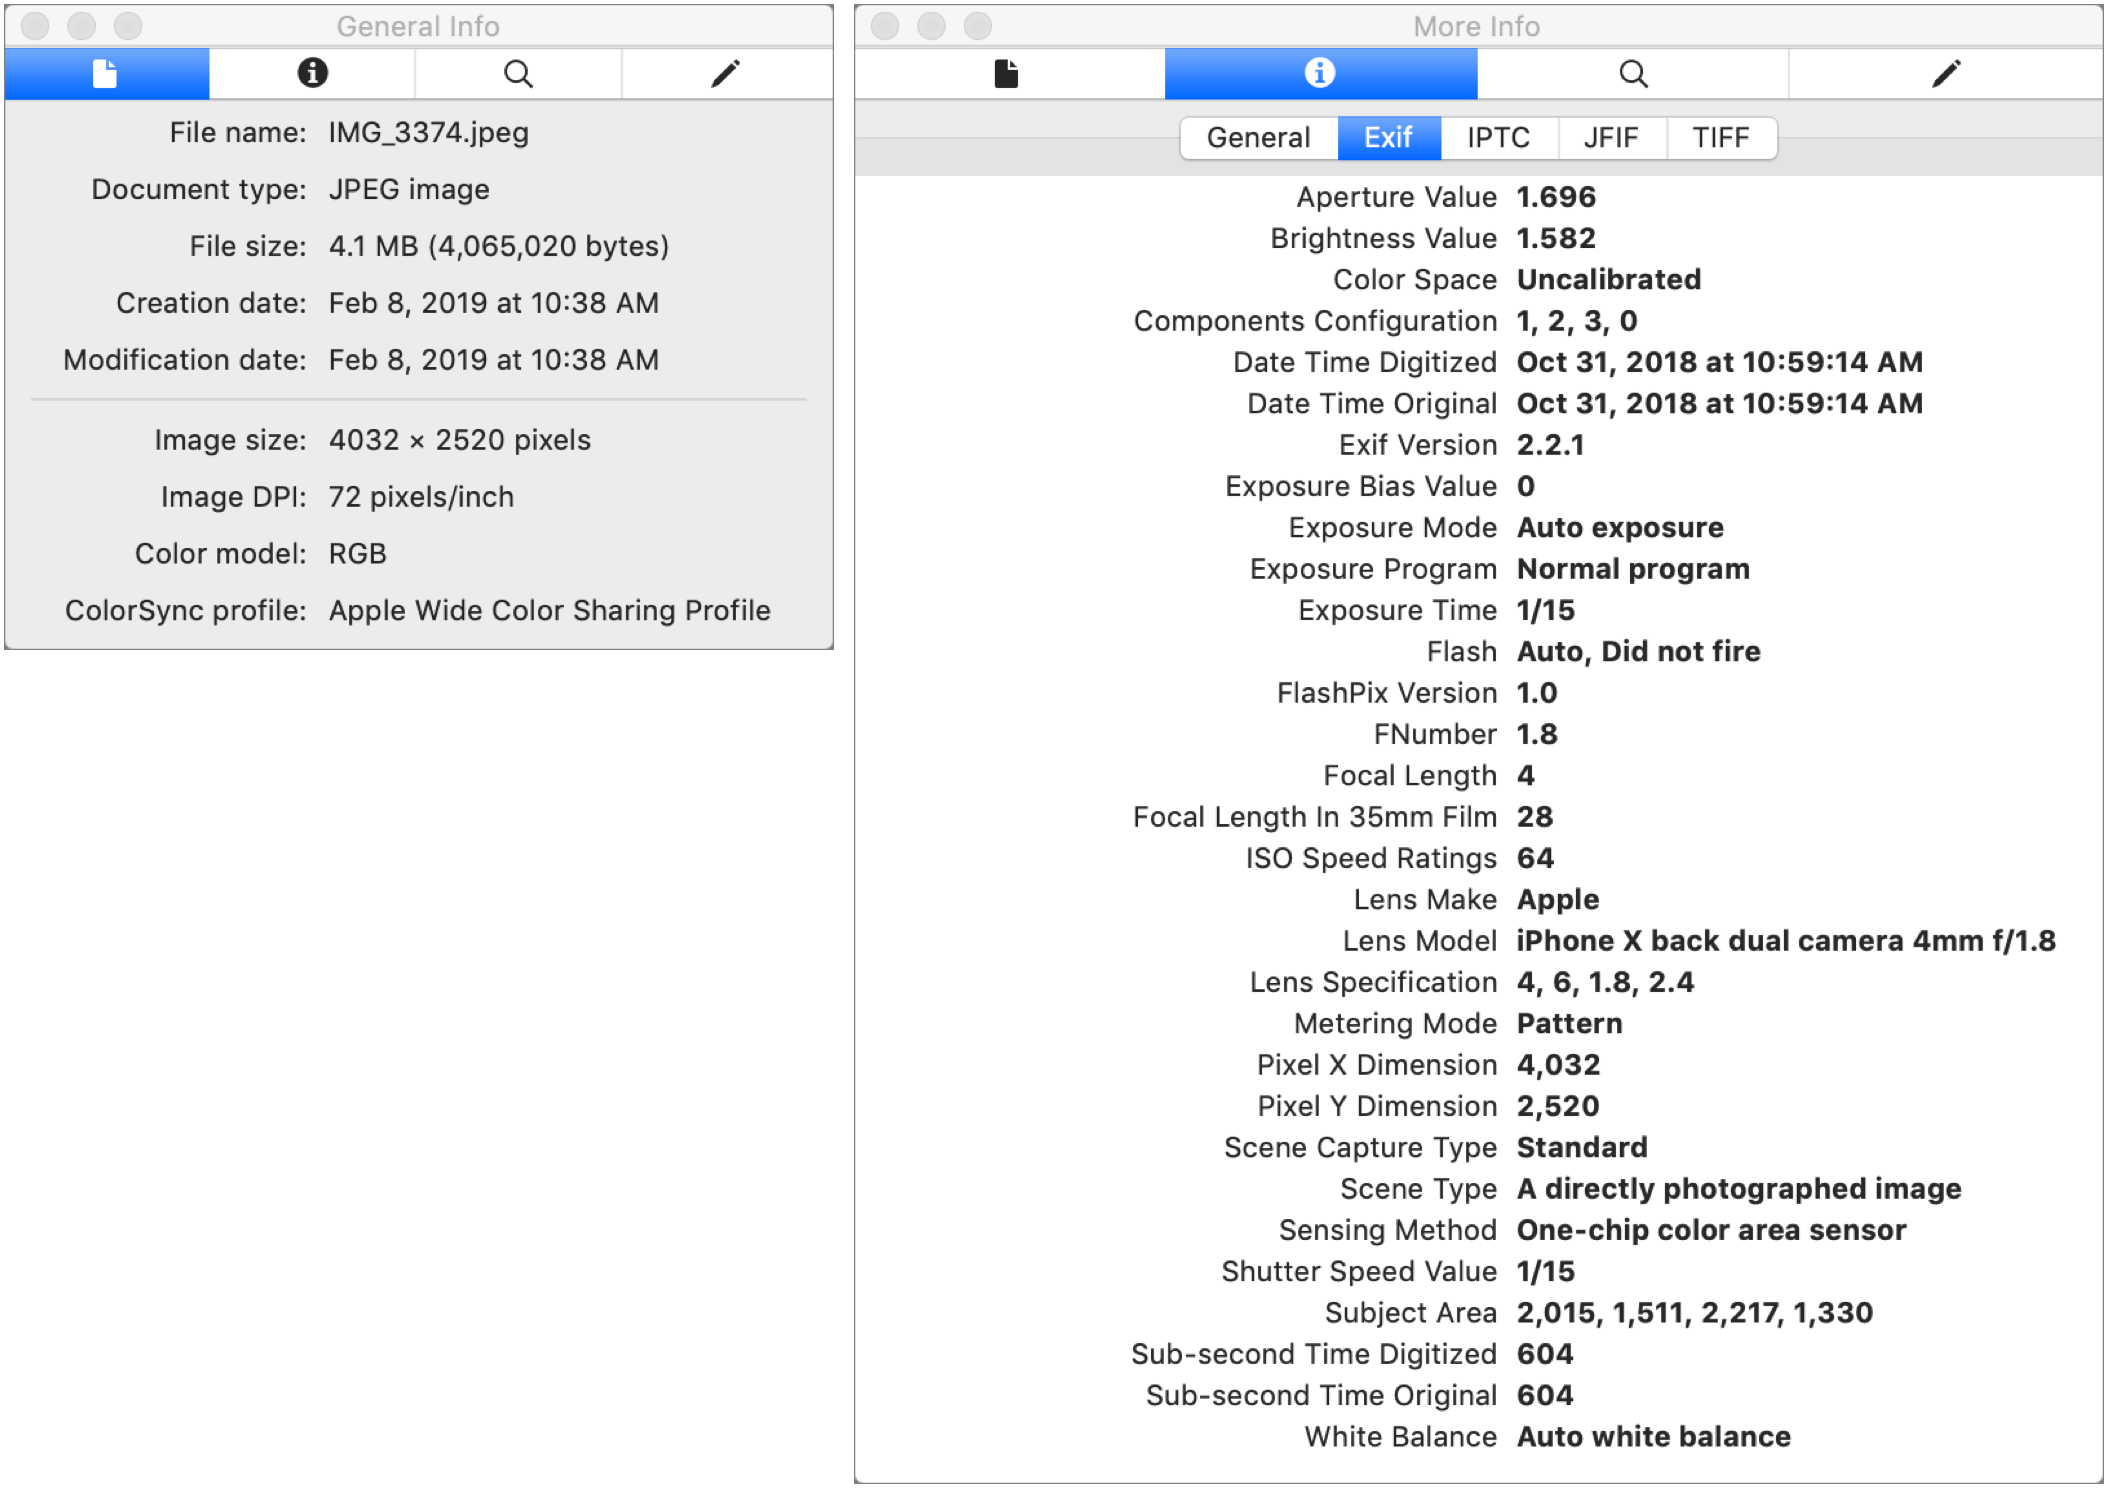
When you have many images you’d like to compare, you can view their thumbnails in a single-window grid, just like the photographer’s contact sheet of old (Figure 24). Choose View > Contact Sheet or press ⌘-Option-6.

Contact Sheet view is actually the sidebar’s Thumbnails view expanded to take over Preview’s entire window—if Preview is in Contact Sheet view and you choose View > Hide Sidebar, Preview focuses on a single image just as it would if you had the sidebar open and chose View > Hide Sidebar.
Double-click a thumbnail to expand it to fill the entire window. The only way to return to Contact Sheet view after expanding an image is by choosing View > Contact Sheet again (or pressing ⌘-Option-6), so if you use this view often, it’s worth memorizing the keyboard shortcut.
Depending on how many thumbnails you’re viewing, you may want to adjust their size. With hundreds of images open, you might want the thumbnails to be smaller, or if you have only a few, larger thumbnails might be easier to work with.
To change the thumbnail size, choose View > Zoom In to make them larger or View > Zoom Out to make them smaller. Don’t rely on the menu commands, though, since there are more efficient ways to zoom in and out. ⌘-= (remember it as ⌘-Plus, but you don’t need the Shift key) and ⌘– (⌘-Minus) zoom in and out, respectively, as does pinching in and out on a trackpad.
The keyboard or trackpad shortcuts are absolutely worth using here, especially since the are nine levels of magnification, so you might want to press ⌘-= repeatedly to zoom the thumbnails to their maximum size.
Just as in the sidebar when in Thumbnails view, there are oodles of other things you can do with images in Contact Sheet view, and we discuss those in Managing Images, later.
Zooming Images
We just talked about zooming in Contact Sheet view, so now let’s focus on zooming individual images. When you have an image selected, you can choose View > Zoom In and View > Zoom Out to do exactly what you’d expect. The ⌘-= and ⌘– keyboard shortcuts work too (we think of them as ⌘-Plus and ⌘-Minus).
Whereas Contact Sheet view offers only 11 zoom levels, 20 zoom levels are available when you’re viewing images directly, letting you get down to the point where you can see individual pixels. When you’re zoomed in enough so the image is larger than the window, horizontal and vertical scroll bars appear on the bottom and right edges of the window to let you move around within the zoomed image (Figure 25).

The View menu offers additional choices for image zooming: Zoom to Fit (⌘-9), which fills the window with the document or image, and Actual Size (⌘-0), which does just what it says, regardless of whether the file fits in the window or not.
For more control over the zoomed area that appears in the window, you can make a selection (choose Tools > Rectangular Selection and drag out a rectangle) and then choose View > Zoom to Selection (⌘-*, which may be better thought of as ⌘-Shift-8). That’s a great way to focus on a particular area without having to zoom and then scroll to find the portion of the image you want to work on.
Viewing in Full-Screen Mode
If you’re zooming your images to fit in the largest possible window, why not just use full-screen mode? Either click the green zoom ![]() button in the upper-left corner of the window or choose View > Enter Full Screen. Preview zooms the image to the largest possible size, with black on the sides or bottom as necessary (Figure 27).
button in the upper-left corner of the window or choose View > Enter Full Screen. Preview zooms the image to the largest possible size, with black on the sides or bottom as necessary (Figure 27).

In full-screen mode, Preview acts a little differently. Here’s what you need to know:
Accessing the menu bar and toolbar: In full-screen mode, Preview’s menu bar and toolbar vanish. To reveal them temporarily and access their commands, move the pointer to the top of the screen.
Accessing the Dock: Move your pointer to the bottom of the screen to reveal the Dock (or to the side of the screen, if that’s where you’ve positioned your Dock).
Keeping the toolbar visible: Choose View > Always Show Toolbar. This can be helpful, for instance, if you plan to edit in full-screen mode.
Leaving full-screen mode: Click the green zoom
 button, choose View > Exit Full Screen, or press Esc. We always press Esc.
Contact Sheet view: Although it might not seem obvious, View > Contact Sheet (⌘-Option-6) is available in full-screen mode; it’s a good way to get an overview of the open images.
Using the sidebar: In full-screen mode, the Hide Sidebar command in the View menu changes to Always Show Sidebar (it retains the ⌘-Option-1 keyboard shortcut). Choose it to show or hide the sidebar, which is handy for navigating among a large number of open images.
When the sidebar is showing in full-screen mode, View > Thumbnails and View > Table of Contents work, along with their ⌘-Option-2 and ⌘-Option-3 shortcuts.
Navigating between images with the keyboard: The Down and Right arrow keys and the Space bar move to the next image. The Up and Left arrow keys, along with Shift-Space move to the previous image. In other words, you can’t use Up and Down to navigate vertically in the grid of photos unless you’re in Contact Sheet view.
Playing an Image Slideshow
If you’d like to get a better look at a group of images or share them with someone else onscreen, use Preview to play a slideshow. To do this, open a bunch of images in the same window and then choose View > Slideshow (⌘-Shift-F). You can play a slideshow whether or not you’re in full-screen mode, although it’s not available when you’re in Contact Sheet view.
Preview displays the current image fullscreen and advances to the next image every 5 seconds. A slideshow toolbar appears near the bottom of the screen, with controls to move to the next or previous image, play or pause the slideshow, and exit the slideshow (Figure 28). You can also use the arrow keys to move between slides; pressing Esc exits.

The slideshow toolbar automatically hides itself after a few seconds so it’s not obscuring your beautiful pictures. To get it back, just wiggle the mouse.
Examining Image Metadata
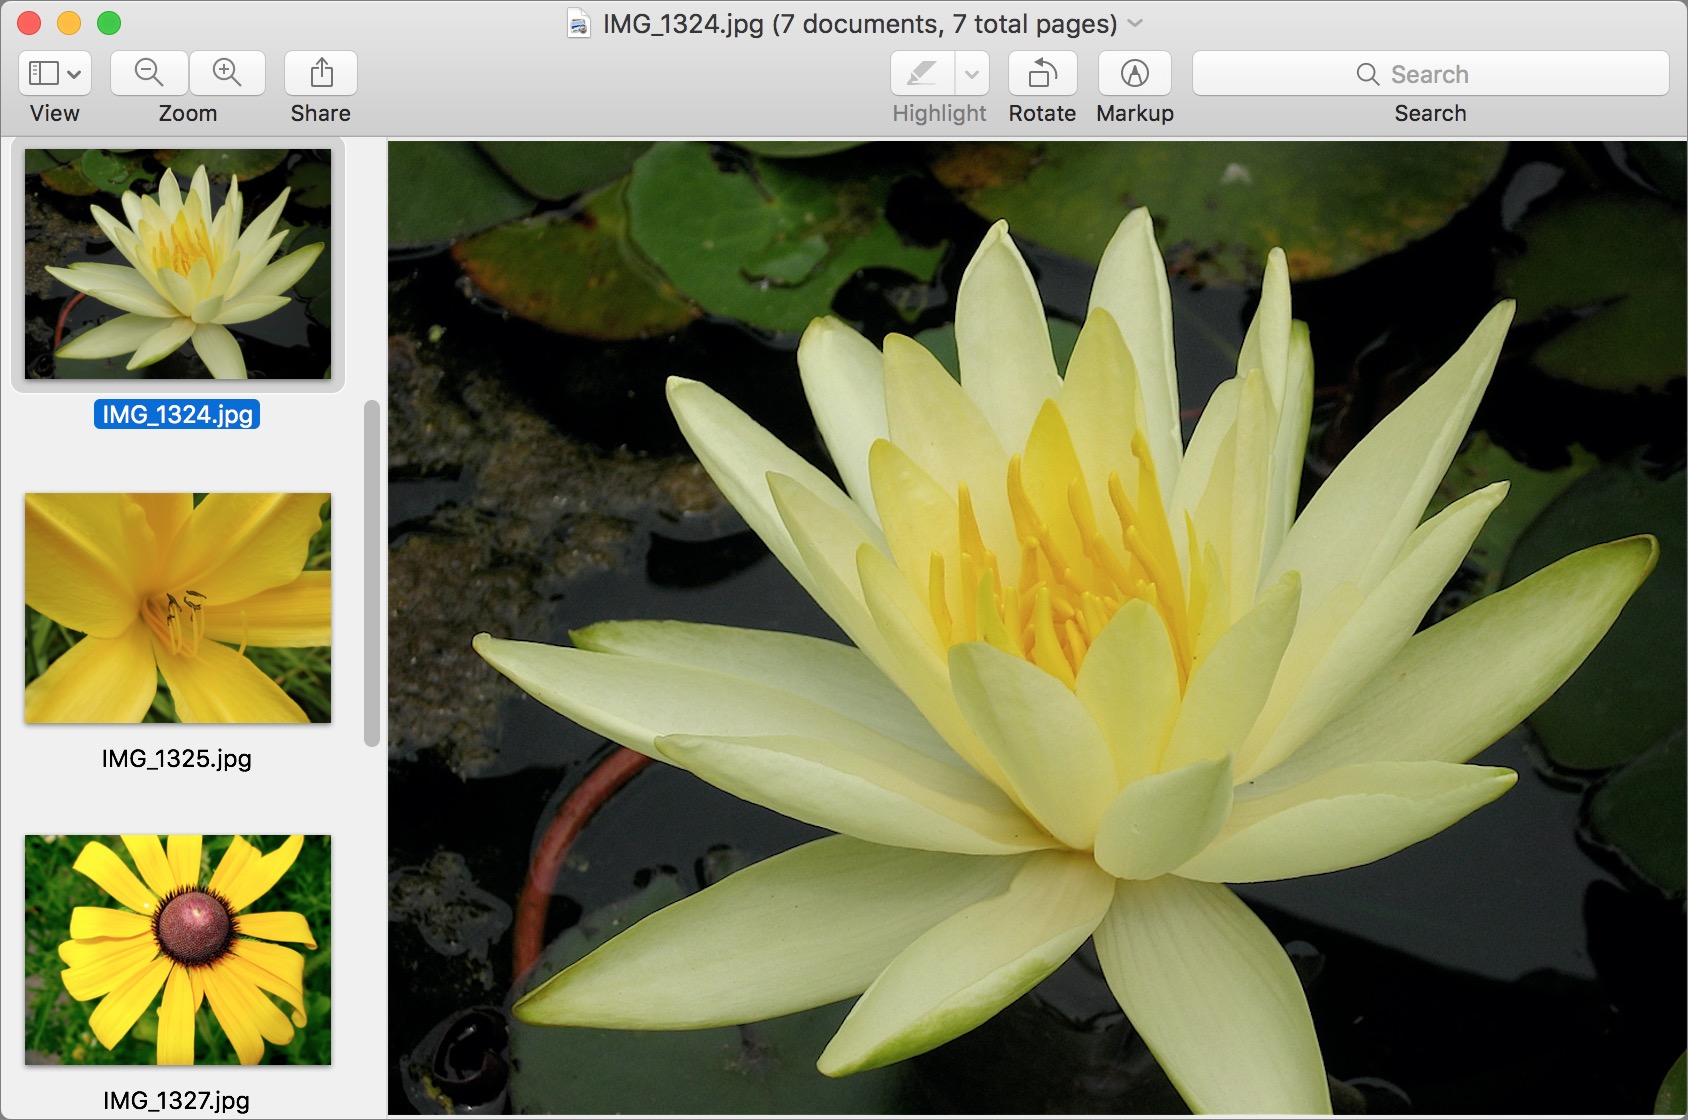
That’s about it for what you can do in Preview with viewing images, but what about the metadata surrounding those files? That’s where the Inspector comes in handy. Choose Tools > Show Inspector (⌘-I) to reveal the Inspector window. It has four panes for images: General Info, More Info, Keywords, and Annotations (Figure 29).
Let’s look at each of these in turn:
General Info: The first pane in the Inspector, General Info, gives you useful information like image size, image DPI, and when the file was created. We use this to look at the image size numbers a lot.
More Info: This pane has (depending on the image) up to five views for General, Exif, IPTC, JFIF, and TIFF data. As you can see in Figure 29, above, there are oodles of details here; you’ll know if you need them.
Keywords: Here you can add keywords to an image so that it can be found more easily in Spotlight. Keywords may already be present if you’ve applied them in an app like Photos. Click the plus
 button to add keywords or the minus
  button to remove them. Honestly, it’s a lot easier to work with keywords in Photos.
Annotations: Use this pane to view and jump to any annotations you’ve made—both text and any shapes you’ve added. Unfortunately, the Annotations pane is entirely useless with images because as soon as you close an image, all its annotations are “flattened” and become just pixels, so they disappear from this pane. It’s mainly for use with PDFs (see Annotate PDFs).
Managing Images
We’ve talked about Preview as an image viewer so far, but that’s a bit like calling the Finder a file viewer. Preview can do much more with images than merely display them. When you select one or more images in the sidebar (or in Contact Sheet view, see Viewing a Contact Sheet), there are quite a few actions you can take.
Rearranging Images
When you open multiple images from the Finder, Preview tries to arrange them in the sidebar in accordance with the order in which you selected them or, if you select them all at once, how they were arranged in the Finder. So, if you select three images named Alice, Bob, and Christine with a Shift-click selection when the folder they’re in is sorted by name, they’ll open in that ABC order. But if their folder is sorted by date such that the order is Bob, Alice, Christine, their Preview thumbnails will appear in BAC order to match. When opening multiple images from a folder in icon view, where the order is often arbitrary, Preview defaults to alphabetical order for its thumbnails.)
The order of thumbnails in the sidebar isn’t fixed, however, and you can select one or more thumbnails and drag them up or down in the list to change the arrangement. The same applies to Contact Sheet view (Figure 30).
We can think of two main reasons to rearrange thumbnails. First, if you want to play a slideshow of all the images in a folder, tweaking the order of the thumbnails gives you control over which images appear when. Second, if you want to create a PDF with one page per image (see Printing to PDF), this is a good way to ensure that they appear in the desired order.
Breezing Through More Tasks
Preview has numerous other features in its File and Edit menus. Some can be applied to multiple images simultaneously, whereas others ignore the sidebar selection and work on just the image that’s showing.
Using the File menu, you can:
Close Selected Images (⌘-Shift-W): Use this command to remove one or more images from the currently open collection. The images aren’t deleted in the Finder.
Save (⌘-S): The Save command applies only to the current image, even if you have multiple images with changes selected in the sidebar.
Duplicate (⌘-Shift-S): Duplicate makes a copy of the selected image in Preview and opens it in a new window. If you’ve selected more than one image, only the current one is duplicated.
Save As (⌘-Shift-Option-S): Hold down the Option key and Duplicate becomes Save As, which lets you save a copy of current image. Again, it works only on the current image when more than one are selected.
Rename: Choose this command and Preview lets you edit the name of the currently selected image in the title bar (Figure 32).

Figure 32: You can rename images right within Preview, which can be helpful for fixing the inscrutable names of images you’ve downloaded from the web. Move To: This command can be helpful if you’re sorting a folder of images. Imagine that you have a folder of photos, some of which are originals and some of which are edited in some obvious way and need to be separated. You can go through them in Preview, and when you come across an edited photo, choose File > Move To to put it in a separate folder.
Export and Export Selected Images: When used with a single image, the Export command lets you change the image format (see Convert and Export). However, when you have multiple images selected, the command changes to Export Selected Images and just makes a copy of each selected image in the destination folder; you don’t get a chance to specify a new image format.
Export as PDF: This command is disappointing, since it works only on the currently selected image, turning it into a standalone PDF. If you want to make a multiple-page PDF of all your open images, print to PDF instead, discussed two bullets down.
Revert To: Like Save, this works only on the currently showing image, and lets you revert to an earlier version, getting rid of changes you’ve made. For details on reverting to the last opened version or browsing all available versions, see Remember Undo!
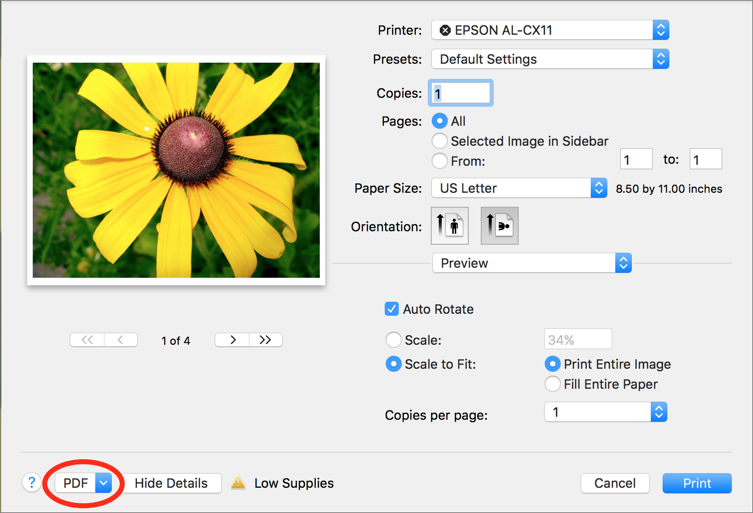
Print (⌘-P): You can, of course, just print multiple images as separate pages, but a more interesting thing to do is to choose Print, and then, from the PDF pop-up menu (Figure 33), choose Save as PDF to get a PDF containing all open images. You might want to change the orientation to landscape if you’re printing photos.
Two commands in the Edit menu also prove useful:
Copy (⌘-C): If you select one or more images in Preview and choose Edit > Copy or press ⌘-C, it copies the image(s) to the clipboard. If you then choose File > New from Clipboard (⌘-N), Preview creates a new window, or windows, with untitled versions of each copied image. It’s a fast way to make a duplicate. Weirdly, in the Mojave version of Preview, it often seems to create two copies—Untitled and Untitled 2.
Move Selected Image(s) to Trash (⌘-Delete): We saved what may be the most useful command for last. Let’s say that you have a folder containing a slew of images, many of which need to be deleted. Thanks to this command, you can open all of them at once, switch into full-screen mode to see them better, and then use the arrow keys to flip through them, pressing ⌘-Delete whenever you find one you want to trash.