Manipulate PDFs
We’ve covered how to add text, shapes, signatures, and more to a page in PDF, but what if you want to work at an overview level to re-organize or format the pages in a PDF? Whether it’s Rearranging, Deleting, and Adding Pages; Rotating Pages; Cropping Pages; or even Changing PDF Color, Preview makes it possible.
Rearranging, Deleting, and Adding Pages
If you don’t like the order of pages in your PDF, you can change it. You can also delete pages, copy them to another PDF, and even add a new blank page or a page from a scanner.
TidBITS editor in chief Tonya Engst does this sort of thing all the time with multi-page scanned documents, such as scans of the paperwork that she receives for each payroll. She feeds the pile of papers into her Fujitsu ScanSnap scanner and ends up with one big PDF. In that PDF, she occasionally finds that a page was scanned out of order, and she usually wants to delete a few pages that represent the blank backs of scanned sheets. Plus, she copies the “payroll stub” page for one employee into a separate document so that she can send it to that person electronically. Your needs are probably different, but if you scan documents regularly, Preview can help you manipulate your PDFs.
To start, choose a view where each page in the document appears as a thumbnail:
Thumbnails: Choose View > Thumbnails (⌘-Option-2) to see the thumbnails in the sidebar. This is a better choice for a short document or a document where the changes that you want to make are all in the same short stretch of pages.
Contact Sheet: Choose View > Contact Sheet (⌘-Option-6) (Figure 98). Because you can see many pages more quickly in this grid view, it’s a better choice for longer documents or for situations where you need to work with more pages as you fix up your document. If you work in this view, note that you can press ⌘-= or ⌘– (we think of these commands as ⌘-Plus and ⌘-Minus) to make the thumbnails tiny (thus showing more in the window at once) or to make them nearly large enough to read (which makes differentiating between similar pages easier).

Once you’re looking at Thumbnails view or Contact Sheet view, it’s time to make some changes:
Rearrange pages: Drag a page thumbnail to a different place in the sidebar (or the contact sheet) to reorder the pages as you like. As you drag, thumbnails of other pages shift out of the way to help you drop the page in the desired spot.
Delete pages: Select one or more thumbnails (by Shift-clicking for a contiguous selection or ⌘-clicking for a discontiguous selection) and press Delete.
Copy a page to another PDF: With two or more Preview document windows visible, drag one or more thumbnails from one PDF document to another to add copies of their pages to the destination document. The dragged pages are added in the location where you drop them. This is particularly handy for combining scanned single-page PDFs into a single file.
Merge PDFs: Drop a PDF from the Finder into the Thumbnails view or Contact Sheet view of an open PDF to merge the two.
You can also add a page to a PDF from the Edit > Insert submenu. Commands there let you add one or more pages from a file, or a blank page to which you can then add text and graphics manually. When using Edit > Insert > Page from File, you can add any graphic Preview can open as a single page, and if you select a multi-page PDF, all of its pages are added.
Rotating Pages
Let’s say you have scanned some paper documents to PDF, but they came out upside down. Although that could have been fixed by clicking the appropriate orientation button when scanning (see Importing from a Scanner), Preview can fix it after the fact too.
Your first step is to switch Preview into Thumbnails view or Contact Sheet view, as we explained earlier in this chapter. You can select just one thumbnail to rotate a single page or select more than one to rotate them all in one step. In fact, you can even select all the thumbnails at once by choosing Edit > Select All (or pressing ⌘-A).
To rotate counter-clockwise, click the Rotate ![]() button in the toolbar, or Option-click the button to rotate in the opposite direction. You may have to click more than once to reach your desired rotation. Or, choose Tools > Rotate Left or Tools > Rotate Right, that’s ⌘-L or ⌘-R.
button in the toolbar, or Option-click the button to rotate in the opposite direction. You may have to click more than once to reach your desired rotation. Or, choose Tools > Rotate Left or Tools > Rotate Right, that’s ⌘-L or ⌘-R.
In Figure 99, for purposes of illustration, we scanned a page upside down and duplicated it three times. We rotated the first copy by 90º to the left (one click of the Rotate button), another by 180º (two clicks), and the last one by 270º to the left (three clicks).

In the real world, when we accidentally scan an entire document upside down, we select all the pages with ⌘-A and then press ⌘-R—and do that again—to flip them right side-up.
Cropping Pages
Just as with images, you can crop pages in a PDF. For example, you might want to remove overly large margins to make a document easier for you to read onscreen.
To crop a single page, use the Rectangular Selection ![]() tool on the Markup toolbar (or choose Tools > Rectangular Selection) to select the area you want to keep and then click Crop on the Markup toolbar (or choose Tools > Crop, ⌘-K). Preview hides everything outside that area.
tool on the Markup toolbar (or choose Tools > Rectangular Selection) to select the area you want to keep and then click Crop on the Markup toolbar (or choose Tools > Crop, ⌘-K). Preview hides everything outside that area.
To crop multiple PDF pages, reveal the sidebar thumbnails by choosing View > Thumbnails, and then use the Rectangular Selection tool on a page to select the area you want to keep after cropping (in Figure 100, we’re eliminating the extra white space at the top of each scanned page). Once you’ve made your selection, click the current page in the sidebar and press ⌘-A to select all the pages. Click the Crop button on the Markup toolbar (⌘-K) to crop every page in the document to the selected dimensions.

Changing PDF Color
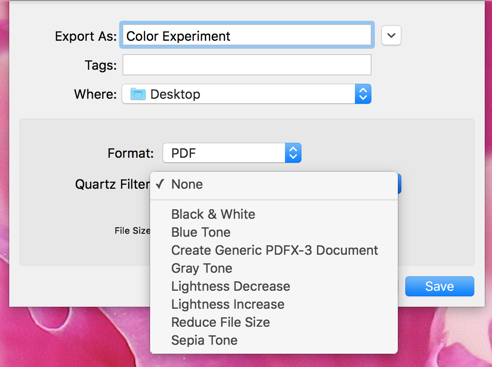
The Mac’s graphic engine, Quartz, is based on PDF, so as a bonus, when you export a PDF by choosing File > Export, you have the option of applying a Quartz filter in order to adjust the look of the exported document (Figure 101).
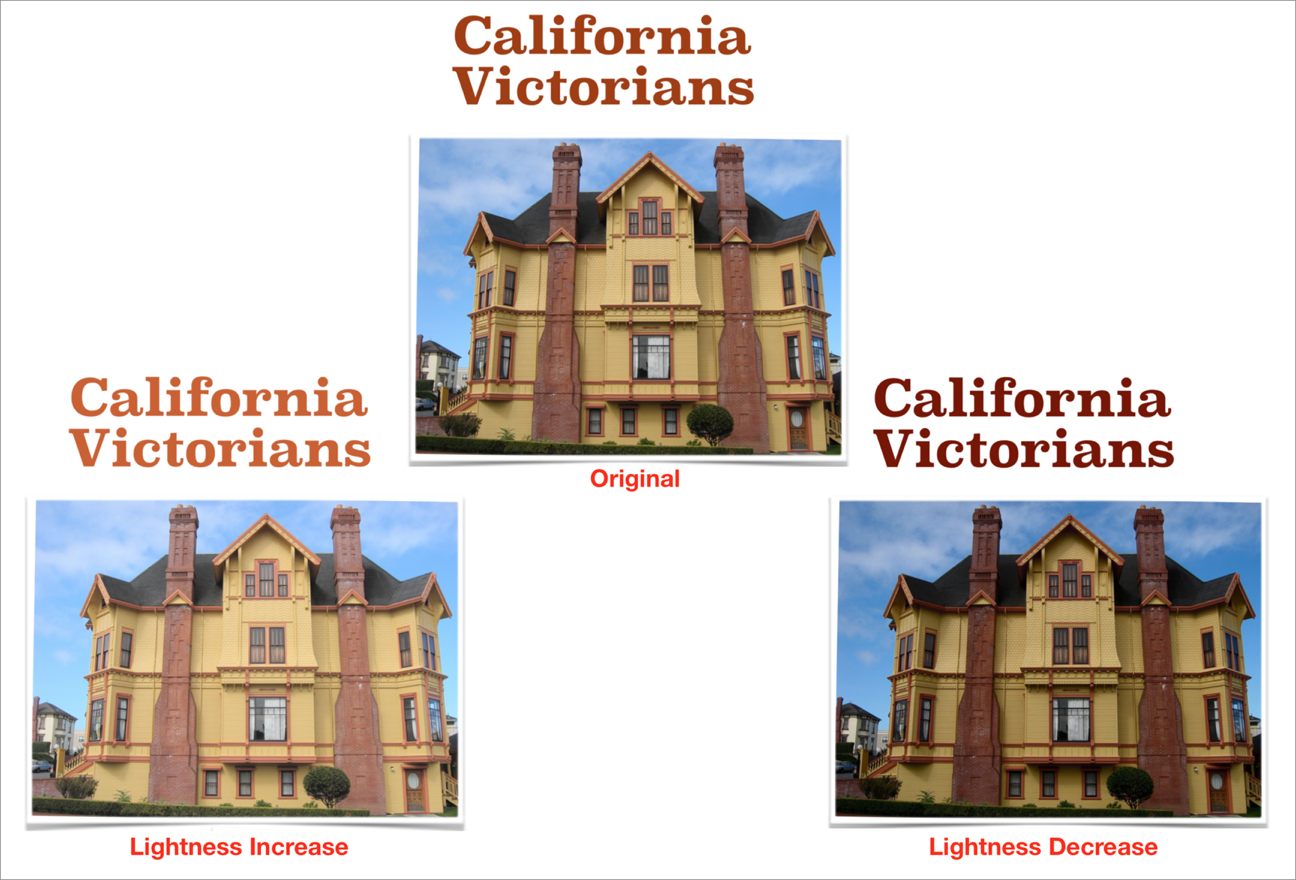
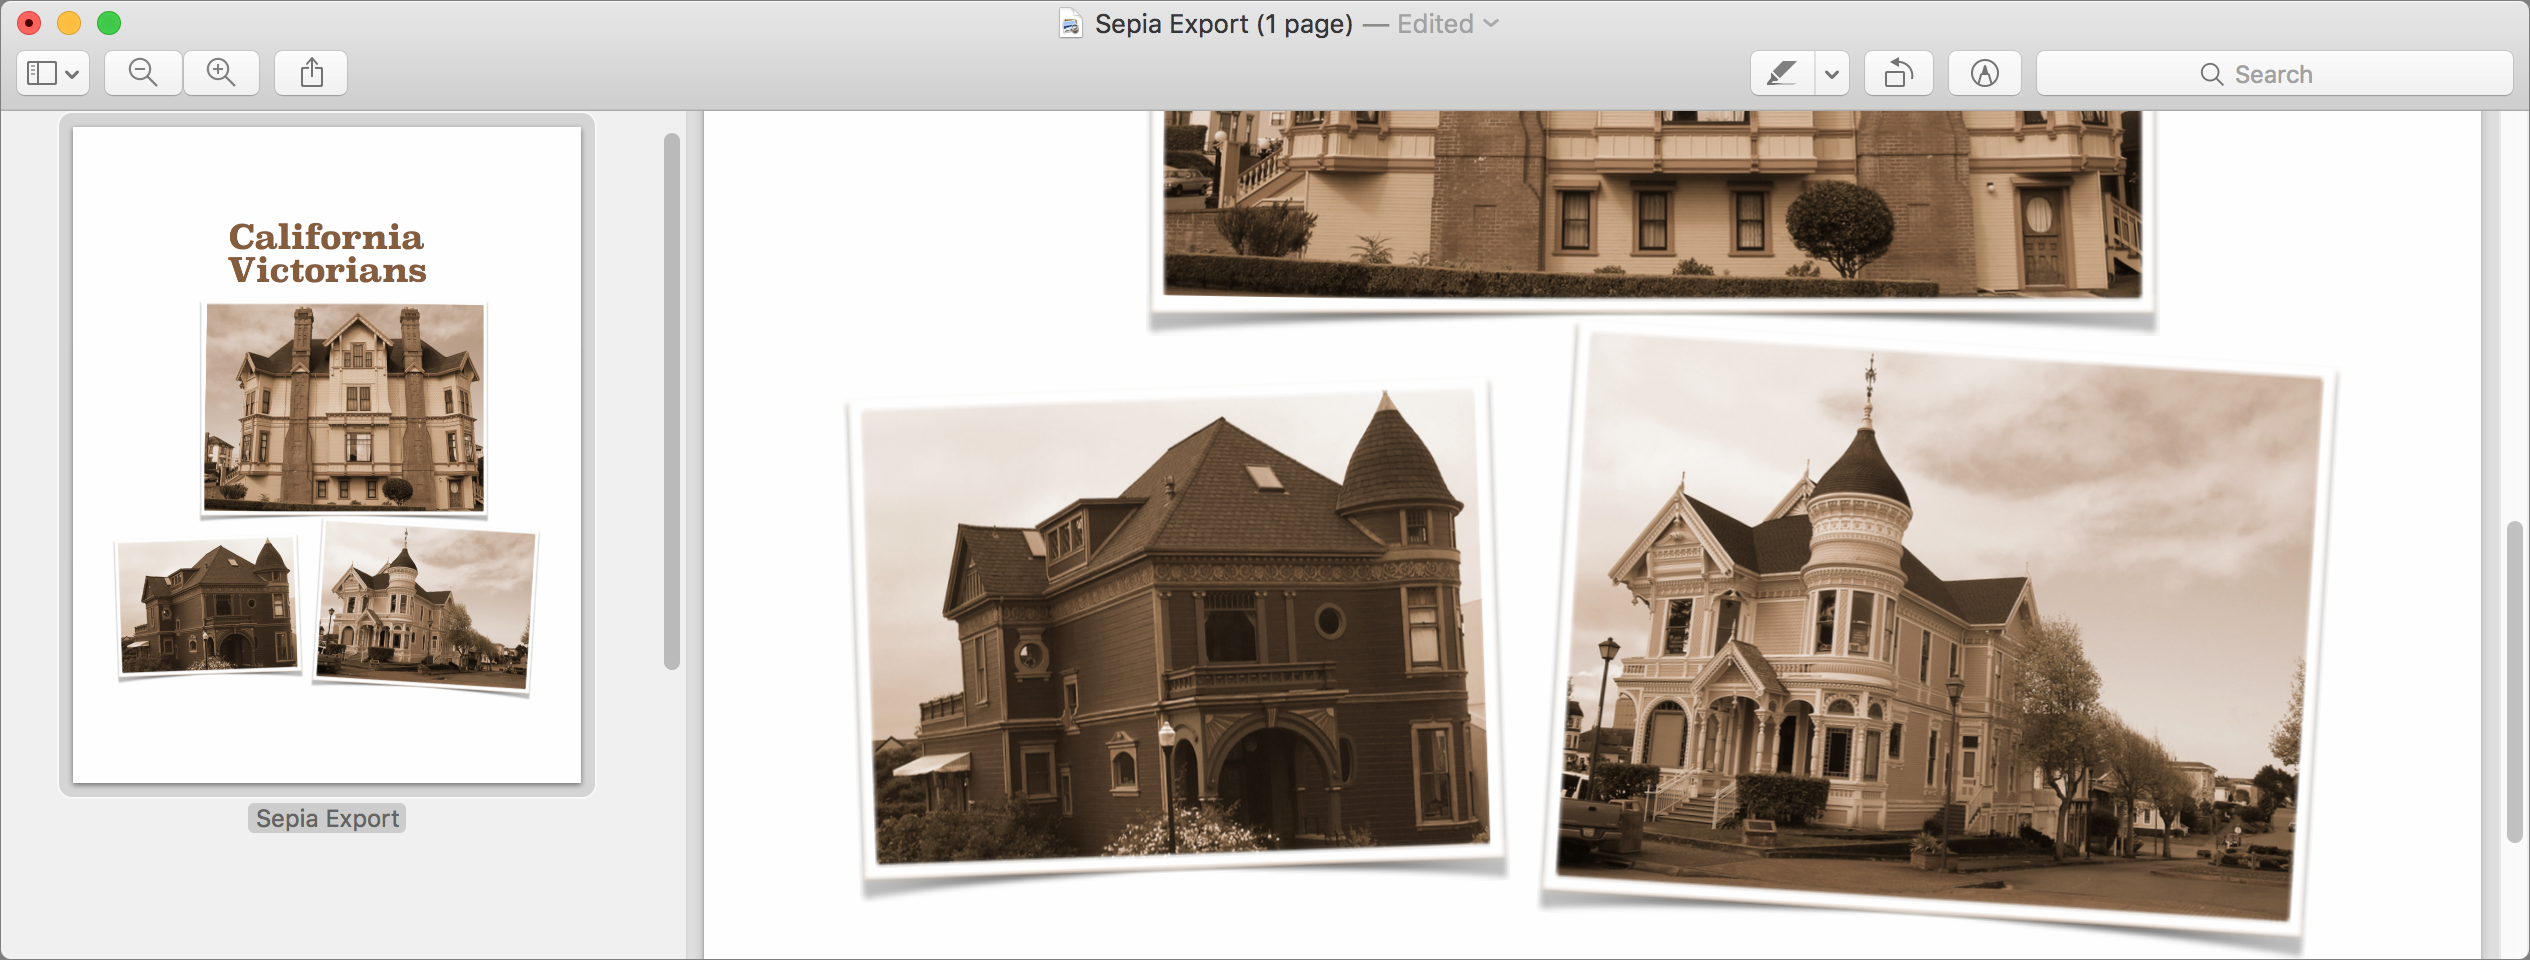
The Quartz filters that change your PDF’s color are Black & White, Blue Tone, Gray Tone, and Sepia Tone. They do what you’d expect, making the page black-and-white or turning all colors—images and text—into shades of blue, gray, or sepia (Figure 102).
Lightness Increase and Lightness Decrease apply to all colors as well, so their effects are relatively subtle in photos, but can make a large difference to colored text (Figure 103).