Post Basic Messages
The atomic unit of Slack is the message, a chunk of text with a unique time stamp that appears chronologically in a channel or conversation. In this chapter, I look at the basics of messages, ranging from the etiquette of what you say to the practical issues of composing, editing, deleting, and responding.
Write a Message
It’s easy to write a message. In any channel or conversation, with the insertion point or focus in the Message field, type some text: Hello, world! In a desktop or web app, press Return or Enter. In mobile apps, tap the send button.
To put a line break within a message without posting it, press Shift-Return/Enter in desktop and web apps, or tap the Return key in mobile apps. (Combining multiple paragraphs in one message minimizes notifications for people who receive an alert for everything that happens in a channel.)
You can also paste text into the Message field. Rich-text formatting is stripped, however.
Use Threads
Threads were a late addition to Slack, coming years into its development. As such, even now, a couple of years after Slack incorporated threads, it often feels tacked on.
A few important elements of Slack threading:
A thread appears as a response to a message in the main window.
Threads are nested a single level deep. You can’t nest or indent replies under threaded replies.
Threads posted in public channels can be viewed and search for by all members as well as guests with access to that channel.
Everyone in a private channel or DM conversation can see all messages in a thread in that channel or conversation.
You can “promote” a message in a thread to the main channel if you think it’s important enough to go there.
Start a Thread
It’s easy to start a thread:
In a desktop or web app, hover over any message’s action bar and click the Thread
 icon. A sidebar opens in which you can type the first message in the thread.
In a mobile app, tap a message, then tap Start a Thread at the bottom. That opens a message-entry field.
Post in a Thread
Messages in a thread work largely as in the main messaging window. You enter text and have a similar set of options, including using formatting and adding attachments. (See Work with Attachments.)
You can also @mention people, and they receive a notification in their Activity feed, and in other ways depending on how they configured alerts (see Reference Other People, ahead). Future posts in a thread in which someone has been tagged results in more notifications to them. Messages in the thread also appear in their Threads and All Unreads/Unreads views.
Slack lets you “promote” a threaded message into the conversation’s main messaging timeline when you check the “Also send to” box before posting the message. This keeps the message in the thread, but also posts a copy in the timeline, which references the thread.
Unfollow and Follow a Thread
One of the advantages of a thread is that you can receive notifications when new messages appear in it, and view the messages in Threads. If that doesn’t feel like an advantage, Slack offers a pair of options to manage that.
For any thread that you start, in which you’re mentioned, or in which you post, you can choose to “unfollow” it. In the Threads view, use the “More actions” ![]() button with any message to choose “Unfollow thread.”
button with any message to choose “Unfollow thread.”
Slack also offers the converse: You can opt to follow any message, whether or not it’s the start of a thread. In the main messaging view, use the “Show message actions” ![]() button to choose Follow Message.
button to choose Follow Message.
Format a Message
Slack offers several ways to apply styling to text, like bold, strikethrough, and italic, as well as to structure a message with bullet lists and quotation formats.
It’s a bit confusing in early December 2019, because Slack added a new rich-text formatting option in desktop and web apps replacing a previous, text-based specification method; left that method in mobile apps; half retained it in desktop and web apps; and then changed its decision, because users complained about losing the text method.
Here’s how you can format as of early December 2019 and what’s expected in coming weeks, at which point I’ll update this book to reflect that change:
Rich-text formatting with a toolbar (desktop, web, mobile). Added in November 2019, you can type or paste messages, then select part of them and apply formatting from one of seven buttons in a format bar below the message field. The formatting appears as you type. You can show and hide the format bar by clicking the Formatting
 icon.
icon.Rich-text formatting with a keyboard (desktop, web, mobile with keyboard). You can select text and use keyboard shortcuts corresponding to several formatting options, like bold, list, and code style. You can also press a keystrokes and then type in that text style or using a list, code, or quote format. Formatting appears as you type in desktop and web apps; with mobile, see the next item.
Text-based specification (mobile). Using certain special characters, like underscore, asterisk, and backtick, you can set italic, bold, code, and other formatting. After you send the message to the conversation, the formatting appears. If you use a keyboard with a mobile device, using keyboard shortcuts drops in the appropriate text items, like asterisks, but doesn’t preview the formatting.
Text-based specification (desktop, web). As I virtually pen these words, Slack has just promised to add an option for people who prefer this format so that users can toggle between toolbar and text formatting. However, for now, using the formatting characters immediately applies formatting as you type.
Now let’s dig into the formatting options.
Style Text Directly
Slack offers eight formatting options you can select directly and immediately see from the format toolbar (Figure 17). For each format, you can either select text and then apply it with the button or invoke it and then start typing in that format.

These eight formats are:
Bold, italic, strikethrough, and
codeNumbered and bulleted lists
Blockquote style, which indents text and styles text to indicate it’s quoted
Code block, which creates lines of text with a differently shaded background and uses
code-style characters for the text
Each of these also has keyboard shortcuts, which appear in tooltips or hover text for each of the format toolbar buttons. This includes ⌘/Control-B for bold and ⌘/Control-Shift-8 to start or format a bulleted list. Styling or invoking works the same as with clicking or tapping buttons.
Style with Text Patterns and Characters
Slack launched with formatting via special characters in text. Type the right character around words or phrases for text styles or the right starting characters for block quotes, code blocks, and lists (Figure 18).

Formatting options amount to the following:
Underscores for italics: Put
_underscores_around a word or phrase, and it will be set in italics.Asterisks for bold: A
*word or phrase inside asterisks*becomes bold when you post the message.Tildes (~) for strikethrough: Use
~tildes~for text you want to indicate should be removed.Angle brackets for block quotes: To set off a line of text, precede it with a single
>; use three (>>>) to set off that line and all that follow in the message (Figure 19).
Figure 22: Three angle brackets inset multiple lines. Backticks for code formats: A single
`before and after a range of text sets it in fixed-format code style; three ticks (```) before and after sets off an entire block. (You may want to use a snippet for anything longer than a few lines.)Numbered and bulleted lists: Type an asterisk or a bullet • followed by a space and Slack begins a formatted list; the asterisk is converted to a bullet. Press Shift-Return by keyboard on any app or tap Return in mobile, and a sequential number or a bullet is added on the next line.
Reference Other People
Slack lets you tag other people in a message by using their display name. These are @mentions, just as in Twitter. And just as with Twitter, @mentioning someone makes it more likely that they’ll take note of your post.
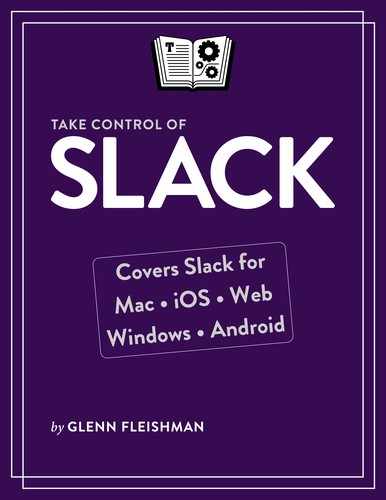
To reference someone by name, type @ and then start typing part of their display name, or any element of their “full name” as entered in their profile. Select a match from the menu that appears (Figure 20). To select a person, you can tap or click in the menu, or, with a keyboard, arrow up or down and then press Return or Enter.
When you post a message with an @mention in it, several things happen:
Slack uses the notification settings for that person to determine how they’re alerted—this could include sending no alert at all, sending an email message, or sliding a notification on screen and setting off loud noises on multiple devices.
Slack highlights each handle in the referencing message in blue.
For that person, Slack adds the mention to the Activity pane. (Click the toolbar’s
 button in the desktop and web apps, or tap the More Items
  button and tap Activity in the mobile apps).
An @mention in a thread adds the referenced person or people as followers of the thread, and subsequent messages appear in their Threads view.
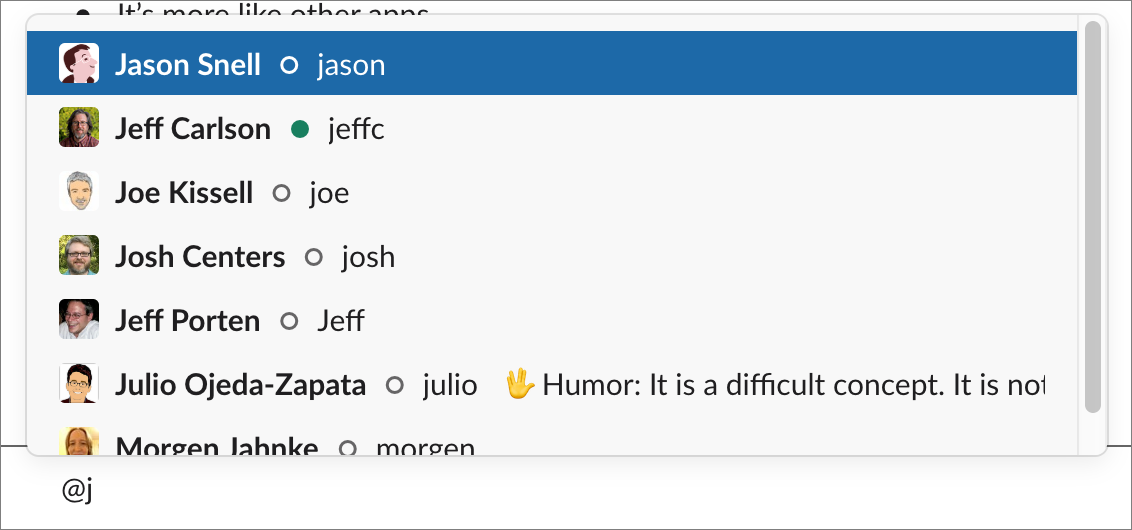
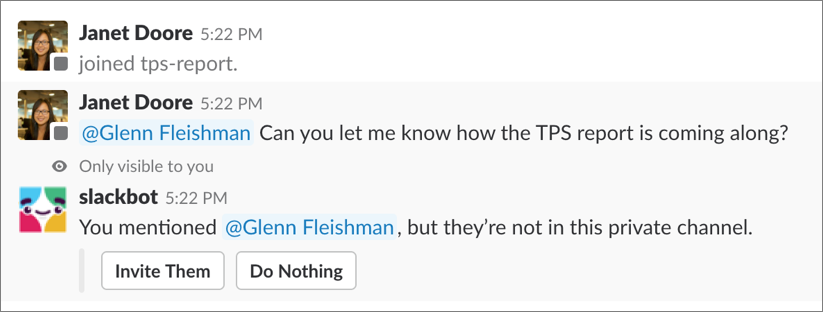
If anyone you reference hasn’t joined the channel in which you’ve just posted the message, Slackbot prompts you to invite that person (Figure 21). In a public channel, you can also pick Let Them Know, which sends them a DM with the link to the message, which they can read without opting to join the channel (Figure 22).
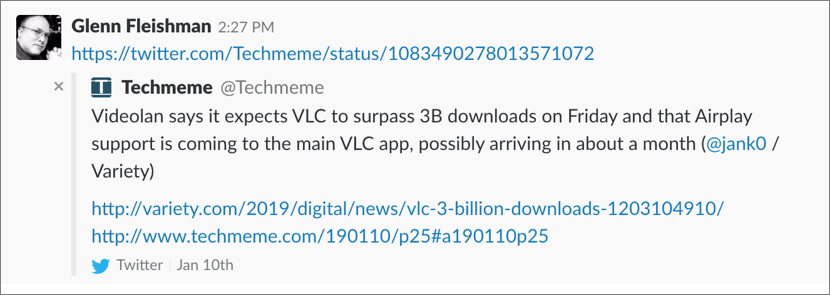
Include Links to Webpages and Media
Paste a URL of a webpage in a message and send the message, and a preview of the page—descriptive text or an image—usually appears (Figure 24). You can remove the preview in a desktop or web app by hovering over it, clicking the tiny grey cancel ![]() icon at its left, then confirming.
icon at its left, then confirming.
By default, Slack tries to show a preview of whatever is at the destination of the URL. This includes a thumbnail of an image, as long as the linked image isn’t greater than 2 MB. Links to video, at YouTube or elsewhere, should result in a playable preview. However, Slack has a lengthy list of reasons why a preview might not appear.
If the destination appears in a constantly updated list of destinations Google has identified as malicious, Slack shows an advisory explaining that it’s unsafe to proceed.
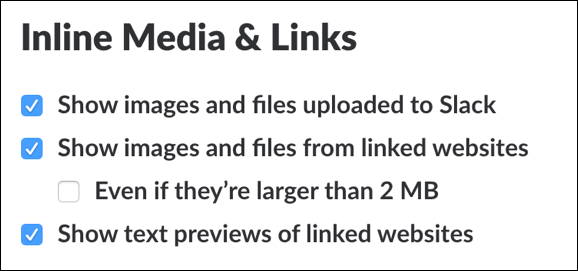
If you don’t want these previews cluttering up your channel feed, the desktop and web apps let you disable them: click the workspace name at the top of the sidebar, choose Preferences > Messages and Media, and look in the Inline Media & Links section (Figure 25). This is also where you can permit images (and file previews) larger than 2 MB (Slack’s default limit).
Use Emoji
If you’re over 35, emoji may seem ridiculous to you; under that age, and they may be an invaluable part of your argot. Emoji are icons that replace or complement the text-only emoticons that were widespread in the early days of the internet.
They’re often used in Slack as a quick shorthand to respond to someone’s message, but can also be used for purely goofy reasons.
I’ll talk about emoji elsewhere in this book, including in Leave a Reaction, but this is a good place to introduce their basics.
Adding an Emoji to a Message
You can add an emoji by browsing or by typing its name:
Browse for the emoji (desktop, web, Android): Click the smiley face
 icon at the far right of the Messages field (far left and below in Android) to see the Emoji browser, which is shown in the figure just above. The browser has buttons at the top that display different categories: People, Nature, Food & Drink, Activity, Travel & Places, Objects, Symbols, Flags, and Custom. As you hover over any emoji in a desktop or web app, it shows a preview at the bottom and its text name, which you can memorize if you prefer typing. In Android, hold down on an emoji to see its Slack name.
Type the emoji name: In the Messages field, type a colon (Android) or a colon plus the first two characters in the emoji’s name (all other platforms) to see a pop-up showing potential matches. Keep typing to reduce the number of matches (Figure 27). Typed emojis must be closed with a colon—for example,
:wink:. Slack uses the same standard names for emoji that you find across many other programs and services, which is handy. Here’s a list.
Figure 30: You can starting typing the name of an emoji even if you don’t know its full description. Type an emoticon: Slack also converts emoticons to emoji for a lot of popular text sequences, like
:oto ?. A full list appears at this Slack support page.
Edit or Delete a Posted Message
Unlike Twitter and many other messaging services, after you post a message in Slack, you can edit it or delete it. This makes fixing typos—and removing awkward or inappropriate messages—a snap.
Slack provides several ways to edit messages:
Desktop or web app: For the immediately preceding message you posted, press the Up arrow in the empty Message field.
Or, hover over any message that you wrote, click the “More actions”
 button, then choose Edit Message.
Mobile app: Hold on a posted message that you wrote to open a menu, then tap Edit Message.
When you edit a message, it changes from a posted item to an editable field (Figure 29).

You can edit with all the same features as a new message, then either click Save Changes or press Return or Enter to approve the changes. Or, to cancel your edits and leave the message as it was, click Cancel or press Escape. In iOS and iPadOS, tap Save or Cancel. In Android, tap √ or the  arrow in the upper-left corner to cancel the change.
A tiny, gray “(edited)” tag appears next to your edited message in the message list.
Similarly, there are a few ways to delete one of your posted messages:
Desktop or web app: Hover over any message, click the “More actions”
button, then choose Delete Message. Confirm the deletion (Figure 30).
Figure 33: You’re always prompted before deleting. A destructive edit works too, and can be executed with keystrokes alone. For your just-posted message, make sure the current Message field is empty, press the Up arrow, select all and delete the text, and press Return or Enter. Confirm the deletion.
Mobile app: Press on the message to open a menu, and tap Delete Message. You will be asked to confirm the deletion.
Navigate the Message List
While other people are composing messages in the selected conversation, you’ll see up to two names beneath the Message field. When more than two people are typing, you’ll see what has become a classic Slack message: several people are typing. It’s even the title of Slack’s blog.
As more messages are added in a channel or conversation, the older ones scroll to the top and disappear. They’re not gone for good:
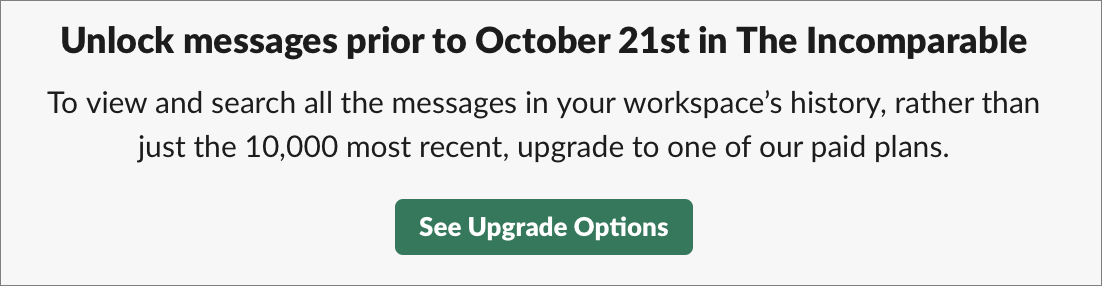
In paid workspaces, you can scroll back to the start of time—when the channel or conversation was created.
In free-tier workspaces, only the 10,000 most-recent messages across the entire workspace are retained, so conversations can easily be truncated. Fortunately, Slack warns you when you’ve scrolled back to the cut-off point of a free-tier workspace’s messages (Figure 31).
Dates and Times
Slack separates the message list into days. It displays text labels if any messages have occurred recently—Today and Yesterday—and then date-stamped markers for each preceding day. As you scroll back in time, the date marker in the desktop and web apps slides to the top and remains fixed there so long as there are preceding messages you can’t see that were also posted on the same day.
A time stamp appears above or next to each posted message. If the same person posts multiple messages in quick succession, you’ll see just the first message’s time stamp, but hovering, in a desktop or web app, over any subsequent message in that group reveals its time stamp to its left.
Unread Messages
Slack uses the terms read and unread a little differently than other systems that track what you’ve viewed. If you return to a channel or conversation after being away, Slack inserts a red line in the message list to delineate where unread messages start (Figure 33).

If the number of unread messages exceeds what can be displayed in the currently visible area of the message list, a banner along the top notes how many are unread (Figure 34). In Slack’s mobile apps, you can tap it to jump up in the list to the last unread point.

In the desktop and web apps, the banner is merely informative by default; to get the same click-and-jump behavior, you have to change a workspace preference: click the workspace name at the top of the main sidebar, choose Preferences > Mark as Read, and select “Start me at the newest message, but leave unseen messages unread.” Now if the New Messages divider has scrolled up off screen, the word “Jump” appears at the left; click anywhere on the banner to jump to the first unread message.
In iOS and iPadOS, you can disable the blue unread bar. Tap the More Items ![]() button > Settings > Advanced and enabled “Mark As Read Immediately.”
button > Settings > Advanced and enabled “Mark As Read Immediately.”
Here are a few tips for working with unread messages:
Use All Unreads (desktop, web): Slack offers a single spot where you can review all unread messages, but it isn’t enabled by default. Instead, open Workspace > Preferences > Sidebar, and check Show All Unreads.
Browse the sidebar: You can easily spot a channel or conversation with unread messages by looking for bold type in the sidebar. In some Slack clients, you’ll also see red badges in the sidebar. The number in the badge indicates either how many unread messages contain your handle or any highlight words, or how many unread direct messages are in a conversation (Figure 35).
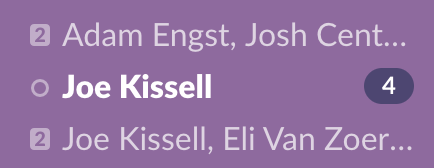
Figure 38: For conversations with unread messages, Slack shows how many new direct messages are waiting. Navigate with the keyboard: If you’re using a desktop app, or the web or a mobile app on a device with a physical keyboard, you can jump among conversations and channels that have unread messages, too. Press Option-Shift (or Alt-Shift) and arrow up or down to the previous or next unread message.
Mark all as read: To mark as read everything currently unread messages in the selected channel or conversation, press Escape in the desktop and web apps, or scroll to the bottom in a mobile app. You can also use the blue banner at the top of the main timeline in Figure 34: select the little white close
 icon—or anywhere in the banner—to mark everything as read, too.
Mark workspace as read: You can nuke the unread status for an entire workspace in desktop and web apps: press Shift-Escape.
Restore unread status: What if you marked a message as read, but actually wanted to preserve its unread status as a reminder? You can! In a desktop or web app, Option- or Alt-click the message. You can also hover over a message, click “More actions”
, then select “Mark unread.” In a mobile app, tap the message and tap Mark Unread. However you mark a message unread, the New or New Messages label appears in the conversation just above it.
Interact with a Message
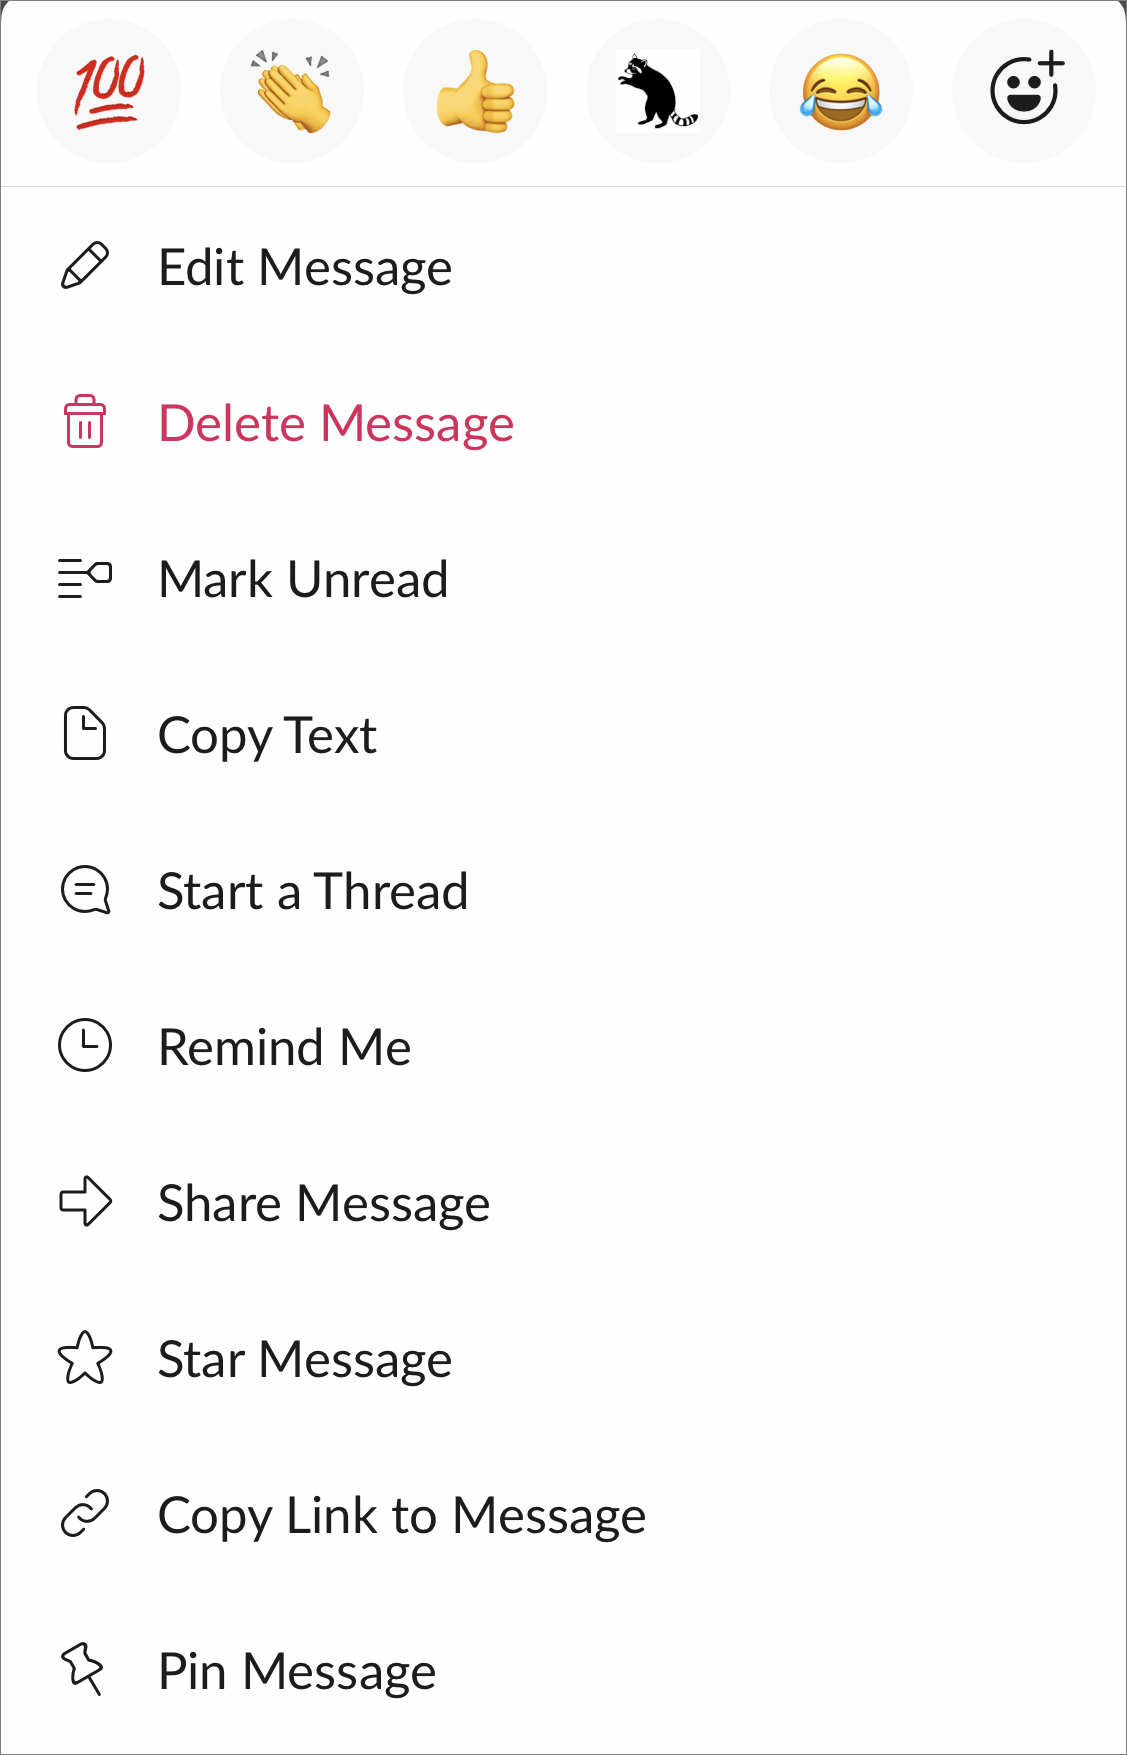
Once a message is posted to Slack, you might want to interact with it as on a social network: mark it with a star, reply to it, copy it, share it, or get a permanent link. The key to these interactions is the “More actions” menu. To view its contents in the desktop and web versions of Slack, hover over a message and click the “More actions” ![]() button. In the mobile apps, press and hold on the message until a menu appears (Figure 36).
button. In the mobile apps, press and hold on the message until a menu appears (Figure 36).
Most of these interactions are fairly obvious, and I covered the Mark Unread command in the previous topic. Here, I want to explain how reactions work, what to expect when you Mark a Message for Later (with a star), and how to Share or Link to a Message.
Leave a Reaction
The emoji I talked about a few pages earlier are also available from the Message Action menu as reactions, which are little avatar addenda attached to a message. Reactions are always public—anyone who can view the conversation can also view its reactions. Most obviously, you might want to put a thumbs up ? after a message you agree with, but a wide variety of images exist for different reactions (Figure 37), and you can add more than one.

Once a reaction is added, other people can click it to add their assent, which is shown as a number count next to the emoji; both are contained inside a tiny lozenge-shaped box. Hover over a reaction to see which people added it or increased its count.
Mark a Message for Later
To mark a message that you want to keep for general reference, you can “star” it. In the desktop and web apps, click the star that appears in the action bar when you hover over it. In the mobile apps, press and hold a message and then tap Star Message in the menu. The starred status of a message is always private. This differs from social networks, where stars or hearts are public. Use a reaction, above, for a public response—including a heart or a star!
In desktop and web apps, the somewhat ponderous text “Added to your starred items” shows above the starred message; the briefer “Starred” appears in mobile apps. In all apps, the message is lightly highlighted using a faint yellow.
To view messages you’ve starred:
In desktop and web apps, click the Starred Items
 button in the upper-right corner (Figure 38).
In iOS and iPad OS, choose Starred Items from the More Items
menu.In Android, tap the workspace’s icon in the upper-left corner, tap the Home menu, and choose “Starred items.”
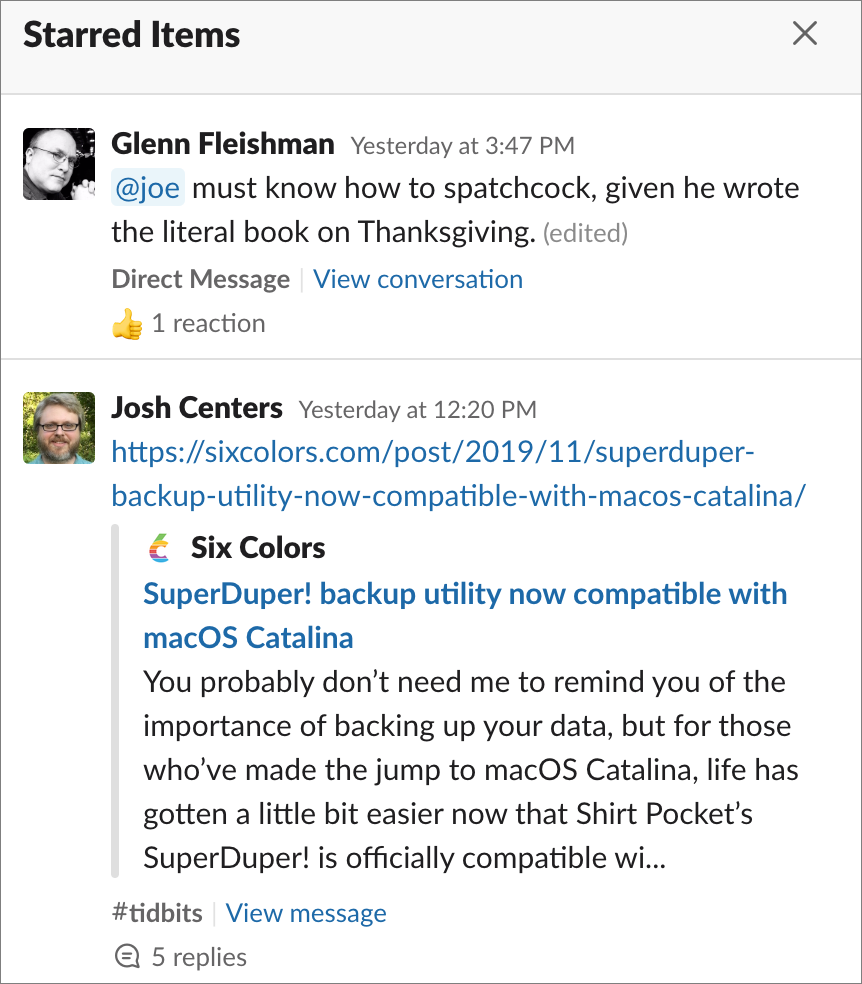
The Starred Items pane acts like your own private “best of Slack” collection. In the desktop and web apps, you can hover over the message in the Starred Items pane and click the Jump  button to go to the point in the message list where that message appears so that you can see it in context.
To remove a message from Starred Items, either hover over it (desktop and web apps) and click the star; or in mobile apps, press and hold it and tap Remove Star (iOS/iPadOS) or Unstar Message (Android).
Share or Link to a Message
If you want to refer to a message that was already posted, you can, of course, copy and paste its text as a new message. But an even easier option is to share it or link to it.
When you share a message, it appears again at the bottom of the message list in an embedded, quoted format, along with a new message that you can add while you prepare to share it (Figure 39). In contrast, when you link to a message, it appears in a slightly different quoted format in the message list again, but without any new message (Figure 40).
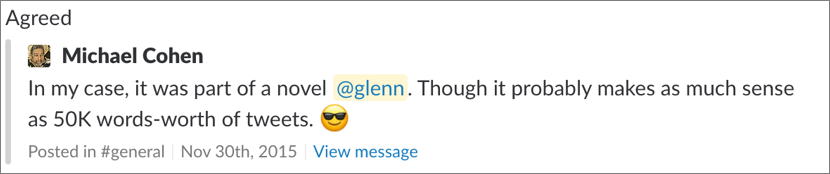

Both kinds of message appear in the timeline with a gray bar at their left indicating a quotation, but the shared bar is a slightly darker gray—almost ludicrously not much darker and very hard to perceive!
To share a message:
In the desktop or web app, hover over the message, then click the “Share message”
 button. In the mobile app, press and hold a message and select Share Message.
If the message can be shared beyond its original conversation—an intentional limitation for DMs and private channels—you next select where to share it. This includes public and private channels and DMs. In desktop and web apps, type a channel or DM name into the field that appears or use the drop-down menu to select one. In mobile apps, a “Share in” list appears. If it can’t be shared elsewhere, Slack lets you know (Figure 41).

Figure 44: Messages in DMs and private channels can be shared only in the same conversation. The Share Message dialog lets you optionally attach a new message that appears above the embedded, quoted message (Figure 42).

Figure 45: The Share Message dialog makes it simple to share a message. Click the Share button.
To link to a message:
Desktop and web apps: Click the message’s “More actions”
button, and choose Copy link.Mobile app: Press and hold on a message and select Copy Link to Message from the menu.
Now, paste the copied link into a new Slack message (Figure 43)—the message can contain more text than just the link. If that channel or conversation has privileges to see that link, Slack will quote the original message.

The link is actually the permanent Slack archive URL—yes, each Slack message has a unique URL. The URL can be used to view the message in its original position in its original channel. If you open it in a web browser, it will offer to open it in a desktop Slack app, but you can opt instead to view it within the web app.
Work with Attachments
With its treatment of attachments, Slack moves beyond being just a messaging tool and becomes a simple file server too. By attachments, I mean files that a workspace member brings into the workspace, either privately for themselves or for groups in a channel or direct message conversation.
Attachments can be uploaded and stored centrally on Slack’s servers, or they can be linked to from several outside services: Box, Dropbox, Google Drive, and OneDrive.
Upload a File
You can add a file to a Slack workspace in any conversation, or you can upload it to your private file storage area.
Slack offers several ways to add or upload a file:
Add file: In a desktop or web app, click the “Attach file”
 button next to the message field, then select an option under “Add a file from.” Depending on which apps are added to the workspace, you might see Your Computer, Dropbox, “A cloud service” (which can include Dropbox, Google Drive, and other services), or others.
Drag file: The desktop and web apps also let you drag and drop up to 10 files onto the Slack window (Figure 44). Yes, this works with the web app! Hold down Shift to bypass the details dialog that lets you add a message and rename files.

Figure 47: You can drag and drop images directly into Slack. Paste image: You can paste an image from the clipboard into the Message field in a desktop or web app as well.
Attach files in mobile: In a mobile app, tap the Attachment
 button. (In a thread, first tap the blue show options
  button to see the Attachment button.) Choose among the following:
Select a file from the Your Files list, which shows any file you’ve uploaded, as well as special files created in Slack. (See Go Beyond Basic Messages for more on those kinds of files.)
In iOS and iPadOS, tap Add a File, tap Browse, and either choose from iCloud Drive files or tap Locations to see other cloud services you’ve connected to the Files app.
Use photos in mobile: In a mobile app, you can tap the Photos
 icon to bring up a list of images stored on your device. (If you’re viewing a thread, first tap the blue show options button.) You can also take a picture or shoot video: in iOS and iPadOS, tap the Photos icon and then the Camera
  icon; in Android, tap the Camera icon.
Once you’ve added, selected, or uploaded a file, follow these steps:
Desktop and web:
- In the dialog that appears, you can add a message related to the file or files (Figure 48).

Figure 48: Enter a comment and choose an upload location. You can optionally change the filename by clicking the Edit button on the file item, filling in a new name, and then clicking Save Changes. For images, click the image, then click Edit in the upper-left corner, enter the new name, and click Save Changes.
Click “Add file” to add more files up to 10 total.
For private files, uncheck “Share with.” Otherwise, select a conversation. The current conversation is the default.
Click Upload to finish.
Mobile:
Optionally fill in a message in the message field (labeled “Jot something down” in Android).
Optionally hold down on the file preview to change its name. Tap Save to finish in Android or Rename to finish in iOS or iPadOS.
Tap Send (iOS/iPadOS) or the Send
 button (Android) to post the link in the channel.
The uploaded file now appears inline in the conversation, assuming you didn’t choose to keep it private in a desktop or mobile app (Figure 49). The post includes a preview or an icon for the file along with an option to view or download it, depending on its type and size.

You can’t delete an uploaded file by deleting the message that references it; that only deletes the message and leaves the file intact. For help, see Manage Uploaded Files.
Link a Cloud-Stored Item
Although an app may connect Google Drive (including Google Docs), Box, Dropbox, or OneDrive to your workspace, you can bring files from any of these services into your workspace even if the apps have not been set up. Start by finding a link to a file that you want to attach, then paste the link into a Slack message. Slackbot asks how it should import the link (Figure 51).

You’re prompted with three choices:
Connect: Connect applies automatically to all future links pasted from the service being used, and adds the app to the workspace. (For free plans, an app slot has to be available.)
Not now: This option puts a clickable version of the link in the message list, but Slack treats it as just a web link and does not attach the file. This is the best option for a new Slack user to avoid making a workspace-wide decision.
Don’t Ask Again: All future links will be pasted in from the service being used.
The first time you pick Connect, Slack brings up an authentication page for the service.
Manage Uploaded Files
Before you can do anything with an uploaded file (or snippet or post, described next), you need to find it in your workspace. You can look in the message list, but unless it’s a recent post, it may be hard to find.
Instead consult Slack’s file directory. Use the More Items ![]() button and select Files in a desktop or web app or Your Files in iOS or iPadOS (Figure 52).
button and select Files in a desktop or web app or Your Files in iOS or iPadOS (Figure 52).
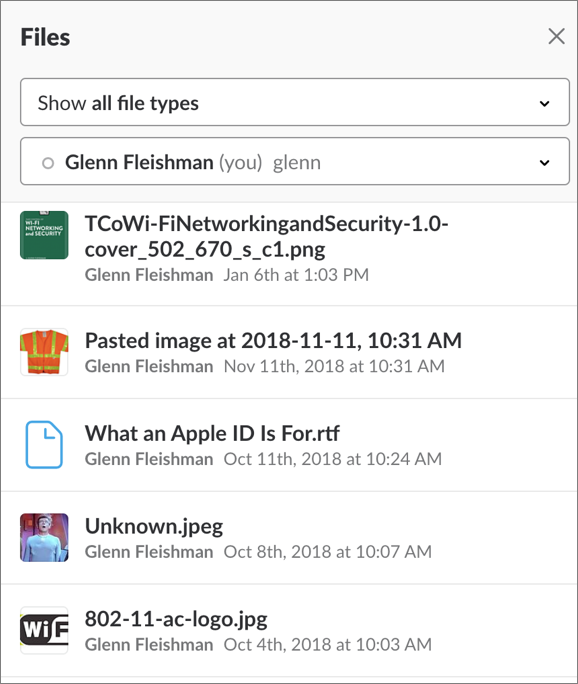
To filter which files are shown in a desktop or web app, click the “Show all files types” menu. You can then choose an option such as Posts, Snippets, Images, PDF Files, or (if connected) Google Docs. Click the second pop-up menu to filter by user: it shows your name and you can select Everyone or a member’s name. Other people’s files have to have been uploaded to a public channel or in a conversation that you’re part of.
In Android, iOS, and iPadOS, tap the Search ![]() icon and use options you can tap or type in.
icon and use options you can tap or type in.
In mobile apps, tap the Search ![]() icon and provide a search parameter to see other files. Type in
icon and provide a search parameter to see other files. Type in from: and tap “enter” to see all files, or type from: followed by an individual’s name to see just their files.
Once you’ve found a file, you can see a preview or gain more information about it. You can also access controls for working with it. Some of the options, like editing or reacting, are the same as those for any message.
The interface for working with files is a bit inconsistent between apps and between the message list and the Files pane. These are the icons you may see when hovering over a file in the desktop or web apps; in a few cases, as marked, you’ll also see some of them in a mobile app when you tap a file:
Download
 icon: Appears for all files, except posts
Share
icon: Appears for all files in all appsEdit
 icon: Appears for snippets
Edit in new window
 icon: Appears for posts
More actions
 icon: Appears for all files in all apps
Star
icon: The icon appears only in iOS and iPadOS
Options that don’t have an icon in one or more apps likely have an item that appears in the “More actions” ![]() menu: click or tap that to find the correct feature. (Android inexplicably uses
menu: click or tap that to find the correct feature. (Android inexplicably uses ![]() for “More actions” in just this one place.)
for “More actions” in just this one place.)
Now let’s dig into what all these options provide.
Basic file management:
Rename a file (all): Use Rename to change the file’s title. (Only appears for your own files.)
Delete a file (all): You can delete files and links to cloud files, as long as they’re you’re own. In a desktop or web app, choose “Delete file” or “Delete file from Slack.” In a mobile app, tap Delete File (iOS/iPadOS) or Delete (Android) for files in Slack, but cloud file links can’t be removed in mobile.
Viewing and downloading:
Download a file (desktop, web): The Download command transfers a copy of the file to your device.
Download an image (mobile): In Android, you can use Download with an image; in iOS and iPadOS, use Save Image. (These operating systems also let you view the image in a browser and use “Open in” to copy the file to an appropriate app via the Share sheet or activity view.)
See the original file on the web (desktop, web): If the Open Original command appears, choose it to bring up the file in a web browser.
Sharing and collaborating:
Open in New Window (desktop, web): Posts are a special kind of internal formatted and shareable Slack document. This button brings up the post in its editor. See Create Posts.
Edit (desktop, web): You can use Edit to view or modify snippets, a way to paste in text for coding or formatting. See Insert Code or Text Snippets.
Share the file in another channel or conversation (all): Use the Share File
button or Share File command to drop a reference in a conversation, with an optional message (Figure 53).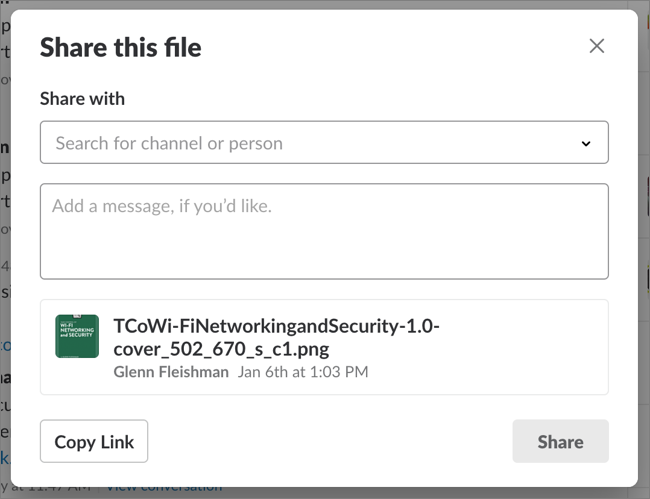
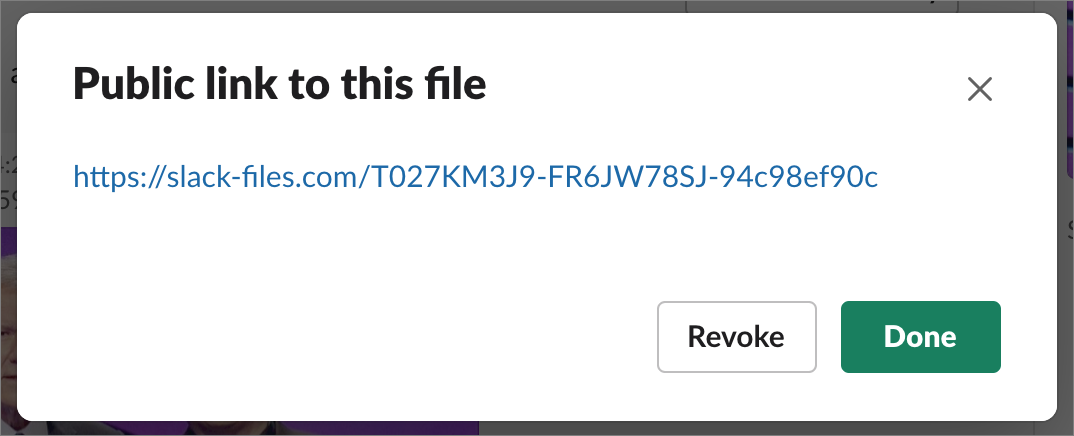
Figure 53: Share a file into a channel, group DM, or with a person. Make a download URL for non-workspace members (desktop, web): Choose “Create external link.” Slack pops up a dialog containing a public web URL, with the URL selected so you can easily copy it (Figure 54). Click Revoke to cancel the URL (and then click “revoke it” to confirm) or click Done to save it. Once you click Done, the “Create external link” command changes to “View external link.”
Go Beyond Basic Messages
Now that you know the basics of messaging in Slack, it’s time to look at more sophisticated options. In Insert Code or Text Snippets, I discuss how to insert structured text, such as color-coded programming code or Markdown. In Create Posts, I explain how to create documents that can be commented on and edited by other people.
Insert Code or Text Snippets
Although messages can be fairly long, and can include basic formatting, Slack offers another kind of message, called a snippet, for pasted-in chunks of programming code or longer runs of text. Snippets are useful for two reasons. First, they let workspace members post large chunks of viewable and editable text without having to upload a file or clog the message list. Second, Slack automatically formats snippets with styles and syntax coloring for a variety of programming languages and a couple of text formats.
As of this writing, Slack can offer the customized display of 64 different kinds of coding languages and text-based formatting languages, plus pure Plain Text and an auto-detect option. These include:
A huge number of programming languages (like C++ and Swift) and scripting languages (like perl, JavaScript, AppleScript, and PHP)
Formatting languages like HTML and XML
Data structures like JSON
Markdown, a common formatting approach for content-management systems
To post a snippet:
In the desktop app or the web app, click the “Attach file”
button next to the Message field, choose “Create new,” and then choose “Code or text snippet.”In the “Create snippet” dialog, give your snippet a title (optional), choose the desired format (or rely on Auto Detect Type ), then paste or type the snippet.
Even in the dialog, Slack applies formatting to the snippet text (like bold and italics) as well as colors that correspond to the syntax of the particular language or format (Figure 55). Programmers who like this sort of thing really like it (count yours truly among them) because errors in coding or structure become obvious.
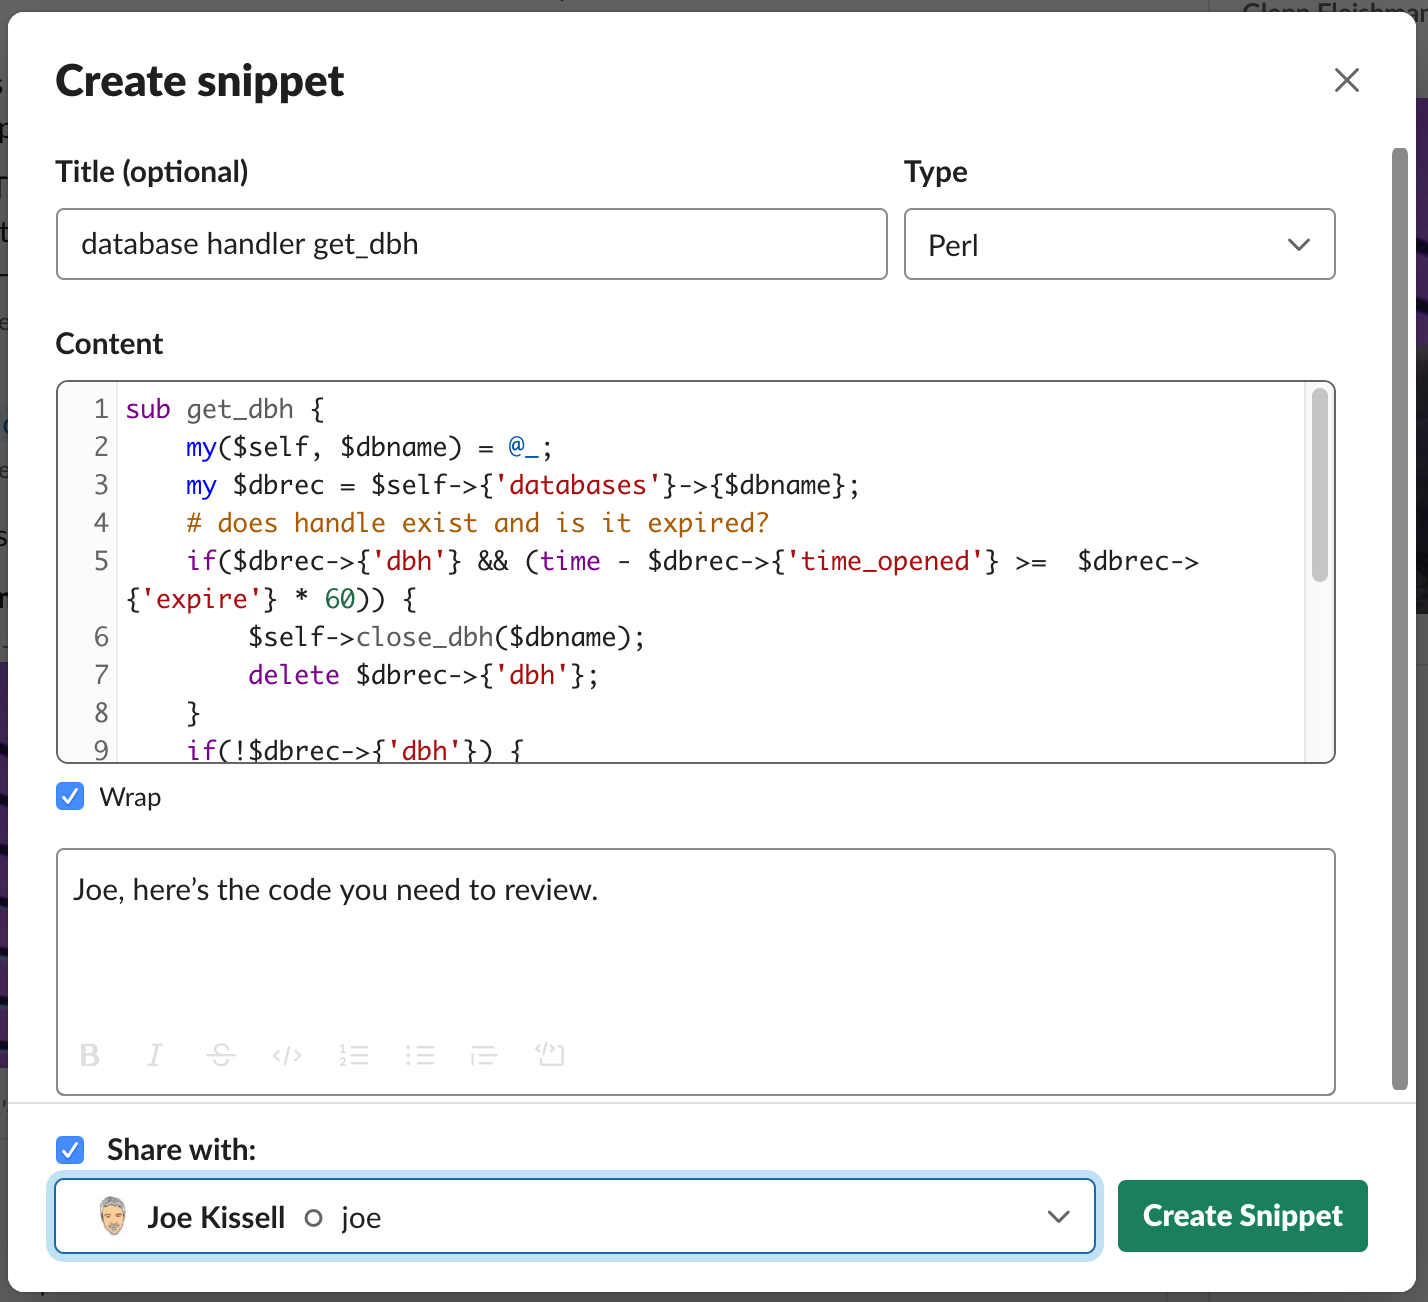
Figure 55: Code appears with color and other formatting that helps readers more easily parse the text and spot errors. Select the Wrap checkbox to soft-wrap the text to the column width instead of having it remain on a single line.
Select the Share With checkbox if you want to share the snippet right away, then choose the location where or person with whom you want to share it.
You can optionally enter a message that appears as a thread attached to the post that contains the snippet.
Click Create Snippet.
Slack adds the snippet to your workspace and, if the snippet is shared in step 4 above, it posts it into the conversation or channel.
When added, a snippet is shown in a brief form by default; to expand it, click or tap it. Any member can collapse or expand it in their view.
You aren’t limited to just viewing snippets you’ve created; you can also edit them; hover over one and click the Edit ![]() button. That could be useful for tweaking a snippet in response to comments, without having to make a whole new one. See Manage Uploaded Files, earlier in this chapter, if you need help with other options. (Mobile apps can only view snippets, not edit them.)
button. That could be useful for tweaking a snippet in response to comments, without having to make a whole new one. See Manage Uploaded Files, earlier in this chapter, if you need help with other options. (Mobile apps can only view snippets, not edit them.)
Create Posts
If what you want to say is too long for a normal Slack message in a desktop or web app, you can write a post instead. Posts have a lot of neat features:
They appear inline in the message list and can behave much like normal messages, so they can be reacted to, pinned, and so forth.
Posts appear in the Files pane and act like attachments and snippets, so they can be shared among conversations, given a public URL, and commented on.
They can include formatting (Figure 57).
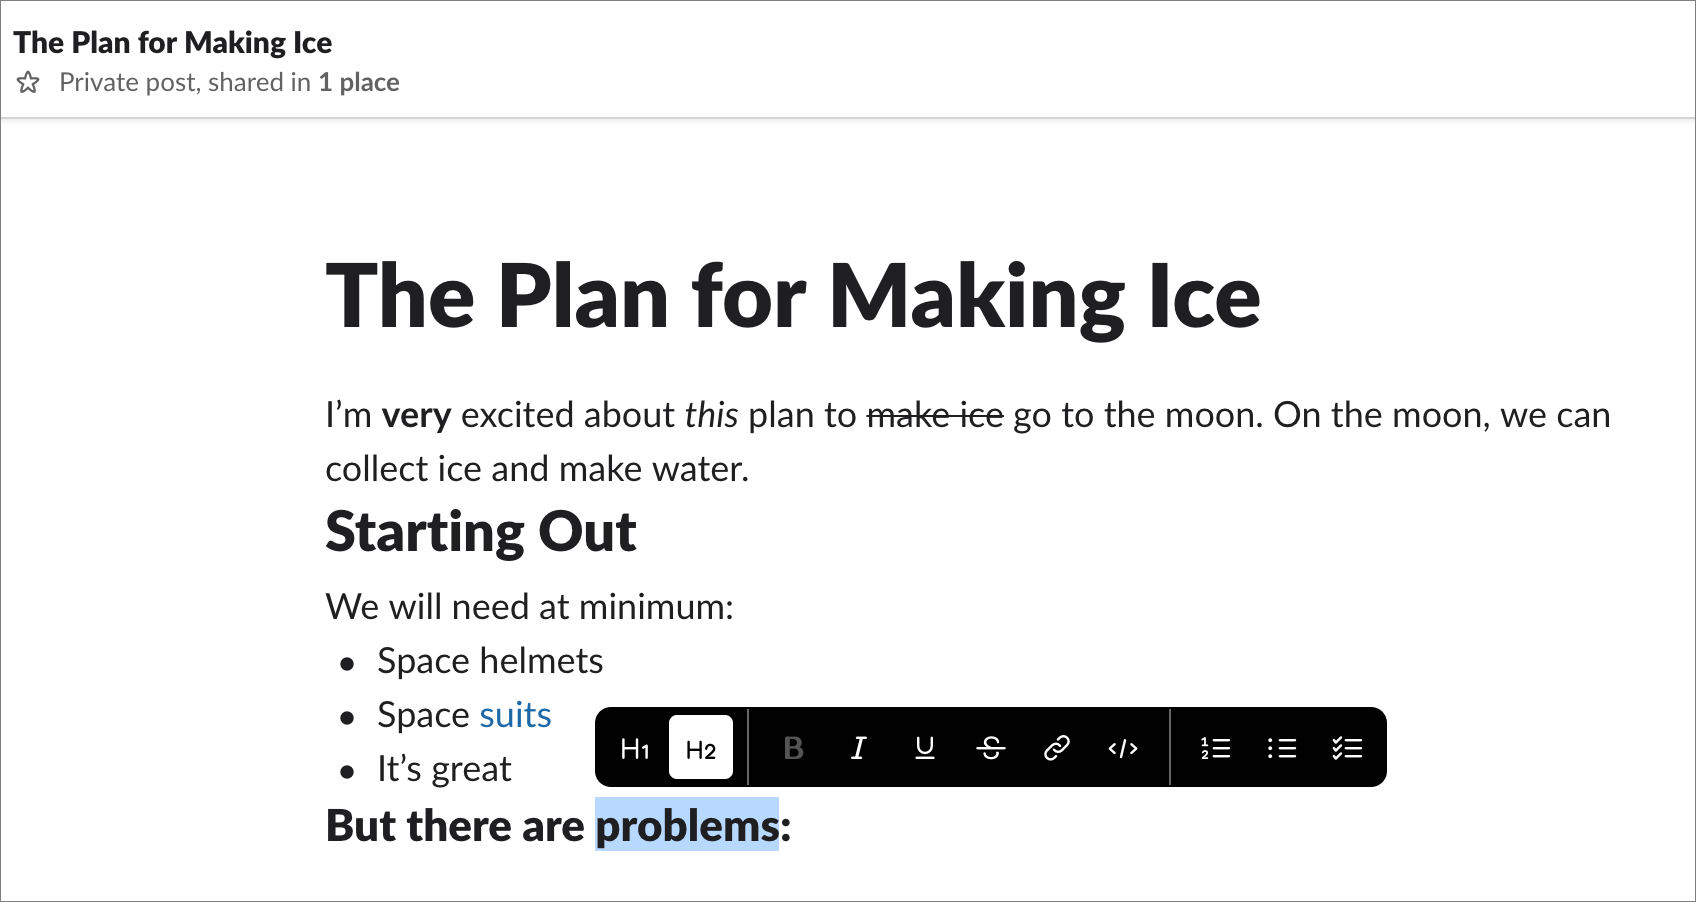
Figure 57: Posts allow blog-like formatted entries. You can let others on your workspace edit them collaboratively within the desktop and web apps.
Posts count against your workspace’s file-storage total, but not your message count. That lets a post persist even if it’s older than your 10,001st oldest message in a free-tier workspace.
To add a post, click the “Attach file” button adjacent to the Message field and choose Post. Slack opens a window into which you can type or paste your post.
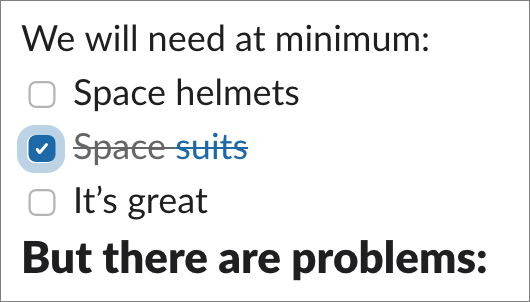
You can start typing and then select some text to format it. A unified format bar (shown in Figure 57) lets you apply bold, italic, underline, strikethrough, and code formatting; add a link; or apply list formatting for a numbered (or ordered) list, a bulleted list, and a checkbox list. If you check any line’s box, the item following is struck through and the box has a check appear in it (Figure 58).
Inline Slack-style text formatting works here too, just as in a message dialog, like surrounding a word with underscores to make it italic or asterisks to turn it bold. You can also use paragraph and heading formats as long as you put a space after the shortcuts: one or two hash marks (# or ##) for H1 and H2; or you can type an asterisk (*) or a number to start list formatting.
When you’re done typing and formatting your post, click Share to open the “Share this post” dialog (Figure 59). It offers a large number of options, some optional:
Choose the channel or conversation in which you want to place the post.
Opt whether you want to let other people edit it check selecting “Let others edit this post.”
You can create a public link that allows people who aren’t within Slack to view it. For posts shared in private channels and conversations, the post has to be first shared in a public channel.
The dialog shows a list of channels and conversations in which the post has been shared, and that can be revoked by clicking the close
 icon to the right of the channel or conversation name.
Want to provide some detail while sharing? Add a comment.
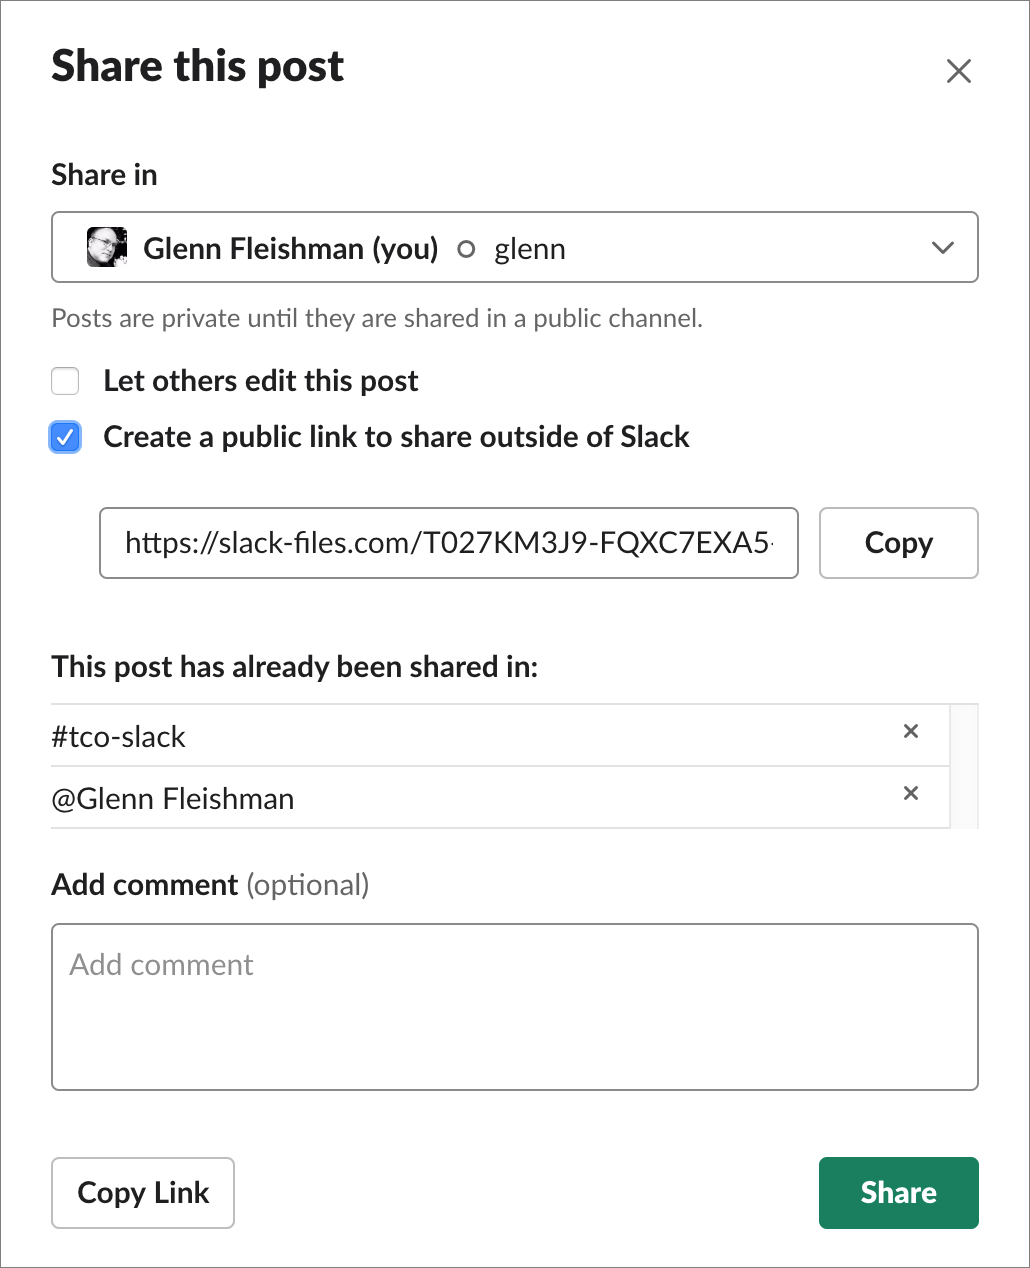
Now click Share to put an entry related to the post in the selected channel or conversation. You can also click Copy Link to obtain a link that may be shared within Slack. You can change any options by clicking the Share button again.
If you’ve shared the post for editing, workspace members can now take turns modifying the post. Any member editing the post (including you) must click Done Editing at the top of the post to push out changes and free up the post for another person to edit.
Slack’s mobile apps show an accurate preview of a post and let you star, share, and copy its link, but you can’t edit the post in the app. In iOS and iPadOS, you can tap the “More actions” ![]() button at the lower-right corner of the screen and tap View in Browser, where it’s fully editable—the rare case of Slack allowing mobile browser access.
button at the lower-right corner of the screen and tap View in Browser, where it’s fully editable—the rare case of Slack allowing mobile browser access.