
Work with Extended Battery Life
There’s a point while reading superlatives when your eyes rightly glaze over. I know I have a very low limit for it. Which is why I sometimes feel like a huckster and shill when people ask me about the battery life of an M-series Mac laptop. It’s ridiculous. It’s absurd. I’m nearly embarrassed to talk about it, because it’s so danged huge. And that was before the release of the 14-inch and 16-inch MacBook Pros.
An M-series chip consumes energy so efficiently that it can carry out processor-intensive tasks over a long period of time and consume what seems to be somewhere between one-third and one-half as much battery power as a comparable Intel laptop. Sometimes, even less.
And when you’re performing more normal tasks, like reading articles in a web browser or using a word processor, or simply leaving your Mac active and not engaged in working on it, the battery seems to go on and on and on and on. I’ve taken my Mac off power and left it by accident, and several hours later come back and find that its charge remains nearly full.
I’d wager that some people could work for two full business days in a putative post-pandemic world of commuting or travel without plugging in. That’s the kind of performance associated with an iPad.
Add to that the fast-charging mode for 14-inch and 16-inch MacBook Pros and the M2 MacBook Air, and you could potentially work for another full business day every time you can manage just 30 minutes of charging.
In this chapter, I detail how macOS charges and manages batteries, so you understand how best to keep your battery in fine fettle. I explain MagSafe 3 and the new fast-charging mode. And you’ll learn to use macOS and third-party tools to keep on top of current time left and charging cycles to maximize battery life and longevity.
How Batteries Charge and Cycle
Lithium-ion (Li-ion) batteries are a modern miracle that effectively made mobile devices feasible, as well as electric cars and much else. Unlike previous generations of batteries used in vehicles and electronics—odd bedfellows there—Li-ion batteries hold energy densely while discharging slowly when not in use. They also lack the dreaded “memory effect” found in older rechargeable batteries, when a battery that’s not fully discharged starts to get stuck at a maximum recharge limit that’s far below its actual maximum capability.
Developments a few years ago allowed manufacturers to move away from a battery-cell approach, in which Li-ion batteries were in a form factor similar to alkaline and nickel metal hydride (NimH) rechargeable ones. A “polymer” form of Li-ion allows them to be shaped in all sorts of ways. Apple used this effectively to fill in all the empty spots in an iPhone with battery, and to create the equivalent of layered shingles of batteries to fill the insides of laptops.
The real limit with Li-ion batteries is carefully charging them to the safest full capacity. Overcharging one of these batteries or battery packs can lead to excessive heating, which can cause a fire.
This is why “100%” isn’t really 100% when it comes to Li-ion charging. Even with a fresh device, the “100%” charge is 100% of what the battery maker and the device maker decide is the safest amount to charge a given battery. There’s always additional capacity that’s left in reserve to avoid overheating.
There’s also an inflection point in charging at 80% of current capacity. Below 80%, a charger in a device charges at effectively full speed, although devices with battery temperature sensors factor that in, such as Mac laptops that can run Catalina and later and all M1 Macs.
At 80%, however, charging slows dramatically to something more like a trickle, because it’s easier to overwhelm the battery at this stage. This is all managed behind the scenes, of course, and better hardware does a better job in managing this last little phase. But it also explains the phenomenon you’ve certainly noticed that your battery-containing devices charge really fast and then really slow.
Li-ion batteries lose capacity as they age, and thus “100%” charged on your Mac’s battery icon after two years could be 70% of the original “100%.”
Apple says that its laptops should retain 80% of their original maximum capacity after 1,000 charging cycles. A cycle isn’t every time you plug in, but a measure of charging to 100%. So if your battery is at 50% and is charged to 100%, that’s half a cycle. Firmware tracks the number of cycles and other data.
The other fly in this Li-ointment is that the more a device’s battery is charged to its putative 100% capacity, the more wear that’s put on the battery. It’s better to charge to something like 80% to preserve the longevity of the battery and avoid the cost of premature replacement.
It’s tempting to want your battery charged to what the display says is 100% all the time, so when you remove it from AC power, you have the maximum charge on the go. But then you pay for that later as the full charge ebbs from running your Mac for, say, 15 hours to 10 hours, to 7.5 hours, and then you’re frustrated and get the battery replaced.
That’s why Apple changed its approach in macOS, which pays particular dividends with an M-series Mac.
Before we dig into charging changes and macOS features, let’s take a quick detour for those who own or are considering buying a 14-inch or 16-inch MacBook Pro to understand the new MagSafe 3 and fast charging. If you’re not one of those people, you can skip ahead to Examine Your Charging in macOS.
Get To Know Fast Charging and MagSafe 3
The 2021 MacBook Pros brought the return of all sorts of connectors, including MagSafe. A somewhat beloved Apple-proprietary connector that went through two iterations across a decade of Intel models, MagSafe provides a magnetically secured power connection.
With the introduction of USB-C, MagSafe disappeared for years of new Mac laptop models, starting with the 2015 12-inch MacBook. Now it’s back as MagSafe 3.
Alongside MagSafe 3 comes fast charging, a way to top your battery up by as much as 50% of its capacity in 30 minutes. What might be difficult to grasp fully from Apple’s discussion of fast charging is that it doesn’t always require a MagSafe connection. Let’s start with MagSafe and then dig into the particular setup needed for fast charging.
MagSafe Deters Damage
Apple created MagSafe to solve a common problem at a time when laptops were almost always plugged in to charge or use because battery life ran down so fast. A cable was always dangling at home, in a café, or in an airport terminal—a cable that was easy for a pet, child, or anyone to snag and take an expensive laptop down with it.
MagSafe attaches magnetically, perfectly lining up electrical contacts required to pass power within the port on the Mac and the MagSafe end of a power cable. The approach maximizes reduced-friction shear: at any angle except straight out, the cable end pops off with far less effort than it takes to start a laptop moving off a surface. (That effort is known as stiction for static friction.)
While the USB-C cable end was smaller than other kinds of charging cables previously relied on, it could only be pulled straight out with reduced friction; in all other directions, you could overcome stiction first and down goes the laptop. Hence the joy at its return.
The new MagSafe 3 has a slightly different form shape from the first and second iterations. A dedicated port appears on all M1 Pro/M1 Max MacBook Pros, and a MagSafe 3-to-USB-C cable comes with every new MacBook Pro that pairs with a power adapter with a USB-C port.
Speed Up Charging
Along with MagSafe 3, Apple built fast charging into the M2 MacBook Air and 14-inch and 16-inch MacBook Pros. However, you don’t always need a MacSafe 3 cable to use fast charging. I’ll explain why, but let me start with what’s behind fast charging.
Apple says fast charging on these models allows refilling half a Mac’s battery capacity in 30 minutes. In the previous section, you learned both about the 80% threshold in charging lithium-ion batteries and how a “100%” charge isn’t exactly 100%.
The same provisos seem likely with “50%” in fast charging. Until (and if) Apple releases more detail specifications, I have to speculate that the charge on your battery has to be somewhere in the 10% to 20% range to allow for a complete fast charge. Otherwise, it will be a fast top-off to whatever point Apple has established as a margin of safety—70%? 60%?—and then regular normal-speed charging after that.
However, reaching 50% to 70% on the new MacBook Pro could give you as much as or more than a full average working day’s worth of charge. And if you run low, you just need a few minutes to get hours more charge even if you don’t have 30 minutes to spare.
I would compare normal and fast charging to electric-car charging. In that world, “Level 1” charging is at 120 volts (and from 12 to 24 amps), and it can take many hours to fill a battery, which is fine for overnight charging or when you’re not using the car during the day. “Level 2” pulls 240 volts and 32 amps, and can charge several times as fast, letting a quick bite for lunch or cup of coffee give you substantial additional range.
Apple accomplishes fast charging by relying on a USB standard: Power Delivery 3.1. Before USB-C, few people had heard of Power Delivery, because although it was an underlying part of USB standards, many laptop and tablet makers created their own charging standards or proprietary variants.
USB-C connector convergence also brought with it a greater standardization on Power Delivery, including support for up to 100 W charging over a cable that could also carry high-speed data and video. The 3.1 update to Power Delivery raises maximum power to 240 watts. Not every cable will support that because not every need requires that much power to pass over, and higher-wattage cables cost more to manufacture.
The M2 MacBook Air has a 53 watt-hour (Wh) battery, the 14-inch MacBook Pro incorporates a 70 Wh battery, the 16-inch bakes in a 100 Wh battery. Chargers need to be appropriately sized to both provide enough juice to power a laptop under heavy use and not deplete the battery at all or at least significantly while doing so.
This is where the right charge and cable make a difference, as Apple doesn’t ship the same power adapter with every M2 MacBook Air or 14-inch MacBook Pro. Let’s go through the mix and match, including the 16-inch MacBook Pro for full clarity:
30 W power adapter: The entry-level M2 MacBook Air (M2 with 8-core CPU/8-core GPU) includes a 30 W power adapter that can charge via an included MagSafe 3 to USB-C or USB-C to USB-C cable. (All M2 MacBook Air’s include the MagSafe 3 cable.)
35 W dual USB-C compact charger: Included with all 10-core GPU M2 MacBook Air models, this charger has two USB-C ports and slightly higher power. It’s available for an extra $20 when buying the entry-level M2 MacBook Air.
67 W power adapter: This power adapter ships with the base-level 14-inch MacBook Pro (8-core CPU/14-core GPU M1 Pro), as an option (at no extra cost) with the 10-core GPU M2 MacBook Air, and as a $20 upgrade for the 8-core GPU M2 MacBook Air. It doesn’t allow for fast charging on a 14-inch MacBook Pro, but does with an M2 MacBook Air. The adapter works with either a MagSafe 3 to USB-C or USB-C to USB-C cable.
96 W power adapter: All other models of the 14-inch MacBook Pro include a 96 W power adapter. It allows fast charging with either a MagSafe 3 to USB-C or 100 W rated USB-C to USB-C cable.
140-watt power adapter: All 16-inch MacBook Pros include a 140-watt power adapter. You can use fast charging only with USB-C to MagSafe 3, because it’s the only cable rated to handle that wattage. You can charge up to 100 W with the adapter and a 100 W rated USB-C to USB-C cable.
This is a little confusing, but I think it’s easy to sort out the options:
Spend the $20 for the 67 W charger with an M2 MacBook Air—the two-port USB-C charger isn’t worth convenience over recharge rate.
If you buy a 14-inch MacBook Pro base model, shell out $20 for the higher-wattage charger.
Always carry your MagSafe 3 to USB-C cable with you and the Apple-provided adapter.
Now, onto how macOS improves charging and understanding battery health for everyone.
Examine Your Charging in macOS
Apple has a mixed history with battery charging—not that their history is terrible, but it took them an awfully long time to prioritize improving their operating systems to better manage a set of well-understood characteristics about Li-ion batteries.
It wasn’t until Catalina that Apple shifted its Mac laptops from the approach of charging to 100% when plugged in to charging based on a pattern of usage and the temperature of the battery. Starting in Big Sur, macOS provides more insight into Apple’s choices. It added a chart of usage and charging across 24 hours and across 10 days.
With “Optimized battery charging” selected in System Preferences > Battery (Monterey) or System Settings > Battery and clicking the info ![]() icon next to Battery Health (Ventura), macOS customizes when charging proceeds past 80%. It only charges to 100% with a clever logic: if it predicts you will be taking the laptop off power within the period of time that it can charge it to 100%.
icon next to Battery Health (Ventura), macOS customizes when charging proceeds past 80%. It only charges to 100% with a clever logic: if it predicts you will be taking the laptop off power within the period of time that it can charge it to 100%.
Starting in Big Sur 11.3, this also includes checking your calendar for appointments and factoring them in to the charging schedule. (There’s no configuration for calendar-based charging predictions, but it appears to be built into the code that manages the process.)
You can see optimized charing revealed in the graph in Figure 12, found in the Battery pane’s Battery view (Monterey) or main view (Ventura), which shows 24 hours of usage, including a separate bar chart for when the screen was lit up.
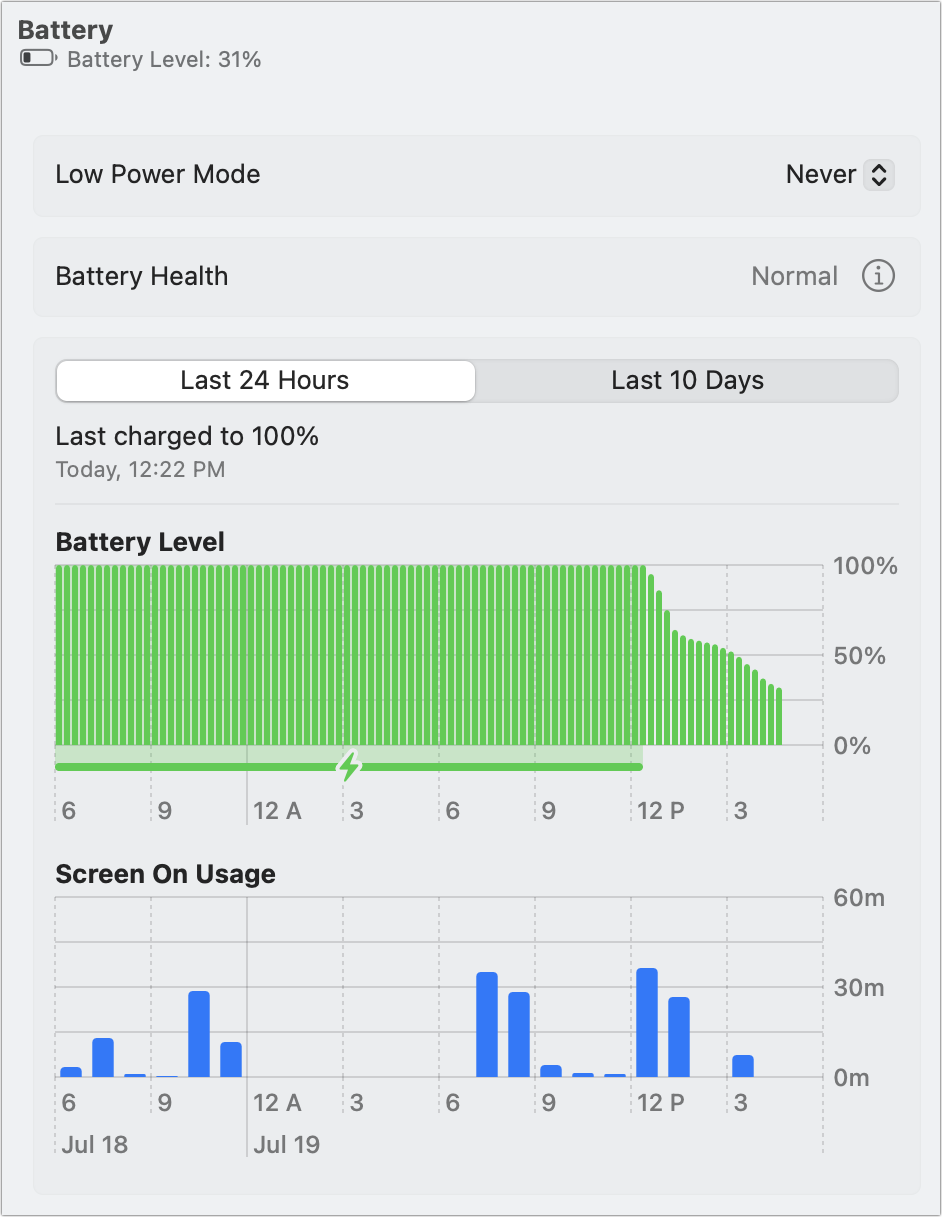
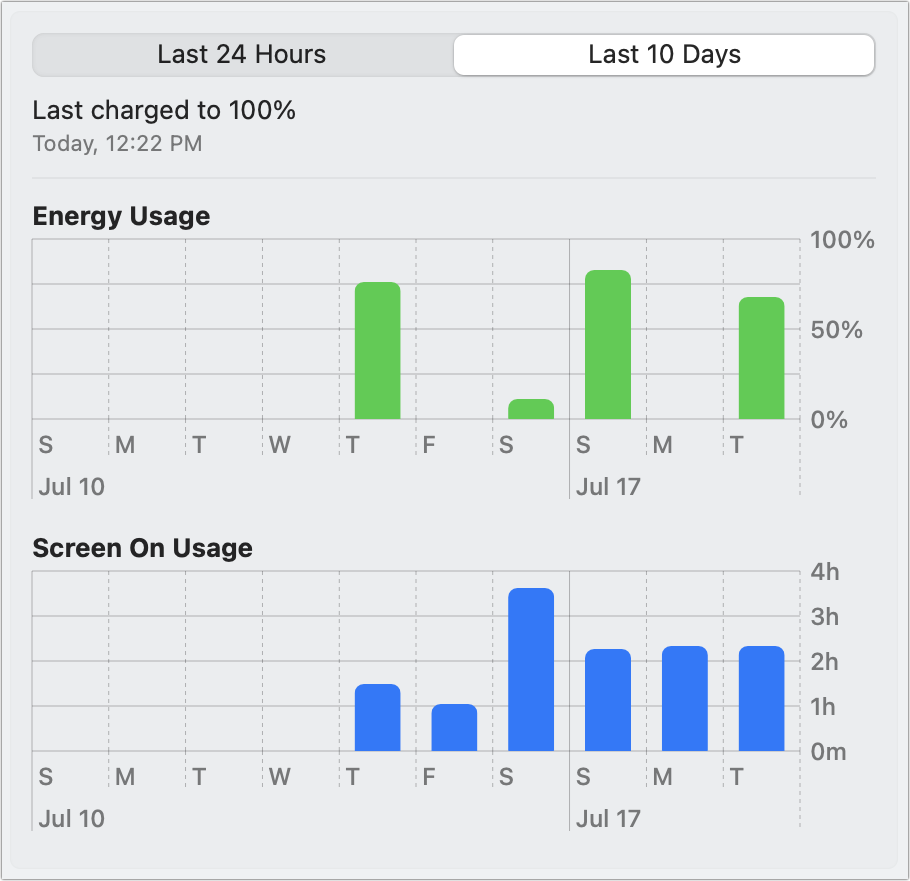
The charging line at the bottom of the Battery Level section shows the times when the laptop was plugged in. And the “Last charged to 100%” label at right lets you know the last time macOS took the battery to full. You can also view a more succinct 10-day history (Figure 13).
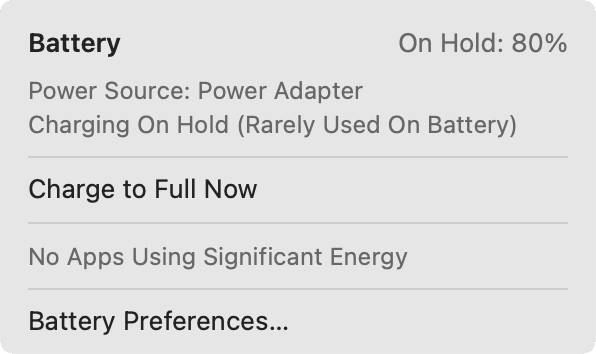
You can see how macOS is handling the current charging situation by clicking the battery ![]() icon in the menu bar (Figure 14). As shown, charging has halted (“On Hold”), the battery is at 80%, and macOS informs you this Mac is Rarely Used On Battery. If plugged in and charging, you see an estimate of the time to a full charge. If Charge to Full Now appears, you can select it to override the hold status.
icon in the menu bar (Figure 14). As shown, charging has halted (“On Hold”), the battery is at 80%, and macOS informs you this Mac is Rarely Used On Battery. If plugged in and charging, you see an estimate of the time to a full charge. If Charge to Full Now appears, you can select it to override the hold status.
To see the state of your battery, including its current capacity relative to its original in Monterey, click the Battery button and then the Battery Health button. Ventura shows an item in the Battery settings for Battery Health with the current status as a label. Click the info ![]() icon to its right to get a longer explanation about battery health, its maximum capacity, and access the Optimized Battery Charging switch (Figure 15).
icon to its right to get a longer explanation about battery health, its maximum capacity, and access the Optimized Battery Charging switch (Figure 15).

Starting in Monterey, macOS offers a “Low power mode” in Battery settings. This feature came a few releases ago to iOS and iPadOS. It’s designed to eke out more useful time on your device. Your Mac stops performing most optional background activities, (like polling for email), reduces backlighting, optimizes video streaming, and throttles low-level system activities. With Low Power Mode, you could conceivably get hours more than with macOS’s normal behavior.
On an iPhone or iPad, the operating system helpfully suggests invoking Low Power Mode when the remaining battery drops to 20%. You can also enable the mode at any time. In Monterey and Ventura, however, Low Power Mode can only be manually enabled: check its box (Monterey) or choose a menu option (Ventura) when you want to use the mode; uncheck it when you’re no longer skimping on power.
Use a Third-Party Battery Utility
Apple reveals a modest amount about the state of your battery. For vastly more detail, useful in figuring out further charging optimization or troubleshooting battery issues before taking it in for repair, I suggest Battery Monitor from Marcel Bresink Software (Figure 16).

The app provides extensive detail about the battery pack of cells in your Mac, and it works on M-series Macs as well as Intel models. Among other details you can find at a glance are the total number of charge cycles, the maximum capacity for the battery pack as shipped and its current estimated capacity, and the battery pack’s status, such as current charge and temperature. (Note that M-series batteries have a serial number.)
Whenever you launch Battery Monitor, it adds an entry about capacity for that day that’s tracked by battery, either by serial number or another unique indicator. If you use the utility over time or keep it running, this generates a chart of battery decline.
Because I’ve updated my laptop from a 2015 12-inch MacBook to a 2020 M1 MacBook Air using Apple’s Migration Assistant utility, you can see the history of where my original battery rapidly declined (at far left, in orange), and then how the warranty-replacement second battery (middle, red) also suffered an only slightly less rapid pattern of wear (Figure 17). (This was mainly before Catalina and its battery optimization software, which would have largely avoided the problem.)

The app has several other charts that you can run over shorter intervals from 1 to 48 hours, to track voltage and other parameters. Most of the time, these aren’t useful unless you’re trying to test out the battery usage of an app or peripheral, see how long your M-series laptop can hold out, or are sorting out a problem and want to have an informed conversation with Apple about warranty repair.