
Manage System Security
Apple has built in a number of excellent protections in recent years against a combination of physical intrusion, in which someone can sit down in front of your Mac and attempt to break in, and system integrity, in which system files have been increasingly immutable.
In this chapter, I explain three major elements of system security that are different on an M-series Mac and that you may find yourself needing to work with or around.
Protect a Drive with FileVault
The current version of FileVault was developed for Mac OS X 10.7 Lion way back in 2011, where it combined two separate features: software-based full-disk encryption (often called FDE) with a special startup and login mode that worked with a fully encrypted disk. (Apple later added dedicated silicon to Macs to accelerate encryption.)
With the introduction of the T2 Security Chip in Intel Macs, Apple separated FDE from the FileVault login mode. On T2-equipped Macs and M-series Macs, which have a Secure Enclave, the internal drive is always encrypted. FDE is always on and can’t be disabled.
Intel Macs still require a special startup mode in recoveryOS, but M-series Macs no longer do: they boot into macOS directly.
So what’s the difference with an M-series Mac between FileVault enabled and disabled? Here’s the distinction:
With FileVault disabled, the startup process automatically retrieves the volume’s security key in a process mediated by the Secure Enclave. The Data volume is decrypted even before an account password is successfully entered. That leaves an inch of room for an attacker to try gain access, difficult as it might be.
With FileVault enabled, a Mac with Apple silicon boots from the System volume; the Data volume remains fully encrypted. Once the password for a user account is successfully entered, macOS can retrieve the encryption key that protects the Data volume, and unlock it for use.
How macOS Manages FDE
While FDE is not a feature of FileVault as such with an M-series Mac, since encryption is always enabled, FileVault does mediate how a Mac’s startup drive becomes available after it starts up or restarts.
Full-disk encryption puts a layer between the operating system and a storage drive that automatically decrypts all information coming off the drive and encrypts it as it’s written. This means all information whenever it’s stored on the drive—when it’s at rest—is fully encrypted. This includes when the Mac is in use and when it’s powered down.
Only while a Mac is active is stored information vulnerable to interception, as macOS must hold the encryption key in memory to allow it to encrypt and decrypt data on the fly. This allows macOS to treat an encrypted volume as if it were effectively not encrypted at all while in use, including letting you share the volume over a network; back it up to an external drive, a networked volume, or an internet service; and use sync services like Dropbox, iCloud Drive, and OneDrive.
Whenever any Mac with FileVault enabled is shut down—whether an M-series model or a pre-T2 Intel Mac—its startup drive is an inaccessible vault, with no more information accessible than a lump of solid metal. The key material necessary to decrypt its data can’t be accessed.
Enable and Manage FileVault
Because Apple made the decision for security reasons that FDE is always enabled on M-series Macs, these Macs take just seconds to enable or disable FileVault’s remaining feature: securing the Data volume at startup.
You manage FileVault’s state via System Preferences (Monterey) or System Settings (Ventura). Here’s how to get started in Monterey:
Open System Preferences > Security & Privacy > FileVault.
Click the lock
 icon.
icon.Use Touch ID to unlock the pane if available. Otherwise, enter your administrator username and password, and click Unlock.
Click Turn On FileVault.
In Ventura, here’s how to get started:
Go to System Settings > Privacy & Security and scroll to the FileVault section.
Click Turn On to the right of the FileVault label.
Enter your administrator username and password, and click Unlock
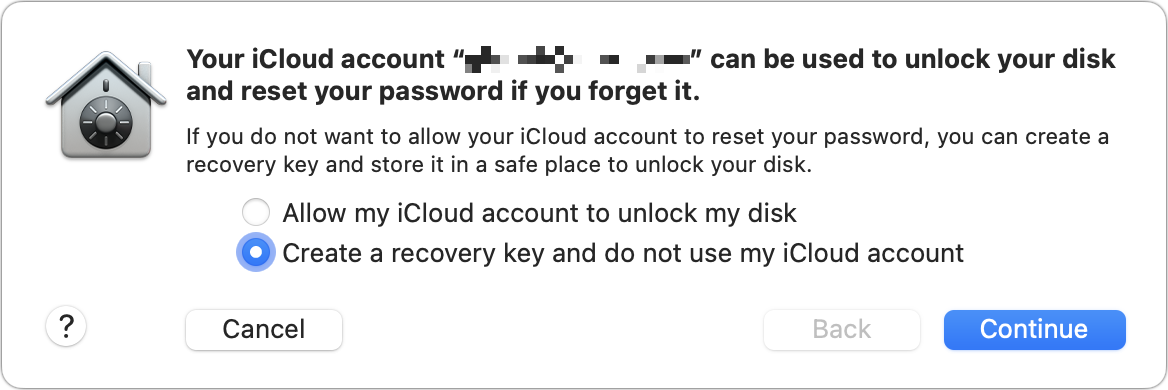
Now you’re in the same place for both operating systems. macOS prompts you about how to handle the Recovery Key, explained further just below: you can opt for “Allow my iCloud account to unlock my disk” or “Create a recovery key and do not use my iCloud account” (Figure 20). Make your choice and click Continue. (You can also cancel at this stage, or click Back.)
If you opted to create a recovery key, it appears now, once, and never again (Figure 21). Record it; see below.

FileVault is now enabled.
In some cases, you may see an option labeled Enable Users, which lets you select which users may log in via the FileVault process from a cold start or a restart. Click that button and review which users aren’t enabled. If you want to add them, you select the user, enter their password, and click OK.
You can disable FileVault by clicking Turn Off FileVault to disable it in (Monterey) or Turn Off (Ventura). You may be prompted to enter an administrator password or to confirm turning it off. FileVault disables itself almost instantly on an M-series Mac.
Troubleshoot Enabling FileVault
While FileVault should work without a glitch, I have helped Macworld readers troubleshoot two sticky and seemingly rare problems that you can’t predict will happen and have somewhat frustrating paths to resolution.
The two errors some people have seen are:
A generic error that FileVault can’t be enabled.
A specific error that reads “A recovery key has been set by your company, school or institution” and they aren’t associated with any company, school, or institution.
In the first case, the problem may be that a “secure token” required by accounts that can turn FileVault on may be missing. The circumstances by which it gets lost are obscure. But this Macworld column should help you restore an account’s secure token.
The second error is irritating to those who own their own Macs and no system administrator has ever managed their Mac. In that case, you can typically delete a file in an obscure location and the error goes away. This column provides the details for the fix.
Consider Security and Integrity with the Recovery Key
The FileVault Recovery Key is a precious object that you should treat like the gold that it is virtually made of. If anything goes wrong with the elements of your Mac’s startup process that storage and manage passwords for accounts, or in the unlikely event you forget the password to your computer’s account, the Recovery Key is the only way you can decrypt the drive. Without it—and any backup that is accessible—its contents are truly gone for good.
Apple, knowing this, allows you to store the Recovery Key in your iCloud account. It’s not available for you to view or retrieve manually: it can only be retrieved through the recovery mode process that allows you to unlock FileVault when no account password will work. (See Apple’s support note on resetting your password with the Recovery Key for details.)
However, if you let Apple store the key, then it is protected only by normal iCloud credentials. That has three implications:
If you lose access somehow to your iCloud account, which can happen, the key is not retrievable. (In that case, you should immediately turn FileVault off and back on, which generates a new Recovery Key unrelated to the previous one.)
If someone gains access to your iCloud credentials, they could unlock a Mac you own that they have access to by using the FileVault recovery process.
A government agency, rightly or wrongly, could force Apple legally or extrajudicially to provide this key for a device they had seized or otherwise obtained. To my knowledge, this has never occurred, but it’s possible Apple would be constrained from revealing it in any country in which it occurred; that seems unlikely given the company’s stance on encryption and privacy.
If you choose to create a Recovery Key locally, you need to copy it down immediately before dismissing the dialog. I made a Secure Note in 1Password with it, as I trust the protection behind 1Password and have access to 1Password data on other devices, securely synced.
Control macOS’s System Integrity
Earlier I described how APFS, Catalina, and Big Sur progressively changed the nature of how macOS is organized on a drive, and how it starts up and protects system files. Let’s dig into that a little further here in how it relates to system integrity—and how to work around that when you need to.
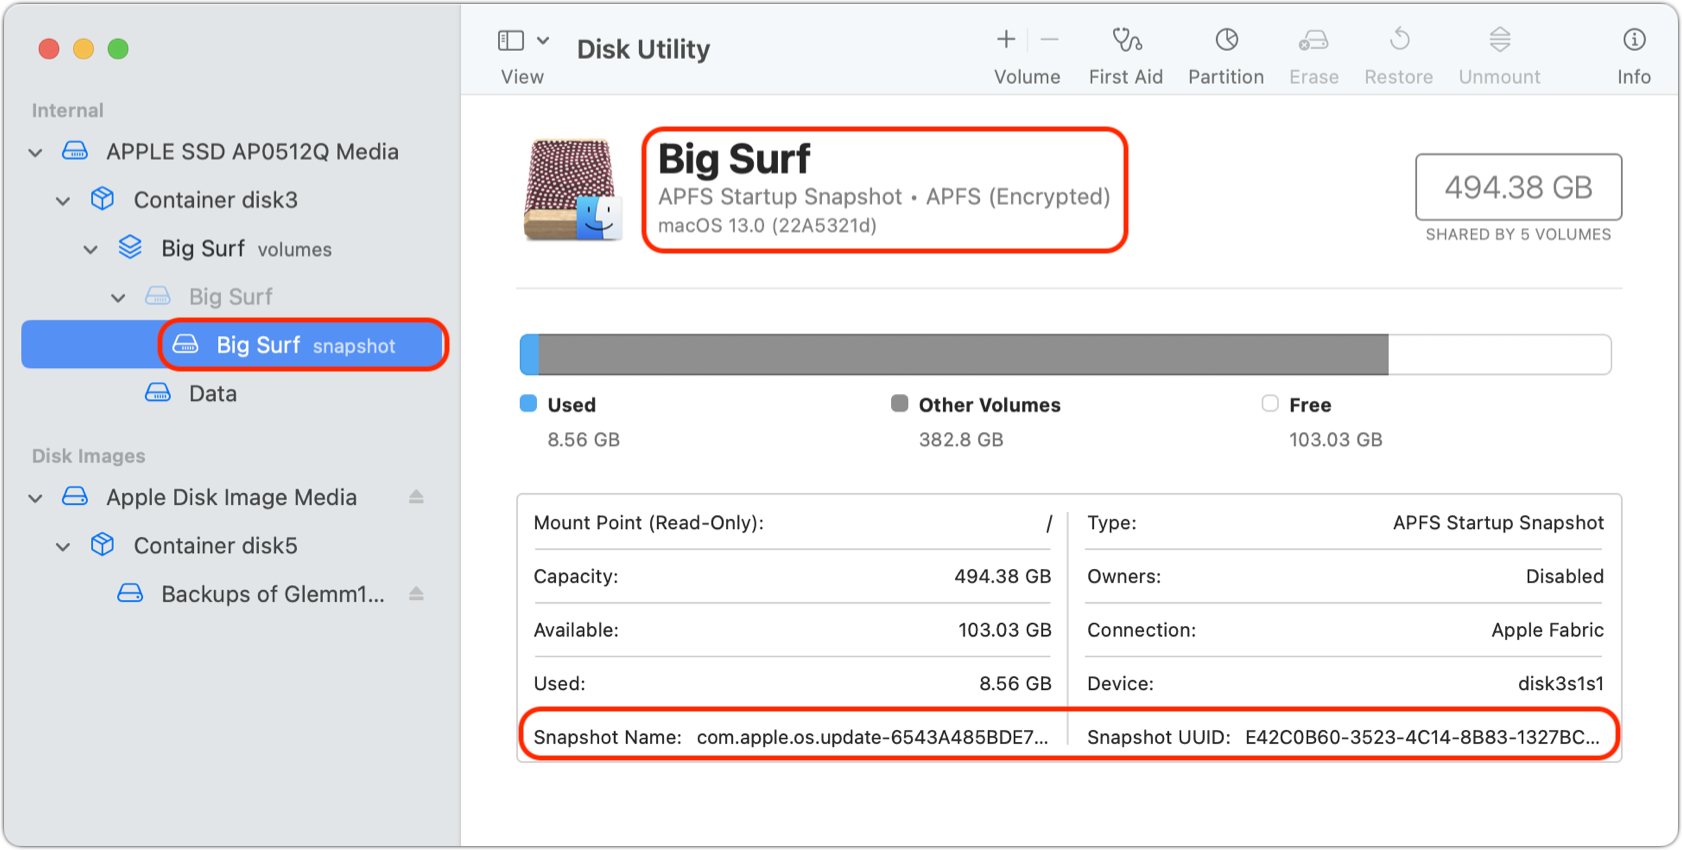
Unlike Catalina, which first split macOS into a read-only system volume and a read/write user Data volume, Big Sur doesn’t even mount the system volume. Instead, it uses the “snapshot” feature of APFS that allows the filesystem to capture a particular point in time.
In Big Sur and later, a snapshot of the system volume is only created after the system drive’s contents are validated through a chain of cryptographic trust. The snapshot cannot be changed, because it has no writable components—it’s like looking at a picture. As you can see in Figure 22, the system is marked as an APFS System Snapshot, and has a unique name, while the main system volume is dimmed. (This is coupled with system files being locked for either execution or writing, too, as described in “Hardware-based memory protection” in Other Hardware Security Upgrades.)
During installation of Big Sur or later, on both Intel and M-series Macs, the installer creates a Signed System Volume by producing a cryptographic signature when installation is finished. An M-series Mac can only run Big Sur and later releases, and has a hardware-based check that lets it validate that the system is authorized by Apple, and that the macOS seal hasn’t been “broken.” That seal allows the detection of a single changed bit on the system drive after installation. If the seal can’t be verified, you’re prompted to reinstall macOS!
On an M-series Mac, there’s another layer of protection. Every file has its own signature, which is stored in the system volume’s metadata, and that metadata is also cryptographically signed. Every time a system app runs or a file is read, macOS on an M1 Mac validates that the underlying data hasn’t changed since boot. Whew!
With all that in place, Big Sur and later on Intel Macs, and all Macs with Apple silicon, block you by default by booting into anything but the latest version of macOS. You can work around this with the Startup Security Utility, which allows reducing the level of restrictions.
Modify Startup Security with a Utility
Apple boosted security starting with T2-equipped Macs as only they could only when they had absolute control over the entire boot process, something made possible by the Secure Enclave and other elements.
Apple let Intel Macs have more leeway about what kind of systems it could boot, which allowed not just Boot Camp, but also other native Windows and Linux installations, and more exotic options.
The M-series Macs are much more locked down, at least for now. I expect over time for Apple to provide a pathway to allow booting from other systems, partly because it lets them sell hardware to people who don’t want to run macOS or don’t only want to run macOS.
You change boot security policies via the Secure Startup Utility accessible via recoveryOS. See Restart in recoveryOS to restart in that mode, and then choose Utilities > Secure Startup Utility.
While Intel Macs let you disable security altogether, an M-series Mac has just two available standard security modes (Figure 23). By default, Full Security is selected. This option allows your Mac to run either the current macOS that’s installed on your startup volume or the latest macOS trusted by Apple. A fun fact about Full Security is that it requires an internet connection; when you install or update macOS, your Mac sends a unique ID based on the CPU installed on your individual Mac to an Apple “signing server.” That server produces a cryptographic signature tied to your Mac, which means that the version installed cannot be run on any other Mac.

Reduced Security expands the universe of possible versions of macOS that can be installed. This allows as well for non-unique copies of macOS to run—ones that aren’t tied to a specific Mac as above.
Reduced Security also adds the option to select or deselect the ability of a user to install signed kernel extensions; and for remote management, which is used in schools and businesses, to control these kernel extensions and software updates. Some organizations may need particular extensions for security software, and may also want to delay automatic software updates in case of incompatibility or support burdens.
With an M-series Mac, access System Security Utility by following these steps:
Restart in recoveryOS, click Options, and authenticate with a valid account. (See Restart in recoveryOS.)
Choose Utilities > Startup System Utility.
The app launches. Click Unlock to mount the disk, which will be encrypted.
When prompted, select an administrator user and enter the corresponding password, then click Unlock.
Select the volume (even if there’s just one) and click Security Policy.
Select the level of security you want to apply and click OK.
Quit the utility and choose Apple > Restart.