
Launch iOS and iPadOS Apps on Your Mac
One of the most surreal things you can do on an M-series Mac is install and launch apps designed for iOS and iPadOS. Because the M-series Mac has a compatible ARM-based processor, mobile apps can run across those three platforms. (macOS apps can’t run in iOS or iPadOS…yet?)
Not every iOS and iPadOS app can run, but most can. Touch-based actions have to be mapped to ones that can be performed with a mouse, trackpad, or keyboard, too. But it’s a surprisingly seamless process.
Find and Install Mobile Apps
The Mac App Store now offers both macOS apps that developers have made available for download, sale, or subscription through Apple, and iOS and iPadOS apps.
Unfortunately, you can’t browse through categories to find mobile apps. You have to either follow a direct link to an iOS or iPadOS app or search by keywords or by name. For instance, search for “calculator” and you will see two items under “Results for ‘calculator’”: Mac Apps and iPhone & iPad Apps. Click the latter link, and the results are all mobile apps (Figure 24).

All apps will show either “Designed for iPhone” or “Designed for iPad.” Apps designed for both appear to show only the iPad label, though. Obtaining an app and downloading it is just the same as with any Mac app in the App Store or in the iOS and iPadOS App Stores (Figure 25).

You can also click your avatar in the lower-left corner of the App Store or choose Store > View Account, and then click iPhone & iPad Apps to see apps you purchased on any App Store. You can then download them to your Mac.
Apple offers developers frameworks that allow mobile apps to work best inside macOS without making many changes in their iOS and iPadOS apps. You will see the label “Not verified for macOS” for apps that don’t take advantage of these frameworks.
App developers can opt to exclude their mobile apps from appearing as available for M-series Macs. Apple lists a number of reasons why a developer may make that choice in their coding documentation, which include requirements for sensors built into iPhones and iPads not present in Macs, restricting access to the code innards of apps (which can be readily viewed in macOS), or having a touch-focused approach that won’t work well on a Mac even with substitutions described below.
Use Mobile Apps
iOS and iPadOS apps appear in the Applications folder (or elsewhere) just like an any other app and can be launched without any special arrangement. You can use App name > Preferences > General to rotate the orientation of the app window for apps that have support portrait and landscape views, and, starting in Big Sur 11.3, change the relative size of the app’s window.
By default, apps have Touch Alternatives enabled, which let you use the keyboard and trackpad/mouse to provide input that simulates that of using a touchscreen. You can choose after launch how to interact. Choose App name > Preferences > Touch Alternatives (Figure 26). This view also shows and explains how all the equivalents work.
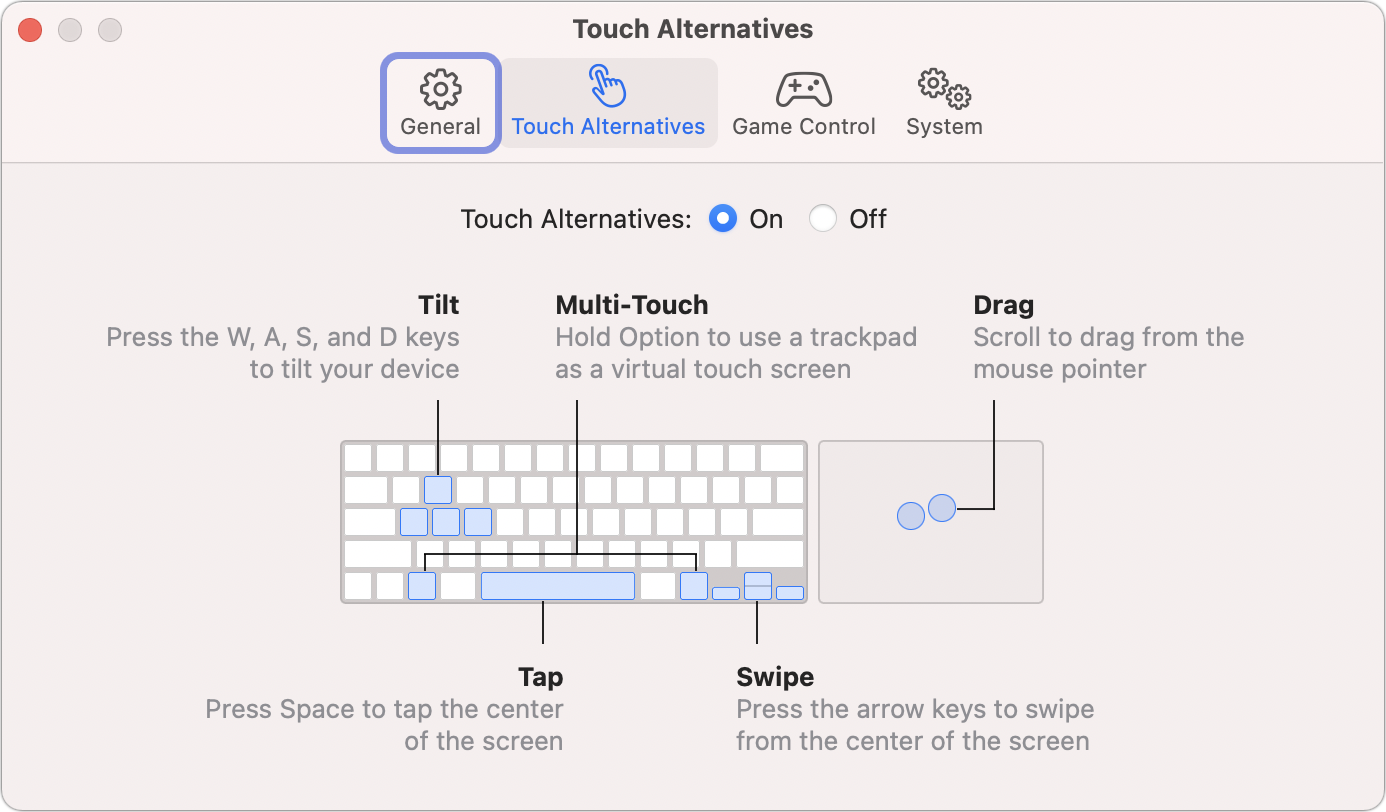
When you hold down Option to simulate multi-touch, a highlighted circle appears on screen where each finger is positioned on the trackpad to help you mentally connect the two actions. You also have several other options:
Press the Space bar to tap in the middle of the app’s screen.
Use the inverted T of arrow keys to simulate swiping from the center outward in the direction of the arrows.
Use a similar inverted T of W, A, S, and D to simulate tilting forward (W), backward (S), left (A), and right (D).
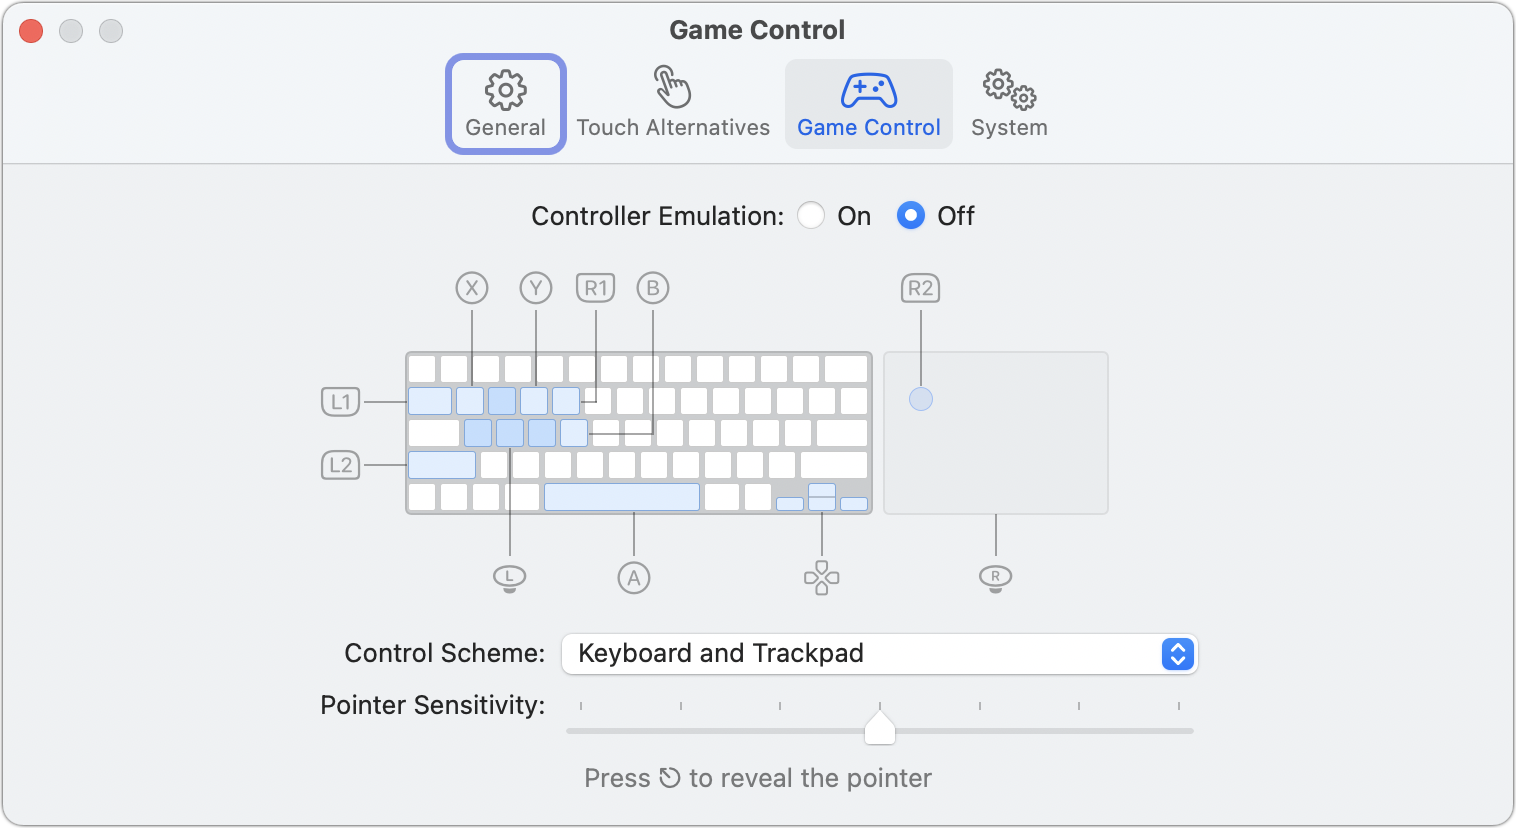
You may have an iOS/iPadOS app that allows game controller input, and that can be hard to manage with touch-style keyboard simulation. Instead, choose Game Control in Preferences and enable it, which turns off Touch Alternatives if it’s on (Figure 27).
If you opt to not use Touch Alternatives or Game Control, and disable both, then you’re reliant on how the app interprets keyboard and mouse input.
For apps that have been updated to be macOS “verified,” and for iPad apps that consider the use of a cover with a keyboard build, a keyboard connected via the Lightning port or Bluetooth, or a mouse or trackpad connected through any means, you may be able to interact very naturally with the app without the touch-like assist.
The System view mediates how an iOS/iPadOS app requests access to data on your system, such as Location Services. You can see which services are in use in the System view and go to System Preferences > Security & Privacy > Privacy to see enable or disable access to that service for the app you’re using.