There are many ways to make MacBook your own using the built-in capabilities that Mac OS X provides. Starting with Finder, you can change many aspects of how MacBook looks and works to tailor it to your personal preferences. This makes it work better for you because MacBook adapts to the way you work, instead of you having to adapt to the way it works.
Finder is the application that controls MacBook's desktop, how files and folders are managed, and many other aspects of the way MacBook works. Like all the other applications you use, Finder also has a set of preferences you can configure to change the way it looks and works.
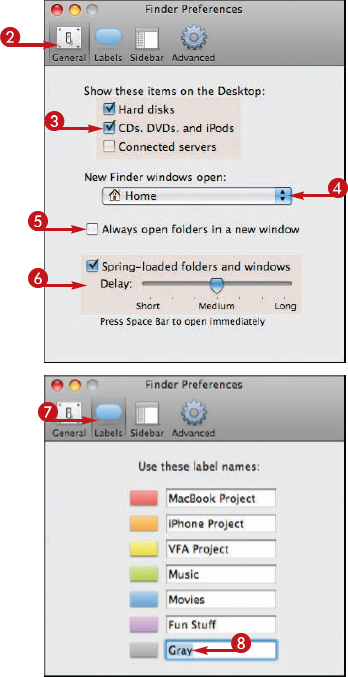
Like other applications, you change Finder preferences using its Preferences command. The resulting dialog box has several tabs that you use to configure specific aspects of how Finder works.
Set Finder Preferences

The Finder Preferences window appears.
Note
A faster way to open the preferences for any application, including the Finder, is to press


Note
You can associate files and folders with labels to help you identify and organize them more easily on the desktop.


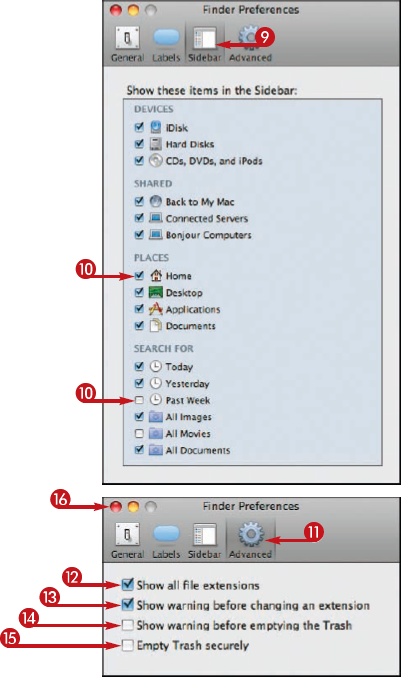
Note
When you uncheck an item's check box, it is still available in Finder windows, you just do not see its icon on the Sidebar.


Tip
Which folders can I use as my start folder for new Finder windows?
The initial location is your Home folder, but you can choose any folder you want. On the New Finder windows open pop-up menu, choose Other. In the resulting dialog box, select the folder you want to be the default, and then click Choose. Each time you open a new Finder window, you move to that folder automatically.

How do I associate labels with folders and files?
Open a Finder window showing the folder or file you want to label. Press
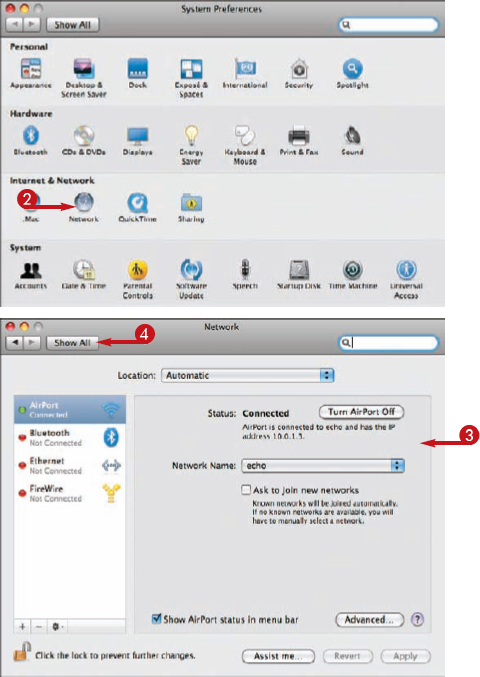
The System Preferences application is used to configure many different aspects of how MacBook looks and works. In fact, most of the personalization you do is done with this application.
The System Preferences application is a single application that is organized in many different panes; each pane uses to configure a specific aspect of MacBook. You open the pane you want to use to configure a specific area. For example, you use the Dock pane to configure the Dock and the Network pane to connect MacBook to a network.
Explore the System Preferences Application
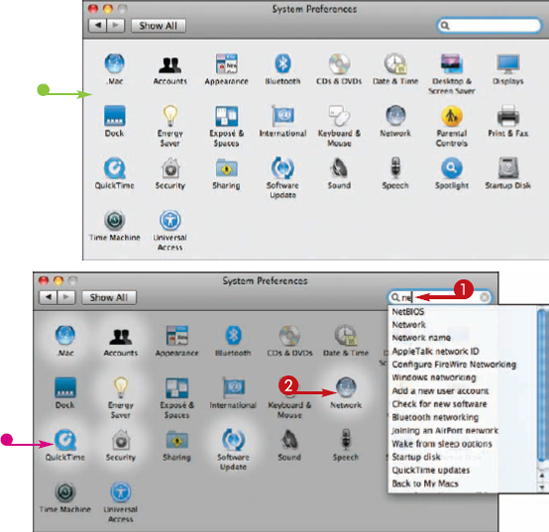
OPEN AND USE SYSTEM PREFERENCES
The System Preferences application opens and you see all of the panes it offers.
The pane associated with that icon appears.
The open pane closes and you see all the icons again.
Search for a Pane
Tip
I cannot make some changes in the System Preferences application, but I can make others. Why?
In order to make changes to various, but not all, settings using the System Preferences application, you must be logged in under an administrator user account or verify that you are an administrator. The easiest way to tell is to look at the Lock icon located in the lower left corner of a pane. If you do not see the Lock icon, any user can change the pane. If the Lock is "locked," click it to verify you are an administrator by entering you user name and password. If the Lock is "unlocked," you are verified as an administrator and can make changes.
Why do I see a section called Other in my System Preferences application?
Some software you install, especially when it is associated with a hardware device, includes a pane installed on the System Preferences application that you use to configure that software or hardware. All of these additions to the default panes are organized in the Other category.
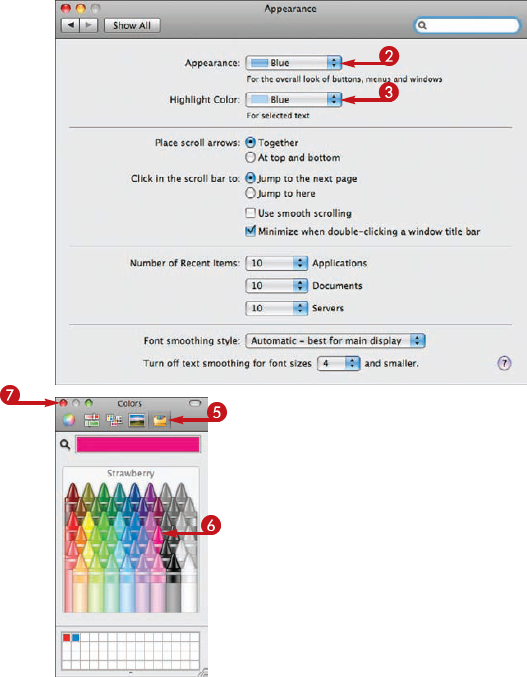
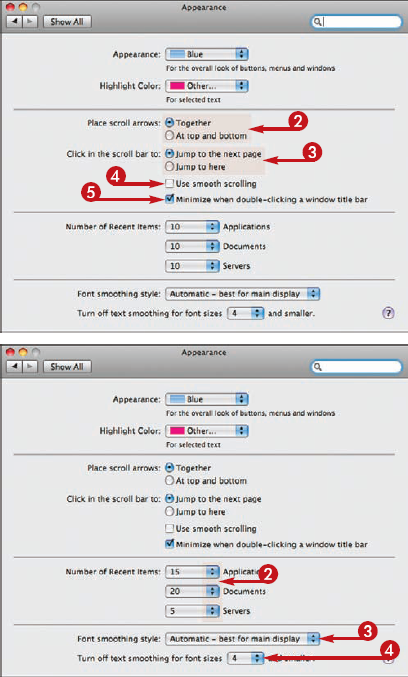
Using the Appearance pane, you can configure the color of buttons, menus, and windows along with the color used when something is highlighted to show that it is selected. You can also configure how scrolling in Finder windows works.
While not directly related to appearance, you also use the Appearance pane to determine how many items are stored on Recent menus. You can also control how font smoothing works.

Change the Desktop's Appearance
The Color Picker appears.
The controls for the picker you selected fill the window.
The color you configured is shown on the Highlight Color menu and is used to highlight items on the desktop.
SET RECENT ITEMS AND FONT SMOOTHING
Note
Most applications also have a recents list; the System Preferences application setting impacts only Mac OS X.
Tip
Which Color Picker mode is the best?
Each mode offers different ways to choose colors. The easiest to use is the Crayon mode because you can simply choose colors by clicking a crayon. The other modes offer more control and specificity. For example, you can use the Color Wheel mode to select any color in the spectrum by dragging the intensity bar up or down and then clicking in the wheel to choose a specific color. The other modes offer different tools. To add a custom color to a mode's palette, drag it from the sample box at the top of the window to the palette at the bottom; you can choose the color again by clicking it on the palette.

As you use MacBook, you look at the desktop quite often. So why not look at something you want to see? That is where setting the desktop picture comes in; the desktop picture fills the background on the desktop and you see it behind any windows that are open.
While it is called a desktop picture, you are not limited to pictures. You can use just about any kind of graphic file as a desktop picture.
Set a Desktop Picture
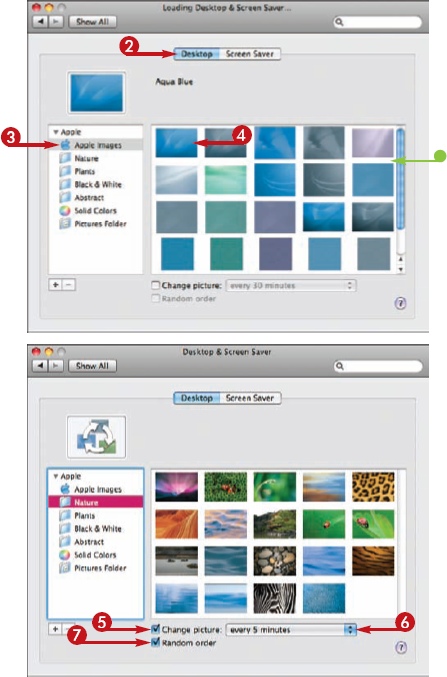
SET A DEFAULT IMAGE AS THE DESKTOP PICTURE
The Desktop picture tools appear.
That image fills the desktop.
A new image from the selected source is applied to the desktop according to the timing selected.
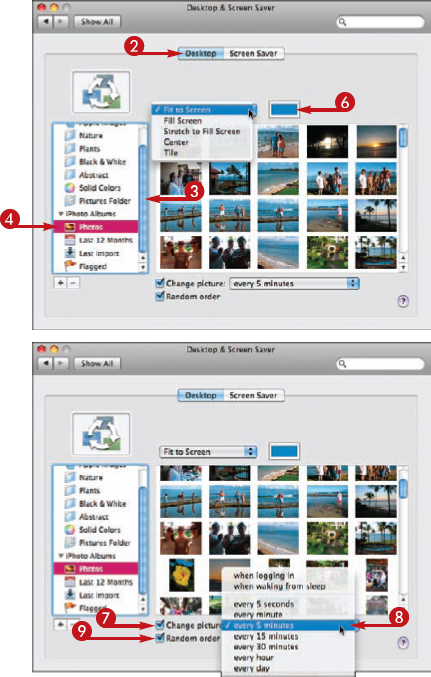
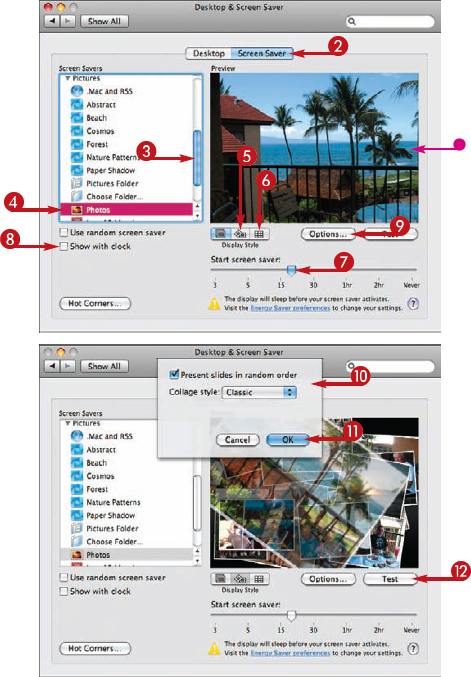
SET A PHOTO FROM YOUR IPHOTO LIBRARY AS THE DESKTOP PICTURE
The images in the selected album appear in the right-hand part of the window.
A new image from the iPhoto album source is applied to the desktop according to the timing selected.
Tip
What is the Picture Folder source?
By default, a number of applications store graphic files in the Pictures folder within your Home folder. If you choose this folder on the source list, you see all the images it contains; you can select images from this source just as you do from one of the other sources.

What if the location of the photos I want to use as the desktop picture does not appear on the source list?
You can choose any folder as a source of desktop pictures by clicking the Add (+) button located at the bottom of the source list. Use the resulting dialog box to move to and select the folder containing the images you want. After you click the Choose button, that folder appears as a source on the list.

A screen saver does two things for you. One is that it prevents possible damage to your screen from having the same image on it for a long period of time. The other, and probably more important, purpose is to entertain you by displaying images that you choose on the screen.
When you are running on batteries, it is better to put MacBook to sleep when you are using it instead of showing the screen saver because that uses more power. The screen saver is more useful when you are running on the power adapter.
Choose a Screen Saver
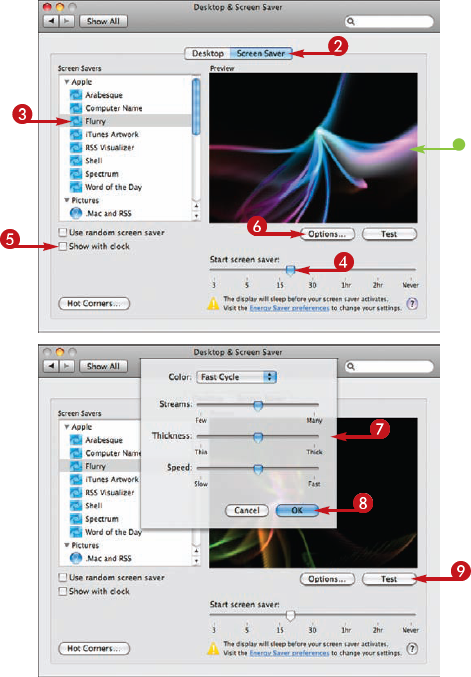
CHOOSE AN APPLE SCREEN SAVER
Note
If you want a screen saver to be selected at random, check the Use random screen saver check box.
Note
Each screen saver has its own set of options, so what you see on the Option menu depends on the screen saver you select.
You see the screen saver in action.
Note
Each type of screen saver has its own set of options that appear in the Options menu.
You see the screen saver in action.
Tip
Why do I never see my screen saver?
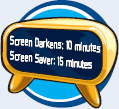
The screen saver interacts with the settings on the Energy Saver pane, one of which is the amount of time that passes before the screen darkens to save energy (which also happens to be the best way to save the screen, too). If that time is less than the screen saver is set for, you do not see the screen saver before the screen goes dark; you see a warning saying so below the time slider on the Screen Saver pane. Reduce the time for the screen saver to be less than the time for the display to be darkened (see the next section).
What are hot corners?
You can set a hot corner so that when you place the pointer in that corner, the screen saver activates. Click the Hot Corners button and then choose Start Screen Saver on the menu for the corner you want to be hot. When you move the pointer to that corner, the screen saver starts.

MacBook uses so little energy that it is unlikely that you can make any difference in your electric bill by changing how MacBook uses energy.
However, when you are running MacBook on battery power, saving energy is very important because the rate at which MacBook consumes battery power determines how long you can work.
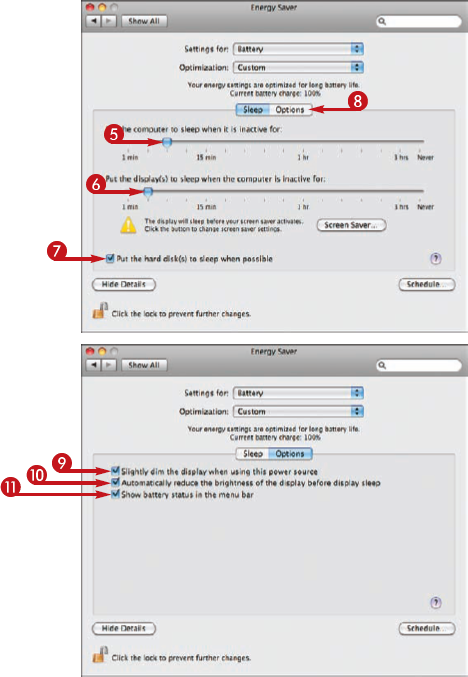
Save Energy
The pane expands so you see all of its controls.
The other controls on the pane are adjusted to match the settings you selected.
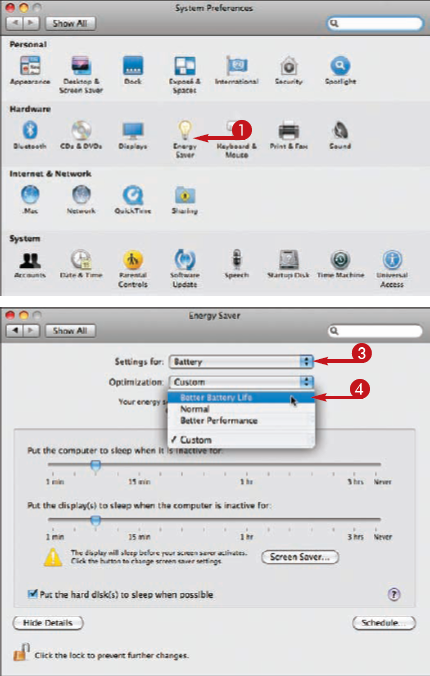
Note
As soon as you make a change, the setting on the Optimization pop-up menu becomes Custom to show that you are not using a default scheme anymore.
Tip
What about running on the power adapter?
If you choose Power Adapter on the Settings for pop-up menu, you can configure energy settings when MacBook is running on the power adapter. These can be different than those you use while on battery power. MacBook knows when it is on battery and chooses the appropriate energy options automatically. When you choose Power Adapter, a different set of options appears on the Options tab.
What is the Schedule button for?
If you click the Schedule button on the Options tab, you can schedule MacBook to start or wake up at a specific time automatically. You can have it shut down or sleep at a specific time automatically, too.
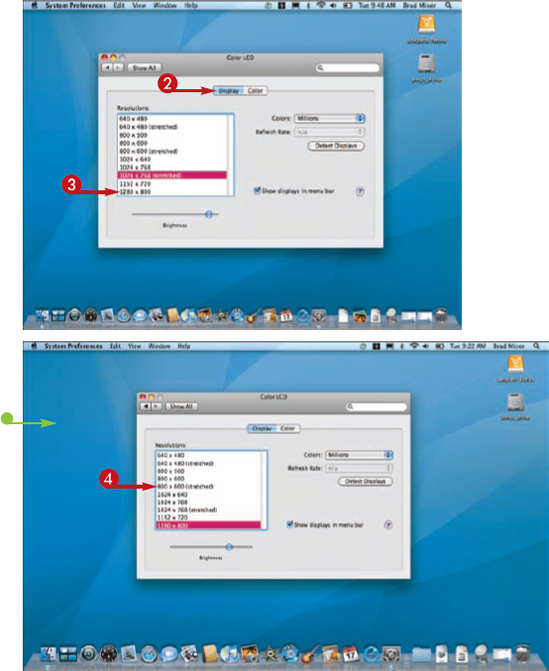
MacBook's screen is what you look at while you use it, so knowing how to configure the screen so it matches your viewing preferences is important. You can configure the display's resolution, number of colors, and brightness.
Although the physical size of MacBook's screen is fixed, the amount of information that can be displayed (its resolution) on it is not. That is because each pixel (short for picture element) that makes up the display's images can be larger or smaller. When pixels are larger, what is on the screen is shown on a larger, zoomed-in scale. When pixels are smaller, more content is displayed on the screen, but on a smaller, zoomed-out scale.
Configure MacBook's Screen
CONFIGURE THE MACBOOK'S SCREEN ON THE DISPLAYS PANE
The Displays pane opens.
Note
If you are running on battery power, keeping the screen dimmer lowers the amount of power you use, which extends the time you can work.
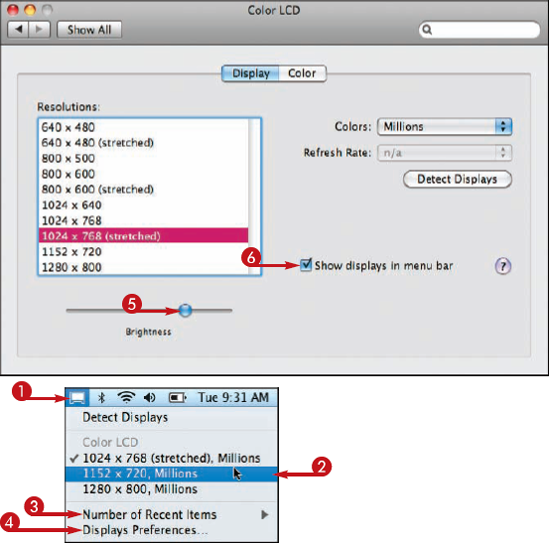
CONFIGURE THE MACBOOK'S SCREEN ON THE DISPLAYS MENU
Tip
How else can I set screen brightness?
MacBook includes two keys you can use to change the screen's brightness. Press F1 to lower the brightness or F2 to increase it. These do the same thing as the Brightness slider on the Displays pane. Each time you press one of the keys, an indicator appears on the screen to show you the relative brightness level you have set.
What do the other controls on the Display tab do?
You can use the Colors pop-up menu to set the number of colors displayed on MacBook's screen; however, there is not really any reason to use less than Millions of colors (this control is used for older Macs that do not have enough graphics processing power to display millions of colors at all resolutions). The Detect Displays button (and command on the Displays menu) is used when you connect MacBook to an external display or projector. The Color tab is used to configure a color profile for the display. You will not likely need to do this unless you are doing very precise color printing work, in which case, you configure a screen profile to match your printer output.
Obviously, using MacBook is a hands-on experience. Your primary inputs are through the keyboard and trackpad. You can configure both the keyboard and trackpad to suit your input preferences.
Like other areas, you use specific panes of the System Preferences application to change settings for either.

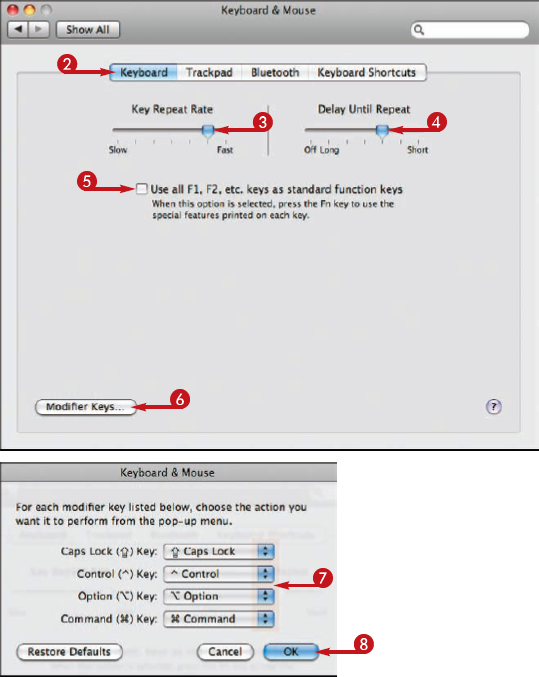
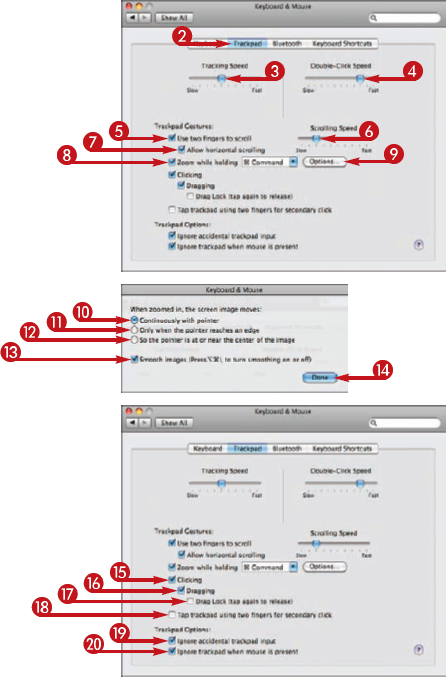
Configure the Keyboard and Trackpad
CONFIGURE THE KEYBOARD
The Keyboard pane opens.
Note
If you get annoyed by accidentally hitting the Caps Lock key, you can disable it by choosing No Action on its pop-up menu.
The Trackpad pane opens.
The Options drop-down menu appears.


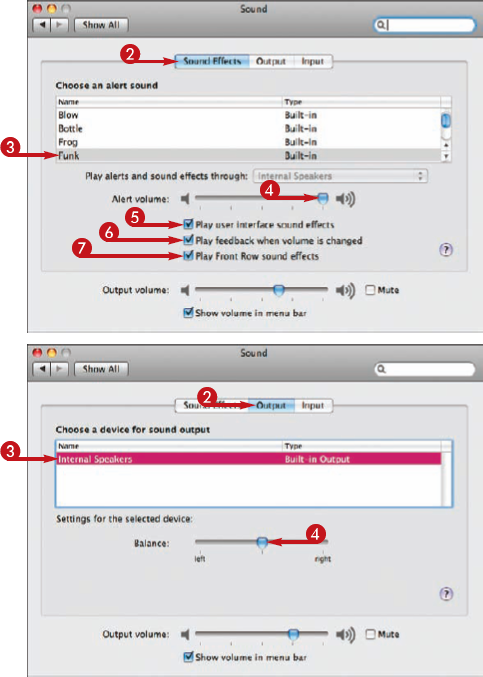
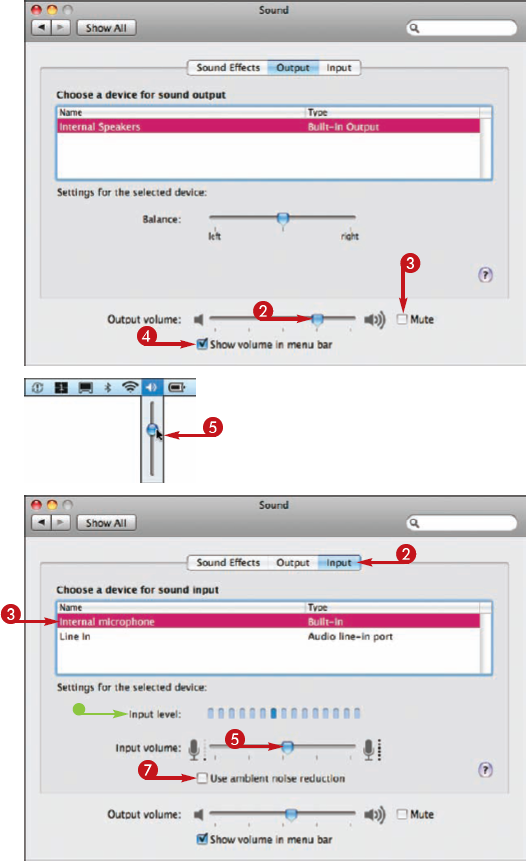
From sound effects to music and movies, sound is an important part of the MacBook experience. Additionally, you will want to use sound input for audio and video chats, recording narration for movies, and so on.
The Sound pane of the System Preferences application is your primary stop for managing audio settings on MacBook.

Control MacBook's Sound
CONFIGURE SOUND EFFECTS
The Sound pane appears.
The sound plays.
The Sound pane appears.
The Sound pane appears.
The Sound pane appears.
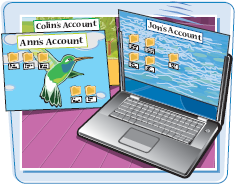
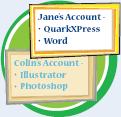
Mac OS X is a multiuser system; you can create user accounts for each person who uses MacBook. Each person then has a unique desktop, folders, files, and preferences, so MacBook is tailored specifically to each person who uses it.

Create and Configure User Accounts
CREATE A USER ACCOUNT
The New Account sheet appears.
Mac OS X creates a short user name based on what you enter.
Note
This name is important because it appears in a number of places, such as the URL to that user's Web site on MacBook.

Note
If you did not keep the Password Assistant open, you need to remember the password you configured to be able to type it in.
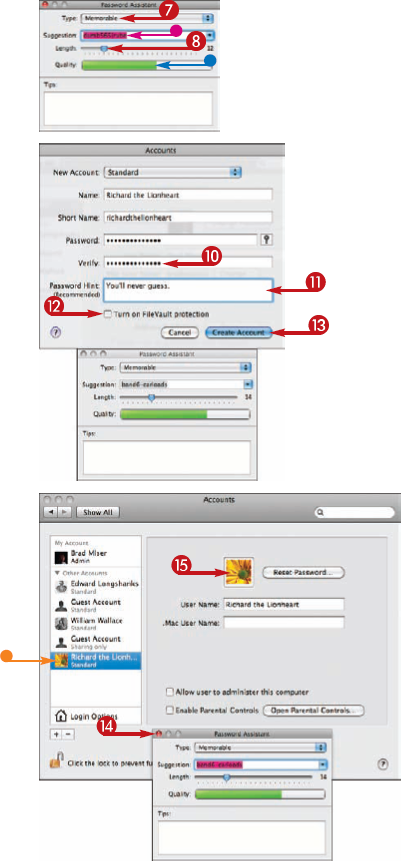
A Standard user account can access all the MacBook's resources, but cannot perform administrator tasks, such as installing applications; you should use this type for most users. An administrator account allows access to the administration tasks, many of which are discussed in this chapter.
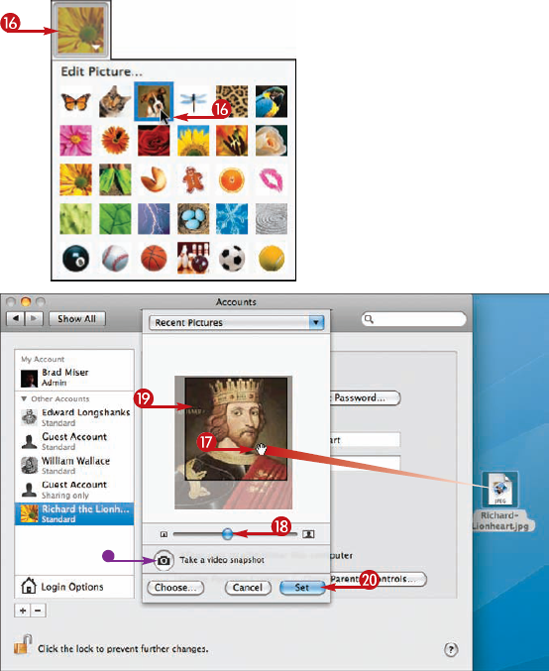
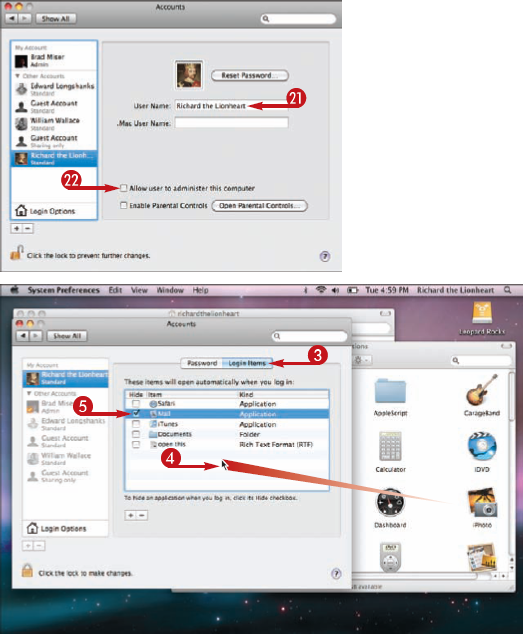
If you clicked Edit Picture, the Edit Picture sheet appears.

After about three seconds the image is captured.
The image is associated with the user account.


CONFIGURE LOGIN ITEMS FOR A USER ACCOUNT
The next time the user logs in, the items you configured open automatically.
Tip
Do I have to configure a password for a user account?
A user account does not have to have a password. If you leave the Password and Verify fields empty, you see a warning that not providing a password is not secure. If you are sure that is not a problem for you, clear the warning prompt and complete the user creation. The user is able to log in to MacBook without entering a password, which can mean that anyone who has access to the MacBook can use it.
What if a user forgets his or her password?
Open the Accounts pane, select the user's account on the list, and click Reset Password. Use the resulting sheet to configure a new password just as you do when you create an account. The user is able to log in with the new password.

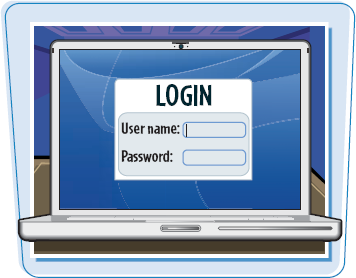
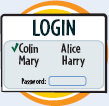
There are a number of ways you can configure the login process for MacBook. On the Login window, you can present a list of users so that to log in, a user clicks his or her user name and enters a password. Or, you can present an empty user name and password field and the user has to complete both to log in. There are also a number of other ways to configure the Login window by showing or hiding specific buttons. You can also disable or enable Automatic Login.
Fast user switching is another option, which allows multiple people to be logged into MacBook at the same time. Each user can quickly move back into his or her account because it is left open instead of each user logging out before another logs in.
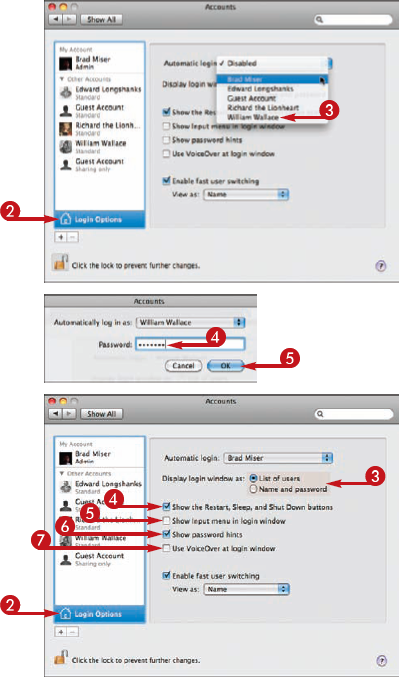
Set Login Options
CONFIGURE AUTOMATIC LOGIN
The Login Options pane appears.
Each time MacBook starts or restarts, the user you selected is logged in automatically.
CONFIGURE THE LOGIN WINDOW
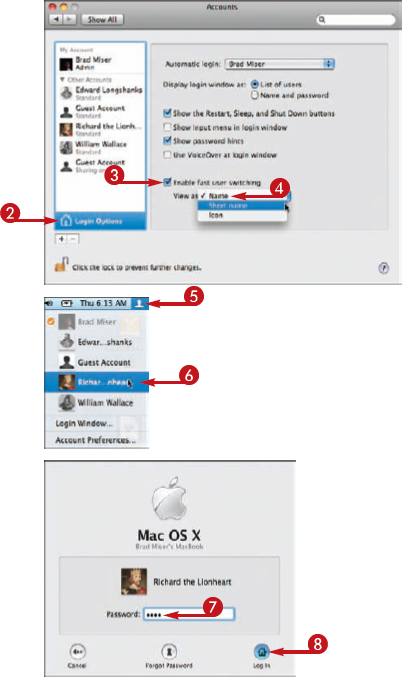
CONFIGURE AND USE FAST USER SWITCHING
The Fast User Switching menu (

All the user accounts on MacBook are shown. The users that are currently logged in are marked with a check mark.
The user is logged in and his or her desktop appears. The previous user remains logged in; select that user's account on the menu to move back to it.
Tip
What happens to running applications when another user logs in using fast user switching?
Because a user does not log out when another one logs in using fast user switching, the applications and processes running under a user account continue to run in the background even while another user is using MacBook
How I can leave myself logged in so my applications continue to work, but no one else can see or use what I am doing?
On the Fast User Switching menu, choose Login Window. The Login window appears, but you remain logged in. To start using MacBook again, choose your user account, enter your password, and click Login. You move back to where you left off.
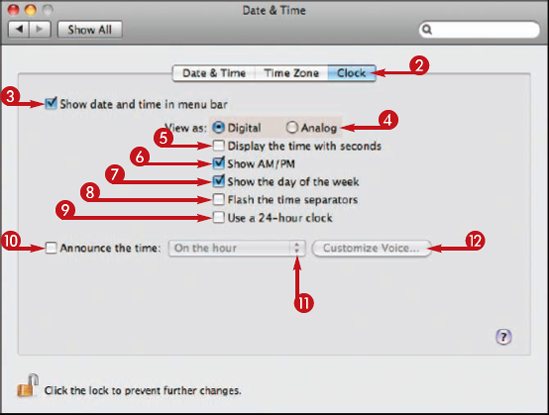
MacBook can help you by keeping track of the time and date for you. Obviously, you can use MacBook to see what time it is, but time and date are also important because MacBook stamps all the files and folders you use with the time and date they were created and when they were changed. Likewise, e-mails are also time and date stamped. The time and date that gets applied to these items are those that are configured on MacBook.
There are two basic ways to set MacBook's time and date: automatically using a timeserver, or manually. If you have an Internet connection, having MacBook set its clock automatically is a good idea.
Set and Configure MacBook's Clock
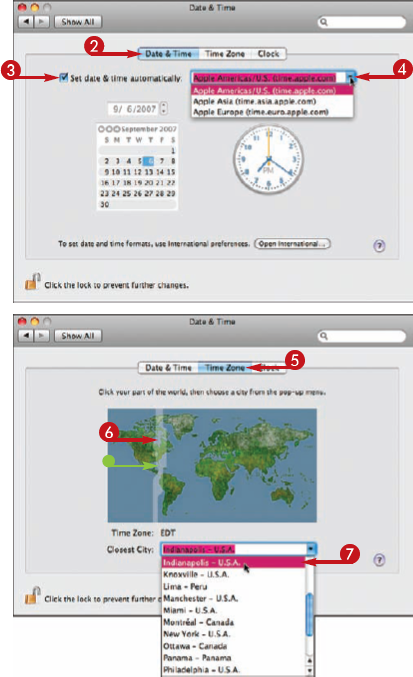
CONFIGURE MACBOOK TO SET ITS CLOCK AUTOMATICALLY
If MacBook is connected to the Internet, it sets the time and date automatically.
Tip
What if I take MacBook to a different time zone?
You can leave MacBook in its previous time zone no matter where you are located. Of course, when you are in a different time zone than the one configured on MacBook, its time will not match the local time. If that bothers you, you can always change the current time zone using the previous steps.
What if the time and date are not in the right format?
Open the International pane of the System Preferences application. Click the Formats tab. Choose the region whose time and date format you want to use or click Customize buttons to configure a custom format.
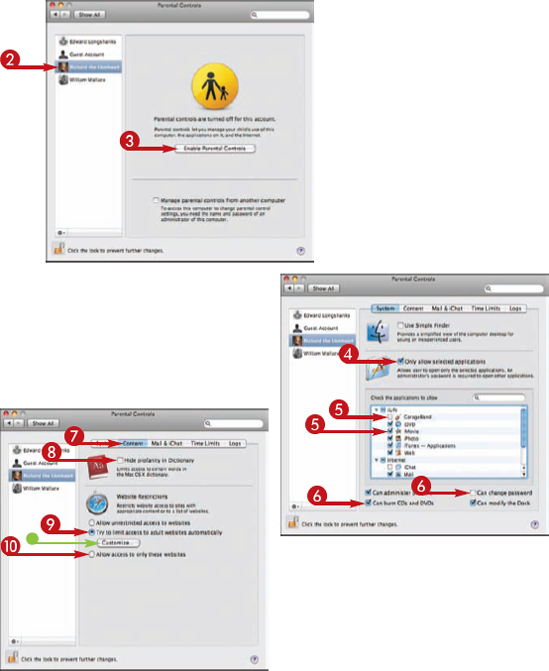
The phrase parental controls is a bit misleading. Although these can certainly be used to protect children from interactions on the Internet that might not be good for them, you can use the same tools to tailor any user's access to MacBook and the Internet.
You can also use Parental Controls to limit access to applications and system functions.
Protect Users with Parental Controls
The Parental Controls tabs appear.
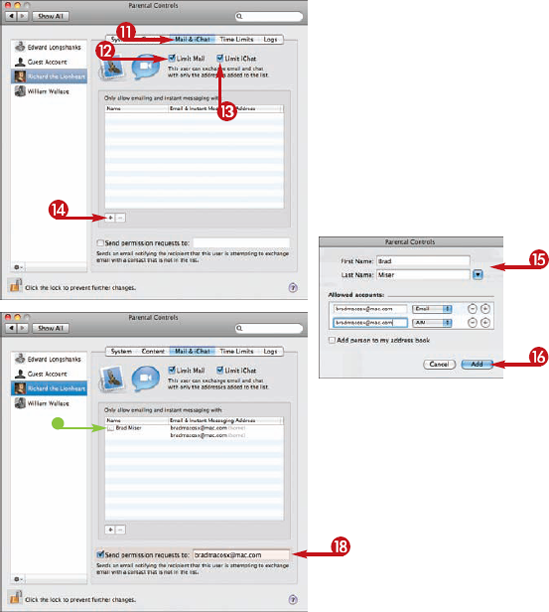
Note
The e-mail and chat controls work only with Mail and iChat.
The Parental Controls drop-down menu appears.
Tip
What is the Time Limits tab for?
You can use the Time Limits tab to limit the amount of time the user can use MacBook. You can configure time on weekdays and weekends. You can also configure "bedtimes" during which the user is unable to access MacBook.

What is the Logs tab for?
On the Logs tab, you can view the user's activities, such as Web sites visited, Web sites blocked, applications used, and so on.