With MacBook, you can virtually explore the world, communicate with just about everyone you know, create the next great American novel, make that novel into a movie, listen to music, watch TV, and manage an iPod or iPhone. Before you dive into all that amazing functionality, take a quick tour of MacBook to get familiar with its layout and how you interact with it.
Here you can learn about the MacBook's major features from the outside, including its controls, ports, and other areas that you use to control your MacBook and to connect it to other devices.
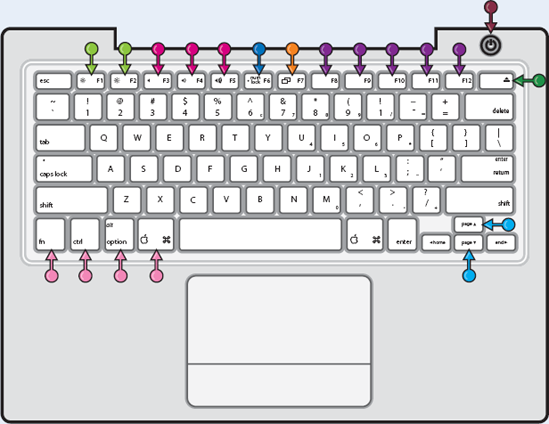
Tour MacBook
The MacBook's display provides a sharp, bright, and colorful view into all that you do
Use the built-in iSight camera to video conference, take photos, and more
Input audio-to-audio conference and record your voice or other sound
Along with the standard letter and number keys, you have function keys to control your MacBook
Enables you to move the cursor on the screen just by sliding your finger
Click the button to perform actions
Connect MacBook to other devices, such as drives, iPods, and so on
Pulses when MacBook is asleep, glows solid when MacBook is on but its display is dimmed
Use or burn CDs and DVDs
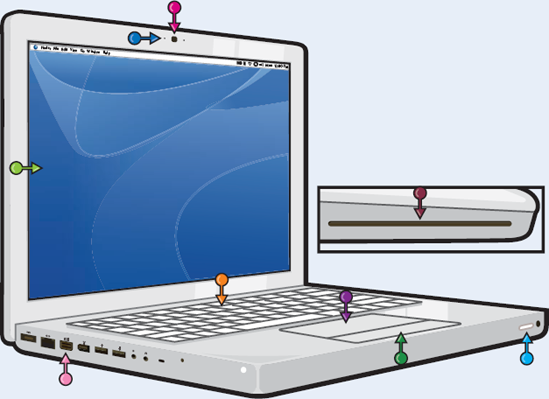
Press F1 to decrease your screen's brightness or F2 to increase it
F3 mutes MacBook, F4 turns the volume down, and F5 turns it up
Press F6 to transform m, j, k, l, u, i, and o keys into number keys for easier number entry
When MacBook is connected to an external display or projector, press this to use mirroring or dual displays
Press to perform specific functions, such as opening the Dashboard
Press to eject a CD or DVD
Press to invoke keyboard shortcuts
Press to move around the screen
Press to turn MacBook on; press and hold to force MacBook to turn off
MacBooks are elegantly designed and are simple and easy to use. But do not let that fool you; they are very powerful and extremely capable computers that can do just about anything you want them to.
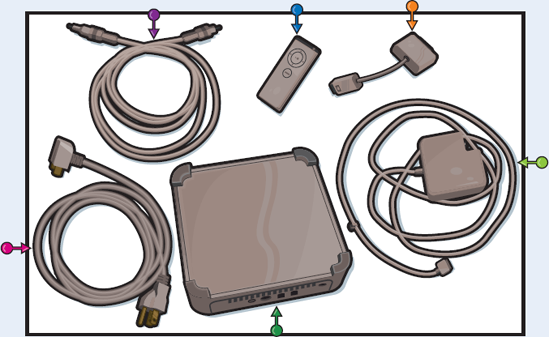
Connect headphones or use a Toslink adapter to connect MacBook to digital audio output devices, such as surround sound speakers
Connect microphones or digital audio input devices
Connect USB devices, such as external mice, keyboards, iPods, and disk drives
Connect disk drives, video cameras, and other FireWire devices
Use an optional adapter to connect MacBook to an external display or projector
Connect MacBook to an Ethernet network
Connect MacBook to power

Transforms standard outlet power to what MacBook needs to run and charges its battery
Connects to the power adapter to enable you to connect MacBook to a power outlet
Control MacBook from afar, such as when you are listening to music or watching movies
An optional Mini-DVI adapter enables you to connect MacBook to external displays for more screen room
An optional Toslink adapter and digital audio cable enable you to connect MacBook to digital audio devices, such as surround sound speakers
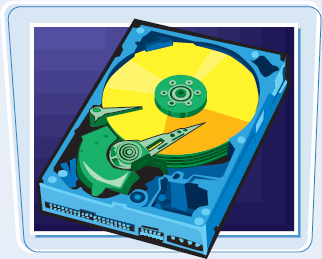
Every MacBook user should have an external hard drive to back up important files and for extra working room
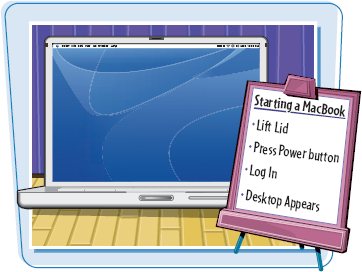
Starting a MacBook is not much of a challenge. After you turn MacBook on, you might also need to log in to start using it (which is not a challenge either). That is because Mac OS X supports multiple user accounts so that each person who uses MacBook can have his own resources. You created at least one user account when you first turned MacBook on.
Mac OS X includes an automatic login feature, which bypasses the login process. If this feature is turned on, you do not have to log in to start using MacBook. If it is not turned on, you need to know a user name and password to be able to log into a user account.
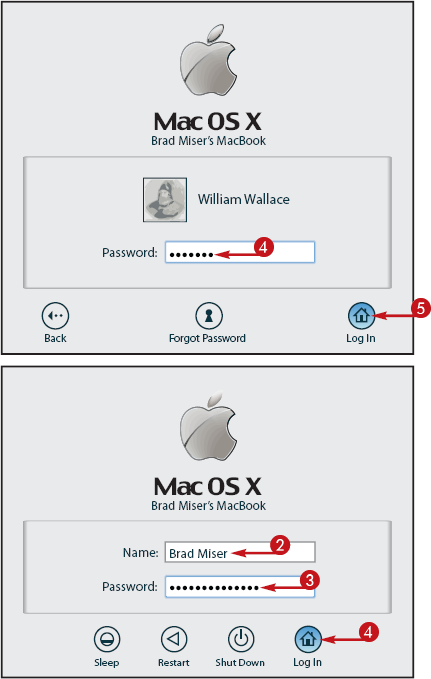
START UP


MacBook turns on and starts the boot process.
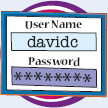
LOG IN WITH THE USER LIST
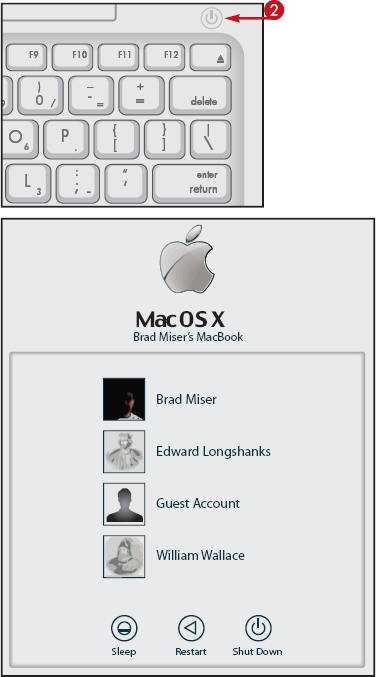
The Login window appears, showing the Name and Password fields.


You log into the user account and the Mac OS X desktop appears.
Tip
What if I forget my password?
If you enter an incorrect password or do not enter a password correctly, the Login screen shudders when you try to log in. This lets you know that the password you provided does not work. Try entering it again. If that does not help, click the Forgot Password button and a password hint appears on the screen. If you still cannot login, try a different user account.

What kind of user accounts are there?
An administrator account enables you to configure various aspects of the system; the first user account you created during the first time you started your MacBook is an administrator account. Standard accounts cannot access very many of the configuration tools and can be limited even further. Guest accounts also have limited access to the system. The root account is the most powerful, but you use that one only in specific situations.

MacBooks operate through the Mac operating system, which is currently in version 10.5, more commonly called OS X Leopard.
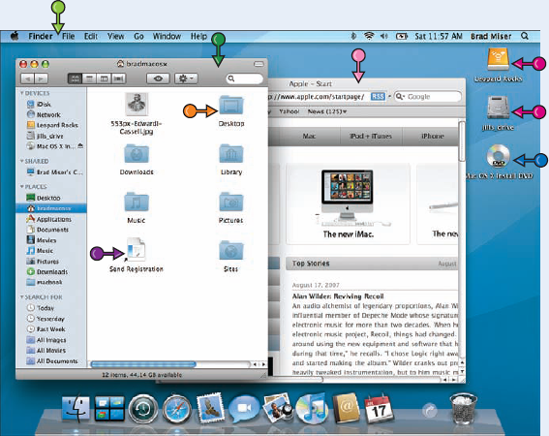
The Mac OS X desktop is the overall window through which you view all that happens on MacBook, such as looking at the contents of folders, working on documents, and surfing the Web.
Explore the Mac OS X Desktop
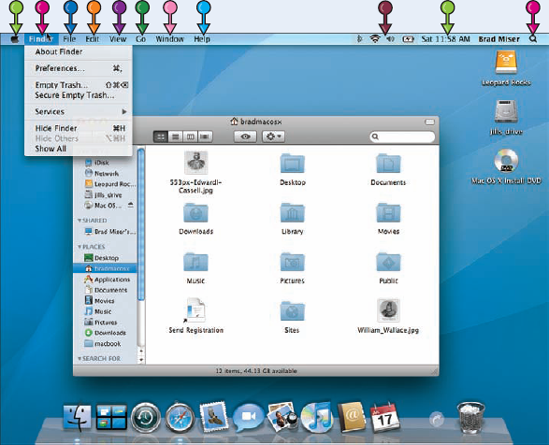
A menu bar always appears at the top of the screen so you can access the commands it contains
MacBook stores its data, including the software it needs to work, on hard drives. It includes one internal hard drive, but you can connect external drives too
CDs and DVDs are also incredibly useful for storing your own data
Containers that you use to organize files and other folders stored on MacBook
Documents (text, graphics, movies, and songs, for example), applications, or other sources of data
You view the contents of folders in Finder windows
When you use applications, you use the windows those applications present, which can be for documents, Web pages, and games
This menu is always visible so you can access special commands, such as Shut Down and Log Out
Where you control the Finder application itself, such as to empty the trash or set preferences
Use commands on this menu to work with files and Finder windows
This menu is not as useful in the Finder as it is in other applications, but here you can undo what you have done or copy and paste information
Enables you to determine how you view the desktop, especially Finder windows
Takes you to various places, such as specific folders
Enables you to work with open Finder windows
Use when you need help with Mac OS X or the other applications
You can configure the menu bar to include specific menus, such as Volume, AirPort, Battery, and many more
Here you see the current time and day
Enables you to search for information on MacBook and on the Internet
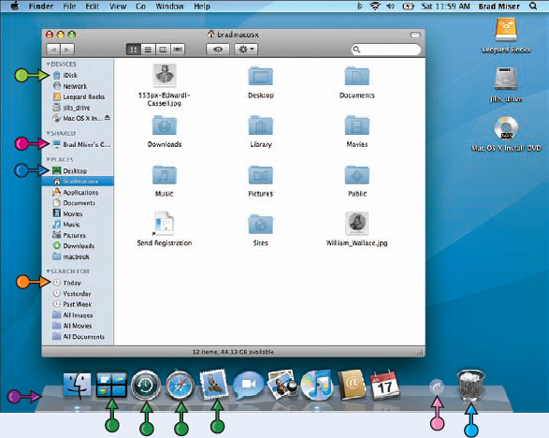
The Finder application controls the Mac OS X desktop, so you see its menu bar whenever you work with this application. The Dock and Sidebar enable you to access items quickly.
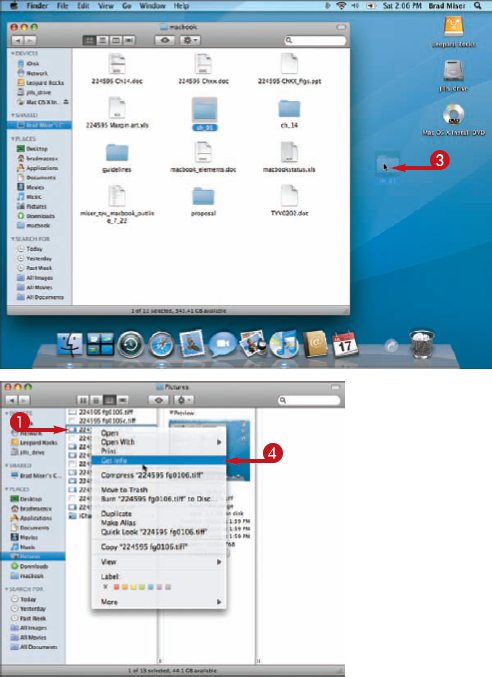
FINDER WINDOWS
Click to close a window
Click to shrink a window and move it onto the Dock
When clicked, a Finder window expands to show you as much as possible; click it again to return to the previous size
The name of the location whose contents you see in the window
Contains tools you use to work with files and folders
Find files, folders, and other information
When clicked, the toolbar and sidebar are hidden or shown
Enables you to quickly access devices, folders and files, and searches you have saved
Within a window, the contents of a location are shown; this example shows the icon view
Shows information about the current location, such as the amount of free space when you are viewing a hard drive
Drag this handle to change the size of a window
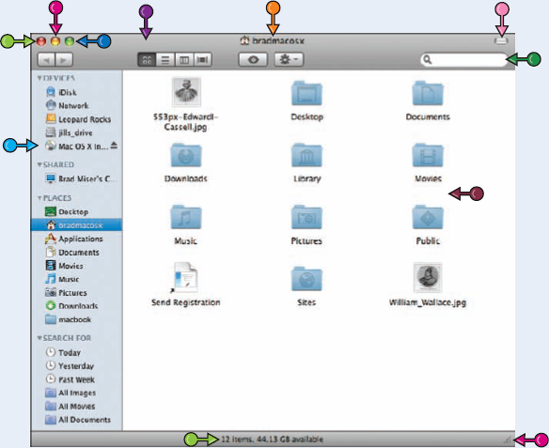
Contains your iDisk (.Mac members), the Network folder, hard drives, CDs/DVDs, and iPods that your MacBook can access
Computers and other resources being shared on a network
Files and folders you can open by clicking them
Saved searches that you can run by clicking them
Shows files and folders you can access along with applications that are currently running
Icons on the left side of the Dock are for applications; open applications have a glowing dot under their icon
Icons on the right side of the Dock are for files and folders. The default Dock includes the Downloads folder for files you download from the Internet
Items you delete go here (to get rid of them, empty the trash); when you select an ejectable device, such as a DVD, this becomes the Eject icon
To tell MacBook what you want to do, point the onscreen arrow to the object that you want to work with by sliding a finger over the trackpad.
The number of times and how you click the trackpad button determines what happens to what you are pointing at.
Point and Click, Double-click, or Right-click
POINT AND CLICK
The object is highlighted to indicate that it is now selected.
DOUBLE-CLICK
Whatever you were pointing at opens. For example, if you were pointing at a document, it opens in the associated application. If you pointed to a folder, it opens and you see its contents.
The object at which you were pointing becomes attached to the arrow and remains so until you release the trackpad button.
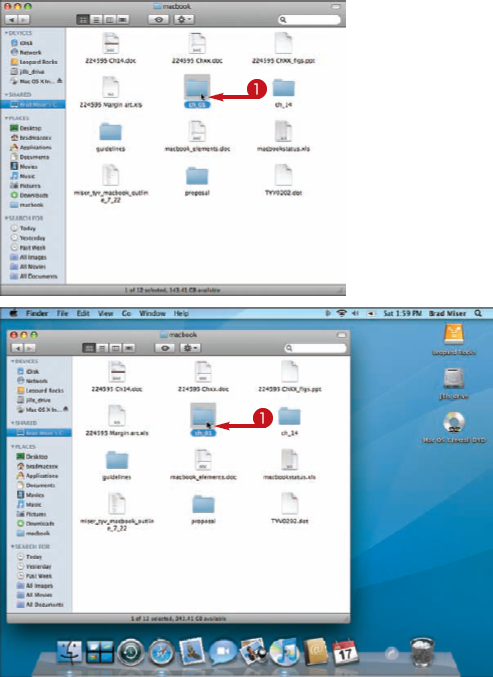
The object is moved or copied to the new location.
Note
If you drag something to a different volume it is copied there. If you move it to a different location on the same volume, it is moved there.
RIGHT-CLICK (
A contextual menu appears.
Note
It is called a contextual menu because the commands appearing on it depend on what you point to.
Note
Clicking the right button on a mouse does the same thing as
Tip
Why do things I click stick to the arrow?
You can configure the trackpad so you can drag things without having to hold the trackpad button. When this setting is on and you click something, it gets attached to the arrow. When you move the arrow, the object moves too. To disable this, open the System Preferences application, open the Trackpad pane of the Keyboard & Mouse pane, and uncheck the Dragging check box.
Nothing happens when I double-click things to open them. Why?
Two clicks have to happen within a certain amount of time to be registered as a double-click. You can configure the amount of time this takes by using the Trackpad pane of the Keyboard & Mouse pane of the System Preferences application.

As you use MacBook, you work with data. Underlying all this data is the need to store and organize it. The major data storing and organizing items thatMacBook uses are described in this section.
Hard Disk
Hard disks are the physical means MacBook uses to store data. The general concept is that data is stored on a magnetic disk accessed via a read/write head. MacBook has one internal hard drive that contains the software it needs to runapplications you install, and documents you create. You can connect external hard disks to MacBook through its USB or FireWire ports to expand the storage room available. Hard drives come in various storage capacities, such as 160GB, and operate at different speeds (faster is better). Hard disks are represented on MacBook with icons, each under a different name. Hard disks are also called hard drives.
Volume
A volume is an area of disk space created using software rather than a physical device. A hard drive can be partitioned into multiple volumes, where each volume acts like a separate hard disk. A volume performs the same task as a hard disk, which is to store data. In fact, when you work with a volume, you might not be able to tell the difference. You can also access volumes being shared with you over a network. Application installers often appear as volumes that you use as if they were a hard disk. Volumes are used to organize data in different ways and to represent various resources with which you work.
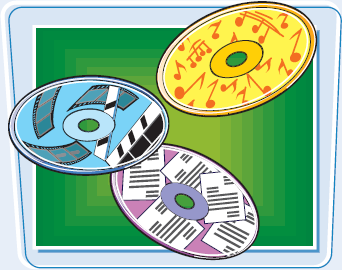
CDs and DVDs serve many purposes. Examples abound, including listening to audio CDs, watching DVD movies and TV shows, and installing applications on CD or DVD. You can also put your own data on CD or DVD, such as burning audio CDs with iTunes, creating DVDs with iDVD, and backing up your data on DVD. MacBook has a slot-loading disc drive located on its right side; to use a disc, simply insert it into the slot.
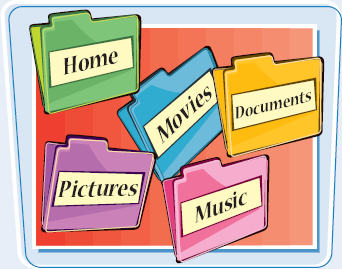
Folders
Like manila folders in the physical world, folders on MacBook are a means to organize things, such as files and other folders. Mac OS X includes many folders by default. You can create, name, delete, and organize folders in any way you see fit (mostly any way – there are some folders you cannot or should not change). You open a folder in a Finder window to view its contents.
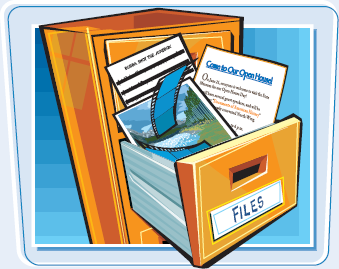
Files
A file is a container for data. Files can contain many different kinds of data. For example, some files are documents, such as text documents you create with a word processor. Files are also images, songs, movies, and other kinds of content. Files make up the operating system that runs MacBook; you typically do not interact with system files directly. Files have names that include file name extensions, such as .jpg and .doc (which can be hidden), and are represented by icons in Finder windows and e-mail attachments.
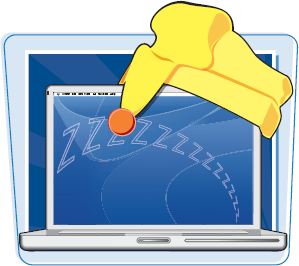
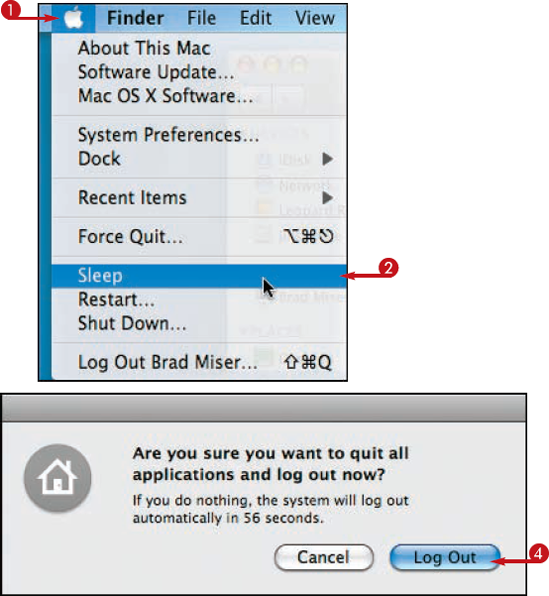
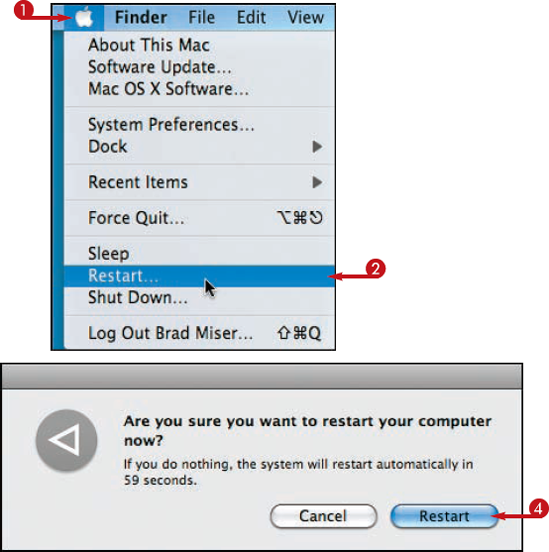
When your work with MacBook is complete for the day, there are several ways to stop using MacBook. Most of the time, you either put MacBook to sleep or log out. During sleep, activity continues and everything you had open remains open, but MacBook goes into low-power mode; you can wake it up to quickly get back to whatever you were doing. When you log out, all open documents and applications close and you return to the Log Out screen, but MacBook continues to run.
Restart shuts it down and then starts it again; you most typically use this during troubleshooting. Shut Down turns MacBook off.
Sleep, Log Out, Restart, or Shut Down
SLEEP OR LOG OUT
If you selected Sleep, MacBook's display goes dark, its hard drive stops, and the Sleep indicator light pulses.
Note
You can put MacBook to sleep even faster by closing its lid.
If you selected Log Out, the Log Out confirmation dialog box appears.
All applications and documents close, and the Log In screen opens.
Note
A faster way to log out is to press

Depending on which option you chose, the appropriate confirmation dialog box appears.
MacBook shuts down and then starts up again.

MacBook turns off.
Note
You can also perform the tasks in this section by pushing the Power button. The dialog box that appears contains Restart, Sleep, and Shut Down buttons. Click a button to perform that action.
Tip
Should I turn my MacBook off?
In most cases, no. It is usually better to just put it to sleep. When you want to use it again, wake MacBook up and it is ready in just a few seconds. Starting it up again can take several moments. If you will not be using MacBook for an extended period of time, it is better to shut it down so the battery does not get drained.
When should I log out instead of shutting my MacBook down?
If you leave your MacBook in a place where other people can get to it, you probably do not want to leave it running in case someone decides to see what he can do with it. You can shut it down. However, if automatic login is turned on, someone can simply turn MacBook on and start using it. To prevent someone from using MacBook, log out. Everything you had open closes and you return to the Login screen. When you want to use it again, you can quickly log back in. Later, you can learn how to set MacBook so it automatically locks to protect it when you aren't actively using it.