CHAPTER 8
Browsing the Web and E-Mailing

Your iPhone is fully equipped to browse the web and send e-mail via a Wi-Fi connection or via the cellular network.
Access Websites Quickly with Bookmarks
Keep a Reading List of Web Pages
Navigate Among Open Web Pages Using Tabs
Manage Your App and Website Passwords
Using the Sign In with Apple Feature
Reply To or Forward an E-Mail Message
Browse the Web with Safari
Your iPhone comes equipped with the Safari app, which enables you to browse the web. You can quickly go to a web page by entering its address in the Address box or by following a link.
Although you can browse quickly by opening a single web page at a time, you may prefer to open multiple pages and switch back and forth among them. Safari makes this easy to do. You can also install other browsers, such as Google Chrome or Microsoft Edge, from the App Store and use them instead of, or as well as, Safari.
Browse the Web with Safari
Open Safari and Navigate to Web Pages
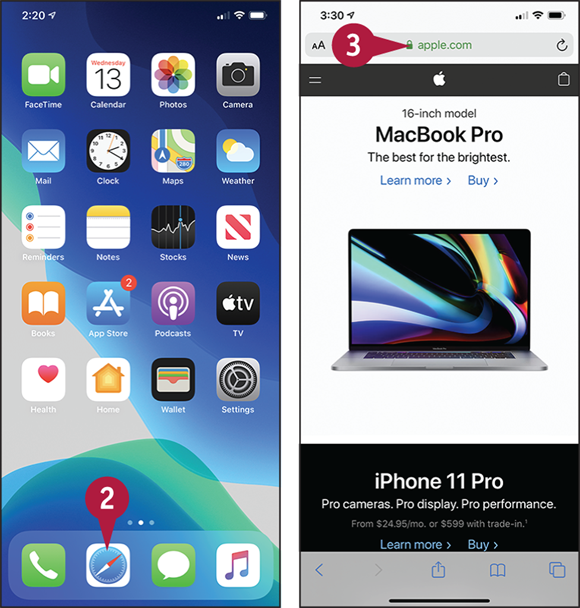
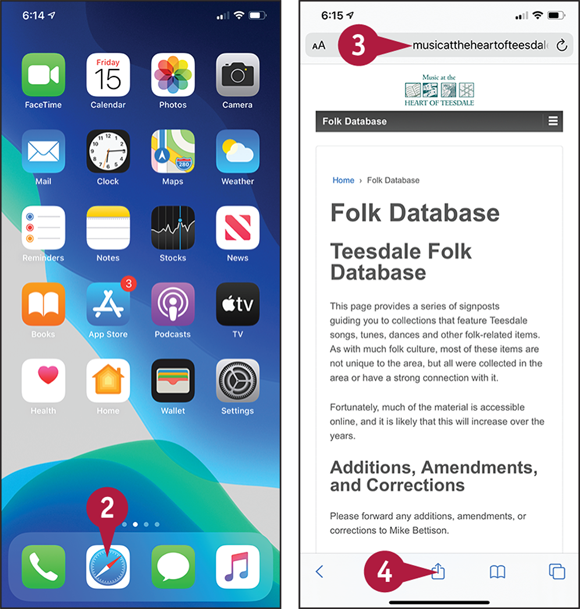
![]() Swipe up from the bottom of the screen.
Swipe up from the bottom of the screen.
The Home screen appears.
![]() Tap Safari (
Tap Safari (![]() ).
).
Safari opens and loads the last web page that was shown.
![]() Tap the Address box.
Tap the Address box.
Note: You can enter widely used domain extensions, such as .com and .net, by tapping and holding. (the period key) and tapping the extensions on the pop-up panel that appears.
Safari selects the current contents of the Address box, and the keyboard appears.
![]() Tap Delete (
Tap Delete (![]() ) if you need to delete the contents of the Address box.
) if you need to delete the contents of the Address box.
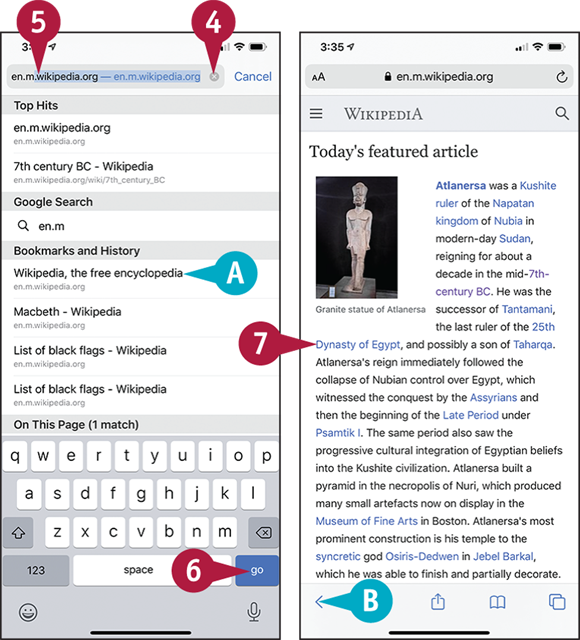
![]() Type the address of the page you want to open.
Type the address of the page you want to open.
![]() You can also tap a search result that Safari displays below the Address box.
You can also tap a search result that Safari displays below the Address box.
![]() Tap go.
Tap go.
Safari displays the page.
![]() Tap a link on the page.
Tap a link on the page.
Safari displays that page.
![]() After going to a new page, tap Back (
After going to a new page, tap Back (![]() ) to display the previous page. You can then tap Forward (
) to display the previous page. You can then tap Forward (![]() ) to go forward again.
) to go forward again.
Open Multiple Pages and Navigate Among Them
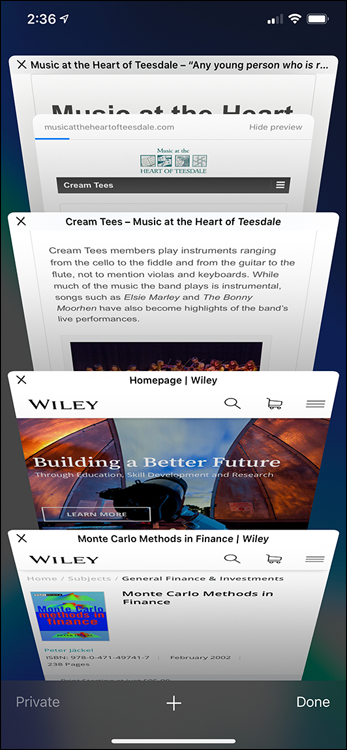
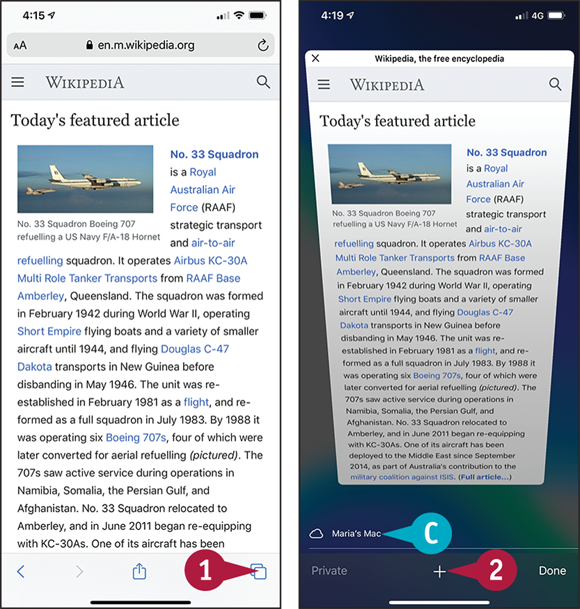
![]() Tap Pages (
Tap Pages (![]() ).
).
Safari displays the list of open pages, each bearing a Close button (![]() ).
).
![]() Below the list of open pages, you can find a list of recent pages you opened on other devices that use the same iCloud account.
Below the list of open pages, you can find a list of recent pages you opened on other devices that use the same iCloud account.
![]() Tap New Page (
Tap New Page (![]() ).
).
Note: In landscape orientation, a large-screen iPhone displays a tab bar at the top of the screen. Tap the tab for the page you want to view.

Safari opens a new page and displays your bookmarks.
![]() Tap the Address box, and then go to the page you want.
Tap the Address box, and then go to the page you want.
Note: You can also go to a page by using a bookmark, as described in the next section, “Access Websites Quickly with Bookmarks.”
The page appears.
![]() To switch to another page, tap Pages (
To switch to another page, tap Pages (![]() ).
).
Safari displays the list of pages.
![]() Tap the page you want to see.
Tap the page you want to see.
![]() You can tap Close (
You can tap Close (![]() ) to close a page.
) to close a page.
Access Websites Quickly with Bookmarks
Typing web addresses can be laborious, even with the help that the iPhone’s keyboard adds, so you will probably want to use bookmarks to access websites you visit often.
By syncing your existing bookmarks from your computer or online account, as described in Chapter 1, you can instantly provide your iPhone with quick access to the web pages you want to visit most frequently. You can also create bookmarks on your iPhone, as discussed in the next section, “Create Bookmarks.”
Access Websites Quickly with Bookmarks
Open the Bookmarks Screen
![]() Swipe up from the bottom of the screen.
Swipe up from the bottom of the screen.
The Home screen appears.
![]() Tap Safari (
Tap Safari (![]() ).
).
Safari opens.
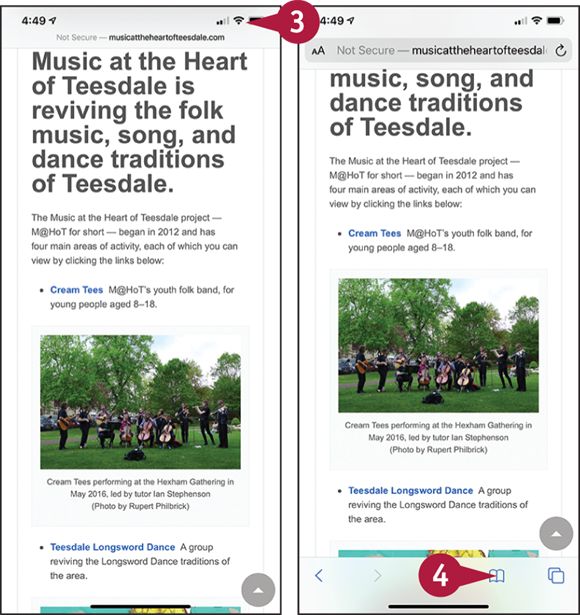
![]() If the navigation bar at the bottom is hidden, tap at the top of the screen.
If the navigation bar at the bottom is hidden, tap at the top of the screen.
The navigation bar appears.
Note: You can also scroll up a short distance to display the navigation bar.
![]() Tap Bookmarks (
Tap Bookmarks (![]() ).
).
The Bookmarks screen appears.
Note: You can display the Bookmarks screen quickly from the Home screen by tapping and holding Safari (![]() ) and then tapping Show Bookmarks (
) and then tapping Show Bookmarks (![]() ) on the pop-up panel.
) on the pop-up panel.
Explore Your History
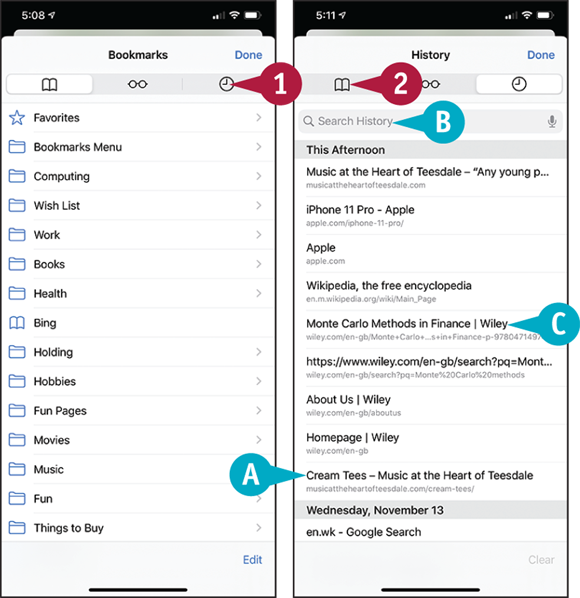
![]() On the Bookmarks screen, tap History (
On the Bookmarks screen, tap History (![]() ).
).
The History screen appears, showing a list of the web pages you have recently visited.
![]() You can tap a time or a day to display the list of web pages you visited then.
You can tap a time or a day to display the list of web pages you visited then.
![]() You can tap Search History (
You can tap Search History (![]() ) and type search terms to search for particular pages.
) and type search terms to search for particular pages.
Note: If the Search History box is hidden, swipe down at the top of the list of pages.
![]() You can tap a page’s button to display that page.
You can tap a page’s button to display that page.
![]() Tap Bookmarks (
Tap Bookmarks (![]() ) when you want to return to the Bookmarks screen.
) when you want to return to the Bookmarks screen.

Open a Bookmarked Page and Use the Toolbar
![]() On the Bookmarks screen, tap the bookmarks folder or category you want to see. This example uses the Books folder.
On the Bookmarks screen, tap the bookmarks folder or category you want to see. This example uses the Books folder.
The contents of the folder or category appear. For example, the contents of the Books folder appear.
![]() You can delete a bookmark by swiping it to the left and then tapping Delete.
You can delete a bookmark by swiping it to the left and then tapping Delete.
![]() When you find the bookmark for the web page you want to open, tap the bookmark.
When you find the bookmark for the web page you want to open, tap the bookmark.
![]() The web page opens.
The web page opens.
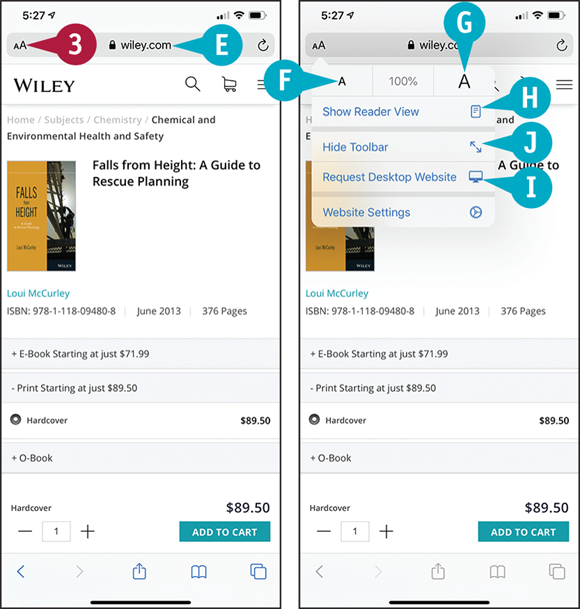
![]() If you need to change your view of the page, tap Show/Hide Toolbar (
If you need to change your view of the page, tap Show/Hide Toolbar (![]() ).
).
The toolbar opens.
![]() Tap Smaller (
Tap Smaller (![]() ) to zoom out.
) to zoom out.
![]() Tap Larger (
Tap Larger (![]() ) to zoom in.
) to zoom in.
![]() Tap Show Reader View (
Tap Show Reader View (![]() ) to switch to Reader View for ease of reading.
) to switch to Reader View for ease of reading.
![]() Tap Request Desktop Website (
Tap Request Desktop Website (![]() ) to request the desktop site instead of the mobile version.
) to request the desktop site instead of the mobile version.
![]() Tap Hide Toolbar (
Tap Hide Toolbar (![]() ) or tap Show/Hide Toolbar (
) or tap Show/Hide Toolbar (![]() ) again when you no longer need the toolbar.
) again when you no longer need the toolbar.
Create Bookmarks
When you want to access a web page again easily, create a bookmark for it. If you have set your iPhone to sync bookmarks with your iCloud account, the bookmark becomes available on your computer or online account as well when you sync.
If you create many bookmarks, it is usually helpful to create multiple folders in which you can organize the bookmarks. You can create folders easily on the iPhone and choose the folder in which to store each bookmark.
Create Bookmarks
Create a Bookmark
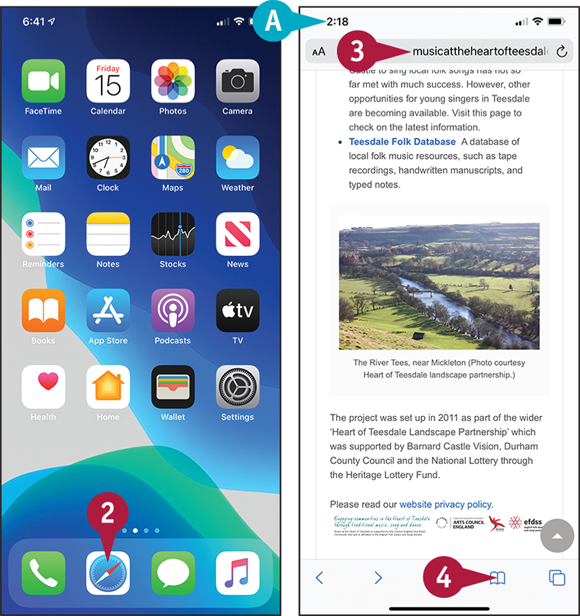
![]() Swipe up from the bottom of the screen.
Swipe up from the bottom of the screen.
The Home screen appears.
![]() Tap Safari (
Tap Safari (![]() ).
).
Safari opens and displays the last web page you were viewing.
![]() Navigate to the web page you want to bookmark.
Navigate to the web page you want to bookmark.
![]() Tap Share (
Tap Share (![]() ).
).
The Share sheet appears.
![]() Tap Add Bookmark (
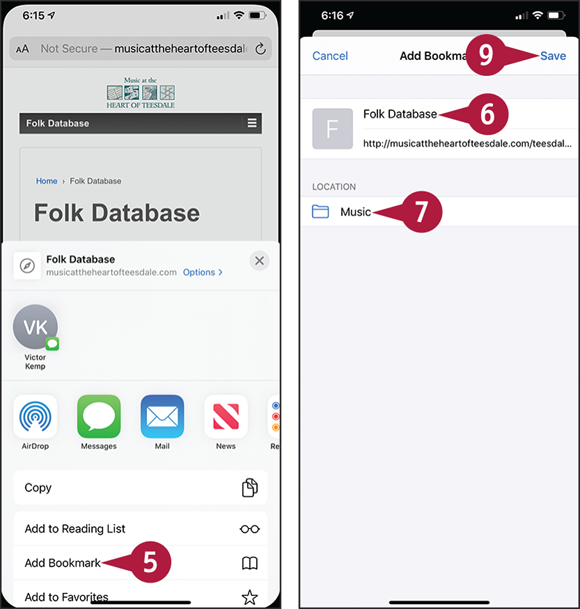
Tap Add Bookmark (![]() ).
).
The Add Bookmark screen appears.
![]() Edit the suggested name, or type a new name, as needed.
Edit the suggested name, or type a new name, as needed.
![]() Tap the current folder under the Location heading.
Tap the current folder under the Location heading.
The Choose a Folder screen appears.
![]() Tap the folder in which to store the bookmark.
Tap the folder in which to store the bookmark.
The Add Bookmark screen appears.
![]() Tap Save.
Tap Save.

Create a New Folder for Bookmarks
![]() In Safari, tap Bookmarks (
In Safari, tap Bookmarks (![]() ).
).
The Bookmarks screen appears.
![]() Tap Edit.
Tap Edit.
The editing controls appear.
![]() You can drag a handle (
You can drag a handle (![]() ) to change the order of the bookmark folders.
) to change the order of the bookmark folders.
![]() You can tap Delete (
You can tap Delete (![]() ) and then tap the textual Delete button to delete a bookmark folder and its contents.
) and then tap the textual Delete button to delete a bookmark folder and its contents.
![]() Tap New Folder.
Tap New Folder.

The Edit Folder screen appears.
![]() Type the name for the folder.
Type the name for the folder.
![]() Tap the folder under the Location heading.
Tap the folder under the Location heading.
A screen showing the list of folders appears.
![]() Tap the folder in which to store the bookmark folder.
Tap the folder in which to store the bookmark folder.
The Edit Folder screen appears again.
![]() Tap All (
Tap All (![]() ).
).
The Bookmarks screen appears, still with editing controls displayed.
![]() Tap Done.
Tap Done.
Keep a Reading List of Web Pages
Safari’s Reading List feature enables you to save a web page for later without creating a bookmark. You can quickly add the current web page to Reading List by using the Share sheet. Once you have added pages, you access Reading List through the Bookmarks feature. When viewing Reading List, you can display either all the pages it contains or only those you have not read.
Keep a Reading List of Web Pages
Add a Web Page to Reading List
![]() Swipe up from the bottom of the screen.
Swipe up from the bottom of the screen.
The Home screen appears.
![]() Tap Safari (
Tap Safari (![]() ).
).
Safari opens and displays the last web page you were viewing.
![]() Navigate to the web page you want to add to Reading List.
Navigate to the web page you want to add to Reading List.
![]() If the navigation bar is hidden, tap at the top of the screen to display it.
If the navigation bar is hidden, tap at the top of the screen to display it.
![]() Tap Share (
Tap Share (![]() ).
).

The Share sheet appears.
![]() Tap Add to Reading List (
Tap Add to Reading List (![]() ).
).
The first time you give the Add to Reading List command, the Automatically Save Reading List Articles for Offline Reading? dialog opens.
![]() Tap Save Automatically if you want to save the articles so you can read them when you do not have an Internet connection, which is usually helpful. If not, tap Don’t Save Automatically.
Tap Save Automatically if you want to save the articles so you can read them when you do not have an Internet connection, which is usually helpful. If not, tap Don’t Save Automatically.
Safari adds the web page to Reading List.
Note: To change the Automatically Save Offline setting later, display the Home screen, tap Settings (![]() ), and then tap Safari (
), and then tap Safari (![]() ). Scroll down to the Reading List section and set the Automatically Save Offline switch to On (
). Scroll down to the Reading List section and set the Automatically Save Offline switch to On (![]() ) or Off (
) or Off (![]() ), as needed.
), as needed.
Open Reading List and Display a Page
![]() In Safari, tap Bookmarks (
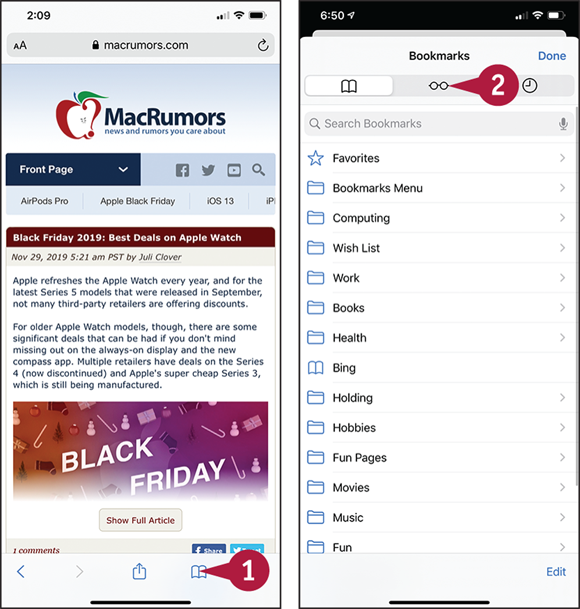
In Safari, tap Bookmarks (![]() ).
).
The Bookmarks screen appears.
![]() Tap Reading List (
Tap Reading List (![]() ).
).
Note: You can quickly display the Reading List screen from the Home screen by tapping and holding Safari (![]() ) and then tapping Show Reading List on the pop-up panel.
) and then tapping Show Reading List on the pop-up panel.

The Reading List screen appears.
![]() Tap Show All.
Tap Show All.
Reading List displays all the pages it contains, including those you have read.
![]() Pages you have read appear with gray shading.
Pages you have read appear with gray shading.
![]() You can tap Show Unread to display only unread pages.
You can tap Show Unread to display only unread pages.
![]() Tap the page you want to open.
Tap the page you want to open.
![]() If you decide not to open a page from Reading List, tap Done to hide the Reading List screen.
If you decide not to open a page from Reading List, tap Done to hide the Reading List screen.
Navigate Among Open Web Pages Using Tabs
If you browse the web a lot, you will probably need to open many web pages in Safari at the same time. Safari presents your open pages as a list of scrollable tabs, making it easy to navigate from one page to another.
You can change the order of the tabs to suit your needs, and you can quickly close a tab by either tapping its Close button or simply swiping it off the list.
Navigate Among Open Web Pages Using Tabs

Open Safari and Display the List of Tabs
![]() Swipe up from the bottom of the screen.
Swipe up from the bottom of the screen.
The Home screen appears.
![]() Tap Safari (
Tap Safari (![]() ).
).
Safari opens or becomes active.
Note: If Safari has hidden the on-screen controls, tap at the top of the screen to display them. Alternatively, scroll up the screen a short way.
![]() Tap Pages (
Tap Pages (![]() ).
).
The list of pages appears.
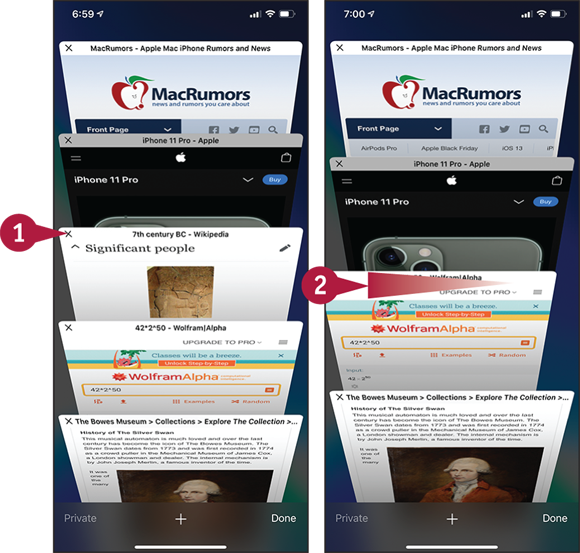
Close Pages You Do Not Need to Keep Open
![]() Tap Close (
Tap Close (![]() ) on the tab for a page you want to close.
) on the tab for a page you want to close.
The page closes, and the tab disappears from the list.
![]() Alternatively, you can tap a tab and swipe it left off the screen.
Alternatively, you can tap a tab and swipe it left off the screen.
The page closes, and the tab disappears from the list.
Note: You can turn a large-screen iPhone to landscape orientation and then tap Close (![]() ) to close the current tab.
) to close the current tab.
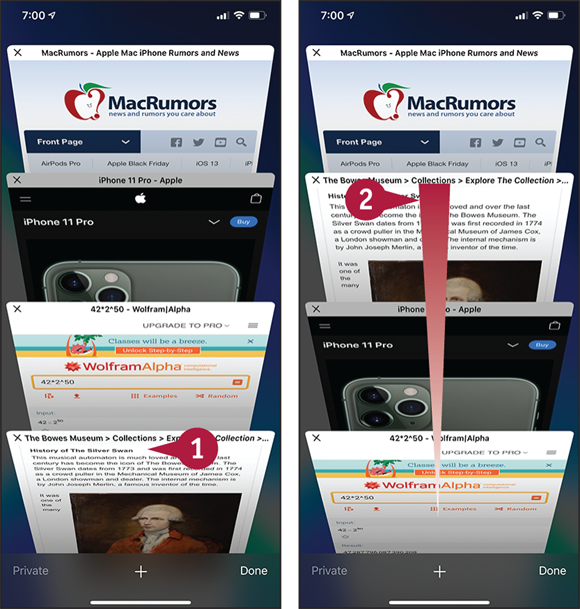
Change the Order of the Pages
![]() Tap and hold the tab for a page you want to move.
Tap and hold the tab for a page you want to move.
The tab moves to the foreground.
![]() Drag the tab to where you want it to appear in the list, and then release it.
Drag the tab to where you want it to appear in the list, and then release it.
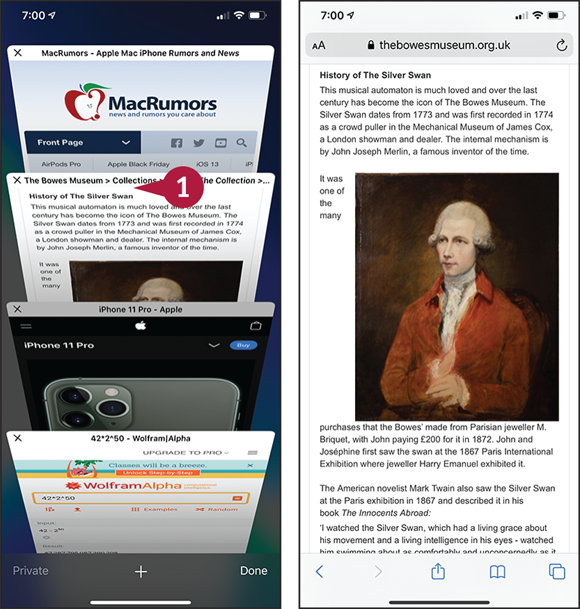
Find a Page and Display It
![]() Tap the tab for the page you want to display.
Tap the tab for the page you want to display.
The page opens.
Note: You can also turn a large-screen iPhone to landscape orientation to display the tab bar at the top of the screen. You can then tap the tab you want to view.
Tighten Up Safari’s Security
To protect yourself against websites that infect computers with malware or try to gain your sensitive personal or financial information, turn on Safari’s Fraudulent Website Warning feature. You can also turn off the JavaScript programming language, which can be used to attack your iPhone. Additionally, you can block pop-up windows, which some websites use to display unwanted information; block new cookies and data; and set Safari to prevent cross-site tracking.
Tighten Up Safari’s Security

![]() Swipe up from the bottom of the screen.
Swipe up from the bottom of the screen.
The Home screen appears.
![]() Tap Settings (
Tap Settings (![]() ).
).
The Settings screen appears.
![]() Tap Safari (
Tap Safari (![]() ).
).
The Safari screen appears.
![]() The AutoFill feature enables you to save information — such as your name, address, and credit card details — for filling out web forms quickly.
The AutoFill feature enables you to save information — such as your name, address, and credit card details — for filling out web forms quickly.
![]() Set the Block Pop-ups switch to On (
Set the Block Pop-ups switch to On (![]() ) to block unwanted pop-up windows.
) to block unwanted pop-up windows.

![]() Set the Prevent Cross-Site Tracking switch to On (
Set the Prevent Cross-Site Tracking switch to On (![]() ) or Off (
) or Off (![]() ), as needed.
), as needed.
![]() Set the Block All Cookies switch to On (
Set the Block All Cookies switch to On (![]() ) or Off (
) or Off (![]() ), as needed.
), as needed.
![]() Set the Fraudulent Website Warning switch to On (
Set the Fraudulent Website Warning switch to On (![]() ).
).
![]() Set the Check for Apple Pay switch to On (
Set the Check for Apple Pay switch to On (![]() ) to let websites check whether Apple Pay is enabled.
) to let websites check whether Apple Pay is enabled.
![]() Tap Clear History and Website Data.
Tap Clear History and Website Data.

Note: If the Clear History and Website Data button is dimmed and unavailable, your iPhone has restrictions applied. If you manage the iPhone, you may be able to remove these restrictions through Screen Time.
A dialog opens.
![]() Tap Clear History and Data.
Tap Clear History and Data.
The dialog closes.
Safari clears your browsing history and data.
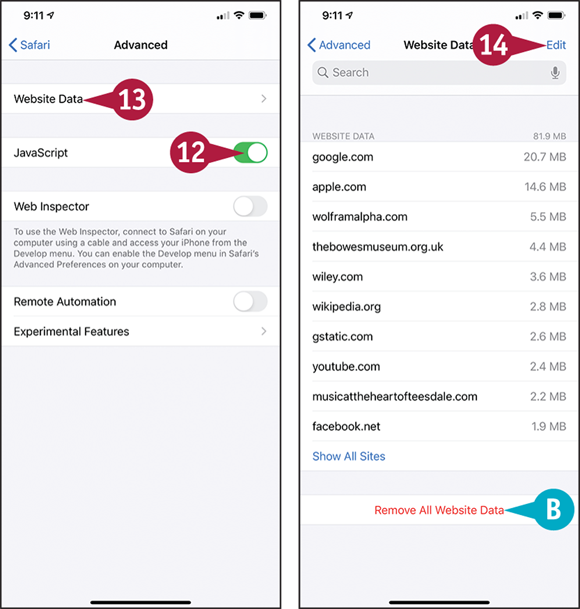
![]() Tap Advanced.
Tap Advanced.
The Advanced screen appears.
![]() Set the JavaScript switch to On (
Set the JavaScript switch to On (![]() ) or Off (
) or Off (![]() ), as needed.
), as needed.
Note: Turning off JavaScript may remove some or most functionality of harmless sites.
![]() Tap Website Data.
Tap Website Data.
The Website Data screen appears.
![]() You can tap Remove All Website Data to remove all website data.
You can tap Remove All Website Data to remove all website data.
![]() Tap Edit.
Tap Edit.
A Delete icon (![]() ) appears to the left of each website.
) appears to the left of each website.
![]() To delete a website’s data, tap Delete (
To delete a website’s data, tap Delete (![]() ), and then tap the textual Delete button that appears.
), and then tap the textual Delete button that appears.
![]() Tap Done.
Tap Done.
Manage Your App and Website Passwords
Your iPhone can store your app and website passwords so that Safari and other apps can enter them automatically when needed, reducing the need for you to type passwords manually.
The App & Website Passwords screen in the Settings app enables you to view the list of password entries your iPhone has stored. You can view and edit a password entry, which lets you copy the password, update it, or change the sites for which it is used; delete a password; or add a new password entry.
Manage Your App and Website Passwords
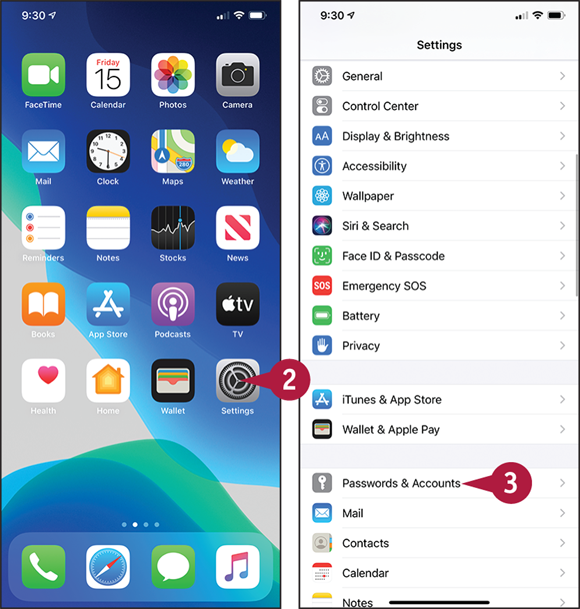
![]() Swipe up from the bottom of the screen.
Swipe up from the bottom of the screen.
The Home screen appears.
![]() Tap Settings (
Tap Settings (![]() ).
).
The Settings screen appears.
![]() Tap Passwords & Accounts (
Tap Passwords & Accounts (![]() ).
).

The Passwords & Accounts screen appears.
![]() Tap Website & App Passwords.
Tap Website & App Passwords.
Note: Before displaying the Passwords screen, the iPhone authenticates you. Normally, this happens via Face ID and takes only moments. If Face ID repeatedly fails, you will need to enter your passcode.
The Passwords screen appears.
![]() You can tap Search (
You can tap Search (![]() ) and type a search term to search for a particular password.
) and type a search term to search for a particular password.
![]() Tap the password entry you want to view.
Tap the password entry you want to view.
The screen for the password entry appears.
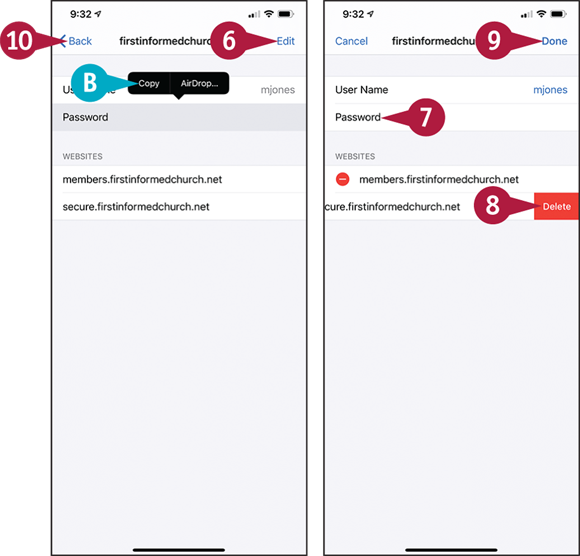
![]() You can copy the username or password by tapping and holding it and then tapping Copy on the pop-up toolbar.
You can copy the username or password by tapping and holding it and then tapping Copy on the pop-up toolbar.
![]() If you need to edit the username, password, or list of websites, tap Edit.
If you need to edit the username, password, or list of websites, tap Edit.
The fields open for editing.
![]() Edit the username or password as needed.
Edit the username or password as needed.
![]() To remove a website, tap Delete (
To remove a website, tap Delete (![]() ) and then tap the textual Delete button.
) and then tap the textual Delete button.
![]() Tap Done.
Tap Done.
Editing Mode closes.
![]() Tap Passwords (
Tap Passwords (![]() ).
).

The Passwords screen appears again.
Note: You can delete a password entry by swiping it left and then tapping Delete.
![]() To add a new password, tap Add Password (
To add a new password, tap Add Password (![]() ).
).
The Add Password screen appears.
![]() Type or paste the website address.
Type or paste the website address.
![]() Type or paste the username.
Type or paste the username.
![]() Type or paste the password.
Type or paste the password.
![]() Tap Done.
Tap Done.
The Passwords screen appears again.
Using the Sign In with Apple Feature
Many apps and websites require you to create an account and sign in to it before you can use them. Each account typically requires a valid e-mail address and a password; ideally, each password should be unique, but the more passwords you have, the harder it is to remember them.
One solution to this problem is to use a password manager, but your iPhone offers a neater solution: the Sign In with Apple feature, which simplifies the process of signing into apps and websites — and even lets you hide your e-mail address from apps and websites.
Understanding the Requirements for Sign In with Apple
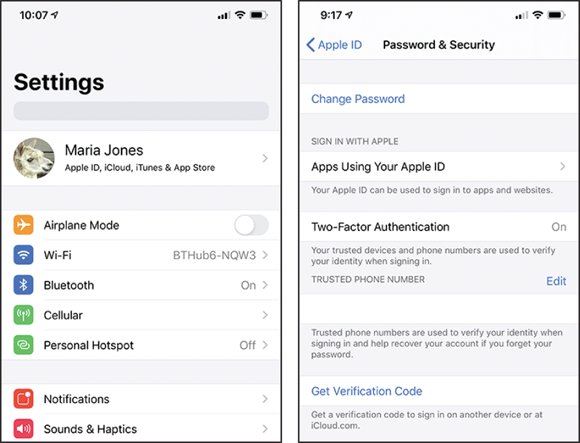
Sign In with Apple uses your existing Apple ID, the credentials you use to sign in to iCloud. Normally, you configure your iPhone to use your Apple ID when first setting up the iPhone. You can verify that your iPhone is using your Apple ID by tapping Settings (![]() ) on the Home screen and making sure that “Apple ID” appears on the Apple ID button, the one that bears your name and picture at the top of the Settings screen.
) on the Home screen and making sure that “Apple ID” appears on the Apple ID button, the one that bears your name and picture at the top of the Settings screen.
Sign In with Apple requires you to have enabled two-factor authentication on your iPhone. Two-factor authentication is a security feature that requires you to use a trusted device to receive a verification code when signing in to your account on a new device for the first time. Until you enable two-factor authentication, your iPhone prompts you relentlessly to do so; and once you have enabled two-factor authentication, you cannot disable it again. You can verify that your iPhone has two-factor authentication enabled by tapping Settings (![]() ), tapping Apple ID, and then tapping Password & Security. On the Password & Security screen, check that the Two-Factor Authentication button shows On.
), tapping Apple ID, and then tapping Password & Security. On the Password & Security screen, check that the Two-Factor Authentication button shows On.
Sign In to an App or Website Using Sign In with Apple

When you go to sign in to an app or website that supports Sign In with Apple, a button such as Continue with Apple or Sign In with Apple appears. Tap this button to start creating an account using your Apple ID. Enter your name the way you want it to appear. Then tap Share My Email (![]() changes to
changes to ![]() ) if you want to use your e-mail address, or tap Hide My Email (
) if you want to use your e-mail address, or tap Hide My Email (![]() changes to
changes to ![]() ) if you want to have Apple create a unique address on its relay service and forward messages from the app or website to your e-mail address. Tap Continue and follow any other prompts that appear.
) if you want to have Apple create a unique address on its relay service and forward messages from the app or website to your e-mail address. Tap Continue and follow any other prompts that appear.
See Which Apps Are Using Your Apple ID
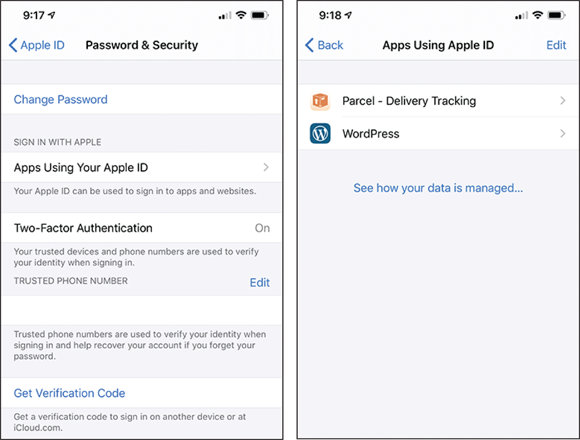
To see which apps are using your Apple ID, tap Settings (![]() ) on the Home screen. On the Settings screen, tap Apple ID, the button at the top that contains your name and picture. On the Apple ID screen, tap Password & Security to display the Password & Security screen. Here, tap Apps Using Your Apple ID to display the Apps Using Apple ID screen, which contains a list of the apps.
) on the Home screen. On the Settings screen, tap Apple ID, the button at the top that contains your name and picture. On the Apple ID screen, tap Password & Security to display the Password & Security screen. Here, tap Apps Using Your Apple ID to display the Apps Using Apple ID screen, which contains a list of the apps.
Block Forwarded Messages or Stop Using Sign In with Apple for an App

To stop using Sign In with Apple for a particular app, follow the instructions in the previous section to display the Apps Using Apple ID screen.
Tap the app you want to stop using. A screen for that app appears, such as the WordPress screen shown here.
If you configured the Hide My Email feature for this app, the Hide My Email section appears. Here, the This App Received button shows the e-mail address that Apple used for this app. The Forward To button shows the address to which messages from the app are forwarded. You can set the Forward To switch to Off (![]() ) to stop receiving messages from the app.
) to stop receiving messages from the app.
To stop using Sign In with Apple for this app, tap Stop Using Apple ID and then tap Stop Using in the confirmation dialog box that opens.
Read E-Mail
After you have set up Mail during the initial setup routine, as described in Chapter 1, or by adding other accounts, as explained in Chapter 4, you are ready to send and receive e-mail messages using your iPhone. This section shows you how to read your incoming e-mail messages. You learn to reply to messages and write messages from scratch later in this chapter.
Read E-Mail
Read a Message and View an Attached File
![]() Swipe up from the bottom of the screen.
Swipe up from the bottom of the screen.
The Home screen appears.
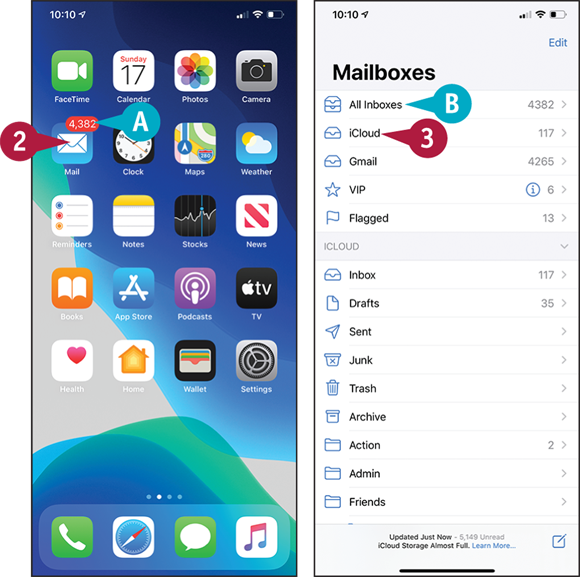
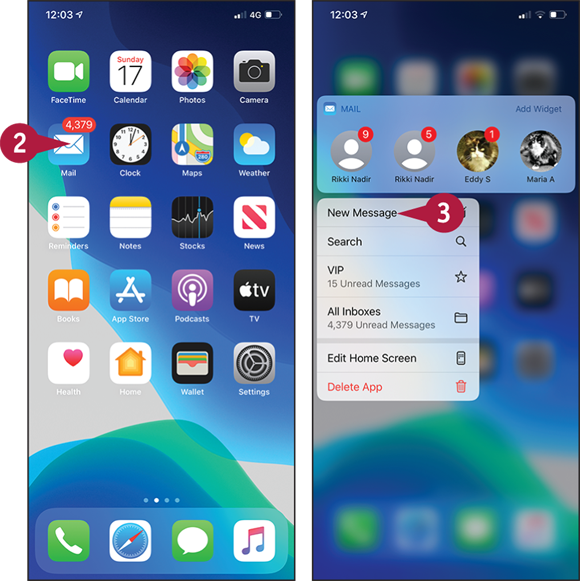
![]() The badge shows the number of unread messages.
The badge shows the number of unread messages.
![]() Tap Mail (
Tap Mail (![]() ).
).
The Mailboxes screen appears.
Note: If Mail does not show the Mailboxes screen, tap Back (![]() ) until the Mailboxes screen appears.
) until the Mailboxes screen appears.
![]() Tap the inbox you want to open.
Tap the inbox you want to open.
![]() To see all your incoming messages together, tap All Inboxes.
To see all your incoming messages together, tap All Inboxes.

![]() A blue dot indicates an unread message.
A blue dot indicates an unread message.
![]() A paperclip icon (
A paperclip icon (![]() ) indicates one or more attachments.
) indicates one or more attachments.
![]() A gold star indicates the message’s sender is one of your VIPs. See the second tip for information about VIPs.
A gold star indicates the message’s sender is one of your VIPs. See the second tip for information about VIPs.
![]() You can tap Filter (
You can tap Filter (![]() ) to filter the messages by Unread status, displaying only unread messages. You can then tap Unread to apply a different filter.
) to filter the messages by Unread status, displaying only unread messages. You can then tap Unread to apply a different filter.
![]() Tap a message.
Tap a message.
The message opens.
![]() You can tap Previous (
You can tap Previous (![]() ) or Next (
) or Next (![]() ) to display another message.
) to display another message.
![]() If the message has an attachment, tap it.
If the message has an attachment, tap it.

The attachment opens in the viewer.
Note: Mail’s viewer can display many types of attached files, but not all files.
Note: If Mail has hidden the controls at the top of the screen, tap the screen to display the controls.
![]() If you want to send the file to an app or share it with others, tap Share (
If you want to send the file to an app or share it with others, tap Share (![]() ).
).
The Share sheet opens.
![]() Tap the means of sharing, such as Copy to Pages (
Tap the means of sharing, such as Copy to Pages (![]() ) for a Word document.
) for a Word document.
![]() Tap Done.
Tap Done.
The message appears again.
Access New Messages Quickly from the Home Screen
![]() Swipe up from the bottom of the screen.
Swipe up from the bottom of the screen.
The Home screen appears.
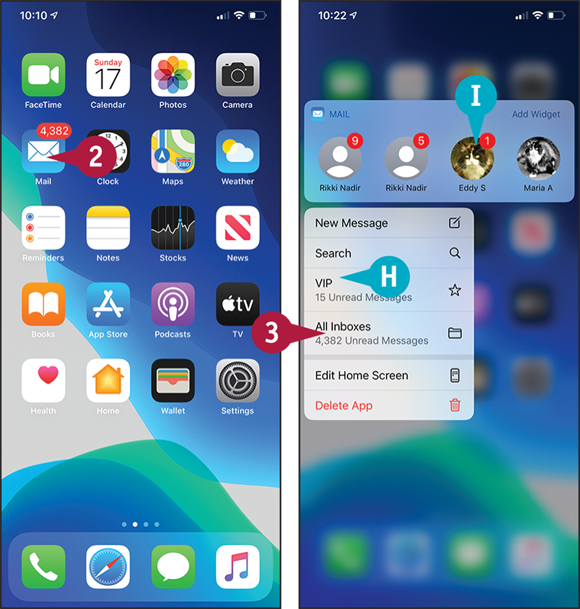
![]() Tap and hold Mail (
Tap and hold Mail (![]() ).
).
The pop-up panel opens.
![]() You can also tap another button, such as VIP.
You can also tap another button, such as VIP.
![]() You can tap a contact whose icon bears a badge to display a new message from that contact.
You can tap a contact whose icon bears a badge to display a new message from that contact.
![]() Tap All Inboxes.
Tap All Inboxes.
The All Inboxes screen appears.
Reply To or Forward an E-Mail Message
Mail makes it easy to reply to an e-mail message or forward it to others. If the message had multiple recipients, you can choose between replying only to the sender of the message and replying to the sender and all the other recipients in the To field and the Cc field, if there are any. Recipients in the message’s Bcc field, whose names you cannot see, do not receive your reply.
Reply To or Forward an E-Mail Message

Open the Message You Will Reply To or Forward
![]() Swipe up from the bottom of the screen.
Swipe up from the bottom of the screen.
The Home screen appears.
![]() Tap Mail (
Tap Mail (![]() ).
).
The Mailboxes screen appears.
Note: When you launch Mail, the app checks for new messages. This is why the number of new messages you see on the Mailboxes screen sometimes differs from the number on the Mail badge on the Home screen.
![]() Tap the inbox you want to see.
Tap the inbox you want to see.

The inbox opens.
![]() Tap the message you want to open.
Tap the message you want to open.
The message opens.
![]() Tap Action (
Tap Action (![]() ).
).
The Action dialog opens.
Note: You can also reply to or forward a message by using Siri. For example, say “Reply to this message” or “Forward this message to Alice Smith,” and then tell Siri what you want the message to say.

Reply To the Message
![]() In the Action dialog, tap Reply.
In the Action dialog, tap Reply.
![]() To reply to all recipients, tap Reply All. Reply to all recipients only when you are sure that they need to receive your reply. Often, it is better to reply only to the sender.
To reply to all recipients, tap Reply All. Reply to all recipients only when you are sure that they need to receive your reply. Often, it is better to reply only to the sender.
A screen containing the reply appears.
![]() Mail automatically adds your signature, if you have one.
Mail automatically adds your signature, if you have one.
![]() Type your reply to the message.
Type your reply to the message.
![]() Tap Send (
Tap Send (![]() ).
).
Mail sends the message.
Forward the Message
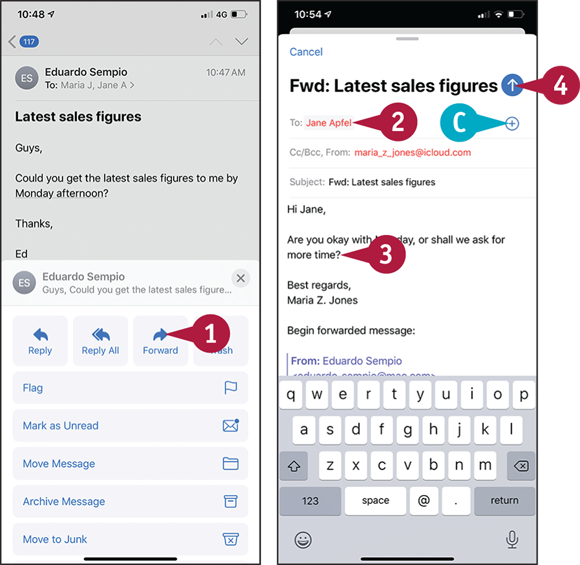
![]() In the Action dialog, tap Forward.
In the Action dialog, tap Forward.
A screen containing the forwarded message appears.
![]() Type the recipient’s address.
Type the recipient’s address.
![]() Alternatively, you can tap Add Contact (
Alternatively, you can tap Add Contact (![]() ) and choose the recipient in your Contacts list.
) and choose the recipient in your Contacts list.
![]() Type a message if needed.
Type a message if needed.
![]() Tap Send (
Tap Send (![]() ).
).
Mail sends the message.
Organize Your Messages in Mailbox Folders
To keep your inbox or inboxes under control, you should organize your messages into mailbox folders.
You can quickly move a single message to a folder after reading it or after previewing it in the message list. Alternatively, you can select multiple messages in your inbox and move them all to a folder in a single action. You can also delete any message you no longer need.
Organize Your Messages in Mailbox Folders
Open Mail and Move a Single Message to a Folder
![]() Swipe up from the bottom of the screen.
Swipe up from the bottom of the screen.
The Home screen appears.
![]() Tap Mail (
Tap Mail (![]() ).
).
The Mailboxes screen appears.
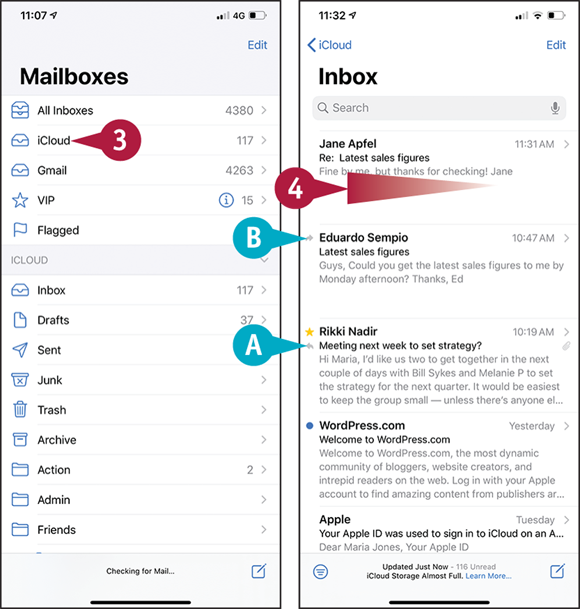
![]() Tap the mailbox you want to open.
Tap the mailbox you want to open.
The mailbox opens.
![]() The Replied arrow (
The Replied arrow (![]() ) indicates you have replied to the message.
) indicates you have replied to the message.
![]() The Forwarded arrow (
The Forwarded arrow (![]() ) indicates you have forwarded the message.
) indicates you have forwarded the message.
![]() Swipe left on the message you want to move.
Swipe left on the message you want to move.

The swipe controls appear.
![]() You can delete the message by tapping Trash (
You can delete the message by tapping Trash (![]() ).
).
![]() Tap More (
Tap More (![]() ).
).
The Action dialog opens.
![]() Tap Move Message.
Tap Move Message.
Note: If the message is from a VIP, the Move Message dialog opens. Tap Move to “Starred” to move the message to the Starred mailbox, or tap Other Mailbox to display the Move This Message to a New Mailbox screen.
The Move This Message to a New Mailbox screen appears.
![]() Tap the mailbox to which you want to move the message.
Tap the mailbox to which you want to move the message.
Mail moves the message.

Move Multiple Messages to a Folder
![]() In the mailbox, tap Edit.
In the mailbox, tap Edit.
![]() Tap the selection button (
Tap the selection button (![]() changes to
changes to ![]() ) next to each message you want to move.
) next to each message you want to move.
![]() Tap Move.
Tap Move.

The Move These Messages to a New Mailbox screen appears.
![]() Tap the destination mailbox.
Tap the destination mailbox.
![]() To move the messages to a mailbox in another account, tap Accounts. On the Accounts screen, tap the appropriate account to display the mailboxes in the account, then tap the destination mailbox.
To move the messages to a mailbox in another account, tap Accounts. On the Accounts screen, tap the appropriate account to display the mailboxes in the account, then tap the destination mailbox.
Note: Mail studies your history of moving messages so it can suggest the folder you may want for a particular message, saving you scrolling through all your folders.
The mailbox appears again, now without the messages you moved.
Write and Send E-Mail Messages
Your iPhone is great for reading and replying to e-mail messages you receive, but you will likely also need to write new messages. When you do, you can use the data in the Contacts app to address your outgoing messages quickly and accurately. If the recipient’s address is not one of your contacts, you can type the address manually.
You can attach one or more files to an e-mail message to send those files to the recipient. This works well for small files, but many mail servers reject files larger than several megabytes in size.
Write and Send E-Mail Messages
![]() Swipe up from the bottom of the screen.
Swipe up from the bottom of the screen.
The Home screen appears.
![]() Tap and hold Mail (
Tap and hold Mail (![]() ).
).
The pop-up panel appears.
![]() Tap New Message (
Tap New Message (![]() ).
).
Note: You can also tap Mail (![]() ) and then tap New Message (
) and then tap New Message (![]() ) to start a new message.
) to start a new message.
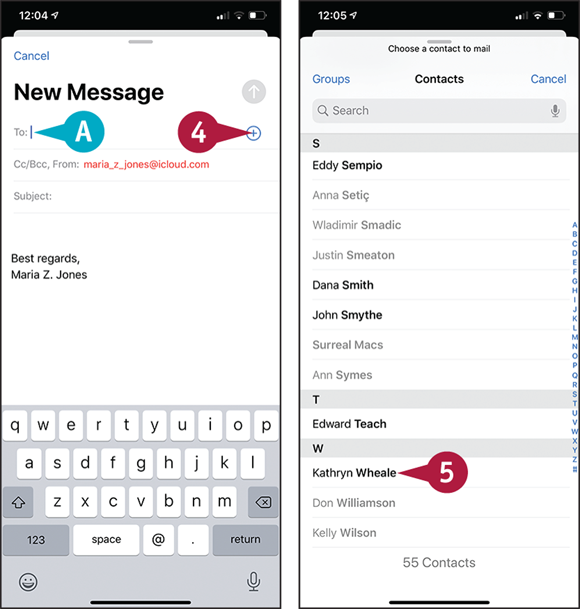
The New Message screen appears.
![]() Tap Add Contact (
Tap Add Contact (![]() ).
).
The Contacts list appears.
Note: If necessary, change the Contacts list displayed by tapping Groups, making your choice on the Groups screen, and then tapping Done.
![]() If the person you are e-mailing is not a contact, type the address in the To area. You can also start typing here and then select a matching contact from the list that the Mail app displays.
If the person you are e-mailing is not a contact, type the address in the To area. You can also start typing here and then select a matching contact from the list that the Mail app displays.
Note: Contacts that appear in gray have no e-mail address.
![]() Tap the contact you want to send the message to.
Tap the contact you want to send the message to.
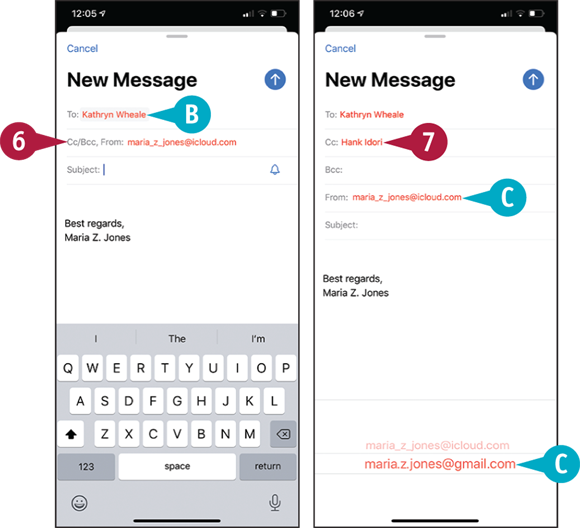
![]() The contact’s name appears in the To area.
The contact’s name appears in the To area.
Note: You can add other contacts to the To area by repeating steps 4 and 5.
![]() If you need to add a Cc or Bcc recipient, tap Cc/Bcc, From.
If you need to add a Cc or Bcc recipient, tap Cc/Bcc, From.
The Cc, Bcc, and From fields expand.
![]() Tap the Cc area or Bcc area, and then follow steps 4 and 5 to add a recipient.
Tap the Cc area or Bcc area, and then follow steps 4 and 5 to add a recipient.
![]() To change the e-mail account you are sending the message from, tap From, and then tap the account to use.
To change the e-mail account you are sending the message from, tap From, and then tap the account to use.
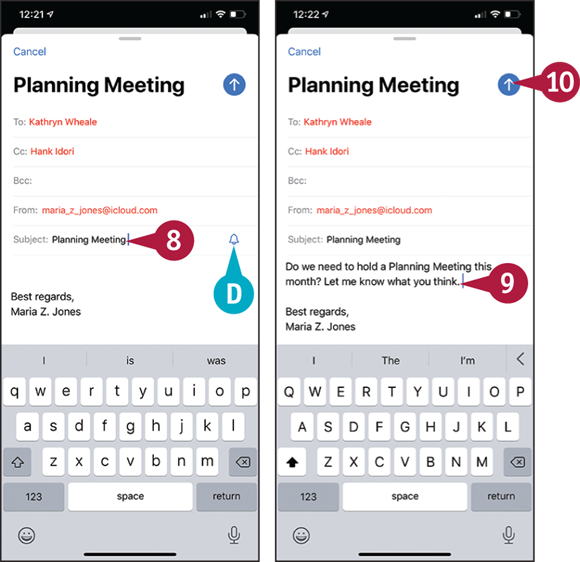
![]() Tap Subject, and then type the message’s subject.
Tap Subject, and then type the message’s subject.
![]() You can tap Notifications (
You can tap Notifications (![]() changes to
changes to ![]() ) to receive notifications when someone responds to the e-mail conversation.
) to receive notifications when someone responds to the e-mail conversation.
![]() Tap below the Subject line, and then type the body of the message.
Tap below the Subject line, and then type the body of the message.
Note: If you need to stop working on a message temporarily, tap its title bar and drag it down to the bottom of the screen. You can then work with other messages. To resume work on the parked message, tap its title bar.
![]() Tap Send.
Tap Send.
Mail sends the message.