
CHAPTER 12
Advanced Features and Troubleshooting

You can connect your iPhone to VPNs and Exchange Server, troubleshoot problems, and locate it when it goes missing. You can also manage your Apple ID.
Take Screenshots or Screen Recordings
Connect Your iPhone to Exchange Server
Extend Your iPhone’s Runtime on the Battery
Back Up and Restore Using Your Computer
Back Up and Restore Using iCloud
Troubleshoot Wi-Fi Connections
Take Screenshots or Screen Recordings
iOS enables you to capture screenshots and screen recordings. A screenshot is a still image that shows whatever appears on the screen and is great for capturing and sharing information easily. A screen recording is a video of what happens on screen and is useful for demonstrating how to take particular actions.
The screenshot functionality uses a keypress and is enabled by default. The screen recording functionality requires you to add the Screen Recording control to Control Center, from which you can then start a screen recording.
Take a Screenshot
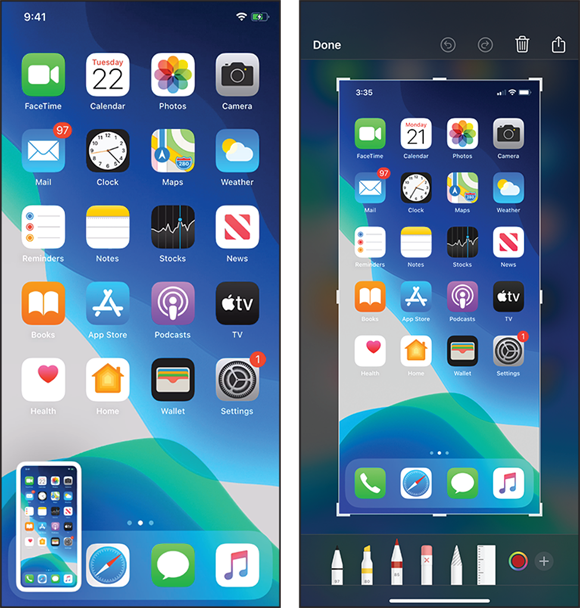
To take a screenshot of what is currently displayed on the screen, press Side and Volume Up at the same time. A miniature version of the screen appears in the lower-left corner of the screen for a few seconds, and then disappears.
If you want to mark up the screenshot immediately, or share it, tap this miniature to open the screenshot for editing. To mark up the screenshot, use the icons at the bottom of the screen. At the top, tap Undo (![]() ) to undo your last action, tap Redo (
) to undo your last action, tap Redo (![]() ) to redo the last action you undid, tap Delete (
) to redo the last action you undid, tap Delete (![]() ) to delete the screenshot, or tap Share (
) to delete the screenshot, or tap Share (![]() ) to share it.
) to share it.
Add the Screen Recording Control to Control Center
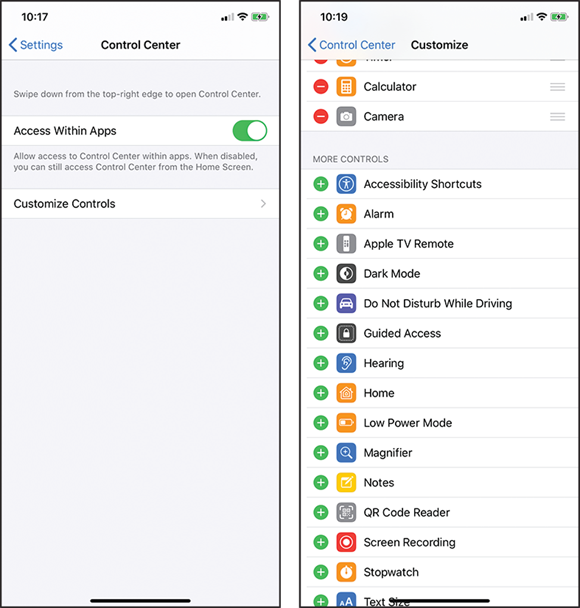
First, you need to add the Screen Recording control to Control Center so that you can access it. This control is not one of the default items in Control Center.
Swipe up to display the Home screen, and then tap Settings (![]() ) to display the Settings screen. Tap Control Center (
) to display the Settings screen. Tap Control Center (![]() ) to display the Control Center screen, and then tap Customize Controls to display the Customize screen.
) to display the Control Center screen, and then tap Customize Controls to display the Customize screen.
In the More Controls section, tap Add (![]() ) to the left of Screen Recording. The Screen Recording icon appears in the Include list at the top of the Customize screen.
) to the left of Screen Recording. The Screen Recording icon appears in the Include list at the top of the Customize screen.
Start a Screen Recording

Swipe down from the upper-right corner of the screen to display Control Center. Tap Screen Recording (![]() ). A 3-second countdown timer starts. Swipe up from the bottom of the screen to close Control Center unless you want to record it. A red Stop button (
). A 3-second countdown timer starts. Swipe up from the bottom of the screen to close Control Center unless you want to record it. A red Stop button (![]() ) appears briefly in the upper-left corner of the screen in place of the clock readout. The red button then displays the clock readout.
) appears briefly in the upper-left corner of the screen in place of the clock readout. The red button then displays the clock readout.
Perform the actions you want to record. When you finish, tap the clock readout (![]() ) to open the Screen Recording dialog, and then tap Stop.
) to open the Screen Recording dialog, and then tap Stop.
Watch a Screen Recording
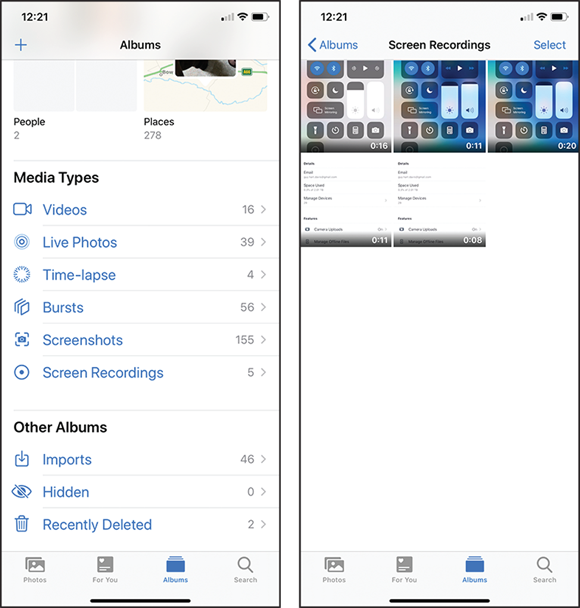
After you end a screen recording, a banner appears telling you that iOS has saved the screen recording. You can tap this banner to display the screen recording in the Photos app.
To open the screen recording later, swipe up to display the Home screen, and tap Photos (![]() ). In the Photos app, tap Albums (
). In the Photos app, tap Albums (![]() changes to
changes to ![]() ), and then tap Screen Recording (
), and then tap Screen Recording (![]() ) to display the screen recordings.
) to display the screen recordings.
Tap the screen recording you want to play back.
Connect to a Network via VPN
Virtual private networking, or VPN, enables you to connect your iPhone securely to a network across the Internet. For example, you can connect to a network at your workplace.
You can use VPN on your iPhone in two ways. First, you can create a VPN connection in the Settings app, as shown on these pages. Second, you can use a dedicated app supplied by a commercial VPN provider.
Connect to a Network via VPN
Set Up the VPN Connection on the iPhone
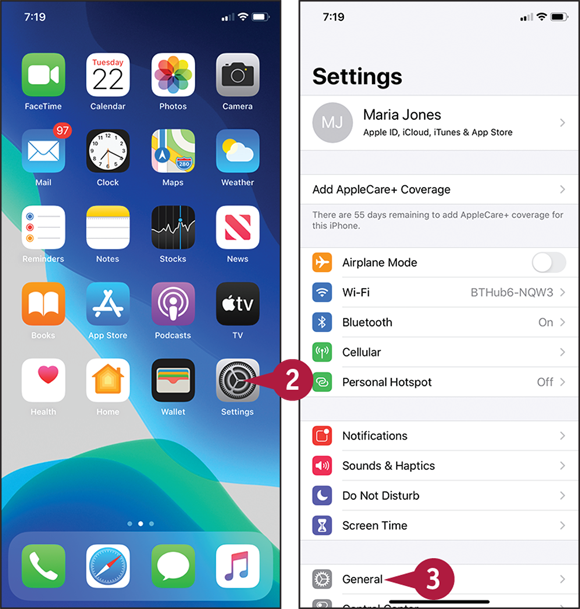
![]() Swipe up from the bottom of the screen.
Swipe up from the bottom of the screen.
The Home screen appears.
![]() Tap Settings (
Tap Settings (![]() ).
).
The Settings screen appears.
Note: After you have set up a VPN configuration, the VPN switch appears in the top section of the Settings screen. You can connect to the currently selected virtual private network by setting the switch to On (![]() changes to
changes to ![]() ).
).
![]() Tap General (
Tap General (![]() ).
).
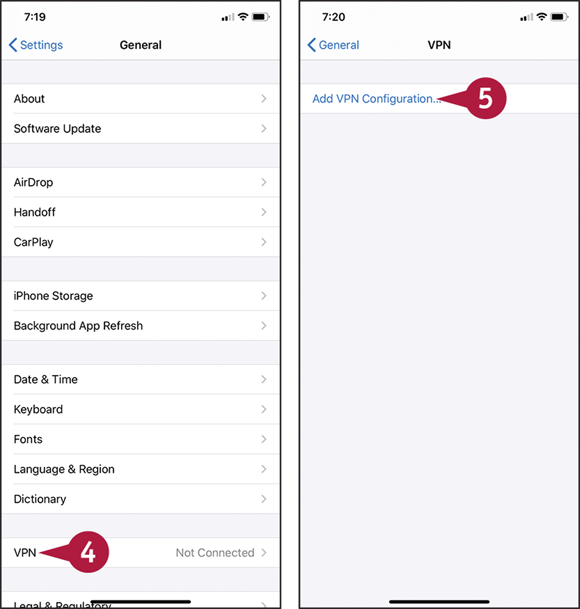
The General screen appears.
![]() Toward the bottom of the screen, tap VPN.
Toward the bottom of the screen, tap VPN.
The VPN screen appears.
![]() Tap Add VPN Configuration.
Tap Add VPN Configuration.
Note: If your iPhone already has a VPN configuration you want to use, tap it, and then go to step 1 of the next set of steps, “Connect to the Virtual Private Network.”
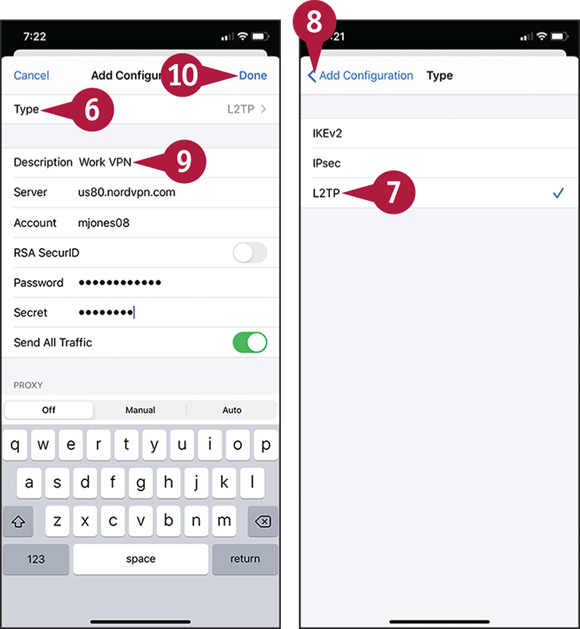
The Add Configuration screen appears.
![]() Tap Type.
Tap Type.
The Type screen appears.
![]() Tap the VPN type: IKEv2, IPSec, or L2TP.
Tap the VPN type: IKEv2, IPSec, or L2TP.
![]() Tap Add Configuration (
Tap Add Configuration (![]() ).
).
The Add Configuration screen appears again.
![]() Fill in the details of the virtual private network.
Fill in the details of the virtual private network.
Note: Set the Send All Traffic switch to On (![]() ) if you want your iPhone to send all Internet traffic across the virtual private network after you connect.
) if you want your iPhone to send all Internet traffic across the virtual private network after you connect.
![]() Tap Done.
Tap Done.
The VPN configuration appears on the VPN screen.
Connect to the Virtual Private Network
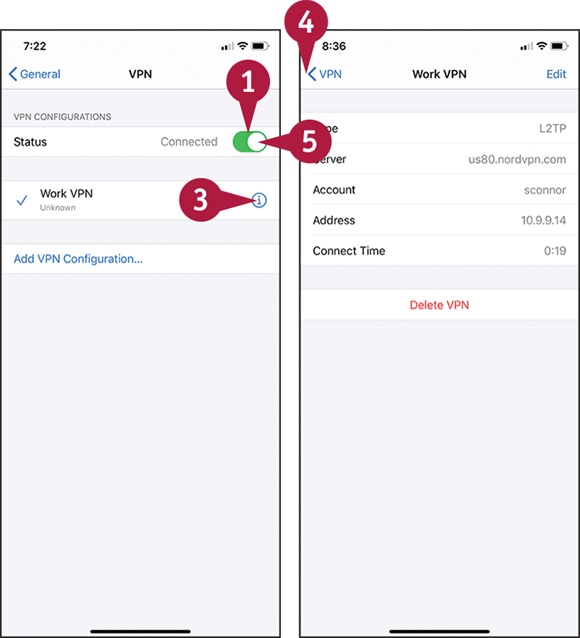
![]() On the VPN screen, set the Status switch to On (
On the VPN screen, set the Status switch to On (![]() changes to
changes to ![]() ).
).
The iPhone connects to the virtual private network.
![]() Work across the network connection as if you were connected directly to the network.
Work across the network connection as if you were connected directly to the network.
![]() To see how long your iPhone has been connected, or to learn its IP address, tap Information (
To see how long your iPhone has been connected, or to learn its IP address, tap Information (![]() ).
).
![]() Tap VPN (
Tap VPN (![]() ) to return to the VPN screen.
) to return to the VPN screen.
![]() When you are ready to disconnect from the virtual private network, set the Status switch to Off (
When you are ready to disconnect from the virtual private network, set the Status switch to Off (![]() changes to
changes to ![]() ).
).
Connect Your iPhone to Exchange Server
You can set up your iPhone to connect to Exchange Server or Office 365 for e-mail, contacts, calendaring, reminders, and notes. You can use either the built-in Mail app, as shown here, or Microsoft’s Outlook app.
Ask an administrator for the Exchange connection details you need: your e-mail address, your password, the server name if required, and the domain name if required. You may be able to set up the account using only the e-mail address and password, but often you need the server name and domain as well.
Connect Your iPhone to Exchange Server
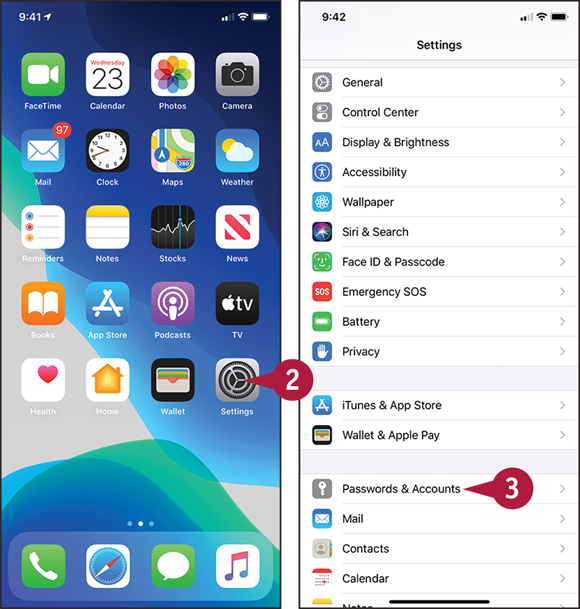
![]() Swipe up from the bottom of the screen.
Swipe up from the bottom of the screen.
The Home screen appears.
![]() Tap Settings (
Tap Settings (![]() ).
).
The Settings screen appears.
Note: If you have not yet set up an e-mail account on the iPhone, you can also open the Add Account screen by tapping Mail (![]() ) on the iPhone’s Home screen.
) on the iPhone’s Home screen.
![]() Tap Passwords & Accounts (
Tap Passwords & Accounts (![]() ).
).
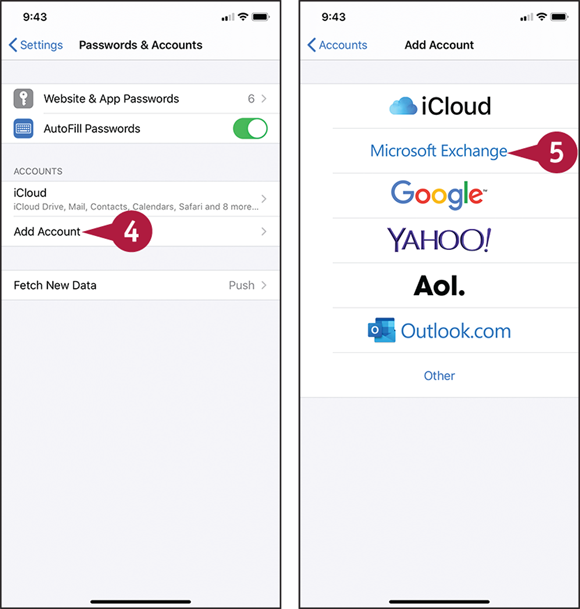
The Passwords & Accounts screen appears.
![]() Tap Add Account.
Tap Add Account.
The Add Account screen appears.
![]() Tap Microsoft Exchange.
Tap Microsoft Exchange.
Note: You can also set up an Exchange account using a configuration profile file that an administrator provides.
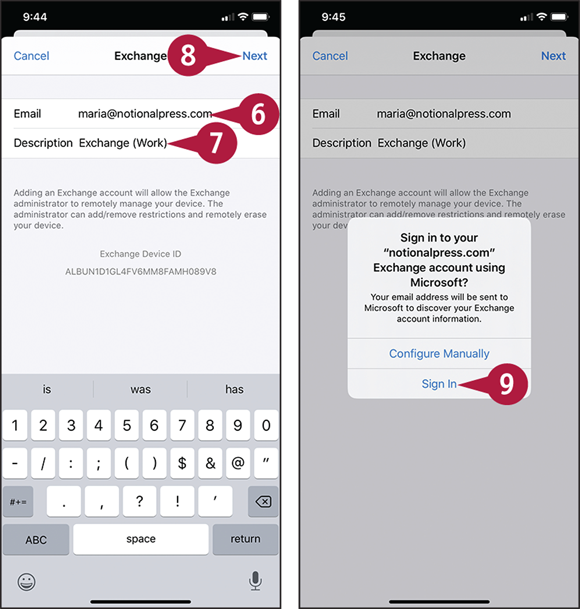
The Exchange screen appears.
![]() Type your e-mail address. As usual, you can tap and hold the period key to enter frequently used domains, such as .com and .org.
Type your e-mail address. As usual, you can tap and hold the period key to enter frequently used domains, such as .com and .org.
![]() Type a descriptive name for the account field. The default name is Exchange.
Type a descriptive name for the account field. The default name is Exchange.
![]() Tap Next.
Tap Next.
The Sign In to Your Exchange Account Using Microsoft? dialog opens.
![]() Tap Sign In.
Tap Sign In.
A password screen appears.
![]() Enter your password.
Enter your password.
![]() Tap Sign In.
Tap Sign In.
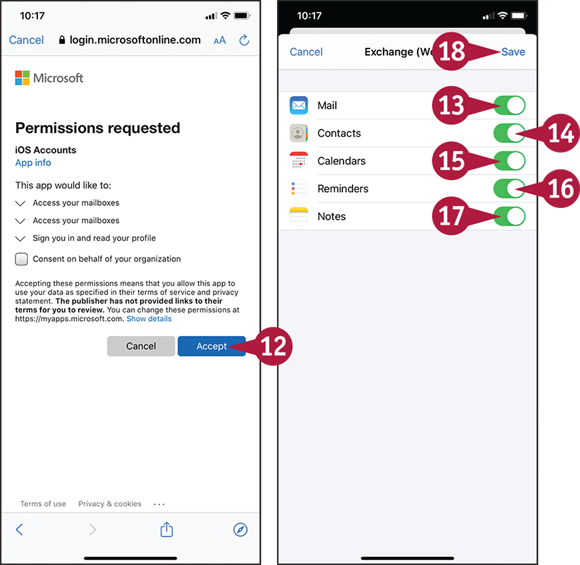
The Permissions Requested screen appears.
![]() Read the permissions, and then tap Accept if you want to proceed.
Read the permissions, and then tap Accept if you want to proceed.
Note: Tap Consent on Behalf of Your Organization (![]() changes to
changes to ![]() ) only if you are an administrator.
) only if you are an administrator.
The Exchange screen appears.
![]() Set the Mail switch to On (
Set the Mail switch to On (![]() ) or Off (
) or Off (![]() ).
).
![]() Set the Contacts switch to On (
Set the Contacts switch to On (![]() ) or Off (
) or Off (![]() ).
).
![]() Set the Calendars switch to On (
Set the Calendars switch to On (![]() ) or Off (
) or Off (![]() ).
).
![]() Set the Reminders switch to On (
Set the Reminders switch to On (![]() ) or Off (
) or Off (![]() ).
).
![]() Set the Notes switch to On (
Set the Notes switch to On (![]() ) or Off (
) or Off (![]() ).
).
![]() Tap Save.
Tap Save.
The new account appears on the Mail screen.
Update Your iPhone’s Software
Apple frequently releases new versions of the iPhone’s software to fix problems, improve performance, and add new features. To keep your iPhone running quickly and smoothly, and to add any new features, update its software when a new version becomes available.
The easiest way to update your iPhone’s software is directly on the iPhone. If you use your computer to manage your iPhone, you can also perform the update using your computer.
Update Your iPhone’s Software
Update Your iPhone’s Software on the iPhone
![]() Swipe up from the bottom of the screen.
Swipe up from the bottom of the screen.
The Home screen appears.
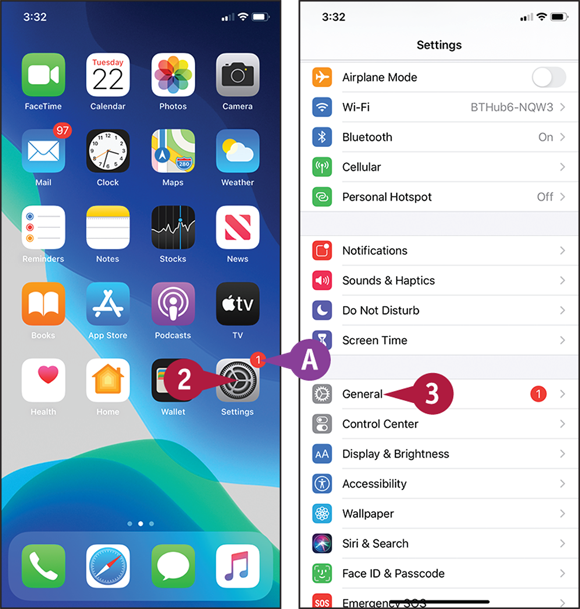
![]() The badge on the Settings icon indicates that a Settings notification is waiting for you. Often, this means an update is available.
The badge on the Settings icon indicates that a Settings notification is waiting for you. Often, this means an update is available.
![]() Tap Settings (
Tap Settings (![]() ).
).
The Settings screen appears.
![]() Tap General (
Tap General (![]() ).
).

The General screen appears.
![]() Tap Software Update.
Tap Software Update.
The Software Update screen appears.
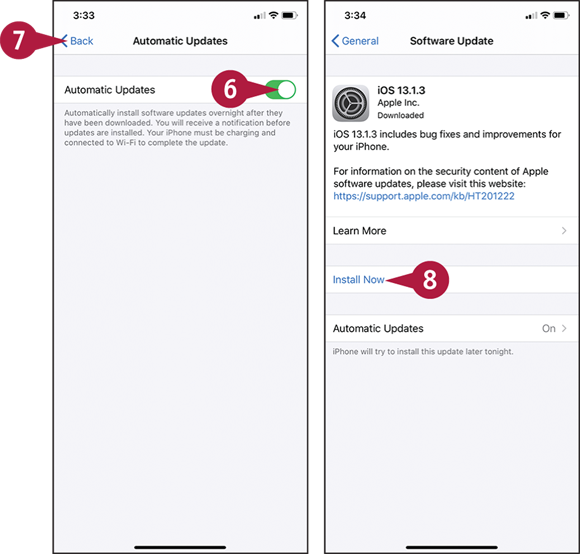
![]() If Automatic Updates is set to Off, tap Automatic Updates.
If Automatic Updates is set to Off, tap Automatic Updates.
If Automatic Updates is set to On, go to step 8.
The Automatic Updates screen appears.
![]() Set the Automatic Updates switch to On (
Set the Automatic Updates switch to On (![]() ).
).
![]() Tap Back (
Tap Back (![]() ).
).
The Software Update screen appears again.
![]() Tap Install Now.
Tap Install Now.
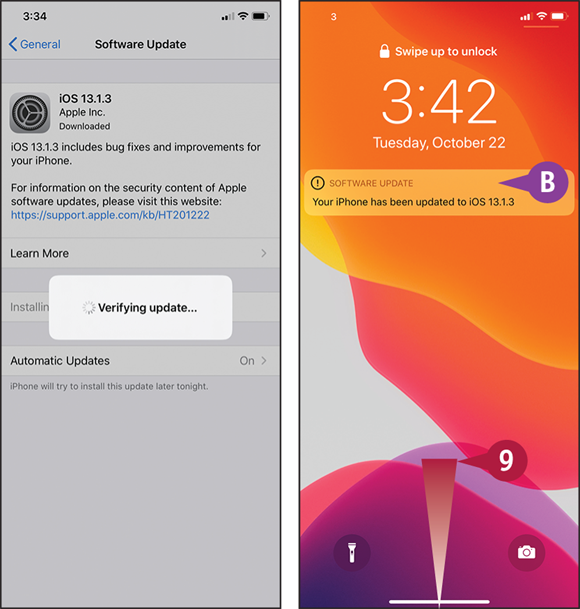
The installation of the update begins.
After iOS verifies the update and installs the files, your iPhone restarts.
![]() A Software Update banner confirms that your iPhone has been updated.
A Software Update banner confirms that your iPhone has been updated.
![]() Swipe up from the bottom of the screen to unlock the iPhone.
Swipe up from the bottom of the screen to unlock the iPhone.
You will need to enter your passcode to sign in following the restart.
Extend Your iPhone’s Runtime on the Battery
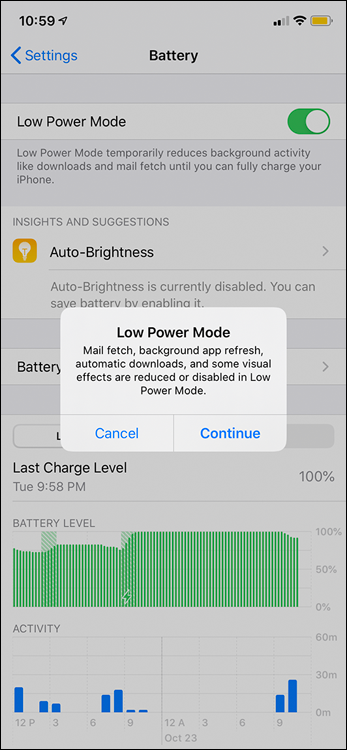
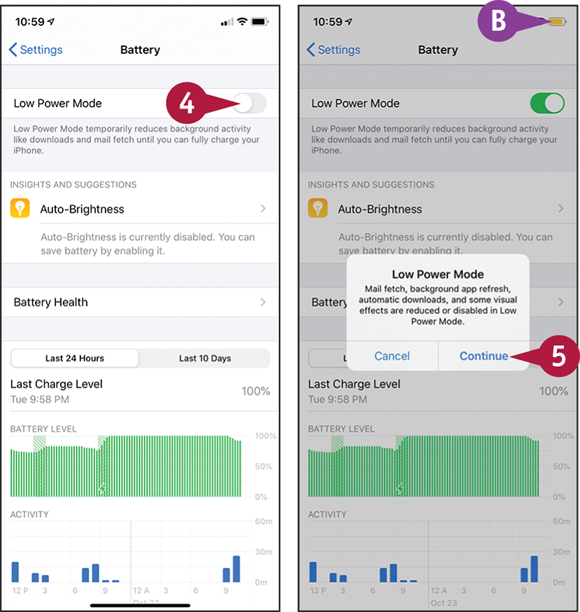
To extend your iPhone’s runtime on the battery, you can reduce the power usage by dimming the screen; turning off Wi-Fi, Bluetooth, and cellular data when you do not need them; and setting your iPhone to go to sleep quickly. When the battery reaches 20 percent power, your iPhone prompts you to turn on Low Power Mode, which disables background app refreshing, slows down the processor, and turns off some demanding graphical features. You can also enable Low Power Mode manually anytime you want.
Extend Your iPhone’s Runtime on the Battery
Dim the Screen
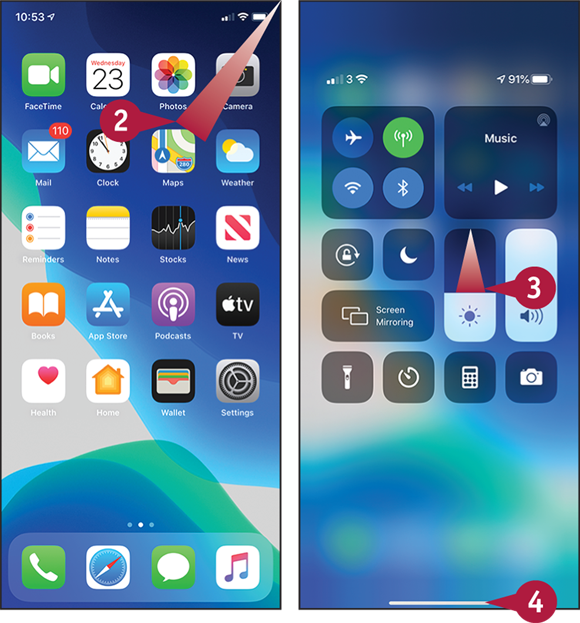
![]() Swipe up from the bottom of the screen.
Swipe up from the bottom of the screen.
The Home screen appears.
![]() Swipe down from the upper-right corner of the screen.
Swipe down from the upper-right corner of the screen.
Control Center opens.
![]() Swipe down the Brightness control.
Swipe down the Brightness control.
The screen brightness decreases.
![]() Tap the bar at the bottom of the screen.
Tap the bar at the bottom of the screen.
Control Center closes.

Turn Off Wi-Fi, Bluetooth, and Cellular Data
![]() Swipe up from the bottom of the screen.
Swipe up from the bottom of the screen.
The Home screen appears.
![]() Swipe down from the upper-right corner of the screen.
Swipe down from the upper-right corner of the screen.
Control Center opens.
![]() You can turn off all communications by tapping Airplane Mode (
You can turn off all communications by tapping Airplane Mode (![]() changes to
changes to ![]() ).
).
![]() To turn off Wi-Fi, tap Wi-Fi (
To turn off Wi-Fi, tap Wi-Fi (![]() changes to
changes to ![]() ).
).
![]() To turn off Bluetooth, tap Bluetooth (
To turn off Bluetooth, tap Bluetooth (![]() changes to
changes to ![]() ).
).
![]() To turn off cellular data, tap Cellular Data (
To turn off cellular data, tap Cellular Data (![]() changes to
changes to ![]() ).
).
![]() Tap the bar at the bottom of the screen.
Tap the bar at the bottom of the screen.
Control Center closes.

Turn On Low Power Mode Manually
![]() Swipe up from the bottom of the screen.
Swipe up from the bottom of the screen.
The Home screen appears.
![]() Tap Settings (
Tap Settings (![]() ).
).
The Settings screen appears.
![]() Tap Battery (
Tap Battery (![]() ).
).
The Battery screen appears.
![]() Set the Low Power Mode switch to On (
Set the Low Power Mode switch to On (![]() changes to
changes to ![]() ).
).
The first time you set the Low Power Mode switch to On, the Low Power Mode dialog opens.
![]() Tap Continue.
Tap Continue.
Your iPhone enables Low Power Mode.
![]() The battery icon appears yellow to indicate that the iPhone is using Low Power Mode.
The battery icon appears yellow to indicate that the iPhone is using Low Power Mode.
Note: For quick access to Low Power Mode, add its icon to Control Center. From the Home screen, tap Settings (![]() ), tap Control Center (
), tap Control Center (![]() ), and then tap Customize Controls. On the Customize screen, tap Add (
), and then tap Customize Controls. On the Customize screen, tap Add (![]() ) to the left of Low Power Mode.
) to the left of Low Power Mode.
Back Up and Restore Using Your Computer
When you sync your iPhone with your computer, Finder or iTunes automatically backs up the iPhone’s data and settings, unless you have chosen to back up your iPhone to iCloud instead. You can also run a backup manually as explained here.
If your iPhone suffers a software or hardware failure, you can use Finder or iTunes to restore the data and settings to your iPhone or to a new iPhone, an iPad, or an iPod touch. You must turn off the Find My iPhone feature before restoring your iPhone.
Back Up and Restore Using Your Computer
Back Up Your iPhone
![]() Connect your iPhone to your computer via the USB cable or via Wi-Fi.
Connect your iPhone to your computer via the USB cable or via Wi-Fi.
The iPhone appears in the Sidebar in Finder on macOS Catalina or on the navigation bar in iTunes on earlier macOS versions of Windows.
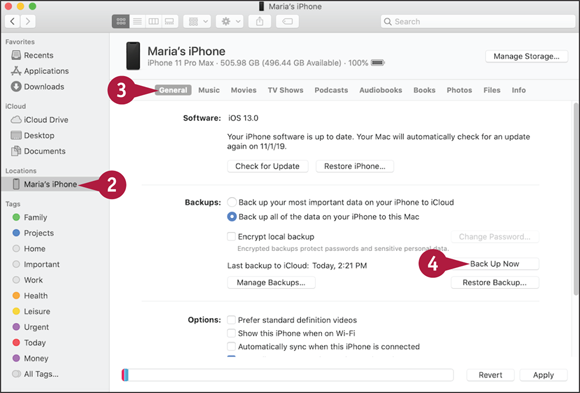
![]() Click iPhone (
Click iPhone (![]() ) in the Sidebar or on the navigation bar.
) in the Sidebar or on the navigation bar.
The iPhone’s management screens appear.
![]() On macOS Catalina, click General to display the General screen. On earlier macOS or Windows, click Summary to display the Summary screen.
On macOS Catalina, click General to display the General screen. On earlier macOS or Windows, click Summary to display the Summary screen.
![]() Click Back Up Now.
Click Back Up Now.
iTunes backs up your iPhone.
Turn Off the Find My iPhone Feature on Your iPhone
![]() Swipe up from the bottom of the screen.
Swipe up from the bottom of the screen.
The Home screen appears.
![]() Tap Settings (
Tap Settings (![]() ).
).
The Settings screen appears.
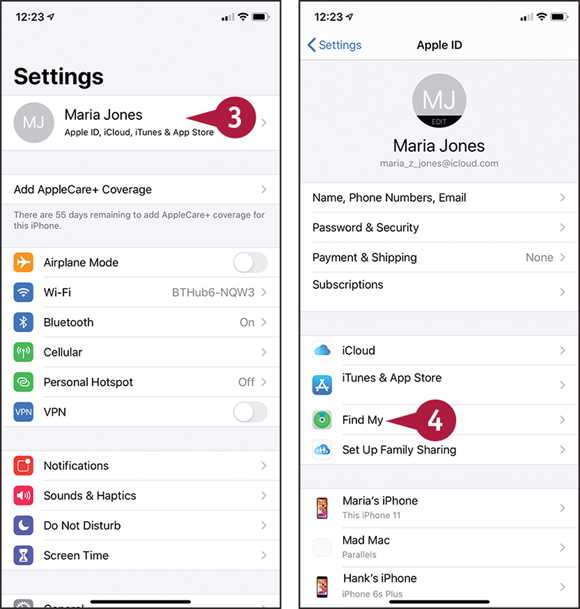
![]() Tap Apple ID, the button bearing your Apple ID name.
Tap Apple ID, the button bearing your Apple ID name.
The Apple ID screen appears.
![]() Tap Find My (
Tap Find My (![]() ) to display the Find My screen.
) to display the Find My screen.
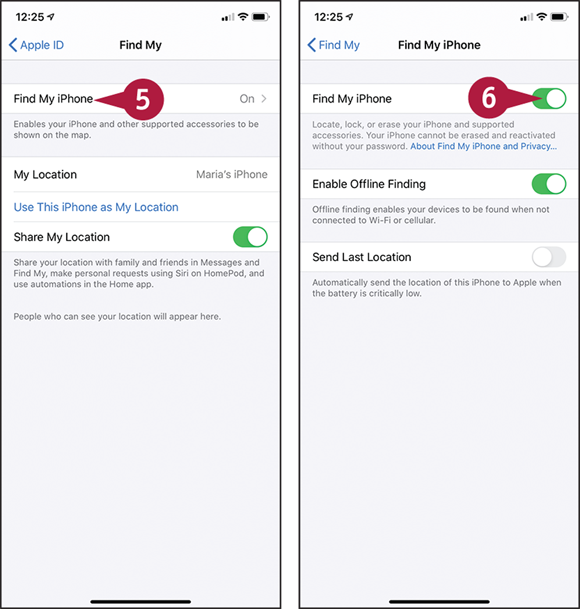
![]() Tap Find My iPhone (
Tap Find My iPhone (![]() ).
).
The Find My iPhone screen appears.
![]() Set the Find My iPhone switch to Off (
Set the Find My iPhone switch to Off (![]() changes to
changes to ![]() ).
).
The Apple ID Password dialog opens.
![]() Type the password for your Apple ID.
Type the password for your Apple ID.
![]() Tap Turn Off.
Tap Turn Off.
The iPhone turns off the Find My iPhone feature.

Restore Your iPhone
![]() On the General screen in Finder or the Summary screen in iTunes, click Restore iPhone.
On the General screen in Finder or the Summary screen in iTunes, click Restore iPhone.
A dialog asks you to confirm that you want to restore the iPhone to its factory settings.
![]() Click Restore or Restore and Update, depending on which button appears.
Click Restore or Restore and Update, depending on which button appears.
Finder or iTunes backs up the iPhone’s data, restores the software on the iPhone, and returns the iPhone to its factory settings.
Note: Do not disconnect the iPhone during the restore process. Doing so can leave the iPhone in an unusable state.
![]() On the Welcome to Your New Phone screen, click Restore from this backup (
On the Welcome to Your New Phone screen, click Restore from this backup (![]() changes to
changes to ![]() ).
).
![]() Click
Click ![]() and choose your iPhone by name.
and choose your iPhone by name.
![]() Click Continue.
Click Continue.
Finder or iTunes restores the data and settings to your iPhone.
Your iPhone restarts, appears in Finder or iTunes, and then syncs.
![]() Disconnect the iPhone.
Disconnect the iPhone.
Back Up and Restore Using iCloud
Instead of backing up your iPhone to your computer, you can back it up to iCloud, preferably via Wi-Fi, but optionally — if you have a generous data plan — via the cellular network. If your iPhone suffers a software or hardware failure, you can restore its data and settings from backup.
You can choose which items to back up to iCloud. You do not need to back up apps, media files, or games you have bought from the iTunes Store, because you can download them again.
Back Up and Restore Using iCloud
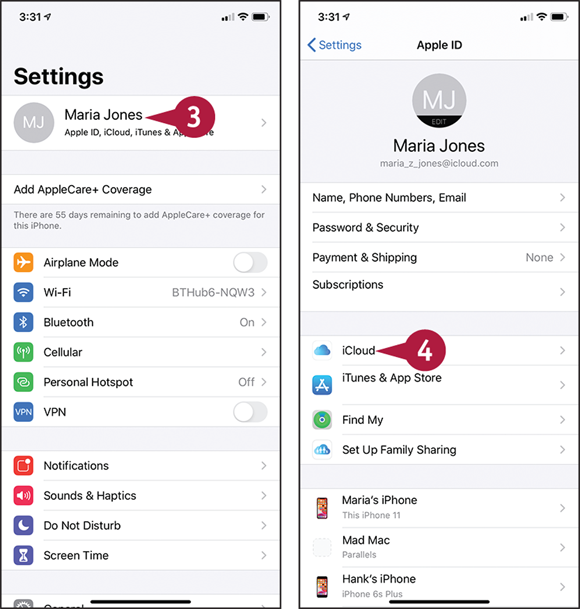
![]() Swipe up from the bottom of the screen.
Swipe up from the bottom of the screen.
The Home screen appears.
![]() Tap Settings (
Tap Settings (![]() ).
).
The Settings screen appears.
![]() Tap Apple ID, the button bearing your Apple ID name.
Tap Apple ID, the button bearing your Apple ID name.
The Apple ID screen appears.
![]() Tap iCloud (
Tap iCloud (![]() ).
).
Note: The 5GB of storage in a standard free iCloud account is enough space to store your iPhone’s settings and your most important data and files.
The iCloud screen appears.
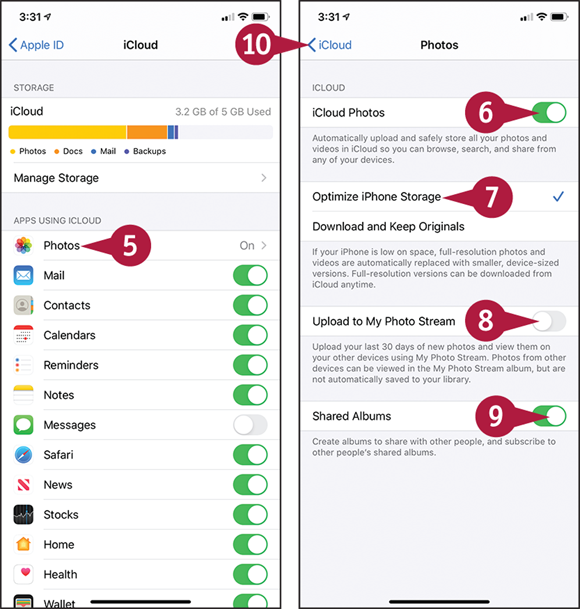
![]() Tap Photos.
Tap Photos.
The Photos screen appears.
![]() Set the iCloud Photos switch to On (
Set the iCloud Photos switch to On (![]() ) if you want to store all your photos in iCloud.
) if you want to store all your photos in iCloud.
![]() If you enable iCloud Photos, tap Optimize iPhone Storage or Download and Keep Originals, as needed.
If you enable iCloud Photos, tap Optimize iPhone Storage or Download and Keep Originals, as needed.
![]() Set the Upload to My Photo Stream switch to On (
Set the Upload to My Photo Stream switch to On (![]() ) if you want to upload all your new photos.
) if you want to upload all your new photos.
![]() Set the Shared Albums switch to On (
Set the Shared Albums switch to On (![]() ) if you want to share albums with others via iCloud.
) if you want to share albums with others via iCloud.
![]() Tap iCloud (
Tap iCloud (![]() ).
).
The iCloud screen appears again.
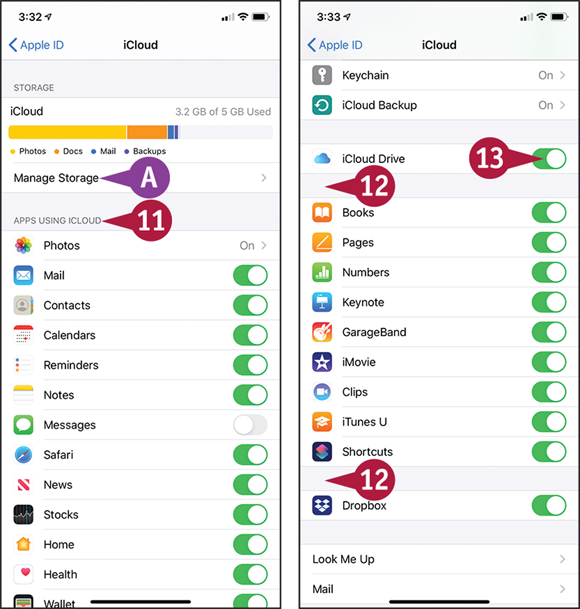
![]() If you need more storage space, tap Manage Storage to display the iCloud Storage screen, and then tap Change Storage Plan.
If you need more storage space, tap Manage Storage to display the iCloud Storage screen, and then tap Change Storage Plan.
![]() In the Apps Using iCloud section, set each app’s switch to On (
In the Apps Using iCloud section, set each app’s switch to On (![]() ) or Off (
) or Off (![]() ), as needed.
), as needed.
![]() In the nameless lower sections, set each app’s switch to On (
In the nameless lower sections, set each app’s switch to On (![]() ) or Off (
) or Off (![]() ), as needed.
), as needed.
![]() Set the iCloud Drive switch to On (
Set the iCloud Drive switch to On (![]() ).
).
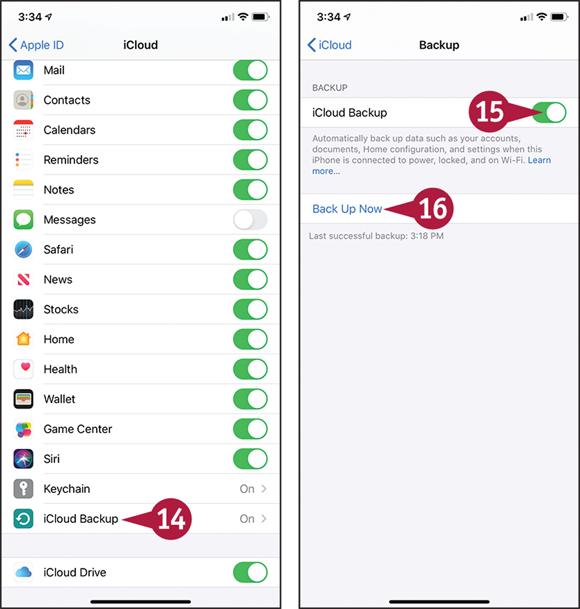
![]() At the bottom of the Apps Using iCloud section, tap iCloud Backup (
At the bottom of the Apps Using iCloud section, tap iCloud Backup (![]() ).
).
The Backup screen appears.
![]() Set the iCloud Backup switch to On (
Set the iCloud Backup switch to On (![]() ).
).
![]() If you want to back up your iPhone now, tap Back Up Now.
If you want to back up your iPhone now, tap Back Up Now.
Your iPhone begins backing up its contents to iCloud.
Reset Your iPhone’s Settings
If your iPhone malfunctions, you can reset its network settings, reset the Home screen’s icons, reset your keyboard dictionary, reset your location and privacy settings, or reset all settings to eliminate tricky configuration issues. If your iPhone has intractable problems, you can back it up, erase all content and settings, and then set it up from scratch. You can also erase your iPhone before selling or giving it to someone else; you must turn off Find My iPhone first.
Reset Your iPhone’s Settings
Display the Reset Screen
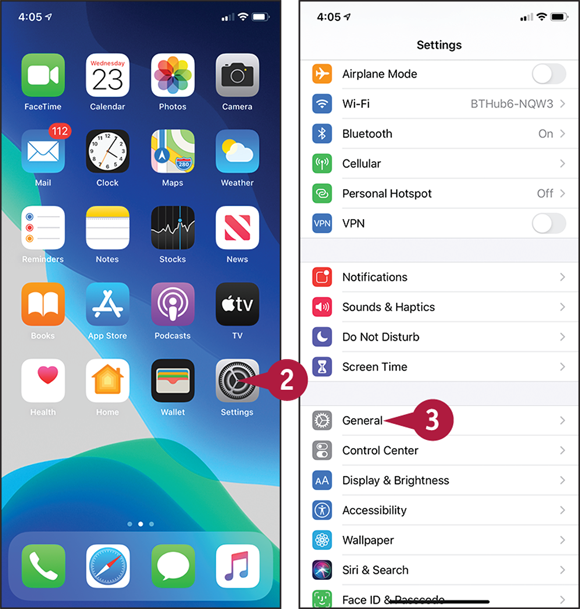
![]() Swipe up from the bottom of the screen.
Swipe up from the bottom of the screen.
The Home screen appears.
![]() Tap Settings (
Tap Settings (![]() ).
).
The Settings screen appears.
Note: If your iPhone is not responding to the Home button or your taps, press and hold the Sleep/Wake button and Home for about 15 seconds to reset the iPhone.
![]() Tap General (
Tap General (![]() ).
).

The General screen appears.
![]() Tap Reset.
Tap Reset.
The Reset screen appears.
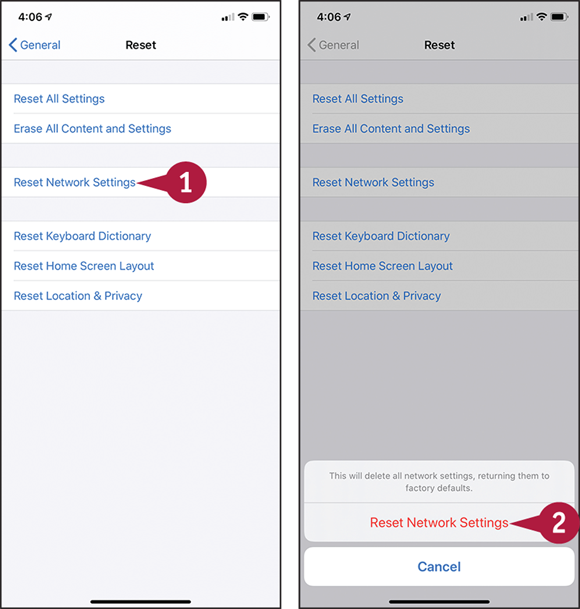
You can then tap the appropriate button: Reset All Settings, Erase All Content and Settings, Reset Network Settings, Reset Keyboard Dictionary, Reset Home Screen Layout, or Reset Location & Privacy.
Reset Your Network Settings
![]() On the Reset screen, tap Reset Network Settings.
On the Reset screen, tap Reset Network Settings.
Note: If your iPhone prompts you to enter your passcode at this point, do so.
A dialog opens, warning you that this action will delete all network settings and return them to their factory defaults.
![]() Tap Reset Network Settings.
Tap Reset Network Settings.
iOS resets your iPhone's network settings.

Restore Your iPhone to Factory Settings
Note: If you intend to sell or give away your iPhone, turn off Find My iPhone before restoring your iPhone to factory settings. See the second tip.
![]() On the Reset screen, tap Erase All Content and Settings.
On the Reset screen, tap Erase All Content and Settings.
Note: Enter your passcode if prompted to do so.
Note: If iOS prompts you to update your iCloud backup before erasing, tap Backup Then Erase. If you have backed up just now, tap Erase Now instead.
![]() Tap Erase iPhone.
Tap Erase iPhone.
![]() Tap Erase iPhone.
Tap Erase iPhone.
iOS wipes your media and data and restores your iPhone to factory settings.
Troubleshoot Wi-Fi Connections
To avoid exceeding your data plan, use Wi-Fi networks whenever they are available instead of using your cellular connection.
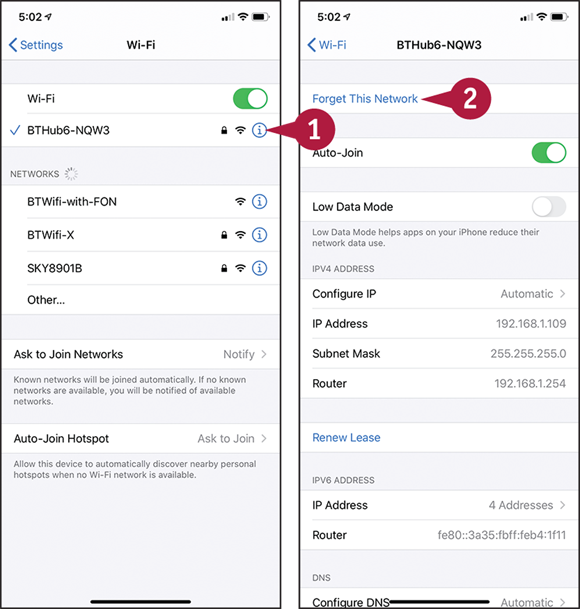
Normally, the iPhone automatically reconnects to Wi-Fi networks to which you have previously connected it and maintains those connections without problems. But you may sometimes need to request your iPhone’s network address again, a process called renewing the lease on the IP address. You may also need to tell your iPhone to forget a network, and then rejoin the network manually, providing the password again.
Troubleshoot Wi-Fi Connections
Renew the Lease on Your iPhone’s IP Address
![]() Swipe up from the bottom of the screen.
Swipe up from the bottom of the screen.
The Home screen appears.
Note: You can sometimes resolve a Wi-Fi problem by turning Wi-Fi off and back on. Swipe diagonally down from the upper-right corner of the screen to open Control Center, tap Wi-Fi (![]() changes to
changes to ![]() ), and then tap Wi-Fi again (
), and then tap Wi-Fi again (![]() changes to
changes to ![]() ).
).
![]() Tap Settings (
Tap Settings (![]() ).
).
The Settings screen appears.
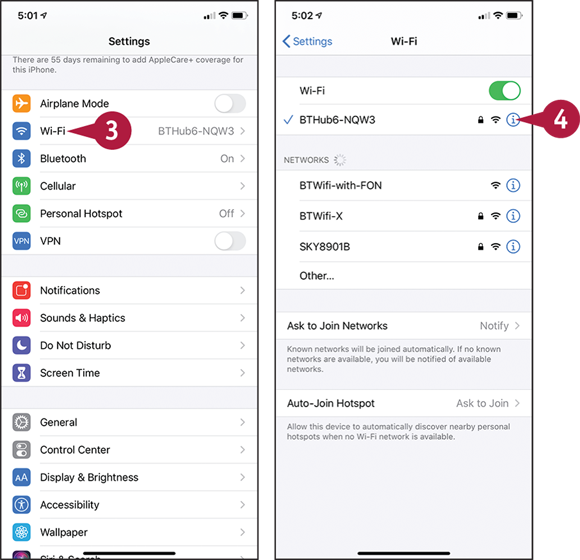
![]() Tap Wi-Fi (
Tap Wi-Fi (![]() ).
).
The Wi-Fi screen appears.
![]() Tap Information (
Tap Information (![]() ) to the right of the network for which you want to renew the lease.
) to the right of the network for which you want to renew the lease.
The network’s screen appears.
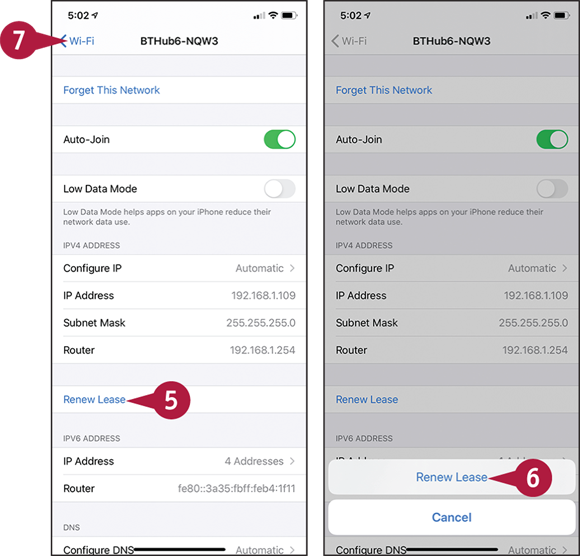
![]() Tap Renew Lease.
Tap Renew Lease.
The Renew Lease dialog opens.
![]() Tap Renew Lease.
Tap Renew Lease.
![]() Tap Wi-Fi (
Tap Wi-Fi (![]() ).
).
The Wi-Fi screen appears.
Forget a Network and Then Rejoin It
![]() On the Wi-Fi screen, tap Information (
On the Wi-Fi screen, tap Information (![]() ) to the right of the network.
) to the right of the network.
The network’s screen appears.
![]() Tap Forget This Network.
Tap Forget This Network.
Note: If turning Wi-Fi off and then back on does not resolve a Wi-Fi problem, try turning Airplane Mode on briefly and then turning it off again. Swipe down from the upper-right corner of the screen to open Control Center, tap Airplane Mode (![]() changes to
changes to ![]() ), and then tap Airplane Mode again (
), and then tap Airplane Mode again (![]() changes to
changes to ![]() ).
).
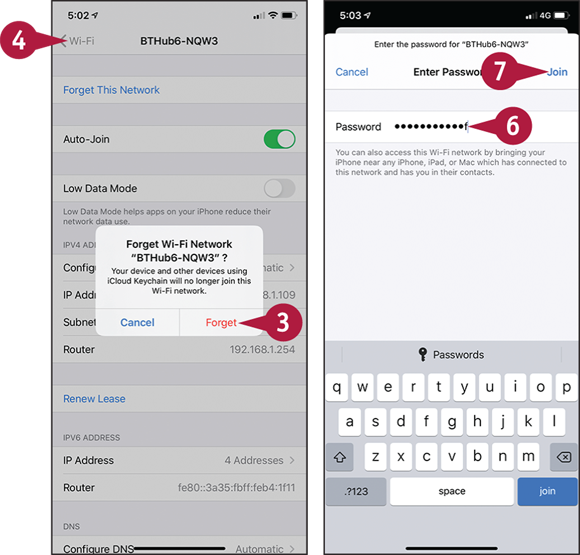
The Forget Wi-Fi Network dialog opens.
![]() Tap Forget.
Tap Forget.
The iPhone removes the network’s details.
![]() Tap Wi-Fi (
Tap Wi-Fi (![]() ).
).
The Wi-Fi screen appears.
![]() Tap the network’s name.
Tap the network’s name.
The Enter Password screen appears.
![]() Type the password for the network.
Type the password for the network.
![]() Tap Join.
Tap Join.
The iPhone joins the network.
Locate Your iPhone with Find My iPhone
If you have an iCloud account, you can use the Find My iPhone feature to locate your iPhone if it has been lost or stolen. You can also display a message on the iPhone — for example, to tell the finder how to contact you — or remotely wipe the data on the iPhone.
To use Find My iPhone, you must first set up your iCloud account on your iPhone, and then enable the Find My iPhone feature. Normally, you perform both actions while first setting up your iPhone.
Locate Your iPhone with Find My iPhone

Turn On the Find My iPhone Feature
![]() Set up your iCloud account on your iPhone as discussed in “Set Up and Activate Your iPhone” in Chapter 1.
Set up your iCloud account on your iPhone as discussed in “Set Up and Activate Your iPhone” in Chapter 1.
Note: You may have turned on the Find My iPhone feature when setting up your iCloud account.
![]() Swipe up from the bottom of the screen.
Swipe up from the bottom of the screen.
The Home screen appears.
![]() Tap Settings (
Tap Settings (![]() ).
).
The Settings screen appears.
![]() Tap Apple ID, the button that bears your Apple ID name.
Tap Apple ID, the button that bears your Apple ID name.
The Apple ID screen appears.
![]() Tap Find My (
Tap Find My (![]() ).
).

The Find My screen appears.
![]() Tap Find My iPhone (
Tap Find My iPhone (![]() ).
).
The Find My iPhone screen appears.
![]() Set the Find My iPhone switch to On (
Set the Find My iPhone switch to On (![]() ).
).
![]() Set the Enable Offline Finding switch to On (
Set the Enable Offline Finding switch to On (![]() ).
).
![]() Set the Send Last Location switch to On (
Set the Send Last Location switch to On (![]() ) if you want your iPhone to send Apple its location when the battery runs critically low.
) if you want your iPhone to send Apple its location when the battery runs critically low.
Locate Your iPhone Using Find My iPhone
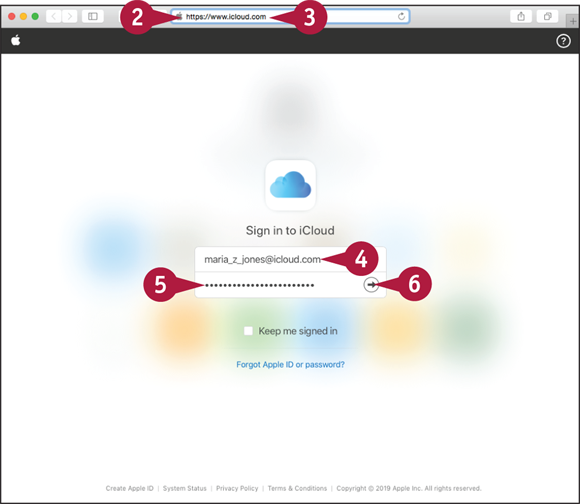
![]() On a computer, open a web browser, such as Microsoft Edge, Internet Explorer, Chrome, or Safari.
On a computer, open a web browser, such as Microsoft Edge, Internet Explorer, Chrome, or Safari.
Note: On an iOS device, use the Find My app to locate a missing iPhone. You cannot use an Android device.
![]() Click the Address box.
Click the Address box.
![]() Type
Type www.icloud.com and press ![]() in Windows or
in Windows or ![]() on a Mac.
on a Mac.
The Sign in to iCloud web page appears.
![]() Type your username.
Type your username.
![]() Type your password.
Type your password.
![]() Click Sign In (
Click Sign In (![]() ).
).
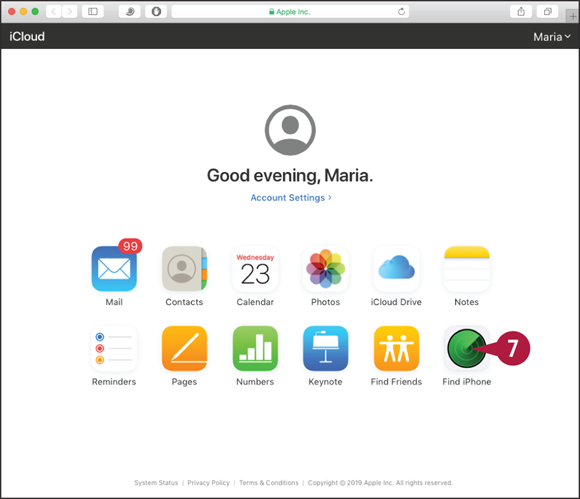
The iCloud site appears, displaying either the Home page or the page you last used.
Note: If you have set up two-step verification on your Apple ID, the Verify Your Identity screen may appear. Click the device to use for verification, and then enter the code sent to the device on the Enter Verification Code screen. In the Trust This Browser? dialog that opens, click Trust or Don’t Trust, as appropriate.
Note: If iCloud displays a page other than the Home page, click iCloud and then click Find My iPhone (![]() ) on the pop-up panel. Go to step 8.
) on the pop-up panel. Go to step 8.
![]() Click Find iPhone (
Click Find iPhone (![]() ).
).
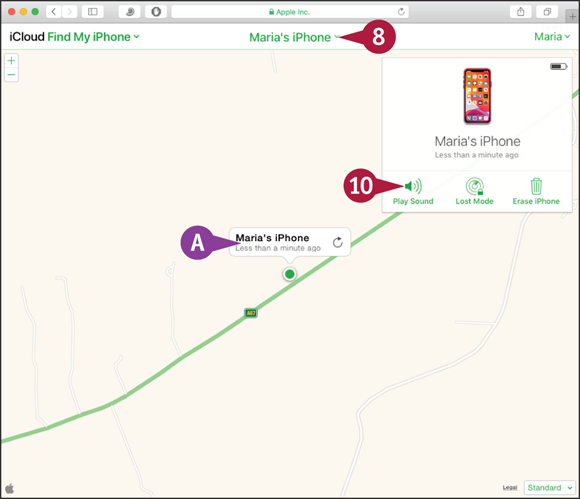
Find My iPhone is a powerful feature you can use when your iPhone goes missing.
If Find My iPhone reveals someone has taken your iPhone, you can wipe its contents to prevent anyone from hacking into your data. However, know that wiping your iPhone prevents you from locating the iPhone again — ever — except by chance. Wipe your iPhone only when you have lost it, you have no hope of recovering it, and you must destroy the data on it.
The iCloud Find My iPhone screen appears.
Click the pop-up menu at the top. Normally, this shows All Devices at first.
The My Devices pop-up panel appears.
Click your iPhone.
![]() Your iPhone’s location appears.
Your iPhone’s location appears.
The Info dialog appears, showing when the iPhone was last located.
If you want to play a sound on the iPhone, click Play Sound (![]() ). This feature is primarily helpful for locating your iPhone if you have mislaid it somewhere nearby.
). This feature is primarily helpful for locating your iPhone if you have mislaid it somewhere nearby.
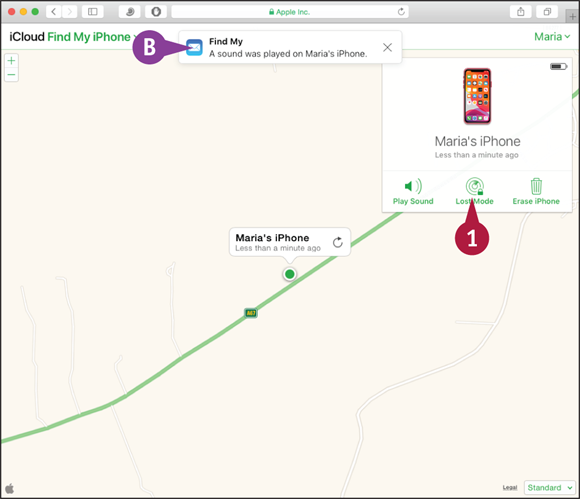
![]() A message indicates that the iPhone has played the sound.
A message indicates that the iPhone has played the sound.
Lock the iPhone with a Passcode
![]() Click Lost Mode (
Click Lost Mode (![]() ) in the Info dialog.
) in the Info dialog.
The Lost Mode dialog appears, prompting you to enter a phone number where you can be reached.
![]() Optionally, click Number and type the number.
Optionally, click Number and type the number.
![]() Click Next.
Click Next.
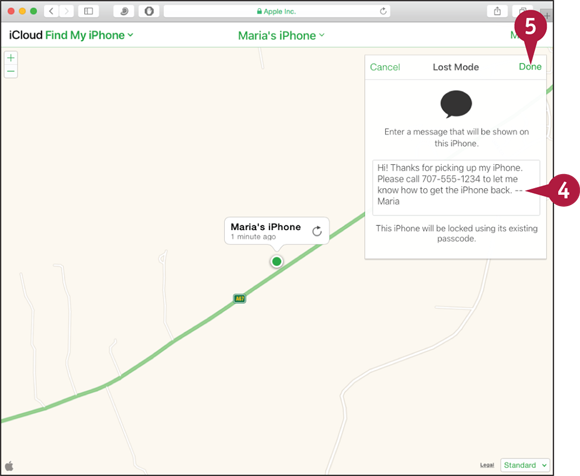
The Lost Mode dialog prompts you to enter a message.
![]() Type a message to whoever finds your iPhone.
Type a message to whoever finds your iPhone.
![]() Click Done.
Click Done.
iCloud sends the lock request to the iPhone, which locks itself.
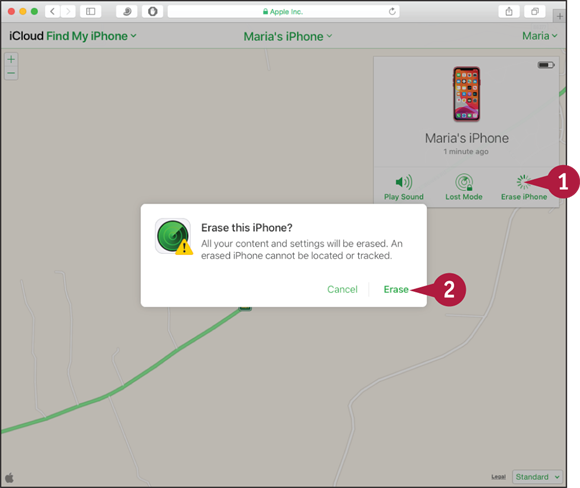
Remotely Erase Your iPhone
![]() Click Erase iPhone (
Click Erase iPhone (![]() ) in the Info dialog.
) in the Info dialog.
The Erase This iPhone? dialog opens.
Note: If this iPhone is the last trusted device for your Apple ID, the Erase Last Trusted Device? dialog opens instead of the Erase This iPhone? dialog. Read the warning about having to use your Recovery Key to access your Apple ID. If you are sure you want to erase the iPhone, click Erase.
![]() Click Erase.
Click Erase.
iCloud sends the erase request to the iPhone, which erases its data.
Manage Your Apple ID
Your iPhone uses your Apple ID for authentication and authorization. Using the Apple ID screen in the Settings app, you can review your Apple ID information and change it if necessary. For example, you may need to change your display name, add a payment method or shipping address, or verify that two-factor authentication is enabled for security. You can also edit the phone numbers and e-mail addresses at which you are reachable via iMessage and FaceTime.
Manage Your Apple ID
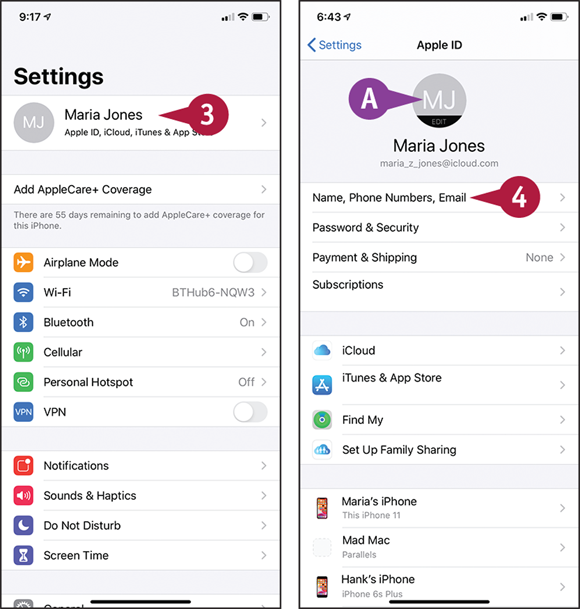
![]() Swipe up from the bottom of the screen to display the Home screen.
Swipe up from the bottom of the screen to display the Home screen.
![]() Tap Settings (
Tap Settings (![]() ) to display the Settings screen.
) to display the Settings screen.
![]() Tap Apple ID, the button that shows your Apple ID name, to display the Apple ID screen.
Tap Apple ID, the button that shows your Apple ID name, to display the Apple ID screen.
![]() To add a photo or update an existing photo, tap the account icon. In the Photo dialog that opens, tap Take Photo or Choose Photo, as appropriate, and then follow the prompts.
To add a photo or update an existing photo, tap the account icon. In the Photo dialog that opens, tap Take Photo or Choose Photo, as appropriate, and then follow the prompts.
Note: At the bottom of the Apple ID screen is a Sign Out button that you can tap to sign out of your account.
![]() Tap Name, Phone Numbers, Email.
Tap Name, Phone Numbers, Email.
Note: If the Sign In to iCloud dialog opens, type your password and then tap OK.
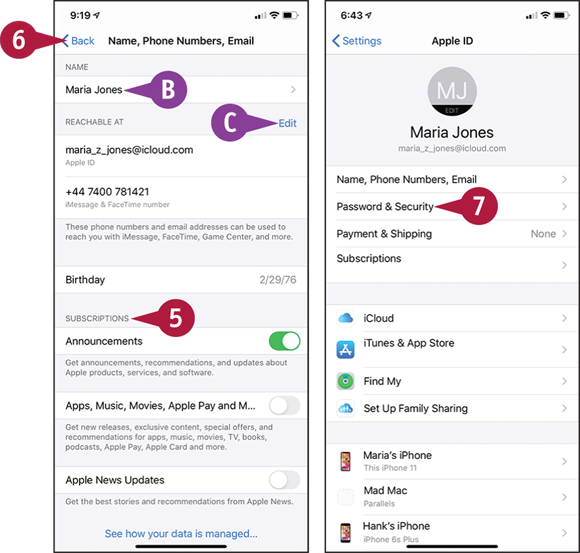
The Name, Phone Numbers, Email screen appears.
![]() You can tap Name and edit your name.
You can tap Name and edit your name.
![]() You can add phone numbers and e-mail addresses to the Reachable At list by tapping Edit and then tapping Add Email or Phone Number.
You can add phone numbers and e-mail addresses to the Reachable At list by tapping Edit and then tapping Add Email or Phone Number.
![]() In the Subscriptions section, set the switches to On (
In the Subscriptions section, set the switches to On (![]() ) or Off (
) or Off (![]() ) to control which messages you receive.
) to control which messages you receive.
![]() Tap Back (
Tap Back (![]() ).
).
The Apple ID screen appears again.
![]() Tap Password & Security.
Tap Password & Security.
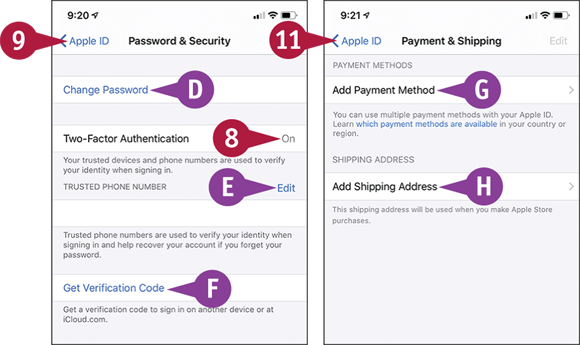
The Password & Security screen appears.
![]() You can tap Change Password and follow the prompts to change your Apple ID password.
You can tap Change Password and follow the prompts to change your Apple ID password.
![]() Verify that the Two-Factor Authentication button shows On. If not, follow the prompts to enable two-factor authentication.
Verify that the Two-Factor Authentication button shows On. If not, follow the prompts to enable two-factor authentication.
![]() You can tap Edit and then change your trusted phone numbers.
You can tap Edit and then change your trusted phone numbers.
![]() You can tap Get Verification Code to get a code for signing in on another device or at iCloud.com.
You can tap Get Verification Code to get a code for signing in on another device or at iCloud.com.
![]() Tap Apple ID (
Tap Apple ID (![]() ).
).
The Apple ID screen appears.
![]() Tap Payment & Shipping.
Tap Payment & Shipping.
The Payment & Shipping screen appears.
![]() You can tap Add Payment Method to add a payment method.
You can tap Add Payment Method to add a payment method.
![]() You can tap Add Shipping Address to add a shipping address.
You can tap Add Shipping Address to add a shipping address.
![]() Tap Apple ID (
Tap Apple ID (![]() ).
).
The Apple ID screen appears.
![]() Tap the button for your iPhone.
Tap the button for your iPhone.
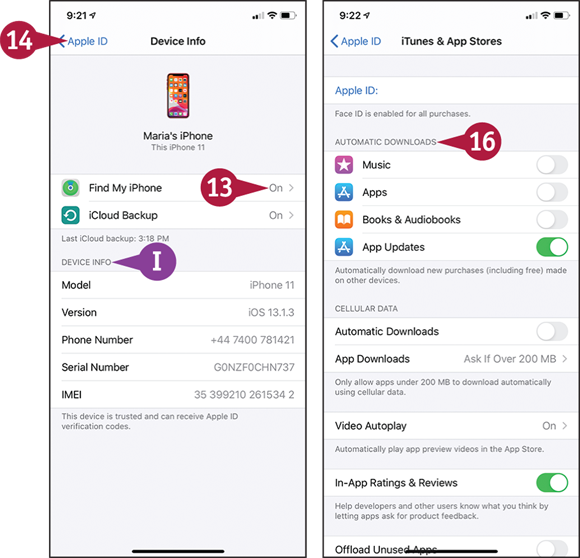
The Device Info screen appears.
![]() Verify that the Find My iPhone button shows On. If not, tap Find My iPhone and set the Find My iPhone switch to On (
Verify that the Find My iPhone button shows On. If not, tap Find My iPhone and set the Find My iPhone switch to On (![]() ).
).
![]() You can view your phone’s details.
You can view your phone’s details.
![]() Tap Apple ID (
Tap Apple ID (![]() ).
).
The Apple ID screen appears.
![]() Tap iTunes & App Stores.
Tap iTunes & App Stores.
The iTunes & App Stores screen appears.
![]() In the Automatic Downloads area, set each switch to On (
In the Automatic Downloads area, set each switch to On (![]() ) or Off (
) or Off (![]() ), as needed.
), as needed.