
Chapter 8. Copying Motion as ActionScript 3.0
Flash CS4 Professional features an interesting tool, introduced in
Flash CS3, that helps bridge the gap between programmed and timeline-based
animation. Available from the Timeline panel, this feature facilitates
collaboration between designers and developers by converting timeline tweens
and keyframe settings into ActionScript 3.0 code, and sometimes a flexible
XML-based format used by the new Animator
class. The ActionScript involved is generated automatically. This
feature lets a designer use traditional animation techniques, complete with
motion guides and easing, to provide sophisticated motion templates that a
developer can harness to program animation for any number of additional
objects, even in separate FLA files.
Copying Motion
Imagine a project in which three photos are each required to respond visually to a mouse click. The photos are expected to start small, and then increase in size and rotate slightly while easing to a stop. Ideally, this motion should include a bit of blur along the y-axis. The developer assigned to this project is perfectly comfortable writing the necessary ActionScript, but doesn’t have a stylistic sense of how the motion should ultimately be conveyed. Conversely, the designer on this project is thoroughly comfortable finessing the motion, but doesn’t know the first thing about code. How can these team members combine their efforts?
The clear answer is to make use of the authoring tool’s Copy Motion as ActionScript 3.0 feature, which can capture the following characteristics of a motion tween:
Position
Scale
Skew
Rotation
Transformation point
Color
Blend mode
Orientation to path
Scale
Cache as bitmap setting
Frame labels
Motion guides
Custom easing
Filters
Flash CS4 now gives you two distinct tweening models. The new approach, which works in conjunction with the new Motion Editor panel, generates property arrays of motion tween data on a frame-by-frame basis. The old approach—familiar to longtime Flash users and now known as a classic tween—translates keyframe data alone into an XML format that’s less dense, relatively speaking, and easier to modify by direct code manipulation.
Because the Copy Motion as ActionScript 3.0 feature is a marriage of timeline- and code-based tweening, this chapter pays tribute to the wedding rhyme “something old, something new,” and picks the best of both worlds to achieve its goal.
In this imaginary team setting, the designer gets the project rolling—for starters, with the new tweening model—and then hands off the motion data to the developer. You can follow along by playing both roles.
In a new ActionScript 3.0 FLA file, use the Rectangle tool to draw an approximately 300 × 400 pixel rectangle on the stage.
Convert the rectangle to a movie clip symbol named
standin, with its registration point in the center, and then position it just above the lower middle edge of the stage. Use the Free Transform tool to resize the movie clip to approximately 25 percent of its actual size (Figure 8-1).In the Timeline, select frame 20, and then add a new frame (Insert→Timeline→Frame) to produce a span of frames. Flash’s new tweening model creates property keyframes for you. Right-click (Ctrl-click) anywhere inside the span of frames, and then select Create Motion Tween. This action sets the current layer apart as a Motion Tween layer, so you can take advantage of the new Motion Editor panel to configure tween characteristics.
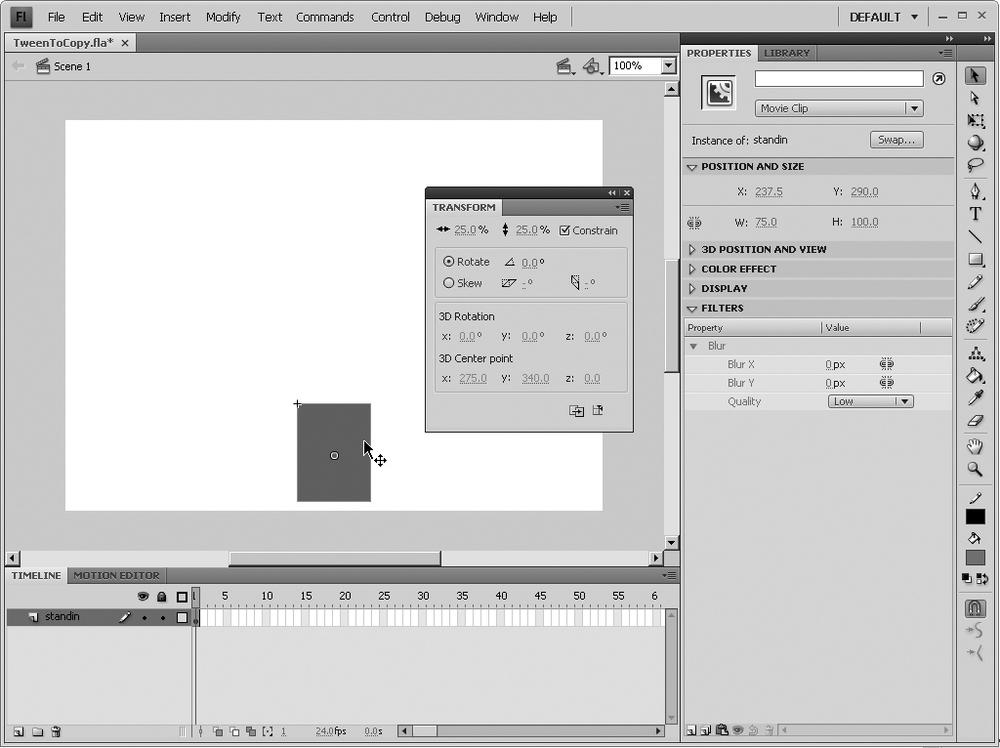
Select frame 20. This step indicates your intent to apply changes to that frame. Now select the movie clip, and then use the Free Transform tool to resize the movie clip’s dimensions to approximately 80 percent. Make sure to rotate the rectangle as described in the hypothetical project requirements (for example, apply a 15-degree rotation) and reposition the movie clip up toward the top of the stage.
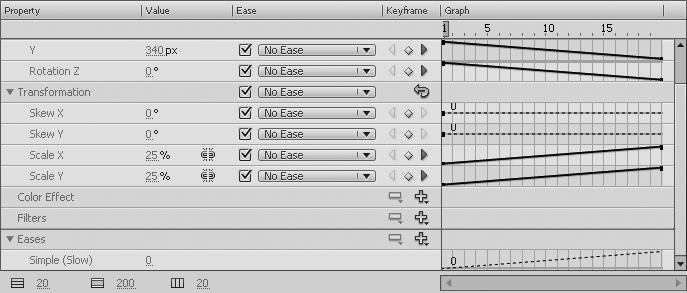
Open the Motion Editor panel by clicking its tab or selecting Window→Motion Editor. Note the three hot text values along the bottom-left corner (Figure 8-2). Hover over these to see a tooltip of their names: Graph Size, Expanded Graph Size, and Viewable Frames. These hot text values adjust the settings of the property graphs inside the Motion Editor panel. Click and hold over the number for Viewable Frames. While holding down the mouse button, slide the mouse left and right to adjust the number. As you do, note that the number of visible frames in the Motion Editor panel’s graphs update to match. Set the Viewable Frames value to 20, to show the full number of frames in your tween span.
Scrub the playhead—that is, drag the playhead back and forth—to assess your work. As you do, note that a yellow diamond appears in the graphs’ Keyframe column when the playhead encounters a property keyframe. This is an
 Add or Remove Keyframe button, which does what its name describes.
Drag the playhead to frame 1.
Add or Remove Keyframe button, which does what its name describes.
Drag the playhead to frame 1.Scroll vertically if necessary to locate the Filters. Click the
 Add Color, Filter, or Ease button, and then select Blur. Change the
default Blur X and Blur Y values to 0, and then drag the playhead to
frame 13. Add a keyframe to the Blur Y row by clicking the Add
Keyframe button or right-clicking (Ctrl-clicking) the curve and
choosing Add Keyframe from the context menu. Change the Blur Y value
to 40 at this new keyframe. Finally, drag the playhead to frame 20,
add another keyframe to the Blur Y row, and then, in that last
keyframe, change the Blur Y value to 0 again.
Add Color, Filter, or Ease button, and then select Blur. Change the
default Blur X and Blur Y values to 0, and then drag the playhead to
frame 13. Add a keyframe to the Blur Y row by clicking the Add
Keyframe button or right-clicking (Ctrl-clicking) the curve and
choosing Add Keyframe from the context menu. Change the Blur Y value
to 40 at this new keyframe. Finally, drag the playhead to frame 20,
add another keyframe to the Blur Y row, and then, in that last
keyframe, change the Blur Y value to 0 again.Select the Timeline—not in the Motion Editor panel, but the panel labeled Timeline—and then click the Motion Tween layer to select it. Use the Property inspector’s Ease hot text to apply an ease of 100. If you like, scrub the playhead again or press Enter (Return) to preview the animation with the easing. When you’re satisfied, right-click (Ctrl-click) inside the span of frames, and then select Copy Motion as ActionScript 3.0.
Warning
At this point, the authoring tool has copied some text to the clipboard on your behalf, so be careful to avoid selecting Edit→Copy or otherwise replacing the clipboard contents.
You may now remove your designer hat.
Applying Motion to Other Objects
With your motion data copied to the clipboard, it’s time to don your developer hat and put that data to use.
Create a new ActionScript 3.0 FLA file. In the Timeline, select frame 1, and then open the Actions panel as if to type some code. Instead, paste the contents of the clipboard. You should now see a considerable amount of ActionScript in the Actions panel. The actual code pasted depends on the tweens you made in your role as designer, but you should see something like the following:
import fl.motion.AnimatorFactory;
import fl.motion.MotionBase;
import flash.filters.*;
import flash.geom.Point;
var __motion_standin_2:MotionBase;
if(__motion_standin_2 == null) {
    import fl.motion.Motion;
    __motion_standin_2 = new Motion();
    __motion_standin_2.duration = 20;

    // The following calls to addPropertyArray assign data values
    // for each tweened property. There is one value in the Array
    // for every frame in the tween, or fewer if the last value
    // remains the same for the rest of the frames.
    __motion_standin_2.addPropertyArray("x", [0,0,0,0,0,0,0,0,0,0,¬
         0,0,0,0,0,0,0,0,0,0]);
    __motion_standin_2.addPropertyArray("y", [0,−14.7562,−28.7166,¬
         −41.8812,−54.2425,−65.8156,−76.5852,−86.5591,−95.7297,¬
         −104.104,−111.683,−118.467,−124.454,−129.638,−134.026,¬
         −137.611,−140.408,−142.401,−143.598,−144]);
    __motion_standin_2.addPropertyArray("scaleX", [0.25,0.31,0.36,¬
         0.41,0.46,0.50,0.54,0.58,0.62,0.65,0.68,0.70,0.73,0.75,¬
         0.76,0.78,0.79,0.79,0.80,0.80]);
    __motion_standin_2.addPropertyArray("scaleY", [0.25,0.31,0.36,¬
         0.41,0.46,0.50,0.54,0.58,0.62,0.65,0.68,0.70,0.73,0.75,¬
         0.76,0.78,0.79,0.79,0.80,0.80]);
    __motion_standin_2.addPropertyArray("skewX", [0]);
    __motion_standin_2.addPropertyArray("skewY", [0]);
    __motion_standin_2.addPropertyArray("rotationConcat", [0,¬
         −1.53716,−2.99142,−4.36279,−5.65047,−6.85604,−7.97792,¬
         -−9.01691,9.9722,−10.8446,−11.6341,−12.3407,−12.9644,¬
         −13.5044,−13.9616,−14.335,−14.6263,−14.834,−14.9587,¬
         −15.0005]);

    // This call to initFilters supplies the Motion with an Array
    // of the fully-qualified class names of the filters in the
    // target's DisplayObject.filters list, in the same order and
    // indices.
    __motion_standin_2.initFilters(["flash.filters.BlurFilter"],¬
         [0]);

    // The following calls to addFilterPropertyArray assign data
    // values for each tweened filter's properties.
    __motion_standin_2.addFilterPropertyArray(0, "blurX", [0]);
    __motion_standin_2.addFilterPropertyArray(0, "blurY", [0,¬
         6.48999,12.63,18.42,23.8567,28.9467,33.6833,38.07,36.3943,¬
         30.08,24.3657,19.2514,14.7371,10.8286,7.52001,4.81715,¬
         2.70857,1.20572,0.302858,0]);
    __motion_standin_2.addFilterPropertyArray(0, "quality",¬
         [BitmapFilterQuality.LOW]);

    // Create an AnimatorFactory instance, which will manage
    // targets for its corresponding Motion.
    var __animFactory_standin_2:AnimatorFactory = new AnimatorFactory(¬
         __motion_standin_2);

    // Call the addTarget function on the AnimatorFactory
    // instance to target a DisplayObject with this Motion.
    // __animFactory_standin_2.addTarget(<instance name goes here>);
}
Note a number of important aspects here:
Several
importdirectives in the first few lines, which let you use theAnimatorFactoryclass and other related classesThe declaration of a
__motion_standin_2variable (the actual variable name may vary), which is at first set to an instance of theMotionBaseclass, and later to aMotioninstanceNumerous lines of automatically generated motion-related ActionScript (these are the tween property arrays)
A call to the
AnimationFactory.addTarget()method, invoked on an instance named__animFactory_standin_2(again, the actual variable name may vary)
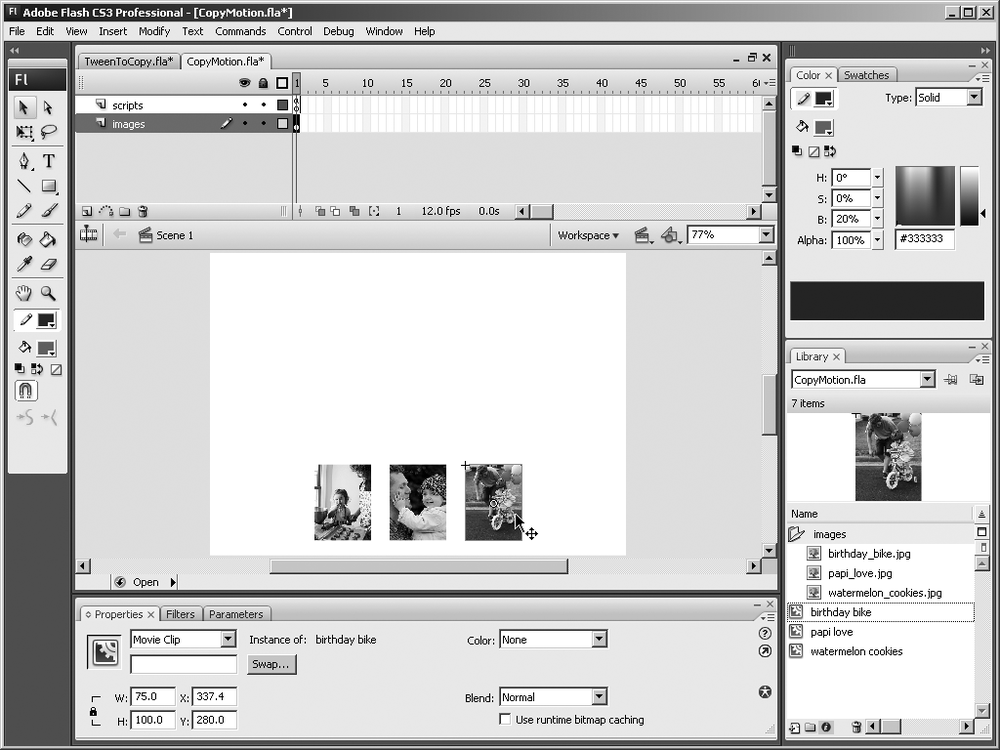
On its own, this pasted code can’t produce anything visual. It expects a
DisplayObjectinstance, which means you have to provide one. Select File→Import→Import to Library, and then locate three image files approximately 300 × 400 pixels apiece.Create a new layer in the timeline, and then drag each image to the stage. Convert each image to a movie clip symbol. Use the Free Transform tool to resize each movie clip to 25 percent of its actual size, and then arrange the movie clips as shown in Figure 8-3.
Note
The
MovieClipclass inherits functionality fromDisplayObject, so movie clip symbols meet the needs of theAnimatorFactoryclass, which expects aDisplayObjectinstance.Select the movie clip on the left, and then give it the instance name photo1. Return to the Actions panel, and then uncomment the last line of code by removing the leading double slashes (change shown in bold).
// Call the addTarget function on the AnimatorFactory
    // instance to target a DisplayObject with this Motion.
    __animFactory_standin_2.addTarget(<instance name goes here>);
Replace the expression
<instance name goes
        here>
with the instance name photo1.
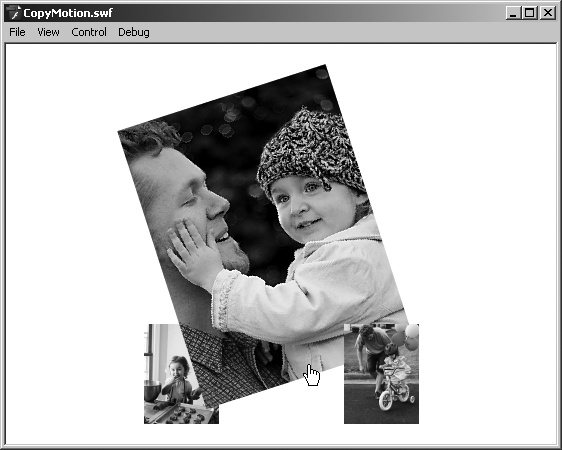
Select Control→Text Movie to compile the SWF file. Thanks to the Copy Motion as ActionScript 3.0 feature, the left movie clip now mimics the animation created in a separate FLA file by the designer (Figure 8-4).
So far, so good! The designer created a motion template with all the subtlety that comes from a manual approach. The developer then applied that motion to another object—including changes in position, scale, rotation, and blur—with very little effort. In this exercise, the motion data happened to be copied and pasted in the same authoring environment, but bear in mind, the pasted code is nothing more than text. The designer could just as easily have sent the motion data in an email message.
This is a useful start, but the property arrays in the generated
code are fairly unwieldy. Consider the array for the y property.
__motion_standin_2.addPropertyArray("y", [0,−14.7562,−28.7166,¬
       −41.8812,−54.2425,−65.8156,−76.5852,−86.5591,−95.7297,¬
       −104.104,−111.683,−118.467,−124.454,−129.638,−134.026,¬
       −137.611,−140.408,−142.401,−143.598,−144]);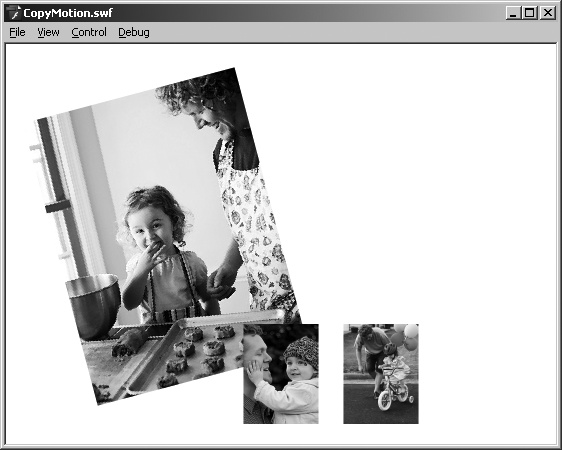
Those values represent a frame-by-frame snapshot of the destination
DisplayObject instance’s vertical
movement. Which of those values represents the keyframe at frame 13? What
if any of these values needs to be changed by hand in the code? These
questions don’t have easy answers!
In the remainder of this chapter, you’ll see how the developer can tweak this animation by having the designer export it as automatically generated XML. The developer can then edit the XML and even revise the ActionScript to make the animation more responsive. The trick is to use classic tweens.
Going Retro for the Sake of XML
It doesn’t take long to redo the animation using classic tweens.
Return to your motion template FLA file. In the Timeline, right-click (Ctrl-click) the layer with the Motion Tween, and then select Remove Tween.
Select frame 20, and then insert a keyframe (Insert→Timeline→Keyframe). In frame 20, resize the rectangle movie clip to 80 percent, rotate it, and reposition it toward the top of the stage. Right-click (Ctrl-click) anywhere between frames 1 and 20, and then select Create Classic Tween. In the Ease area of the Property inspector, make sure the Rotate drop-down displays Auto and the Scale checkbox is selected. Apply an Ease value of 100.
Select frame 13 and insert a keyframe. Select the movie clip and, using the Filters area of the Property inspector, add a blur and set the Blur Y property to 40. Scrub the playhead, if you like, to preview your work.
At this point, you have three keyframes in your span of frames. The first two keyframes have classic tweens applied. Carefully select all frames but the last keyframe—that is, all frames that have a tween—and then right-click (Ctrl-click) and select Copy Motion as ActionScript 3.0. When you do, Flash prompts you with the dialog box shown in Figure 8-5. Type
photo1, and then click OK to close the dialog box.

Warning
At this point, again, the authoring tool has copied text to the clipboard on your behalf. Be careful to avoid selecting Edit→Copy or otherwise replacing the clipboard contents.
Return to the FLA file with the three photos. Delete the existing ActionScript, and then replace it by pasting the current contents of the clipboard. As before, your own generated code may vary from what is shown here. Nonetheless, it’ll look something like this:
import fl.motion.Animator;
var photo1_xml:XML = <Motion duration="20" xmlns="fl.motion.*"
    xmlns:geom="flash.geom.*" xmlns:filters="flash.filters.*">
    <source>
        <Source frameRate="24" x="275.95" y="334.5" scaleX="1.001"
            scaleY="1" rotation="0" elementType="movie clip"
            symbolName="standin">
            <dimensions>
                <geom:Rectangle left="0" top="0" width="83.95"
                    height="108.95"/>
            </dimensions>
            <transformationPoint>
                <geom:Point x="0.4997022036926742"
                    y="0.5002294630564479"/>
            </transformationPoint>
        </Source>
    </source>

    <Keyframe index="0" tweenSnap="true" tweenSync="true">
        <tweens>
            <CustomEase>
                <geom:Point x="0.4502575506968478" y="0"/>
                <geom:Point x="0.7075778422117028"
                    y="0.6092627089536725"/>
            </CustomEase>
        </tweens>
        <filters>
            <filters:BlurFilter blurX="0" blurY="0" quality="1"/>
        </filters>
    </Keyframe>

    <Keyframe index="12" tweenSnap="true" tweenSync="true"
        x="−11.399999999999977" y="−104.44999999999999"
        scaleX="2.451548451548452" scaleY="2.453" rotation="−11.3">
        <tweens>
            <CustomEase>
                <geom:Point x="0.29906669248852413"
                    y="0.5760325983121745"/>
                <geom:Point x="0.6150788560295106" y="1"/>
            </CustomEase>
        </tweens>
        <filters>
            <filters:BlurFilter blurX="0" blurY="40" quality="1"/>
        </filters>
    </Keyframe>

    <Keyframe index="19" x="−15" y="−137.95"
        scaleX="2.9180819180819184" scaleY="2.921" rotation="−15">
        <filters>
            <filters:BlurFilter blurX="0" blurY="0" quality="1"/>
        </filters>
    </Keyframe>
</Motion>;

var photo1_animator:Animator = new Animator(photo1_xml, photo1);
photo1_animator.play();
Don’t worry if that looks like just as much code as before. There are a number of important changes this time.
Only a single
importdirective in the first line, which allows use of theAnimatorclassThe declaration of a
photo1_xmlvariable, set to an instance of theXMLclass and populated with a lengthy XML document (the motion tween data)The declaration of a
photo1_animatorvariable in the next-to-last line, set to an instance of theAnimatorclass and presented with two parameters: the XML instancephoto1_xml,and the instance namephoto1, as supplied by the designerA call to the
Animator.play()method, invoked onphoto1_animator
How is this more useful than data gathered from the new tweening model? It all depends on whether or not you plan to edit frame properties in the code. In this case, the XML represents snapshots of merely the keyframes. In contrast, the other approach flooded you with 20 snapshots of every frame in the tween span. Here, there are only three, and because they’re keyframes, you can type in your changes and let Flash interpolate the in-between values for you.
Editing the Default XML
Fast-forward half a week. The designer’s out sick today, but that doesn’t stop the team lead from letting you know (in a panic!) that the animation needs to be adjusted. The blur effect is a tad heavy, says the client, and the rotation needs to lean ever so slightly more to the left. Surely this is an easy fix, right?
As it turns out, the answer’s yes.
In the three photos FLA file, open the Actions panel again, and then take another look at the XML. The basic structure looks like this (with most of the information removed for the sake of brevity):
<Motion
attributes omitted> <source> //elements omitted</source> <Keyframeattributes omitted> //elements omitted</Keyframe> <Keyframeattributes omitted> //elements omitted</Keyframe> <Keyframeattributes omitted> //elements omitted</Keyframe> </Motion>;The
<source>element, and its children, describe the default state of the original stand-in rectangle. The remaining sibling elements,<Keyframe>, and their children, represent the three keyframes used in the designer’s FLA file, frames 1, 13, and 20. This adjustment’s goal is to reduce the blur effect slightly—that’s in the second<Keyframe>element—and increase the rotation by a smidgeon—that’s in the third.Obviously, your personal adjustments will vary depending on the exact nature of your own XML, so feel free to experiment. One possibility might look like this (operative changes in bold):
<Keyframe index="12" tweenSnap="true" tweenSync="true"
    x="−11.399999999999977" y="−104.44999999999999"
    scaleX="2.451548451548452" scaleY="2.453" rotation="−11.3">
    <tweens>
        <CustomEase>
            <geom:Point x="0.29906669248852413"
                y="0.5760325983121745"/>
            <geom:Point x="0.6150788560295106" y="1"/>
        </CustomEase>
    </tweens>
    <filters>
        <filters:BlurFilter blurX="0" blurY="20" quality="1"/>
     </filters>
</Keyframe>

<Keyframe index="19" x="−18" y="−137.95"
    scaleX="2.9180819180819184" scaleY="2.921" rotation="−15">
    <filters>
        <filters:BlurFilter blurX="0" blurY="0" quality="1"/>
    </filters>
</Keyframe>
In the first of the listed
<Keyframe>elements, theblurYattribute of a nested<filters>element has been changed from 40 to 20. In the second, arotationattribute has been changed from −15 to −18.Note
It’s worth noting that the
indexattributes of these<Keyframe>elements don’t match the frame numbers of the actual keyframes in the timeline: they’re behind by one number apiece. This discrepancy occurs because the<Keyframe>elements start their counting from 0, rather than 1. So the XML version of frame 13 is listed as 12, and the XML version of frame 20 listed as 19.Select Control→Test Movie to see the updated visuals.
Editing the Default ActionScript
Now that the animation satisfies the customer, it’s time to make the photos respond to mouse clicks.
To let each movie clip respond separately to ActionScript instructions, each symbol needs its own unique instance name. Select each move clip in turn, and then use the Property inspector to give them the instance names photo1, photo2, and photo3.
Open the Actions panel one last time, and then comment out the final two lines of the existing code:
//var photo1_animator:Animator = new Animator(photo1_xml, ¬
    photo1);
//photo1_animator.play();
Type the following new ActionScript after the commented code:
photo1.buttonMode = true;
photo1.addEventListener(MouseEvent.CLICK, clickHandler);
photo2.buttonMode = true;
photo2.addEventListener(MouseEvent.CLICK, clickHandler);
photo3.buttonMode = true;
photo3.addEventListener(MouseEvent.CLICK, clickHandler);

var photo1_animator:Animator = new Animator(photo1_xml, ¬
     photo1);

function clickHandler(evt:MouseEvent):void {
    photo1_animator.rewind();
    photo1_animator.target = evt.target as MovieClip;
    photo1_animator.play();
}
The first six lines configure each movie clip in the same way. Setting the
Sprite.buttonModeproperty totruecauses the mouse pointer to change from the default arrow to the cursor used for hyperlinks when the mouse hovers over each movie clip (this is possible because theMovieClipclass inherits functionality fromSprite). TheEventDispatcher.addEventListener()method associates each movie clip with a customclickHandler()function in response to mouse clicks (possible because theMovieClipclass also inherits fromEventDispatcher).The
clickHandler()function is executed any time one of the movie clips is clicked.The
clickHandlerfunction does three tasks:Invokes
rewind()on the most recent animation, as represented by thephoto1_animatorinstance (this resets an enlarged image to its original state)Sets the
targetproperty ofphoto1_animatorto the selected (clicked) movie clip symbol, by way of theMouseEvent.targetproperty (to assurephoto1_animatorthat its new target is indeed a movie clip, the reference is cast as a movie clip with theasoperator)Invokes
play()on the newly targetedphoto1_animatorinstance, which sets the most recently clicked movie clip in motion
Select Control→Test Movie to experience the updated interactivity (Figure 8-6).
Note
Be aware that the XML generated by the Copy Motion as ActionScript 3.0 feature is influenced by three XML namespaces:
xmlns="fl.motion.*"xmlns:geom="flash.geom.*"xmlns:filters="flash.filters.*"
These namespaces must be accounted for if you intend to navigate these XML elements with ECMAScript for XML (E4X) syntax. For more information, see the section Namespaces in Chapter 3.