
Chapter 5. Creating and Working with Code
Chapter 2 introduced the idea that ActionScript can be associated with a FLA file in more ways than one. Your approach is typically contingent on the complexity of a project and the manner in which certain visual effects are achieved. For example, you might be involved in a project that contains numerous timeline animations—think in terms of an interactive corporate mascot, whose responsiveness depends on a collection of canned manual tweens. This may require at least some code in selected keyframes of the animated timeline(s) in question. On the other hand, your project might consist of nothing more than a custom video player, in which case every asset could appear inside a single frame, and possibly be generated entirely with code. In this latter case, most or all of your ActionScript might be stored outside the authoring tool altogether.
In a nutshell, ActionScript 3.0 code can be placed in:
External code snippets, which are external text files with an .as extension, formatted just like keyframe code and brought into a timeline with the
includedirectiveCustom classes, which are also external text files with an .as extension, but structured with the
packagedefinition andclassdefinition keywords and referenced by a timeline with theimportdirective
In ActionScript 2.0, you could also attach code directly to objects—not just to keyframes, but to the “surface” of movie clip symbols, buttons, and components—by way of the Actions panel or the Behaviors panel. ActionScript 3.0 no longer supports this ability. In fact, the Behaviors panel is disabled when a FLA file’s publish settings are configured for ActionScript 3.0. The implications of this change are discussed in the section “Exploring New Features in the Actions Panel and Script Windows,” later in this chapter.
Although you can use third-party script editors in conjunction with Flash CS3 Professional (see Chapter 2), the Actions panel is likely your most convenient first stop when it comes to timeline code. This is true for the simple reason that timeline code is physically attached to a FLA file’s keyframes, so its placement requires the authoring tool regardless of where the code is created. For relatively simple projects, it takes less effort to type your ActionScript directly into the Actions panel than to continuously swap between the authoring tool and another editor. If you find yourself getting cramped in the Actions panel, especially in complex projects, that might be a nudge to consider moving your code to external files, possibly formatting them as custom classes. An example of this is shown in the section “Associating FLA Files to AS Files” in this chapter.
Thinking in Terms of the Timeline
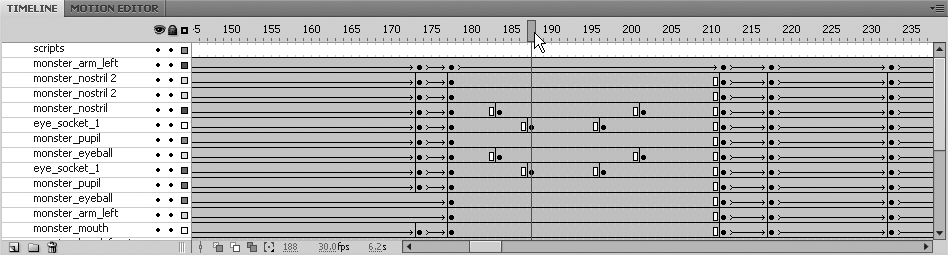
When you use the Actions panel, keep in mind that your code operates under the auspices of a timeline metaphor, a workflow immediately familiar to Flash designers and people who work with video editing software. During authoring, the Timeline and Motion Editor provide a draggable playhead (Figure 5-1) that manages the display of visual elements present in a given frame (that is, in a given moment of time). As you drag the playhead manually along a timeline, you can watch as each keyframe updates the visual display, often in conjunction with motion tweens and shape tweens. At runtime, a SWF file proceeds in the same manner, executing ActionScript as the playhead enters any keyframe that contains code.
Note
Only the Timeline works in conjunction with the Actions panel. The Motion Editor is strictly designed for visual content.
In fact, ActionScript takes higher priority than visual updates.
When Flash Player encounters a keyframe, it first executes any
ActionScript it finds, and only then updates the display. This distinction
is subtle, but important. Consider the following example, in which a
for loop is mistakenly used to update
the position of a movie clip with the instance name
myClip:
// Incorrect code
for (var i:int = 0; i < 50; i++) {
    myClip.x += 2;
}
The expression inside this loop, myClip.x
+= 2, increments the x
property of myClip by 2 pixels on each turn. This may
give the impression that myClip will inch to the
right in 2-pixel steps, traveling a total of 100 pixels over time, but
that isn’t what actually happens. In practice, the movie clip jumps
immediately to the right—the full distance. Why? When the playhead enters
this frame, Flash Player executes the for loop first, all in one go, and only then
updates the visual elements of the frame, including
myClip. By the time that update happens, the value of
x has already been increased to
100.
To successfully animate this movement with ActionScript, you could
use an Event.ENTER_FRAME handler, which
triggers its instructions every time the playhead enters a frame. This
action happens even when the playhead has been halted with a stop() method (think of the playhead as an
idling engine that rotates even when the car is standing still).
myClip.addEventListener(Event.ENTER_FRAME, slideClip);
function slideClip(evt:Event):void {
if (myClip.x < 100) {
myClip.x += 2;
} else {
myClip.removeEventListener(Event.ENTER_FRAME, ¬
slideClip);
}
}In this revision, the x property
of myClip is incremented only once per
frame entry. The if statement removes
the event listener, which has been triggering slideClip(), when x reaches 100.
In another approach, you could use the Tween class and one of the many easing classes
located in the same fl.transitions
package:
import fl.transitions.Tween;
import fl.transitions.easing.*;

var tw:Tween = new Tween(myClip, "x", Strong.easeInOut, ¬
     0, 100, 1.5, true);
This time, the related classes must be imported. The first line
brings in Tween, and the second line
brings in all the classes of the easing
package in one swoop, thanks to the wildcard character (*): Regular,
Strong, Elastic, Bounce, Back,
and None. A variable is declared—here,
tw—and instructions are given by way of
a series of parameters. Again, myClip is moved along
its x-axis, using a combination strong ease in/ease out. The starting
position is 0, and the destination is 100. Here, the tween lasts 1.5
seconds (the final parameter, true,
interprets the previous parameter in terms of seconds, rather than
frames).
Thanks to looping mechanisms like Event.ENTER_FRAME and Tween, a single frame of ActionScript can
perform animation that might otherwise span hundreds or even thousands of
frames. This can be a tremendous advantage, but even so, certain scenarios
demand an artist’s touch.
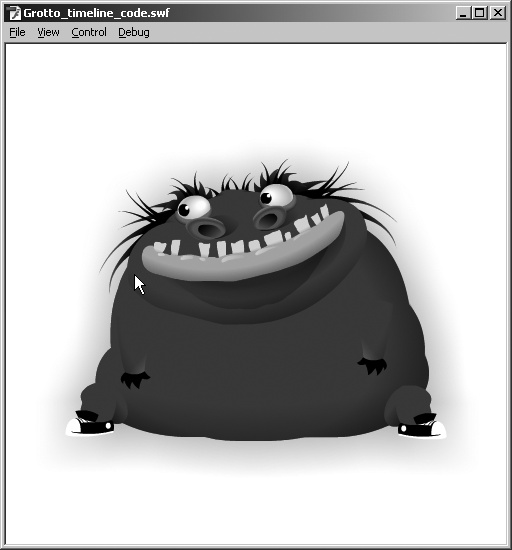
Figure 5-2 shows an interactive cartoon character, Grotto, created by Chris Georgenes (http://mudbubble.com/). Grotto “sleeps” until the user “disturbs” him by moving the mouse cursor over his massive form. If the user chooses not to, the animation simply loops and Grotto slumbers on.
The required programming isn’t especially difficult, but it can become overcomplicated if forced into a single frame. Here, the movie clip’s instance name, appropriately enough, is grotto:
grotto.addEventListener(Event.ENTER_FRAME, slumber);
function slumber(evt:Event):void {
    if (grotto.currentFrame == 129) {
        grotto.gotoAndPlay(1);
    }
    if (grotto.currentFrame == grotto.totalFrames) {
        grotto.stop();
    }
}

grotto.addEventListener(MouseEvent.MOUSE_OVER, wake);
function wake(evt:MouseEvent):void {
    grotto.gotoAndPlay(174);
}
Two event handlers run the show here. First, an Event.ENTER_FRAME handler checks the MovieClip.currentFrame property of
grotto to see if that movie clip’s current frame
equals 129, which happens to be a good place to loop the playhead. If
currentFrame indeed equals 129,
grotto is instructed to play again from frame 1 of
its own timeline, which loops the sleeping sequence. Second, a MouseEvent.MOUSE_OVER handler breaks out of this
loop by sending grotto directly to frame 174, which
leads to frames in which the monster opens his eyes. Back in the Enter.ENTER_FRAME handler, if currentFrame equals the total number of frames
in that timeline—in other words, if the full animation has run its
course—grotto is instructed to stop.
This code’s problem is that the Event.ENTER_FRAME handler incessantly triggers
the custom slumber() function. At a
default frame rate of 24 frames per second (fps), slumber() would be executed approximately every
42 milliseconds! As it turns out, this particular FLA file has a frame
rate of 30fps, which makes the situation even worse. In spite of all this
triggering, the value of currentFrame
meets the criteria for action on only two possible frames. Clearly, this
code isn’t as efficient or easy to work with as it could be!
Here’s another approach.
By adding a few short lines of code to keyframes in the
grotto timeline, you can drop the convoluted event
handler altogether, leaving only the MouseEvent.MOUSE_OVER handler:
grotto.addEventListener(MouseEvent.MOUSE_OVER, wake);
function wake(evt:MouseEvent):void {
    grotto.gotoAndPlay(174);
}
That’s the same wake() function
as before; no changes. Meanwhile, the functionality previously managed by
the Event.ENTER_FRAME handler is now
provided by two effortless frame scripts in the
grotto timeline:
// In frame 129 of the grotto movie clip:
gotoAndPlay(1);

// In frame 810 of the grotto movie clip:
stop();
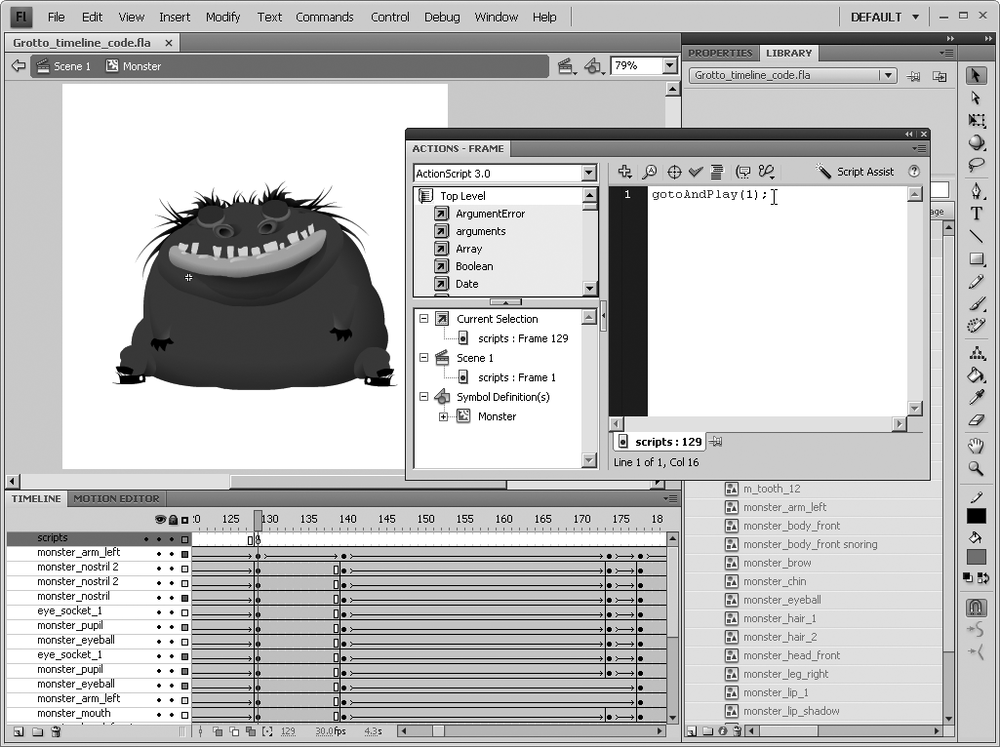
To attach ActionScript to a desired frame, simply select that frame in the Timeline, and then add a new keyframe (Insert→Timeline→Keyframe). With the keyframe selected, open the Actions panel, and then start typing, as shown in Figure 5-3. If the Actions panel is already open, it automatically updates to point to the selected keyframe.
Note
ActionScript can be attached to any keyframe of any layer, but
this practice often leads to confusion, as code may become lost among
potentially hundreds of keyframes and layers. As a best practice, Adobe
recommends that, when code is present, you should place it in a
dedicated scripts layer at the top of any timeline. This action puts
code keyframes in immediate view. Most developers name this layer
scripts or actions, but the name doesn’t matter as long
as it descriptively distinguishes the layer.
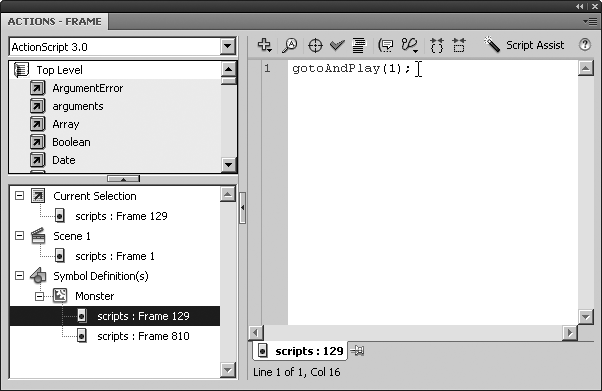
Note that the lower-left corner of the Actions panel (Figure 5-4) offers a hierarchical tree view of coded keyframes in the main timeline (Scene 1), as well as coded keyframes in the timelines of movie clip symbols. In this case, only one symbol exists (the animated character named Monster in the library—grotto is the instance name), but additional symbols would be just as easy to locate in this area. You can select frames either by clicking a keyframe of the Timeline or, for quicker access, clicking one of the tree view nodes. At bottom-center, a pushpin icon lets you open the scripts of more than one frame at a time.
That discussion covers the basics of how to attach code to keyframes. The actual writing of code happens in the Script pane on the right side, which is handier than ever thanks to a number of enhancements introduced in Flash CS3 and still present in Flash CS4.
New Features in the Actions Panel and Script Windows
When a FLA file is configured for ActionScript 3.0, the Flash authoring tool provides two interfaces for writing code: the Actions panel and Script windows. You use the Actions panel, available under Window→Actions, for creating and editing code attached to timeline keyframes, as seen earlier in this chapter.
Script windows are used for creating and editing code stored in external ActionScript files. Just like FLA files, Script windows are displayed as tabbed documents rather than in a panel. As Figure 5-5 shows, the selection of a Script window temporarily disables authoring tool panels, which become active again when a FLA file is selected. To open a Script window, select File→New→ActionScript file, or open an existing ActionScript file.
The features of both the Actions panel and Script windows overlap considerably. Flash professionals will already be familiar with the features carried over from previous versions of the authoring tool, but to cover the bases, the next sections provide a brief overview of existing features before launching into the new items.
Actions Panel
Figure 5-6 shows the Actions panel’s toolbar, whose buttons are described from left to right.
 Add a New Item to the Script:
Provides a list of the full ActionScript 3.0 application
programming interface (API). Select and click to add
properties, methods, and events to the current position of the
cursor in the Script pane.
Add a New Item to the Script:
Provides a list of the full ActionScript 3.0 application
programming interface (API). Select and click to add
properties, methods, and events to the current position of the
cursor in the Script pane. Insert a Target Path: Opens an
Insert Target Path dialog box with a tree view of targettable
objects, such as movie clips, text fields, buttons, and components,
by instance name. Select the desired target, and then click OK to
add the target path to the current position of the cursor in the
Script pane.
Insert a Target Path: Opens an
Insert Target Path dialog box with a tree view of targettable
objects, such as movie clips, text fields, buttons, and components,
by instance name. Select the desired target, and then click OK to
add the target path to the current position of the cursor in the
Script pane. Check Syntax: Provides guidance
for some—but not all—syntax errors. This feature is not as thorough
as the compiler errors, compiler warnings, and runtime errors
discussed in Chapter 11.
Check Syntax: Provides guidance
for some—but not all—syntax errors. This feature is not as thorough
as the compiler errors, compiler warnings, and runtime errors
discussed in Chapter 11. Auto Format: Formats Actions
panel code according to user preferences set using
Edit→Preferences→Auto Format (Flash→Preferences→Auto Format).
Erroneous code can’t be formatted, so this button acts as a kind of
secondary syntax checker.
Auto Format: Formats Actions
panel code according to user preferences set using
Edit→Preferences→Auto Format (Flash→Preferences→Auto Format).
Erroneous code can’t be formatted, so this button acts as a kind of
secondary syntax checker. Show Code Hint: Displays a
tooltip with expected parameters when the cursor is positioned
immediately after a method call’s first parenthesis.
Show Code Hint: Displays a
tooltip with expected parameters when the cursor is positioned
immediately after a method call’s first parenthesis. Debug Options: Adds and removes
breakpoints, and clears all breakpoints. Breakpoints are discussed
in detail in Chapter 11.
Debug Options: Adds and removes
breakpoints, and clears all breakpoints. Breakpoints are discussed
in detail in Chapter 11. Show/Hide Toolbox: Shows and hides the
Actions panel’s left side.
Show/Hide Toolbox: Shows and hides the
Actions panel’s left side. Script Assist: Isn’t covered in
this book, as the feature isn’t especially useful with ActionScript
3.0.
Script Assist: Isn’t covered in
this book, as the feature isn’t especially useful with ActionScript
3.0. Help: Opens the onboard
documentation in a browser.
Help: Opens the onboard
documentation in a browser.Warning
The following is erroneous code which the Check Syntax button failed to catch:
var num:int = 1;
var num:int = 2;
In ActionScript 3.0, variables can’t be declared more than once in the same scope. If you run the syntax checker against these two lines, you get a message saying, “This script contains no errors,” which is misleading. The syntax checker also misses capitalization errors, such as
tracE()ortrAce(), and is dependable only in terms of gross structural syntax. For confident testing, watch the Compiler Errors panel during the compile process.
Collapsible code sections
As of Flash CS3, the Actions panel supports collapsible code sections, a practice known as code folding. This feature lets you temporarily condense one or more lines of text into a stand-in button, which helps reduce clutter in long or complex passages of code. The collapsed button displays the first few characters of the folded text for easy identification (see Figure 5-7). Line numbering is properly accounted for. Hovering over the button causes a tooltip to display a longer excerpt of the folded text, and double-clicking expands the code to its original state. Collapsed sections can be nested, and are saved with the FLA file, so they’re remembered when you close and reopen the authoring tool.
To collapse a section of code, use the mouse or arrow keys to select a number of adjacent lines. A pair of minus icons (Windows) or arrow icons (Mac) appear to the left of the selection (Figure 5-8). You have the following options for collapsing the code:
Click one of the minus or arrow icons.
Click the
 Collapse Between Braces button in the Actions panel
toolbar.
Collapse Between Braces button in the Actions panel
toolbar.Click the
 Collapse Section button in the Actions panel toolbar. Holding Alt
while clicking collapses code outside the selection.
Collapse Section button in the Actions panel toolbar. Holding Alt
while clicking collapses code outside the selection.Right-click (Ctrl-click) the selection, and then choose one of the collapse-related options:
Collapse Between Braces doesn’t require a selection, and folds text between two curly braces (
{}) when the cursor is positioned between such braces.Collapse Selection folds the current selection.
Collapse Outside Section folds everything but the current selection.
To expand a previously collapsed section of code, choose any of the following:
Shortcuts for quickly adding and removing code comments
Now you can handle code commenting with a few clicks, rather than typing. This may seem like a marginal benefit, like a sprinter who shaves his legs to gain a few seconds, but every little bit helps. For every distraction cast aside, you gain additional time and focus spent on actual coding.
Commenting lets you add instructional notes to your code that
are ignored by the compiler. You have two ways to comment. A line
comment is designated by two slashes (//) in a given line, and affects only the
line in which it appears:
// This handles the NET_STATUS event ...
function statusHandler(evt:NetStatusEvent):void {
    if (evt.info.code == "NetStream.Play.Stop") {
        removeChild(vid); // Removes video from
                          // the display list
    }
}
Note that a line comment can begin before or after executable code.
A block comment is also designated by a special character
sequence, /* ... */, only this
time, everything between those characters is affected:
/*
This handles the NET_STATUS event ...
function statusHandler(evt:NetStatusEvent):void {
    if (evt.info.code == "NetStream.Play.Stop") {
        removeChild(vid);
    }
}
*/
Note
Developers often use both block and line comments during troubleshooting to temporarily isolate regions of code.
You can certainly type these character sequences by hand, but using the new shortcuts will save you time. To comment out a region of code, use the mouse or arrow keys to select a number of adjacent lines. At this point, you have two options, either of which will do:
Right-click (Ctrl-click) the selection, and then choose one of the comment-related options:
Apply /* */ Comment wraps the selection in a block comment
Apply // Comment precedes each line in the selection with double slashes; if no selection is made, the double slashes appear wherever the cursor is positioned
Click the
 Apply block comment button or the
  Apply line comment button in the Actions panel toolbar.
To uncomment a region of code, choose any of the following:
Script Windows
Figure 5-9 shows a Script window’s toolbar. Of the buttons shown, every one performs exactly as described in the section “Actions Panel.” The only difference is that Script windows don’t feature a Script Assist button. Instead, they display a Target drop-down menu, which was introduced in Flash CS3.
The Target drop-down list becomes active when one or more FLA files are open in addition to the current script document. The drop-down list displays each of the open FLA files and lets you specify which one should be compiled in concert with the current script document (when using Control→Test Movie or Debug→Debug Movie).
ActionScript Can No Longer Be Attached to Objects
In the earliest days of ActionScript, code could be attached
directly to objects in much the same way it can be attached to frames.
You can’t attach code in the same manner in ActionScript 3.0. Direct
attachment to objects was made possible by two functions, on() and onClipEvent(), which were supported as
recently as ActionScript 2.0. In fact, these functions are still
available in Flash CS4, but only when a FLA file’s publish settings are
configured for versions of ActionScript other than 3.0.
This change has a potentially significant impact on certain
traditional Flash developer workflows. For example, the Behaviors panel
replies on the on() and onClipEvent() functions for many of its
behaviors. Because these functions are no longer supported, the
Behaviors panel is disabled in FLA files that use the language’s latest
version.
If you were a fan of the Behaviors panel but find yourself wanting or needing to work in ActionScript 3.0, keep your chin up! The secret to this panel is that it’s nothing more than a ghostwriter. It writes ActionScript, and so can you. Obviously, some uses of the Behaviors panel are more involved than others, but here’s an investigative effort into reproducing some functionality by hand.
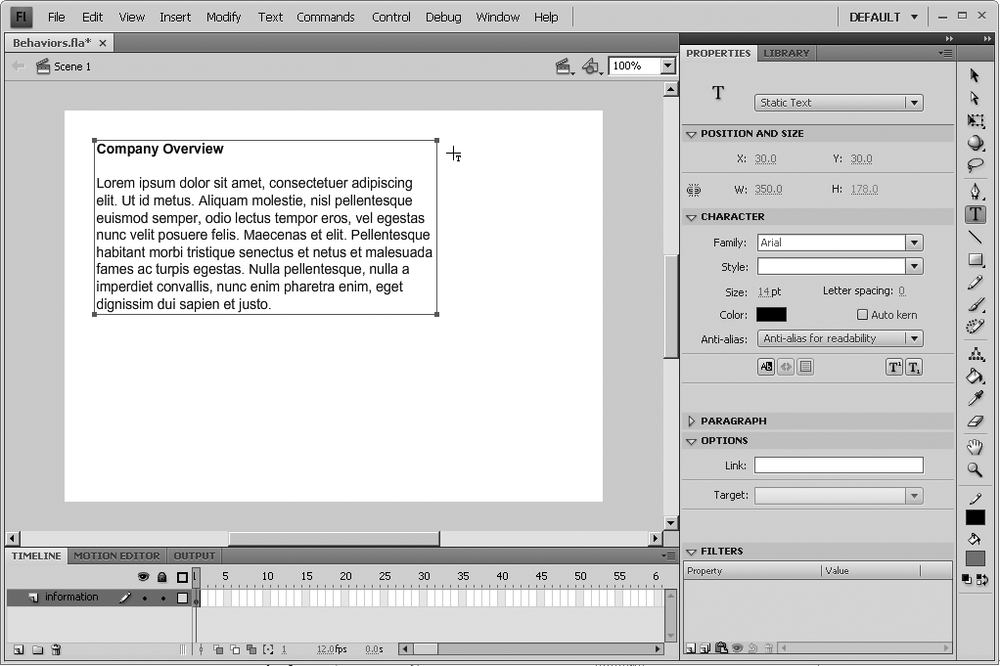
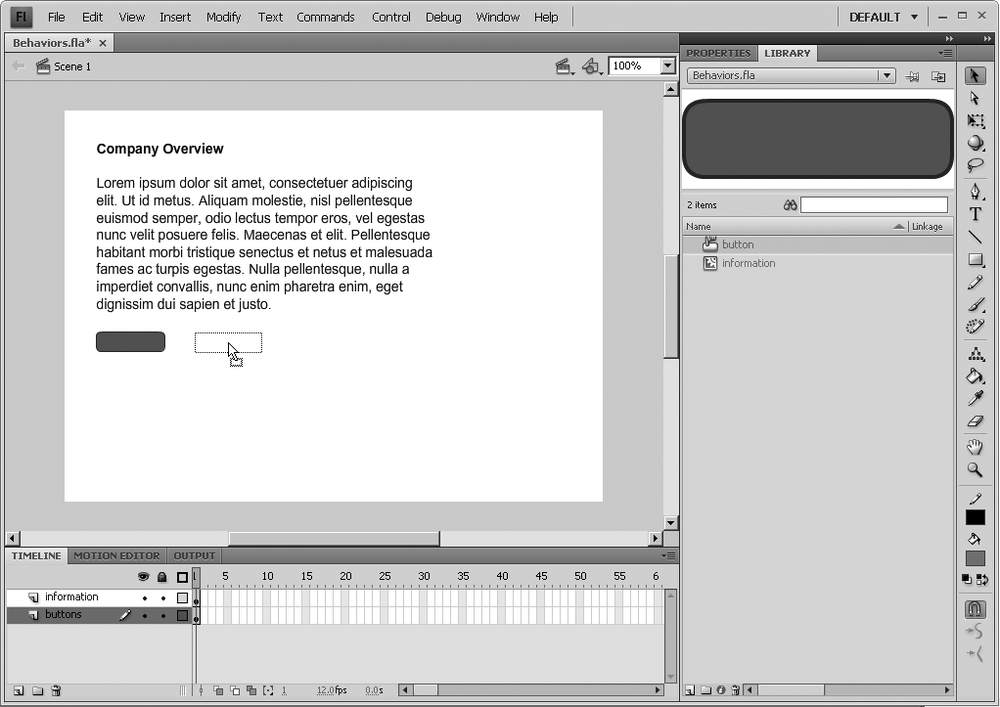
Create an ActionScript 3.0 FLA file. In the Timeline, rename the default layer to
information. Use the Text tool to create a static text field with a paragraph of stand-in text, as shown in Figure 5-10.Convert the text field to a movie clip symbol, and then give it the instance name mcInfo in the Property inspector.
Double-click the movie clip to enter its timeline. Select frame 2 in the timeline, and then add a keyframe. This action duplicates the text field in frame 1. Update the text field in frame 2 with different stand-in text.
Select Edit→Edit Document to return to the main timeline. Add a new layer, and then name it
buttons. In the new layer, use one of the drawing tools to draw a shape, and then convert the shape to a button symbol. Drag a second instance of this button from the Library to the same new layer, as shown in Figure 5-11.If this were an ActionScript 2.0 FLA file, you could use the Behaviors panel to attach a prewritten code template to each button, instructing it to display its corresponding text field by sending mcInfo to the relevant keyframe. Instead, you’re going to see how easy it can be to write this sort of ActionScript 3.0 by hand.
Use the Property inspector to give both button symbols an instance name. For this demonstration, use
btnLeftandbtnRight. Add a new layer to the main timeline for your code. Select frame 1 of this new layer, and then enter the following code into the Actions panel:mcInfo.stop(); btnLeft.addEventListener(MouseEvent.CLICK, leftHandler); function leftHandler(evt:MouseEvent):void { mcInfo.gotoAndStop(1); } btnRight.addEventListener(MouseEvent.CLICK, rightHandler); function rightHandler(evt:MouseEvent):void { mcInfo.gotoAndStop(2); }The first line tells mcInfo to stop where it is (frame 1), which displays the first text field. The remaining two code blocks associate mouse-related event handlers to the button symbols, using the same structure seen elsewhere throughout this chapter. Button symbols are defined by the
SimpleButtonclass, which, likeMovieClip, inherits functionality from theEventDispatcherclass, includingaddEventListener(). This method partners an event with a custom function, as shown. Because this code appears in the same frame as the assets to which it refers, the playhead has no problem wiring up all the parts when it enters this frame during playback.Select Control→Test Movie to verify that the buttons correctly update mcInfo.
Setting ActionScript Preferences
Working with ActionScript in the Flash authoring tool is a customizable experience. You have several places to set your preferences, discussed in the following sections. Some of these preferences pertain to the appearance of code in the Actions panel and Script windows, while others affect the way ActionScript is compiled.
Preferences Dialog Box
Select Edit→Preferences (Flash→Preferences) to open the authoring tool’s general Preferences dialog box. This dialog box influences Flash CS4 across the board, from ActionScript to the drawing tools, text characteristics, and how graphic assets are imported from other applications.
ActionScript
In the Preferences dialog box’s Category list area, select ActionScript to review and edit ActionScript preferences (Figure 5-12).
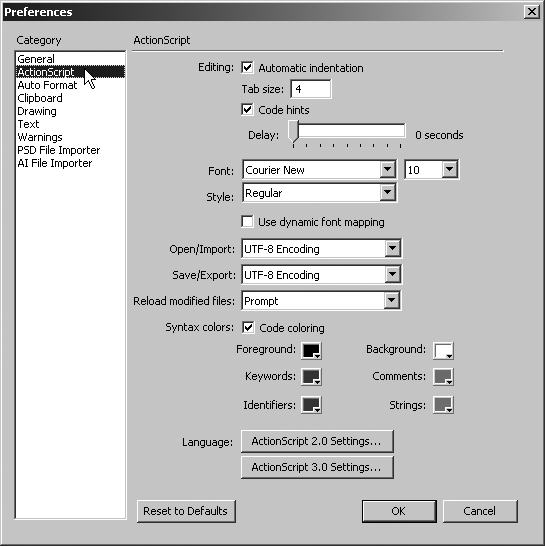
Most of these settings affect the appearance of code in the Actions panel and Script windows, including font face and size, the tab size for optional automatic indentation, and configurable syntax colors for optional code coloring. You can toggle code hinting here, and delay tooltips for code hinting in quarter-second increments from 0 to 4 seconds.
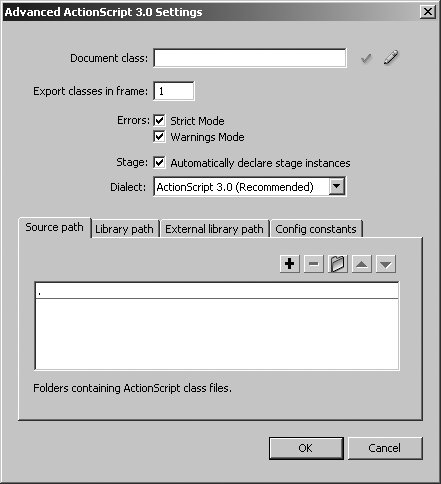
The ActionScript 3.0 Settings button manages source and library path settings for built-in and custom class packages, as well as SWC files (components built in Flash or Flex) that bundle ActionScript and/or visual assets. Clicking this button opens a dialog box named ActionScript 3.0 Advanced Settings, with four areas to specify file paths (Figure 5-13).
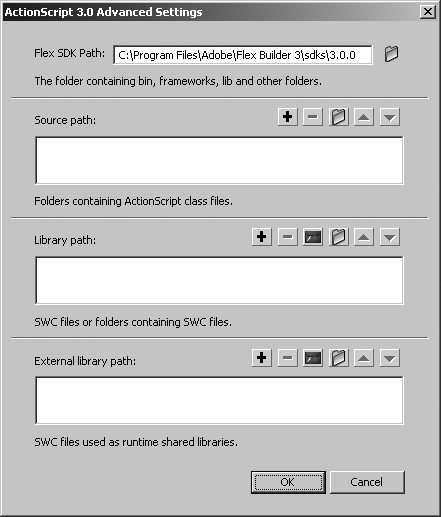
Flex SDK Path: Only necessary when a FLA file collaborates with assets from the Flex framework. Without such collaboration, Flash documents ignore this field. By default, this path points to a file named flex.swc, installed with Flash CS4, but you can change this path to a different location of the Flex Software Development Kit (SDK)—such as the install folder for Flex Builder 3, for example—if you prefer.
Source Path: In Flash CS3, this setting was formerly configured with two paths: a dot (
.) indicating the FLA file’s current folder, and $(AppConfig)/ActionScript 3.0/Classes, which pointed to the built-in, or intrinsic, classes native to ActionScript 3.0. In Flash CS4, these paths are located in a per-FLA dialog box discussed in the Flash Publish Settings of this chapter. Because these paths are now located elsewhere, this setting is empty in this dialog box. You can optionally add paths to custom classes, including third-party code distributed as AS files, by clicking the Add New Path button, and then clicking the
  Browse to Path button.
Library Path: Developers can distribute their ActionScript as AS files or SWC files. The difference is primarily that the SWC format can hold numerous files—including the subfolders that represent package structures—in a single archive, like ZIP or SIT files. This provides a degree of protection because a SWC’s contents are self-contained. If you want FLA files to use third-party code stored in SWC files, click the
Add New
Path button, and then click the  Browse to SWC File button to point to a SWC file or the
Browse to Path button to point to a folder of SWC files.
Browse to SWC File button to point to a SWC file or the
Browse to Path button to point to a folder of SWC files.External Library Path: This setting follows the same concept as Library Path, but for SWC files that contain visual or audio assets for use as runtime shared libraries. This provides developers a way to re-use elements stored in a central location, which is useful in team settings.
The Source Path setting, also known as a classpath setting, tells the compiler where to look for corresponding AS files when classes are referenced in ActionScript 3.0 code. If you write a custom class file (touched on later in this chapter), you can safely compile when your AS file is located in the same folder as the FLA file that uses it. You’ll soon realize, however, how handy it is to keep a full library of custom class files within reach. This is where the Source Path setting becomes useful.
In Windows, for example, you might keep a folder named ActionScript 3.0 Classes inside your
My Documents folder. If you have
a library of custom sound classes arranged in a package called
com.loudmouth.sound, it means your
ActionScript
3.0 Classes folder contains a subfolder named
com, which in turn contains
nested subfolders loudmouth and
sound, which finally contain the
custom class files in question. Adding the location of My DocumentsActionScript 3.0 Classes to
your Source Path setting lets you reference these custom classes in
the same manner as built-in classes. For example, to reference any
class inside the com.loudmouth.sound package, you could use
the import directive like this:
import com.loudmouth.sound.*. After
this line, classes in the custom
package can be referenced by class name alone, just like the built-in
MovieClip class.
Auto Format
In the Preferences dialog box’s Category list area, select Auto Format to review and edit formatting preferences for ActionScript (Figure 5-14).
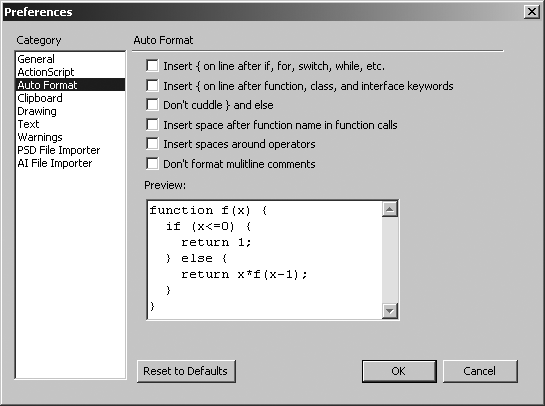
A handful of checkboxes let you specify your styling choices for ActionScript code. A text area gives you a visual preview.
Warning
The Auto Format feature is best suited for frame scripts. Using it with external class files often formats that code incorrectly, sometimes rendering it unusable.
Flash Publish Settings
With an ActionScript 3.0 FLA file open, select File→Publish
Settings→Flash→Settings to open a FLA-file–specific equivalent to the
ActionScript 3.0 Advanced Settings dialog box (Figure 5-15) discussed
earlier. This dialog box offers one of the two locations to
specify a FLA file’s document class (see Chapter 6 for details), as well as source
and library path settings that may be pertinent to only the document at
hand. Notice the dot (.) entry in the
Source Path tab. The Library path tab contains the default path
$(AppConfig)/ActionScript 3.0/libs,
which points to the Flash CS4 intrinsic files for ActionScript 3.0. You
can specify additional classpaths and SWC files as described in the
“ActionScript” subsection of the Preferences Dialog Box earlier in this chapter.
By default, when classes are compiled into a SWF file, these classes are exported into frame 1. In most cases this is appropriate, but advanced developers may choose to override this setting by changing the frame number displayed. You can toggle Strict mode and Warnings mode here. These two affect the volume of guidance sent to the Compiler Errors and Output panels during compiling (see Chapter 11 for details).
The “Automatically declare stage instances” setting pertains to class files that refer to assets in a companion FLA file—assets that have already been given instance names on the stage. Technically, these instance names should be declared as properties in the class definition, but because they already exist as instance names on the stage, declaring them as properties can cause a conflict at compile time. You can omit these declarations in the class file as long as this checkbox is selected.
The Dialect drop-down list determines which flavor of ActionScript the compiler uses. As discussed in Chapter 1, ActionScript 3.0 is an implementation of the ECMA-262 specification. As it happens, ActionScript is stricter than the specification requires. While ECMAScript allows for prototype-based inheritance, the ActionScript dialect does not. Advanced developers who wish to make use of this feature may set the dialect to ECMAScript, but the recommended default is ActionScript 3.0, which lets SWF files perform more efficiently due to the omission of prototype-related infrastructure.
Associating FLA Files with AS Files
At the beginning of this chapter, ActionScript was described as something that can be written in external files as well as keyframes. When stored outside a FLA file, ActionScript is saved as a simple text file with an .as extension, such as commonFunctions.as. In complex projects especially, it often makes sense to store ActionScript in external files. You can organize script files into code libraries for common re-use, easily searched, and edited with any simple text editor or a Script window of the Flash authoring tool. For an overview on a selection of external script editors, see Chapter 2.
Warning
When a FLA file is published, its ActionScript is “baked in” to the compiled SWF file. This is roughly analogous to the way the layers in Photoshop PSD file are no longer available in an exported JPG. It is important to understand that FLA files must be republished when external code is updated.
External ActionScript can be referenced by a FLA file in four ways:
as a snippet, brought into Flash with the include directive; as a class, referenced by the
timeline with the import directive and
instantiated in keyframe code; as a document class, which requires no code
in the FLA file at all; and finally, as a linkage class. These last two
options are covered in Chapter 6 and
Chapter 7,
respectively.
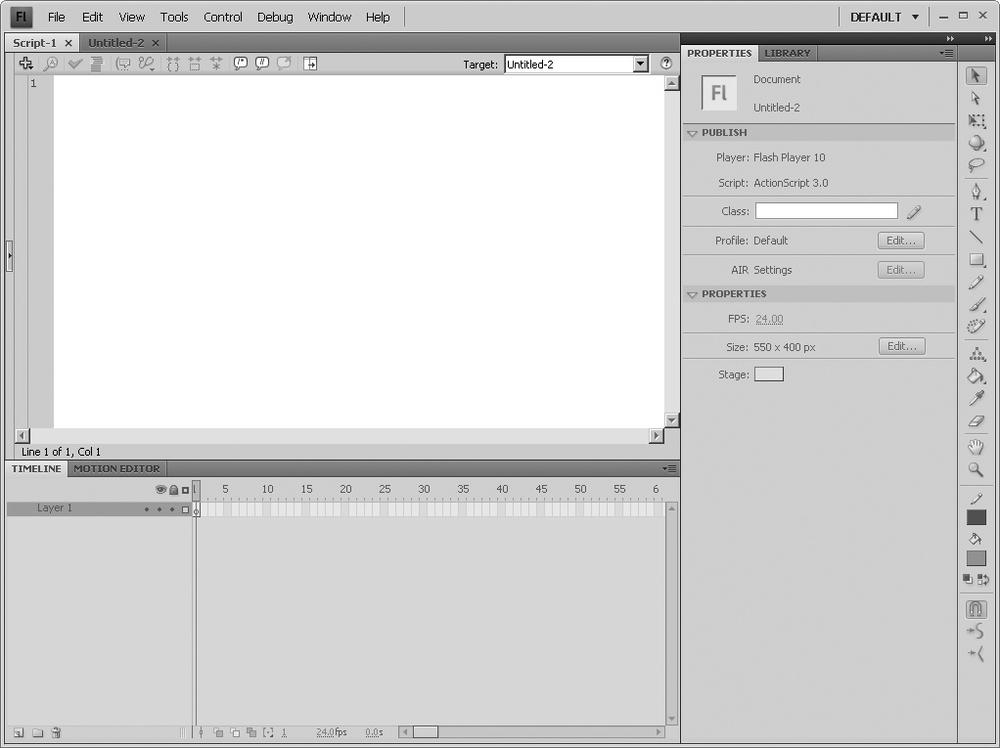
To see how AS files can improve workflow efficiency, consider the following keyframe ActionScript, which displays and loops the video content shown in Figure 5-16.
var vid:Video = new Video(320, 240);
addChild(vid);

var nc:NetConnection = new NetConnection();
nc.connect(null);

var ns:NetStream = new NetStream(nc);
vid.attachNetStream(ns);

var listener:Object = new Object();
listener.onMetaData = function(evt:Object):void {};
ns.client = listener;

ns.addEventListener(NetStatusEvent.NET_STATUS, ¬
     statusHandler);

function statusHandler(evt:NetStatusEvent):void {
    if (evt.info.code == "NetStream.Play.Stop") {
        ns.seek(0);
    }
}

ns.play("Peter_Pringle_Theremin.flv");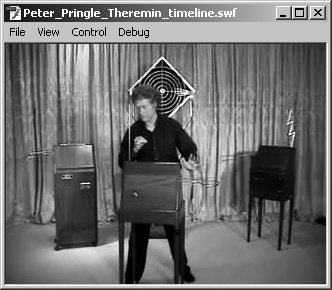
If you want a series of videos, each as a separate SWF file in its own HTML document, you can copy the original FLA file as often as necessary. Only the final line would need to be updated, in order to point to a different FLV file. This approach works in a pinch, but if the functionality changes—for example, the video should now rewind and pause, rather than loop—additional code must be revised in each separate FLA file. To avoid this, you can begin to abstract your code—that is, lift the reusable portion for general application—by consolidating the repetitive elements into a single script file. This way, the whole series of FLA files can then look to the same external code for instructions.
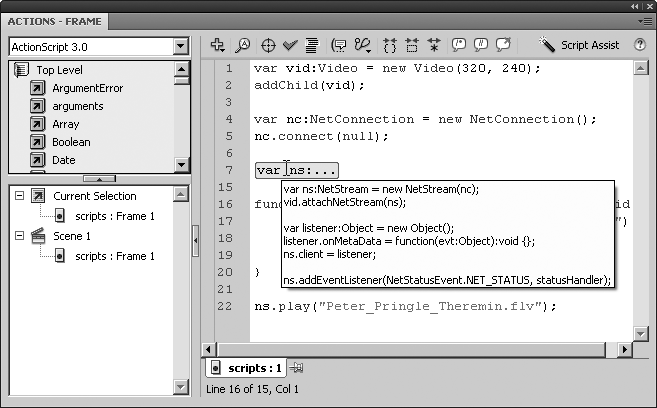
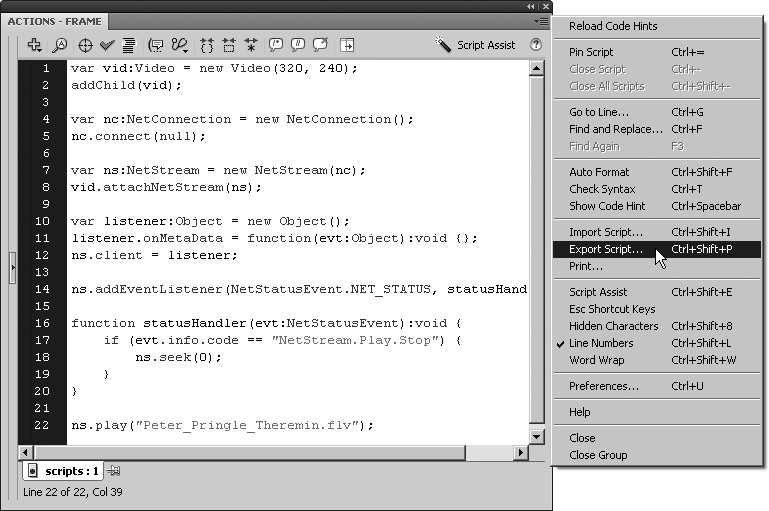
Code Snippets
The Actions panel gives you an export feature that facilitates the creation of code snippets. Just click the panel’s menu, as shown in Figure 5-17, and then select Export Script. This action opens a Save As dialog box that lets you save the code content of the selected frame as an AS file.
To use this external file, delete the existing keyframe code—all
but the last line, in this case—and then use the include
directive:
include "VideoPlayback_scr.as";
ns.play("Peter_Pringle_Theremin.flv");
Because the AS and FLA files are in the same folder, only the
script’s file name is necessary. For files in separate locations,
include the full file path between the quotation marks after the
include directive.
Note
In ActionScript 2.0, the include directive was preceded by the pound
sign—#include—and the line that
contained it could not end with a semicolon. In ActionScript 3.0, the
pound sign is gone and the semicolon is optional, but
recommended.
At this point, only the two lines shown are necessary in each
separate FLA file, where the second line will be updated to point to the
corresponding FLV file. At compile time, the include directive effectively pastes the
content of VideoPlayback_scr.as
into the keyframe, as if it had never been exported. The benefit to your
workflow is that any change made to the AS file is now updated
automatically in each companion FLA file as it’s recompiled.
Classes
Custom classes potentially give you an even greater sense of
abstraction. Just as built-in classes define native objects like
MovieClip, TextField, Array, and the like, custom classes define
custom objects that can be just as useful. The structure of classes
requires a package and class declaration. Class properties are
declared near the top, and import
directives are required for every additional class referenced in the
code. Class code is saved as simple text, with the same file name as the
class itself. In this case, the file name would be VideoPlayback.as because the class
itself is called VideoPlayback.
package {

    import flash.display.MovieClip;
    import flash.events.NetStatusEvent;
    import flash.media.Video;
    import flash.net.NetConnection;
    import flash.net.NetStream;

    public class VideoPlayback {

        private var _vid:Video;
        private var _nc:NetConnection;
        private var _ns:NetStream;
        private var _listener:Object;

        public function VideoPlayback(timeline:MovieClip, ¬
             file:String) {
            init(timeline, file);
        }
        private function init(timeline:MovieClip, ¬
             file:String):void {
            _vid = new Video(320, 240);
            timeline.addChild(_vid);

            _nc = new NetConnection();
            _nc.connect(null);

            _ns = new NetStream(_nc);
            _vid.attachNetStream(_ns);

            _listener = new Object();
            _listener.onMetaData = function( ¬
                 evt:Object):void {};
            _ns.client = _listener;

            _ns.addEventListener(NetStatusEvent.NET_STATUS, ¬
                 statusHandler);

            _ns.play(file);
        }
        private  function statusHandler( ¬
             evt:NetStatusEvent):void {
            if (evt.info.code == "NetStream.Play.Stop") {
                _ns.seek(0);
            }
        }

    }
}
To use this class, delete all of the existing keyframe code and
use the import directive
instead:
import VideoPlayback;
new VideoPlayback(this, "Peter_Pringle_Theremin.flv");
Note the lack of quotation marks and file extension: you’re
importing a class this time, not a text file. After this line, the
custom class can be instantiated with the new keyword, just like any built-in class.
This includes the possibility of parameters, as shown. If the AS and FLA
files are in the same folder, the import directive is optional, provided that
the FLA file’s Source Path setting includes the dot (.) entry discussed in the Flash Publish Settings of this chapter.
At this point, each separate FLA file needs only the two lines
shown, where a custom VideoPlayback
object manages the video content when you give it a target timeline and
the file path of an FLV file. Any change to the class is automatically
updated for each companion FLA file as it’s recompiled.
Using Script Assist
The concept of Script Assist has existed in many versions of the Flash authoring tool, and has evolved over the years. Prior to Adobe’s acquisition of Macromedia, Flash MX developers encountered a similar feature in an Actions panel preference setting for Normal Mode versus Expert Mode. Think of Script Assist as a built-in form of on-the-job training that can potentially expand your overall understanding of the ActionScript 3.0 API. Just be advised, Script Assist can also be a very tedious tool, so its usefulness depends largely on your personal learning preferences. This feature temporarily sets the Actions panel’s Script pane as read-only, and gives you an alternative approach to adding, removing, and editing code.
Consider a FLA file with three movie clip symbols already on the stage. Each symbol has a unique instance name: mcA, mcB, and mcC. In this hypothetical scenario, you would like to program the second symbol, mcB, to respond to a mouse click that sends the current webpage to a new URL. In order to use Script Assist in this endeavor, it helps to mentally enter into a research-oriented state of mind. Why? Because using Script Assist is a bit like forgoing the highway (typing is faster!) in favor of numerous back roads. You’ll need a map.
These three symbols are movie clips, which means they’re instances
of the MovieClip class. Your first
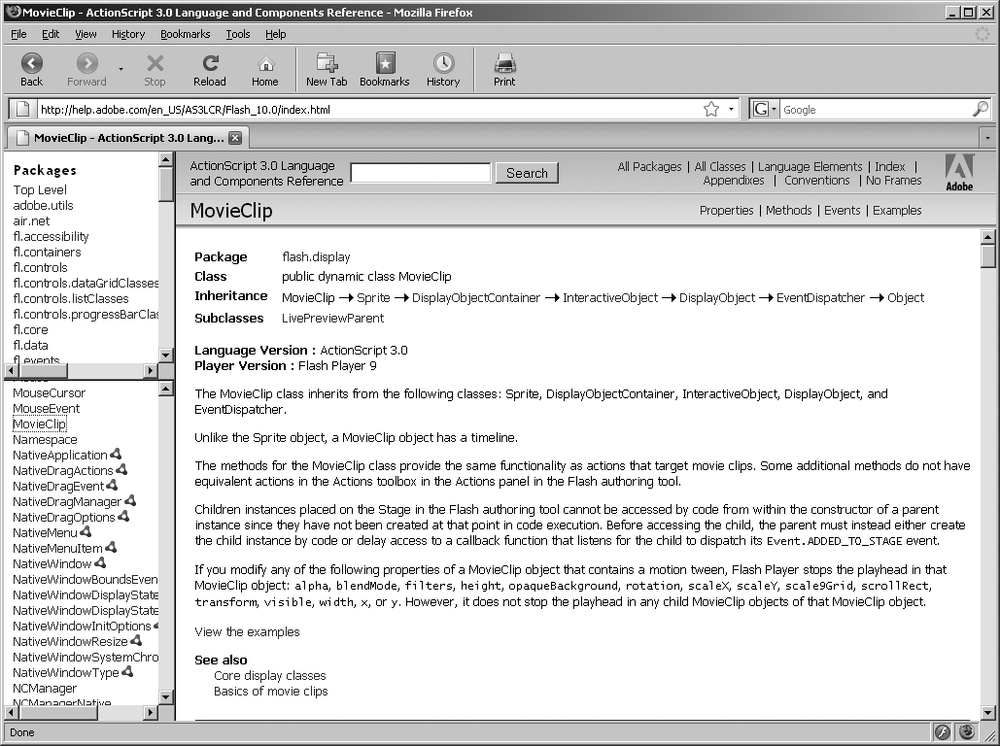
stop, then, may very well be the onboard documentation, in order to
consult the MovieClip class entry of
the ActionScript 3.0 Language and Components Reference (Figure 5-18). Classes define
objects, and you can effectively think of class entries as Owner’s Manuals
for the object in question. Entries typically cover one or more of the
following categories, depending on the functionality of the class:
properties, which describe the object’s
characteristics; methods, which describe what the
object can do; and events, which describe what the
object can react to.
In this scenario, you’d like to program mcB to
respond to a mouse click, so you scroll the Events heading to see if this
goal is even possible with movie clips. Under the Events heading, make
sure to click the Show Inherited Events hyperlink to unveil events that
the MovieClip class inherits from other
classes in its family tree. Sure enough, supported events include click, mouseUp, and other mouse-related
responses.
In order to associate an event with a function, you need mcB to actually
do something; namely, to make the event/function
association. The things an object can do are called methods, so you scroll
to the Public Methods heading and, this time, click the Show Inherited
Methods hyperlink. The MovieClip class
supports an addEventListener() method
inherited from the EventDispatcher class. Click the
EventDispatcher hyperlink to learn that
this class belongs to the flash.events
package. Now it’s time to use this information.
When selected, the Actions panel’s Script Assist button changes the
Script pane as shown in Figure 5-19. The area at the
bottom is no longer editable by direct typing, so the addEventListener() method must be assigned to
mcB with the ![]() “Add a new item to the script” button. Remember, movie clips inherit from
“Add a new item to the script” button. Remember, movie clips inherit from
EventDispatcher, which resides in the
flash.events package. Clicking the blue plus icon leads you to the desired method
by way of a series of submenus:
flash.events→EventDispatcher→Methods→addEventListener.
Selecting this method updates the Script pane as shown in Figure 5-20. At this point,
clicking into the Object input field activates the ![]() “Insert a target path” button, which you can use to build a reference to
mcB by way of a dialog box (you could alternately
type
“Insert a target path” button, which you can use to build a reference to
mcB by way of a dialog box (you could alternately
type mcB directly into the Object
input field). Note that the flash.events.EventDispatcher package has been
automatically imported. Strictly speaking, this isn’t necessary for every
class referenced in keyframe code, but its presence doesn’t hurt
anything.
Each input field indicates the particular sort of input it needs.
The type and listener fields, for example, represent the first two
parameters required by the addEventListener() method: a string and a
function, respectively. The remaining parameters are set between
brackets—for example, [useCapture]—which tells you the remaining
parameters are optional.
As you researched earlier in the onboard documentation, movie clips
support a click event, which is
displayed as a hyperlink in the documentation. Clicking that hyperlink
shows that the click event belongs to
the MouseEvent class, and should be
referenced as the CLICK constant. Now
you can type MouseEvent.CLICK into the type
input field. As you do, Script Assist continues to build the addEventListener() expression in the
non-editable bottom region of the Script pane. In this way, you may
continue to supply parameters, such as a custom clickHandler reference in the listener field
(Figure 5-21).
Sometimes Script Assist is, frankly, not worth the effort. To
actually write the clickHandler()
function you just referenced, you would have to click the blue plus icon
again to add a new expression. This time, the choice would be Language
Elements→Statements, Keywords & Directives→definition
keyword→function, which is arguably unintuitive, even for a seasoned
programmer. After choosing “function”, you’d see the Script pane update as
shown in Figure 5-22, and
you could again fill out the input fields in the Script pane’s upper
half.
You might just find it easier to deselect the Script Assist button at this point, and then type in the remaining code by hand:
function clickHandler(evt:MouseEvent):void {
    var url:URLRequest = new URLRequest("http://www.domain.com/");
    navigateToURL(url);
}
The choice is yours.