
Chapter 14. How Do I Work with Events?
14.0 Introduction
The new event model is one of the biggest changes ActionScript 3.0
introduces. Gone are the event handlers of prior versions, such as
onRelease or the more antiquated
on(release) handler applied directly to
symbol instances. The new model makes use exclusively of event
listeners. In simple terms, event listeners are established to
monitor for the occurrence of a particular event, and then execute a
function when that event is received. Since listeners are required for all
event processing, this chapter both explains and uses them
extensively.
Even if you have experience with event listeners from prior versions of ActionScript (perhaps from use with components or objects for capturing key events), the event flow is quite different in ActionScript 3.0. Events can cascade down through the display list and bubble back up to the root of the file, allowing for advanced event handling. In line with the focus of this quick answer guide, this chapter covers the basic essentials of event processing, but provides an adequate overview to get you started.
14.1 Understanding Event Listeners
Solution
Create an event listener and accompanying function to execute when a desired event is received.
Discussion
The first part of reacting to an event is to create an event
listener. You do this by using the addEventListener() method, attaching the
listener to the object that will be the event. Intermediate to advanced
use of the event model suggests a variety of places to attach listeners,
some of which this chapter demonstrates. This example, however, uses the
direct approach, and attaches the listener to the interactive object
that a user will click: a sprite referenced by sp.
sp.addEventListener(MouseEvent.CLICK, onClick);
The method requires two arguments. The first is the event for
which the listener must listen. Typically, you use constants provided
for this purpose but, as you’ll learn later in this chapter, you can
also use strings. In this case, a mouse click has been specified by
using the CLICK event of the MouseEvent class.
The second argument is the name of the function you want to trigger when the event occurs. The function used as a listener function is like any other function except that listener functions require an argument, even though arguments in standalone functions are optional. This is because the event model is designed to pass on information about the event, the target of the event (the interactive element that was clicked, for example), which object the listener is attached to, and related information (such as stage locations, modifier key usage, and other data). Just like other arguments, a data type should be specified for the listener argument for type checking. The type provided should be the type of the event associated with the listener.
function onClick(evt:MouseEvent):void {
    trace("button clicked");
}
Here is an example script that shows a listener in action. When
you click the red sprite, the onClick() listener function is triggered, and the string is traced to the Output
panel. In later recipes in this chapter, you’ll learn how to work with
the item that the user clicked, and parse data from the argument.
var sp:Sprite = new Sprite();
drawSquare(sp, 0xFF0000);
sp.x = sp.y = 100;
sp.buttonMode = true;
addChild(sp);

sp.addEventListener(MouseEvent.CLICK, onClick);
function onClick(evt:MouseEvent):void {
    trace("sprite clicked");
}

function drawSquare(obj:Object, col:uint):void {
    var g:Graphics = obj.graphics;
    g.beginFill(col, 1);
    g.drawRect(0, 0, 40, 40);
    g.endFill();
}
14.2 Capturing Mouse Events
Problem
You want to execute code when the user interacts with an element using the mouse, for example enlarging an object when rolling over it with the mouse.
Discussion
In the previous recipe, you learned the basics of event listeners, using a mouse click as an example. This recipe demonstrates not only how to react to other mouse events, but also the ability to attach more than one listener to an object. This ability lets you perform different actions based on each event, even when interacting with the same object.
The following script excerpt works when interacting with a display
object called sp. When rolling over
the object, sp becomes 150 percent
larger than its original size. When rolling out, sp returns to its original size.
sp.addEventListener(MouseEvent.MOUSE_OVER, onOver);
sp.addEventListener(MouseEvent.MOUSE_OUT, onOut);

function onOver(evt:MouseEvent):void {
    sp.scaleX = sp.scaleY *= 1.5;
}
function onOut(evt:MouseEvent):void {
    sp.scaleX = sp.scaleY = 1;
}
The code is very similar to the previous recipe’s example. The event-related differences are that two listeners are used, each listens for a different event, and each calls a different function. In essence, the listener code has been doubled to account for the new listener set, but both listeners are attached to the same object.
The next script example uses separate mouse down and up events, in
contrast to the use of the CLICK
event, which triggers after the consecutive executions of both down and
up events (forming a complete “click”). This script turns on object
dragging when you click on a display object, and turns off dragging when
you release the mouse over the display object.
A very important change in this script is the introduction of the
target property seen in the onDown() function. This property, parsed from
the listener function argument, contains the target that dispatched the
event. Using this property, you can avoid hard-coding the object in the
function.
For example, this script successfully drags either of two display
objects, using only one set of functions. That is, relevant listeners
are attached to each object, but both listeners reference the same
functions. If the object being manipulated inside the functions were
hard-coded, rather than identified through the event’s target property, only the hard-coded object
would move, regardless of which the user tried to drag.
var sp:Sprite = new Sprite();
drawCir(sp, 0x9900AA);
sp.x = sp.y = 100;
addChild(sp);

var sp2:Sprite = new Sprite();
drawCir(sp2, 0x00AA00);
sp2.x = sp2.y = 200;
addChild(sp2);

sp.addEventListener(MouseEvent.MOUSE_DOWN, onDown);
sp.addEventListener(MouseEvent.MOUSE_UP, onUp);

sp2.addEventListener(MouseEvent.MOUSE_DOWN, onDown);
sp2.addEventListener(MouseEvent.MOUSE_UP, onUp);

function onDown(evt:MouseEvent):void {
    evt.target.startDrag();
}
function onUp(evt:MouseEvent):void {
    stopDrag();
}

function drawCir(obj:Object, col:uint):void {
    var g:Graphics = obj.graphics;
    g.beginFill(col, 1);
    g.drawCircle(0, 0, 40);
    g.endFill();
}
A later recipe will improve upon this script by correctly reacting when the mouse is released outside the bounds of the display object.
See Also
14.1 Understanding Event Listeners for understanding
event listeners, 14.5 Using the target and currentTarget Event Properties for when to use
target and currentTarget properties, and 14.6 Simulating a Mouse Up Outside Event for simulating a mouse
up outside event.
14.3 Understanding Event Flow
Solution
Review the capture, target, and bubbling phases, with particular attention to the default use of target and bubbling phases.
Discussion
Events flow through a SWF file in a specified manner, and
mechanisms exist to work with these events in multiple ways. For ease of
discussion, this recipe will discuss the flow of a MouseEvent.CLICK event, and assume the user
clicked on a movie clip that’s nested inside another movie clip found in
the main timeline. Looking at Figure 14-1, the movie clip clicked by
the user is mc2, and is also labeled
as “target.”
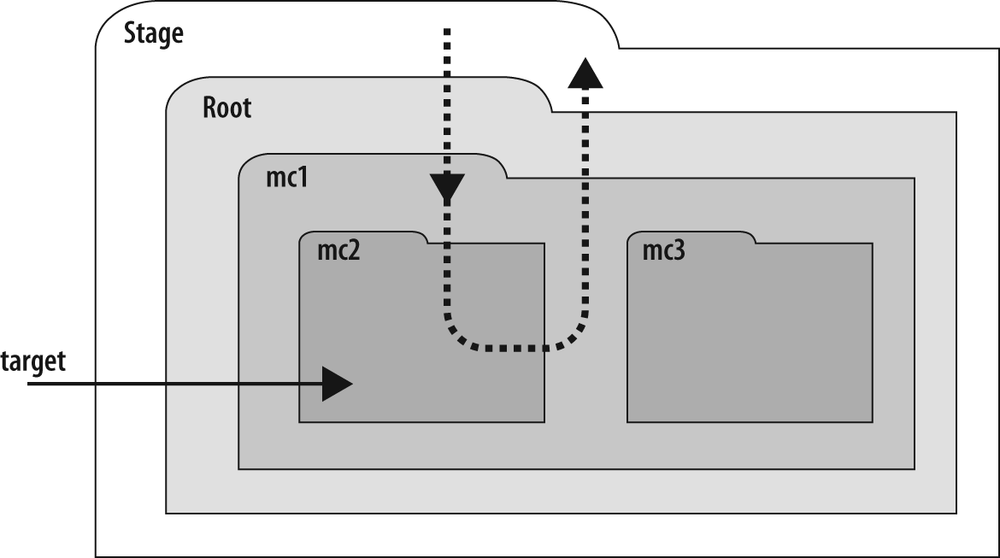
When someone clicks the movie clip, the event actually starts at the stage and begins to move through the display list. It makes its way through the display objects until it encounters the object on which she clicked. This is the target of the event. Rather than stopping when it reaches the target, the event continues on its round trip journey back through the display list to the main timeline and stage.
The initial journey to, but not including, the target is the capture phase of the event model. The actual time spent with the target is the target phase, and the return journey back to the stage is the bubbling phase.
The capture phase is the period during which Flash Player is trying to identify the object that dispatched the event. Starting at the stage, the event moves through display objects until the target’s found, at which point the phase ends. By default, the capture phase is not used. 14.14 Capturing an Event Before It Reaches Its Target, “Using the Capture Phase,” discusses turning on this phase.
The target and bubbling phases however, which listeners employ by default, are used in virtually every ActionScript 3.0 project. The importance of the target phase is probably fairly obvious. Briefly, Flash Player is processing a mouse click (for example) at the object on which the user clicked. This model is called the event-processing model in prior versions of ActionScript.
The bubbling phase brings new power to ActionScript. Using event bubbling, you can attach a listener to a parent object, and the desired event acts on all of its children. The next recipe demonstrates.
See Also
14.4 Using Event Bubbling for event bubbling, and 14.14 Capturing an Event Before It Reaches Its Target for using the capture phase.
14.4 Using Event Bubbling
Problem
You want to simplify code and add power to event processing by capturing events as they move through the display list from one object to another.
Solution
Attach an event listener to a display object container and let event bubbling act on its children.
Discussion
In 14.2 Capturing Mouse Events, the example script used a direct approach to event processing by attaching an event listener to each display object. This recipe includes a modified version of that example that takes advantage of event bubbling. You see two significant changes.
First, a display object container has been created, into which two circle sprites have been added. Second, instead of attaching a listener to each sprite, one listener is attached to the container. The default behavior to bubble events means that all its children can process the event.
var contnr:Sprite = new Sprite();
addChild(contnr);

var sp:Sprite = new Sprite();
drawCir(sp, 0x9900AA);
sp.x = sp.y = 100;
contnr.addChild(sp);

var sp2:Sprite = new Sprite();
drawCir(sp2, 0x00AA00);
sp2.x = sp2.y = 200;
contnr.addChild(sp2);

contnr.addEventListener(MouseEvent.MOUSE_DOWN, onDown);
contnr.addEventListener(MouseEvent.MOUSE_UP, onUp);

function onDown(evt:MouseEvent):void {
    evt.target.startDrag();
}
function onUp(evt:MouseEvent):void {
    stopDrag();
}

function drawCir(obj:Object, col:uint):void {
    var g:Graphics = obj.graphics;
    g.beginFill(col, 1);
    g.drawCircle(0, 0, 40);
    g.endFill();
}
Only the clicked circle is dragged (instead of the container and,
therefore, both children) because only the target of the event is
affected. The evt.target property always refers to
the circle receiving the mouse down event.
See Also
14.5 Using the target and currentTarget Event Properties for when
to use target and currentTarget properties.
14.5 Using the target and currentTarget Event Properties
Problem
When parsing data from an event listener function argument, you
want to know when to use the target
and currentTarget
properties.
Solution
Use target when you want to
know which object is the recipient of the event, and use currentTarget when you want to know to which
object the event listener is attached.
Discussion
In one regard, the distinction between the target and currentTarget is straightforward. The object
acted upon by the event (the button that’s clicked, the sprite that’s
rolled over, etc.) is the target,
while the object to which the listener is attached is the currentTarget. The two properties can refer to
the same object when the event dispatcher is also the object with the
listener. This circumstance is true when attaching a listener directly
to a button, for example. Clicking on the button dispatches the mouse
event (button is target), and the
listener is attached to the button (button is currentTarget).
When to use each property, however, is not always clear. The following script demonstrates a draggable window metaphor. A window-like sprite is drawn and, within it, a drag bar is drawn. An event listener starts dragging on mouse down, stops dragging on mouse up, and is attached to the window sprite.
var window:Sprite = new Sprite();
drawRoundedRectangle(window, 0x000099, 200, 200);
window.x = window.y = 100;
addChild(window);

var dragBar:Sprite = new Sprite();
drawRoundedRectangle(dragBar, 0x000033, 200, 40);
window.addChild(dragBar);

window.addEventListener(MouseEvent.MOUSE_DOWN, onDown);
window.addEventListener(MouseEvent.MOUSE_UP, onUp);

function onDown(evt:MouseEvent):void {
    //evt.target.startDrag();
    evt.currentTarget.startDrag();
}
function onUp(evt:MouseEvent):void {
    stopDrag();
}

function drawRoundedRectangle(obj:Object, col:uint, ¬
         w:Number, h:Number):void {
    var g:Graphics = obj.graphics;
    g.lineStyle(1, col);
    g.beginFill(col, .5);
    g.drawRoundRect(0, 0, w, h, 20);
    g.endFill();
}
Attaching the listener to the window sprite means that any child of that display object container can process the mouse event. This outcome occurs because the default behavior (unchanged in this example) lets the children capture the event during bubbling.
The most common approach of using the target property within the listener function
means that you can drag the container and any child within. This ability
creates the unfortunate side effect of being able to drag the bar by
itself, without dragging the window along with it. See this in action by
switching between the two bolded lines in the onDown() function of this example (commenting
out the line not in use).
As written, however, currentTarget is used in the function, so only
the object to which the listener is attached can be dragged. As a
result, dragging the window drags the window, and dragging the bar also
drags the window.
14.6 Simulating a Mouse Up Outside Event
Problem
You want a means of insuring that mouse events occurring outside
the bounds of a display object can be processed. However, ActionScript
3.0 has no equivalent to the onReleaseOutside event found in prior versions
of ActionScript.
Solution
Add an additional listener to the stage responsible for reacting to mouse up events.
Discussion
In certain ActionScript 3.0 scenarios, such as drag-and-drop
activities, an application can go awry due to the lack of a “mouse up
outside” event. Consider the simple drag-and-drop example in 14.4 Using Event Bubbling. If, while dragging one of the circle
sprites in that example, you accidentally release the mouse button while
the cursor is not over the same sprite, the
dragging behavior doesn’t cease. The sprite in question didn’t receive
the mouse up event required to execute the stopDrag() method. To stop the dragging, you
must click on the sprite again to ensure that the mouse button is
released over the sprite, and a mouse up event occurs.
Although earlier versions of ActionScript had a built-in event
mechanism (onReleaseOutside) for this
scenario, ActionScript 3.0 doesn’t include this feature.
Instead, you must add a listener to the stage to receive the mouse up event (because the event doesn’t occur at the display object). In most cases, you can even just associate the listener to the same function used by the display object listener. Only one line of code needs to be added to 14.4 Using Event Bubbling, like the example shown here in bold, to achieve the desired result.
contnr.addEventListener(MouseEvent.MOUSE_DOWN, onDown);
contnr.addEventListener(MouseEvent.MOUSE_UP, onUp);

stage.addEventListener(MouseEvent.MOUSE_UP, onUp);
See Also
14.4 Using Event Bubbling for event bubbling.
14.7 Capturing Frame Events
Discussion
A frame script is executed only once each time the Flash playhead enters a frame span. The playhead must leave the frame span and re-enter it again to execute the script a subsequent time. If, for example, you stop the playhead in a frame that contains a frame script, then that script doesn’t behave as if it were in a frame loop executing continuously.
You can, however, use the Event.ENTER_FRAME event to repeatedly trigger
a function. This event is available to sprites and movie clips
(including the main timeline), and triggers as many times per second as
dictated by the frame rate of your SWF file. The following example adds
10 degrees to the current rotation of a sprite, each time the event
occurs.
var sp:Sprite;
drawSquare();

sp.addEventListener(Event.ENTER_FRAME, onLoop);

function onLoop(evt:Event):void {
    evt.target.rotation += 10;
}

function drawSquare():void {
    sp = new Sprite();
    var g:Graphics = sp.graphics;
    g.beginFill(0x000099, 1);
    g.drawRect(0, 0, 40, 40);
    g.endFill();
    sp.x = sp.y = 100;
    addChild(sp);
}
Warning
It is very important to remove enter frame event listeners when you’re no longer using them, as a later recipe will demonstrate. Not removing the listeners can prevent them from being collected by the garbage collector. This trait can be especially intrusive when the listener’s in a SWF file that you wish to load into another SWF file. If the listener wasn’t properly removed in the loaded content, it can prevent the loaded file from being unloaded.
See Also
14.8 Improving Performance by Removing Event Listeners for removing event listeners.
14.8 Improving Performance by Removing Event Listeners
Discussion
As you might imagine, performing an unnecessary task repeatedly can waste resources. In the case of event listeners, both memory and performance are at risk if you don’t remove unused listeners.
A listener is unnecessary when your application no longer needs to rely on it to capture an event. For example, if a button’s never clicked, you still need its listener if the button can be clicked. That is, the need to react to that button click still remains, even if the button’s not used. However, tasks that will no longer be needed can be eliminated upon the completion of an event. For instance, if your project contains a one-time load process, listeners for events such as progress, error checking, and load-complete can all be removed once the loading has concluded.
The bold lines in the following code can be inserted in the
onLoop() function in the previous
recipe. Assume this project design requires only that the rotation add
10 degrees per event, and then stop once the rotation reaches or exceeds
135 degrees. The rotation is stopped, therefore, by removing the event
listener in a conditional within the listener function.
function onLoop(evt:Event):void {
    evt.target.rotation += 10;
    if (evt.target.rotation >= 135) {
        sp.removeEventListener(Event.ENTER_FRAME, onLoop);
    }
}
The removeEventListener()
method requires arguments. You must specify the coupling of event and
listener function that must be removed, because you can create multiple
listeners for the same object that listen for the same event but trigger
different functions, or that trigger the same function upon the
occurrence of different events.
If you use any optional listener features, such as invoking the capture phase, setting event priority, or using weak references (all discussed in later recipes), you shouldn’t include these parameters in the removal process. For example, the following hypothetical listener uses a weak reference, but the removal of that same listener does not include those same parameter values.
sp.addEventListener(Event.ENTER_FRAME, onLoop, false, 0, true);
sp.removeEventListener(Event.ENTER_FRAME, onLoop);
Warning
Removing listeners is important for memory management and performance, but it’s crucial when it comes to loading and unloading external assets. Enter frame event listeners that haven’t been removed from a loaded SWF file, for example, prevent that SWF file from being unloaded at runtime.
See Also
14.7 Capturing Frame Events for capturing frame events and 14.10 Capturing Stage Events through 14.12 Dispatching Your Own Events for optional event listener features.
14.9 Capturing Keyboard Events
Solution
Listen for the KeyboardEvent.KEY_DOWN event and parse
keyboard input from the listener argument.
Discussion
Two example uses for Keyboard event listeners include attaching them to a text field, in which case they respond only when the text field has focus, or attaching them to the stage, which is ideal for navigation systems. The following script uses a listener to demonstrate a few methods and properties related to key events.
The first three lines of the onKeyPressed() function use the event charCode property to look for text input. The
charCode property is the numeric
value of a key found in the designated character set. (UTF-8 is the
default character set.) A key with a corresponding text character
returns a charCode greater than zero
for each character. For example, lowercase a and
uppercase A have different charCode values.
Using the String method
fromCharCode()translates this number
into a string value. Other keys, such as Tab, Backspace, arrow keys, and
so forth, return a charCode of zero,
letting you filter them out, if desired.
The remainder of the onKeyPressed() function is a navigation
example, explained after the script.
var sp:Sprite;
drawSquare();

stage.addEventListener(KeyboardEvent.KEY_DOWN, onKeyPressed);
function onKeyPressed(evt:KeyboardEvent):void {
    if (evt.charCode > 0) {
           trace(String.fromCharCode(evt.charCode), "= char code", evt.charCode);
    }

    var shiftMod:int = 1
    if (evt.shiftKey) { shiftMod = 10 };

    if (evt.keyCode == Keyboard.RIGHT) {
        sp.x += shiftMod;
    } else if (evt.keyCode == Keyboard.DOWN) {
        sp.y += shiftMod;
    }
}

function drawSquare():void {
    sp = new Sprite();
    var g:Graphics = sp.graphics;
    g.beginFill(0x000099, 1);
    g.drawRect(0, 0, 40, 40);
    g.endFill();
    sp.x = sp.y = 20;
    addChild(sp);
}
The next two lines use the event shiftKey property to see if the Shift key is
pressed. Starting with a value of 1, the value of shiftMod is changed to 10 only if shiftKey is true (meaning the Shift key is
pressed). As a result, the sprite is moved 1 pixel at a time unless the
Shift key is pressed, in which case the sprite is moved 10 pixels at a
time.
The last conditional block checks the value of keyCode. The keyCode property returns a numeric value that
corresponds to the value of a key on the keyboard,
not a specific character on that key. For example, the
1 on a keypad and the 1 on the
main keyboard return different keyCode values, but lowercase
a and uppercase A return the
same keyCode values.
You can use the keyCode
property for things like navigation by comparing its value to constants
of the KeyboardEvent class that stand
for the arrow keys. In this recipe, the x-coordinate of the sprite
sp is changed when the right arrow
key is pressed, and the y-coordinate of sp is changed when the down arrow key is
pressed.
14.10 Capturing Stage Events
Problem
You want to determine when the user resizes the stage, when the mouse leaves the stage, or when the user enters full-screen mode.
Discussion
Using stage events can add a real professional touch to your work, and possibly even solve a problem or two. The first event discussed in this recipe is for determining when the user resizes the stage. This can occur when resizing a player, or projector window, or resizing a browser window with a SWF file set to percent size mode (instead of pixels or match movie size).
Before demonstrating the feature, you must set the stage scaleMode and align properties to not scale, and to align to
the upper-left corner of the window, when resized, as seen in the first
two lines of the following script. Without setting the scaleMode this way, the SWF file and
all its contents scale to match the window size, instead of
just resizing the canvas on which non-scaled content resides. The blue
circle in the following script enlarges or reduces based on window size
adjustments, rather than just repositioning itself to re-center in a
changing stage size.
Similarly, if you don’t set the align property to align to the top left of the
window, then the content in the SWF file appears to move around
unpredictably as the alignment is affected by varying window size. You
can witness this behavior, and that of scaling content, by commenting
out one or both of the first lines in this script, and setting the SWF
file size in the publishing template to percent.
The remainder of the script does nothing more than position a sprite, with a blue circle therein, in the center of the stage—both initially, and every time the stage is resized.
stage.scaleMode = StageScaleMode.NO_SCALE;
stage.align = StageAlign.TOP_LEFT;
stage.addEventListener(Event.RESIZE, onStageResize);

function onStageResize (evt:Event):void {
    positionSprite();
}

var sp:Sprite = drawSprite();
addChild(sp);
positionSprite();

function positionSprite():void {
    sp.x = stage.stageWidth/2;
    sp.y = stage.stageHeight/2;
}

function drawSprite():Sprite {
    var mySprite = new Sprite();
    var g:Graphics = mySprite.graphics;
    g.beginFill(0x0000FF, 1);
    g.drawCircle(0, 0, 20);
    g.endFill();
    return mySprite;
}
The Stage class also has two
other very handy events: Event.MOUSE_LEAVE and Event.FULLSCREEN. The former can tell you when
the user’s mouse has left the bounds of the Flash Player stage. This
feature lets you drop performance demands when the SWF file no longer
has user focus (by dropping the frame rate, for example) or merely
alerting the user that his mouse is still needed.
The latter event can trigger programmed behavior if the user switches to full-screen mode. This could be used to reposition UI elements or, as in this recipe, display text that reminds the user to return to normal mode using the Escape key (a fact that is only automatically displayed by Flash Player for a brief moment).
These features don’t work in the Flash interface’s embedded player, so test the following scripts in a browser. To enable both features, change your HTML publishing template (File→Publish Settings→HTML→Template) to “Flash Only - Allow Full Screen.” Thereafter, you can test using the Flash shortcut, File→Publish Preview→HTML.
To easily demonstrate the use of Event.MOUSE_LEAVE, the first part of the
following script draws a gray background the same size of the stage, and
a red box that is 100 × 100 pixels. When the mouse leaves the stage (as
shown by the gray rectangle), the red box will fade to 50 percent
opaque. After the script, you’ll learn how to respond to the mouse
returning to the stage.
var backSprite:Sprite = drawSquare(0xDDDDDD, stage.stageWidth, ¬
     stage.stageHeight);
addChildAt(backSprite, 0);

var foreSprite:Sprite = drawSquare(0xFF0000, 100, 100);
addChild(foreSprite);

stage.addEventListener(Event.MOUSE_LEAVE, onLeave);
function onLeave(evt:Event):void {
    foreSprite.alpha = .5;

    stage.addEventListener(MouseEvent.MOUSE_MOVE, onEnter);
    function onEnter(evt:MouseEvent):void {
        foreSprite.alpha = 1;
        stage.removeEventListener(MouseEvent.MOUSE_MOVE, onEnter);
    }
}

function drawSquare(col:uint, w:Number, h:Number):Sprite {
    var tempSprite:Sprite = new Sprite();
    var g:Graphics = tempSprite.graphics;
    g.beginFill(col, 1);
    g.drawRect(0, 0, w, h);
    g.endFill();
    return tempSprite;
}
Note
Flash Player doesn’t detect the mouse leaving the stage if the mouse is down.
There is no direct opposite of the Event.MOUSE_LEAVE event. That is, using
ActionScript, you can’t
automatically detect when the mouse returns to the Flash stage. However,
while the mouse is moving on the stage, MouseEvent.MOUSE_MOVE events are
triggered. Therefore, one way to determine if the mouse has re-entered
the stage is to set up an event listener that listens for mouse
movement.
For greatest efficiency, this recipe adds the event listener only when the mouse leaves the stage, and then removes the listener when the mouse is again detected on the stage. (Removing event listeners was discussed in 14.8 Improving Performance by Removing Event Listeners.)
Finally, the Event.FULLSCREEN
event is demonstrated in the following continuation of the previous
script. This passage picks up from the previous code block by using the
foreground sprite as a button. Each time the button’s clicked, the
screen mode is changed, and a text message is displayed or removed,
accordingly.
The first listener just reacts to a mouse event, but it does
include the displayState property of the stage.
This property can tell you if the screen is in full-screen or normal
mode. The second listener dispatches the Event.FULLSCREEN event each time the stage
enters or leaves full-screen mode. (Separate events for entering and
exiting full-screen mode don’t exist.)
Just before creating the second listener, a text field is
initialized and positioned, using the stage’s fullScreenWidth and fullScreenHeight properties. After the
listener detects each display state change, the resulting screen mode
value is queried. In full-screen mode, the text field is added to the
display list, and the field is later removed from the display list upon
return to normal mode.
Note
Object initializations are typically consolidated at the top of a script, but the text field creation in this example has been placed immediately before the listener for tutorial context. This process simplifies the later option of combining the scripts in this recipe into one cumulative file.
stage.scaleMode = StageScaleMode.NO_SCALE;
stage.align = StageAlign.TOP_LEFT;

foreSprite.addEventListener(MouseEvent.CLICK, onClick);
function onClick(evt:Event):void {
    if (stage.displayState == StageDisplayState.NORMAL) {
        stage.displayState = StageDisplayState.FULL_SCREEN;
    } else {
        stage.displayState = StageDisplayState.NORMAL;
    }
}

var noticeFld:TextField = addNotice("Press ESC to return to normal view");
stage.addEventListener(Event.FULLSCREEN, onFull);
function onFull(evt:Event):void {
    if (stage.displayState == StageDisplayState.FULL_SCREEN) {
        addChild(noticeFld);
    } else {
        removeChild(noticeFld);
    }
}

function addNotice(msg:String):TextField {
    var txtFrmt:TextFormat = new TextFormat();
    txtFrmt.size = 14;
    txtFrmt.bold = true;

    var txtFld:TextField = new TextField();
    txtFld.autoSize = TextFieldAutoSize.LEFT;
    txtFld.text = msg;
    txtFld.setTextFormat(txtFrmt);

    txtFld.x = stage.fullScreenWidth/2 - txtFld.width/2;
    txtFld.y = stage.fullScreenHeight - txtFld.height;
    return txtFld;
}
Note
The resize and full-screen events can be used together. If you copy and paste all of the scripts in this recipe into one file, then not only can you enter full-screen mode but the blue circle re-centers itself into the middle of the screen each time you change screen modes. During full-screen mode, the mouse leave event isn’t dispatched.
See Also
14.8 Improving Performance by Removing Event Listeners for removing listeners.
14.11 Using a Timer to Dispatch Events
Problem
You want to use a recurring event that’s not linked to the frame rate, or a one-time event that’s delayed.
Solution
Use a timer and specify the duration between event dispatches, and how many events are dispatched.
Discussion
The first step in using timer events is to create and start a
timer. ActionScript 3.0’s new Timer
class essentially provides a consistent mechanism to replace the
setInterval() and setTimeout() methods, so you can use them a
bit more easily.
The Timer class accepts two
arguments. The first is the duration between events, in milliseconds. If
you want an event to occur every 5 seconds, this value would be 5000.
This duration begins counting when the timer is started, before the
first event is fired, so you can also use it to delay the dispatching of
a single event. The second is an optional finite number of times you
want the timer event to fire.
The following sample uses the syntax for delaying an event (by dispatching it only once), firing an event a finite number of times, and looping an event infinitely by specifying no limit of occurrences, respectively. All samples use a duration of 1000 milliseconds (one second).
new Timer(1000, 1);
new Timer(1000, 10);
new Timer(1000);
Here’s a demonstration of a timer in action. This example, expanded over the remainder of this recipe, and the next recipe, is based on the metaphor of a quiz timer. You may wish to monitor time throughout a quiz or test with regular reminders. If, for example, you wanted to time an hour-long quiz, you might want reminders every 10 minutes to gauge your progress. (To make this code easy to test, it uses an interval of 2 seconds, rather than 10 minutes.)
The first two lines of this block create and start a timer that
fires every 2 seconds for a total of six times. The next four lines add
an event listener to the timer, to trigger the onRemind() function every time a timer event
is received. The function traces “reminder” to the Output panel. (In a
real-world example, this might sound a chime, or move a progress
bar.)
var timr:Timer = new Timer(2000, 6);
timr.start();

timr.addEventListener(TimerEvent.TIMER, onRemind, false, 0, true);
function onRemind(evt:TimerEvent):void {
    trace("reminder");
}
The Timer class has another
handy event called TimeEvent.TIMER_COMPLETE that notifies you
when the timer has dispatched an event the designated number of times.
(When an infinite timer is desired, this event never fires.) This
ability’s very useful for cleaning up after your timer, as the following
section of code demonstrates.
The first line of the listener function stops the timer, the second two lines remove both listeners from this recipe, and the last line traces that the result as a simple visual cue of the function’s success.
timr.addEventListener(TimerEvent.TIMER_COMPLETE, onRemindFinal);
function onRemindFinal(evt:TimerEvent):void {
    evt.target.stop();
    evt.target.removeEventListener(TimerEvent.TIMER, onRemind);
    evt.target.removeEventListener(TimerEvent.TIMER_COMPLETE, onRemindFinal);
    trace("timer complete, listeners removed");
}
Warning
Removing event listeners for timers is a very important concept to understand because, like event listeners, timers can prevent a SWF file from being unloaded. As an extra rub, timers can’t be unloaded unless they’re stopped first.
See Also
14.8 Improving Performance by Removing Event Listeners for removing event listeners and 14.12 Dispatching Your Own Events for using custom events.
14.12 Dispatching Your Own Events
Problem
You want to create and dispatch a custom event, rather than rely on pre-existing ActionScript 3.0 events.
Solution
Use the dispatchEvent() method
to send a custom event and use that same event as the first argument of
an event listener.
Discussion
You’ll probably find yourself, at one point or another, wishing that an ActionScript class had one or two additional events to fill a void in your project. Moreover, you’ll probably want to add events to custom classes that you write yourself.
Any class (including your own) that extends the ActionScript 3.0
EventDispatcher class can send an
event. This includes many display objects (such as the main timeline),
meaning that you can also dispatch events from frame scripts.
This example builds on the previous recipe to dispatch an event when a timer’s halfway through its cycle. If you imagine the code required to check for the halfway point of a timer cycle, you might assume an additional mechanism, such as an enter frame event would be required. A listener with a conditional might continuously compare the timer’s progress with your desired value, to determine if the halfway point has been reached. This way works, of course, but the ability to dispatch events makes this process a bit easier.
One of the ideas behind event dispatching is to take advantage of something that has already occurred, and use that as an occasion to inform another part of your application that an event has occurred. For example, an event might be dispatched after a load process completes or a sound finishes playing.
In this case, you can take advantage of the fact that the timer is firing at regular intervals and, when a condition has been met, dispatch your own event. This process removes the unneeded overhead of an enter frame event, for example, that might otherwise be required to check to see if the condition has been satisfied. All that remains is to set up a listener to react to your custom event.
If you want to go all the way and make your event follow the same
practices as ActionScript 3.0 classes, you can create your own event
class. This class could define a public constant for each event, and let
you specify your event the same way you would any other—MyLoadEvent.DONE, as a hypothetical example.
However, in many cases this is overkill. Since these constants are just
consistent, reliable stand-ins for strings, primarily used for more
structured data type checking, you can use a string directly, if
preferred.
In the following example, (the bold lines of which can be added to
the previous recipe) a conditional uses the Timer properties repeatCount and currentCount to see if at least half the timer
events have been dispatched. Upon that occurrence, the custom event
halfway is dispatched and trapped by
its own listener.
function onRemind(evt:TimerEvent):void {
    trace("reminder");
    if (evt.target.currentCount >= evt.target.repeatCount/2) {
        dispatchEvent(new Event("halfway"));
    }
}
addEventListener("halfway", onHalfway, false, 0, true);
function onHalfway(evt:Event):void {
    trace("halfway point reached");
}
As seen in the added conditional, creating the event is as
straightforward as instantiating any object, using the new keyword. The process uses the Event class to form the custom event, and the
dispatchEvent() method to send it on
its way.
See Also
14.11 Using a Timer to Dispatch Events for context with using timer events.
14.13 Manually Calling Event Listener Functions
Problem
You want to explicitly call a function used by an event listener without generating argument errors.
Solution
Pass a custom event or null reference to the function when called.
Discussion
The ActionScript 3.0 event model requires that each listener function contain a parameter for receiving event data. This system’s very useful for parsing information about the event but can also generate errors when calling the function manually (because no event is being passed to the listener function).
Consider the following example. A listener that triggers the
function onClick() is attached to the
stage. When trying to call the function manually, an error is
thrown.
stage.addEventListener(MouseEvent.CLICK, onClick);
function onClick(evt:MouseEvent):void {
    //function contents
}

onClick();
//results in error
To prevent the error, you can create a custom event of the type needed by the listener.
onClick(new MouseEvent(MouseEvent.CLICK));
Alternately, you can pass null
with the function call.
onClick(null);
However, this may create other errors depending on how your function is structured. For example, if your listener function parses event-related information from its parameter, you may receive a null-object error.
The following example demonstrates that generating a stand-in
event is handled properly both when the function’s purpose is unrelated
to the event (as seen in the first line of the function, tracing a
string) and when event data is used (as seen in the second line, tracing
the target of the event). The result of the latter trace is null because the event is artificial and,
therefore, there’s no event target, but it doesn’t generate an
error.
stage.addEventListener(MouseEvent.CLICK, onClick);
function onClick(evt:MouseEvent):void {
    trace("onClick executed");
    trace(evt.target);
}

onClick(new MouseEvent(MouseEvent.CLICK));
14.14 Capturing an Event Before It Reaches Its Target
Discussion
The addEventListener() method
has three optional parameters. The first is useCapture, a Boolean, that determines the
phase of the event. The first line of the following syntax is an example
event listener with the two mandatory arguments, while the second shows
the useCapture parameter with its
default value of false.
sp.addEventListener(MouseEvent.CLICK, onClick);
sp.addEventListener(MouseEvent.CLICK, onClick, false);
This default value processes the event during the target/bubbling
phases, and has been used throughout this chapter and discussed in 14.5 Using the target and currentTarget Event Properties. Setting this value
to true switches the event processing
stage to the capture phase, meaning the event will move through the
display list on its first leg of the journey but
not reach the target.
Most programmers rarely use this phase. The capture phase may sometimes be used to stop an event from continuing to propagate through the display list. Another use, however, is to prevent a display object container from reacting to an event, but let the container’s children respond to that same event.
In 14.2 Capturing Mouse Events, you learned how to act only on a target of an event. However, this process required a separate listener for each target. In 14.4 Using Event Bubbling, you learned how to apply a listener to a display object container so that all of the container’s children could automatically react to the event. In this recipe, you also attach a listener to a container, but use the capture phase so only the children can react.
A scenario that discusses all of these approaches might be dragging two children of a display object container. Applying listeners directly to the children means only the children are draggable, but you need two listeners. Applying a listener to the container requires only one listener but, by default, the container’s also draggable. Using the capture phase in the latter instance, however, means that the children are draggable, but the container remains fixed.
The mouse down listener in this example has been changed to use
the capture phase (note the third argument, true).
var contnr:Sprite = new Sprite();
drawRoundedRectangle(contnr, 0x000099, 130, 130);
contnr.x = contnr.y = 100;
addChild(contnr);

var child0:Sprite = new Sprite();
drawRoundedRectangle(child0, 0x000033, 40, 40);
child0.x = child0.y = 20;
contnr.addChild(child0);

var child1:Sprite = new Sprite();
drawRoundedRectangle(child1, 0x330000, 40, 40);
child1.x = child1.y = 70;
contnr.addChild(child1);

contnr.addEventListener(MouseEvent.MOUSE_DOWN, onDown, true);
contnr.addEventListener(MouseEvent.MOUSE_UP, onUp);

function onDown(evt:MouseEvent):void {
    evt.target.startDrag();
}
function onUp(evt:MouseEvent):void {
    stopDrag();
}

function drawRoundedRectangle(obj:Object, col:uint, w:Number, h:Number):void {
    var g:Graphics = obj.graphics;
    g.lineStyle(1, col);
    g.beginFill(col, .5);
    g.drawRoundRect(0, 0, w, h, 20);
    g.endFill();
}
See Also
14.8 Improving Performance by Removing Event Listeners for information about removing event listeners, and 14.14 Capturing an Event Before It Reaches Its Target regarding the capture phase.
14.15 Setting the Execution Order of Events
Problem
You need to use the same event to trigger multiple listener functions, but want to set or change the order in which those functions are executed.
Discussion
The second of three optional parameters of the addEventListener() method sets the execution
order of multiple occurrences of the same event.
For example, three listeners that use mouse up, down, and click events,
respectively, aren’t affected by this setting. However, three listeners
that all use mouse up events are ordered according to the use of the
priority parameter.
The following shows this parameter with its default value of 0. Because the order of parameters is fixed, using the second optional parameter requires the use of the first. However, you can simply pass in the default values of any parameters you don’t wish to change.
sp.addEventListener(MouseEvent.CLICK, onClick, false, 0);
This recipe’s example traces a message to the Output panel when the mouse button is clicked over the stage. The first unique event dispatched clears the variable used to contain the message, and the last unique event dispatched traces the assembled message. In between, however, are three occurrences of the same event. They consecutively assemble a verb, noun, and adjective based on order of execution because no priority is specified. The result is the question, “is Claire beautiful” (punctuation omitted intentionally).
However, if you comment out the original trio of mouse up listeners, and comment in their twins, then you see that the optional priority parameter has been used. This parameter accepts a non-negative integer, and executes the same events based on the highest priority number first. (Any listener without a priority specified uses the default priority value of 0.) This changes the traced output, executing the functions in the order of noun, verb, adjective. The result is the tracing of the true statement, “Claire is beautiful,” to the Output panel.
var msg:String = "";

stage.addEventListener(MouseEvent.MOUSE_DOWN, onClear);

stage.addEventListener(MouseEvent.MOUSE_UP, onVerb);
stage.addEventListener(MouseEvent.MOUSE_UP, onNoun);
stage.addEventListener(MouseEvent.MOUSE_UP, onAdjective);

/*
stage.addEventListener(MouseEvent.MOUSE_UP, onVerb, false, 1);
stage.addEventListener(MouseEvent.MOUSE_UP, onNoun, false, 2);
stage.addEventListener(MouseEvent.MOUSE_UP, onAdjective, false, 0);
*/

stage.addEventListener(MouseEvent.CLICK, onShowMsg);

function onClear(evt:Event):void {
    msg = "";
}

function onNoun(evt:Event):void {
    msg += "Claire ";
}

function onVerb(evt:Event):void {
    msg += "is ";
}

function onAdjective(evt:Event):void {
    msg += "beautiful ";
}

function onShowMsg(evt:Event):void {
    trace(msg);
}
Note
You can use variables can be used for priority values, so that you can change the execution order of listener functions on the fly.
14.16 Using Weak Listeners
Problem
In addition to good memory management practices, you want to increase the likelihood that an unwanted object will be removed from memory.
Discussion
The third and last optional parameter of the addEventListener() method substitutes a
weak reference to the listener for the strong,
persistent connection used by default. Weak references are support tools
to help with memory management. Flash Player uses a common memory
management method called garbage collection to
clear unused elements from memory. It marks any unused elements for
collection, and then, during more efficient periods in your application,
sweeps through and clears everything up.
If you’re not careful about removing unwanted objects from memory, you can run into performance and/or memory problems. A very important part of this process is removing unused event listeners, as discussed in 14.8 Improving Performance by Removing Event Listeners. However, using weak references for listeners lets Flash help a bit when determining which objects are set for removal from memory. The basic idea of weak listeners is: if the object to which a reference was being maintained no longer exists, don’t let the reference prevent garbage collection.
Think of the relationship between milk and its surrounding carton. If there’s milk in the carton, the carton shouldn’t be thrown away. However, when the milk’s gone, you don’t want to keep the carton in your refrigerator. That outcome is the effect with a normal (default) event listener. A reference remains, and the empty carton isn’t available for collection.
Metaphorically, the milk’s a button, the carton’s an event listener, and the refrigerator’s the total available memory. Proper memory management requires that you throw the milk carton in the trash when the milk’s gone, and wait for the garbage collectors to pick it up and take it away on their next visit. However, if you forget to throw the carton away, a weak reference may help. There’s no longer any milk in the carton (the button has been deleted). Therefore, since there’s no longer a link between carton and milk (button and listener), the carton can be discarded.
To enable weak listeners, all you need to do is set the last
optional parameter of the addEventListener() method to true. You can do this without being forced to
use either of the first two parameters simply by reiterating their
default values. The following line of script enables a weak reference
for a display object called sp, and a
listener function called onClick().
Neither the capture phase nor priority features are being used.
sp.addEventListener(MouseEvent.CLICK, onClick, false, 0, true);Warning
Using weak listeners is not a substitute for explicitly removing listeners!
See Also
14.8 Improving Performance by Removing Event Listeners for information about removing event listeners.