I’m sure Apple wouldn’t mind if you ordered all of your movies and television shows from the iTunes Store, but of course that’s not the only source for video. I’d guess you own a collection of movies on DVD you’d like to watch on the Apple TV, where you only need to highlight a title to play it.
Although Hollywood movies get most of the attention, they’re not the only video sources you can watch. If you own a digital camcorder, you probably have a lot of footage already sitting on a hard drive or stored on tape that would be perfect viewing on your widescreen TV. This chapter is all about how to encode that content into an Apple TV-friendly format.
Back in the early days of MP3 music, one of my primary reasons for using digital jukebox software like iTunes was to access my entire library of music from one place, without having to sort through stacks of (admittedly disorganized) CDs to find one album or song. Now, after ripping (encoding) my music, all my CDs are in storage and I can find whatever song I want with a few clicks in iTunes.
I’d also like to do the same with DVDs I’ve purchased.
For example, I loaned disc 1 of the series Firefly to a friend and completely forgot about it. Months passed. When I wanted to watch an episode again, I couldn’t find the disc. I asked my friend, who said he’d returned the CD shortly after I’d loaned it to him. It turned out the case had slipped behind my entertainment center and was actually within a foot of my DVD player the whole time. If I had ripped the episodes to a hard drive, I could have just pulled up the one I wanted to watch and not thought any more about it.
Here’s another good example: If you have children, you know that a DVD takes a lot of abuse until they’re unplayable. When it reaches that point, you could explain to Junior that nothing in life is permanent, that all things must come to an end, and that Thomas the Tank Engine isn’t the end-all and be-all of existence. But you’d probably end up buying a new copy anyway. With the Apple TV, you can rip that original disc and then put it safely away and play the contents from the Apple TV at any time.
Let me say at the outset that video encoding is a topic you could easily lose yourself in. Fortunately, others with that knowledge and expertise have created tools that can convert video to formats the Apple TV can play.
If you own a Mac, download HandBrake (handbrake.m0k.org), a free, open-source application that can rip commercial DVDs. The latest version added encoding presets for the Apple TV and the video-enabled iPod.
Note
A Windows version of HandBrake is also available, but as of the publication of this book, I can’t recommend it. Primarily this is because it won’t decrypt commercial DVDs, making it useless for what we’re trying to do here. But it’s also pretty rough around the edges, with an interface especially that needs more work. If you’re ripping unencrypted DVDs and aren’t bothered by interface issues (like status boxes that don’t reveal the status), HandBrake for Windows is a good free solution.
Under Windows, DVD to Apple TV Converter (www.mp4converter.net) provides the same capabilities in an easy-to-use interface for $30. Several similar utilities are available; I’m using this one as an example.
I’ll walk through the steps required to grab the video content and then take a look at some of the specific settings that come into play.
To rip a DVD using HandBrake, do the following:
Launch HandBrake. If the DVD isn’t in your Mac’s optical drive, insert it. HandBrake detects the disc and scans it, specifically looking for a folder called VIDEO_TS.
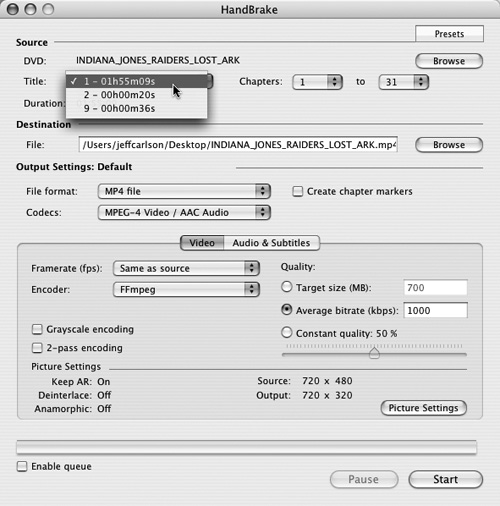
A DVD’s structure is made up of titles and chapters. A feature movie, for example, may occupy one title, while a making-of video on the same disc would be another title. In HandBrake, check that the selection in the Title pop-up menu looks like it would be feature length; in FIGURE 9.1, title 1’s duration is 1 hour and 55 minutes, so that’s definitely the movie itself.
If you plan to rip the entire movie, leave the Chapters pop-up menus alone. However, if you want to encode just a portion of the movie, choose the chapter numbers you want; these represent scenes in the movie that you can easily skip to when playing the DVD.
Click the Presets button to reveal the Presets drawer and click HB–AppleTV. The output settings are switched to values that generate a movie that will play on the Apple TV (I’ll cover these in more detail later).
Choose a destination and name for the file that will be created in the Destination field; either type the path name directly or click the Browse button and change the information in the dialog that appears.
Click Start to initiate the encoding.
Depending on the length of the movie and the power of your computer, this step could take a while. Video encoding is processor-intensive, so you might want to go grab a cup of tea.
To rip a DVD using DVD to Apple TV Converter, follow these steps:
Launch the program. If the DVD isn’t in your computer’s optical drive, insert it.
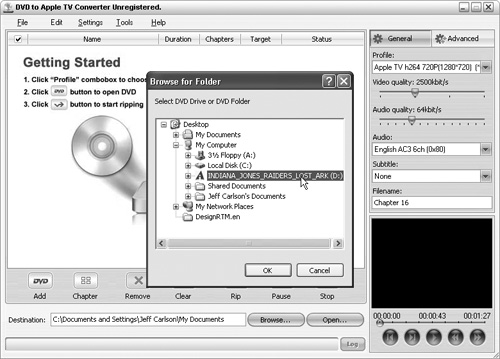
Click the Add button and select the DVD in the Browse for Folder dialog (FIGURE 9.2).
In the list of titles and chapters, mark the checkboxes for the ones you want to encode. All chapters on disc are selected by default, so deselect any that aren’t part of the title that contains the movie itself.
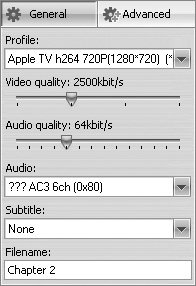
In the General pane, choose AppleTV h264 720P from the Profile pop-up menu (FIGURE 9.3). (If your television doesn’t support 720p playback, choose AppleTV h264 480p instead.)
Enter a name in the Filename field.
Click the Browse button next to the Destination field to choose a location for the generated file.
Click the Rip button to initiate encoding.
To make the movie appear on the Apple TV, you need to add it to iTunes. Locate the file that the DVD ripping software created and drag it to the iTunes library. Or, choose File > Add to Library (Command-O) on the Mac or File > Add File to Library (Ctrl+O) under Windows and find the file using the Add to Library dialog. The movie appears in your Movies list after the Apple TV is synchronized.
Who would have suspected that people would pay good money for the entire first season of The Dukes of Hazzard? Using the steps outlined previously, you can rip discs that contain multiple episodes of a TV show—look for titles with a duration of around 20 or 40 minutes (the actual length of an episode minus commercials).
Instead of ripping each episode individually, Hand-Brake can grab them all at once and save them to separate files. Here’s how:
Follow the steps outlined in the previous pages to choose a title containing an episode.
When the settings are chosen, click the Enable queue checkbox at the lower-left corner of the window.
In the Destination field, give the file a unique name (such as the episode number).
Click the Add to queue button to put that title on the waiting list.
Choose another title from the Title menu, give it a unique name, and click Add to queue again. Repeat for as many episodes you want to rip from the disc.
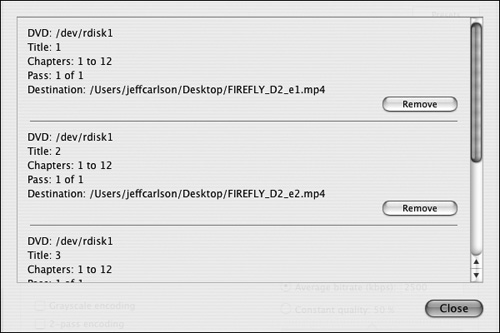
Click the Show queue button at any time during this process to view a list of what’s scheduled to be encoded (FIGURE 9.4).
You can click the Remove button to cancel an item. In fact, if you need to change the settings of an item in the queue, simply remove it and add it again with the new options.
Click the Start button to initiate encoding.
Add the episode files to iTunes.
While your video is being ripped, let’s go back and look at some of the encoding settings we skipped over in the name of getting speedy results. Tweaking these enables you to massage the output, letting you give up some image quality in favor of creating smaller files on disk, for example.
Here’s how Apple lists the supported video formats:
H.264 and protected H.264 (from iTunes Store): Up to 5 Mbps, Progressive Main Profile (CAVLC) with AAC-LC audio up to 160 Kbps (maximum resolution: 1280 by 720 pixels at 24 fps, 960 by 540 pixels at 30 fps) in .m4v, .mp4 and .mov file formats
iTunes Store purchased video: 320 by 240 pixels or 640 by 480 pixels
MPEG-4: Up to 3 Mbps, Simple Profile with AAC-LC audio up to 160 Kbps (maximum resolution: 720 by 432 pixels at 30 fps) in .m4v, .mp4 and .mov file formats
H.264 and MPEG-4 are codecs (a shortened term for compressor-decompressor), the mathematical methods of compressing video to manageable sizes. Progressive Main Profile (CAVLC) is a specific encoding method used, essentially a way of ordering the data that makes video delivery efficient. (I could explain more about context-adaptive variable-length coding, but my brain would explode. You can find more information at en.wikipedia.org/wiki/H.264.)
Bitrate is the measure of how much data is transferred per second. The Apple TV can handle video encoded in H.264 at up to 5 megabits per second (Mbps), while MPEG-4 can handle up to 3 Mbps. In general, a higher bitrate produces higher-quality video, because more information is delivered per second. But that also creates larger file sizes. The presets in HandBrake and DVD to Apple TV Converter use 2.5 Mbps (expressed as 2500 kilobits per second, or Kbps) or 3 Mbps as a compromise. Movies purchased from the iTunes Store, by comparison, average about 1.5 Mbps so they will also play on video-enabled iPods, which don’t have the same robust video-decoding hardware such as is found on the Apple TV or on personal computers. If you’re experimenting with the settings yourself, bitrate is a good place to start with other values.
The audio bitrate is also included: AAC-LC audio at up to 160 Kbps refers to audio encoded using the Advanced Audio Coding-Lossy Compression codec.
Resolution is the size of the video image in pixels. One of the easiest ways to reduce the size of a movie file is to rip it at a lower resolution (such as 640 by 480 pixels), because you’re rendering far fewer pixels. Movies purchased from the iTunes Store are either 320 by 240 pixels (the size offered when video first became available) or 640 by 480 pixels, which can be played on a video-enabled iPod.
Framerate is expressed as frames per second (fps). When you have more frames, you’re using more data, which is why 720p HD video is limited to 24 fps on the Apple TV. However, 24 fps is also the framerate of projected film, which exhibits a specific “movie quality” appearance. Compare that to NTSC video (the standard in the United States), which runs at 30 fps and has a distinct “video” feel. (The other video standard, PAL, runs at 25 fps and is often used by independent filmmakers to simulate that film look.) If you encode an HD movie at 30 fps, the Apple TV won’t play it.
The Apple TV can play files in .m4v, .mp4 (both MPEG-4), and .mov (QuickTime movie) formats. What’s notable about these requirements is that the box will not play some other well-known formats such as DivX or Windows Media (.wmv).
Tip
Enterprising hackers have come up with ways to modify the Apple TV so that it will play those and other formats. See wiki.awkwardtv.org for more information.
You know the feeling when you can see something but it’s just out of your reach? That’s how I feel about HD video and the iTunes Store. The pieces are there to provide HD movies and TV shows, but so far (as this book went to press, at least) Apple’s offerings are still small by comparison.
In Chapter 5, I mentioned that some video podcasts are offered in HD, even HD specifically encoded for the Apple TV. You can also download high-definition movies from Apple’s QuickTime pages and other online sources. Making them Apple TV-friendly is simple.
If you’ve upgraded QuickTime Player to QuickTime Pro (which costs $30), simply open the HD movie, choose File > Export, and select Movie to Apple TV as the export format.
Another Mac solution is VisualHub from Techspansion ($23, www.techspansion.com/visualhub/), which not only converts videos much faster than QuickTime’s pokey pace, but also handles some video formats that QuickTime can’t read. Apple TV Video Converter ($30, www.mp4converter.net) handles the same tasks on the Windows side.
If the HD source video is larger than the Apple TV’s maximum resolution, use the programs’ advanced settings to specify a size of 1280 by 720 pixels, set the encoding type to H.264, and be sure to set the framerate as 24 fps.
Tip
“If I can specify an HD resolution, why not just convert my DVD movies to 1280 by 720?” you may be asking yourself. Unfortunately, resolution doesn’t work that way. If your original resolution is lower than what you’re trying to achieve (which is the case with DVD), upsampling in this way only adds pixels and often degrades image quality—the computer is guessing where to insert pixels where they didn’t exist before.
Most digital camcorders include a cable that lets you plug the device directly into your television to play back the video that you shot, which is a better viewing experience than crowding around the camcorder’s two-inch screen. But that puts you back behind the TV, messing with cables video inputs and audio sources.
Plus, you may have already edited your footage. When friends and relatives come to visit, show off your handiwork (and your vacation highlights) on the television. As high-definition camcorders start to trickle into people’s hands, this option is going to become more popular.
For the sake of example, I’m going to assume that you’ve already edited your video using a program like Apple’s iMovie HD (free on new Macs, or part of the $80 iLife suite) or Microsoft’s Windows MovieMaker, which comes with Windows XP Service Pack 2 (SP2).
If your movie was editing in iMovie HD, do the following:
Open your edited movie in iMovie HD.
Choose File > Export, or press Command-Shift-E to display the Share dialog.
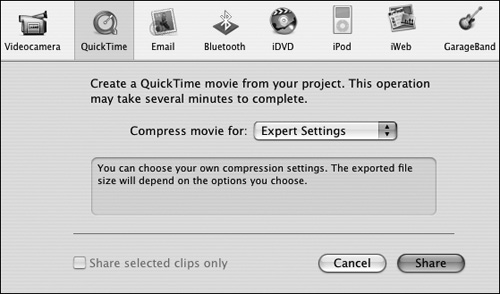
From the Compress movie for pop-up menu, choose Expert Settings (FIGURE 9.5).
Click the Share button to continue, which brings up a save dialog.
From the Export menu, choose Movie to Apple TV.
Click Save to export the movie. The software saves a version that’s appropriate for the source material—HD movies are exported at the Apple TV’s HD resolution, for example.
Locate the exported file and add it to iTunes to make it available to the Apple TV.
Tip
If you own a Mac and want to know more about editing in iMovie HD (and creating DVDs using iDVD), allow me to humbly suggest my book iMovie HD & iDVD for Mac OS X: Visual QuickStart Guide. It covers everything from shooting footage to burning the final movie on DVD. See www.jeffcarlson.com/imovie/ for more information.
Follow these steps to export a movie from Windows Movie Maker:
Open your edited movie in Windows Movie Maker.
In the Tasks pane, click Finish Movie and then choose Save to my computer. The Save Movie Wizard appears.
Give the movie a file name and choose a location on disk where it will be saved.
On the next screen, click the Other settings radio button and choose High quality video (NTSC) (FIGURE 9.6).
Launch your favorite video conversion software; for this example, I’m using Apple TV Video Converter. The steps in most programs should be similar, however.
Click the Add button and locate your exported movie.
Click the Encode button to convert the file.
Add the new movie file to iTunes for later synchronizing to the Apple TV.

A downside to ripping your own DVDs or converting your movies is that they don’t include the type of metadata that make Smart Playlists so helpful. Just a few minutes of work, however, can remedy that:
In iTunes, select the movie and choose File > Get Info.
Click the Info icon or tab.
Enter whatever data you want into the fields provided.
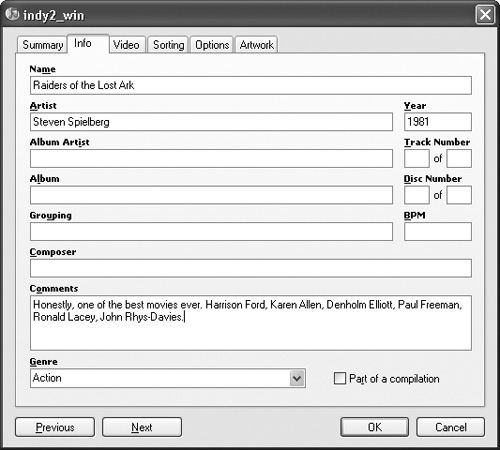
Since iTunes began its life as a music player, the fields on the Info tab are really music-centric. However, what’s important is that you’re adding information that can be found later. So, for example, you could insert the director’s name in the Artist field and list the major cast members in the Comments field (FIGURE 9.7).
Tip
To be more specific in your metadata tagging, download Lostify for Mac (lowellstewart.com/lostify/) or one of the AtomicParsley utilities for Windows (atomicparsley.sourceforge.net), which can set tags such as rating (TV or MPAA) and production number that are not editable within iTunes.
When iTunes imports a video, it creates an icon based on the movie file’s first frame. To give your movie a better appearance, do the following:
In iTunes, bring up the contextual menu (right-click or Ctrl-click on a Mac with a single-button mouse) and choose either Show in Finder (Mac) or Show in Windows Explorer.
Open the file in QuickTime Player Pro.
Drag the scrubber bar below the movie to the frame that you’d like to use as the icon.
Choose Edit > Copy.
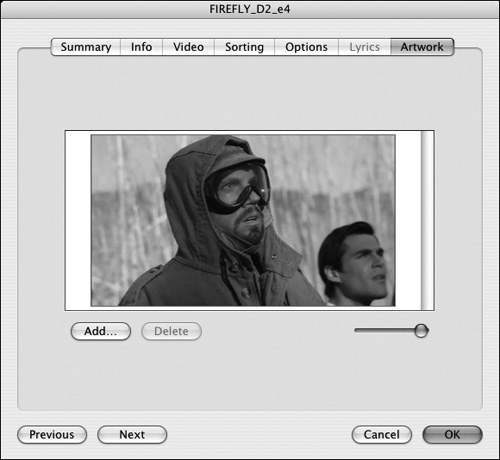
In iTunes, choose File > Get Info and click the Artwork tab.
Select the artwork that’s currently there (if any) and click the Delete button.
Choose Edit > Paste to insert the image, which will be used as the icon in iTunes and on the Apple TV (FIGURE 9.8).