
If you’ve ever gotten trapped in a snake’s nest of cables behind the TV, you know that making several video and audio components work together isn’t easy. Starting out from scratch, it can be a no-sweat operation. But more than likely you’ll be attempting to Borg together the Apple TV with other equipment.
The upside is that Apple has intentionally limited your choices. The Apple TV contains only a few ports for connecting to your television and stereo, which cuts down the number of cables while still delivering all that color and stereo sound. Grab a flashlight, make room behind the TV, and let’s get started.
Generally speaking, follow these steps to hook up the Apple TV:
Connect the Apple TV and the television using either HDMI or component video cables.
If you’re outputting audio to a device other than the television, connect the Apple TV using analog or optical audio cables.
Plug in the Apple TV’s power cable.
Tip
The Apple TV does not include an on/off switch, so connecting the power cable turns it on. The device checks for available video and audio equipment at launch, so make sure your other cables are connected before you plug in the power cable.
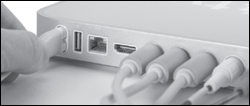
If you’ve not yet run across devices with HDMI (High-Definition Multimedia Interface) connections, you soon will. HDMI can deliver video and audio over one cable, making setup a breeze (FIGURE 1.1). But more important is that HDMI can push digital video formats ranging from standard-definition (SD) to uncompressed high-definition (HD) variants, meaning this standard should be around for a while (also see the sidebar at right).
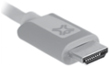
Connect the cable to the HDMI port on the back of the Apple TV (FIGURE 1.2), and plug the other end into the HDMI port on your television. Done!
Tip
What if your TV’s HDMI port is already being used by another device? Get an inexpensive HDMI switcher that lets you plug in more than one HDMI cable.
Although HDMI is quickly becoming the standard for widescreen TVs, some sets use DVI, the same type of connector on many computer displays. In fact, a friend of mine recently bought a 20-inch Dell monitor to use as a television instead of a more expensive HDTV.
You can buy an HDMI-to-DVI cable (or just an adapter if you already have a cable with HDMI at both ends). The only catch is that DVI doesn’t carry audio, so you’d need to connect an analog or optical audio cable to hear the sound.
The other video option is to connect a component cable between the Apple TV and your television (FIGURE 1.3). Three plugs carry the red, green, and blue video signals that make up the image you see.
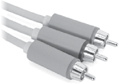
Unlike HDMI, component cables carry only video, which means you’ll need to connect audio cables from the Apple TV to your television or stereo (unless you want to relive those silent movie days—music videos, especially, are fun to watch without sound).
To get sound out of the Apple TV (if you’re not using HDMI), you’ll need an audio cable. The most common is analog audio, which features two plugs on each end, one red and one white, corresponding to the left and right audio channels (FIGURE 1.4).
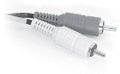
Connect the cable to the red and white audio ports on the Apple TV (FIGURE 1.5), and to the corresponding ports on your television or on your stereo receiver.

The other audio option is to plug a Toslink fiber-optic cable to the optical audio port on the back of the Apple TV (FIGURE 1.6) if your television or stereo supports optical connections.

Optical audio is entirely digital, so in theory an optical connection will produce higher-quality sound (though of course that’s also dependent on your other gear).
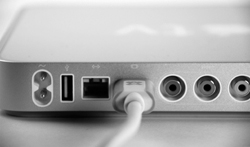
With the video and audio connected, it’s time to power up the Apple TV. Make sure the television is set to the correct input (check the instructions that came with the TV), and insert the power cable (FIGURE 1.7). The LED on the front of the box blinks yellow, and an Apple logo appears on your screen.
Note
Want to see a tiny example of Apple’s smart industrial design? The end of the power plug is gray except for the portion that gets inserted into the device, which is white. When the white disappears, you know the plug is securely connected.
When you power up, the Apple TV attempts to determine the best video mode, so don’t be surprised if the screen flickers as it tries various resolutions. Some televisions display the current setting in a corner of the screen.
Note
If you don’t see anything at all, and the light on the front of the Apple TV is on, check your TV’s input source and that all of the cables are fastened tight. If that does nothing, grab the remote that came with the Apple TV. Press and hold the Menu and Up (+) buttons for several seconds. The device will cycle through its list of resolutions; when the message “If you can see the Apple logo, select OK” appears, press the Play button on the remote.
After a few seconds, the light on the front of the device becomes solid white.
Next, you’re asked to choose a language (FIGURE 1.8).

Using the included remote, press the Menu up/Scroll (+) and Menu Down/Scroll (–) buttons to highlight a language.
Press the Select/Play/Pause button in the middle of the button ring to make your selection.
You’re in! Time to get connected to your home network.
Note
In this chapter, we’ve covered every port on the back of the Apple TV except two: the Ethernet port, discussed in the next chapter, offers a wired connection to your home network; and the USB port, which...does nothing (FIGURE 1.9). At least, that’s what Apple wants you to believe. Its true purpose is to allow Apple to perform diagnostics and servicing, and is therefore not for your use. That hasn’t stopped some enterprising hackers from trying (and succeeding) to enable the port. However, doing so isn’t easy to do, will void your warranty, and is beyond the scope of this book. If you’re curious, poke around at www.appletvhacks.net or www.appletvhacker.com.
