
A DVD player plays back movies from the discs you insert into it. Your TV set-top box gets broadcast programming from a cable strung to your house or a satellite dish mounted on the roof.
The Apple TV gets its content from the computers on your home network. The Ethernet port connects to traditional wired networks, but unless you’ve strung cables through the house (which often involves drilling holes in walls and floors), you probably want to take advantage of the Apple TV’s built-in wireless networking.
A network can comprise millions of computers, but for our purposes, here are a few common setups that are likely to match what you have in your home. What’s important is that the Apple TV can connect to at least one computer and the Internet.
Your Internet connection comes into the house via a broadband modem (either cable or DSL) that you or your Internet service provider (ISP) set up. The modem is connected to your computer via an Ethernet cable (FIGURE 2.1).
Some broadband modems also have extra Ethernet ports to connect more computers via Ethernet; if that’s not the case, you probably have an Ethernet switch or hub between the modem and the computer to connect other computers.
To connect the Apple TV, run a cable from the modem or switch to its Ethernet port (FIGURE 2.2).
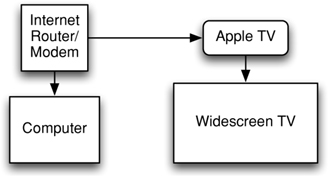
As in the previous example, the Internet connection comes into the house via a modem; some ISPs provide models that also act as wireless routers. More commonly, however, an additional wireless router (also sometimes called a base station) connects to the broadband modem via Ethernet. Apple’s AirPort Extreme Base Station is an example.
The wireless router transmits data to and from one or more computers over the air and acts as a traffic cop between machines.
In this setup, the Apple TV operates as just another computer on the network, using its built-in wireless capability to transfer data to and from the base station (FIGURE 2.3).

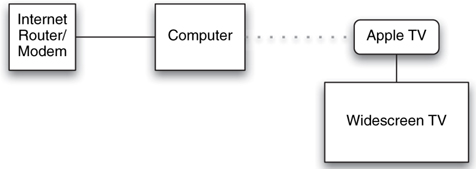
If you own just one computer, you don’t necessarily need to buy a wireless router to network the Apple TV. As long as your computer has wireless capabilities, you can set it up to act as the base station (FIGURE 2.4, next page).
On the Mac, follow these steps:
From the Apple menu, choose System Preferences.
Click the Sharing icon, or choose Sharing from the View menu.
Click the Internet tab.
From the pop-up menu labeled “Share your connection from,” choose Built-in Ethernet.
In the box below that (“To computers using”), turn on AirPort.
Click the AirPort Options button.
Enter the name of your network-to-be in the Network Name field.
Click the Enable WEP box and create a password if you want to prevent strangers from accessing your network.
Click OK to dismiss the AirPort Options dialog.
Click the Start button to create the wireless network.
Tip
For this type of ad-hoc connection, Mac OS X offers only WEP (Wireless Encryption Protocol) security. Unfortunately, crackers can now break into a WEP-protected network within a matter of minutes. Realistically, requiring a password to join a wireless network is secure enough to keep most people out. But if you’re more concerned, purchase a wireless router that offers WPA (Wireless Protected Access) security.
Under Windows, the sequence goes like this:
Click the Start menu and choose Control Panel.
Double-click the Network Connections icon. (Depending on how the control panels are displayed, you may have to access this from the Network and Internet Connections category.)
Right-click the wireless network connection icon, and choose Properties from the pop-up menu.
Click the Wireless Networks tab.
In the Preferred networks section, click the Add button. The Wireless network properties dialog appears.
Enter a name for your network in the Network name (SSID) field.
Disable the option labeled “The key is provided for me automatically” and enter a password in the fields provided.
Mark the “This is a computer-to-computer (ad-hoc) network” box.
Click OK to dismiss that dialog, and then click OK again to finish.
After you choose a language at the first startup, the Apple TV immediately looks for a network connection. To avoid confusion, the Apple TV prioritizes Ethernet over wireless networking. If an Ethernet cable is attached and the network is active, Ethernet is used. If not, the Apple TV searches for an available wireless network.
Note
Since we’re setting up the Apple TV for the first time, I’m listing steps as you would encounter them at startup. However, you can always return to these network configuration screens later by choosing Network in the Settings screen.
The most difficult part of using Ethernet may be stringing networking cable through the house—most likely, your Internet router is located in a room far away from the television. (Okay, I’ll admit it, I’m a homeowner with an embarassing lack of do-it-yourself building skills. Wireless networking must have been developed with people like me in mind.)
However, Ethernet offers a couple of advantages: It offers faster data transfer speeds than wireless networking, and isn’t subject to signal interference the way wireless is. You may also have a wired Ethernet network already installed, or perhaps none of your computers are wireless-capable.
Tip
Ethernet is also useful when performing the first synchronization with the Apple TV; see the end of this chapter for more details.
With an Ethernet cable attached, the first message you’ll see after choosing a language is “Connecting to the network.” What happens next depends on how IP (Internet protocol) addresses are assigned on your network:
DHCP. Your network’s router hands out IP addresses automatically.
Manually. Each computer on your network is identified by a specific IP address.
If your network uses DHCP (which is most common, as you’ll learn later in this chapter), you’re all done. Feel free to skip to Chapter 3. If not, see “Configure TCP/IP,” later in this chapter.
After a moment of scanning, the Apple TV displays a list of available wireless networks (FIGURE 2.5).
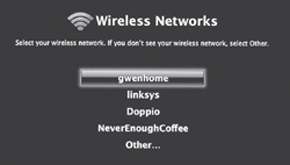
To establish a connection, follow these steps:
Use the remote’s Menu up/scroll (+) and Menu down/scroll (–) buttons to select the name of your wireless network.
Press the Select/Play/Pause button in the center to choose that network.
If the network is protected using a WEP password, choose the type of password to enter:
WEP Password: Human-readable alphanumeric password, such as “dog” (though of course that’s a terrible password).
WEP 40/128-bit Hex and WEP 40/128-bit ASCII: Some base stations use coded passwords in hex or ASCII text; check your router’s instructions for more information.
If your network is protected with the increasingly common and much more secure WPA (Wireless Protected Access) protocol, you’ll go directly to the next step.
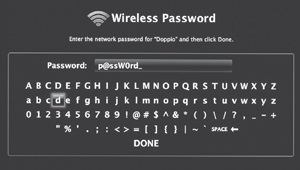
On the Wireless Password screen, use the remote to enter the network’s password, character by character, and then choose Done (FIGURE 2.6). (This screen does not appear if your network is unprotected.)
After the Apple TV establishes a connection with the wireless network, it attempts to gain Internet access using TCP/IP, the system of assigning addresses to all connected machines. TCP/IP is configured in one of two ways: DHCP or manual IP.
Most home networks use DHCP (Dynamic Host Control Protocol) to direct traffic between the Internet and your computers. When a computer (or in this case, the Apple TV) is added to the network, the wireless router or modem automatically assigns an IP address.
DHCP is like checking into a hotel: the clerk tells you which room you’re staying in and can send messages to you in that room for the duration of your stay.
If your network uses DHCP, there’s no more configuration left to do. The Apple TV’s snazzy startup animation plays, and you’re asked to associate with a computer running iTunes (feel free to skip ahead to Chapter 3).
Alternatively, your network may use a set of specific IP numbers to identify connected computers. Using the earlier analogy, this would be like living in an apartment that has a fixed, private address.
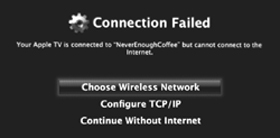
The Apple TV first attempts to connect using DHCP because that’s the most common approach. If that doesn’t work, a Connection Failed screen appears (FIGURE 2.7).
To assign a manual IP address, make sure you have the IP address information (your ISP may have provided this) and do the following:
Choose Configure TCP/IP.
On the Network setup screen, choose Manually.
Enter the IP address to be assigned to the Apple TV. Press the Menu up/scroll (+) and Menu down/scroll (–) buttons to select each number, then press the Next/forward button to go to the next number. Choose Done when you’re finished.
On the next screen, enter the subnet mask in the same manner and choose Done.
On the next screen, enter the IP address of your router and choose Done.
If you need to enter a DNS server address, do that on the following screen, then choose Done.
Lastly, the Apple TV asks you to choose your wireless network again and enter its password. Once that’s completed, it establishes the connection.
Note
A connection to the Internet isn’t completely necessary; as shown in the Connection Failed screen, you can choose to continue without an Internet connection. However, doing so will prevent you from playing back protected content purchased from the iTunes Store (the first time, at least; see Chapter 4). You also won’t be able to view movie trailers, listen to song samples from the iTunes Store, watch previews of music videos, or have the Apple TV check for software updates.
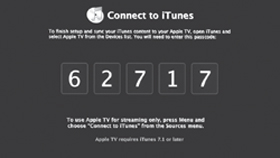
Now that the Apple TV is hooked into your home network, you should see a random five-digit number in large text (FIGURE 2.8). This is the gateway to accessing movies and music managed by iTunes on your computer.
Apple initially assumes that you want to synchronize the Apple TV, which copies media from your computer to the box’s internal hard drive. This is the same behavior as the iPod: you associate it with one computer.
Tip
You’re not required to sync with a computer—it’s just the more common approach, which is why this option appears right after you’ve set up the Apple TV’s network connection for the first time. You could instead stream content, which sends it over the network in real time. I discuss syncing and streaming in more detail in Chapter 8, but for now, if you want to stream instead of sync, press the Menu button on the remote to bypass this screen.
To set up the association, do the following:
On your Mac or PC, launch iTunes. (If you don’t have iTunes 7.1 or later installed, download it for free from www.apple.com/itunes/.)
Click the Apple TV item that appears in the Devices list in the left-hand column (FIGURE 2.9).
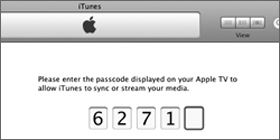
Enter the five-digit number on your TV screen (FIGURE 2.10). iTunes verifies the passcode with the Apple TV.
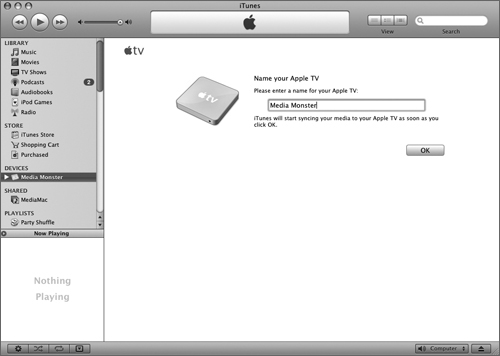
In the next screen that appears, name your Apple TV (FIGURE 2.11); this is mostly to differentiate this device with other Apple TVs you may own.
Click OK. The Apple TV contacts the iTunes Store to verify that the computer you’re syncing with is authorized to play purchased content. When that’s done, it starts to copy media to the hard drive.

Depending on how much media you have and the type of network you’re using, synchronization could take a while. If you’re using an 802.11b or 802.11g wireless network, consider connecting the Apple TV via Ethernet for the first sync.
The good news is that you don’t have to wait for the sync to finish before you start enjoying your media. The Apple TV knows what’s in your computer’s iTunes library, so it can access whatever it needs. If you want to watch a movie right away, for example, it will be streamed over the network.
Tip
When you play movies or TV shows during a sync, the sync process is paused so that playback can use as much bandwidth as needed. Syncing will resume when you’re done watching the show.
When the synchronization is finished, Apple TV plays your content directly from the hard drive.