
The Apple TV is hooked up, networked, synchronized with a computer, and ready to deliver entertainment you’ve purchased from the iTunes Store (or provided yourself; see Chapter 9).
And, as we learned in Chapter 1, it’s connected to a widescreen TV. More than likely, your TV is of generous size—maybe it’s not a 102-inch monstrosity featured at events such as the yearly Consumer Electronics Show, but larger than the no-name TV/VCR combo that came home from college with you.
What to do? Let’s fill that screen with some video!
Pop the popcorn, fluff up the couch pillows, dim the lights, and settle in.
Call me traditional, but I like the experience of seeing movie trailers before the feature film, just like in a theater. In this case, however, I don’t have to sit through annoying commercials, and I get to choose which trailers to watch. The Apple TV connects to the Internet and can download trailers for movies that are currently screening or coming soon. Do the following:
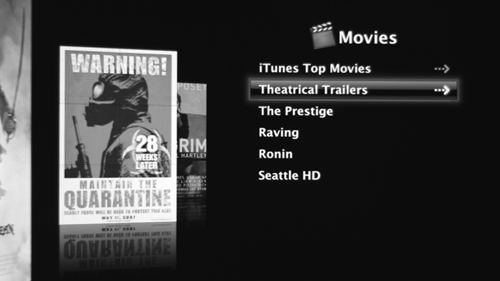
From the Apple TV’s main screen, choose Movies.
You can choose between two sets of trailers (FIGURE 5.1). Select iTunes Top Movies to view a list of the day’s top-selling movies at the iTunes Store, or select Theatrical Trailers for movies that are not yet available on iTunes.
Press Select/Play/Pause to go to the next screen.
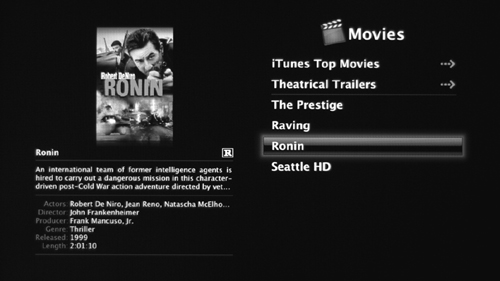
Scroll down the list to select the trailer you want to watch. When you highlight a title, information about it appears to the left (FIGURE 5.2).
Note
Currently, you can only watch trailers for movies at the iTunes Store. If the preview is so compelling that you want to buy the flick, you need to purchase it from the iTunes Store on a computer—you can’t do it via the Apple TV. Perhaps in the future Apple will introduce a way to scratch that instant-gratification itch and let you buy movies directly from the couch.
Press Select/Play/Pause to start downloading the trailer. A progress bar appears at the bottom of the screen (FIGURE 5.3). The spinning cursor indicates that video is downloading, while the solid blue line tells you how much of the video has transferred. The black triangle is the playhead, which indicates where you are within the video.

After enough video has buffered (and again, that will depend on your Internet connection), the trailer starts playing (FIGURE 5.4). When it finishes, you’re taken back to the list of trailers.

Tip
Even if you have a widescreen television, the video may appear letterboxed, showing black bars above and below the movie image. While most widescreen TVs have an aspect ratio of 1.78:1 (more commonly referred to as 16:9), film is generally projected in a shorter 1.85:1 aspect ratio that emphasizes width (and allows cinematographers to really capture scenic vistas). Do not attempt to adjust the picture; we control the horizontal and the vertical.
Okay, enough with the movies you can’t yet watch in their entirety—what about the ones on the Apple TV’s hard drive? Follow these steps to start playing, in theater-speak, “our featured presentation.”
From the Apple TV’s main screen, choose Movies.
Scroll down the list to select the movie you want to watch. As with trailers, information about it appears to the left, including the movie’s duration (FIGURE 5.5). Movies that didn’t come from the iTunes Store display the first frame of video as the preview image.
Tip
Don’t see the movie you want? Check that the Apple TV and your computer are both connected to the network and that iTunes is running. Also check the sync settings in iTunes to make sure your movie isn’t being excluded from the sync process. You can find more about synchronizing and streaming in Chapter 8, but for now we’re assuming that the movies you want have been synced from your computer.
Press Select/Play/Pause to start the movie.
Now, while I enjoy going out to see a movie—and there’s nothing like seeing a good film (or even a moderately good film) with a crowd of other movie-goers—screening a movie at home does have its advantages. I can pause in the middle to get something from the refrigerator, watch a particularly good scene again, or skip past boring sections.
To halt playback, press the Select/Play/Pause button. Press the button again to start playing again.
Note
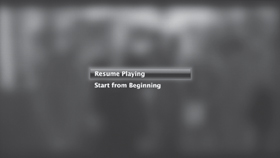
If you pause in the middle of a movie, the Apple TV notes the location and transfers that information to the computer the next time it syncs. If you want to watch the movie on the computer later (let’s say you’re traveling with your laptop), you can just pick up where you left off (FIGURE 5.6). The video-capable iPod and the iPhone also pick up the location information when you synchronize them with the computer, so all three devices start and end at the same point. See Chapter 8 for more information on syncing and other devices.
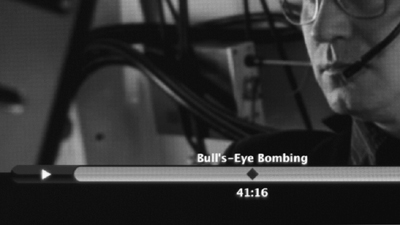
Movies purchased from the iTunes Store include chapter markers, just as you’d find on a DVD, that let you skip ahead to specific scenes. To jump to the next chapter, press the Next/Fast-forward button once. To jump back one chapter, press the Previous/Rewind button once. When you do, the chapter name appears above the progress bar at the bottom of the screen (FIGURE 5.7).
If the movie does not include chapter markers, such as a video you’ve created or ripped from a DVD, pressing the Next and Previous buttons jumps ahead or back incrementally. The length of the jump depends on the duration of the movie; a two-hour feature, for example, jumps about seven minutes per button press.
For more precise searching, you can rewind or forward the video in 10-second blocks. Here’s how:
Instead of jumping around, you may want to quickly scan the video at three different speeds.
Press and hold the Rewind or Fast-forward button to speed up playback.
The triangular play icon at the far left of the progress bar changes into a set of three triangles that indicate the speed (FIGURE 5.8). The longer you hold the button down, the faster playback will be; three white triangles is the fastest speed.
Press the Select/Play/Pause button again to resume normal playback.
Tip
You can also change the reviewing speed without keeping the button held down. Press Rewind or Fast-forward and hold it long enough to start the accelerated playback. Then, let go of the button—the quick-scan continues. Press the button once to switch to the next-fastest speed. For example, if you’re fast-forwarding at the first fast speed (one triangle), pressing the Fast-forward button once speeds up to the next speed (two triangles). You can also go back one speed by pressing the Rewind button. Lastly, pressing the Fast-forward button at the fastest speed (three triangles) kicks it back down to the first fast speed (one triangle).
In Pirates of the Caribbean: The Curse of the Black Pearl, is that a crew member in a cowboy hat standing on the deck of the pirate ship? (Yep.) It’s easy to catch gaffes like that by slowing the playback:
Press the Select/Play/Pause button to pause the movie.
Press and hold the Rewind or Fast-forward button to play back in slow motion. As with speeding up the video, holding the button down, or pressing it again once playback resumes, changes the speed of the slow-motion playback.
Press the Select/Play/Pause button again to return to normal speed.
You won’t be surprised to learn that watching a TV show is just like watching a movie. The same controls work for playing, pausing, and reviewing video. What’s different is how the Apple TV organizes the shows and their episodes.
From the main Apple TV screen, select TV shows and press Select/Play/Pause. This brings up the TV Shows screen (FIGURE 5.9).

As with movie trailers, you can choose iTunes Top TV Episodes to view the current best-selling episodes and watch 30 second previews.
The rest of the list can be sorted two different ways: by Show and by Date.
The Show view is the default and is helpful when you subscribe to several shows because it groups episodes together by series.
If the Show view is not already active, press the Next/Fast-forward button. It doesn’t matter which item is selected in the list.
In this view, each show is given its own line with a greater-than symbol (>) indicating when more than one episode is available. When a show contains unwatched episodes, a blue sphere appears next to the show title.
Press Select/Play/Pause to choose a show.
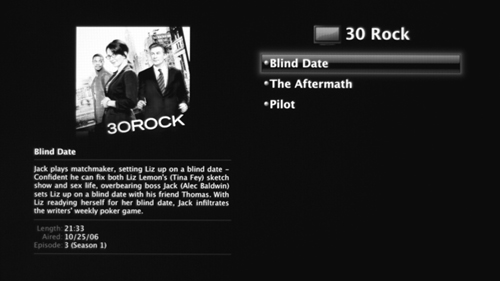
On the next screen, choose an episode name to watch it (FIGURE 5.10).
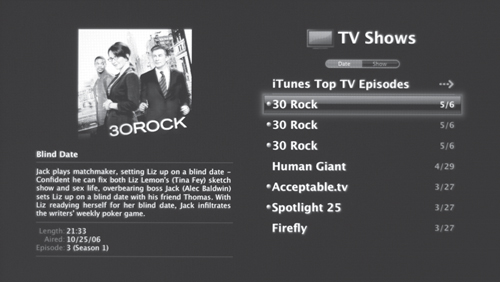
In the Date view, each episode appears in the list, sorted by the date it was purchased.
Press the Previous/Rewind button to switch to the Date view.
Newest episodes show up at the top of the list, but there’s a catch: only the show name appears in the list. You need to highlight an episode and look at its information (in the lower left corner of the screen) to learn the episode name, number, and the date it first aired (FIGURE 5.11).
Press Select/Play/Pause to start playing an episode.
Note
The Date view sorts only by the date that episodes were purchased, which runs into sorting problems. If you’re following along with a Season Pass or Multi-Pass, this isn’t a big deal because the latest episode appears chronologically based on its original air date. But for shows that have already aired, there’s no secondary sorting on either episode number or original air date. That leads to a list of Star Trek episodes, for example, that appear based on when they were added to iTunes—and since iTunes doesn’t necessarily download them in order, you end up with a jumble. Sorting by Show instead gives you a season in reverse episode order (newest first), avoiding confusion.
Tip
When you begin to play an episode, the Apple TV considers it “watched” and removes the blue sphere icon, even if you didn’t watch the whole thing. However, in terms of syncing, it’s not completely “watched”: with the sync option in iTunes set to sync only unwatched episodes, the partially-viewed one is still included. (See Chapter 8.) The blue icon indicates the item is completely unwatched; if you watch only part of the episode, the icon goes away because you’ve watched part of it. However, the episode remains on the list as unwatched because you’ve not watched it through to the end.